
diff options
Diffstat (limited to 'content')
121 files changed, 2047 insertions, 1913 deletions
diff --git a/content/blog/2018-11-28-aes-encryption.md b/content/blog/2018-11-28-aes-encryption.md index 5da599e..7c2ff3a 100644 --- a/content/blog/2018-11-28-aes-encryption.md +++ b/content/blog/2018-11-28-aes-encryption.md @@ -13,8 +13,7 @@ If you're not familiar with encryption techniques, National Institute of Standards and Technology, sub-selected from the Rijndael family of ciphers (128, 192, and 256 bits) in 2001. Furthering its popularity and status, the US government chose AES as their default encryption method for -top-secret data, removing the previous standard which had been in place since -1977. +top-secret data, removing the previous standard which had been in place since 1977. AES has proven to be an extremely safe encryption method, with 7-round and 8-round attacks making no material improvements since the release of this @@ -24,8 +23,8 @@ encryption standard almost two decades ago. > fastest single-key attacks on round-reduced AES variants [20, 33] so far are > only slightly more powerful than those proposed 10 years ago [23,24]. > -> - [Bogdonav, et -> al.](http://research.microsoft.com/en-us/projects/cryptanalysis/aesbc.pdf) +> - [Bogdonav, et +> al.](http://research.microsoft.com/en-us/projects/cryptanalysis/aesbc.pdf) # How Secure is AES? @@ -99,8 +98,8 @@ where feasible: 1. Privacy is a human right and is recognized as a national right in some countries (e.g., [US Fourth Amendment](https://www.law.cornell.edu/wex/fourth_amendment)). -2. "Why not?" Encryption rarely affects performance or speed, so there's - usually not a reason to avoid it in the first place. +2. "Why not?" Encryption rarely affects performance or speed, so there's usually + not a reason to avoid it in the first place. 3. Your digital identity and activity (texts, emails, phone calls, online accounts, etc.) are extremely valuable and can result in terrible consequences, such as identity theft, if leaked to other parties. Encrypting @@ -110,10 +109,10 @@ where feasible: devices. 5. Corporations, governments, and other nefarious groups/individuals are actively looking for ways to collect personal information about anyone they - can. If someone's data is unencrypted, that person may become a target due - to the ease of data collection. + can. If someone's data is unencrypted, that person may become a target due to + the ease of data collection. **Read More:** -- [Federal Information Processing Standards Publication - 197](http://nvlpubs.nist.gov/nistpubs/FIPS/NIST.FIPS.197.pdf) +- [Federal Information Processing Standards Publication + 197](http://nvlpubs.nist.gov/nistpubs/FIPS/NIST.FIPS.197.pdf) diff --git a/content/blog/2018-11-28-cpp-compiler.md b/content/blog/2018-11-28-cpp-compiler.md index c0ce0b3..a7dce40 100644 --- a/content/blog/2018-11-28-cpp-compiler.md +++ b/content/blog/2018-11-28-cpp-compiler.md @@ -16,7 +16,7 @@ executed. There are many steps and intricacies to the compilation process, and this post was a personal exercise to learn and remember as much information as I can. -``` cpp +```cpp #include <iostream> int main() @@ -76,7 +76,7 @@ dynamically. For example, the `Hello, world!` code snippet above compiles into the following assembly code: -``` asm +```asm .LC0: .string "Hello, world!\n" main: diff --git a/content/blog/2019-01-07-useful-css.md b/content/blog/2019-01-07-useful-css.md index bdabd94..1e6e014 100644 --- a/content/blog/2019-01-07-useful-css.md +++ b/content/blog/2019-01-07-useful-css.md @@ -34,15 +34,15 @@ extended, where extra variables could be defined for `primary-text`, For example, here are some variables defined at the root of the website, which allows for any subsequent CSS rules to use those variables: -``` css +```css :root { - --primary-color: black; - --secondary-color: white; + --primary-color: black; + --secondary-color: white; } body { - background-color: var(--primary-color); - color: var(--secondary-color); + background-color: var(--primary-color); + color: var(--secondary-color); } ``` @@ -50,14 +50,14 @@ body { Box shadows were once my mortal enemy. No matter how hard I tried, I just couldn't get them to work how I wanted. Because of this, my favorite discovery -has been CSSMatic's [box shadow -generator](https://www.cssmatic.com/box-shadow). It provides an excellent tool -to generate box shadows using their simple sliders. Surprisingly, this is the -reason I learned how box shadows work! You can use the sliders and watch how the -CSS code changes in the image that is displayed. Through this, you should -understand that the basic structure for box shadows is: - -``` css +has been CSSMatic's [box shadow generator](https://www.cssmatic.com/box-shadow). +It provides an excellent tool to generate box shadows using their simple +sliders. Surprisingly, this is the reason I learned how box shadows work! You +can use the sliders and watch how the CSS code changes in the image that is +displayed. Through this, you should understand that the basic structure for box +shadows is: + +```css box-shadow: inset horizontal vertical blur spread color; ``` @@ -67,55 +67,55 @@ with the code, experiment, and learn. **Box Shadow #1** -``` html +```html <div class="shadow-examples"> - <div class="box effect1"> - <h3>Effect 1</h3> - </div> + <div class="box effect1"> + <h3>Effect 1</h3> + </div> </div> ``` -``` css +```css .box h3 { - text-align: center; - position: relative; - top: 80px; + text-align: center; + position: relative; + top: 80px; } .box { - width: 70%; - height: 200px; - background: #fff; - margin: 40px auto; + width: 70%; + height: 200px; + background: #fff; + margin: 40px auto; } .effect1 { - box-shadow: 0 10px 6px -6px #777; + box-shadow: 0 10px 6px -6px #777; } ``` **Box Shadow #2** -``` html +```html <div class="shadow-examples"> - <div class="box effect2"> - <h3>Effect 2</h3> - </div> + <div class="box effect2"> + <h3>Effect 2</h3> + </div> </div> ``` -``` css +```css .box h3 { - text-align: center; - position: relative; - top: 80px; + text-align: center; + position: relative; + top: 80px; } .box { - width: 70%; - height: 200px; - background: #fff; - margin: 40px auto; + width: 70%; + height: 200px; + background: #fff; + margin: 40px auto; } .effect2 { - box-shadow: 10px 10px 5px -5px rgba(0, 0, 0, 0.75); + box-shadow: 10px 10px 5px -5px rgba(0, 0, 0, 0.75); } ``` @@ -128,7 +128,7 @@ Now, let's move on to the best part of this article: flexbox. The flexbox is by far my favorite new toy. I originally stumbled across this solution after looking for more efficient ways of centering content horizontally AND vertically. I had used a few hack-ish methods before, but flexbox throws those -out the window. The best part of it all is that flexbox is *dead simple*. +out the window. The best part of it all is that flexbox is _dead simple_. Flexbox pertains to the parent div of any element. You want the parent to be the flexbox in which items are arranged to use the flex methods. It's easier to see @@ -136,34 +136,34 @@ this in action that explained, so let's see an example. **Flexbox** -``` html +```html <div class="flex-examples"> - <div class="sm-box"> - <h3>1</h3> - </div> - <div class="sm-box"> - <h3>2</h3> - </div> + <div class="sm-box"> + <h3>1</h3> + </div> + <div class="sm-box"> + <h3>2</h3> + </div> </div> ``` -``` css +```css .flex-examples { - display: flex; - flex-wrap: wrap; - justify-content: flex-start; - align-items: center; - padding: 10px; - background-color: #f2f2f2; + display: flex; + flex-wrap: wrap; + justify-content: flex-start; + align-items: center; + padding: 10px; + background-color: #f2f2f2; } .sm-box { - display: flex; - justify-content: center; - align-items: center; - width: 20%; - height: 100px; - background: #fff; - margin: 40px 10px; + display: flex; + justify-content: center; + align-items: center; + width: 20%; + height: 100px; + background: #fff; + margin: 40px 10px; } ``` diff --git a/content/blog/2019-09-09-audit-analytics.md b/content/blog/2019-09-09-audit-analytics.md index d2d0d46..e99cce7 100644 --- a/content/blog/2019-09-09-audit-analytics.md +++ b/content/blog/2019-09-09-audit-analytics.md @@ -23,10 +23,10 @@ One of the common mistakes that managers (and anyone new to the process) make is assuming that everything involved with this process is "data analytics". In fact, data analytics are only a small part of the process. -See **Figure 1** for a more accurate representation of where data analysis -sits within the full process. This means that data analysis does not include -querying or extracting data, selecting samples, or performing audit tests. These -steps can be necessary for an audit (and may even be performed by the same +See **Figure 1** for a more accurate representation of where data analysis sits +within the full process. This means that data analysis does not include querying +or extracting data, selecting samples, or performing audit tests. These steps +can be necessary for an audit (and may even be performed by the same associates), but they are not data analytics.  @@ -110,12 +110,11 @@ some applicable standards, such as IPPF Standard 1300. Additionally, IPPF Standard 2060 discusses reporting: > The chief audit executive must report periodically to senior management and -> the board on the internal audit activity's purpose, authority, -> responsibility, and performance relative to its plan and on its conformance -> with the Code of Ethics and the Standards. Reporting must also include -> significant risk and control issues, including fraud risks, governance issues, -> and other matters that require the attention of senior management and/or the -> board. +> the board on the internal audit activity's purpose, authority, responsibility, +> and performance relative to its plan and on its conformance with the Code of +> Ethics and the Standards. Reporting must also include significant risk and +> control issues, including fraud risks, governance issues, and other matters +> that require the attention of senior management and/or the board. > > - IPPF Standard 2060 @@ -163,12 +162,12 @@ where the auditor must write the scripts manually. Python and the R-language are solely scripting languages. The general trend in the data analytics environment is that if the tool allows -you to do everything by clicking buttons or dragging elements, you won't be -able to fully utilize the analytics you need. The most robust solutions are -created by those who understand how to write the scripts manually. It should be -noted that as the utility of a tool increases, it usually means that the -learning curve for that tool will also be higher. It will take auditors longer -to learn how to utilize Python, R, or ACL versus learning how to utilize Excel. +you to do everything by clicking buttons or dragging elements, you won't be able +to fully utilize the analytics you need. The most robust solutions are created +by those who understand how to write the scripts manually. It should be noted +that as the utility of a tool increases, it usually means that the learning +curve for that tool will also be higher. It will take auditors longer to learn +how to utilize Python, R, or ACL versus learning how to utilize Excel. # Visualization @@ -192,13 +191,13 @@ Lastly, let's take a look at an example of data visualization. This example comes from a [blog post written by Kushal Chakrabarti](https://talent.works/2018/03/28/the-science-of-the-job-search-part-iii-61-of-entry-level-jobs-require-3-years-of-experience/) in 2018 about the percent of entry-level US jobs that require experience. -**Figure 3** shows us an easy-to-digest picture of the data. We can quickly -tell that only about 12.5% of entry-level jobs don't require experience. +**Figure 3** shows us an easy-to-digest picture of the data. We can quickly tell +that only about 12.5% of entry-level jobs don't require experience. This is the kind of result that easily describes the data for you. However, make sure to include an explanation of what the results mean. Don't let the reader -assume what the data means, especially if it relates to a complex subject. *Tell -a story* about the data and why the results matter. For example, **Figure 4** +assume what the data means, especially if it relates to a complex subject. _Tell +a story_ about the data and why the results matter. For example, **Figure 4** shows a part of the explanation the author gives to illustrate his point. 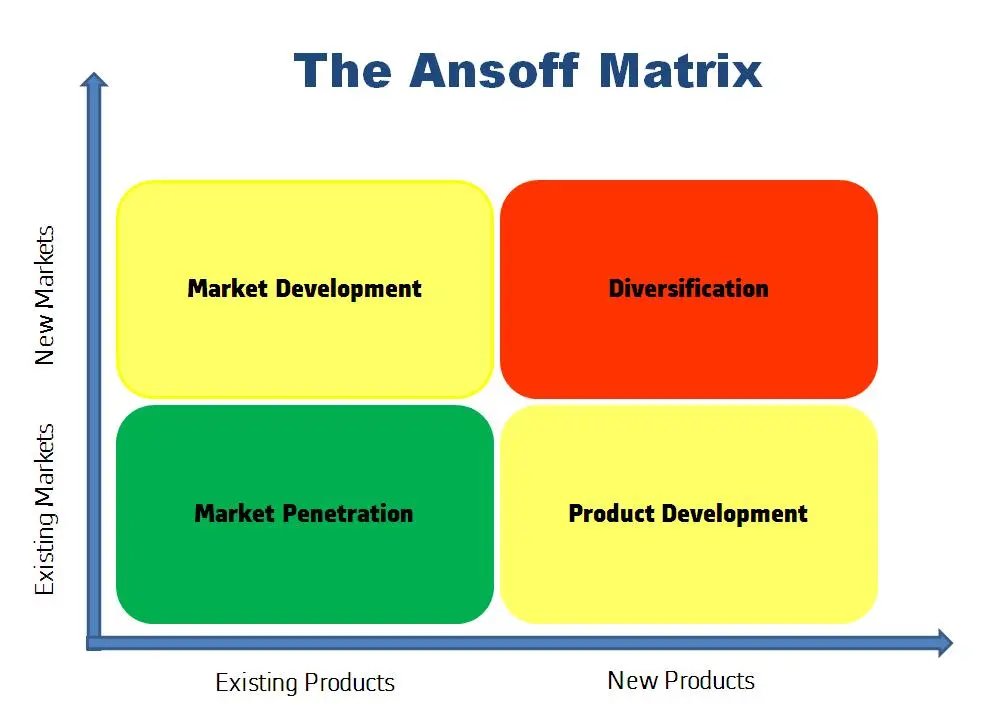 @@ -75,8 +75,8 @@ increases in their investor dividends for 57 consecutive years(2019). Diversification, the final strategy of the Ansoff Matrix, is more difficult than the others since it involves exploring both new markets and new products. Related diversification is a diversification strategy that closely relates to -the firm's core business. Coca-Cola's best example of related diversification -is its acquisition of Glaceau and Vitamin Water, which expanded their drinking +the firm's core business. Coca-Cola's best example of related diversification is +its acquisition of Glaceau and Vitamin Water, which expanded their drinking lines of business(2019). ## Unrelated Diversification diff --git a/content/blog/2019-12-16-password-security.md b/content/blog/2019-12-16-password-security.md index aae3109..ddf8812 100644 --- a/content/blog/2019-12-16-password-security.md +++ b/content/blog/2019-12-16-password-security.md @@ -32,10 +32,10 @@ Once you think you have a good idea of all your different authentication methods, I recommend using a password manager such as [Bitwarden](https://bitwarden.com/). Using a password manager allows you to automatically save your logins, create randomized passwords, and transfer -passwords across devices. However, you'll need to memorize your "vault -password" that allows you to open the password manager. It's important to make -this something hard to guess since it would allow anyone who has it to access -every password you've stored in there. +passwords across devices. However, you'll need to memorize your "vault password" +that allows you to open the password manager. It's important to make this +something hard to guess since it would allow anyone who has it to access every +password you've stored in there. Personally, I recommend using a [passphrase](https://en.wikipedia.org/wiki/Passphrase) instead of a @@ -88,25 +88,25 @@ Guidelines and Authentication and Lifecycle Management. > it would be impractical for an attacker to guess or otherwise discover the > correct secret value. A memorized secret is something you know. > -> - NIST Special Publication 800-63B +> - NIST Special Publication 800-63B NIST offers a lot of guidance on passwords, but I'm going to highlight just a few of the important factors: -- Require passwords to be a minimum of 8 characters (6 characters if randomly - generated and be generated using an approved random bit generator). -- Compare potential passwords against a list that contains values known to be - commonly-used, expected, or compromised. -- Offer guidance on password strength, such as a strength meter. -- Implement a rate-limiting mechanism to limit the number of failed - authentication attempts for each user account. -- Do not require composition rules for passwords and do not require passwords to - be changed periodically (unless compromised). -- Allow pasting of user identification and passwords to facilitate the use of - password managers. -- Allow users to view the password as it is being entered. -- Use secure forms of communication and storage, including salting and hashing - passwords using a one-way key derivation function. +- Require passwords to be a minimum of 8 characters (6 characters if randomly + generated and be generated using an approved random bit generator). +- Compare potential passwords against a list that contains values known to be + commonly-used, expected, or compromised. +- Offer guidance on password strength, such as a strength meter. +- Implement a rate-limiting mechanism to limit the number of failed + authentication attempts for each user account. +- Do not require composition rules for passwords and do not require passwords + to be changed periodically (unless compromised). +- Allow pasting of user identification and passwords to facilitate the use of + password managers. +- Allow users to view the password as it is being entered. +- Use secure forms of communication and storage, including salting and hashing + passwords using a one-way key derivation function. NIST offers further guidance on other devices that require specific security policies, querying for passwords, and more. All the information discussed so far diff --git a/content/blog/2020-01-25-linux-software.md b/content/blog/2020-01-25-linux-software.md index c3624de..71461e1 100644 --- a/content/blog/2020-01-25-linux-software.md +++ b/content/blog/2020-01-25-linux-software.md @@ -184,7 +184,7 @@ sudo nano /etc/pacman.conf Now, scroll down and uncomment the `multilib` section. -``` config +```config # Before: #[multilib] #Include = /etc/pacman.d/mirrorlist diff --git a/content/blog/2020-01-26-steam-on-ntfs.md b/content/blog/2020-01-26-steam-on-ntfs.md index 74d1e71..187aaba 100644 --- a/content/blog/2020-01-26-steam-on-ntfs.md +++ b/content/blog/2020-01-26-steam-on-ntfs.md @@ -13,11 +13,11 @@ Screenshot](https://img.cleberg.net/blog/20200125-the-best-linux-software/steam. If you want to see how to install Steam on Linux, see my other post: [Linux Software](../linux-software/). -Are you having trouble launching games, even though they've installed -correctly? This may happen if you're storing your games on an NTFS-formatted -drive. This shouldn't be an issue if you're storing your games on the same -drive that Steam is on, but some gamers prefer to put Steam on their main drive -and game files on another SSD or HDD. +Are you having trouble launching games, even though they've installed correctly? +This may happen if you're storing your games on an NTFS-formatted drive. This +shouldn't be an issue if you're storing your games on the same drive that Steam +is on, but some gamers prefer to put Steam on their main drive and game files on +another SSD or HDD. To fix this problem, you'll need to try a few things. First, you'll need to install the `ntfs-3g` package, which is meant for better interoperability with @@ -44,12 +44,12 @@ mkdir /mnt/steam_library ``` To automatically mount drives upon system boot, you will need to collect a few -items. The UUID is the identification number connected to whichever drive -you're using to store Steam games. +items. The UUID is the identification number connected to whichever drive you're +using to store Steam games. -Drives are usually labeled similar to `/dev/nvme0n1p1` or `/dev/sda1`, so -you'll need to find the line in the output of the command below that correlates -to your drive and copy the UUID over to the `/etc/fstab` file. +Drives are usually labeled similar to `/dev/nvme0n1p1` or `/dev/sda1`, so you'll +need to find the line in the output of the command below that correlates to your +drive and copy the UUID over to the `/etc/fstab` file. ```sh sudo blkid | grep UUID= @@ -72,7 +72,7 @@ sudo nano /etc/fstab Each drive you want to mount on boot should have its own line in the `/etc/fstab` file that looks similar to this: -``` config +```config UUID=B64E53824E5339F7 /mnt/steam_library ntfs-3g uid=1000,gid=1000 0 0 ``` diff --git a/content/blog/2020-02-09-cryptography-basics.md b/content/blog/2020-02-09-cryptography-basics.md index 9df1549..6e55809 100644 --- a/content/blog/2020-02-09-cryptography-basics.md +++ b/content/blog/2020-02-09-cryptography-basics.md @@ -23,7 +23,7 @@ Glossary's definition: > transformation is reversible, cryptography also deals with restoring encrypted > data to an intelligible form. > -> - [Internet Security Glossary (2000)](https://tools.ietf.org/html/rfc2828) +> - [Internet Security Glossary (2000)](https://tools.ietf.org/html/rfc2828) Cryptography cannot offer protection against the loss of data; it simply offers encryption methods to protect data at-rest and data in-traffic. At a high-level, @@ -37,15 +37,15 @@ utilizes one or more values called keys to encrypt or decrypt the data. To create or evaluate a cryptographic system, you need to know the essential pieces to the system: -- **Encryption Algorithm (Primitive):** A mathematical process that encrypts - and decrypts data. -- **Encryption Key:** A string of bits used within the encryption algorithm as - the secret that allows successful encryption or decryption of data. -- **Key Length (Size):** The maximum number of bits within the encryption key. - It's important to remember that key size is regulated in many countries. -- **Message Digest:** A smaller, fixed-size bit string version of the original - message. This is practically infeasible to reverse, which is why it's - commonly used to verify integrity. +- **Encryption Algorithm (Primitive):** A mathematical process that encrypts + and decrypts data. +- **Encryption Key:** A string of bits used within the encryption algorithm as + the secret that allows successful encryption or decryption of data. +- **Key Length (Size):** The maximum number of bits within the encryption key. + It's important to remember that key size is regulated in many countries. +- **Message Digest:** A smaller, fixed-size bit string version of the original + message. This is practically infeasible to reverse, which is why it's + commonly used to verify integrity. # Symmetric Systems (Secret Key Cryptography) @@ -136,9 +136,9 @@ encrypts just the data portion of packets in the transport methods, but it encrypts both the data and headers in the tunnel method (introducing an additional header for authentication). -**Secure Shell (SSH):** SSH is another network protocol used to protect -network services by authenticating users through a secure channel. This protocol -is often used for command-line (shell) functions such as remote shell commands, +**Secure Shell (SSH):** SSH is another network protocol used to protect network +services by authenticating users through a secure channel. This protocol is +often used for command-line (shell) functions such as remote shell commands, logins, and file transfers. **Kerberos:** Developed by MIT, Kerberos is a computer-network authentication @@ -152,16 +152,16 @@ encryption method for Windows Active Directory (AD). If you're someone who needs solutions on how to control risks associated with utilizing a crytograhpic system, start with a few basic controls: -- **Policies:** A policy on the use of cryptographic controls for protection - of information is implemented and is in accordance with organizational - objectives. -- **Key management:** A policy on the use, protection and lifetime of - cryptographic keys is implemented through the entire application lifecycle. -- **Key size:** The organization has researched the optimal key size for their - purposes, considering national laws, required processing power, and longevity - of the solution. -- **Algorithm selection:** Implemented algorithms are sufficiently appropriate - for the business of the organization, robust, and align with recommended - guidelines. -- **Protocol configuration:** Protocols have been reviewed and configured - suitable to the purpose of the business. +- **Policies:** A policy on the use of cryptographic controls for protection + of information is implemented and is in accordance with organizational + objectives. +- **Key management:** A policy on the use, protection and lifetime of + cryptographic keys is implemented through the entire application lifecycle. +- **Key size:** The organization has researched the optimal key size for their + purposes, considering national laws, required processing power, and + longevity of the solution. +- **Algorithm selection:** Implemented algorithms are sufficiently appropriate + for the business of the organization, robust, and align with recommended + guidelines. +- **Protocol configuration:** Protocols have been reviewed and configured + suitable to the purpose of the business. diff --git a/content/blog/2020-03-25-session-messenger.md b/content/blog/2020-03-25-session-messenger.md index c5e75c9..7b283eb 100644 --- a/content/blog/2020-03-25-session-messenger.md +++ b/content/blog/2020-03-25-session-messenger.md @@ -44,16 +44,16 @@ Since most people are looking for an alternative to a popular chat app, I am going to list out the features that Session has so that you are able to determine if the app would suit your needs: -- Multiple device linking (via QR code or ID) -- App locking via device screen lock, password, or fingerprint -- Screenshot blocking -- Incognito keyboard -- Read receipts and typing indicators -- Mobile notification customization -- Old message deletion and conversation limit -- Backups -- Recovery phrase -- Account deletion, including ID, messages, sessions, and contacts +- Multiple device linking (via QR code or ID) +- App locking via device screen lock, password, or fingerprint +- Screenshot blocking +- Incognito keyboard +- Read receipts and typing indicators +- Mobile notification customization +- Old message deletion and conversation limit +- Backups +- Recovery phrase +- Account deletion, including ID, messages, sessions, and contacts # Downloads @@ -76,8 +76,8 @@ Options](https://img.cleberg.net/blog/20200325-session-private-messenger/session # Creating an Account -Once you've installed the app, simply run the app and create your unique -Session ID. It will look something like this: +Once you've installed the app, simply run the app and create your unique Session +ID. It will look something like this: `05af1835afdd63c947b47705867501d6373f486aa1ae05b1f2f3fcd24570eba608`. You'll need to set a display name and, optionally, a password. If you set a @@ -96,8 +96,8 @@ Authentication](https://img.cleberg.net/blog/20200325-session-private-messenger/ Once you've created your account and set up your profile details, the next step is to start messaging other people. To do so, you'll need to share your Session -ID with other people. From this point, it's fairly straightforward and acts -like any other messaging app, so I won't dive into much detail here. +ID with other people. From this point, it's fairly straightforward and acts like +any other messaging app, so I won't dive into much detail here. ## macOS diff --git a/content/blog/2020-05-03-homelab.md b/content/blog/2020-05-03-homelab.md index 8f5d57a..c0a53e9 100644 --- a/content/blog/2020-05-03-homelab.md +++ b/content/blog/2020-05-03-homelab.md @@ -32,11 +32,11 @@ Plex and Pi-hole until I grew tired with the slow performance. Here are the specifications for the Pi 4: -- Broadcom BCM2711, Quad core Cortex-A72 (ARM v8) 64-bit SoC @ 1.5GHz -- 4GB LPDDR4-3200 SDRAM -- Gigabit Ethernet -- H.265 (4kp60 decode), H264 (1080p60 decode, 1080p30 encode) -- 64 GB MicroSD Card +- Broadcom BCM2711, Quad core Cortex-A72 (ARM v8) 64-bit SoC @ 1.5GHz +- 4GB LPDDR4-3200 SDRAM +- Gigabit Ethernet +- H.265 (4kp60 decode), H264 (1080p60 decode, 1080p30 encode) +- 64 GB MicroSD Card ## Dell Optiplex 5040 @@ -49,11 +49,11 @@ during quarantine. Here are the specifications for the Dell Optiplex 5040: -- Intel Core i3 6100 -- 8GB RAM DDR3 -- Intel HD Graphics -- Gigabit Ethernet -- 500GB Hard Drive +- Intel Core i3 6100 +- 8GB RAM DDR3 +- Intel HD Graphics +- Gigabit Ethernet +- 500GB Hard Drive While this hardware would be awful for a work computer or a gaming rig, it turned out to be wonderful for my server purposes. The only limitation I have @@ -118,7 +118,7 @@ operating system. ## Docker -I am *very* new to Docker, but I have had a lot of fun playing with it so far. +I am _very_ new to Docker, but I have had a lot of fun playing with it so far. Docker is used to create containers that can hold all the contents of a system without interfering with other software on the same system. So far, I have successfully installed pi-hole, GitLab, Gogs, and Nextcloud in containers. diff --git a/content/blog/2020-05-19-customizing-ubuntu.md b/content/blog/2020-05-19-customizing-ubuntu.md index 8c23128..ca79afc 100644 --- a/content/blog/2020-05-19-customizing-ubuntu.md +++ b/content/blog/2020-05-19-customizing-ubuntu.md @@ -7,7 +7,7 @@ draft = false # More Information -For inspiration on designing your *nix computer, check out the +For inspiration on designing your \*nix computer, check out the [r/unixporn](https://libredd.it/r/unixporn) subreddit! # Customizing Ubuntu @@ -36,10 +36,9 @@ following command: sudo apt install gnome-tweaks ``` -After you've finished installing the tool, simply launch the Tweaks -application, and you'll be able to access the various customization options -available by default on Ubuntu. You might even like some of the pre-installed -options. +After you've finished installing the tool, simply launch the Tweaks application, +and you'll be able to access the various customization options available by +default on Ubuntu. You might even like some of the pre-installed options. ## GNOME Application Themes @@ -66,8 +65,8 @@ Steps to import themes into Tweaks: 4. Close tweaks if it is open. Re-open Tweaks and your new theme will be available in the Applications dropdown in the Appearance section of Tweaks. -If the theme is not showing up after you've moved it into the themes folder, -you may have uncompressed the folder into a sub-folder. You can check this by +If the theme is not showing up after you've moved it into the themes folder, you +may have uncompressed the folder into a sub-folder. You can check this by entering the theme folder and listing the contents: ```sh @@ -129,7 +128,7 @@ folders to the `/usr/share/fonts/` directory instead. If you spend a lot of time typing commands, you know how important the style and functionality of the terminal is. After spending a lot of time using the default GNOME terminal with [unix -shell](https://en.wikipedia.org/wiki/Bash_(Unix_shell)), I decided to try some +shell](<https://en.wikipedia.org/wiki/Bash_(Unix_shell)>), I decided to try some different options. I ended up choosing [Terminator](https://terminator-gtk3.readthedocs.io/en/latest/) with [zsh](https://en.wikipedia.org/wiki/Z_shell). diff --git a/content/blog/2020-07-20-video-game-sales.md b/content/blog/2020-07-20-video-game-sales.md index 749bad8..1ada35d 100644 --- a/content/blog/2020-07-20-video-game-sales.md +++ b/content/blog/2020-07-20-video-game-sales.md @@ -14,23 +14,23 @@ scrape of vgchartz.com. Fields include: -- Rank: Ranking of overall sales -- Name: The game name -- Platform: Platform of the game release (i.e. PC,PS4, etc.) -- Year: Year of the game's release -- Genre: Genre of the game -- Publisher: Publisher of the game -- NA~Sales~: Sales in North America (in millions) -- EU~Sales~: Sales in Europe (in millions) -- JP~Sales~: Sales in Japan (in millions) -- Other~Sales~: Sales in the rest of the world (in millions) -- Global~Sales~: Total worldwide sales. +- Rank: Ranking of overall sales +- Name: The game name +- Platform: Platform of the game release (i.e. PC,PS4, etc.) +- Year: Year of the game's release +- Genre: Genre of the game +- Publisher: Publisher of the game +- NA~Sales~: Sales in North America (in millions) +- EU~Sales~: Sales in Europe (in millions) +- JP~Sales~: Sales in Japan (in millions) +- Other~Sales~: Sales in the rest of the world (in millions) +- Global~Sales~: Total worldwide sales. There are 16,598 records. 2 records were dropped due to incomplete information. # Import the Data -``` python +```python # Import the Python libraries we will be using import pandas as pd import numpy as np @@ -48,7 +48,7 @@ Results](https://img.cleberg.net/blog/20200720-data-exploration-video-game-sales # Explore the Data -``` python +```python # With the description function, we can see the basic stats. For example, we can # also see that the 'Year' column has some incomplete values. df.describe() @@ -56,7 +56,7 @@ df.describe() 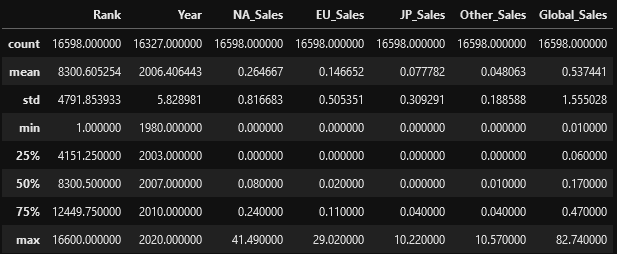 -``` python +```python # This function shows the rows and columns of NaN values. For example, df[179,3] = nan np.where(pd.isnull(df)) @@ -66,7 +66,7 @@ np.where(pd.isnull(df)) # Visualize the Data -``` python +```python # This function plots the global sales by platform sns.catplot(x='Platform', y='Global_Sales', data=df, jitter=False).set_xticklabels(rotation=90) ``` @@ -74,7 +74,7 @@ sns.catplot(x='Platform', y='Global_Sales', data=df, jitter=False).set_xticklabe 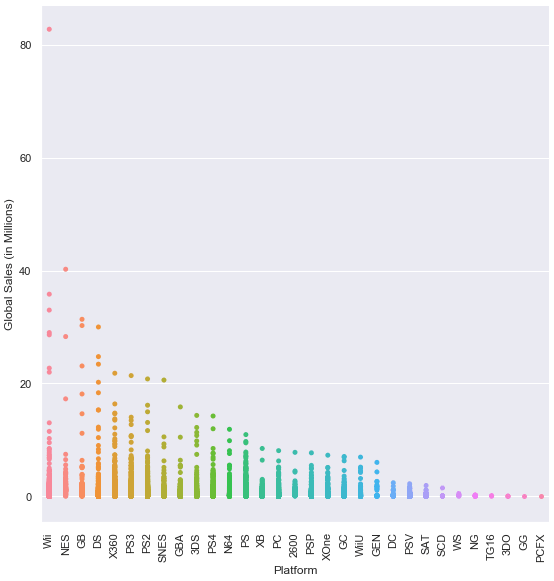 -``` python +```python # This function plots the global sales by genre sns.catplot(x='Genre', y='Global_Sales', data=df, jitter=False).set_xticklabels(rotation=45) ``` @@ -82,7 +82,7 @@ sns.catplot(x='Genre', y='Global_Sales', data=df, jitter=False).set_xticklabels( 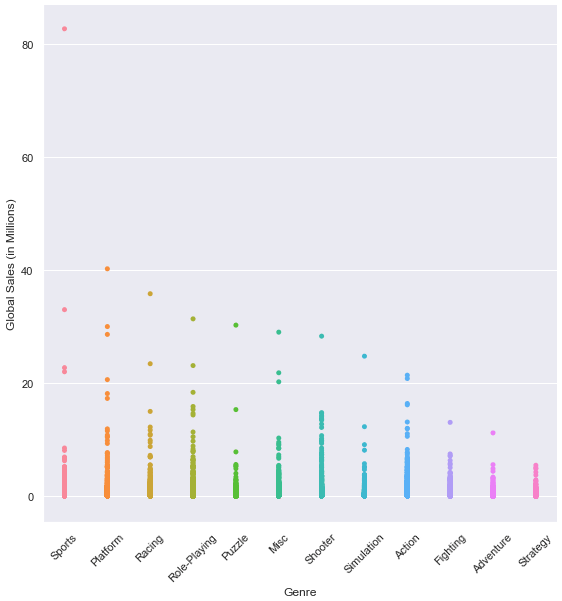 -``` python +```python # This function plots the global sales by year sns.lmplot(x='Year', y='Global_Sales', data=df).set_xticklabels(rotation=45) ``` @@ -90,7 +90,7 @@ sns.lmplot(x='Year', y='Global_Sales', data=df).set_xticklabels(rotation=45)  -``` python +```python # This function plots four different lines to show sales from different regions. # The global sales plot line is commented-out, but can be included for comparison df2 = df.groupby('Year').sum() @@ -121,7 +121,7 @@ Year](https://img.cleberg.net/blog/20200720-data-exploration-video-game-sales/06 ## Investigate Outliers -``` python +```python # Find the game with the highest sales in North America df.loc[df['NA_Sales'].idxmax()] @@ -146,7 +146,7 @@ df3.describe() 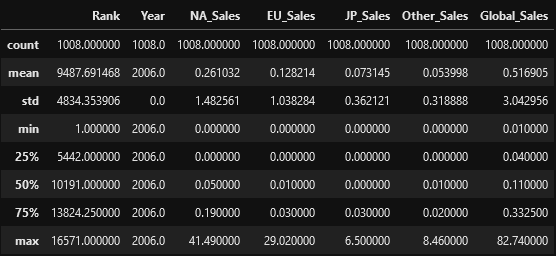 -``` python +```python # Plot the results of the previous dataframe (games from 2006) - we can see the year's results were largely carried by Wii Sports sns.catplot(x="Genre", y="Global_Sales", data=df3, jitter=False).set_xticklabels(rotation=45) ``` @@ -154,7 +154,7 @@ sns.catplot(x="Genre", y="Global_Sales", data=df3, jitter=False).set_xticklabels 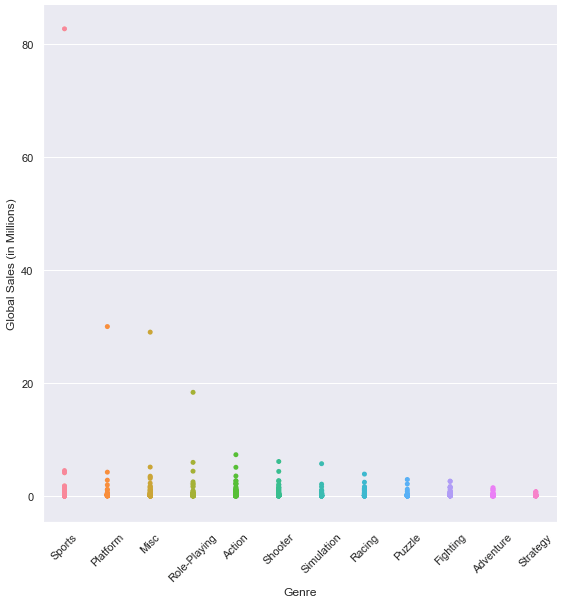 -``` python +```python # We can see 4 outliers in the graph above, so let's get the top 5 games from that dataframe # The results below show that Nintendo had all top 5 games (3 on the Wii and 2 on the DS) df3.sort_values(by=['Global_Sales'], ascending=False).head(5) diff --git a/content/blog/2020-07-26-business-analysis.md b/content/blog/2020-07-26-business-analysis.md index 4105d04..20fb82d 100644 --- a/content/blog/2020-07-26-business-analysis.md +++ b/content/blog/2020-07-26-business-analysis.md @@ -13,10 +13,10 @@ project was obtained using Foursquare's developer API. Fields include: -- Venue Name -- Venue Category -- Venue Latitude -- Venue Longitude +- Venue Name +- Venue Category +- Venue Latitude +- Venue Longitude There are 232 records found using the center of Lincoln as the area of interest with a radius of 10,000. @@ -26,7 +26,7 @@ with a radius of 10,000. The first step is the simplest: import the applicable libraries. We will be using the libraries below for this project. -``` python +```python # Import the Python libraries we will be using import pandas as pd import requests @@ -42,7 +42,7 @@ are using in this project comes directly from the Foursquare API. The first step is to get the latitude and longitude of the city being studied (Lincoln, NE) and setting up the folium map. -``` python +```python # Define the latitude and longitude, then map the results latitude = 40.806862 longitude = -96.681679 @@ -60,7 +60,7 @@ we use our first API call below to determine the total results that Foursquare has found. Since the total results are 232, we perform the API fetching process three times (100 + 100 + 32 = 232). -``` python +```python # Foursquare API credentials CLIENT_ID = 'your-client-id' CLIENT_SECRET = 'your-client-secret' @@ -129,7 +129,7 @@ the categories and name from each business's entry in the Foursquare data automatically. Once all the data has been labeled and combined, the results are stored in the `nearby_venues` dataframe. -``` python +```python # This function will extract the category of the venue from the API dictionary def get_category_type(row): try: @@ -203,7 +203,7 @@ We now have a complete, clean data set. The next step is to visualize this data onto the map we created earlier. We will be using folium's `CircleMarker()` function to do this. -``` python +```python # add markers to map for lat, lng, name, categories in zip(nearby_venues['lat'], nearby_venues['lng'], nearby_venues['name'], nearby_venues['categories']): label = '{} ({})'.format(name, categories) @@ -224,18 +224,18 @@ map_LNK \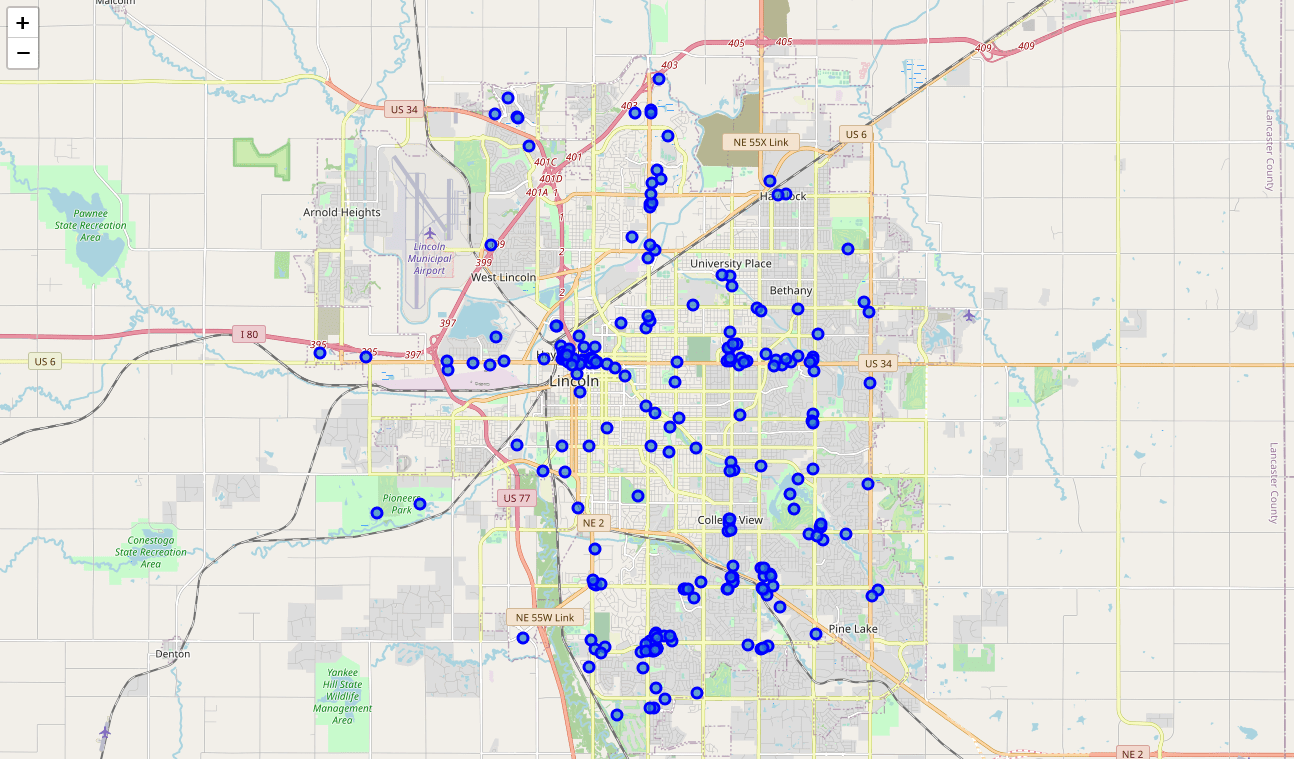 -# Clustering: *k-means* +# Clustering: _k-means_ -To cluster the data, we will be using the *k-means* algorithm. This algorithm is +To cluster the data, we will be using the _k-means_ algorithm. This algorithm is iterative and will automatically make sure that data points in each cluster are as close as possible to each other, while being as far as possible away from other clusters. However, we first have to figure out how many clusters to use (defined as the -variable *'k'*). To do so, we will use the next two functions to calculate the +variable _'k'_). To do so, we will use the next two functions to calculate the sum of squares within clusters and then return the optimal number of clusters. -``` python +```python # This function will return the sum of squares found in the data def calculate_wcss(data): wcss = [] @@ -275,7 +275,7 @@ Now that we have found that our optimal number of clusters is six, we need to perform k-means clustering. When this clustering occurs, each business is assigned a cluster number from 0 to 5 in the dataframe. -``` python +```python # set number of clusters equal to the optimal number kclusters = n @@ -289,7 +289,7 @@ nearby_venues.insert(0, 'Cluster Labels', kmeans.labels_) Success! We now have a dataframe with clean business data, along with a cluster number for each business. Now let's map the data using six different colors. -``` python +```python # create map with clusters map_clusters = folium.Map(location=[latitude, longitude], zoom_start=12) colors = ['#0F9D58', '#DB4437', '#4285F4', '#800080', '#ce12c0', '#171717'] @@ -321,7 +321,7 @@ which clusters are more popular for businesses and which are less popular. The results below show us that clusters 0 through 3 are popular, while clusters 4 and 5 are not very popular at all. -``` python +```python # Show how many venues are in each cluster color_names = ['Dark Green', 'Red', 'Blue', 'Purple', 'Pink', 'Black'] for x in range(0,6): @@ -337,7 +337,7 @@ Our last piece of analysis is to summarize the categories of businesses within each cluster. With these results, we can clearly see that restaurants, coffee shops, and grocery stores are the most popular. -``` python +```python # Calculate how many venues there are in each category # Sort from largest to smallest temp_df = nearby_venues.drop(columns=['name', 'lat', 'lng']) diff --git a/content/blog/2020-08-22-redirect-github-pages.md b/content/blog/2020-08-22-redirect-github-pages.md index 1a54b2a..b666c20 100644 --- a/content/blog/2020-08-22-redirect-github-pages.md +++ b/content/blog/2020-08-22-redirect-github-pages.md @@ -25,7 +25,7 @@ DNS configuration. Add these 5 entries to the very top of your DNS configuration: -``` txt +```txt @ A 185.199.108.153 @ A 185.199.109.153 @ A 185.199.110.153 diff --git a/content/blog/2020-08-29-php-auth-flow.md b/content/blog/2020-08-29-php-auth-flow.md index fcc9e02..633a15f 100644 --- a/content/blog/2020-08-29-php-auth-flow.md +++ b/content/blog/2020-08-29-php-auth-flow.md @@ -17,7 +17,7 @@ copying and pasting the code from their library's documentation. For example, here's the code I use to authenticate users with the Tumblr OAuth API for my Tumblr client, Vox Populi: -``` php +```php // Start the session session_start(); @@ -52,13 +52,13 @@ MySQL database and PHP. The beginning to any type of user authentication is to create a user account. This process can take many formats, but the simplest is to accept user input from a form (e.g., username and password) and send it over to your database. For -example, here's a snippet that shows how to get username and password -parameters that would come when a user submits a form to your PHP script. +example, here's a snippet that shows how to get username and password parameters +that would come when a user submits a form to your PHP script. **Note**: Ensure that your password column is large enough to hold the hashed value (at least 60 characters or longer). -``` php +```php // Get the values from the URL $username = $_POST['username']; $raw_password = $_POST['password']; @@ -99,7 +99,7 @@ To be able to verify that a returning user has a valid username and password in your database is as simple as having users fill out a form and comparing their inputs to your database. -``` php +```php // Query the database for username and password // ... @@ -115,24 +115,24 @@ if(password_verify($password_input, $hashed_password)) { # Storing Authentication State Once you've created the user's account, now you're ready to initialize the -user's session. **You will need to do this on every page you load while the -user is logged in.** To do so, simply enter the following code snippet: +user's session. **You will need to do this on every page you load while the user +is logged in.** To do so, simply enter the following code snippet: -``` php +```php session_start(); ``` Once you've initialized the session, the next step is to store the session in a cookie so that you can access it later. -``` php +```php setcookie(session_name()); ``` -Now that the session name has been stored, you'll be able to check if there's -an active session whenever you load a page. +Now that the session name has been stored, you'll be able to check if there's an +active session whenever you load a page. -``` php +```php if(isset(session_name())) { // The session is active } @@ -144,7 +144,7 @@ The next logical step is to give your users the option to log out once they are done using your application. This can be tricky in PHP since a few of the standard ways do not always work. -``` php +```php // Initialize the session. // If you are using session_name("something"), don't forget it now! session_start(); diff --git a/content/blog/2020-09-01-visual-recognition.md b/content/blog/2020-09-01-visual-recognition.md index 8d71286..d143d52 100644 --- a/content/blog/2020-09-01-visual-recognition.md +++ b/content/blog/2020-09-01-visual-recognition.md @@ -7,13 +7,13 @@ draft = false # What is IBM Watson? -If you've never heard of [Watson](https://www.ibm.com/watson), this service is -a suite of enterprise-ready AI services, applications, and tooling provided by +If you've never heard of [Watson](https://www.ibm.com/watson), this service is a +suite of enterprise-ready AI services, applications, and tooling provided by IBM. Watson contains quite a few useful tools for data scientists and students, including the subject of this post today: visual recognition. -If you'd like to view the official documentation for the Visual Recognition -API, visit the [API +If you'd like to view the official documentation for the Visual Recognition API, +visit the [API Docs](https://cloud.ibm.com/apidocs/visual-recognition/visual-recognition-v3?code=python). # Prerequisites @@ -52,7 +52,7 @@ pip install --upgrade --user "ibm-watson>=4.5.0" Next, we need to specify the API key, version, and URL given to us when we created the Watson Visual Recognition service. -``` python +```python apikey = "<your-apikey>" version = "2018-03-19" url = "<your-url>" @@ -60,7 +60,7 @@ url = "<your-url>" Now, let's import the necessary libraries and authenticate our service. -``` python +```python import json from ibm_watson import VisualRecognitionV3 from ibm_cloud_sdk_core.authenticators import IAMAuthenticator @@ -77,14 +77,14 @@ visual_recognition.set_service_url(url) **[Optional]** If you'd like to tell the API not to use any data to improve their products, set the following header. -``` python +```python visual_recognition.set_default_headers({'x-watson-learning-opt-out': "true"}) ``` Now we have our API all set and ready to go. For this example, I'm going to include a `dict` of photos to load as we test out the API. -``` python +```python data = [ { "title": "Grizzly Bear", @@ -122,7 +122,7 @@ each section. In the case of an API error, the codes and explanations are output to the console. -``` python +```python from ibm_watson import ApiException for x in range(len(data)): @@ -164,7 +164,7 @@ or greater, you would simply adjust the `threshold` in the When your program runs, it should show the output below for each photo you provide. -``` txt +```txt ---------------------------------------------------------------- Image Title: Grizzly Bear Image URL: https://example.com/photos/image1.jpg diff --git a/content/blog/2020-09-22-internal-audit.md b/content/blog/2020-09-22-internal-audit.md index 39c1cce..62e8da0 100644 --- a/content/blog/2020-09-22-internal-audit.md +++ b/content/blog/2020-09-22-internal-audit.md @@ -12,8 +12,8 @@ Overview](https://img.cleberg.net/blog/20200922-what-is-internal-audit/internal- One of the many reasons that Internal Audit needs such thorough explaining to non-auditors is that Internal Audit can serve many purposes, depending on the -organization's size and needs. However, the Institute of Internal Auditors -(IIA) defines Internal Auditing as: +organization's size and needs. However, the Institute of Internal Auditors (IIA) +defines Internal Auditing as: > Internal auditing is an independent, objective assurance and consulting > activity designed to add value and improve an organization's operations. It @@ -54,9 +54,10 @@ function, process, system, or other subject matters. The internal auditor determines the nature and scope of an assurance engagement. Generally, three parties are participants in assurance services: (1) the person or group directly involved with the entity, operation, function, process, system, or other subject -- (the process owner), (2) the person or group making the assessment - (the -internal auditor), and (3) the person or group using the assessment - (the -user). + +- (the process owner), (2) the person or group making the assessment - (the + internal auditor), and (3) the person or group using the assessment - (the + user). ## Consulting @@ -121,10 +122,10 @@ model. Looking at this model from an auditing perspective shows us that auditors will need to align, communicate, and collaborate with management, including business area managers and chief officers, as well as reporting to the governing body. -The governing body will instruct internal audit *functionally* on their goals +The governing body will instruct internal audit _functionally_ on their goals and track their progress periodically. -However, the internal audit department will report *administratively* to a chief +However, the internal audit department will report _administratively_ to a chief officer in the company for the purposes of collaboration, direction, and assistance with the business. Note that in most situations, the governing body is the audit committee on the company's board of directors. @@ -136,8 +137,8 @@ objective function that can provide assurance over the topics they audit. A normal audit will generally follow the same process, regardless of the topic. However, certain special projects or abnormal business areas may call for -changes to the audit process. The audit process is not set in stone, it's -simply a set of best practices so that audits can be performed consistently. +changes to the audit process. The audit process is not set in stone, it's simply +a set of best practices so that audits can be performed consistently.  diff --git a/content/blog/2020-09-25-happiness-map.md b/content/blog/2020-09-25-happiness-map.md index 77d9c55..f150ea6 100644 --- a/content/blog/2020-09-25-happiness-map.md +++ b/content/blog/2020-09-25-happiness-map.md @@ -14,14 +14,14 @@ scores, as well as other national scoring measures. Fields include: -- Overall rank -- Country or region -- GDP per capita -- Social support -- Healthy life expectancy -- Freedom to make life choices -- Generosity -- Perceptions of corruption +- Overall rank +- Country or region +- GDP per capita +- Social support +- Healthy life expectancy +- Freedom to make life choices +- Generosity +- Perceptions of corruption There are 156 records. Since there are ~195 countries in the world, we can see that around 40 countries will be missing from this dataset. @@ -31,7 +31,7 @@ that around 40 countries will be missing from this dataset. As always, run the `install` command for all packages needed to perform analysis. -``` python +```python !pip install folium geopandas matplotlib numpy pandas ``` @@ -42,7 +42,7 @@ We only need a couple packages to create a choropleth map. We will use visualizations in Python. We will also use geopandas and pandas to wrangle our data before we put it on a map. -``` python +```python # Import the necessary Python packages import folium import geopandas as gpd @@ -58,7 +58,7 @@ GeoPandas will take this data and load it into a dataframe so that we can easily match it to the data we're trying to analyze. Let's look at the GeoJSON dataframe: -``` python +```python # Load the GeoJSON data with geopandas geo_data = gpd.read_file('https://raw.githubusercontent.com/datasets/geo-countries/master/data/countries.geojson') geo_data.head() @@ -67,11 +67,11 @@ geo_data.head() 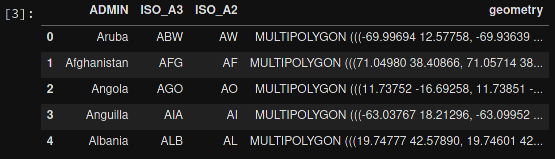 -Next, let's load the data from the Kaggle dataset. I've downloaded this file, -so update the file path if you have it somewhere else. After loading, let's -take a look at this dataframe: +Next, let's load the data from the Kaggle dataset. I've downloaded this file, so +update the file path if you have it somewhere else. After loading, let's take a +look at this dataframe: -``` python +```python # Load the world happiness data with pandas happy_data = pd.read_csv(r'~/Downloads/world_happiness_data_2019.csv') happy_data.head() @@ -88,7 +88,7 @@ below showed empty countries. I searched both data frames for the missing countries to see the naming differences. Any countries that do not have records in the `happy_data` df will not show up on the map. -``` python +```python # Rename some countries to match our GeoJSON data # Rename USA @@ -111,13 +111,13 @@ happy_data.at[democratic_congo_index, 'Country or region'] = 'Democratic Republi # Merge the Data Now that we have clean data, we need to merge the GeoJSON data with the -happiness data. Since we've stored them both in dataframes, we just need to -call the `.merge()` function. +happiness data. Since we've stored them both in dataframes, we just need to call +the `.merge()` function. We will also rename a couple columns, just so that they're a little easier to use when we create the map. -``` python +```python # Merge the two previous dataframes into a single geopandas dataframe merged_df = geo_data.merge(happy_data,left_on='ADMIN', right_on='Country or region') @@ -136,7 +136,7 @@ simplest way to find the center of the map and create a Folium map object. The important part is to remember to reference the merged dataframe for our GeoJSON data and value data. The columns specify which geo data and value data to use. -``` python +```python # Assign centroids to map x_map = merged_df.centroid.x.mean() y_map = merged_df.centroid.y.mean() @@ -173,7 +173,7 @@ Now that we have a map set up, we could stop. However, I want to add a tooltip so that I can see more information about each country. The `tooltip_data` code below will show a popup on hover with all the data fields shown. -``` python +```python # Adding labels to map style_function = lambda x: {'fillColor': '#ffffff', 'color':'#000000', diff --git a/content/blog/2020-10-12-mediocrity.md b/content/blog/2020-10-12-mediocrity.md index f919900..7a1c8e7 100644 --- a/content/blog/2020-10-12-mediocrity.md +++ b/content/blog/2020-10-12-mediocrity.md @@ -16,7 +16,7 @@ allowed us to reach a lesser yet still superb solution. Philosophers throughout history have inspected this plight from many viewpoints. Greek mythology speaks of the [golden -mean](https://en.wikipedia.org/wiki/Golden_mean_(philosophy)), which uses the +mean](<https://en.wikipedia.org/wiki/Golden_mean_(philosophy)>), which uses the story of Icarus to illustrate that sometimes "the middle course" is the best solution. In this story, Daedalus, a famous artist of his time, built feathered wings for himself and his son so that they might escape the clutches of King @@ -40,9 +40,9 @@ considered. Over and over throughout history, we've found that perfection is often unrealistic and unachievable. However, we push ourselves and our peers to "give -100%" or "go the extra mile," while it may be that the better course is to -give a valuable level of effort while considering the effects of further effort -on the outcome. Working harder does not always help us achieve loftier goals. +100%" or "go the extra mile," while it may be that the better course is to give +a valuable level of effort while considering the effects of further effort on +the outcome. Working harder does not always help us achieve loftier goals. This has presented itself to me most recently during my time studying at my university. I was anxious and feeling the stresses of my courses, career, and @@ -56,8 +56,8 @@ talking to my father when he said something simple that hit home: The thought was extremely straightforward and uncomplicated, yet it was something that I had lost sight of during my stress-filled years at school. Ever since then, I've found myself pausing and remembering that quote every time I -get anxious or stressed. It helps to stop and think "Can I do anything to -affect the outcome, or am I simply worrying over something I can't change?" +get anxious or stressed. It helps to stop and think "Can I do anything to affect +the outcome, or am I simply worrying over something I can't change?" # When Mediocrity Isn't Enough diff --git a/content/blog/2020-12-27-website-redesign.md b/content/blog/2020-12-27-website-redesign.md index cb34ca0..5df3d35 100644 --- a/content/blog/2020-12-27-website-redesign.md +++ b/content/blog/2020-12-27-website-redesign.md @@ -15,17 +15,16 @@ subdomains. One of the parts I've enjoyed the most about web development is the aspect of designing an identity for a web page and working to find exciting ways to -display the site's content. Inevitably, this means I've changed the designs -for my websites more times than I could possibly count. Since I don't really -host anything on my main webpage that's vital, it allows me the freedom to -change things as inspiration strikes. - -Historically, I've relied on core utilities for spacing, components, and -layouts from [Bootstrap](https://getbootstrap.com) and added custom CSS for -fonts, accents, colors, and other items. I also tend to create sites with no -border radius on items, visible borders, and content that takes up the entire -screen (using whitespace inside components instead of whitespace around my -components). +display the site's content. Inevitably, this means I've changed the designs for +my websites more times than I could possibly count. Since I don't really host +anything on my main webpage that's vital, it allows me the freedom to change +things as inspiration strikes. + +Historically, I've relied on core utilities for spacing, components, and layouts +from [Bootstrap](https://getbootstrap.com) and added custom CSS for fonts, +accents, colors, and other items. I also tend to create sites with no border +radius on items, visible borders, and content that takes up the entire screen +(using whitespace inside components instead of whitespace around my components). # The Redesign Process @@ -45,8 +44,8 @@ brutalist web design doesn't have to be minimal, it often is. I suppose, in a way, I did create a brutalist website since my HTML is semantic and accessible, hyperlinks are colored and underlined, and all native browser -functions like scrolling and the back button work as expected. However, I -didn't think about brutalism while designing these sites. +functions like scrolling and the back button work as expected. However, I didn't +think about brutalism while designing these sites. The new design followed a simple design process. I walked through the screens on my blog and asked myself: "Is this element necessary for a user?" This allowed @@ -60,10 +59,10 @@ blog post descriptions, and the scroll-to-top button. It also helped to move all categories to a single page, rather than have each category on its own page. The final big piece to finish the -"[KonMari](https://en.wikipedia.org/wiki/Marie_Kondo#KonMari_method)"-like -part of my process was to remove Bootstrap CSS in its entirety. However, this -meant pulling out a few very useful classes, such as `.img-fluid` and the -default font stacks to keep in my custom CSS. +"[KonMari](https://en.wikipedia.org/wiki/Marie_Kondo#KonMari_method)"-like part +of my process was to remove Bootstrap CSS in its entirety. However, this meant +pulling out a few very useful classes, such as `.img-fluid` and the default font +stacks to keep in my custom CSS. After removing all the unnecessary pieces, I was finally able to reorganize my content and add a very small amount of custom CSS to make everything pretty. @@ -91,5 +90,5 @@ for all four categories! First contextual paints of the blog homepage are under is within a separate CSS file, and the CSS for my main website is simply embedded in the HTML file. -Now that everything is complete, I can confidently say I'm happy with the -result and proud to look at the fastest set of websites I've created so far. +Now that everything is complete, I can confidently say I'm happy with the result +and proud to look at the fastest set of websites I've created so far. diff --git a/content/blog/2020-12-28-neon-drive.md b/content/blog/2020-12-28-neon-drive.md index 97f73e4..34ca045 100644 --- a/content/blog/2020-12-28-neon-drive.md +++ b/content/blog/2020-12-28-neon-drive.md @@ -70,19 +70,19 @@ endurance game mode. Neon Drive sits nicely within the well-founded cult genre of Outrun. Other games that I've enjoyed in this same spectrum are: -- [Far Cry 3: Blood +- [Far Cry 3: Blood Dragon](https://store.steampowered.com/app/233270/Far_Cry_3__Blood_Dragon/) -- [Retrowave](https://store.steampowered.com/app/1239690/Retrowave/) -- [Slipstream](https://store.steampowered.com/app/732810/Slipstream/) +- [Retrowave](https://store.steampowered.com/app/1239690/Retrowave/) +- [Slipstream](https://store.steampowered.com/app/732810/Slipstream/) Although these games aren't necessarily in the same genre, they do have aspects that place them close enough to interest gamers that enjoyed Neon Drive: -- [Black Ice](https://store.steampowered.com/app/311800/Black_Ice/) -- [Cloudpunk](https://store.steampowered.com/app/746850/Cloudpunk/) -- [Need for Speed: +- [Black Ice](https://store.steampowered.com/app/311800/Black_Ice/) +- [Cloudpunk](https://store.steampowered.com/app/746850/Cloudpunk/) +- [Need for Speed: Heat](https://store.steampowered.com/app/1222680/Need_for_Speed_Heat/) -- [VirtuaVerse](https://store.steampowered.com/app/1019310/VirtuaVerse/) +- [VirtuaVerse](https://store.steampowered.com/app/1019310/VirtuaVerse/) Of course, if all you really care about is the arcade aspect of these games, you can check out the [Atari diff --git a/content/blog/2020-12-29-zork.md b/content/blog/2020-12-29-zork.md index 894ae00..e2ccc61 100644 --- a/content/blog/2020-12-29-zork.md +++ b/content/blog/2020-12-29-zork.md @@ -14,8 +14,8 @@ up and take a ride back to the 1980s with this masterpiece. # Game Description -Zork is an interactive, text-based computer game originally released in -1980. This series, split into three separate games, introduced a robust and +Zork is an interactive, text-based computer game originally released in 1980. +This series, split into three separate games, introduced a robust and sophisticated text parser to gamers. People were largely used to the simple commands used in the popular game [Colossal Cave Adventure](https://en.wikipedia.org/wiki/Colossal_Cave_Adventure), but Zork @@ -37,7 +37,7 @@ intended, you should try to play it without using the map.  -*[Map Source](https://www.filfre.net/2012/01/exploring-zork-part-1/)* +_[Map Source](https://www.filfre.net/2012/01/exploring-zork-part-1/)_ # In-Game Screenshots @@ -45,25 +45,24 @@ After playing the game (for the first time ever) for several weeks around 2014, I was finally able to beat the game with some online help to find the last couple items. As I was writing this post, I installed the game again to grab some screenshots to show off the true glory of this game. As noted in [Jimmy -Maher's playthrough](https://www.filfre.net/2012/01/exploring-zork-part-1/), -the original Zork games looked quite a bit different due to the older hardware -of computers like the Apple II and multiple bug fixes that Infocom pushed out -after the game's initial release. My play-through uses the [Zork +Maher's playthrough](https://www.filfre.net/2012/01/exploring-zork-part-1/), the +original Zork games looked quite a bit different due to the older hardware of +computers like the Apple II and multiple bug fixes that Infocom pushed out after +the game's initial release. My play-through uses the [Zork Anthology](https://store.steampowered.com/app/570580/Zork_Anthology/) version, which utilizes DOSBox on Windows. The first screenshot here shows the introductory information, which doesn't include instructions of any kind for the player. If you haven't played text -adventures before, try to use simple commands like "go west," "look around," -or "hit troll with elvish sword." +adventures before, try to use simple commands like "go west," "look around," or +"hit troll with elvish sword."  In this second screenshot, we see the player has entered the house and found the trophy case in the living room. The lantern and sword in this room allow the player to explore dark areas and attack enemies. If you don't use the lantern, -you won't be able to see anything in dark areas, and you may be eaten by a -grue. +you won't be able to see anything in dark areas, and you may be eaten by a grue.  @@ -78,9 +77,9 @@ case or carried until you feel like you want to put things away. It's been quite a few years since I first played Zork, but I clearly remember the late nights and bloodshot eyes that helped me find all the treasures. This game is well worth the time and effort, even though the text-based aspect may be -off-putting to gamers who didn't have to grow up playing games without -graphics. However, I believe that the strategy and skills learned in early video -games like Zork can actually help you, even when playing newer games. +off-putting to gamers who didn't have to grow up playing games without graphics. +However, I believe that the strategy and skills learned in early video games +like Zork can actually help you, even when playing newer games. If you do decide to play Zork, you can download Zork I, II, and III from Infocom's [download page](http://infocom-if.org/downloads/downloads.html) for diff --git a/content/blog/2021-01-01-seum.md b/content/blog/2021-01-01-seum.md index 1cdb759..98b680c 100644 --- a/content/blog/2021-01-01-seum.md +++ b/content/blog/2021-01-01-seum.md @@ -47,13 +47,13 @@ existing orange portals, light all yellow beacons, avoid things like fireballs and blades, or use any satanic power orbs lying around. These special abilities include: -- Gravity -- Teleport -- Rewind -- Spawn platform -- Roar (DLC) -- Rocket (DLC) -- Shadow world (DLC) +- Gravity +- Teleport +- Rewind +- Spawn platform +- Roar (DLC) +- Rocket (DLC) +- Shadow world (DLC) For the main storyline, there are nine floors to beat. Each floor contains nine regular levels, one boss level, and one bonus level; although you don't diff --git a/content/blog/2021-01-04-fediverse.md b/content/blog/2021-01-04-fediverse.md index bf23946..293a106 100644 --- a/content/blog/2021-01-04-fediverse.md +++ b/content/blog/2021-01-04-fediverse.md @@ -34,13 +34,13 @@ users. This strategy is great for making sure control of the social web isn't controlled by a single organization, but it also has some downsides. If I create a Mastodon instance and get a ton of users to sign up, I can shut the server -down at any time. That means you're at risk of losing the content you've -created unless you back it up, or the server backs it up for you. Also, -depending on the software used (e.g. Mastodon, Pixelfed, etc.), censorship may -still be an issue if the server admins decide they want to censor their users. -Now, censorship isn't always a bad thing and can even benefit the community as -a whole, but you'll want to determine which servers align with your idea of -proper censorship. +down at any time. That means you're at risk of losing the content you've created +unless you back it up, or the server backs it up for you. Also, depending on the +software used (e.g. Mastodon, Pixelfed, etc.), censorship may still be an issue +if the server admins decide they want to censor their users. Now, censorship +isn't always a bad thing and can even benefit the community as a whole, but +you'll want to determine which servers align with your idea of proper +censorship. However, these are risks that we take when we sign up for any online platform. Whatever your reason is for trying out federated social networks, they are part @@ -58,39 +58,39 @@ might just find the perfect home. ## Reddit -- [Lemmy](https://lemmy.ml/instances) +- [Lemmy](https://lemmy.ml/instances) ## Twitter/Facebook/Tumblr -- [Mastodon](https://joinmastodon.org) -- [Diaspora](https://diasporafoundation.org) -- [Friendica](https://friendi.ca) -- [GNU Social](https://gnusocial.network) -- [Pleroma](https://pleroma.social) +- [Mastodon](https://joinmastodon.org) +- [Diaspora](https://diasporafoundation.org) +- [Friendica](https://friendi.ca) +- [GNU Social](https://gnusocial.network) +- [Pleroma](https://pleroma.social) ## Instagram -- [Pixelfed](https://pixelfed.org) +- [Pixelfed](https://pixelfed.org) ## Slack/Discord -- [Matrix](https://element.io) +- [Matrix](https://element.io) ## Youtube/Vimeo -- [Peertube](https://joinpeertube.org) +- [Peertube](https://joinpeertube.org) ## Spotify/Soundcloud -- [Funkwhale](https://funkwhale.audio) +- [Funkwhale](https://funkwhale.audio) ## Podcasting -- [Pubcast](https://pubcast.pub) +- [Pubcast](https://pubcast.pub) ## Medium/Blogger -- [WriteFreely](https://writefreely.org) +- [WriteFreely](https://writefreely.org) # Get Started diff --git a/content/blog/2021-01-07-ufw.md b/content/blog/2021-01-07-ufw.md index 803173c..b843fe8 100644 --- a/content/blog/2021-01-07-ufw.md +++ b/content/blog/2021-01-07-ufw.md @@ -9,8 +9,8 @@ draft = false Uncomplicated Firewall, also known as ufw, is a convenient and beginner-friendly way to enforce OS-level firewall rules. For those who are hosting servers or any -device that is accessible to the world (i.e., by public IP or domain name), -it's critical that a firewall is properly implemented and active. +device that is accessible to the world (i.e., by public IP or domain name), it's +critical that a firewall is properly implemented and active. Ufw is available by default in all Ubuntu installations after 8.04 LTS. For other distributions, you can look to install ufw or check if there are @@ -57,9 +57,9 @@ sudo ufw default allow outgoing # Adding Port Rules -Now that we've disabled all incoming traffic by default, we need to open up -some ports (or else no traffic would be able to come in). If you need to be able -to `ssh` into the machine, you'll need to open up port 22. +Now that we've disabled all incoming traffic by default, we need to open up some +ports (or else no traffic would be able to come in). If you need to be able to +`ssh` into the machine, you'll need to open up port 22. ```sh sudo ufw allow 22 @@ -102,7 +102,7 @@ Now that the firewall is enabled, let's check and see what the rules look like. sudo ufw status numbered ``` -``` txt +```txt Status: active To Action From @@ -114,8 +114,8 @@ Status: active # Deleting Rules If you need to delete a rule, you need to know the number associated with that -rule. Let's delete the first rule in the table above. You'll be asked to -confirm the deletion as part of this process. +rule. Let's delete the first rule in the table above. You'll be asked to confirm +the deletion as part of this process. ```sh sudo ufw delete 1 @@ -134,7 +134,7 @@ sudo ufw app list The results should look something like this: -``` txt +```txt Available applications: OpenSSH Samba @@ -152,7 +152,7 @@ sudo ufw app info plexmediaserver-dlna You'll get a blurb of info back like this: -``` txt +```txt Profile: plexmediaserver-dlna Title: Plex Media Server (DLNA) Description: The Plex Media Server (additional DLNA capability only) @@ -182,7 +182,7 @@ make sure the content is properly formatted. For example, here are the contents my `plexmediaserver` file, which creates three distinct app rules for ufw: -``` config +```config [plexmediaserver] title=Plex Media Server (Standard) description=The Plex Media Server @@ -199,14 +199,14 @@ description=The Plex Media Server (with additional DLNA capability) ports=32400/tcp|3005/tcp|5353/udp|8324/tcp|32410:32414/udp|1900/udp|32469/tcp ``` -So, if I wanted to create a custom app rule called "mycustomrule," I'd create -a file and add my content like this: +So, if I wanted to create a custom app rule called "mycustomrule," I'd create a +file and add my content like this: ```sh sudo nano /etc/ufw/applications.d/mycustomrule ``` -``` config +```config [mycustomrule] title=My Custom Rule description=This is a temporary ufw app rule. diff --git a/content/blog/2021-02-19-macos.md b/content/blog/2021-02-19-macos.md index bcdf698..c13df87 100644 --- a/content/blog/2021-02-19-macos.md +++ b/content/blog/2021-02-19-macos.md @@ -29,7 +29,7 @@ The desktop itself reminds me of GNOME more than anything else I've seen: even Pantheon from [ElementaryOS](https://elementary.io/), which people commonly refer to as the closest Linux distro to macOS. The desktop toolbar is great and far surpasses the utility of the GNOME toolbar due to the fact that the -extensions and icons *actually work*. I launch macOS and immediately see my +extensions and icons _actually work_. I launch macOS and immediately see my shortcuts for Tresorit, Bitwarden, and Mullvad pop up as the computer loads. Even further, the app dock is very useful and will be yet another familiarity @@ -171,9 +171,9 @@ want](https://github.com/ohmyzsh/ohmyzsh/wiki/Themes), save the file, and exit. ZSH_THEME="af-magic" ``` -After changing the `.zshrc` file, you'll need to close your terminal and -re-open it to see the changes. Optionally, just open a new tab if you're using -iTerm2, and you'll see the new shell config. +After changing the `.zshrc` file, you'll need to close your terminal and re-open +it to see the changes. Optionally, just open a new tab if you're using iTerm2, +and you'll see the new shell config. # Oh-My-Zsh Plugins diff --git a/content/blog/2021-03-19-clone-github-repos.md b/content/blog/2021-03-19-clone-github-repos.md index e2b1ce0..ca1547a 100644 --- a/content/blog/2021-03-19-clone-github-repos.md +++ b/content/blog/2021-03-19-clone-github-repos.md @@ -20,8 +20,8 @@ nano clone_github_repos.sh ``` Next, paste in the following information. Note that you can replace the word -`users` in the first line with `orgs` and type an organization's name instead -of a user's name. +`users` in the first line with `orgs` and type an organization's name instead of +a user's name. ```sh CNTX=users; NAME=YOUR-USERNAME; PAGE=1 @@ -45,8 +45,8 @@ Now you can run the script and should see the cloning process begin. # Cloning from Sourcehut -I haven't fully figured out how to directly incorporate Sourcehut's GraphQL -API into a bash script yet, so this one will take two steps. +I haven't fully figured out how to directly incorporate Sourcehut's GraphQL API +into a bash script yet, so this one will take two steps. First, log-in to Sourcehut and go to their [GraphQL playground for Git](https://git.sr.ht/graphql). Next, paste the following query into the left diff --git a/content/blog/2021-03-28-gemini-capsule.md b/content/blog/2021-03-28-gemini-capsule.md index 183f744..73f1d2c 100644 --- a/content/blog/2021-03-28-gemini-capsule.md +++ b/content/blog/2021-03-28-gemini-capsule.md @@ -8,21 +8,21 @@ draft = false # What is Gemini? [Gemini](https://gemini.circumlunar.space/) is an internet protocol introduced -in June 2019 as an alternative to HTTP(S) or Gopher. In layman's terms, it's -an alternative way to browse sites (called capsules) that requires a special +in June 2019 as an alternative to HTTP(S) or Gopher. In layman's terms, it's an +alternative way to browse sites (called capsules) that requires a special browser. Since Gemini is not standardized as an internet standard, normal web -browsers won't be able to load a Gemini capsule. Instead, you'll need to use -[a Gemini-specific browser](https://gemini.%20circumlunar.space/clients.html). +browsers won't be able to load a Gemini capsule. Instead, you'll need to use [a +Gemini-specific browser](https://gemini.%20circumlunar.space/clients.html). The content found within a Gemini page is called [Gemtext](https://gemini.circumlunar.space/docs/cheatsheet.gmi) and is -*extremely* basic (on purpose). Gemini only processes the text, no media content +_extremely_ basic (on purpose). Gemini only processes the text, no media content like images. However, you're able to style 3 levels of headings, regular text, links (which will display on their own line), quotes, and an unordered list. Here's a complete listing of valid Gemtext: -``` txt +````txt # Heading 1 ## Heading 2 ### Heading 3 @@ -39,7 +39,7 @@ My List: ** Item ```Anything between three backticks will be rendered as code.``` -``` +```` ### Free Option @@ -87,8 +87,8 @@ tools, but mostly surrounds their hosted Git repository service. Simply put, it's a minimal and more private alternative to services like GitHub. This walkthrough is more advanced and involves things like Git, SSH, the command -line. If you don't think you know enough to do this, check out my walkthrough -on creating a Gemini capsule for the Midnight Pub instead. +line. If you don't think you know enough to do this, check out my walkthrough on +creating a Gemini capsule for the Midnight Pub instead. The first thing you'll need to do is create an SSH key pair, if you don't already have one on your system. Once created, grab the contents of `id_rsa.pub` @@ -107,8 +107,8 @@ format exactly: mkdir your-username.srht.site && cd your-username.srht.site ``` -Now that we've created the repo, let's initialize Git and add the proper -remote URL. +Now that we've created the repo, let's initialize Git and add the proper remote +URL. ```sh git init @@ -121,13 +121,13 @@ git remote add origin git@git.sr.ht:~your-username/your-username.srht.site Now that our repository is set up and configured, we will need to create at least two files: -- `index.gmi` -- `.build.yml` +- `index.gmi` +- `.build.yml` For your `.build.yml` file, use the following content and be sure to update the `site` line with your username! -``` yaml +```yaml image: alpine/latest oauth: pages.sr.ht/PAGES:RW environment: @@ -146,7 +146,7 @@ even just copy and paste the Gemtext cheatsheet. If you want to serve both HTML and Gemini files from this repository, just add a second command to the `upload` section: -``` yaml +```yaml - upload: | acurl -f https://pages.sr.ht/publish/$site -Fcontent=@site.tar.gz -Fprotocol=GEMINI acurl -f https://pages.sr.ht/publish/$site -Fcontent=@site.tar.gz @@ -158,9 +158,9 @@ Lastly, commit your changes and push them to the remote repo. git add .; git commit -m "initial commit"; git push --set-upstream origin HEAD ``` -If you've successfully created the files with the proper format, you'll see -the terminal print a message that lets you know where the automatic build is -taking place. For example, here's what the terminal tells me: +If you've successfully created the files with the proper format, you'll see the +terminal print a message that lets you know where the automatic build is taking +place. For example, here's what the terminal tells me: ```sh remote: Build started: diff --git a/content/blog/2021-03-28-vaporwave-vs-outrun.md b/content/blog/2021-03-28-vaporwave-vs-outrun.md index a89074b..dd8a137 100644 --- a/content/blog/2021-03-28-vaporwave-vs-outrun.md +++ b/content/blog/2021-03-28-vaporwave-vs-outrun.md @@ -47,8 +47,8 @@ specific aspects that make Vaporwave unique: The time frame for references, logos, etc. focuses mostly on the 1990s in Vaporwave. You'll see old school Pepsi logos, Microsoft 95 screens, tropical -plants, classic marble sculptures, and many references from Japan's influence -in the 90s. +plants, classic marble sculptures, and many references from Japan's influence in +the 90s. ## Art diff --git a/content/blog/2021-03-30-vps-web-server.md b/content/blog/2021-03-30-vps-web-server.md index 508f720..26ba13e 100644 --- a/content/blog/2021-03-30-vps-web-server.md +++ b/content/blog/2021-03-30-vps-web-server.md @@ -85,9 +85,9 @@ increase the resources at any time. # Configuring DNS Settings Okay, so now let's get into some actual work that has to be done to get content -moved from a shared host to a VPS. At this point, I'm assuming you have a -shared host with website content that you can still access, and you've -purchased a new VPS and can SSH into that server. +moved from a shared host to a VPS. At this point, I'm assuming you have a shared +host with website content that you can still access, and you've purchased a new +VPS and can SSH into that server. The first change is minor, but it should be done immediately in order to get things moving: DNS settings. Go to wherever your DNS settings are handled. If @@ -98,15 +98,15 @@ DNS over to your new VPS provider. For me, I route my DNS through Once you know where your DNS settings are, go ahead and update the `A` records to match the public IP address of your VPS. For example: -``` txt +```txt A example.com xxx.xxx.xxx.xxx A subdomain xxx.xxx.xxx.xxx CNAME www example.com. ``` If you have any other records that require updates, such as MX or TXT records -for a mail server, be sure to update those accordingly. Personally, I don't -host my own mail server. I route all mail on my custom domains to +for a mail server, be sure to update those accordingly. Personally, I don't host +my own mail server. I route all mail on my custom domains to [Migadu](https://www.migadu.com). Hosting your own email server can become complex quickly and is not for beginners. @@ -132,8 +132,8 @@ set it up. First, let's update and upgrade our server. -**NOTE:** Since we have logged in to the server as `root` for now, we don't -need to use the `sudo` modifier before our commands. +**NOTE:** Since we have logged in to the server as `root` for now, we don't need +to use the `sudo` modifier before our commands. ```sh apt update && apt upgrade -y @@ -173,8 +173,8 @@ from the VPS): ssh-copy-id testuser@xxx.xxx.xxx.xxx ``` -If you've disabled password-based SSH, you'll need to manually copy your SSH -key into the `~/.ssh/authorized_keys` file. +If you've disabled password-based SSH, you'll need to manually copy your SSH key +into the `~/.ssh/authorized_keys` file. # Install Software @@ -209,9 +209,9 @@ sudo mkdir example.com ``` We have a folder for `example.com` now, so let's add an `index.html` file and -put it within a specific `public_html` folder. You don't need this -`public_html` if you don't want it, but it helps with organizing items related -to `example.com` that you don't want to publish to the internet. +put it within a specific `public_html` folder. You don't need this `public_html` +if you don't want it, but it helps with organizing items related to +`example.com` that you don't want to publish to the internet. ```sh cd example.com @@ -222,23 +222,22 @@ sudo nano index.html You can put anything you want in this `index.html` file. If you can't think of anything, paste this in there: -``` html +```html <!DOCTYPE html> <html lang="en"> - <head> - <meta charset="utf-8" /> - <meta name="viewport" content="width=device-width, initial-scale=1" /> - <title>Hello, world!</title> - </head> - <body> - <h1>Hello, world!</h1> - </body> + <head> + <meta charset="utf-8" /> + <meta name="viewport" content="width=device-width, initial-scale=1" /> + <title>Hello, world!</title> + </head> + <body> + <h1>Hello, world!</h1> + </body> </html> ``` -If you want something to be served at `example.com/page01/file.txt`, you'll -have to create the `page01` directory under the `example.com` directory. For -example: +If you want something to be served at `example.com/page01/file.txt`, you'll have +to create the `page01` directory under the `example.com` directory. For example: ```sh cd /var/www/example.com/public_html @@ -261,7 +260,7 @@ sudo nano example.com.conf This configuration file will have a few default lines, but you'll need to edit it to look similar to this (settings may change based on your personal needs): -``` config +```config <VirtualHost *:80> ServerAdmin your-email@email-provider.com ServerName example.com @@ -290,8 +289,8 @@ sudo apache2ctl configtest Now, restart the web server entirely. After this, you should be able to browse to `http://example.com` and see the HTML content you provided earlier. Note that -SSL/TLS has not been enabled yet, so you won't be able to use the secure -version yet (`https://example.com`). +SSL/TLS has not been enabled yet, so you won't be able to use the secure version +yet (`https://example.com`). ```sh sudo systemctl restart apache2 diff --git a/content/blog/2021-04-17-gemini-server.md b/content/blog/2021-04-17-gemini-server.md index 19b336f..4082679 100644 --- a/content/blog/2021-04-17-gemini-server.md +++ b/content/blog/2021-04-17-gemini-server.md @@ -76,9 +76,9 @@ sudo ./install.sh # Configure the Gemini Service We have a little more to do, but since this script tries to immediately run the -service, it will likely fail with an exit code. Let's add our finishing -touches. Edit the following file and replace the hostname with your desired URL. -You can also change the directory where content will be served. +service, it will likely fail with an exit code. Let's add our finishing touches. +Edit the following file and replace the hostname with your desired URL. You can +also change the directory where content will be served. ```sh sudo nano /etc/systemd/system/gemini.service @@ -130,19 +130,18 @@ sudo ufw reload # Creating Content -Let's create the Gemini capsule. Note that wherever you set the -WorkingDirectory variable to earlier, Agate will expect you to put your Gemini -capsule contents in a sub-folder called "content." So, I place my files in -"/var/gmi/content." I'm going to create that folder now and put a file in -there. +Let's create the Gemini capsule. Note that wherever you set the WorkingDirectory +variable to earlier, Agate will expect you to put your Gemini capsule contents +in a sub-folder called "content." So, I place my files in "/var/gmi/content." +I'm going to create that folder now and put a file in there. ```sh sudo mkdir /var/gemini/content sudo nano /var/gemini/content/index.gmi ``` -You can put whatever you want in the "index.gmi" file, just make sure it's -valid Gemtext. +You can put whatever you want in the "index.gmi" file, just make sure it's valid +Gemtext. # The Results @@ -153,9 +152,9 @@ Here are some screenshots of the Gemini page I just created in the  -*Lagrange* +_Lagrange_  -*Amfora* +_Amfora_ diff --git a/content/blog/2021-04-23-php-comment-system.md b/content/blog/2021-04-23-php-comment-system.md index dcc96ff..d79fd2c 100644 --- a/content/blog/2021-04-23-php-comment-system.md +++ b/content/blog/2021-04-23-php-comment-system.md @@ -16,15 +16,15 @@ that should be standard. Of course, there are some really terrible options: -- Facebook Comments -- Discourse +- Facebook Comments +- Discourse There are some options that are better but still use too many scripts, frames, or social integrations on your web page that could impact some users: -- Disqus -- Isso -- Remark42 +- Disqus +- Isso +- Remark42 Lastly, I looked into a few unique ways of generating blog comments, such as using Twitter threads or GitHub issues to automatically post issues. However, @@ -52,22 +52,22 @@ database for any other part of my websites. I blog in plain Markdown files, commit all articles to Git, and ensure that future readers will be able to see the source data long after I'm gone, or the website has gone offline. However, I still haven't committed any images served -on my blog to Git, as I'm not entirely sold on Git LFS yet - for now, images -can be found at [img.cleberg.net](https://img.cleberg.net). +on my blog to Git, as I'm not entirely sold on Git LFS yet - for now, images can +be found at [img.cleberg.net](https://img.cleberg.net). Saving my comments back to the Git repository ensures that another aspect of my site will degrade gracefully. # Create a Comment Form -Okay, let's get started. The first step is to create an HTML form that users -can see and utilize to submit comments. This is fairly easy and can be changed +Okay, let's get started. The first step is to create an HTML form that users can +see and utilize to submit comments. This is fairly easy and can be changed depending on your personal preferences. Take a look at the code block below for the form I currently use. Note that -`<current-url>` is replaced automatically in PHP with the current post's URL, -so that my PHP script used later will know which blog post the comment is -related to. +`<current-url>` is replaced automatically in PHP with the current post's URL, so +that my PHP script used later will know which blog post the comment is related +to. The form contains the following structure: @@ -81,45 +81,45 @@ The form contains the following structure: Markdown is allowed. 5. `<button>` - A button to submit the form. -``` html +```html <form action="/comment.php" method="POST"> - <h3>Leave a Comment</h3> - <section hidden> - <label class="form-label" for="postURL">Post URL</label> - <input - class="form-control" - id="postURL" - name="postURL" - type="text" - value="<current-url>" - /> - </section> - <section> - <label class="form-label" for="userName">Display Name</label> - <input - class="form-control" - id="userName" - name="userName" - placeholder="John Doe" - type="text" - /> - </section> - <section> - <label class="form-label" for="userContent">Your Comment</label> - <textarea - class="form-control" - id="userContent" - name="userContent" - rows="3" - placeholder="# Feel free to use Markdown" - aria-describedby="commentHelp" - required - ></textarea> - <div id="commentHelp" class="form-text"> - Comments are saved as Markdown and cannot be edited or deleted. - </div> - </section> - <button type="submit">Submit</button> + <h3>Leave a Comment</h3> + <section hidden> + <label class="form-label" for="postURL">Post URL</label> + <input + class="form-control" + id="postURL" + name="postURL" + type="text" + value="<current-url>" + /> + </section> + <section> + <label class="form-label" for="userName">Display Name</label> + <input + class="form-control" + id="userName" + name="userName" + placeholder="John Doe" + type="text" + /> + </section> + <section> + <label class="form-label" for="userContent">Your Comment</label> + <textarea + class="form-control" + id="userContent" + name="userContent" + rows="3" + placeholder="# Feel free to use Markdown" + aria-describedby="commentHelp" + required + ></textarea> + <div id="commentHelp" class="form-text"> + Comments are saved as Markdown and cannot be edited or deleted. + </div> + </section> + <button type="submit">Submit</button> </form> ``` @@ -144,7 +144,7 @@ the following tasks in this script: 8. Finally, send the user back to the `#comments` section of the blog post they just read. -``` php +```php // Get the content sent from the comment form $comment = htmlentities($_POST['userContent']); $post_url = $_POST['postURL']; @@ -202,7 +202,7 @@ This piece of code should **really** be inside a function (or at least in an organized PHP workflow). Don't just copy-and-paste and expect it to work. You need to at least supply a `$query` variable depending on the page visited. -``` php +```php $query = 'your-blog-post.html'; // Load saved comments @@ -251,11 +251,11 @@ make sure it is printed when someone visits `https://example.com/comments/`. This comment system is by no means a fully-developed system. I have noted a few possible enhancements here that I may implement in the future: -- Create a secure moderator page with user authentication at - `https://blog.example.com/mod/`. This page could have the option to edit or - delete any comment found in `comments.json`. -- Create a temporary file, such as `pending_comments.json`, that will store - newly-submitted comments and won't display on blog posts until approved by a - moderator. -- Create a `/modlog/` page with a chronological log, showing which moderator - approved which comments and why certain comments were rejected. +- Create a secure moderator page with user authentication at + `https://blog.example.com/mod/`. This page could have the option to edit or + delete any comment found in `comments.json`. +- Create a temporary file, such as `pending_comments.json`, that will store + newly-submitted comments and won't display on blog posts until approved by a + moderator. +- Create a `/modlog/` page with a chronological log, showing which moderator + approved which comments and why certain comments were rejected. diff --git a/content/blog/2021-04-28-photography.md b/content/blog/2021-04-28-photography.md index 73df4d5..2b199fe 100644 --- a/content/blog/2021-04-28-photography.md +++ b/content/blog/2021-04-28-photography.md @@ -48,10 +48,10 @@ perfect for me. For lenses, I decided to buy two lenses that could carry me through most situations: -- [Vario-Tessar T** FE 24-70 mm F4 ZA - OSS](https://electronics.sony.com/imaging/lenses/full-frame-e-mount/p/sel2470z) -- [Tamron 70-300mm f4.5-6.3 Di III - RXD](https://www.tamron-usa.com/product/lenses/a047.html) +- [Vario-Tessar T\*\* FE 24-70 mm F4 ZA + OSS](https://electronics.sony.com/imaging/lenses/full-frame-e-mount/p/sel2470z) +- [Tamron 70-300mm f4.5-6.3 Di III + RXD](https://www.tamron-usa.com/product/lenses/a047.html) In addition, I grabbed a couple [HGX Prime 67mm](https://www.promaster.com/Product/6725) protection filters for the lenses. diff --git a/content/blog/2021-05-30-changing-git-authors.md b/content/blog/2021-05-30-changing-git-authors.md index 18fe966..018b979 100644 --- a/content/blog/2021-05-30-changing-git-authors.md +++ b/content/blog/2021-05-30-changing-git-authors.md @@ -23,9 +23,9 @@ nano change_git_authors.sh The following information can be pasted directly into your bash script. The only changes you need to make are to the following variables: -- `OLD_EMAIL` -- `CORRECT_NAME` -- `CORRECT_EMAIL` +- `OLD_EMAIL` +- `CORRECT_NAME` +- `CORRECT_EMAIL` ```sh #!/bin/sh diff --git a/content/blog/2021-07-15-delete-gitlab-repos.md b/content/blog/2021-07-15-delete-gitlab-repos.md index 5188f59..2c179b6 100644 --- a/content/blog/2021-07-15-delete-gitlab-repos.md +++ b/content/blog/2021-07-15-delete-gitlab-repos.md @@ -47,7 +47,7 @@ nano main.py Enter the following code into your `main.py` script. -``` python +```python import request import json @@ -107,8 +107,8 @@ Now that you have the proper information, replace `{user-id}` with your GitLab username and `{auth-token}` with the authorization token you created earlier. Finally, simply run the script and watch the output. You can also use PyCharm -Community Edition to edit and run the Python script if you don't want to work -in a terminal. +Community Edition to edit and run the Python script if you don't want to work in +a terminal. ```sh python3 main.py diff --git a/content/blog/2021-08-25-audit-sampling.md b/content/blog/2021-08-25-audit-sampling.md index 93576e3..c2d3c1d 100644 --- a/content/blog/2021-08-25-audit-sampling.md +++ b/content/blog/2021-08-25-audit-sampling.md @@ -46,7 +46,7 @@ Now that you know what you're using, you can always check out the code behind `pandas.DataFrame.sample`. This function does a lot of work, but we really only care about the following snippets of code: -``` python +```python # Process random_state argument rs = com.random_state(random_state) @@ -64,9 +64,9 @@ The block of code above shows you that if you assign a `random_state` argument when you run the function, that will be used as a seed number in the random generation and will allow you to reproduce a sample, given that nothing else changes. This is critical to the posterity of audit work. After all, how can you -say your audit process is adequately documented if the next person can't run -the code and get the same sample? The final piece here on randomness is to look -at the [choice](https://docs.%20python.org/3/library/random.html#random.choice) +say your audit process is adequately documented if the next person can't run the +code and get the same sample? The final piece here on randomness is to look at +the [choice](https://docs.%20python.org/3/library/random.html#random.choice) function used above. This is the crux of the generation and can also be examined for more detailed analysis on its reliability. As far as auditing goes, we will trust that these functions are mathematically random. @@ -90,23 +90,22 @@ that will instruct auditors which sample sizes to choose. This allows for uniform testing and reduces overall workload. See the table below for a common implementation of sample sizes: - Control Frequency Sample Size - High Risk Sample Size - Low Risk - ------------------- ------------------------- ------------------------ - More Than Daily 40 25 Daily 40 - 25 Weekly 12 5 Monthly 5 - 3 Quarterly 2 2 Semi-Annually 1 - 1 Annually 1 1 Ad-hoc 1 - 1 +Control Frequency Sample Size - High Risk Sample Size - Low Risk + +--- + +More Than Daily 40 25 Daily 40 25 Weekly 12 5 Monthly 5 3 Quarterly 2 2 +Semi-Annually 1 1 Annually 1 1 Ad-hoc 1 1 ### Sampling with Python & Pandas In this section, I am going to cover a few basic audit situations that require sampling. While some situations may require more effort, the syntax, organization, and intellect used remain largely the same. If you've never used -Python before, note that lines starting with a '`#`' symbol are called -comments, and they will be skipped by Python. I highly recommend taking a quick -tutorial online to understand the basics of Python if any of the code below is -confusing to you. +Python before, note that lines starting with a '`#`' symbol are called comments, +and they will be skipped by Python. I highly recommend taking a quick tutorial +online to understand the basics of Python if any of the code below is confusing +to you. ## Simple Random Sample @@ -114,7 +113,7 @@ First, let's look at a simple, random sample. The code block below will import the `pandas` module, load a data file, sample the data, and export the sample to a file. -``` python +```python # Import the Pandas module import pandas @@ -139,7 +138,7 @@ sample.to_excel(file_output) Now that we've created a simple sample, let's create a sample from multiple files. -``` python +```python # Import the Pandas module import pandas @@ -171,10 +170,10 @@ sample.to_excel(file_output) ## Stratified Random Sample Well, what if you need to sample distinct parts of a single file? For example, -let's write some code to separate our data by "Region" and sample those -regions independently. +let's write some code to separate our data by "Region" and sample those regions +independently. -``` python +```python # Import the Pandas module import pandas @@ -209,7 +208,7 @@ period. This code will generate samples for each month in the data and combine them all together at the end. Obviously, this code can be modified to stratify by something other than months, if needed. -``` python +```python # Import the Pandas module import pandas diff --git a/content/blog/2021-10-09-apache-redirect.md b/content/blog/2021-10-09-apache-redirect.md index 87ea38e..3a03aa9 100644 --- a/content/blog/2021-10-09-apache-redirect.md +++ b/content/blog/2021-10-09-apache-redirect.md @@ -24,10 +24,10 @@ To solve this problem, I really needed to solve two pieces: `/blog/some-post/`. 2. Ensure that no other `.html` files are redirected, such as `index.html`. -After *a lot* of tweaking and testing, I believe I have finally found the +After _a lot_ of tweaking and testing, I believe I have finally found the solution. The solution is shown below. -``` conf +```conf RewriteEngine On RewriteCond %{REQUEST_URI} !\index.html$ [NC] RewriteRule ^(.*).html$ https://example.com/$1 [R=301,L] @@ -41,5 +41,5 @@ following: 3. Find any `.html` files within the website directory and redirect it to exclude the file extension. 4. The final piece is adding the trailing slash (`/`) at the end of the URL - - you'll notice that I don't have an Apache rule for that since Apache - handles that automatically. + you'll notice that I don't have an Apache rule for that since Apache handles + that automatically. diff --git a/content/blog/2021-12-04-cisa.md b/content/blog/2021-12-04-cisa.md index b605493..a81205e 100644 --- a/content/blog/2021-12-04-cisa.md +++ b/content/blog/2021-12-04-cisa.md @@ -25,7 +25,7 @@ hired, getting a raise/bonus, or earning respect in the field. However, to be honest, I am a skeptic of most certifications. I understand the value they hold in terms of how much you need to commit to studying or learning on the job, as well as the market value for certifications such as the CISA. But -I also have known some very ~~incompetent~~ *less than stellar* auditors who +I also have known some very ~~incompetent~~ _less than stellar_ auditors who have CPAs, CISAs, CIAs, etc. The same goes for most industries: if a person is good at studying, they can @@ -49,7 +49,7 @@ sections](https://img.cleberg.net/blog/20211204-i-passed-the-cisa/cisa-exam-sect Since the exam contains 150 questions, here's how those sections break down: | Exam Section | Percentage of Exam | Questions | -|-----------------|--------------------|-----------| +| --------------- | ------------------ | --------- | | 1 | 21% | 32 | | 2 | 17% | 26 | | 3 | 12% | 18 | @@ -68,19 +68,18 @@ Let me approach this from a few different viewpoints. ## Study Materials -Let's start by discussing the study materials I purchased. I'll be referring -to #1 as the CRM and #2 as the QAE. +Let's start by discussing the study materials I purchased. I'll be referring to +#1 as the CRM and #2 as the QAE. 1. [CISA Review Manual, 27th Edition | -Print](https://store.isaca.org/s/store#/store/browse/detail/a2S4w000004KoCbEAK) + Print](https://store.isaca.org/s/store#/store/browse/detail/a2S4w000004KoCbEAK) 2. [CISA Review Questions, Answers & Explanations Manual, 12th Edition | -Print](https://store.isaca.org/s/store#/store/browse/detail/a2S4w000004KoCcEAK) + Print](https://store.isaca.org/s/store#/store/browse/detail/a2S4w000004KoCcEAK) The CRM is an excellent source of information and could honestly be used as a reference for most IS auditors as a learning reference during their daily audit -responsibilities. However, it is **full** of information and can be -overloading if you're not good at filtering out useless information while -studying. +responsibilities. However, it is **full** of information and can be overloading +if you're not good at filtering out useless information while studying. The QAE is the real star of the show here. This book contains 1000 questions, separated by exam section, and a practice exam. My only complaint about the QAE @@ -117,7 +116,7 @@ from the QAE manual and scored 70% (105/150). Here's a breakdown of my initial practice exam: | Exam Section | Incorrect | Correct | Grand Total | Percent | -|-----------------|-----------|---------|-------------|---------| +| --------------- | --------- | ------- | ----------- | ------- | | 1 | 8 | 25 | 33 | 76% | | 2 | 5 | 20 | 25 | 80% | | 3 | 6 | 12 | 18 | 67% | @@ -136,11 +135,11 @@ total. While some practice sessions were worse and some were better, the final results were similar to my practice exam results. As you can see below, my averages were slightly worse than my practice exam. However, I got in over 700 questions of -practice and, most importantly, *I read through the explanations every time I -answered incorrectly and learned from my mistakes*. +practice and, most importantly, _I read through the explanations every time I +answered incorrectly and learned from my mistakes_. | Exam Section | Incorrect | Correct | Grand Total | Percent | -|-----------------|-----------|---------|-------------|---------| +| --------------- | --------- | ------- | ----------- | ------- | | 1 | 33 | 108 | 141 | 77% | | 2 | 33 | 109 | 142 | 77% | | 3 | 55 | 89 | 144 | 62% | @@ -157,7 +156,7 @@ Now, how do the practice scores reflect my actual results? After all, it's hard to tell how good a practice regimen is unless you see how it turns out. | Exam Section | Section Name | Score | -|--------------|------------------------------------------------------------------|-------| +| ------------ | ---------------------------------------------------------------- | ----- | | 1 | Information Systems Auditing Process | 678 | | 2 | Governance and Management of IT | 590 | | 3 | Information Systems Acquisition, Development, and Implementation | 721 | @@ -166,7 +165,7 @@ to tell how good a practice regimen is unless you see how it turns out. Now, in order to pass the CISA, you need at least 450 on a sliding scale of 200-800. Personally, I really have no clue what an average CISA score is. After -a *very* brief look online, I can see that the high end is usually in the low +a _very_ brief look online, I can see that the high end is usually in the low 700s. In addition, only about 50-60% of people pass the exam. Given this information, I feel great about my scores. 616 may not be phenomenal, diff --git a/content/blog/2022-02-10-leaving-the-office.md b/content/blog/2022-02-10-leaving-the-office.md index c16aae8..a3f4013 100644 --- a/content/blog/2022-02-10-leaving-the-office.md +++ b/content/blog/2022-02-10-leaving-the-office.md @@ -61,9 +61,9 @@ desk feature (I'm over 6 feet tall, so probably not an issue for most people). I loved this environment, it allowed me to focus on my work with minimal distractions, but also allowed easy access, so I could spin around in my chair -and chat with my friends without leaving my chair. This is the closest I've -been to a home office environment (which is my personal favorite, as I'll get -to later in this post). +and chat with my friends without leaving my chair. This is the closest I've been +to a home office environment (which is my personal favorite, as I'll get to +later in this post). ## Semi-Open Floor Concept @@ -108,8 +108,8 @@ pairs of desk rows are repeated through the office. This means that when I go, I need to rent a random desk or try to remember the unique ID numbers on desks I like. Once I rent it, I have to make sure no one sat down in that desk without renting it. Then, I can sit down and work, but -will probably need to adjust the monitors so that I'm not staring in the face -of the person across from me all day. Finally, I need to wear headphones as this +will probably need to adjust the monitors so that I'm not staring in the face of +the person across from me all day. Finally, I need to wear headphones as this environment does nothing to provide you with peace or quiet. Luckily, you can rent offices with doors that offer quiet and privacy, which can diff --git a/content/blog/2022-02-10-njalla-dns-api.md b/content/blog/2022-02-10-njalla-dns-api.md index 52b65fc..7f5f9d3 100644 --- a/content/blog/2022-02-10-njalla-dns-api.md +++ b/content/blog/2022-02-10-njalla-dns-api.md @@ -46,7 +46,7 @@ For this demo, we are using the `list-records` and `edit-record` requests. The `list-records` request requires the following payload to be sent when calling the API: -``` txt +```txt params: { domain: string } @@ -55,7 +55,7 @@ params: { The `edit-record` request requires the following payload to be sent when calling the API: -``` txt +```txt params: { domain: string id: int @@ -84,19 +84,21 @@ Next, create a Python script file: nano ~/ddns/ddns.py ``` -The following code snippet is quite long, so I won't go into depth on each -part. However, I suggest you read through the entire script before running it; -it is quite simple and contains comments to help explain each code block. +The following code snippet is quite long, so I won't go into depth on each part. +However, I suggest you read through the entire script before running it; it is +quite simple and contains comments to help explain each code block. :warning: **Note**: You will need to update the following variables for this to work: -- `token`: This is the Njalla API token you created earlier. -- `user_domain`: This is the top-level domain you want to modify. -- `include_subdomains`: Set this to `True` if you also want to modify subdomains found under the TLD. -- `subdomains`: If `include_subdomains` = `True`, you can include your list of subdomains to be modified here. +- `token`: This is the Njalla API token you created earlier. +- `user_domain`: This is the top-level domain you want to modify. +- `include_subdomains`: Set this to `True` if you also want to modify + subdomains found under the TLD. +- `subdomains`: If `include_subdomains` = `True`, you can include your list of + subdomains to be modified here. -``` python +```python #!/usr/bin/python # -*- coding: utf-8 -*- # Import Python modules diff --git a/content/blog/2022-02-16-debian-and-nginx.md b/content/blog/2022-02-16-debian-and-nginx.md index 846b8df..65ef587 100644 --- a/content/blog/2022-02-16-debian-and-nginx.md +++ b/content/blog/2022-02-16-debian-and-nginx.md @@ -10,9 +10,9 @@ draft = false  -I've used various Linux distributions throughout the years, but I've never -used anything except Ubuntu for my servers. Why? I really have no idea, mostly -just comfort around the commands and software availability. +I've used various Linux distributions throughout the years, but I've never used +anything except Ubuntu for my servers. Why? I really have no idea, mostly just +comfort around the commands and software availability. However, I have always wanted to try Debian as a server OS after testing it out in a VM a few years ago (side-note: I'd love to try Alpine too, but I always diff --git a/content/blog/2022-02-17-exiftool.md b/content/blog/2022-02-17-exiftool.md index bc310ec..44a0585 100644 --- a/content/blog/2022-02-17-exiftool.md +++ b/content/blog/2022-02-17-exiftool.md @@ -16,16 +16,16 @@ There are various components of image metadata that you may want to delete before releasing a photo to the public. Here's an incomplete list of things I could easily see just by inspecting a photo on my laptop: -- Location (Latitude & Longitude) -- Dimensions -- Device Make & Model -- Color Space -- Color Profile -- Focal Length -- Alpha Channel -- Red Eye -- Metering Mode -- F Number +- Location (Latitude & Longitude) +- Dimensions +- Device Make & Model +- Color Space +- Color Profile +- Focal Length +- Alpha Channel +- Red Eye +- Metering Mode +- F Number Regardless of your reasoning, I'm going to explain how I used the `exiftool` package in Linux to automatically strip metadata from all images in a directory diff --git a/content/blog/2022-02-20-nginx-caching.md b/content/blog/2022-02-20-nginx-caching.md index fc39b39..536df6b 100644 --- a/content/blog/2022-02-20-nginx-caching.md +++ b/content/blog/2022-02-20-nginx-caching.md @@ -17,7 +17,7 @@ to cache and determining the expiration length. To include more file types, simply use the bar separator (`|`) and type the new file extension you want to include. -``` config +```config server { ... @@ -35,9 +35,9 @@ changes (i.e., I'm never content with my website), I need to know that my readers are seeing the new content without waiting too long. So, I went ahead and set the expiration date at `30d`, which is short enough to -refresh for readers but long enough that clients/browsers won't be -re-requesting the static files too often, hopefully resulting in faster loading -times, as images should be the only thing slowing down my site. +refresh for readers but long enough that clients/browsers won't be re-requesting +the static files too often, hopefully resulting in faster loading times, as +images should be the only thing slowing down my site. # Testing Results @@ -48,7 +48,7 @@ recent image from my blog. In the image below, you can see that the `Cache-Control` header is now present and set to 2592000, which is 30 days represented in seconds (30 days \_ 24 -hours/day \_ 60 minutes/hour ** 60 seconds/minute = 2,592,000 seconds). +hours/day \_ 60 minutes/hour \*\* 60 seconds/minute = 2,592,000 seconds). The `Expires` field is now showing 22 March 2022, which is 30 days from the day of this post, 20 February 2022. diff --git a/content/blog/2022-03-02-reliable-notes.md b/content/blog/2022-03-02-reliable-notes.md index 86526d5..8294032 100644 --- a/content/blog/2022-03-02-reliable-notes.md +++ b/content/blog/2022-03-02-reliable-notes.md @@ -96,8 +96,8 @@ Here's an example of how my Markdown notes look when opened in plain-text mode: 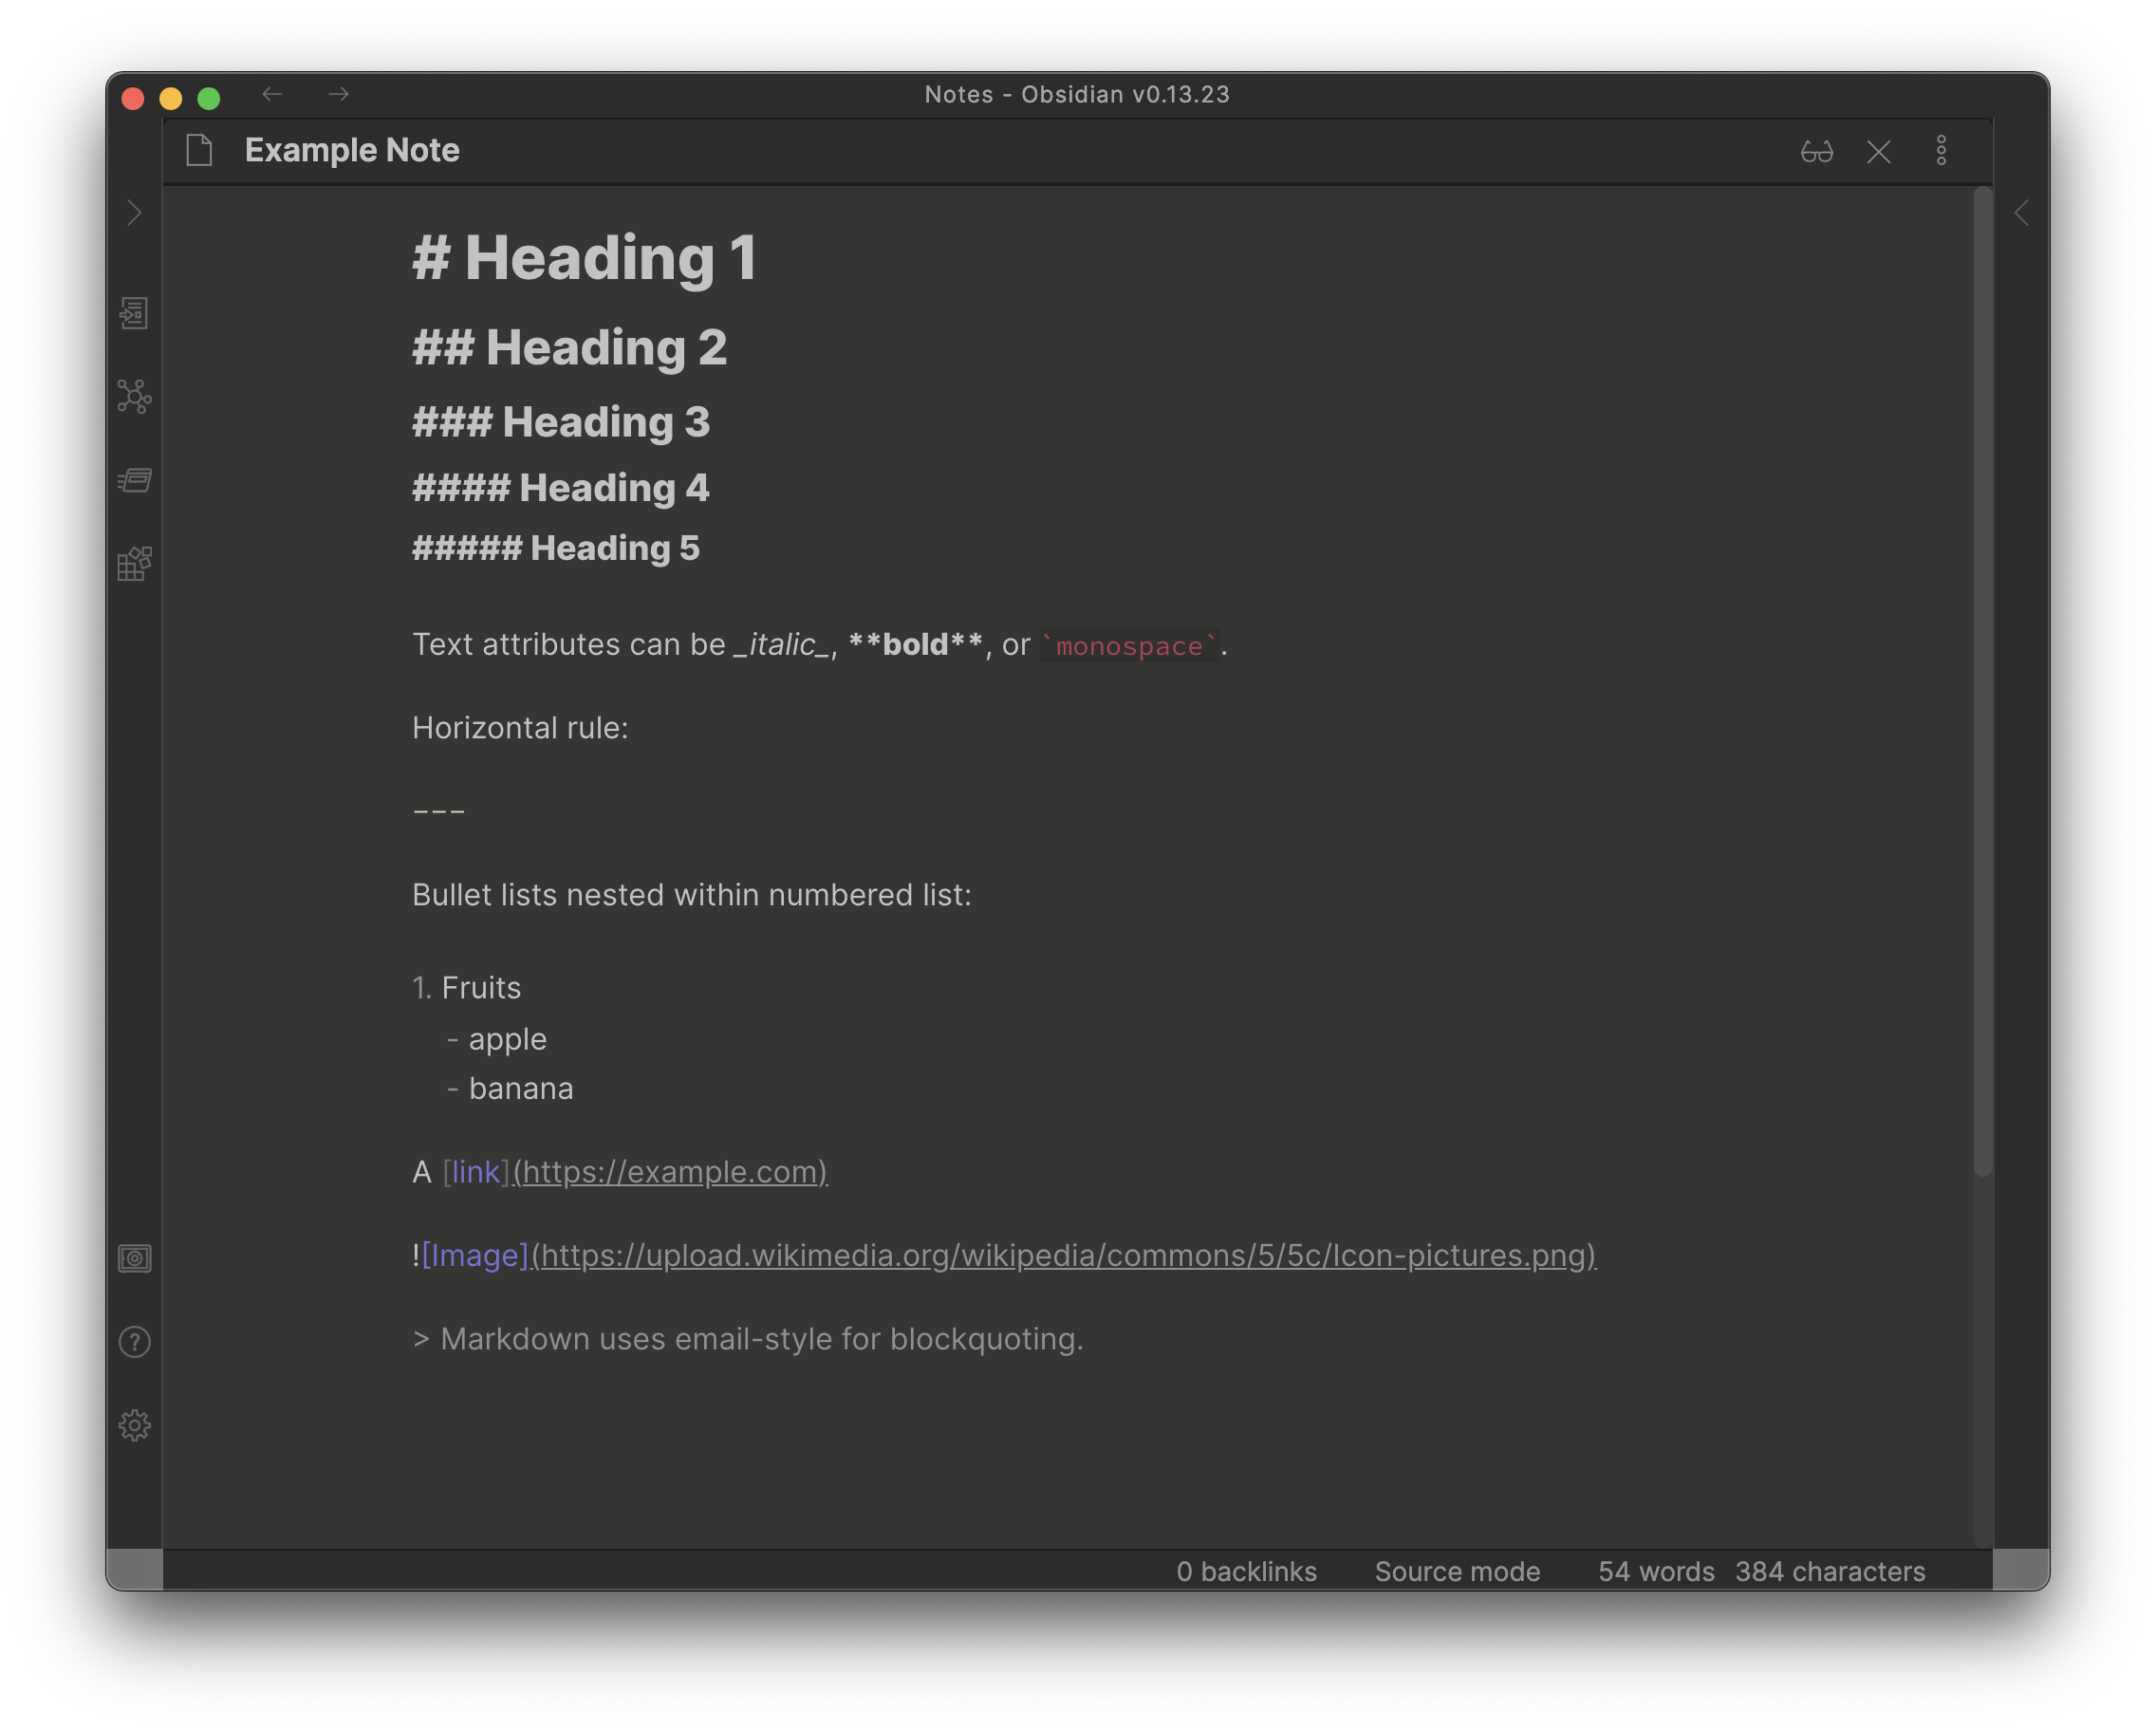 -Here's the "live preview" version, where the Markdown is rendered into its -HTML format: +Here's the "live preview" version, where the Markdown is rendered into its HTML +format: 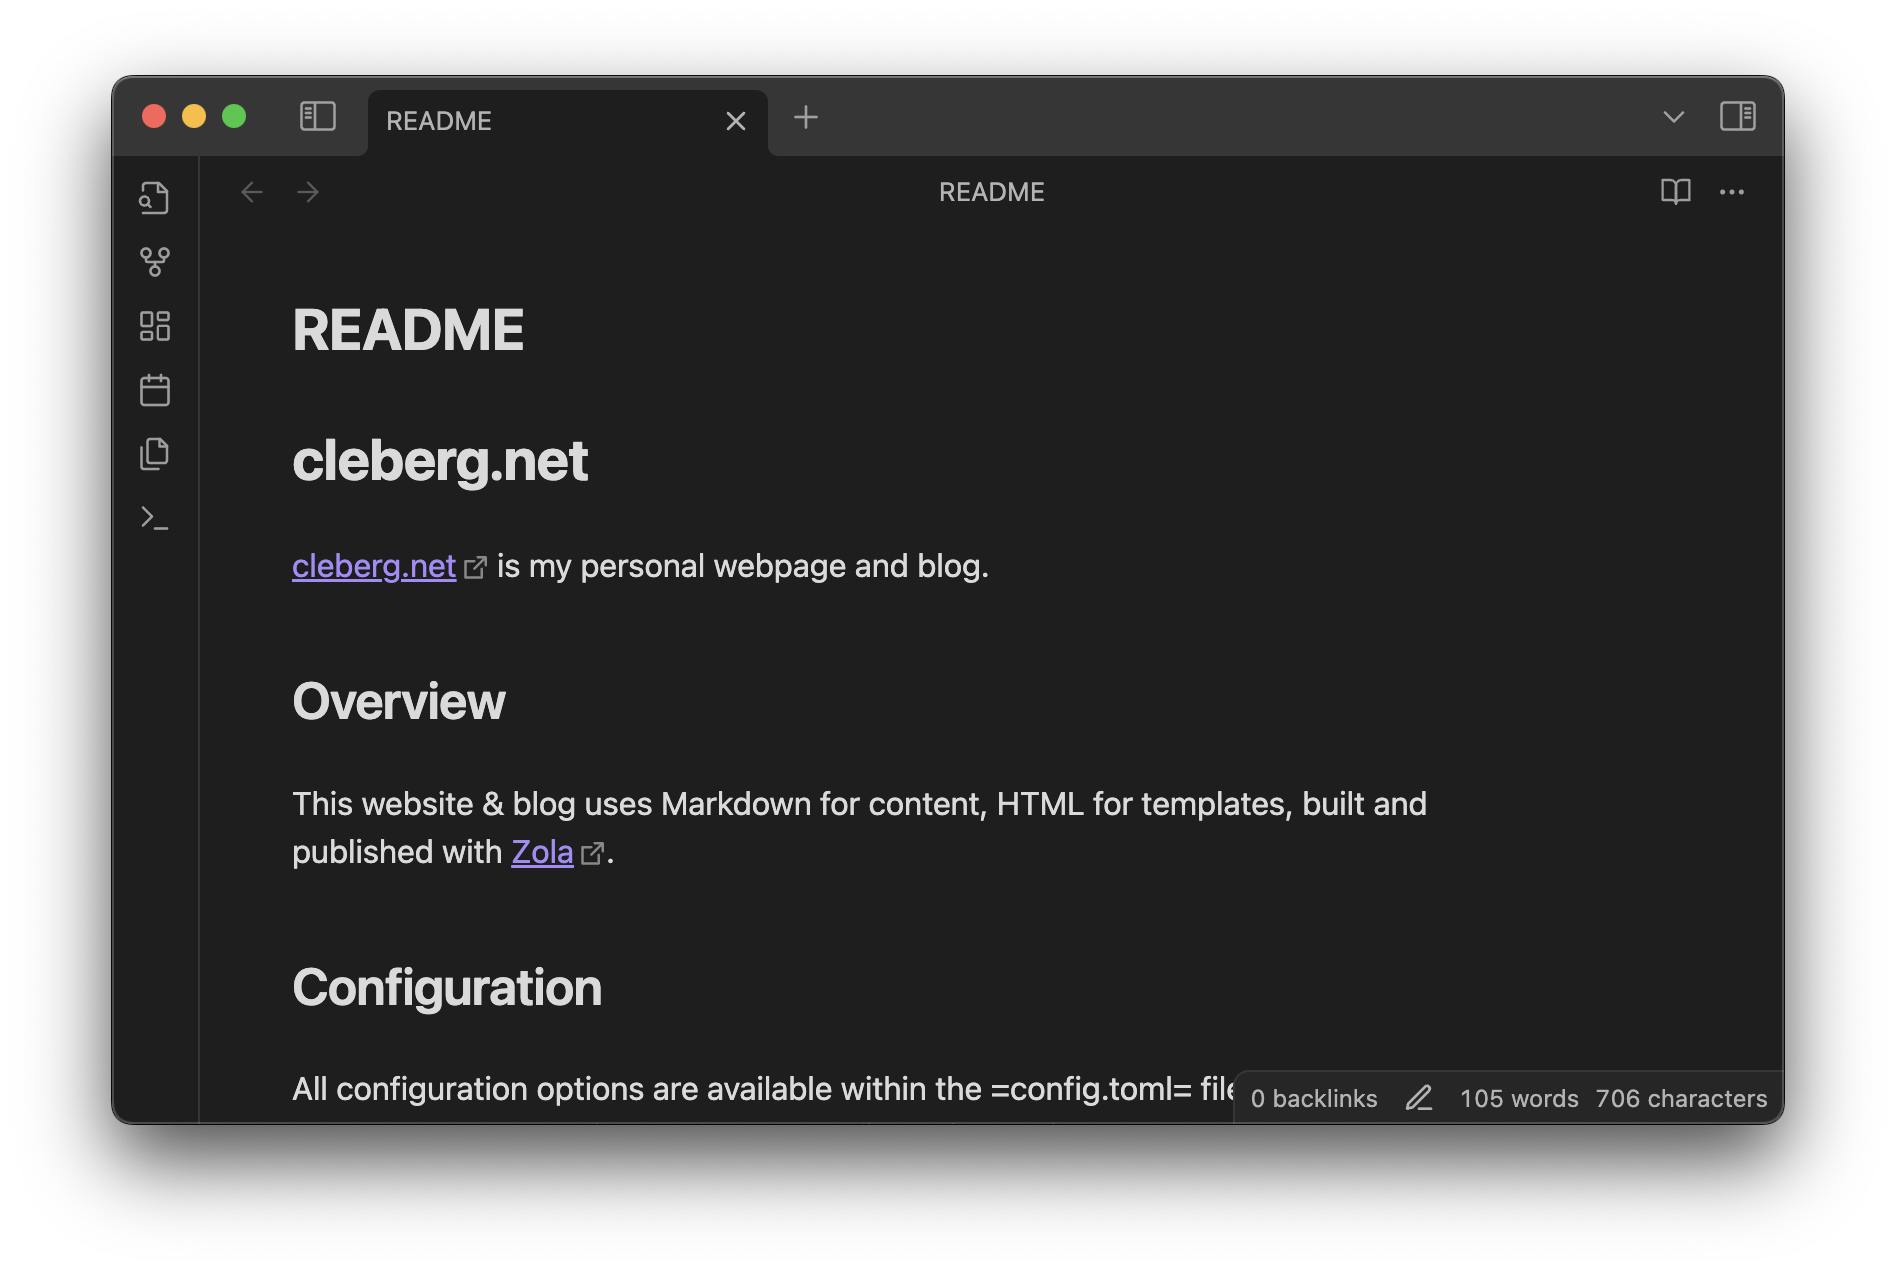 diff --git a/content/blog/2022-03-03-financial-database.md b/content/blog/2022-03-03-financial-database.md index bfe5a98..726e7ee 100644 --- a/content/blog/2022-03-03-financial-database.md +++ b/content/blog/2022-03-03-financial-database.md @@ -62,7 +62,7 @@ The Accounts table contains summary information about an account, such as a car loan or a credit card. By viewing this table, you can find high-level data, such as interest rate, credit line, or owner. -``` sql +```sql CREATE TABLE "Accounts" ( "AccountID" INTEGER NOT NULL UNIQUE, "AccountType" TEXT, @@ -83,7 +83,7 @@ meaning you can join the tables to find a monthly statement for any of the accounts listed in the Accounts table. Each statement has an account ID, statement date, and total balance. -``` sql +```sql CREATE TABLE "Statements" ( "StatementID" INTEGER NOT NULL UNIQUE, "AccountID" INTEGER, @@ -101,7 +101,7 @@ tables. This table contains all information you would find on a pay statement from an employer. As you change employers or obtain new perks/benefits, just add new columns to adapt to the new data. -``` sql +```sql CREATE TABLE "Payroll" ( "PaycheckID" INTEGER NOT NULL UNIQUE, "PayDate" TEXT, @@ -141,13 +141,13 @@ was to create a process to report and visualize on various aspects of the data. In order to explore and create the reports I'm interested in, I utilized a two-part process involving Jupyter Notebooks and Python scripts. -### Step 1: Jupyter Notebooks +### Step 1: Jupyter Notebooks When I need to explore data, try different things, and re-run my code -cell-by-cell, I use Jupyter Notebooks. For example, I explored the -`Accounts` table until I found the following useful information: +cell-by-cell, I use Jupyter Notebooks. For example, I explored the `Accounts` +table until I found the following useful information: -``` python +```python import sqlite3 import pandas as pd import matplotlib @@ -169,12 +169,12 @@ matplotlib.rcParams['legend.labelcolor'] = 'black' df.groupby(['AccountType']).sum().plot.pie(title='Credit Line by Account Type', y='CreditLine', figsize=(5,5), autopct='%1.1f%%') ``` -### Step 2: Python Scripts +### Step 2: Python Scripts -Once I explored enough through the notebooks and had a list of reports I -wanted, I moved on to create a Python project with the following structure: +Once I explored enough through the notebooks and had a list of reports I wanted, +I moved on to create a Python project with the following structure: -``` txt +```txt finance/ ├── notebooks/ │ │ ├── account_summary.ipynb @@ -199,16 +199,15 @@ This structure allows me to: installation if I move to a new machine. 2. Activate a virtual environment in `venv/` so I don't need to maintain a system-wide Python environment just for this project. -3. Keep my `notebooks/` folder to continuously explore the data as I see - fit. +3. Keep my `notebooks/` folder to continuously explore the data as I see fit. 4. Maintain a local copy of the database in `src/` for easy access. 5. Export reports, images, HTML files, etc. to `public/`. -Now, onto the differences between the code in a Jupyter Notebook and the -actual Python files. To create the report in the Notebook snippet above, I -created the following function inside `process.py`: +Now, onto the differences between the code in a Jupyter Notebook and the actual +Python files. To create the report in the Notebook snippet above, I created the +following function inside `process.py`: -``` python +```python # Create summary pie chart def summary_data(accounts: pandas.DataFrame) -> None: accounts_01 = accounts[accounts["Owner"] == "Person01"] @@ -244,13 +243,12 @@ Chart](https://img.cleberg.net/blog/20220303-maintaining-a-personal-financial-da Other charts generated by this project include: -- Charts of account balances over time. -- Line chart of effective tax rate (taxes divided by taxable income). -- Salary projections and error limits using past income and inflation - rates. -- Multi-line chart of gross income, taxable income, and net income. +- Charts of account balances over time. +- Line chart of effective tax rate (taxes divided by taxable income). +- Salary projections and error limits using past income and inflation rates. +- Multi-line chart of gross income, taxable income, and net income. -The best thing about this project? I can improve it at any given time, -shaping it into whatever helps me the most for that time. I imagine that I -will be introducing an asset tracking table soon to track the depreciating -value of cars, houses, etc. Who knows what's next? +The best thing about this project? I can improve it at any given time, shaping +it into whatever helps me the most for that time. I imagine that I will be +introducing an asset tracking table soon to track the depreciating value of +cars, houses, etc. Who knows what's next? diff --git a/content/blog/2022-03-08-plex-migration.md b/content/blog/2022-03-08-plex-migration.md index 7c4ec57..297ed2d 100644 --- a/content/blog/2022-03-08-plex-migration.md +++ b/content/blog/2022-03-08-plex-migration.md @@ -52,9 +52,9 @@ with the device - it's a good idea to take a photo of this screen, so you can enter these commands on the next screen (along with adding support for Nvidia). Finally, type `Ctrl + C` to enter the command line. From this command line, -enter the commands found on the `e` screen. *Remember to add `nomodeset` to the +enter the commands found on the `e` screen. _Remember to add `nomodeset` to the `linux ...` line so that your Nvidia device will display the installation -screens properly!* +screens properly!_ Here's an example of the commands I pulled from the `e` screen and entered on the command line. @@ -101,7 +101,7 @@ source/destination. ## Step 01: [Client] Update Settings -Open up a Plex app and *disable* the `Account` > `Library` > `Empty trash +Open up a Plex app and _disable_ the `Account` > `Library` > `Empty trash automatically after every scan` preference for the source server. ## Step 02: [Destination] Install Plex @@ -133,8 +133,8 @@ Server data directory located?](https://support.plex.tv/articles/202915258-where-is-the-plex-media-server-data-directory-located/). There are many ways to copy the data to the new server and will largely depend -on the size of the folder being copied. Personally, my data folder was ~23GB -and I opted to simply use the `scp` command to copy the files over SSH. +on the size of the folder being copied. Personally, my data folder was ~23GB and +I opted to simply use the `scp` command to copy the files over SSH. This process was throttled by the old server's slow HDD and ports and took approximately 90 minutes to complete. In comparison, moving the data from the @@ -179,12 +179,12 @@ drives from the source server to the destination server. Next, perform the following actions in the client: 1. On the left sidebar, click `More` > Three-Dot Menu > `Scan Library Files` -2. *Enable* the `Account` > `Library` > `Empty trash automatically after every - scan` preference for the source server. -3. On the left sidebar, click `More` > Three-Dot Menu > `Manage Server` > - `Empty Trash` -4. On the left sidebar, click `More` > Three-Dot Menu > `Manage Server` > - `Clean Bundles` +2. _Enable_ the `Account` > `Library` > `Empty trash automatically after every +scan` preference for the source server. +3. On the left sidebar, click `More` > Three-Dot Menu > `Manage Server` > `Empty + Trash` +4. On the left sidebar, click `More` > Three-Dot Menu > `Manage Server` > `Clean + Bundles` 5. On the left sidebar, click `More` > Three-Dot Menu > `Manage Server` > `Optimize Database` diff --git a/content/blog/2022-03-23-nextcloud-on-ubuntu.md b/content/blog/2022-03-23-nextcloud-on-ubuntu.md index 93d539f..e772328 100644 --- a/content/blog/2022-03-23-nextcloud-on-ubuntu.md +++ b/content/blog/2022-03-23-nextcloud-on-ubuntu.md @@ -34,7 +34,7 @@ sudo mysql -uroot -p Once you've logged in, you must create a new user so that Nextcloud can manage the database. You will also create a `nextcloud` database and assign privileges: -``` sql +```sql CREATE USER 'username'@'localhost' IDENTIFIED BY 'password'; CREATE DATABASE IF NOT EXISTS nextcloud CHARACTER SET utf8mb4 COLLATE utf8mb4_general_ci; GRANT ALL PRIVILEGES ON nextcloud.** TO 'username'@'localhost'; @@ -74,7 +74,7 @@ sudo nano /etc/apache2/sites-available/nextcloud.conf Once the editor is open, paste the following information in. Then, save and close the file. -``` config +```config <VirtualHost *:80> DocumentRoot /var/www/example.com ServerName example.com @@ -154,9 +154,9 @@ of Nextcloud, using the `Breeze Dark` theme I installed from the Apps page. 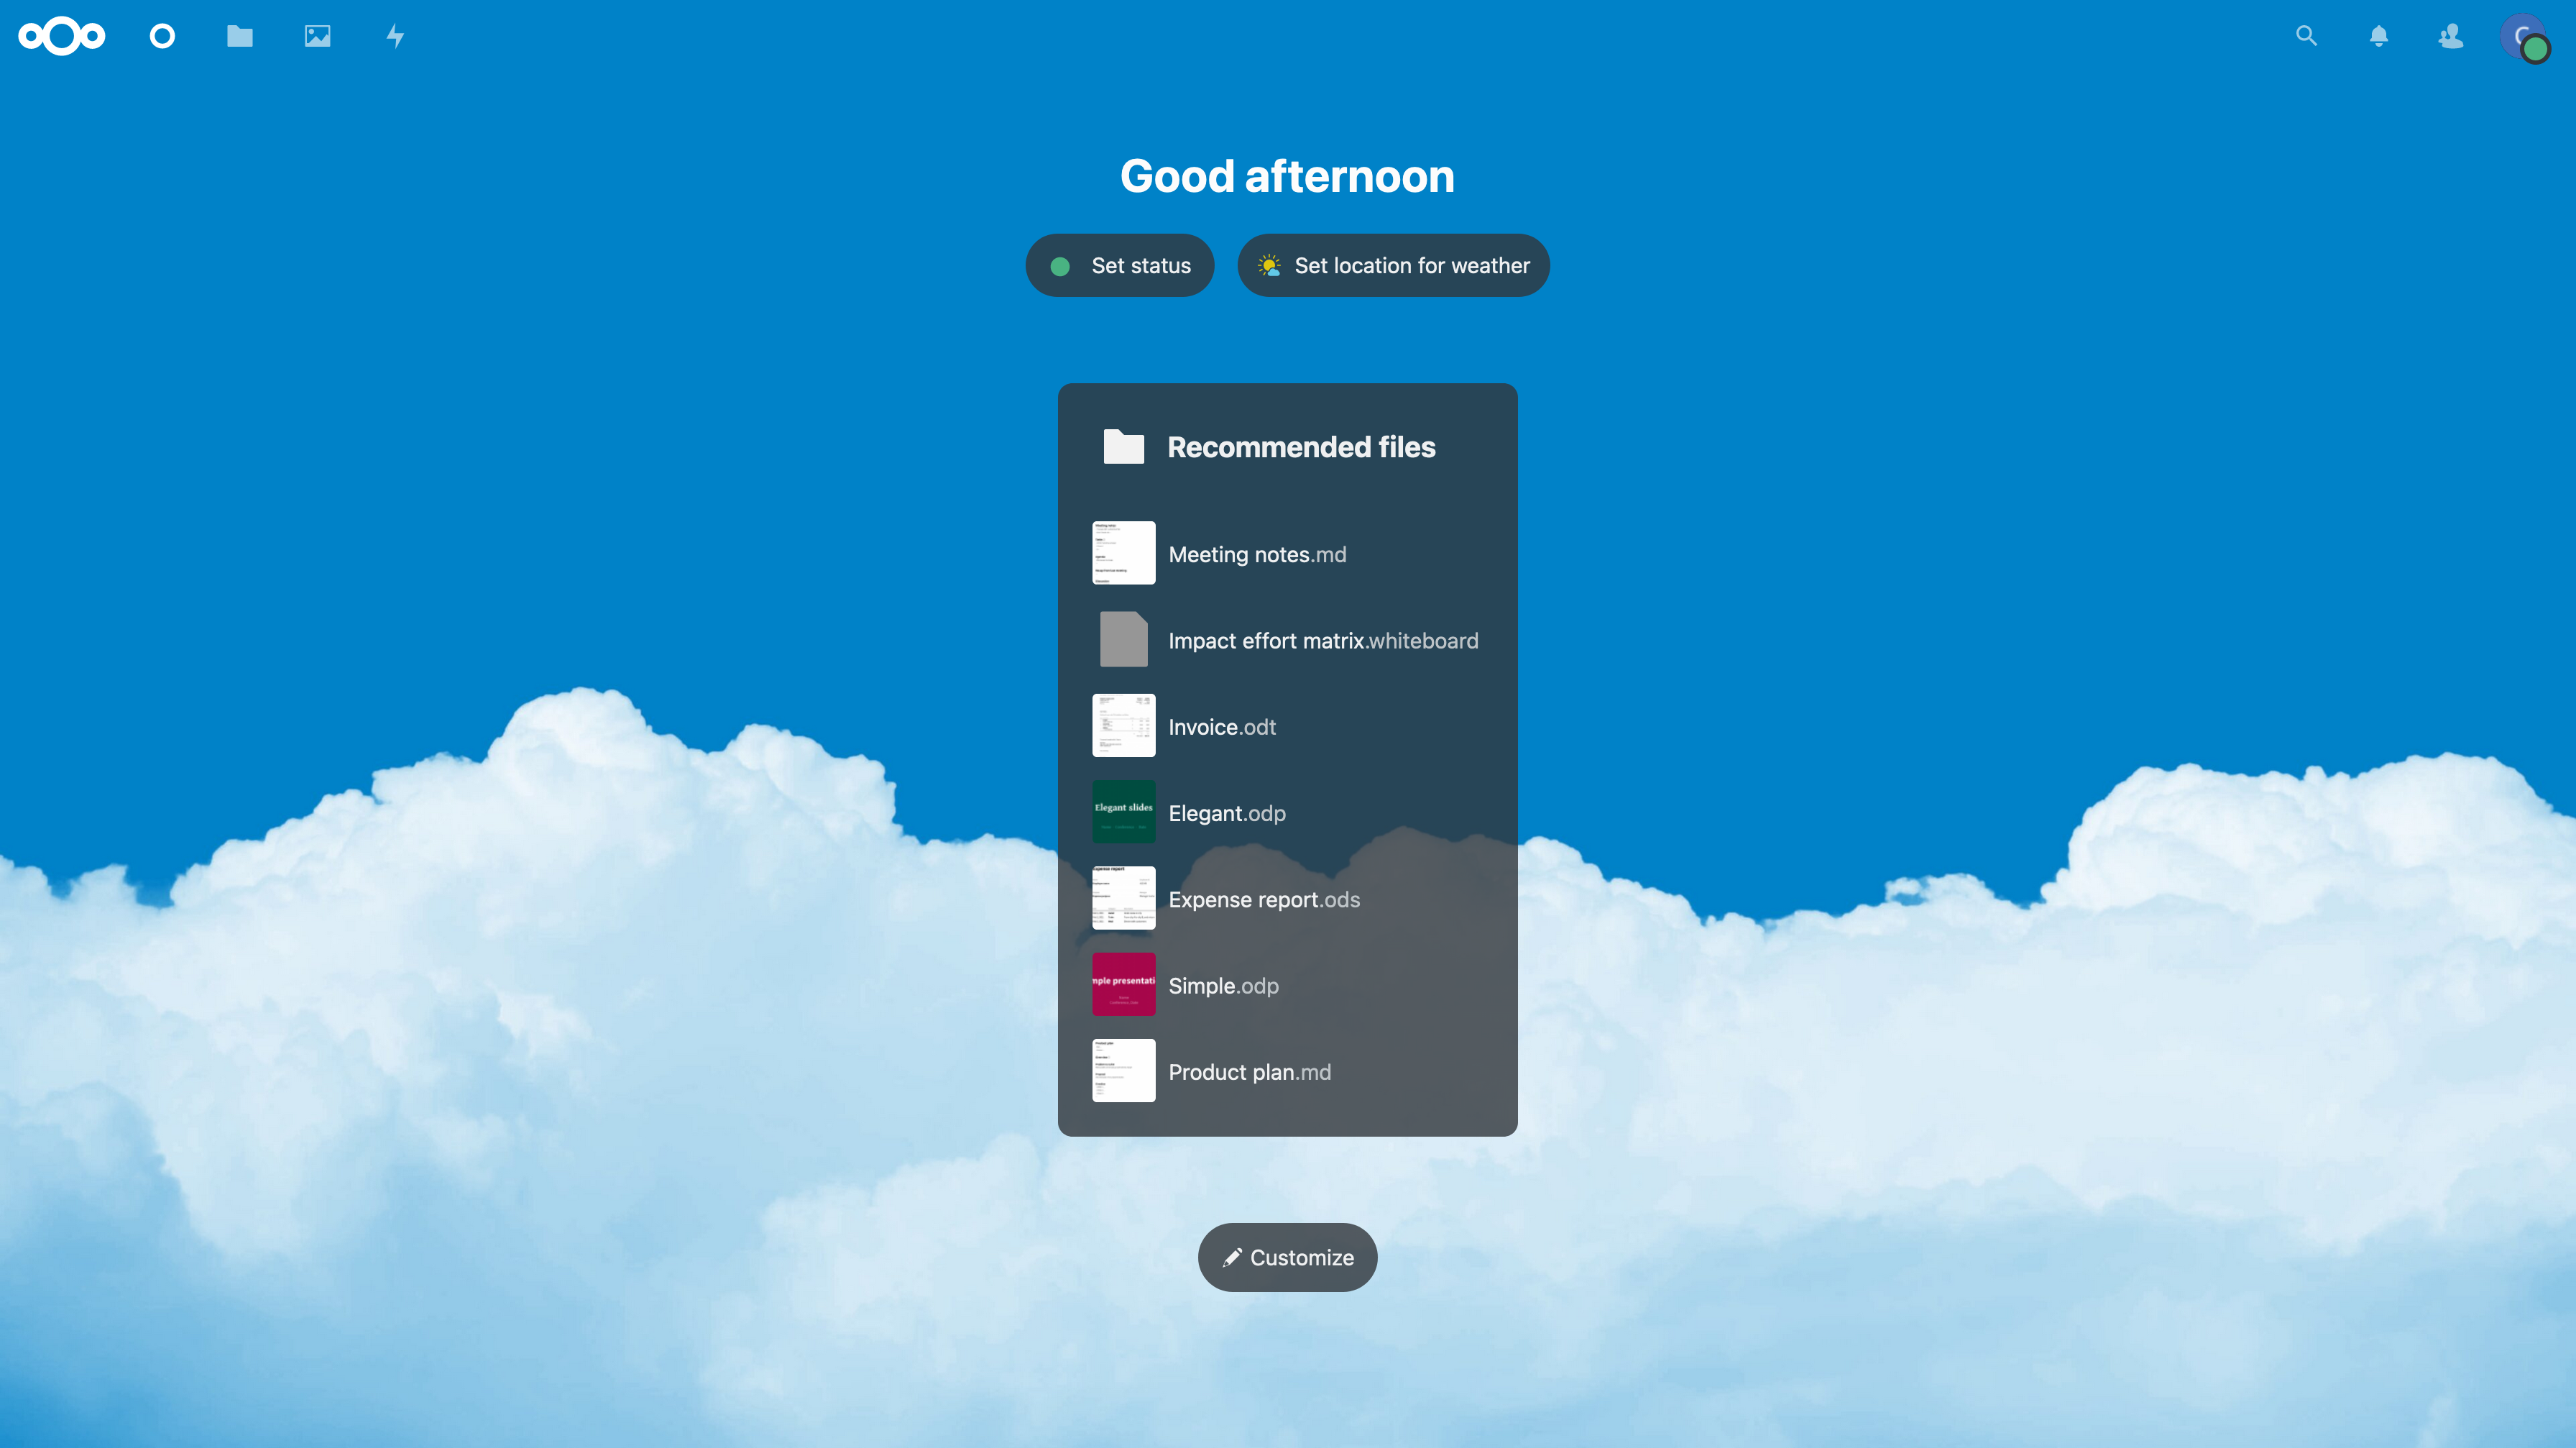 -*Figure 01: Nextcloud Dashboard* +_Figure 01: Nextcloud Dashboard_ 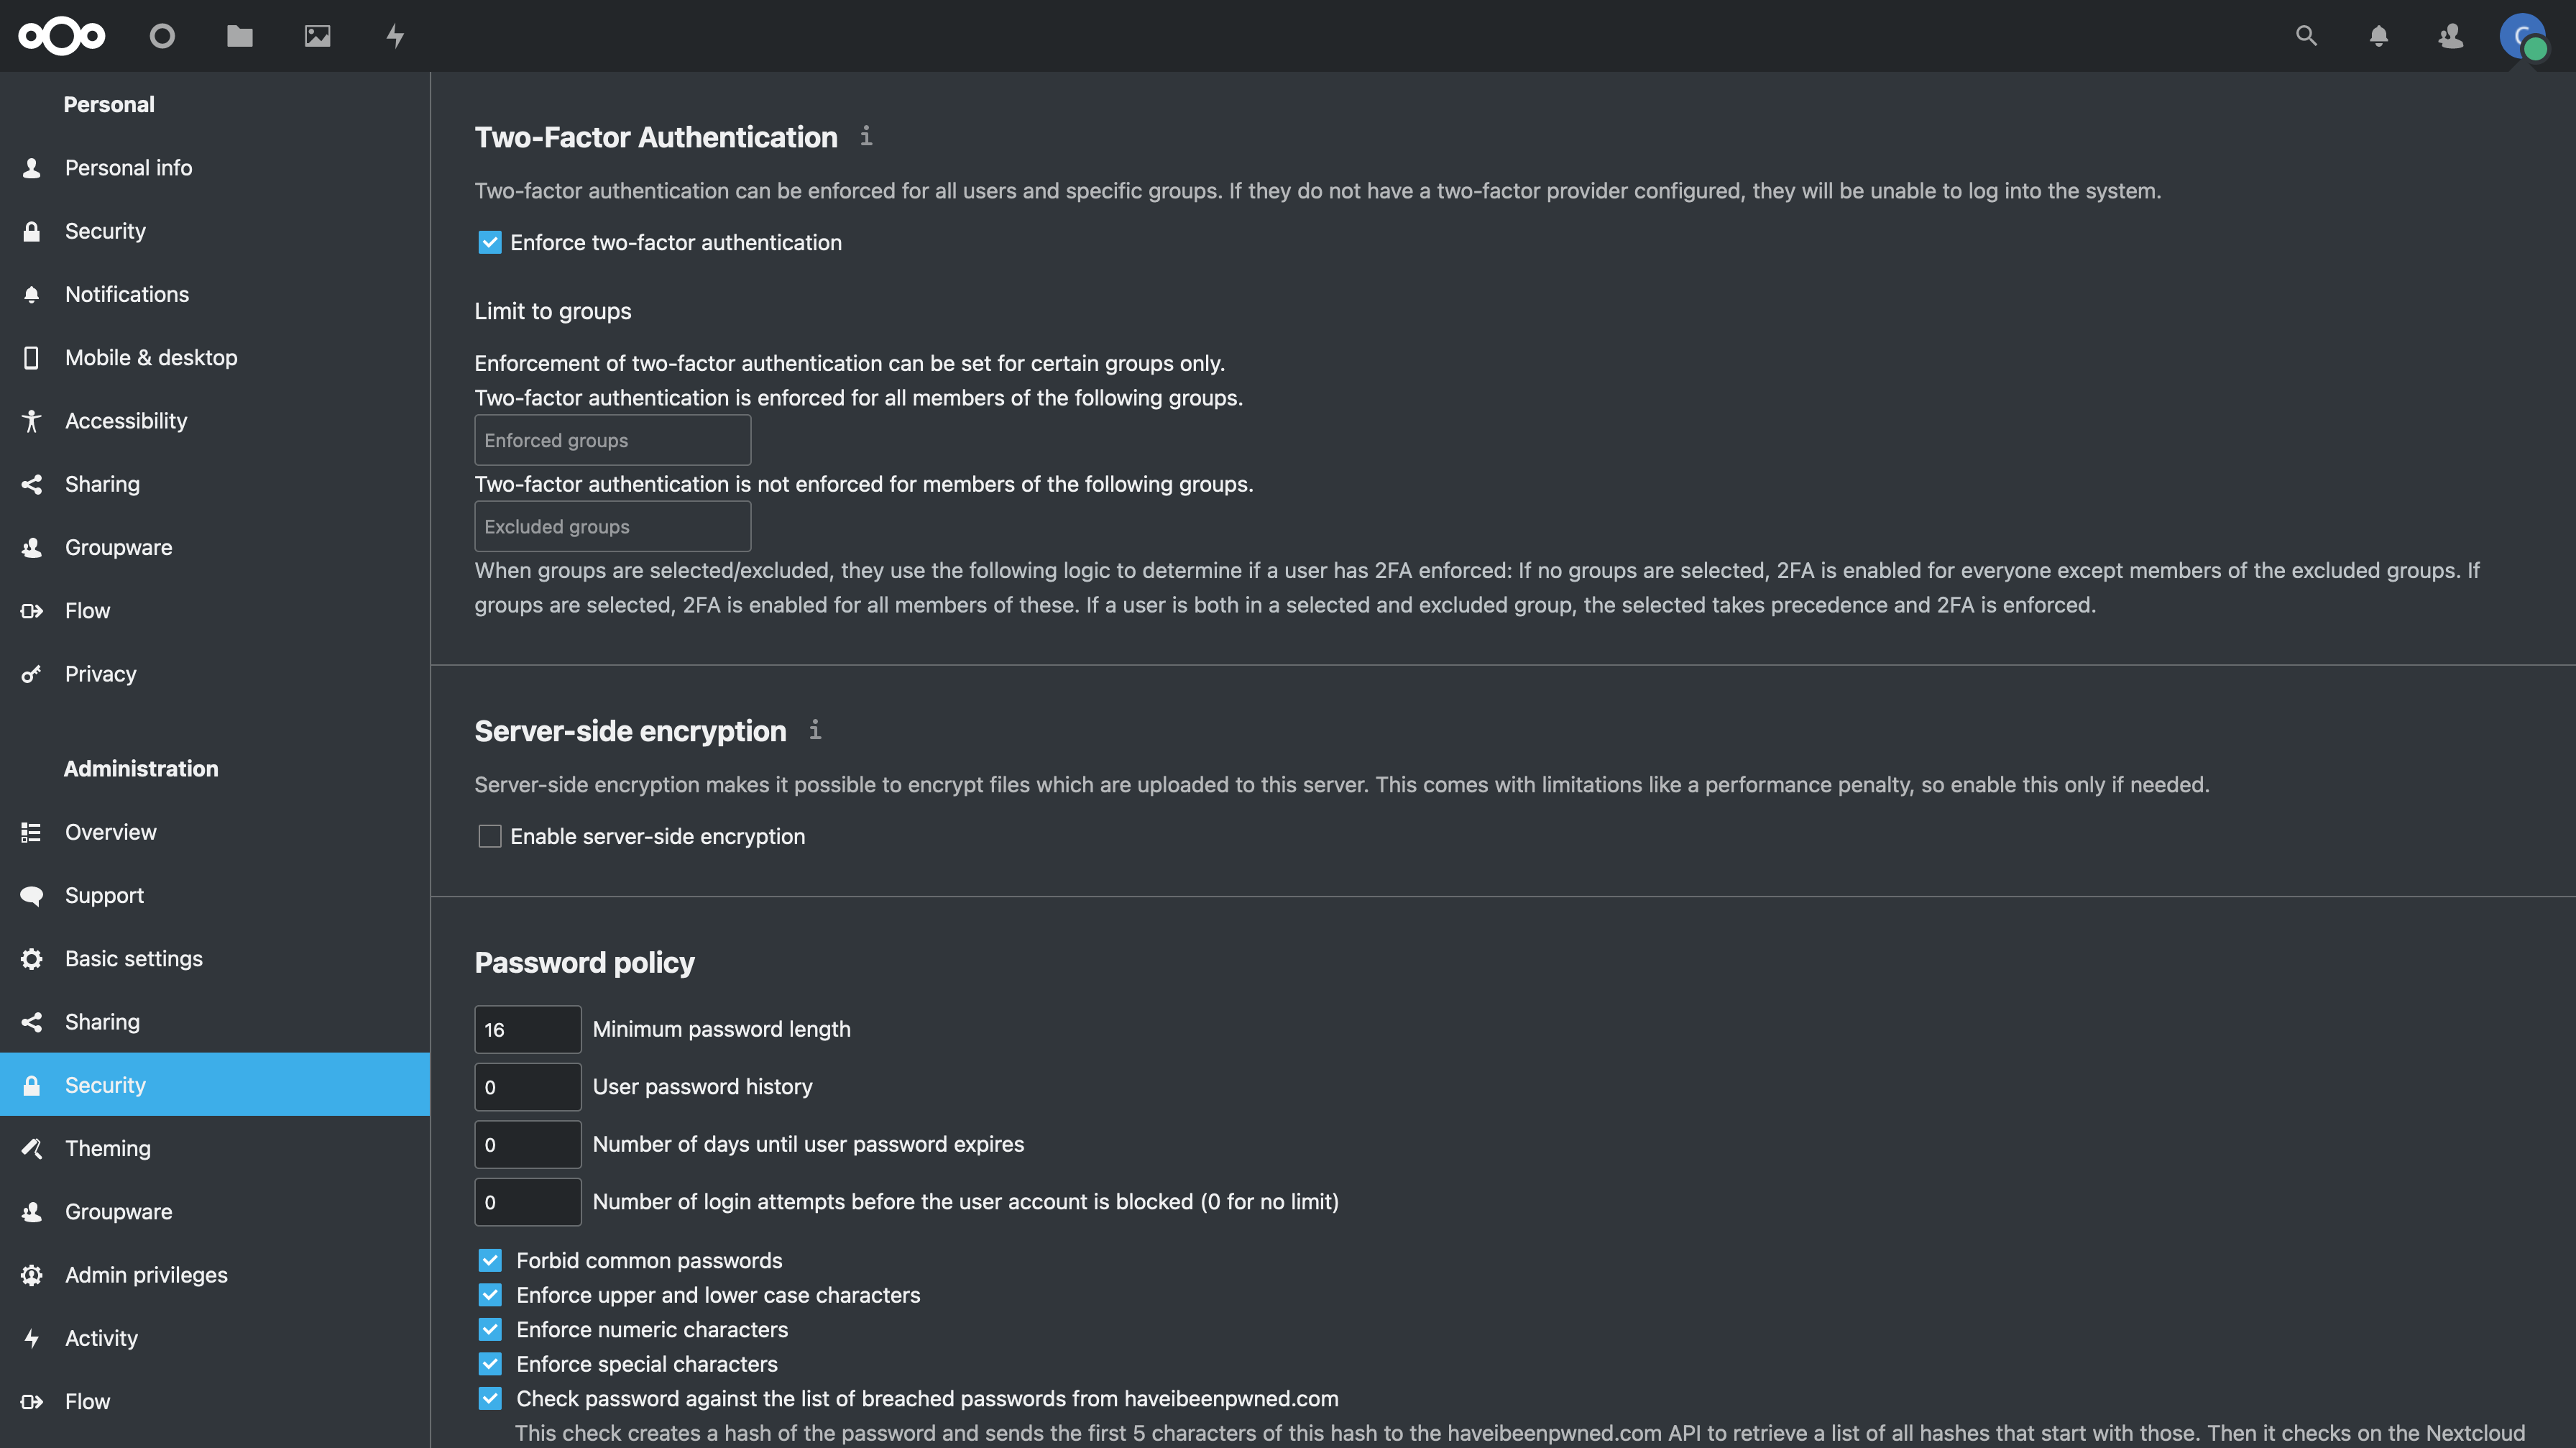 -*Figure 02: Nextcloud Security Settings* +_Figure 02: Nextcloud Security Settings_ diff --git a/content/blog/2022-03-24-server-hardening.md b/content/blog/2022-03-24-server-hardening.md index 6952571..83168e4 100644 --- a/content/blog/2022-03-24-server-hardening.md +++ b/content/blog/2022-03-24-server-hardening.md @@ -16,7 +16,7 @@ draft = false ## My Personal Data Flow -``` txt +```txt ┌───────┐ ┌─────────────────┐ ┌──► VLAN1 ├───► Private Devices │ │ └───────┘ └─────────────────┘ @@ -35,44 +35,44 @@ have to think about the transport of data from `server` to `client`. Let's start with the actual server itself. Think about the following: -- Do I have a firewall enabled? Do I need to update this to allow new ports or - IPs? -- Do I have an IPS/IDS that may prevent outside traffic? -- Do I have any other security software installed? -- Are the services hosted inside Docker containers, behind a reverse proxy, or - virtualized? If so, are they configured to allow outside traffic? +- Do I have a firewall enabled? Do I need to update this to allow new ports or + IPs? +- Do I have an IPS/IDS that may prevent outside traffic? +- Do I have any other security software installed? +- Are the services hosted inside Docker containers, behind a reverse proxy, or + virtualized? If so, are they configured to allow outside traffic? Once the data leaves the server, where does it go? In my case, it goes to a managed switch. In this case, I asked the following: -- What configurations is the switch using? -- Am I using VLANs? - - Yes, I am using 802.1Q VLANs. -- Are the VLANs configured properly? - - Yes, as shown in the Switch section below, I have a separate VLAN to allow - outside traffic to and from the server alone. No other devices, except for - a service port, and in that VLAN. +- What configurations is the switch using? +- Am I using VLANs? + - Yes, I am using 802.1Q VLANs. +- Are the VLANs configured properly? + - Yes, as shown in the Switch section below, I have a separate VLAN to + allow outside traffic to and from the server alone. No other devices, + except for a service port, and in that VLAN. At this point, the data has been processed through the switch. Where does it go next? In my case, it's pretty simple: it goes to the router/modem device. -- Does my ISP block any ports that I need? - - This is an important step that a lot of people run into when self-hosting - at home. Use an online port-checker tool for your IP or call your ISP if - you think ports are blocked. -- Is there a router firewall? - - Yes, I checked that it's configured to allow the ports I need to run my - services publicly. Common web servers and reverse proxies require ports 80 - and 443, but other services like media servers or games can require unique - ports, so be sure to check the documentation for your service(s). -- Are there any other settings affecting inbound/outbound traffic? - - Schedules or access blocks - - Static Routing - - QoS - - Port Forwarding - - DMZ Hosting - - Remote Management (this can sometimes mess with services that also require - the use of ports 80 and 443) +- Does my ISP block any ports that I need? + - This is an important step that a lot of people run into when + self-hosting at home. Use an online port-checker tool for your IP or + call your ISP if you think ports are blocked. +- Is there a router firewall? + - Yes, I checked that it's configured to allow the ports I need to run my + services publicly. Common web servers and reverse proxies require ports + 80 and 443, but other services like media servers or games can require + unique ports, so be sure to check the documentation for your service(s). +- Are there any other settings affecting inbound/outbound traffic? + - Schedules or access blocks + - Static Routing + - QoS + - Port Forwarding + - DMZ Hosting + - Remote Management (this can sometimes mess with services that also + require the use of ports 80 and 443) Once the data leaves my router, it goes to the upstream ISP and can be accessed publicly. @@ -172,7 +172,7 @@ sudo ufw enable rules is commented-out or doesn't exist, create the rule at the bottom of the file. - ``` config + ```config PermitRootLogin no PasswordAuthentication no PubkeyAuthentication yes @@ -192,10 +192,10 @@ sudo ufw enable 3. Enable MFA for `ssh` - This part is optional, but I highly recommend it. So far, we've ensured - that no one can log into our user on the server without using our secret - key, and we've ensured that no one can log in remotely as `root`. Next, you - can enable MFA authentication for `ssh` connections. + This part is optional, but I highly recommend it. So far, we've ensured that + no one can log into our user on the server without using our secret key, and + we've ensured that no one can log in remotely as `root`. Next, you can + enable MFA authentication for `ssh` connections. This process involves editing a couple files and installing an MFA package, so I will not include all the details in this post. To see how to configure @@ -203,7 +203,7 @@ sudo ufw enable SSH](../enable-totp-mfa-for-ssh/).  +MFA](https://img.cleberg.net/blog/20220324-hardening-a-public-facing-home-server/ssh_mfa.png) ## `fail2ban` @@ -239,10 +239,10 @@ order to SSH to this server, I need to plug my laptop into port 23 or else I cannot SSH. Otherwise, I'd need to hook up a monitor and keyboard directly to the server to manage it. -| +| | VLAN ID | VLAN Name | Member Ports | Tagged Ports | Untagged Ports | -|---------|-----------|--------------|--------------|----------------| +| ------- | --------- | ------------ | ------------ | -------------- | | 1 | Default | 1-24 | 1-24 | | | 2 | Server | 1,8,23 | 1,8,23 | | @@ -253,7 +253,7 @@ any related ports (in this case, see that ports `8` and `23` have a PVID of `2`). | Port | PVID | -|------|------| +| ---- | ---- | | 1 | 1 | | 2 | 1 | | 3 | 1 | @@ -285,9 +285,9 @@ On my router, the configuration was as easy as opening the firewall settings and unblocking the ports I needed for my services (e.g., HTTP/S, Plex, SSH, MySQL, etc.). -*Since I'm relying on an ISP-provided modem/router combo for now (not by +_Since I'm relying on an ISP-provided modem/router combo for now (not by choice), I do not use any other advanced settings on my router that would -inhibit any valid traffic to these services.* +inhibit any valid traffic to these services._ The paragraph above regarding the ISP-owned router is no longer accurate as I now use the Ubiquiti Unifi Dream Machine Pro as my router. Within this router, I @@ -303,7 +303,7 @@ available to you. One large piece of self-hosting that people generally don't discuss online is physical security. However, physical security is very important for everyone who -hosts a server like this. Exactly *how* important it is depends on the server +hosts a server like this. Exactly _how_ important it is depends on the server use/purpose. If you self-host customer applications that hold protected data (HIPAA, GDPR, @@ -315,24 +315,25 @@ minor consideration, but one you still need to think about. The first consideration is quite simple: location. -- Is the server within a property you own or housed on someone else's property? -- Is it nearby (in your house, in your work office, in your neighbor's garage, - in a storage unit, etc.)? -- Do you have 24/7 access to the server? -- Are there climate considerations, such as humidity, fires, tornadoes, - monsoons? -- Do you have emergency equipment nearby in case of emergency? +- Is the server within a property you own or housed on someone else's + property? +- Is it nearby (in your house, in your work office, in your neighbor's garage, + in a storage unit, etc.)? +- Do you have 24/7 access to the server? +- Are there climate considerations, such as humidity, fires, tornadoes, + monsoons? +- Do you have emergency equipment nearby in case of emergency? ## Hardware Ownership Secondly, consider the hardware itself: -- Do you own the server in its entirety? -- Are any other users able to access the server, even if your data/space is - segregated? -- If you're utilizing a third party, do they have any documentation to show - responsibility? This could be a SOC 1/2/3 report, ISO compliance report, - internal security/safety documentation. +- Do you own the server in its entirety? +- Are any other users able to access the server, even if your data/space is + segregated? +- If you're utilizing a third party, do they have any documentation to show + responsibility? This could be a SOC 1/2/3 report, ISO compliance report, + internal security/safety documentation. ## Physical Controls @@ -342,10 +343,10 @@ usually covered already if you're utilizing a third party. These can include: -- Server bezel locks -- Server room locks - physical, digital, or biometric authentication -- Security cameras -- Raised floors/lowered ceilings with proper guards/gates in-place within the - floors or ceilings -- Security personnel -- Log sheets and/or guest badges +- Server bezel locks +- Server room locks - physical, digital, or biometric authentication +- Security cameras +- Raised floors/lowered ceilings with proper guards/gates in-place within the + floors or ceilings +- Security personnel +- Log sheets and/or guest badges diff --git a/content/blog/2022-03-26-ssh-mfa.md b/content/blog/2022-03-26-ssh-mfa.md index 8b444f4..658fd14 100644 --- a/content/blog/2022-03-26-ssh-mfa.md +++ b/content/blog/2022-03-26-ssh-mfa.md @@ -11,10 +11,10 @@ If you are a sysadmin of a server anywhere (that includes at home!), you may want an added layer of protection against intruders. This is not a replacement for other security measures, such as: -- Disable root SSH -- Disable SSH password authentication -- Allow only certain users to login via SSH -- Allow SSH only from certain IPs +- Disable root SSH +- Disable SSH password authentication +- Allow only certain users to login via SSH +- Allow SSH only from certain IPs However, MFA can be added as an additional security measure to ensure that your server is protected. This is especially important if you need to allow password @@ -52,7 +52,7 @@ If you are not sure how to answer, read the prompts carefully and think about having to how each situation would affect your normal login attempts. If you are still not sure, use my default responses below. -``` txt +```txt OUTPUT Do you want authentication tokens to be time-based (y/n) y @@ -62,13 +62,13 @@ At this point, use an authenticator app somewhere one of your devices to scan the QR code. Any future login attempts after our upcoming configuration changes will require that TOTP. -``` txt +```txt OUTPUT Do you want me to update your "/home/user/.google_authenticator" file? (y/n) y ``` -``` txt +```txt OUTPUT Do you want to disallow multiple uses of the same authentication @@ -76,7 +76,7 @@ token? This restricts you to one login about every 30s, but it increases your chances to notice or even prevent man-in-the-middle attacks (y/n) y ``` -``` txt +```txt OUTPUT By default, a new token is generated every 30 seconds by the mobile app. @@ -91,7 +91,7 @@ between client and server. Do you want to do so? (y/n) n ``` -``` txt +```txt OUTPUT If the computer that you are logging into isn't hardened against brute-force @@ -112,7 +112,7 @@ google-authenticator -t -d -f -r 3 -R 30 -w 3 The options referenced above are as follows: -``` txt +```txt google-authenticator [<options>] -h, --help Print this message -c, --counter-based Set up counter-based (HOTP) verification @@ -152,7 +152,7 @@ sudo nano /etc/pam.d/sshd You need to do two things in this file. First, add the following lines to the bottom of the file: -``` config +```config auth required pam_google_authenticator.so nullok auth required pam_permit.so ``` @@ -166,7 +166,7 @@ following three authentication factors: 2. Password 3. T/OTP code -``` config +```config #@include common-auth ``` @@ -181,7 +181,7 @@ sudo nano /etc/ssh/sshd_config You'll need to change `ChallengeResponseAuthentication` to yes and add the `AuthenticationMethods` line to the bottom of the file. -``` config +```config ChallengeResponseAuthentication yes AuthenticationMethods publickey,password publickey,keyboard-interactive ``` diff --git a/content/blog/2022-04-02-nginx-reverse-proxy.md b/content/blog/2022-04-02-nginx-reverse-proxy.md index 4ece921..1066d99 100644 --- a/content/blog/2022-04-02-nginx-reverse-proxy.md +++ b/content/blog/2022-04-02-nginx-reverse-proxy.md @@ -16,13 +16,13 @@ where each request should be sent. For example, let's say that I run three servers in my home: -- Server01 (`example.com`) -- Server02 (`service01.example.com`) -- Server03 (`service02.example.com`) +- Server01 (`example.com`) +- Server02 (`service01.example.com`) +- Server03 (`service02.example.com`) I also run a reverse proxy in my home that intercepts all public traffic: -- Reverse Proxy +- Reverse Proxy Assume that I have a domain name (`example.com`) that allows clients to request websites or services from my home servers. @@ -36,7 +36,7 @@ Server~01~ holds that data, Nginx will send the user to Server~01~. If I were to change the configuration so that `example.com` is routed to Server~02~, that same user would be sent to Server~02~ instead. -``` txt +```txt ┌──────┐ ┌───────────┐ │ User │─┐ ┌──► Server_01 │ └──────┘ │ │ └───────────┘ @@ -54,11 +54,11 @@ There are a lot of options when it comes to reverse proxy servers, so I'm just going to list a few of the options I've heard recommended over the last few years: -- [Nginx](https://nginx.com) -- [Caddy](https://caddyserver.com) -- [Traefik](https://traefik.io/) -- [HAProxy](https://www.haproxy.org/) -- [Squid](https://ubuntu.com/server/docs/proxy-servers-squid) +- [Nginx](https://nginx.com) +- [Caddy](https://caddyserver.com) +- [Traefik](https://traefik.io/) +- [HAProxy](https://www.haproxy.org/) +- [Squid](https://ubuntu.com/server/docs/proxy-servers-squid) In this post, we will be using Nginx as our reverse proxy, running on Ubuntu Server 20.04.4 LTS. @@ -118,8 +118,8 @@ search box and ensuring the results are showing the correct IP address. ## Step 2: Open Network Ports This step will be different depending on which router you have in your home. If -you're not sure, try to visit [192.168.1.1](http://192.168.1.1) in your -browser. Login credentials are usually written on a sticker somewhere on your +you're not sure, try to visit [192.168.1.1](http://192.168.1.1) in your browser. +Login credentials are usually written on a sticker somewhere on your modem/router. Once you're able to log in to your router, find the Port Forwarding settings. @@ -131,7 +131,7 @@ this table, `xxx.xxx.xxx.xxx` is the local device IP of the reverse proxy server, it will probably be an IP between `192.168.1.1` and `192.168.1.255`. | NAME | FROM PORT | DEST PORT/IP | ENABLED | -|-------|-----------|-----------------|---------| +| ----- | --------- | --------------- | ------- | | HTTP | 80 | xxx.xxx.xxx.xxx | TRUE | | HTTPS | 443 | xxx.xxx.xxx.xxx | TRUE | @@ -172,7 +172,7 @@ Dashy: nano /etc/nginx/sites-available/dashy.example.com ``` -``` config +```config server { listen 80; server_name dashy.example.com; @@ -189,7 +189,7 @@ Uptime: nano /etc/nginx/sites-available/uptime.example.com ``` -``` config +```config server { listen 80; server_name uptime.example.com; diff --git a/content/blog/2022-04-09-pinetime.md b/content/blog/2022-04-09-pinetime.md index d76015a..a1a3641 100644 --- a/content/blog/2022-04-09-pinetime.md +++ b/content/blog/2022-04-09-pinetime.md @@ -22,20 +22,20 @@ for each watch and the primary functions: 1. Price: - - $26.99 (Sealed) - - $24.99 (Dev Kit) - - $51.98 (One Sealed + One Dev Kit) + - $26.99 (Sealed) + - $24.99 (Dev Kit) + - $51.98 (One Sealed + One Dev Kit) 2. Primary Functionality: - - Clock (+ Smartphone Sync) - - Pedometer - - Heart Rate Monitor - - Sleep Monitor - - Calories burned - - Messaging - - Smartphone Notifications - - Media Controls + - Clock (+ Smartphone Sync) + - Pedometer + - Heart Rate Monitor + - Sleep Monitor + - Calories burned + - Messaging + - Smartphone Notifications + - Media Controls # Unboxing @@ -61,10 +61,10 @@ While turning on the watch for the first time, some of the main design choices you can see in the watch OS, [InfiniTime](https://wiki.pine64.org/wiki/InfiniTime), are: -- A square bezel, not too thin against the sides of the watch. -- A simple, rubber band. -- Basic font and screen pixel design. -- Swipe gestures to access other screens. +- A square bezel, not too thin against the sides of the watch. +- A simple, rubber band. +- Basic font and screen pixel design. +- Swipe gestures to access other screens.  @@ -73,7 +73,7 @@ The OS itself is fantastic in terms of functionality for me. It does exactly what a smartwatch should do - track time, steps, heart rates, and connect to another smart device, without being overly burdensome to the user. -My only gripe so far is that it's *really* difficult to swipe to different +My only gripe so far is that it's _really_ difficult to swipe to different screens, such as pulling down the notification tray. I'm not sure if this is an OS or hardware issue, but it makes it quite hard to quickly move around the screens. @@ -91,10 +91,10 @@ Since I am using iOS as my primary mobile device OS, I am using the This app provides the following for PineTime owners: -- Firmware updates -- Steps -- Charts -- Notifications +- Firmware updates +- Steps +- Charts +- Notifications I mashed up a few screenshots to show off the home page, menu, firmware update, and notification test screens: diff --git a/content/blog/2022-06-01-ditching-cloudflare.md b/content/blog/2022-06-01-ditching-cloudflare.md index 8d5d049..3f9111f 100644 --- a/content/blog/2022-06-01-ditching-cloudflare.md +++ b/content/blog/2022-06-01-ditching-cloudflare.md @@ -25,8 +25,8 @@ if they're worth the higher rates (one domain is 30€ and the other is 45€).+ > **Update (2022.06.03)**: I ended up transferring my final two domains over to > Njalla, clearing my Cloudflare account of personal data, and deleting the -> Cloudflare account entirely. *I actually feel relieved to have moved on to a -> provider I trust.* +> Cloudflare account entirely. _I actually feel relieved to have moved on to a +> provider I trust._ # DNS diff --git a/content/blog/2022-06-07-self-hosting-freshrss.md b/content/blog/2022-06-07-self-hosting-freshrss.md index 1ac2127..3c3ee5d 100644 --- a/content/blog/2022-06-07-self-hosting-freshrss.md +++ b/content/blog/2022-06-07-self-hosting-freshrss.md @@ -46,7 +46,7 @@ of the server and an `AAAA` record with the IPv6 address of the server. Note: assigning an IPv6 (`AAAA`) record is optional, but I like to enable IPV6 for my services. -``` config +```config rss.example.com A xxx.xxx.xxx.xxx rss.example.com AAAA xxxx:xxxx: ... :xxxx ``` @@ -55,8 +55,8 @@ rss.example.com AAAA xxxx:xxxx: ... :xxxx I initially tried to set up a `docker-compose.yml` file with a `.env` file because I prefer to have a file I can look back at later to see how I initially -started the container, but it simply wouldn't work for me. I'm not sure why, -but I assume I wasn't telling `docker-compose` where the `.env` file was. +started the container, but it simply wouldn't work for me. I'm not sure why, but +I assume I wasn't telling `docker-compose` where the `.env` file was. Regardless, I chose to simply run the service with `docker run`. See the following command for my `docker run` configuration: @@ -79,8 +79,8 @@ instance at `localhost:8080`. I **HIGHLY** suggest that you set up your user account prior to exposing this service to the public. It's unlikely that someone is trying to access the exact -domain or IP/port you're assigning here, but as soon as you expose this -service, the first person to open the URL will be able to create the admin user. +domain or IP/port you're assigning here, but as soon as you expose this service, +the first person to open the URL will be able to create the admin user. In order to set up your FreshRSS service, open the `localhost:8080` URL in your browser (you may need to use a local IP instead of `localhost` if you're @@ -104,7 +104,7 @@ sudo nano /etc/nginx/sites-available/rss.example.com Within the config file, I pasted the following code: -``` config +```config upstream freshrss { server 127.0.0.1:8080; keepalive 64; @@ -171,7 +171,7 @@ Once that is set and saved, click the link below the API password field to open the API check tool. It should look something like `https://localhost:8080/api/` or `https://rss.example.com/api/`. -Within this page, you *should* see your correct external URL and "PASS" at the +Within this page, you _should_ see your correct external URL and "PASS" at the bottom of each API type. This would mean everything is set up correctly, and you can now move on and login to any RSS apps that support self-hosted options. @@ -205,7 +205,7 @@ Within `config.php`, you will need to update the `base_url` variable and update it to match your external URL. In my case, I simply commented-out the incorrect URL with `//` and added the correct one on a new line: -``` php +```php <?php return array ( ... @@ -231,8 +231,8 @@ Next, just restart the container: sudo docker restart freshrss ``` -Voilà! Your API check should now "PASS" and you should be able to use one of -the API URLs in your RSS apps. +Voilà! Your API check should now "PASS" and you should be able to use one of the +API URLs in your RSS apps. In my case, I use [NetNewsWire](https://netnewswire.com) on my desktop and phone. diff --git a/content/blog/2022-06-16-terminal-lifestyle.md b/content/blog/2022-06-16-terminal-lifestyle.md index d8c7b75..8e7d6a1 100644 --- a/content/blog/2022-06-16-terminal-lifestyle.md +++ b/content/blog/2022-06-16-terminal-lifestyle.md @@ -7,31 +7,31 @@ draft = false # Text-Based Simplicity -I've detailed my views on web-based minimalism and related topics in other -posts throughout the years; e.g., JavaScript/CSS bloat slowing down websites -that are essentially a text document. However, I have never really expanded -beyond talking about the web and describing how I focus on minimizing -distractions in other digital environments. +I've detailed my views on web-based minimalism and related topics in other posts +throughout the years; e.g., JavaScript/CSS bloat slowing down websites that are +essentially a text document. However, I have never really expanded beyond +talking about the web and describing how I focus on minimizing distractions in +other digital environments. -This post is going to set the baseline for how I *try* to live my digital life. +This post is going to set the baseline for how I _try_ to live my digital life. It does not necessarily get into my physical life, which is often harder to control and contain all the noise in our modern world. While there are new things to do every day in our digital world, I find that keeping a core set of values and interests can ground you and keep you mindful -of *why* you are participating in the digital world. For example, if - at your +of _why_ you are participating in the digital world. For example, if - at your core - you have no interest in what strangers think about random topics, it would be unwise to start participating in social media. However, I am someone who has been dragged in by effective advertising to participate in communities that I realize I do not care for. -I won't dive much further into explaining the philosophy of all this, but I -will link a few helpful articles that may pique your interest if you're in -search of more meaningful experiences: +I won't dive much further into explaining the philosophy of all this, but I will +link a few helpful articles that may pique your interest if you're in search of +more meaningful experiences: -- [Mindfulness](https://en.wikipedia.org/wiki/Mindfulness) -- [Minimalism](https://en.wikipedia.org/wiki/Minimalism) -- [Stoicism](https://en.wikipedia.org/wiki/Stoicism) +- [Mindfulness](https://en.wikipedia.org/wiki/Mindfulness) +- [Minimalism](https://en.wikipedia.org/wiki/Minimalism) +- [Stoicism](https://en.wikipedia.org/wiki/Stoicism) # Living Life in the Terminal @@ -62,9 +62,8 @@ Now that we have some examples out of the way, let's dive into the specifics. I'm going to start off with a hard topic for those who prefer to live in the terminal: web browsing. This task is made hard mostly by websites and web apps -that require JavaScript to run. The other difficult part is that if you're -using a text-based browser, that means images won't load (hopefully that's -obvious). +that require JavaScript to run. The other difficult part is that if you're using +a text-based browser, that means images won't load (hopefully that's obvious). I am using [Lynx](https://lynx.invisible-island.net), a text-based browser that runs quickly and easily in the terminal. Lynx allows me to browser most websites @@ -79,10 +78,10 @@ using their text-only interface. 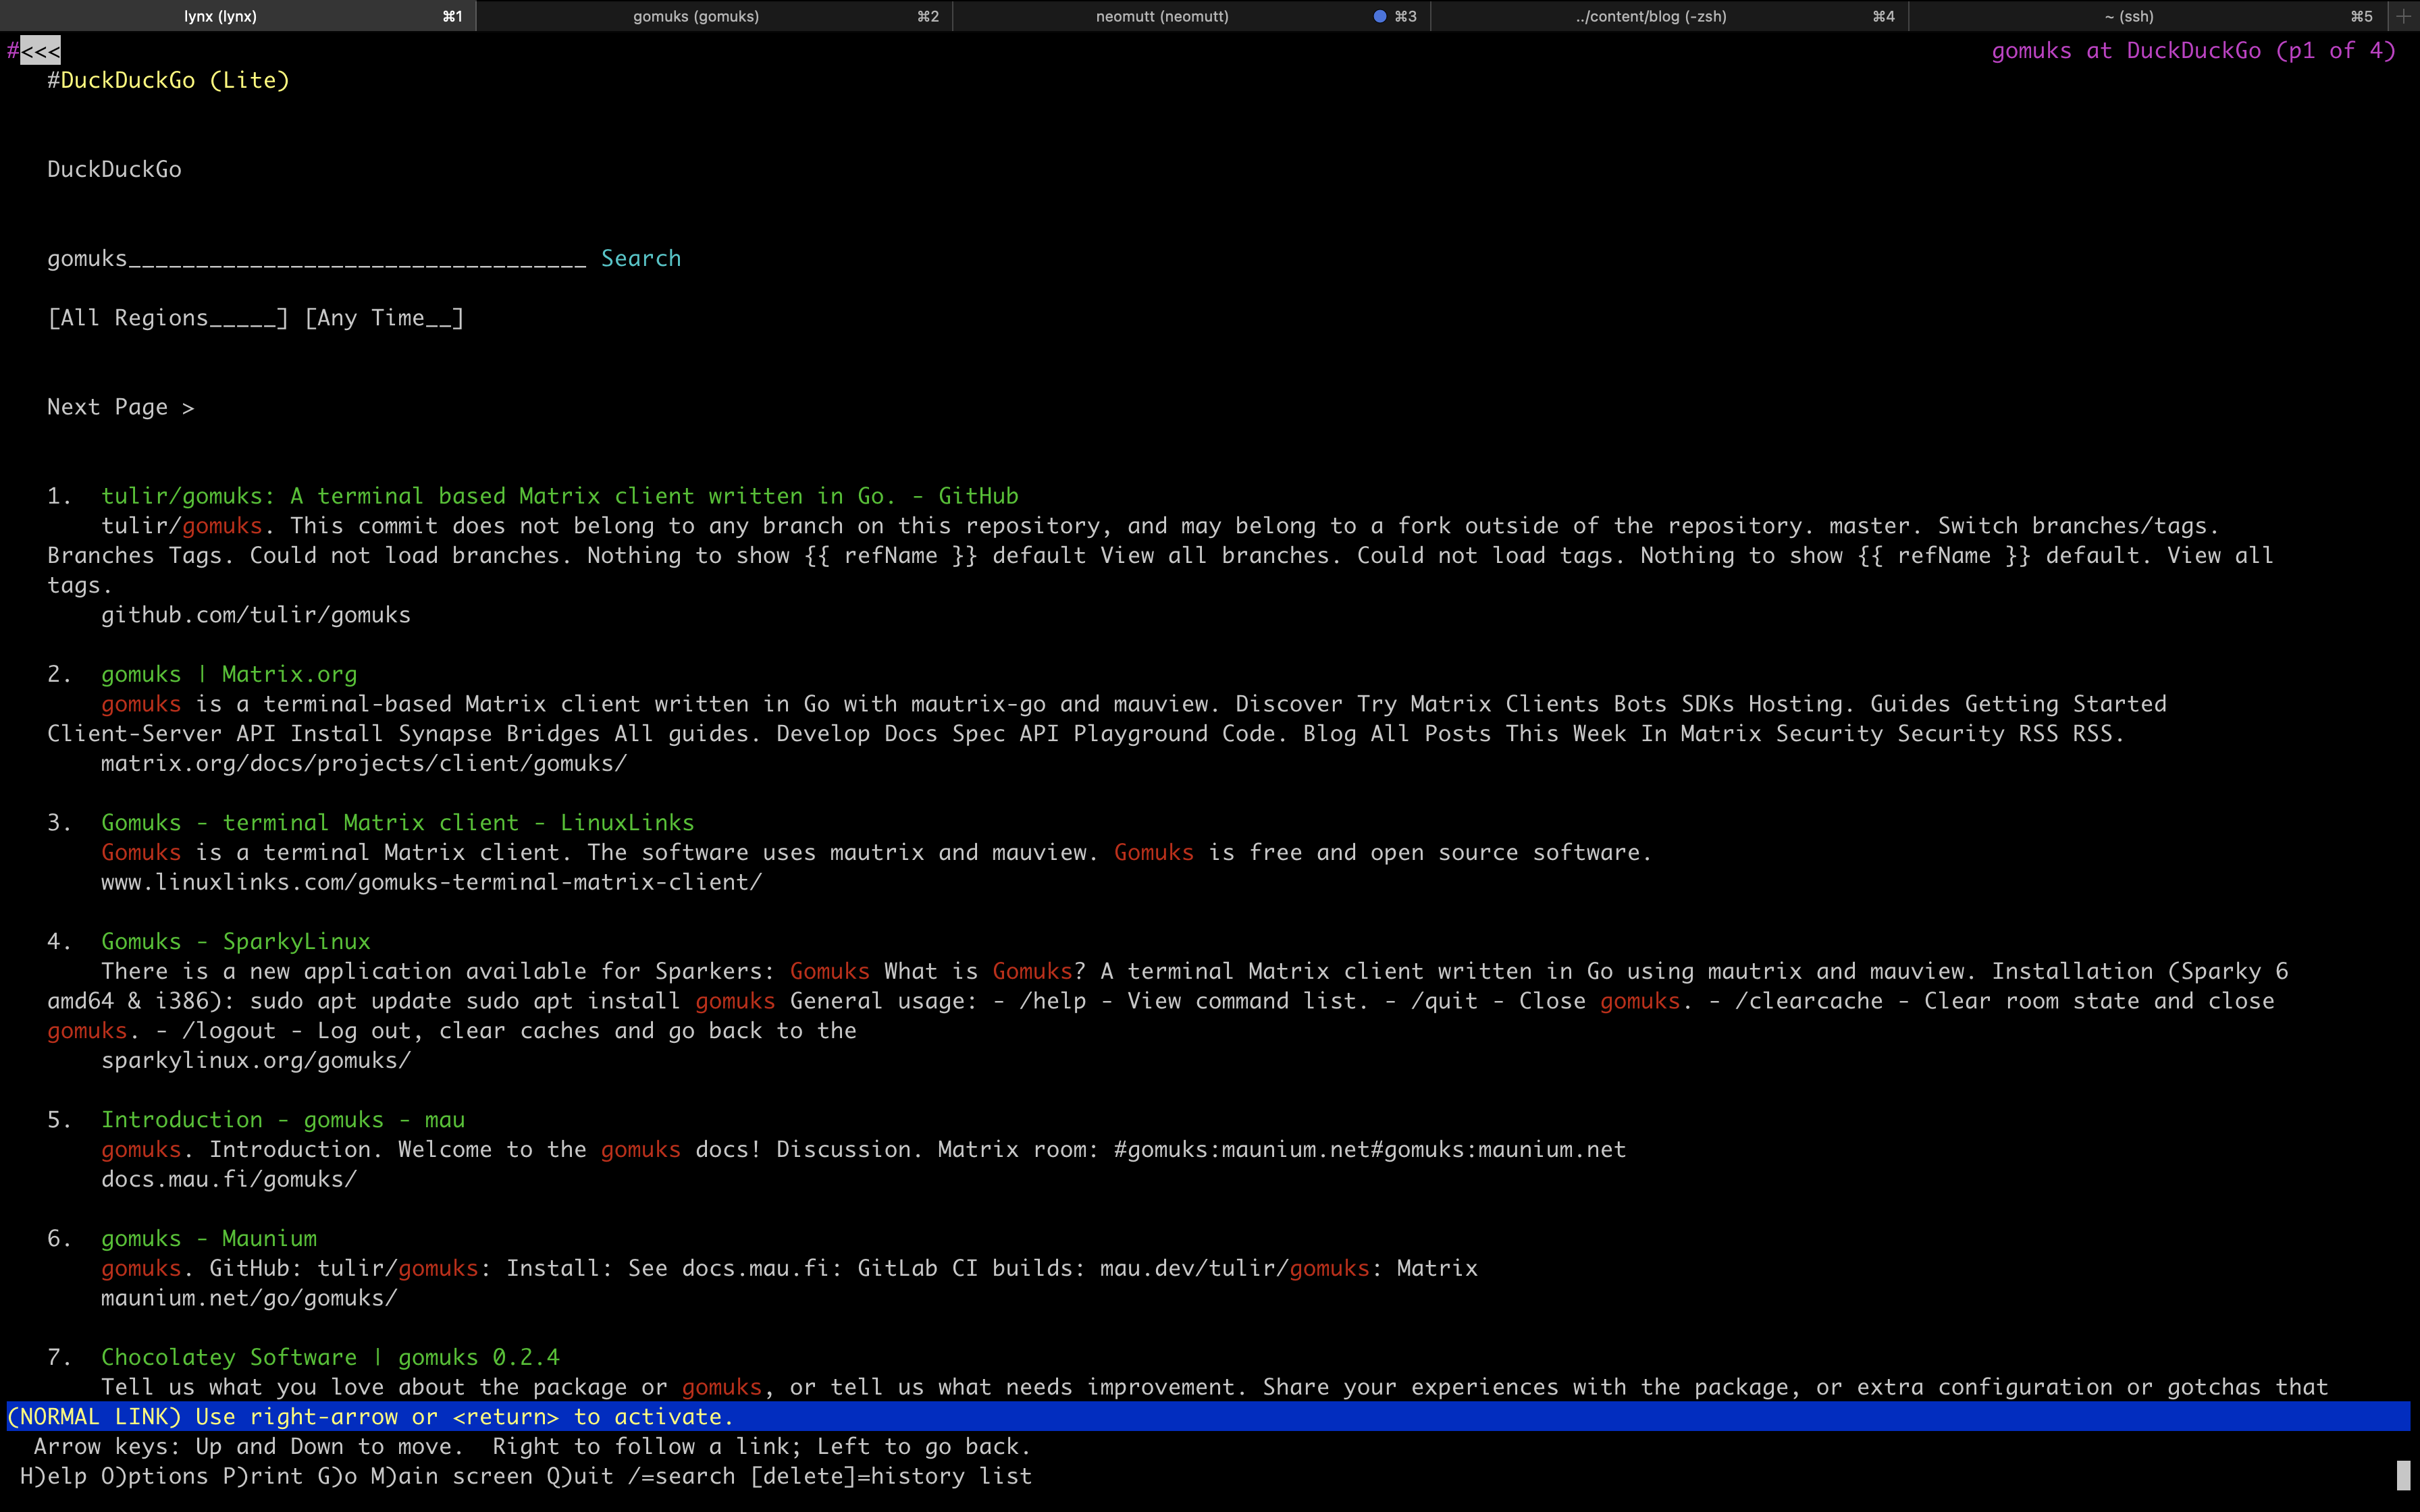 -Eventually, you will run into websites that don't work (or are just too ugly -and messy) in a text-only mode, and you'll be forced to switch over to a GUI -browser to look at that site. Personally, I don't mind this as it doesn't -happen as often as I thought it would. +Eventually, you will run into websites that don't work (or are just too ugly and +messy) in a text-only mode, and you'll be forced to switch over to a GUI browser +to look at that site. Personally, I don't mind this as it doesn't happen as +often as I thought it would. The only time I need to do this is when I want to browse an image/video-focused webpage or if I need to log in to a site, and it doesn't support a text-only @@ -94,8 +93,8 @@ login page. For example, I am able to easily log in to After web browsing activities, my main form of terminal communication is Matrix. I use the [gomuks](https://docs.mau.fi/gomuks/) client currently. -This was incredibly easy to install on macOS (but I will need to see if it'll -be just as easy on Linux when my new laptop arrives): +This was incredibly easy to install on macOS (but I will need to see if it'll be +just as easy on Linux when my new laptop arrives): ```sh brew install gomuks @@ -178,7 +177,7 @@ I am used to the easy extensions found in VSCodium and Kate, so I am slowly learning how to mold the default editing tools to my needs. Currently, this means I am using `nano` with the following configuration: -``` config +```config set breaklonglines set autoindent set linenumbers diff --git a/content/blog/2022-06-22-daily-poetry.md b/content/blog/2022-06-22-daily-poetry.md index a687ce3..96f11b2 100644 --- a/content/blog/2022-06-22-daily-poetry.md +++ b/content/blog/2022-06-22-daily-poetry.md @@ -7,8 +7,8 @@ draft = false # Source Code -I don't want to bury the lede here, so if you'd like to see the full source -code I use to email myself plaintext poems daily, visit the repository: +I don't want to bury the lede here, so if you'd like to see the full source code +I use to email myself plaintext poems daily, visit the repository: [daily-poem.git](https://git.cleberg.net/?p=daily-poem.git;a=summary). # My Daily Dose of Poetry @@ -20,8 +20,8 @@ In this case, I was looking for a simply and easy way to get a daily dose of literature or poetry to read in the mornings. However, I don't want to sign up for a random mailing list on just any website. -I also don't want to have to work to find the reading content each morning, as -I know I would simply give up and stop reading daily. +I also don't want to have to work to find the reading content each morning, as I +know I would simply give up and stop reading daily. Thus, I found a way to deliver poetry to myself in plain-text format, on a daily basis, and scheduled to deliver automatically. @@ -31,8 +31,8 @@ basis, and scheduled to deliver automatically. This solution uses Python and email, so the following process requires the following to be installed: -1. An SMTP server, which can be as easy as installing `mailutils` if you're on - a Debian-based distro. +1. An SMTP server, which can be as easy as installing `mailutils` if you're on a + Debian-based distro. 2. Python (& pip!) 3. The following Python packages: `email`, `smtplib`, `json`, and `requests` @@ -46,7 +46,7 @@ informational. This program starts with a simple import of the required packages, so I wanted to explain why each package is used: -``` python +```python from email.mime.text import MIMEText # Required for translating MIMEText import smtplib # Required to process the SMTP mail delivery import json # Required to parse the poetry API results @@ -55,41 +55,41 @@ import requests # Required to send out a request to the API ## Sending the API Request -Next, we need to actually send the API request. In my case, I'm calling a -random poem from the entire API. If you want, you can call specific poems or -authors from this API. +Next, we need to actually send the API request. In my case, I'm calling a random +poem from the entire API. If you want, you can call specific poems or authors +from this API. -``` python +```python json_data = requests.get('https://poetrydb.org/random').json() ``` This gives us the following result in JSON: -``` json +```json [ - { - "title": "Sonnet XXII: With Fools and Children", - "author": "Michael Drayton", - "lines": [ - "To Folly", - "", - "With fools and children, good discretion bears;", - "Then, honest people, bear with Love and me,", - "Nor older yet, nor wiser made by years,", - "Amongst the rest of fools and children be;", - "Love, still a baby, plays with gauds and toys,", - "And, like a wanton, sports with every feather,", - "And idiots still are running after boys,", - "Then fools and children fitt'st to go together.", - "He still as young as when he first was born,", - "No wiser I than when as young as he;", - "You that behold us, laugh us not to scorn;", - "Give Nature thanks you are not such as we.", - "Yet fools and children sometimes tell in play", - "Some, wise in show, more fools indeed than they." - ], - "linecount": "15" - } + { + "title": "Sonnet XXII: With Fools and Children", + "author": "Michael Drayton", + "lines": [ + "To Folly", + "", + "With fools and children, good discretion bears;", + "Then, honest people, bear with Love and me,", + "Nor older yet, nor wiser made by years,", + "Amongst the rest of fools and children be;", + "Love, still a baby, plays with gauds and toys,", + "And, like a wanton, sports with every feather,", + "And idiots still are running after boys,", + "Then fools and children fitt'st to go together.", + "He still as young as when he first was born,", + "No wiser I than when as young as he;", + "You that behold us, laugh us not to scorn;", + "Give Nature thanks you are not such as we.", + "Yet fools and children sometimes tell in play", + "Some, wise in show, more fools indeed than they." + ], + "linecount": "15" + } ] ``` @@ -102,17 +102,17 @@ presented by the API. For the actual poem content, we need to loop over each line in the `lines` variable since each line is a separate string by default. -> You *could* also extract the title or author and make another call out to the +> You _could_ also extract the title or author and make another call out to the > API to avoid having to build the plaintext poem with a loop, but it just -> doesn't make sense to me to send multiple requests when we can create a -> simple loop on our local machine to work with the data we already have. +> doesn't make sense to me to send multiple requests when we can create a simple +> loop on our local machine to work with the data we already have. > > For > [example](https://poetrydb.org/title/Sonnet%20XXII:%20With%20Fools%20and%20Children/lines.text), -> look at the raw data response of this link to see the poem's lines returned -> in plaintext. +> look at the raw data response of this link to see the poem's lines returned in +> plaintext. -``` python +```python title = json_data[0]['title'] author = json_data[0]['author'] line_count = json_data[0]['linecount'] @@ -130,7 +130,7 @@ For my daily email, I want to see the title of the poem first, followed by the author, then a blank line, and finally the full poem. This code snippet combines that data and packages it into a MIMEText container, ready to be emailed. -``` python +```python msg_body = title + "\n" + author + "\n\n" + lines msg = MIMEText(msg_body) ``` @@ -138,7 +138,7 @@ msg = MIMEText(msg_body) Before we send the email, we need to prepare the metadata (subject, from, to, etc.): -``` python +```python sender_email = 'example@server.local' recipient_emails = ['user@example.com'] msg['Subject'] = 'Your Daily Poem (' + line_count + ' lines)' @@ -152,7 +152,7 @@ Now that I have everything ready to be emailed, the last step is to simply connect to an SMTP server and send the email out to the recipients. In my case, I installed `mailutils` on Ubuntu and let my SMTP server be `localhost`. -``` python +```python smtp_server = 'localhost' s = smtplib.SMTP(smtp_server) s.sendmail(sender_email, recipient_emails, msg.as_string()) @@ -164,7 +164,7 @@ s.quit() Instead of including a screenshot, I've copied the contents of the email that was delivered to my inbox below since I set this process up in plaintext format. -``` txt +```txt Date: Wed, 22 Jun 2022 14:37:19 +0000 (UTC) From: REDACTED To: REDACTED @@ -206,7 +206,7 @@ In the file, simply paste the following snippet at the bottom of the file and ensure that the file path is correctly pointing to wherever you saved your Python script: -``` config +```config 0 8 ** ** ** python3 /home/<your_user>/dailypoem/main.py ``` diff --git a/content/blog/2022-06-24-fedora-i3.md b/content/blog/2022-06-24-fedora-i3.md index 002ba1f..d0cdd9f 100644 --- a/content/blog/2022-06-24-fedora-i3.md +++ b/content/blog/2022-06-24-fedora-i3.md @@ -7,60 +7,56 @@ draft = false # Leaving macOS -As I noted [in a recent post](../foss-macos-apps), I have been planning -on migrating from macOS back to a Linux-based OS. I am happy to say that -I have finally completed my migration and am now stuck in the wonderful -world of Linux again. - -My decision to leave macOS really came down to just a few important -things: - -- Apple Security (Gatekeeper) restricting me from running any software I want. - Even if you disable Gatekeeper and allow software to bypass the rest of the - device installation security, you still have to repeat that process every time - the allowed software is updated. -- macOS sends out nearly constant connections, pings, telemetry, etc. to a - myriad of mysterious Apple services. I'm not even going to dive into how many - macOS apps have constant telemetry on, as well. -- Lastly, I just *really* missed the customization and freedom that comes with - Linux. Being able to switch to entirely new kernel, OS, or desktop within - minutes is a freedom I took for granted when I switched to macOS. - -Now that I've covered macOS, I'm going to move on to more exciting -topics: my personal choice of OS, DE, and various customizations I'm -using. +As I noted [in a recent post](../foss-macos-apps), I have been planning on +migrating from macOS back to a Linux-based OS. I am happy to say that I have +finally completed my migration and am now stuck in the wonderful world of Linux +again. + +My decision to leave macOS really came down to just a few important things: + +- Apple Security (Gatekeeper) restricting me from running any software I want. + Even if you disable Gatekeeper and allow software to bypass the rest of the + device installation security, you still have to repeat that process every + time the allowed software is updated. +- macOS sends out nearly constant connections, pings, telemetry, etc. to a + myriad of mysterious Apple services. I'm not even going to dive into how + many macOS apps have constant telemetry on, as well. +- Lastly, I just _really_ missed the customization and freedom that comes with + Linux. Being able to switch to entirely new kernel, OS, or desktop within + minutes is a freedom I took for granted when I switched to macOS. + +Now that I've covered macOS, I'm going to move on to more exciting topics: my +personal choice of OS, DE, and various customizations I'm using. # Fedora After trying a ton of distros (I think I booted and tested around 20-25 -distros), I finally landed on [Fedora Linux](https://getfedora.org/). I -have quite a bit of experience with Fedora and enjoy the -`dnf` package manager. Fedora allows me to keep up-to-date -with recent software (I'm looking at you, Debian), but still provides a -level of stability you don't find in every distro. - -In a very close second place was Arch Linux, as well as its spin-off: -Garuda Linux (Garuda w/ sway is *beautiful*). Arch is great for -compatibility and the massive community it has, but I have just never -had the time to properly sit down and learn the methodology behind their -packaging systems. - -Basically, everything else I tested was unacceptable in at least one way -or another. Void (`glibc`) was great, but doesn't support -all the software I need. Slackware worked well as a tui, but I wasn't -skilled enough to get a tiling window manager (WM) working on it. +distros), I finally landed on [Fedora Linux](https://getfedora.org/). I have +quite a bit of experience with Fedora and enjoy the `dnf` package manager. +Fedora allows me to keep up-to-date with recent software (I'm looking at you, +Debian), but still provides a level of stability you don't find in every distro. + +In a very close second place was Arch Linux, as well as its spin-off: Garuda +Linux (Garuda w/ sway is _beautiful_). Arch is great for compatibility and the +massive community it has, but I have just never had the time to properly sit +down and learn the methodology behind their packaging systems. + +Basically, everything else I tested was unacceptable in at least one way or +another. Void (`glibc`) was great, but doesn't support all the software I need. +Slackware worked well as a tui, but I wasn't skilled enough to get a tiling +window manager (WM) working on it. ## i3 -One of the reasons I settled on Fedora is that it comes with an official -i3 spin. Being able to use a tiling WM, such as i3 or sway, is one of -the biggest things I wanted to do as soon as I adopted Linux again. +One of the reasons I settled on Fedora is that it comes with an official i3 +spin. Being able to use a tiling WM, such as i3 or sway, is one of the biggest +things I wanted to do as soon as I adopted Linux again. -I will probably set up a dotfile repository soon, so that I don't lose -any of my configurations, but nothing big has been configured thus far. +I will probably set up a dotfile repository soon, so that I don't lose any of my +configurations, but nothing big has been configured thus far. -The two main things I have updated in i3wm are natural scrolling and -binding my brightness keys to the `brightnessctl` program. +The two main things I have updated in i3wm are natural scrolling and binding my +brightness keys to the `brightnessctl` program. 1. Natural Scrolling @@ -70,12 +66,12 @@ binding my brightness keys to the `brightnessctl` program. sudo nano /usr/share/X11/xorg.conf.d/40-libinput.conf ``` - Within the `40-libinput.conf` file, find the following - input sections and enable the natural scrolling option. + Within the `40-libinput.conf` file, find the following input sections and + enable the natural scrolling option. This is the `pointer` section: - ``` conf + ```conf Section "InputClass" Identifier "libinput pointer catchall" MatchIsPointer "on" @@ -87,7 +83,7 @@ binding my brightness keys to the `brightnessctl` program. This is the `touchpad` section: - ``` conf + ```conf Section "InputClass" Identifier "libinput touchpad catchall" MatchIsTouchpad "on" @@ -99,8 +95,8 @@ binding my brightness keys to the `brightnessctl` program. 2. Enabling Brightness Keys - Likewise, enabling brightness key functionality is as simple as - binding the keys to the `brightnessctl` program. + Likewise, enabling brightness key functionality is as simple as binding the + keys to the `brightnessctl` program. To do this, open up your i3 config file. Mine is located here: @@ -108,7 +104,7 @@ binding my brightness keys to the `brightnessctl` program. nano /home/<my-user>/.config/i3/config ``` - ``` conf + ```conf # Use brightnessctl to adjust brightness. bindsym XF86MonBrightnessDown exec --no-startup-id brightnessctl --min-val=2 -q set 3%- bindsym XF86MonBrightnessUp exec --no-startup-id brightnessctl -q set 3%+ @@ -116,43 +112,42 @@ binding my brightness keys to the `brightnessctl` program. 3. `polybar` - Instead of using the default `i3status` bar, I have opted - to use `polybar` instead (as you can also see in the - screenshot above). + Instead of using the default `i3status` bar, I have opted to use `polybar` + instead (as you can also see in the screenshot above). - My config for this menu bar is basically just the default settings - with modified colors and an added battery block to quickly show me - the machine's battery info. + My config for this menu bar is basically just the default settings with + modified colors and an added battery block to quickly show me the machine's + battery info. 4. `alacritty` - Not much to say on this part yet, as I haven't configured it much, - but I installed `alacritty` as my default terminal, and I - am using `zsh` and the shell. + Not much to say on this part yet, as I haven't configured it much, but I + installed `alacritty` as my default terminal, and I am using `zsh` and the + shell. # Software Choices -Again, I'm not going to say much that I haven't said yet in other blog -posts, so I'll just do a quick rundown of the apps I installed -immediately after I set up the environment. +Again, I'm not going to say much that I haven't said yet in other blog posts, so +I'll just do a quick rundown of the apps I installed immediately after I set up +the environment. Flatpak Apps: -- Cryptomator -- pCloud -- Signal +- Cryptomator +- pCloud +- Signal Fedora Packages: -- gomuks -- neomutt -- neofetch -- Firefox - - uBlock Origin - - Bitwarden - - Stylus - - Privacy Redirect +- gomuks +- neomutt +- neofetch +- Firefox + - uBlock Origin + - Bitwarden + - Stylus + - Privacy Redirect Other: -- exiftool +- exiftool diff --git a/content/blog/2022-07-01-git-server.md b/content/blog/2022-07-01-git-server.md index 64a4a43..5299fdb 100644 --- a/content/blog/2022-07-01-git-server.md +++ b/content/blog/2022-07-01-git-server.md @@ -17,22 +17,22 @@ anywhere. Before I dive into the details, I want to state a high-level summary of my self-hosted Git approach: -- This method uses the `ssh://` (read & write) and `git://` (read-only) - protocols for push and pull access. - - For the `git://` protocol, I create a `git-daemon-export-ok` file in any - repository that I want to be cloneable by anyone. - - The web interface I am using (`cgit`) allows simple HTTP cloning by default. - I do not disable this setting as I want beginners to be able to clone one of - my repositories even if they don't know the proper method. -- I am not enabling Smart HTTPS for any repositories. Updates to repositories - must be pushed via SSH. -- Beyond the actual repository management, I am using `cgit` for the front-end - web interface. - - If you use the `scan-path=<path>` configuration in the `cgitrc` - configuration file to automatically find repositories, you can't exclude a - repository from `cgit` if it's stored within the path that `cgit` reads. To - host private repositories, you'd need to set up another directory that - `cgit` can't read. +- This method uses the `ssh://` (read & write) and `git://` (read-only) + protocols for push and pull access. + - For the `git://` protocol, I create a `git-daemon-export-ok` file in any + repository that I want to be cloneable by anyone. + - The web interface I am using (`cgit`) allows simple HTTP cloning by + default. I do not disable this setting as I want beginners to be able to + clone one of my repositories even if they don't know the proper method. +- I am not enabling Smart HTTPS for any repositories. Updates to repositories + must be pushed via SSH. +- Beyond the actual repository management, I am using `cgit` for the front-end + web interface. + - If you use the `scan-path=<path>` configuration in the `cgitrc` + configuration file to automatically find repositories, you can't exclude + a repository from `cgit` if it's stored within the path that `cgit` + reads. To host private repositories, you'd need to set up another + directory that `cgit` can't read. # Assumptions @@ -106,7 +106,7 @@ sudo nano /etc/ssh/sshd_config Within this file, find the following settings and set them to the values I am showing below: -``` conf +```conf PermitRootLogin no PasswordAuthentication no AuthenticationMethods publickey @@ -177,8 +177,8 @@ other than the standard git commands. # Opening the Firewall -Don't forget to open up ports on the device firewall and network firewall if -you want to access these repositories publicly. If you're using default ports, +Don't forget to open up ports on the device firewall and network firewall if you +want to access these repositories publicly. If you're using default ports, forward ports `22` (ssh) and `9418` (git) from your router to your server's IP address. @@ -203,7 +203,7 @@ your `~/.ssh/config` file: nano ~/.ssh/config ``` -``` conf +```conf Host git.example.com # HostName can be a URL or an IP address HostName git.example.com @@ -215,8 +215,8 @@ Host git.example.com There are two main syntaxes you can use to manage git over SSH: -- `git clone [user@]server:project.git` -- `git clone ssh://[user@]server/project.git` +- `git clone [user@]server:project.git` +- `git clone ssh://[user@]server/project.git` I prefer the first, which is an `scp`-like syntax. To test it, try to clone the test repository you set up on the server: @@ -238,7 +238,7 @@ sudo nano /etc/systemd/system/git-daemon.service Inside the `git-daemon.service` file, paste the following: -``` conf +```conf [Unit] Description=Start Git Daemon @@ -322,7 +322,7 @@ mkdir ~/cgit && cd ~/cgit nano docker-compose.yml ``` -``` conf +```conf # docker-compose.yml version: '3' @@ -361,7 +361,7 @@ configuration file: sudo nano /etc/nginx/sites-available/git.example.com ``` -``` conf +```conf server { listen 80; server_name git.example.com; @@ -430,7 +430,7 @@ cd /git/example.git nano config ``` -``` conf +```conf [gitweb] owner = "YourName" ``` @@ -451,7 +451,7 @@ Below is an example configuration for `cgitrc`. You can find all the configuration options within the [configuration manual] (<https://git.zx2c4.com/cgit/plain/cgitrc.5.txt>). -``` conf +```conf css=/cgit.css logo=/logo.png favicon=/favicon.png @@ -569,8 +569,8 @@ files](https://git.zx2c4.com/cgit/tree/filters), repeat the `curl` and `chmod` process above for whichever files you need. However, formatting will not work quite yet since the Docker cgit container -we're using doesn't have the formatting package installed. You can install -this easily by install Python 3+ and the `pygments` package: +we're using doesn't have the formatting package installed. You can install this +easily by install Python 3+ and the `pygments` package: ```sh # Enter the container's command line @@ -592,7 +592,7 @@ commands every time you kill and restart the container!** If not done already, we need to add the following variables to our `cgitrc` file in order for `cgit` to know where our filtering files are: -``` conf +```conf # Highlight source code with python pygments-based highlighter source-filter=/var/www/htdocs/cgit/filters/syntax-highlighting.py diff --git a/content/blog/2022-07-14-gnupg.md b/content/blog/2022-07-14-gnupg.md index 8daba99..77e0623 100644 --- a/content/blog/2022-07-14-gnupg.md +++ b/content/blog/2022-07-14-gnupg.md @@ -47,45 +47,45 @@ I am not doing an in-depth explanation here in order to keep the focus on GPG and not encryption algorithms. If you want a deep dive into cryptography or encryption algorithms, please read my other posts: -- [AES Encryption](../aes-encryption/) (2018) -- [Cryptography Basics](../cryptography-basics/) (2020) +- [AES Encryption](../aes-encryption/) (2018) +- [Cryptography Basics](../cryptography-basics/) (2020) ## Vulnerabilities As of 2022-07-14, there are a few different vulnerabilities associated with GPG or the libraries it uses: -- GPG versions 1.0.2--1.2.3 contains a bug where "as soon as one - (GPG-generated) ElGamal signature of an arbitrary message is released, one can - recover the signer's private key in less than a second on a PC." - ([Source](https://www.di.ens.fr/~pnguyen/pub_Ng04.htm)) -- GPG versions prior to 1.4.2.1 contain a false positive signature verification - bug. - ([Source](https://lists.gnupg.%20org/pipermail/gnupg-announce/2006q1/000211.html)) -- GPG versions prior to 1.4.2.2 cannot detect injection of unsigned data. ( - [Source](https://lists.gnupg.org/pipermail/gnupg-announce/2006q1/000218.html)) -- Libgcrypt, a library used by GPG, contained a bug which enabled full key - recovery for RSA-1024 and some RSA-2048 keys. This was resolved in a GPG - update in 2017. ([Source](https://lwn.net/Articles/727179/)) -- The [ROCA Vulnerability](https://en.wikipedia.org/wiki/ROCA_vulnerability) - affects RSA keys generated by YubiKey 4 tokens. - ([Source](https://crocs.fi.%20muni.cz/_media/public/papers/nemec_roca_ccs17_preprint.pdf)) -- The [SigSpoof Attack](https://en.wikipedia.org/wiki/SigSpoof) allows an - attacker to spoof digital signatures. - ([Source](https://arstechnica.%20com/information-technology/2018/06/decades-old-pgp-bug-allowed-hackers-to-spoof-just-about-anyones-signature/)) -- Libgcrypt 1.9.0 contains a severe flaw related to a heap buffer overflow, - fixed in Libgcrypt 1.9.1 - ([Source](https://web.archive.%20org/web/20210221012505/https://www.theregister.com/2021/01/29/severe_libgcrypt_bug/)) +- GPG versions 1.0.2--1.2.3 contains a bug where "as soon as one + (GPG-generated) ElGamal signature of an arbitrary message is released, one + can recover the signer's private key in less than a second on a PC." + ([Source](https://www.di.ens.fr/~pnguyen/pub_Ng04.htm)) +- GPG versions prior to 1.4.2.1 contain a false positive signature + verification bug. + ([Source](https://lists.gnupg.%20org/pipermail/gnupg-announce/2006q1/000211.html)) +- GPG versions prior to 1.4.2.2 cannot detect injection of unsigned data. ( + [Source](https://lists.gnupg.org/pipermail/gnupg-announce/2006q1/000218.html)) +- Libgcrypt, a library used by GPG, contained a bug which enabled full key + recovery for RSA-1024 and some RSA-2048 keys. This was resolved in a GPG + update in 2017. ([Source](https://lwn.net/Articles/727179/)) +- The [ROCA Vulnerability](https://en.wikipedia.org/wiki/ROCA_vulnerability) + affects RSA keys generated by YubiKey 4 tokens. + ([Source](https://crocs.fi.%20muni.cz/_media/public/papers/nemec_roca_ccs17_preprint.pdf)) +- The [SigSpoof Attack](https://en.wikipedia.org/wiki/SigSpoof) allows an + attacker to spoof digital signatures. + ([Source](https://arstechnica.%20com/information-technology/2018/06/decades-old-pgp-bug-allowed-hackers-to-spoof-just-about-anyones-signature/)) +- Libgcrypt 1.9.0 contains a severe flaw related to a heap buffer overflow, + fixed in Libgcrypt 1.9.1 + ([Source](https://web.archive.%20org/web/20210221012505/https://www.theregister.com/2021/01/29/severe_libgcrypt_bug/)) ### Platforms -Originally developed as a command-line program for *nix systems, GPG now has a +Originally developed as a command-line program for \*nix systems, GPG now has a wealth of front-end applications and libraries available for end-users. However, the most recommended programs remain the same: -- [GnuPG](https://gnupg.org) for Linux (depending on distro) -- [Gpg4win](https://gpg4win.org) for Windows -- [GPGTools](https://gpgtools.org) for macOS +- [GnuPG](https://gnupg.org) for Linux (depending on distro) +- [Gpg4win](https://gpg4win.org) for Windows +- [GPGTools](https://gpgtools.org) for macOS # Creating a Key Pair @@ -170,11 +170,11 @@ interface. As noted in RFC 4880, the general functions of OpenPGP are as follows: -- digital signatures -- encryption -- compression -- Radix-64 conversion -- key management and certificate services +- digital signatures +- encryption +- compression +- Radix-64 conversion +- key management and certificate services From this, you can probably gather that the main use of GPG is for encrypting data and/or signing the data with a key. The purpose of encrypting data with GPG @@ -195,10 +195,10 @@ public key, the recipient(s) of the message can verify that the message was signed with my personal key. The second process, regarding the actual encryption of the message and its -contents, works by using a combination of the sender's keys and the -recipient's keys. This process may vary slightly by implementation, but it most -commonly uses asymmetric cryptography, also known as public-key cryptography. In -this version of encryption, the sender's private key to sign the message and a +contents, works by using a combination of the sender's keys and the recipient's +keys. This process may vary slightly by implementation, but it most commonly +uses asymmetric cryptography, also known as public-key cryptography. In this +version of encryption, the sender's private key to sign the message and a combination of the sender's keys and the recipient's public key to encrypt the message. @@ -275,8 +275,8 @@ In order to verify signed data, a user needs to have: 2. A signature file 3. The public GPG key of the signer -Once the signer's public key is imported on the user's system, and they have -the data and signature, they can verify the data with the following commands: +Once the signer's public key is imported on the user's system, and they have the +data and signature, they can verify the data with the following commands: ```sh # If the signature is attached to the data @@ -296,5 +296,5 @@ them. Otherwise, the best option is to use a keyserver, such as: -- [pgp.mit.edu](https://pgp.mit.edu) -- [keys.openpgp.org](https://keys.openpgp.org) +- [pgp.mit.edu](https://pgp.mit.edu) +- [keys.openpgp.org](https://keys.openpgp.org) diff --git a/content/blog/2022-07-25-curseradio.md b/content/blog/2022-07-25-curseradio.md index 11ef965..ba2b857 100644 --- a/content/blog/2022-07-25-curseradio.md +++ b/content/blog/2022-07-25-curseradio.md @@ -12,9 +12,8 @@ While exploring some interesting Linux applications, I stumbled across player based on Python. This application is fantastic and incredibly easy to install, so I wanted to -dedicate a post today to this app. Let's look at the features within the app -and then walk through the installation process I took to get `curseradio` -working. +dedicate a post today to this app. Let's look at the features within the app and +then walk through the installation process I took to get `curseradio` working. # Features @@ -35,7 +34,7 @@ radio player in the `Favourites` category. ## Commands/Shortcuts | Key(s) | Command | -|------------|---------------------------------| +| ---------- | ------------------------------- | | ↑, ↓ | navigate | | PgUp, PgDn | navigate quickly | | Home, End | to top/bottom | diff --git a/content/blog/2022-07-30-flac-to-opus.md b/content/blog/2022-07-30-flac-to-opus.md index c96f2f5..56547be 100644 --- a/content/blog/2022-07-30-flac-to-opus.md +++ b/content/blog/2022-07-30-flac-to-opus.md @@ -16,7 +16,7 @@ of the files, especially if you're using a weak connection. So, in order to archive the music in a lossless format and still be able to stream it easily, I opted to create a copy of my FLAC files in the [Opus audio -codec](https://en.wikipedia.org/wiki/Opus_(audio_format)). This allows me to +codec](<https://en.wikipedia.org/wiki/Opus_(audio_format)>). This allows me to archive a quality, lossless version of the music and then point my streaming service to the smaller, stream-ready version. @@ -47,20 +47,20 @@ following logic into the script. You **MUST** edit the following variables in order for it to work: -- `source`: The source directory where your FLAC files are stored. -- `dest`: The destination directory where you want the resulting Opus files to - be stored. +- `source`: The source directory where your FLAC files are stored. +- `dest`: The destination directory where you want the resulting Opus files to + be stored. You **MAY** want to edit the following variables to suit your needs: -- `filename`: If you are converting to a file format other than Opus, you'll - need to edit this so that your resulting files have the correct filename - extension. -- `reldir`: This variable can be edited to strip out more leading directories in - the file path. As you'll see later, I ignore this for now and simply clean it - up afterward. -- `opusenc`: This is the actual conversion process. You may want to edit the - bitrate to suit your needs. I set mine at 128 but some prefer 160 or higher. +- `filename`: If you are converting to a file format other than Opus, you'll + need to edit this so that your resulting files have the correct filename + extension. +- `reldir`: This variable can be edited to strip out more leading directories + in the file path. As you'll see later, I ignore this for now and simply + clean it up afterward. +- `opusenc`: This is the actual conversion process. You may want to edit the + bitrate to suit your needs. I set mine at 128 but some prefer 160 or higher. ```sh #!/bin/bash @@ -168,7 +168,7 @@ du -h --max-depth=1 . In my case, my small library went from 78GB to 6.3GB! -``` txt +```txt 78G ./archives 6.3G ./library ``` diff --git a/content/blog/2022-07-31-bash-it.md b/content/blog/2022-07-31-bash-it.md index e5d0b42..e0b1f36 100644 --- a/content/blog/2022-07-31-bash-it.md +++ b/content/blog/2022-07-31-bash-it.md @@ -8,19 +8,19 @@ draft = false # Bash For those who are not familiar, -[Bash](https://en.wikipedia.org/wiki/Bash_(Unix_shell)) is a Unix shell that is -used as the default login shell for most Linux distributions. This shell and +[Bash](<https://en.wikipedia.org/wiki/Bash_(Unix_shell)>) is a Unix shell that +is used as the default login shell for most Linux distributions. This shell and command processor should be familiar if you've used Linux (or older version of macOS) before. However, bash is not the only option. There are numerous other shells that exist. Here are some popular examples: -- [zsh](https://en.wikipedia.org/wiki/Z_shell) -- [fish](https://en.wikipedia.org/wiki/Fish_(Unix_shell)) -- [oksh](https://github.com/ibara/oksh) -- [mksh](https://wiki.gentoo.org/wiki/Mksh) -- [dash](https://en.wikipedia.org/wiki/Debian_Almquist_shell) +- [zsh](https://en.wikipedia.org/wiki/Z_shell) +- [fish](<https://en.wikipedia.org/wiki/Fish_(Unix_shell)>) +- [oksh](https://github.com/ibara/oksh) +- [mksh](https://wiki.gentoo.org/wiki/Mksh) +- [dash](https://en.wikipedia.org/wiki/Debian_Almquist_shell) While each shell has its differences, bash is POSIX compliant and the default for many Linux users. Because of this, I am going to explore a program called @@ -110,7 +110,7 @@ This will provide you a list that looks like the following text block. Within this screen, you will be able to see all available options and which ones are currently enabled. -``` txt +```txt Alias Enabled? Description ag [ ] the silver searcher (ag) aliases ansible [ ] ansible abbreviations @@ -148,7 +148,7 @@ bash-it show plugins You will see the following output showing enabled and disabled plugins: -``` txt +```txt Plugin Enabled? Description alias-completion [ ] autojump [ ] Autojump configuration, see https://github.com/wting/autojump for more details diff --git a/content/blog/2022-08-31-privacy-com-changes.md b/content/blog/2022-08-31-privacy-com-changes.md index 930524b..e9ff651 100644 --- a/content/blog/2022-08-31-privacy-com-changes.md +++ b/content/blog/2022-08-31-privacy-com-changes.md @@ -14,9 +14,9 @@ order to continue using their accounts. [You can view the new cardholder agreement here](https://privacy.com/commercial-cardholder-agreement). -When you log in, you'll be greeted with a pop-up window asking you to review -and agree to the new terms of use. You will also not be able to open any new -cards until the terms are agreed to. +When you log in, you'll be greeted with a pop-up window asking you to review and +agree to the new terms of use. You will also not be able to open any new cards +until the terms are agreed to. ## Changing from a "Prepaid Debit" Model to a "Charge Card" Model @@ -36,9 +36,9 @@ Privacy.com and set the merchant as one of their pre-set options, such as "Smiley's Corner Store" or "NSA Gift Shop." The new model still works with a bank account as a funding source, but the model -is changed so that you get a "line of credit" set according to a 14-day -billing cycle. It seems that Privacy.com will now allow charges to be incurred -without being immediately paid. +is changed so that you get a "line of credit" set according to a 14-day billing +cycle. It seems that Privacy.com will now allow charges to be incurred without +being immediately paid. ## Daily Payments and Available Credit @@ -83,8 +83,8 @@ off my prepaid debit payments, I have no interest in incurring charges that will need to be paid back at a later date. I also have no interest in submitting personal information to Privacy.com. -This type of change toward a "buy it now, pay us later" model is concerning, -and I will be watching Privacy.com to see if they further their interests in the +This type of change toward a "buy it now, pay us later" model is concerning, and +I will be watching Privacy.com to see if they further their interests in the credit model as time goes on. Could we see them start charging interest, fees, etc.? I'm not sure, but this diff --git a/content/blog/2022-09-17-serenity-os.md b/content/blog/2022-09-17-serenity-os.md index fc142cd..87960ea 100644 --- a/content/blog/2022-09-17-serenity-os.md +++ b/content/blog/2022-09-17-serenity-os.md @@ -24,7 +24,7 @@ Per their website: > other systems. > > Roughly speaking, the goal is a marriage between the aesthetic of late-1990s -> productivity software and the power-user accessibility of late-2000s *nix. +> productivity software and the power-user accessibility of late-2000s \*nix. > > This is a system by us, for us, based on the things we like. diff --git a/content/blog/2022-09-21-graphene-os.md b/content/blog/2022-09-21-graphene-os.md index 6c427b2..97a9c10 100644 --- a/content/blog/2022-09-21-graphene-os.md +++ b/content/blog/2022-09-21-graphene-os.md @@ -92,9 +92,9 @@ To start, enable developer mode by going to `Settings` > `About` and tapping `Build Number` seven (7) times. You may need to enter your PIN to enable this mode. -Once developer mode is enabled, go to `Settings` > `System` > `Devloper -Options` and enable OEM Unlocking, as well as USB or Wireless Debugging. In my -case, I chose USB Debugging and performed all actions via USB cable. +Once developer mode is enabled, go to `Settings` > `System` > `Devloper Options` +and enable OEM Unlocking, as well as USB or Wireless Debugging. In my case, I +chose USB Debugging and performed all actions via USB cable. Once these options are enabled, plug the phone into the computer and execute the following command: @@ -104,8 +104,8 @@ adb devices ``` If an unauthorized error occurs, make sure the USB mode on the phone is changed -from charging to something like "File Transfer" or "PTP." You can find the -USB mode in the notification tray. +from charging to something like "File Transfer" or "PTP." You can find the USB +mode in the notification tray. ## Reboot Device diff --git a/content/blog/2022-10-04-mtp-linux.md b/content/blog/2022-10-04-mtp-linux.md index be726fc..7d4fd41 100644 --- a/content/blog/2022-10-04-mtp-linux.md +++ b/content/blog/2022-10-04-mtp-linux.md @@ -20,8 +20,8 @@ confirm that switching to a USB 3.0 port seemed to cut out most of my issues. # Switch USB Preferences to MTP -Secondly, you need to ensure that the phone's USB preferences/mode is changed -to MTP or File Transfer once the phone is plugged in. Other modes will not allow +Secondly, you need to ensure that the phone's USB preferences/mode is changed to +MTP or File Transfer once the phone is plugged in. Other modes will not allow you to access the phone's file system. # Install `jmtpfs` diff --git a/content/blog/2022-10-04-syncthing.md b/content/blog/2022-10-04-syncthing.md index cdb0faa..1e5305c 100644 --- a/content/blog/2022-10-04-syncthing.md +++ b/content/blog/2022-10-04-syncthing.md @@ -11,8 +11,8 @@ If you've been looking around the self-hosted cloud storage space for a while, you've undoubtedly run into someone suggesting [Syncthing](https://syncthing.net) as an option. However, it is an unusual alternative for those users out there who are used to having a centralized cloud -server that serves as the "controller" of the data and interacts with clients -on devices to fetch files. +server that serves as the "controller" of the data and interacts with clients on +devices to fetch files. This post is a walkthrough of the Syncthing software, how I set up my personal storage, and some pros and cons of using the software. @@ -114,10 +114,10 @@ per device. # My Personal Cloud Storage Set-up Personally, I use a model similar to a traditional cloud storage service. I have -a "centralized" server running 24/7 that acts as an Introducer for my -Syncthing network. I think of this as my main storage and all other devices as -tertiary client devices. I will likely add additional servers as backups as time -goes on so that I don't have to rely on my laptop or phone as the only backups. +a "centralized" server running 24/7 that acts as an Introducer for my Syncthing +network. I think of this as my main storage and all other devices as tertiary +client devices. I will likely add additional servers as backups as time goes on +so that I don't have to rely on my laptop or phone as the only backups. Currently, I have one desktop and one mobile device connected to the network, both running intermittently as they are not powered-on 24/7. @@ -139,24 +139,24 @@ iCloud, etc.), and privacy-focused cloud solutions (pCloud, Tresorit, etc.). **Pros:** -- I've faced no data loss at all through my two-month trial run. -- No third-parties store your data on their servers. -- You have full control over your data and can take your data and leave at any - time. -- It's possible to encrypt client-side easily with software like Cryptomator. -- No proprietary clients or mounted volumes, just plain files and folders. +- I've faced no data loss at all through my two-month trial run. +- No third-parties store your data on their servers. +- You have full control over your data and can take your data and leave at any + time. +- It's possible to encrypt client-side easily with software like Cryptomator. +- No proprietary clients or mounted volumes, just plain files and folders. **Cons:** -- The learning curve is steeper than traditional cloud services and is focused - on a technical audience. -- If a device needs to modify files in a Folder, the devices will need to sync - ALL files from the folder, which may be large. To avoid size restraints, split - large folders into smaller folders for syncing. -- Syncing can be slow due to the clients/servers initially connecting or - re-connecting after sleeping. -- Multiple personal devices are required and require the user to own or rent - them as no third-party servers are involved in the storage of data. +- The learning curve is steeper than traditional cloud services and is focused + on a technical audience. +- If a device needs to modify files in a Folder, the devices will need to sync + ALL files from the folder, which may be large. To avoid size restraints, + split large folders into smaller folders for syncing. +- Syncing can be slow due to the clients/servers initially connecting or + re-connecting after sleeping. +- Multiple personal devices are required and require the user to own or rent + them as no third-party servers are involved in the storage of data. Overall, I've had a great experience with Syncthing so far. I've had no data loss, syncing has been quick and easy when changes are made to files, device diff --git a/content/blog/2022-10-22-alpine-linux.md b/content/blog/2022-10-22-alpine-linux.md index 073d584..0de5440 100644 --- a/content/blog/2022-10-22-alpine-linux.md +++ b/content/blog/2022-10-22-alpine-linux.md @@ -14,8 +14,8 @@ and apk as the package manager. According to their website, an Alpine container 130 MB of storage." An actual bare metal machine is recommended to have 100 MB of RAM and 0-700 MB of storage space. -Historically, I've used Ubuntu's minimal installation image as my server OS -for the last five years. Ubuntu worked well and helped as my original server +Historically, I've used Ubuntu's minimal installation image as my server OS for +the last five years. Ubuntu worked well and helped as my original server contained an nVidia GPU and no onboard graphics, so quite a few distros won't boot or install without a lot of tinkering. @@ -53,24 +53,24 @@ setup-alpine The setup script will ask a series of questions to configure the system. Be sure to answer carefully or else you may have to re-configure the system after boot. -- Keyboard Layout (Local keyboard language and usage mode, e.g., us and variant - of us-nodeadkeys.) -- Hostname (The name for the computer.) -- Network (For example, automatic IP address discovery with the "DHCP" - protocol.) -- DNS Servers (Domain Name Servers to query. For privacy reasons, it is NOT - recommended to route every local request to servers like Google's 8.8.8.8.) -- Timezone -- Proxy (Proxy server to use for accessing the web. Use "none" for direct - connections to the internet.) -- Mirror (From where to download packages. Choose the organization you trust - giving your usage patterns to.) -- SSH (Secure SHell remote access server. "Openssh" is part of the default - install image. Use "none" to disable remote login, e.g. on laptops.) -- NTP (Network Time Protocol client used for keeping the system clock in sync - with a time-server. Package "chrony" is part of the default install image.) -- Disk Mode (Select between diskless (disk="none"), "data" or "sys", as - described above.) +- Keyboard Layout (Local keyboard language and usage mode, e.g., us and + variant of us-nodeadkeys.) +- Hostname (The name for the computer.) +- Network (For example, automatic IP address discovery with the "DHCP" + protocol.) +- DNS Servers (Domain Name Servers to query. For privacy reasons, it is NOT + recommended to route every local request to servers like Google's 8.8.8.8.) +- Timezone +- Proxy (Proxy server to use for accessing the web. Use "none" for direct + connections to the internet.) +- Mirror (From where to download packages. Choose the organization you trust + giving your usage patterns to.) +- SSH (Secure SHell remote access server. "Openssh" is part of the default + install image. Use "none" to disable remote login, e.g. on laptops.) +- NTP (Network Time Protocol client used for keeping the system clock in sync + with a time-server. Package "chrony" is part of the default install image.) +- Disk Mode (Select between diskless (disk="none"), "data" or "sys", as + described above.) Once the setup script is finished, be sure to reboot the machine and remove the USB device. @@ -82,8 +82,8 @@ reboot ## Post-Installation There are many things you can do once your Alpine Linux system is up and -running, and it largely depends on what you'll use the machine for. I'm going -to walk through my personal post-installation setup for my web server. +running, and it largely depends on what you'll use the machine for. I'm going to +walk through my personal post-installation setup for my web server. 1. Upgrade the System @@ -96,8 +96,8 @@ to walk through my personal post-installation setup for my web server. 2. Adding a User I needed to add a user so that I don't need to log in as root. Note that if - you're used to using the `sudo` command, you will now need to use the - `doas` command on Alpine Linux. + you're used to using the `sudo` command, you will now need to use the `doas` + command on Alpine Linux. ```sh apk add doas @@ -120,8 +120,7 @@ to walk through my personal post-installation setup for my web server. doas nano /etc/apk/repositories ``` - Uncomment the community line for whichever version of Alpine you're - running: + Uncomment the community line for whichever version of Alpine you're running: ```sh /media/usb/apks @@ -258,9 +257,9 @@ doas lchsh git # Thoughts on Alpine So far, I love Alpine Linux. I have no complaints about anything at this point, -but I'm not completely finished with the migration yet. Once I'm able to -upgrade my hardware to a rack-mounted server, I will migrate Plex and Syncthing -over to Alpine as well - possibly putting Plex into a container or VM. +but I'm not completely finished with the migration yet. Once I'm able to upgrade +my hardware to a rack-mounted server, I will migrate Plex and Syncthing over to +Alpine as well - possibly putting Plex into a container or VM. The performance is stellar, the `apk` package manager is seamless, and system administration tasks are effortless. My only regret is that I didn't install diff --git a/content/blog/2022-11-07-self-hosting-matrix.md b/content/blog/2022-11-07-self-hosting-matrix.md index c98a48e..85de827 100644 --- a/content/blog/2022-11-07-self-hosting-matrix.md +++ b/content/blog/2022-11-07-self-hosting-matrix.md @@ -5,7 +5,7 @@ description = "" draft = false +++ -# Synpase +# Synapse If you're reading this, you likely know that [Synapse](https://github.com/matrix-org/synapse/) is a popular @@ -72,7 +72,7 @@ are a lot of other configuration options found in the [Configuring Synapse](https://matrix-org.github.io/synapse/develop/usage/configuration/config_documentation.html) documentation that can be enabled/disabled at any point. -``` yaml +```yaml server_name: "example.com" ``` @@ -97,7 +97,7 @@ doas nano /etc/nginx/http.d/example.com.conf If you already have TLS certificates for this domain (`example.com`), you can simply use the SSL configuration and point toward your TLS certificates. -``` conf +```conf server { listen 443 ssl http2; listen [::]:443 ssl http2; @@ -139,11 +139,11 @@ server { ``` If you need to generate TLS certificates (I recommend -[Certbot](https://certbot.eff.org/)), you'll need a more minimal Nginx conf -file before you can use the TLS-enabled example above. Instead, use this +[Certbot](https://certbot.eff.org/)), you'll need a more minimal Nginx conf file +before you can use the TLS-enabled example above. Instead, use this configuration file during the Certbot certificate generation process: -``` conf +```conf server { server_name example.com; location / { @@ -196,8 +196,8 @@ Router from the internet to your server's IP address. ## Adding Matrix Users -Finally, if you didn't enable public registration in the `homeserver.yaml` -file, you can manually create users via the command-line: +Finally, if you didn't enable public registration in the `homeserver.yaml` file, +you can manually create users via the command-line: ```sh cd ~/synapse diff --git a/content/blog/2022-11-11-nginx-tmp-errors.md b/content/blog/2022-11-11-nginx-tmp-errors.md index 356db15..32a1913 100644 --- a/content/blog/2022-11-11-nginx-tmp-errors.md +++ b/content/blog/2022-11-11-nginx-tmp-errors.md @@ -5,8 +5,8 @@ description = "" draft = false +++ -*This is a brief post so that I personally remember the solution as it has -occurred multiple times for me.* +_This is a brief post so that I personally remember the solution as it has +occurred multiple times for me._ # The Problem @@ -45,7 +45,7 @@ doas chown -R nginx:nginx /var/lib/nginx sudo chown -R nginx:nginx /var/lib/nginx ``` -You *may* also be able to change the `proxy_temp_path` in your Nginx config, but +You _may_ also be able to change the `proxy_temp_path` in your Nginx config, but I did not try this. Here's a suggestion I found online that may work if the above solution does not: @@ -53,11 +53,11 @@ above solution does not: nano /etc/nginx/http.d/example.com.conf ``` -``` conf +```conf server { ... - # Set the proxy_temp_path to your preference, make sure it's owned by the + # Set the proxy_temp_path to your preference, make sure it's owned by the # `nginx` user proxy_temp_path /tmp; diff --git a/content/blog/2022-11-27-server-build.md b/content/blog/2022-11-27-server-build.md index 17767b2..e631c04 100644 --- a/content/blog/2022-11-27-server-build.md +++ b/content/blog/2022-11-27-server-build.md @@ -26,25 +26,25 @@ results of my server. I'll start by listing all the components I used for this server build: -- **Case**: [Rosewill RSV-R4100U 4U Server Chassis Rackmount +- **Case**: [Rosewill RSV-R4100U 4U Server Chassis Rackmount Case](https://www.rosewill.com/rosewill-rsv-r4100u-black/p/9SIA072GJ92825) -- **Motherboard**: [NZXT B550](https://nzxt.com/product/n7-b550) -- **CPU**: AMD Ryzen 7 5700G with Radeon Graphics -- **GPU**: N/A - I specifically chose one of the few AMD CPUs that support +- **Motherboard**: [NZXT B550](https://nzxt.com/product/n7-b550) +- **CPU**: AMD Ryzen 7 5700G with Radeon Graphics +- **GPU**: N/A - I specifically chose one of the few AMD CPUs that support onboard graphics. -- **RAM**: 64GB RAM (2x32GB) *Max of 128GB RAM on this motherboard* -- **Boot Drive**: Western Digital 500GB M.2 NVME SSD -- **HDD Bay**: - - 10TB WD White *(shucked, moved from previous server)* - - 8TB WD White *(shucked, moved from previous server)* - - 2 x 8TB WD Red Plus *(Black Friday lined up perfectly with this build, - so I grabbed two of these)* -- **PSU**: Corsair RM850 PSU -- **Extras**: - - Corsair TM3Q Thermal Paste - - Noctua 120mm fan *(replacement for front case fan)* - - 2 x Noctua 80mm fans *(replacement for rear case fans)* - - CableMatters 6Gbps SATA Cables +- **RAM**: 64GB RAM (2x32GB) _Max of 128GB RAM on this motherboard_ +- **Boot Drive**: Western Digital 500GB M.2 NVME SSD +- **HDD Bay**: + - 10TB WD White _(shucked, moved from previous server)_ + - 8TB WD White _(shucked, moved from previous server)_ + - 2 x 8TB WD Red Plus _(Black Friday lined up perfectly with this build, + so I grabbed two of these)_ +- **PSU**: Corsair RM850 PSU +- **Extras**: + - Corsair TM3Q Thermal Paste + - Noctua 120mm fan _(replacement for front case fan)_ + - 2 x Noctua 80mm fans _(replacement for rear case fans)_ + - CableMatters 6Gbps SATA Cables # Building the Server @@ -70,8 +70,8 @@ with the tedium of removing the cage to install new drives. # Software -I'm not going to dive into the software as I have done so in other recent -posts. However, I wanted to note that I am using Alpine Linux on this server and +I'm not going to dive into the software as I have done so in other recent posts. +However, I wanted to note that I am using Alpine Linux on this server and hosting most services inside Docker. No virtual machines (VMs) and very few bare-metal services. diff --git a/content/blog/2022-11-29-nginx-referrer-ban-list.md b/content/blog/2022-11-29-nginx-referrer-ban-list.md index 62d00c4..2a7f68f 100644 --- a/content/blog/2022-11-29-nginx-referrer-ban-list.md +++ b/content/blog/2022-11-29-nginx-referrer-ban-list.md @@ -20,7 +20,7 @@ doas nano /etc/nginx/banlist.conf Next, paste the following contents in and fill out the regexes with whichever domains you're blocking. -``` conf +```conf # /etc/nginx/banlist.conf map $http_referer $bad_referer { @@ -45,7 +45,7 @@ doas nano /etc/nginx/nginx.conf Within this file, find the `http` block and add your ban list file location to the end of the block. -``` conf +```conf # /etc/nginx/nginx.conf http { @@ -76,7 +76,7 @@ Code](https://en.wikipedia.org/wiki/List_of_HTTP_status_codes) you want. Code 403 (Forbidden) is logical in this case since you are preventing a client connection due to a banned domain. -``` conf +```conf server { ... @@ -108,7 +108,7 @@ curl https://cleberg.net The HTML contents of the page come back successfully: -``` html +```html <!doctype html>...</html> ``` @@ -122,12 +122,15 @@ This time, I'm met with a 403 Forbidden response page. That means we are successful and any clients being referred from a banned domain will be met with this same response code. -``` html +```html <html> -<head><title>403 Forbidden</title></head> -<body> -<center><h1>403 Forbidden</h1></center> -<hr><center>nginx</center> -</body> + <head> + <title>403 Forbidden</title> + </head> + <body> + <center><h1>403 Forbidden</h1></center> + <hr /> + <center>nginx</center> + </body> </html> ``` diff --git a/content/blog/2022-12-01-nginx-compression.md b/content/blog/2022-12-01-nginx-compression.md index 492b04e..434b42a 100644 --- a/content/blog/2022-12-01-nginx-compression.md +++ b/content/blog/2022-12-01-nginx-compression.md @@ -22,10 +22,10 @@ nano /etc/nginx/nginx.conf Within the `http` block, find the section that shows something like the block below. This is the default gzip configuration I found in my `nginx.conf` file on -Alpine Linux 3.17. Yours may look slightly different, just make sure that -you're not creating any duplicate gzip options. +Alpine Linux 3.17. Yours may look slightly different, just make sure that you're +not creating any duplicate gzip options. -``` conf +```conf # Enable gzipping of responses. #gzip on; @@ -35,7 +35,7 @@ gzip_vary on; Remove the default gzip lines and replace them with the following: -``` conf +```conf # Enable gzipping of responses. gzip on; gzip_vary on; @@ -50,25 +50,25 @@ gzip_disable "MSIE [1-6]"; Each of the lines above enables a different aspect of the gzip response for Nginx. Here are the full explanations: -- `gzip` -- Enables or disables gzipping of responses. -- `gzip_vary` -- Enables or disables inserting the "Vary: Accept-Encoding" - response header field if the directives gzip, gzip~static~, or gunzip are - active. -- `gzip_min_length` -- Sets the minimum length of a response that will be - gzipped. The length is determined only from the "Content-Length" response - header field. -- `gzip_proxied` -- Enables or disables gzipping of responses for proxied - requests depending on the request and response. The fact that the request is - proxied is determined by the presence of the "Via" request header field. -- `gzip_types` -- Enables gzipping of responses for the specified MIME types in - addition to "text/html". The special value "*" matches any MIME type - (0.8.29). Responses with the "text/html" type are always compressed. -- `gzip_disable` -- Disables gzipping of responses for requests with - "User-Agent" header fields matching any of the specified regular - expressions. - - The special mask "msie6" (0.7.12) corresponds to the regular expression - "MSIE [4-6].", but works faster. Starting from version 0.8.11, "MSIE - 6.0; ... SV1" is excluded from this mask. +- `gzip` -- Enables or disables gzipping of responses. +- `gzip_vary` -- Enables or disables inserting the "Vary: Accept-Encoding" + response header field if the directives gzip, gzip~static~, or gunzip are + active. +- `gzip_min_length` -- Sets the minimum length of a response that will be + gzipped. The length is determined only from the "Content-Length" response + header field. +- `gzip_proxied` -- Enables or disables gzipping of responses for proxied + requests depending on the request and response. The fact that the request is + proxied is determined by the presence of the "Via" request header field. +- `gzip_types` -- Enables gzipping of responses for the specified MIME types + in addition to "text/html". The special value "\*" matches any MIME type + (0.8.29). Responses with the "text/html" type are always compressed. +- `gzip_disable` -- Disables gzipping of responses for requests with + "User-Agent" header fields matching any of the specified regular + expressions. + - The special mask "msie6" (0.7.12) corresponds to the regular expression + "MSIE [4-6].", but works faster. Starting from version 0.8.11, "MSIE + 6.0; ... SV1" is excluded from this mask. More information on these directives and their options can be found on the [Module diff --git a/content/blog/2022-12-07-nginx-wildcard-redirect.md b/content/blog/2022-12-07-nginx-wildcard-redirect.md index e8339b9..277424b 100644 --- a/content/blog/2022-12-07-nginx-wildcard-redirect.md +++ b/content/blog/2022-12-07-nginx-wildcard-redirect.md @@ -20,7 +20,7 @@ Instead, I finally found a solution that allows me to redirect both subdomains AND trailing content. For example, both of these URLs now redirect properly using the logic I'll explain below: -``` txt +```txt # Example 1 - Simple base domain redirect with trailing content https://domain1.com/blog/alpine-linux/ -> https://domain2.com/blog/alpine-linux/ @@ -44,7 +44,7 @@ doas nano /etc/nginx/http.d/domain1.conf Within this file, I had one block configured to redirect HTTP requests to HTTPS for the base domain and all subdomains. -``` conf +```conf server { listen [::]:80; listen 80; @@ -66,7 +66,7 @@ For the base domain, I have another `server` block dedicated to redirecting all base domain requests. You can see that the `rewrite` line is instructing Nginx to gather all trailing content and append it to the new `domain2.com` URL. -``` conf +```conf server { listen [::]:443 ssl http2; listen 443 ssl http2; @@ -91,7 +91,7 @@ Once the server gets to the `rewrite` line, it pulls the `subdomain` variable from above and uses it on the new `domain2.com` domain before appending the trailing content (`$request_uri`). -``` conf +```conf server { listen [::]:443 ssl http2; listen 443 ssl http2; diff --git a/content/blog/2022-12-17-st.md b/content/blog/2022-12-17-st.md index 13236a0..732179e 100644 --- a/content/blog/2022-12-17-st.md +++ b/content/blog/2022-12-17-st.md @@ -57,8 +57,8 @@ Note that customizing `st` requires you to modify the source files or to download one of the [available patches](https://st.suckless.org/patches/) for suckless.org. -If you've already installed `st` and want to customize or install a patch, -start by uninstalling the current program. +If you've already installed `st` and want to customize or install a patch, start +by uninstalling the current program. ```sh cd ~/suckless/st @@ -75,8 +75,8 @@ wget https://st.suckless.org/patches/defaultfontsize/st-defaultfontsize-20210225 ``` Once the file is downloaded inside the `st` folder, apply the patch and -re-install the program. You may need to install the `patch` command if you -don't have it installed already (you should have installed it above). +re-install the program. You may need to install the `patch` command if you don't +have it installed already (you should have installed it above). ```sh patch -i st-defaultfontsize-20210225-4ef0cbd.diff diff --git a/content/blog/2022-12-23-alpine-desktop.md b/content/blog/2022-12-23-alpine-desktop.md index ee4b1a4..810f71d 100644 --- a/content/blog/2022-12-23-alpine-desktop.md +++ b/content/blog/2022-12-23-alpine-desktop.md @@ -59,7 +59,7 @@ For v3.17, the `repositories` file should look like this: nano /etc/apk/repositories ``` -``` conf +```conf #/media/sda/apks http://mirrors.gigenet.com/alpinelinux/v3.17/main http://mirrors.gigenet.com/alpinelinux/v3.17/community @@ -193,7 +193,7 @@ Then, I added the Wi-Fi entry to the bottom of the networking interface file: nano /etc/network/interfaces ``` -``` conf +```conf auto wlan0 iface wlan0 inet dhcp ``` @@ -215,7 +215,7 @@ Really, the solution was to enable the `NameResolvingService=resolvconf` in doas nano /etc/iwd/main.conf ``` -``` conf +```conf [Network] NameResolvingService=resolvconf @@ -248,7 +248,7 @@ sway. nano ~/.config/sway/config ``` -``` conf +```conf # Run pipewire audio server exec /usr/libexec/pipewire-launcher diff --git a/content/blog/2023-01-05-mass-unlike-tumblr-posts.md b/content/blog/2023-01-05-mass-unlike-tumblr-posts.md index 971b61a..2e0178e 100644 --- a/content/blog/2023-01-05-mass-unlike-tumblr-posts.md +++ b/content/blog/2023-01-05-mass-unlike-tumblr-posts.md @@ -26,14 +26,18 @@ buttons. Tumblr's unlike buttons are structured as you can see in the following code block. All unlike buttons have an `aria-label` with a value of `Unlike`. -``` html +```html <button class="TRX6J" aria-label="Unlike"> - <span class="EvhBA B1Z5w ztpfZ" tabindex="-1"> - <svg xmlns="http://www.w3.org/2000/svg" height="21" width="23" - role="presentation"> - <use href="#managed-icon__like-filled"></use> - </svg> - </span> + <span class="EvhBA B1Z5w ztpfZ" tabindex="-1"> + <svg + xmlns="http://www.w3.org/2000/svg" + height="21" + width="23" + role="presentation" + > + <use href="#managed-icon__like-filled"></use> + </svg> + </span> </button> ``` @@ -46,8 +50,8 @@ Further, be sure to scroll down to the bottom and force Tumblr to load more posts so that this script unlikes more posts at a time. Once you are logged in and the page is loaded, open the Developer Tools and be -sure you're on the "Console" tab. It should look something like this (this is -in Firefox, Chromium should be similar): +sure you're on the "Console" tab. It should look something like this (this is in +Firefox, Chromium should be similar):  @@ -58,17 +62,17 @@ unlike it. Optionally, you can comment-out the line `elements[i].click();` and uncomment the `console.log()` lines to simply print out information without performing any -actions. This can be useful to debug issues or confirm that the code below -isn't doing anything you don't want it to. +actions. This can be useful to debug issues or confirm that the code below isn't +doing anything you don't want it to. -``` javascript +```javascript const elements = document.querySelectorAll('[aria-label="Unlike"]'); // console.log(elements); // 👉 [button] -for (let i=0; i < elements.length; i++) { - // console.log(elements[i]); - elements[i].click(); -} +for (let i = 0; i < elements.length; i++) { + // console.log(elements[i]); + elements[i].click(); +} ``` # Results diff --git a/content/blog/2023-01-08-fedora-login-manager.md b/content/blog/2023-01-08-fedora-login-manager.md index 8e98610..59c0112 100644 --- a/content/blog/2023-01-08-fedora-login-manager.md +++ b/content/blog/2023-01-08-fedora-login-manager.md @@ -33,7 +33,7 @@ In order to launch i3 manually, you need to set up your X session properly. To start, create or edit the `~/.xinitrc` file to include the following at the bottom. -``` config +```config exec i3 ``` diff --git a/content/blog/2023-01-21-flatpak-symlinks.md b/content/blog/2023-01-21-flatpak-symlinks.md index 382762f..634867a 100644 --- a/content/blog/2023-01-21-flatpak-symlinks.md +++ b/content/blog/2023-01-21-flatpak-symlinks.md @@ -14,8 +14,8 @@ and manually running the Flatpak app with the lengthy `flatpak run ...` command. In the past, I manually created aliases in my `.zshrc` file for certain apps. For example, an alias would look like the example below. -This would allow me to run the command fast within the terminal, but it -wouldn't allow me to run it in an application launcher. +This would allow me to run the command fast within the terminal, but it wouldn't +allow me to run it in an application launcher. ```sh # ~/.zshrc @@ -27,8 +27,7 @@ tiling WMs I use and their application launchers - `dmenu` and `bemenu`. # Creating Symlinks for Flatpak Apps -Let's use the example of Librewolf below. I can install the application like -so: +Let's use the example of Librewolf below. I can install the application like so: ```sh flatpak install flathub io.gitlab.librewolf-community diff --git a/content/blog/2023-01-23-random-wireguard.md b/content/blog/2023-01-23-random-wireguard.md index 1b42a3f..6128254 100644 --- a/content/blog/2023-01-23-random-wireguard.md +++ b/content/blog/2023-01-23-random-wireguard.md @@ -7,8 +7,8 @@ draft = false # Mullvad Wireguard -If you're using an OS that does not support one of Mullvad's apps, you're -likely using the Wireguard configuration files instead. +If you're using an OS that does not support one of Mullvad's apps, you're likely +using the Wireguard configuration files instead. If not, the first step is to visit Mullvad's [Wireguard configuration files](https://mullvad.net/en/account/#/wireguard-config) page and download a @@ -64,7 +64,7 @@ chmod +x ~/vpn.sh The output should look like the following: -``` txt +```txt doas (user@host) password: # ... The script will process all of the iptables and wg commands here @@ -75,8 +75,8 @@ Printing new IP info: You are connected to Mullvad (server country-city-wg-num). Your IP address is 12.345.678.99 ``` -That's all there is to it. You can see your new location and IP via the -`printf` and `curl` commands included in the script. +That's all there is to it. You can see your new location and IP via the `printf` +and `curl` commands included in the script. You can also go to the [Connection Check \| Mullvad](https://mullvad.net/en/check/) page to see if you are fully connected @@ -104,8 +104,8 @@ wg-quick down /home/user/mullvad/us-lax-wg-104.conf ``` I have a TODO item on figuring out how to easily export an environment variable -that contains the configuration file's full name, so that I can just execute -the following: +that contains the configuration file's full name, so that I can just execute the +following: ```sh # Ideal situation if I can export the $file variable to the environment diff --git a/content/blog/2023-01-28-self-hosting-wger.md b/content/blog/2023-01-28-self-hosting-wger.md index f1d4467..6a7a04c 100644 --- a/content/blog/2023-01-28-self-hosting-wger.md +++ b/content/blog/2023-01-28-self-hosting-wger.md @@ -18,29 +18,29 @@ own after installing wger: 1. Dashboard - - Dashboard view of Workout Schedule, Nutrition Plan, Weight Graph, & last + - Dashboard view of Workout Schedule, Nutrition Plan, Weight Graph, & last 5 Weight Logs 2. Training - - Workout Log - - Workout Schedule - - Calendar (shows weight logs and Bad/Neutral/Good days) - - Gallery (shows images you upload) - - Workout templates - - Public templates - - Exercises + - Workout Log + - Workout Schedule + - Calendar (shows weight logs and Bad/Neutral/Good days) + - Gallery (shows images you upload) + - Workout templates + - Public templates + - Exercises 3. Nutrition - - Nutrition plans - - BMI calculator - - Daily calories calculator - - Ingredient overview + - Nutrition plans + - BMI calculator + - Daily calories calculator + - Ingredient overview 4. Body Weight - - Weight overview + - Weight overview ## Documentation @@ -67,14 +67,14 @@ above. A few notes to explain the changes I made to the default files: -- I updated the `ALLOW_REGISTRAION` variable in `prod.env` to `False` after I - created an account via my LAN connection, **before** I connected this app to a - publicly-available domain. -- I uncommented and updated `CSRF_TRUSTED_ORIGINS` to be equal to the public - version of this app: `https://wger.example.com`. -- I updated the port within `docker-compose.yml`, within the `nginx` block. The - port I updated this to will be reflected in my nginx configuration file on the - server (NOT the wger nginx.conf file). +- I updated the `ALLOW_REGISTRAION` variable in `prod.env` to `False` after I + created an account via my LAN connection, **before** I connected this app to + a publicly-available domain. +- I uncommented and updated `CSRF_TRUSTED_ORIGINS` to be equal to the public + version of this app: `https://wger.example.com`. +- I updated the port within `docker-compose.yml`, within the `nginx` block. + The port I updated this to will be reflected in my nginx configuration file + on the server (NOT the wger nginx.conf file). ## Deploy @@ -89,17 +89,17 @@ You can now visit the website on your LAN by going to `localhost:YOUR_PORT` or by the server's IP, if you're not on the same machine that is running the container. -If you wish to connect this app to a public domain name, you'll need to point -an `A` DNS record from the domain to your server's public IP. You'll then need -to create a configuration file for whichever web server or reverse proxy you're +If you wish to connect this app to a public domain name, you'll need to point an +`A` DNS record from the domain to your server's public IP. You'll then need to +create a configuration file for whichever web server or reverse proxy you're using. Wger's README suggests the following reverse proxy configuration for Nginx: -``` conf +```conf upstream wger { # This port should match the port in the `nginx` block of docker-compose.yml - # If the container is running on this same machine, replace this with + # If the container is running on this same machine, replace this with # server 127.0.0.1:8080 server 123.456.789.0:8080; } diff --git a/content/blog/2023-02-02-exploring-hare.md b/content/blog/2023-02-02-exploring-hare.md index 1424aff..4368fdf 100644 --- a/content/blog/2023-02-02-exploring-hare.md +++ b/content/blog/2023-02-02-exploring-hare.md @@ -33,8 +33,8 @@ program. ## Installation -I'm currently running Alpine Linux on my Thinkpad, so the installation was -quite easy as there is a package for Hare in the `apk` repositories. +I'm currently running Alpine Linux on my Thinkpad, so the installation was quite +easy as there is a package for Hare in the `apk` repositories. ```sh doas apk add hare hare-doc @@ -132,8 +132,8 @@ hare build -o example file.ha While I was able to piece everything together eventually, the biggest downfall right now in Hare's documentation. For such a new project, the - documentation is in a great spot. However, bare specifications don't help - as much as a brief examples section would. + documentation is in a great spot. However, bare specifications don't help as + much as a brief examples section would. For example, it took me a while to figure out what the `u64n` function was looking for. I could tell that it took two parameters and the second was my @@ -150,8 +150,8 @@ hare build -o example file.ha enjoy seeing in Hare, such as one to convert decimal (base 10) values to hexadecimal (base 16). - If I'm feeling comfortable with my math, I may work on the list of - functions I want and see if any can make it into the Hare source code. + If I'm feeling comfortable with my math, I may work on the list of functions + I want and see if any can make it into the Hare source code. 3. Overall Thoughts diff --git a/content/blog/2023-05-22-burnout.md b/content/blog/2023-05-22-burnout.md index fefd845..7f1e9ad 100644 --- a/content/blog/2023-05-22-burnout.md +++ b/content/blog/2023-05-22-burnout.md @@ -5,7 +5,7 @@ description = "" draft = false +++ -# RE: Burnout {#re-burnout-1} +# RE: Burnout I recently read [Drew DeVault's post on burnout](https://drewdevault.com/2023/05/01/2023-05-01-Burnout.html) around the @@ -41,5 +41,5 @@ programming, athletics, games, etc. You may have noticed my absence if you're in the same channels, forums, and rooms that I am, but I should finally be active again. -I'm hoping to break an item out of my backlog soon and start working on -building a new project or hack around with a stale one. +I'm hoping to break an item out of my backlog soon and start working on building +a new project or hack around with a stale one. diff --git a/content/blog/2023-06-08-goaccess-geoip.md b/content/blog/2023-06-08-goaccess-geoip.md index 5cce686..b6cf33e 100644 --- a/content/blog/2023-06-08-goaccess-geoip.md +++ b/content/blog/2023-06-08-goaccess-geoip.md @@ -8,7 +8,7 @@ draft = false # Overview [GoAccess](https://goaccess.io/) is an open source real-time web log analyzer -and interactive viewer that runs in a terminal in *nix systems or through your +and interactive viewer that runs in a terminal in \*nix systems or through your browser. # Installation diff --git a/content/blog/2023-06-08-self-hosting-baikal.md b/content/blog/2023-06-08-self-hosting-baikal.md index b56865a..c53da2b 100644 --- a/content/blog/2023-06-08-self-hosting-baikal.md +++ b/content/blog/2023-06-08-self-hosting-baikal.md @@ -28,14 +28,14 @@ the `ports` section to use any port on your server to pass through to port 80 in the container. You can also edit the `volumes` section to use docker volumes instead of local folders. -``` conf +```conf version: "2" services: baikal: image: ckulka/baikal:nginx restart: always ports: - - "8567:80" + - "8567:80" volumes: - ./config:/var/www/baikal/config - ./data:/var/www/baikal/Specific @@ -93,7 +93,7 @@ nano dav Within this file, paste in the configuration from below and change `dav.example.com` to match the URL you'll be using. -``` conf +```conf server { if ($host ~ ^[^.]+\.example\.com$) { return 301 https://$host$request_uri; diff --git a/content/blog/2023-06-18-unifi-ip-blocklist.md b/content/blog/2023-06-18-unifi-ip-blocklist.md index 0d1e014..9e8a860 100644 --- a/content/blog/2023-06-18-unifi-ip-blocklist.md +++ b/content/blog/2023-06-18-unifi-ip-blocklist.md @@ -7,8 +7,8 @@ draft = false # Identifying Abusive IPs -If you're like me and use Unifi network equipment at the edge of the network -you manage, you may know that Unifi is only somewhat decent at identifying and +If you're like me and use Unifi network equipment at the edge of the network you +manage, you may know that Unifi is only somewhat decent at identifying and blocking IPs that represent abusive or threat actors. While Unifi has a [threat @@ -28,6 +28,7 @@ blocked yet. # Create an IP Group Profile To start, login to the Unifi machine's web GUI and navigate to the Network app + > Settings > Profiles. Within this page, choose the `IP Groups` tab and click `Create New`. @@ -58,12 +59,12 @@ navigate to the Network app > Settings > Firewall & Security. Within this screen, find the Firewall Rules table and click `Create Entry`. This entry should contain the following settings: -- Type: `Internet In` -- Description: `<Your Custom Rule>` -- Rule Applied: `Before Predefined Rules` -- Action: `Drop` -- Source Type: `Port/IP Group` -- IPv4 Address Group: `<Name of the Group Profile You Created Above>` +- Type: `Internet In` +- Description: `<Your Custom Rule>` +- Rule Applied: `Before Predefined Rules` +- Action: `Drop` +- Source Type: `Port/IP Group` +- IPv4 Address Group: `<Name of the Group Profile You Created Above>` Customize the remaining configurations to your liking, and then save and enable the firewall rule. diff --git a/content/blog/2023-06-20-audit-review-template.md b/content/blog/2023-06-20-audit-review-template.md index 853bbd1..ede3092 100644 --- a/content/blog/2023-06-20-audit-review-template.md +++ b/content/blog/2023-06-20-audit-review-template.md @@ -7,7 +7,7 @@ draft = false # Overview -This post is a *very* brief overview on the basic process to review audit test +This post is a _very_ brief overview on the basic process to review audit test results, focusing on work done as part of a financial statement audit (FSA) or service organization controls (SOC) report. @@ -25,52 +25,53 @@ variety of engagements, while still ensuring that all key areas are covered. 1. [ ] Check all documents for spelling and grammar. 2. [ ] Ensure all acronyms are fully explained upon first use. 3. [ ] For all people referenced, use their full names and job titles upon first - use. + use. 4. [ ] All supporting documents must cross-reference to the lead sheet and - vice-versa. + vice-versa. 5. [ ] Verify that the control has been adequately tested: - [ ] **Test of Design**: Did the tester obtain information regarding how - the control should perform normally and abnormally (e.g., emergency - scenarios)? + the control should perform normally and abnormally (e.g., emergency + scenarios)? - [ ] **Test of Operating Effectiveness**: Did the tester inquire, observe, - inspect, or re-perform sufficient evidence to support their conclusion - over the control? Inquiry alone is not adequate! + inspect, or re-perform sufficient evidence to support their conclusion + over the control? Inquiry alone is not adequate! 6. [ ] For any information used in the control, whether by the control operator - or by the tester, did the tester appropriately document the source (system or - person), extraction method, parameters, and completeness and accuracy (C&A)? + or by the tester, did the tester appropriately document the source + (system or person), extraction method, parameters, and completeness and + accuracy (C&A)? - [ ] For any reports, queries, etc. used in the extraction, did the tester - include a copy and notate C&A considerations? + include a copy and notate C&A considerations? 7. [ ] Did the tester document the specific criteria that the control is being - tested against? + tested against? 8. [ ] Did the tester notate in the supporting documents where each criterion - was satisfied? + was satisfied? 9. [ ] If testing specific policies or procedures, are the documents adequate? - [ ] e.g., a test to validate that a review of policy XYZ occurs - periodically should also evaluate the sufficiency of the policy itself, if - meant to cover the risk that such a policy does not exist and is not - reviewed. + periodically should also evaluate the sufficiency of the policy + itself, if meant to cover the risk that such a policy does not exist + and is not reviewed. 10. [ ] Does the test cover the appropriate period under review? - [ ] If the test is meant to cover only a portion of the audit period, do - other controls exist to mitigate the risks that exist for the remainder of - the period? + other controls exist to mitigate the risks that exist for the + remainder of the period? 11. [ ] For any computer-aided audit tools (CAATs) or other automation - techniques used in the test, is the use of such tools explained and - appropriately documented? + techniques used in the test, is the use of such tools explained and + appropriately documented? 12. [ ] If prior-period documentation exists, are there any missing pieces of - evidence that would further enhance the quality of the test? + evidence that would further enhance the quality of the test? 13. [ ] Was any information discovered during the walkthrough or inquiry phase - that was not incorporated into the test? + that was not incorporated into the test? 14. [ ] Are there new rules or expectations from your company's internal - guidance or your regulatory bodies that would affect the audit approach for - this control? + guidance or your regulatory bodies that would affect the audit approach + for this control? 15. [ ] Was an exception, finding, or deficiency identified as a result of this - test? + test? - [ ] Was the control deficient in design, operation, or both? - [ ] What was the root cause of the finding? - [ ] Does the finding indicate other findings or potential fraud? - [ ] What's the severity and scope of the finding? - [ ] Do other controls exist as a form of compensation against the - finding's severity, and do they mitigate the risk within the control - objective? + finding's severity, and do they mitigate the risk within the control + objective? - [ ] Does the finding exist at the end of the period, or was it resolved - within the audit period? + within the audit period? diff --git a/content/blog/2023-06-23-byobu.md b/content/blog/2023-06-23-byobu.md index e1607b9..83a0d8d 100644 --- a/content/blog/2023-06-23-byobu.md +++ b/content/blog/2023-06-23-byobu.md @@ -38,8 +38,8 @@ explore should be the keybindings section. The keybindings are configured as follows: -``` txt -byobu keybindings can be user defined in /usr/share/byobu/keybindings/ (or +```txt +byobu keybindings can be user defined in /usr/share/byobu/keybindings/ (or within .screenrc if byobu-export was used). The common key bindings are: F2 - Create a new window diff --git a/content/blog/2023-06-23-self-hosting-convos.md b/content/blog/2023-06-23-self-hosting-convos.md index 6ca90c3..703a598 100644 --- a/content/blog/2023-06-23-self-hosting-convos.md +++ b/content/blog/2023-06-23-self-hosting-convos.md @@ -10,15 +10,15 @@ draft = false [Convos](https://convos.chat/) is an always-online web client for IRC. It has a few features that made it attractive to me as a self-hosted option: -- Extremely simple Docker Compose installation method. -- Runs in the background and monitors chats even while you're not logged in. -- Neatly organized sidebar for conversation and client settings. -- Ability to connect to different hosts and create profiles for hosts. -- By default, registration is closed to the public. You can enable public - registration on the Settings page or generate invitation links on the Users - page. -- Customization of the client theme, organization name and URL, admin email, and - video service. +- Extremely simple Docker Compose installation method. +- Runs in the background and monitors chats even while you're not logged in. +- Neatly organized sidebar for conversation and client settings. +- Ability to connect to different hosts and create profiles for hosts. +- By default, registration is closed to the public. You can enable public + registration on the Settings page or generate invitation links on the Users + page. +- Customization of the client theme, organization name and URL, admin email, + and video service. # Docker Installation @@ -34,7 +34,7 @@ file. You can customize the host port to be something unique, such as `21897:3000`. You can also change the `data` folder to be a docker volume instead, if you prefer. -``` config +```config version: '3' services: @@ -71,7 +71,7 @@ Within the nginx configuration file, paste the following content and be sure to update `convos.example.com` to match your domain and `127.0.0.1:3000` to match the port you opened in the `docker-compose.yml` file. -``` config +```config # Host and port where convos is running upstream convos_upstream { server 127.0.0.1:3000; } @@ -138,22 +138,22 @@ Convos, the default sever is libera.chat. Simply click the `libera` conversation at the top of the sidebar to open it. Once the chat is open, you can claim a nickname by typing: -``` txt +```txt /nick <nick> ``` If the nickname is available, and you'd like to register the nickname to yourself, you'll need to type another command: -``` txt -/msg NickServ REGISTER +```txt +/msg NickServ REGISTER <password> <email> ``` On libera.chat, the server will send a confirmation email with a command that you must message in IRC to verify registration of the nickname: -``` txt +```txt /msg NickServ VERIFY REGISTER <nick> <verification_code> ``` diff --git a/content/blog/2023-06-28-backblaze-b2.md b/content/blog/2023-06-28-backblaze-b2.md index fd93abd..402a6c8 100644 --- a/content/blog/2023-06-28-backblaze-b2.md +++ b/content/blog/2023-06-28-backblaze-b2.md @@ -15,11 +15,11 @@ $0.01/GB/month. However, there are free tiers: -- The first 10 GB of storage is free. -- The first 1 GB of data downloaded each day is free. -- Class A transactions are free. -- The first 2500 Class B transactions each day are free. -- The first 2500 Class C transactions each day are free. +- The first 10 GB of storage is free. +- The first 1 GB of data downloaded each day is free. +- Class A transactions are free. +- The first 2500 Class B transactions each day are free. +- The first 2500 Class C transactions each day are free. You can see which API calls fall into categories A, B, or C here: [Pricing Organized by API @@ -42,8 +42,8 @@ file upload and then sync an entire directory to my Backblaze bucket. # Create a Bucket Before you can start uploading, you need to create a bucket. If you're familiar -with other object storage services, this will feel familiar. If not, it's -pretty simple to create one. +with other object storage services, this will feel familiar. If not, it's pretty +simple to create one. As their webpage says: @@ -55,10 +55,10 @@ As their webpage says: Once you click the `Create a Bucket` button on their webpage or mobile app, you need to provide the following: -- Bucket Unique Name -- Files in Bucket are: `Private` or `Public` -- Default Encryption: `Disable` or `Enable` -- Object Lock: `Disable` or `Enable` +- Bucket Unique Name +- Files in Bucket are: `Private` or `Public` +- Default Encryption: `Disable` or `Enable` +- Object Lock: `Disable` or `Enable` For my bucket, I created a private bucket with encryption enabled and object lock disabled. @@ -126,7 +126,7 @@ bucket: b2 ls <bucket_name> ``` -``` txt +```txt test.md ``` @@ -166,8 +166,8 @@ Note that symlinks are resolved by b2, so if you have a link from has 10TB of data, `b2` will resolve that link and start uploading all 10TB of data linked within the folder. -If you're not sure if you have any symlinks, a symlink will look like this -(note the `->` symbol): +If you're not sure if you have any symlinks, a symlink will look like this (note +the `->` symbol): ```sh > ls -lha diff --git a/content/blog/2023-06-30-self-hosting-voyager.md b/content/blog/2023-06-30-self-hosting-voyager.md index 828c0c6..3ec5d83 100644 --- a/content/blog/2023-06-30-self-hosting-voyager.md +++ b/content/blog/2023-06-30-self-hosting-voyager.md @@ -48,7 +48,7 @@ I will be using a `docker-compose.yml` file to run this container, instead of a nano docker-compose.yml ``` -``` conf +```conf version: "2" services: voyager: @@ -70,8 +70,8 @@ The web app will now be available at the following address: ## Reverse Proxy -If you want to visit this app via an external URL or domain name, you'll need -to set up a reverse proxy. The example below uses Nginx as a reverse proxy. +If you want to visit this app via an external URL or domain name, you'll need to +set up a reverse proxy. The example below uses Nginx as a reverse proxy. Simply create the configuration file, paste the contents below, save the file, symlink the file, and restart Nginx. @@ -80,7 +80,7 @@ symlink the file, and restart Nginx. sudo nano /etc/nginx/sites-available/voyager ``` -``` conf +```conf server { if ($host ~ ^[^.]+\.example\.com$) { return 301 https://$host$request_uri; diff --git a/content/blog/2023-07-12-wireguard-lan.md b/content/blog/2023-07-12-wireguard-lan.md index b12c65e..7a1fad9 100644 --- a/content/blog/2023-07-12-wireguard-lan.md +++ b/content/blog/2023-07-12-wireguard-lan.md @@ -25,7 +25,7 @@ doas mv *.conf /etc/wireguard/ The default configuration files will look something like this: -``` conf +```conf [Interface] # Device: <redacted> PrivateKey = <redacted> @@ -40,9 +40,9 @@ AllowedIPs = <redacted> Endpoint = <redacted> ``` -> Note: If you didn't select the kill switch option, you won't see the -> `PostUp` and `PreDown` lines. In this case, you'll need to modify the script -> below to simply append those lines to the `[Interface]` block. +> Note: If you didn't select the kill switch option, you won't see the `PostUp` +> and `PreDown` lines. In this case, you'll need to modify the script below to +> simply append those lines to the `[Interface]` block. # Editing the Configuration Files @@ -51,15 +51,15 @@ Once you have the files, you'll need to edit them and replace the `PostUp` and I recommend that you do this process as root, since you'll need to be able to access files in `/etc/wireguard`, which are generally owned by root. You can -also try using `sudo` or `doas`, but I didn't test that scenario so you may -need to adjust, as necessary. +also try using `sudo` or `doas`, but I didn't test that scenario so you may need +to adjust, as necessary. ```sh su ``` -Create the Python file that we'll be using to update the Wireguard -configuration files. +Create the Python file that we'll be using to update the Wireguard configuration +files. ```sh nano replace.py @@ -73,7 +73,7 @@ commands. > Note: If your LAN is on a subnet other than `192.168.1.0/24`, you'll need to > update the Python script below appropriately. -``` python +```python import os import fileinput @@ -94,8 +94,8 @@ for file in os.listdir(dir): print("--- done ---") ``` -Once you're done, save and close the file. You can now run the Python script -and watch as each file is updated. +Once you're done, save and close the file. You can now run the Python script and +watch as each file is updated. ```sh python3 replace.py @@ -110,7 +110,7 @@ cat /etc/wireguard/us-chi-wg-001.conf The configuration files should now look like this: -``` conf +```conf [Interface] # Device: <redacted> PrivateKey = <redacted> diff --git a/content/blog/2023-07-19-plex-transcoder-errors.md b/content/blog/2023-07-19-plex-transcoder-errors.md index d007aef..280a41c 100644 --- a/content/blog/2023-07-19-plex-transcoder-errors.md +++ b/content/blog/2023-07-19-plex-transcoder-errors.md @@ -10,21 +10,21 @@ draft = false Occasionally, you may see an error in your Plex client that references a failure with the transcoder conversion process. The specific error wording is: -``` txt +```txt Conversion failed. The transcoder failed to start up. ``` # Debugging the Cause -In order to get a better look at what is causing the error, I'm going to -observe the Plex console while the error occurs. To do this, open the Plex web -client, go to `Settings` > `Manage` > `Console`. Now, try to play the title -again and watch to see which errors occur. +In order to get a better look at what is causing the error, I'm going to observe +the Plex console while the error occurs. To do this, open the Plex web client, +go to `Settings` > `Manage` > `Console`. Now, try to play the title again and +watch to see which errors occur. In my case, you can see the errors below are related to a subtitle file (`.srt`) causing the transcoder to crash. -``` txt +```txt Jul 19, 2023 16:49:34.945 [140184571120440] Error — Couldn't find the file to stream: /movies/Movie Title (2021)/Movie Title (2021).srt Jul 19, 2023 16:49:34.947 [140184532732728] Error — [Req#7611/Transcode/42935159-67C1-4192-9336-DDC6F7BC9330] Error configuring transcoder: TPU: Failed to download sub-stream to temporary file Jul 19, 2023 16:49:35.225 [140184532732728] Warning — [Req#760d/Transcode] Got a request to stop a transcode session without a valid session GUID. diff --git a/content/blog/2023-08-18-agile-auditing.md b/content/blog/2023-08-18-agile-auditing.md index 66f6570..e1b60c4 100644 --- a/content/blog/2023-08-18-agile-auditing.md +++ b/content/blog/2023-08-18-agile-auditing.md @@ -52,20 +52,20 @@ processes and controls at hand. Audit Examples: -- Engagement teams must value the team members, client contacts, and their - interactions over the historical processes and tools that have been used. -- Engagement teams must value a final report that contains sufficient audit - documentation over excessive documentation or scope creep. -- Engagement teams must collaborate with the audit clients as much as feasible - to ensure that both sides are constantly updated with current knowledge of the - engagement's status and any potential findings, rather than waiting for - pre-set meetings or the end of the engagement to communicate. -- Engagement teams must be able to respond to change in an engagement's - schedule, scope, or environment to ensure that the project is completed in a - timely manner and that all relevant areas are tested. - - In terms of an audit department's portfolio, they must be able to respond - to changes in their company's or client's environment and be able to - dynamically change their audit plan accordingly. +- Engagement teams must value the team members, client contacts, and their + interactions over the historical processes and tools that have been used. +- Engagement teams must value a final report that contains sufficient audit + documentation over excessive documentation or scope creep. +- Engagement teams must collaborate with the audit clients as much as feasible + to ensure that both sides are constantly updated with current knowledge of + the engagement's status and any potential findings, rather than waiting for + pre-set meetings or the end of the engagement to communicate. +- Engagement teams must be able to respond to change in an engagement's + schedule, scope, or environment to ensure that the project is completed in a + timely manner and that all relevant areas are tested. + - In terms of an audit department's portfolio, they must be able to + respond to changes in their company's or client's environment and be + able to dynamically change their audit plan accordingly. # Scrum @@ -74,9 +74,9 @@ how an audit team can potentially mold that mindset into the audit world, but how does a team implement these ideas? There are many methods that use an Agile mindset, but I prefer -[Scrum](https://en.wikipedia.org/wiki/Scrum_(software_development)). Scrum is a -framework based on Agile that enables a team to work through a project through a -series of roles, ceremonies, artifacts, and values. +[Scrum](<https://en.wikipedia.org/wiki/Scrum_(software_development)>). Scrum is +a framework based on Agile that enables a team to work through a project through +a series of roles, ceremonies, artifacts, and values. Let's dive into each of these individually. diff --git a/content/blog/2023-09-15-self-hosting-gitweb.md b/content/blog/2023-09-15-self-hosting-gitweb.md index fdc4af3..d687dcb 100644 --- a/content/blog/2023-09-15-self-hosting-gitweb.md +++ b/content/blog/2023-09-15-self-hosting-gitweb.md @@ -34,7 +34,7 @@ Once installed, create an Nginx configuration file. sudo nano /etc/nginx/sites-available/git.example.com ``` -``` conf +```conf server { listen 80; server_name example.com; diff --git a/content/blog/2023-09-19-audit-sql-scripts.md b/content/blog/2023-09-19-audit-sql-scripts.md index 5801773..cddd805 100644 --- a/content/blog/2023-09-19-audit-sql-scripts.md +++ b/content/blog/2023-09-19-audit-sql-scripts.md @@ -18,7 +18,7 @@ types: Oracle, Microsoft SQL, and MySQL. You can use the following SQL script to see all users and their privileges in an Oracle database: -``` sql +```sql SELECT grantee AS "User", privilege AS "Privilege" @@ -52,11 +52,11 @@ You can also extract each table's information separately and perform processing outside the database to explore and determine the information necessary for the audit: -``` sql +```sql SELECT ** FROM sys.dba_role_privs; SELECT ** FROM sys.dba_sys_privs; SELECT ** FROM sys.dba_tab_privs; -SELECT ** FROM sys.dba_users; +SELECT ** FROM sys.dba_users; ``` # Microsoft SQL @@ -64,16 +64,16 @@ SELECT ** FROM sys.dba_users; You can use the following SQL script to see all users and their privileges in a Microsoft SQL Server database ([source](https://stackoverflow.com/a/30040784)): -``` sql +```sql /* Security Audit Report -1) List all access provisioned to a sql user or windows user/group directly +1) List all access provisioned to a sql user or windows user/group directly 2) List all access provisioned to a sql user or windows user/group through a database or application role 3) List all access provisioned to the public role Columns Returned: UserName : SQL or Windows/Active Directory user account. This could also be an Active Directory group. -UserType : Value will be either 'SQL User' or 'Windows User'. This reflects the type of user defined for the +UserType : Value will be either 'SQL User' or 'Windows User'. This reflects the type of user defined for the SQL Server user account. DatabaseUserName: Name of the associated user as defined in the database user account. The database user may not be the same as the server user. @@ -86,70 +86,70 @@ PermissionType : Type of permissions the user/role has on an object. Examples c PermissionState : Reflects the state of the permission type, examples could include GRANT, DENY, etc. This value may not be populated for all roles. Some built in roles have implicit permission definitions. -ObjectType : Type of object the user/role is assigned permissions on. Examples could include USER_TABLE, - SQL_SCALAR_FUNCTION, SQL_INLINE_TABLE_VALUED_FUNCTION, SQL_STORED_PROCEDURE, VIEW, etc. +ObjectType : Type of object the user/role is assigned permissions on. Examples could include USER_TABLE, + SQL_SCALAR_FUNCTION, SQL_INLINE_TABLE_VALUED_FUNCTION, SQL_STORED_PROCEDURE, VIEW, etc. This value may not be populated for all roles. Some built in roles have implicit permission - definitions. -ObjectName : Name of the object that the user/role is assigned permissions on. + definitions. +ObjectName : Name of the object that the user/role is assigned permissions on. This value may not be populated for all roles. Some built in roles have implicit permission definitions. ColumnName : Name of the column of the object that the user/role is assigned permissions on. This value - is only populated if the object is a table, view or a table value function. + is only populated if the object is a table, view or a table value function. */ ---List all access provisioned to a sql user or windows user/group directly -SELECT - [UserName] = CASE princ.[type] +--List all access provisioned to a sql user or windows user/group directly +SELECT + [UserName] = CASE princ.[type] WHEN 'S' THEN princ.[name] WHEN 'U' THEN ulogin.[name] COLLATE Latin1_General_CI_AI END, [UserType] = CASE princ.[type] WHEN 'S' THEN 'SQL User' WHEN 'U' THEN 'Windows User' - END, - [DatabaseUserName] = princ.[name], - [Role] = null, - [PermissionType] = perm.[permission_name], - [PermissionState] = perm.[state_desc], - [ObjectType] = obj.type_desc,--perm.[class_desc], + END, + [DatabaseUserName] = princ.[name], + [Role] = null, + [PermissionType] = perm.[permission_name], + [PermissionState] = perm.[state_desc], + [ObjectType] = obj.type_desc,--perm.[class_desc], [ObjectName] = OBJECT_NAME(perm.major_id), [ColumnName] = col.[name] -FROM +FROM --database user - sys.database_principals princ + sys.database_principals princ LEFT JOIN --Login accounts sys.login_token ulogin on princ.[sid] = ulogin.[sid] -LEFT JOIN +LEFT JOIN --Permissions sys.database_permissions perm ON perm.[grantee_principal_id] = princ.[principal_id] LEFT JOIN --Table columns - sys.columns col ON col.[object_id] = perm.major_id + sys.columns col ON col.[object_id] = perm.major_id AND col.[column_id] = perm.[minor_id] LEFT JOIN sys.objects obj ON perm.[major_id] = obj.[object_id] -WHERE +WHERE princ.[type] in ('S','U') UNION --List all access provisioned to a sql user or windows user/group through a database or application role -SELECT - [UserName] = CASE memberprinc.[type] +SELECT + [UserName] = CASE memberprinc.[type] WHEN 'S' THEN memberprinc.[name] WHEN 'U' THEN ulogin.[name] COLLATE Latin1_General_CI_AI END, [UserType] = CASE memberprinc.[type] WHEN 'S' THEN 'SQL User' WHEN 'U' THEN 'Windows User' - END, - [DatabaseUserName] = memberprinc.[name], - [Role] = roleprinc.[name], - [PermissionType] = perm.[permission_name], - [PermissionState] = perm.[state_desc], - [ObjectType] = obj.type_desc,--perm.[class_desc], + END, + [DatabaseUserName] = memberprinc.[name], + [Role] = roleprinc.[name], + [PermissionType] = perm.[permission_name], + [PermissionState] = perm.[state_desc], + [ObjectType] = obj.type_desc,--perm.[class_desc], [ObjectName] = OBJECT_NAME(perm.major_id), [ColumnName] = col.[name] -FROM +FROM --Role/member associations sys.database_role_members members JOIN @@ -161,39 +161,39 @@ JOIN LEFT JOIN --Login accounts sys.login_token ulogin on memberprinc.[sid] = ulogin.[sid] -LEFT JOIN +LEFT JOIN --Permissions sys.database_permissions perm ON perm.[grantee_principal_id] = roleprinc.[principal_id] LEFT JOIN --Table columns - sys.columns col on col.[object_id] = perm.major_id + sys.columns col on col.[object_id] = perm.major_id AND col.[column_id] = perm.[minor_id] LEFT JOIN sys.objects obj ON perm.[major_id] = obj.[object_id] UNION --List all access provisioned to the public role, which everyone gets by default -SELECT +SELECT [UserName] = '{All Users}', - [UserType] = '{All Users}', - [DatabaseUserName] = '{All Users}', - [Role] = roleprinc.[name], - [PermissionType] = perm.[permission_name], - [PermissionState] = perm.[state_desc], - [ObjectType] = obj.type_desc,--perm.[class_desc], + [UserType] = '{All Users}', + [DatabaseUserName] = '{All Users}', + [Role] = roleprinc.[name], + [PermissionType] = perm.[permission_name], + [PermissionState] = perm.[state_desc], + [ObjectType] = obj.type_desc,--perm.[class_desc], [ObjectName] = OBJECT_NAME(perm.major_id), [ColumnName] = col.[name] -FROM +FROM --Roles sys.database_principals roleprinc -LEFT JOIN +LEFT JOIN --Role permissions sys.database_permissions perm ON perm.[grantee_principal_id] = roleprinc.[principal_id] LEFT JOIN --Table columns - sys.columns col on col.[object_id] = perm.major_id - AND col.[column_id] = perm.[minor_id] -JOIN - --All objects + sys.columns col on col.[object_id] = perm.major_id + AND col.[column_id] = perm.[minor_id] +JOIN + --All objects sys.objects obj ON obj.[object_id] = perm.[major_id] WHERE --Only roles @@ -222,7 +222,7 @@ mysql -u root -p Find all users and hosts with access to the database: -``` sql +```sql SELECT ** FROM information_schema.user_privileges; ``` @@ -243,7 +243,7 @@ after extraction. I have marked the queries below with `SELECT ...` and excluded most `WHERE` clauses for brevity. You should determine the relevant privileges in-scope and query for those privileges to reduce the length of time to query. -``` sql +```sql -- Global Permissions SELECT ... FROM mysql.user; @@ -260,6 +260,6 @@ SELECT ... FROM mysql.columns_priv WHERE db = @db_name; -- Password Configuration -SHOW GLOBAL VARIABLES LIKE 'validate_password%'; +SHOW GLOBAL VARIABLES LIKE 'validate_password%'; SHOW VARIABLES LIKE 'validate_password%'; ``` diff --git a/content/blog/2023-10-04-digital-minimalism.md b/content/blog/2023-10-04-digital-minimalism.md index 6214094..bf923fa 100644 --- a/content/blog/2023-10-04-digital-minimalism.md +++ b/content/blog/2023-10-04-digital-minimalism.md @@ -5,9 +5,9 @@ description = "" draft = false +++ -I've written [a note about minimalism](file:///wiki/#digital-garden) before, -but I wanted to dedicate some time to reflect on digital minimalism and how -I've been able to minimize the impact of digital devices in my life. +I've written [a note about minimalism](file:///wiki/#digital-garden) before, but +I wanted to dedicate some time to reflect on digital minimalism and how I've +been able to minimize the impact of digital devices in my life. > These changes crept up on us and happened fast, before we had a chance to step > back and ask what we really wanted out of the rapid advances of the past @@ -16,29 +16,29 @@ I've been able to minimize the impact of digital devices in my life. > our daily life. We didn't, in other words, sign up for the digital world in > which we're currently entrenched; we seem to have stumbled backward into it. > -> *(Digital Minimalism, 2019)* +> _(Digital Minimalism, 2019)_ # The Principles of Digital Minimalism -As noted in Cal Newport's book, *Digital Minimalism*, there are three main +As noted in Cal Newport's book, _Digital Minimalism_, there are three main principles to digital minimalism that I tend to agree with: 1. Clutter is costly. - - Digital minimalists recognize that cluttering their time and attention - with too many devices, apps, and services creates an overall negative cost - that can swamp the small benefits that each individual item provides in - isolation. + - Digital minimalists recognize that cluttering their time and attention + with too many devices, apps, and services creates an overall negative + cost that can swamp the small benefits that each individual item + provides in isolation. 2. Optimization is important. - - Digital minimalists believe that deciding a particular technology supports - something they value is only the first step. To truly extract its full - potential benefit, it's necessary to think carefully about how they'll - use the technology. + - Digital minimalists believe that deciding a particular technology + supports something they value is only the first step. To truly extract + its full potential benefit, it's necessary to think carefully about how + they'll use the technology. 3. Intentionality is satisfying. - - Digital minimalists derive significant satisfaction from their general - commitment to being more intentional about how they engage with new - technologies. This source of satisfaction is independent of the specific - decisions they make and is one of the biggest reasons that minimalism - tends to be immensely meaningful to its practitioners. + - Digital minimalists derive significant satisfaction from their general + commitment to being more intentional about how they engage with new + technologies. This source of satisfaction is independent of the specific + decisions they make and is one of the biggest reasons that minimalism + tends to be immensely meaningful to its practitioners. # Taking Action @@ -47,47 +47,47 @@ continued performing old habits that are working well: ## Using Devices With Intention -- I already rarely use "social media", mostly limited to forums such as Hacker - News and Tildes, so I've just tweaked my behavior to stop looking for content - in those places when I'm bored. -- Use devices with intention. Each time I pick up a digital device, there should - be an intention to use the device to improve my current situation. No more - endless scrolling or searching for something to interest me. +- I already rarely use "social media", mostly limited to forums such as Hacker + News and Tildes, so I've just tweaked my behavior to stop looking for + content in those places when I'm bored. +- Use devices with intention. Each time I pick up a digital device, there + should be an intention to use the device to improve my current situation. No + more endless scrolling or searching for something to interest me. ## Prevent Distractions -- Disable (most) notifications on all devices. I spent 15-30 minutes going - through the notifications on my phone, watch, and computer to ensure that only - a select few apps have the ability to interrupt me: Calendar, Messages, Phone, - Reminders, & Signal. -- Disable badges for any apps except the ones mentioned in the bullet above. -- Set-up focus profiles across devices so that I can enable different modes, - such as Personal when I only want to see notifications from people I care - about or Do Not Disturb, where absolutely nothing can interrupt me. -- Clean up my home screens. This one was quite easy as I already maintain a - minimalist set-up, but I went extreme by limiting my phone to just eight apps - on the home screen and four in the dock. If I need another app, I'll have to - search or use the app library. -- Remove the work profile from my phone. This was a tough decision as having my - work profile on my device definitely makes my life easier at times, but it - also has quite a negative effect when I'm "always online" and can see the - notifications and team activity 24/7. I believe creating a distinct barrier - between my work and personal devices will be beneficial in the end. +- Disable (most) notifications on all devices. I spent 15-30 minutes going + through the notifications on my phone, watch, and computer to ensure that + only a select few apps have the ability to interrupt me: Calendar, Messages, + Phone, Reminders, & Signal. +- Disable badges for any apps except the ones mentioned in the bullet above. +- Set-up focus profiles across devices so that I can enable different modes, + such as Personal when I only want to see notifications from people I care + about or Do Not Disturb, where absolutely nothing can interrupt me. +- Clean up my home screens. This one was quite easy as I already maintain a + minimalist set-up, but I went extreme by limiting my phone to just eight + apps on the home screen and four in the dock. If I need another app, I'll + have to search or use the app library. +- Remove the work profile from my phone. This was a tough decision as having + my work profile on my device definitely makes my life easier at times, but + it also has quite a negative effect when I'm "always online" and can see the + notifications and team activity 24/7. I believe creating a distinct barrier + between my work and personal devices will be beneficial in the end. ## Creating Alternative Activities This is the most difficult piece, as most of my hobbies and interests lie in the -digital world. However, I'm making a concerted effort to put devices down -unless necessary and force myself to perform other activities in the physical -world instead. +digital world. However, I'm making a concerted effort to put devices down unless +necessary and force myself to perform other activities in the physical world +instead. I've started with a few basics that are always readily available to me: -- Do a chore, such as organizing or cleaning. -- Read a book, study a piece of art, etc. -- Exercise or get outdoors. -- Participate in a hobby, such as photography, birding, disc golf, etc. -- Let yourself be bored and wander into creativity. +- Do a chore, such as organizing or cleaning. +- Read a book, study a piece of art, etc. +- Exercise or get outdoors. +- Participate in a hobby, such as photography, birding, disc golf, etc. +- Let yourself be bored and wander into creativity. # Making Progress diff --git a/content/blog/2023-10-11-self-hosting-authelia.md b/content/blog/2023-10-11-self-hosting-authelia.md index 46773dd..7b5afda 100644 --- a/content/blog/2023-10-11-self-hosting-authelia.md +++ b/content/blog/2023-10-11-self-hosting-authelia.md @@ -23,11 +23,11 @@ portal. This guide assumes you have the following already set-up: -- A registered domain with DNS pointing to your server. -- A subdomain for Authelia (`auth.example.com`) and a subdomain to protect via - Authelia (`app.example.com`). -- A working Nginx web server. -- Docker and docker-compose installed. +- A registered domain with DNS pointing to your server. +- A subdomain for Authelia (`auth.example.com`) and a subdomain to protect via + Authelia (`app.example.com`). +- A working Nginx web server. +- Docker and docker-compose installed. # Installation @@ -49,19 +49,19 @@ Within this file, paste the following content. If you prefer a different local port, modify the port on the left side of the colon on the `9091:9091` line. Be sure to modify the `TZ` variable to your timezone. -``` yml -version: '3.3' +```yml +version: "3.3" services: - authelia: - image: authelia/authelia - container_name: authelia - volumes: - - ./config:/config - ports: - - 9091:9091 - environment: - - TZ=America/Chicago + authelia: + image: authelia/authelia + container_name: authelia + volumes: + - ./config:/config + ports: + - 9091:9091 + environment: + - TZ=America/Chicago ``` Start the container with docker-compose: @@ -93,107 +93,107 @@ and modify as necessary. The major required changes are: -- Any instances of `example.com` should be replaced by your domain. -- `jwt_secret` - Use the `pwgen 40 1` command to generate a secret for yourself. -- `access_control` - Set the Authelia domain to bypass here, as well as any - subdomains you want to protect. -- `session` > `secret` - Use the `pwgen 40 1` command to generate a secret for - yourself. -- `regulation` - Set the variables here to restrict login attempts and bans. -- `storage` > `encryption_key` - Use the `pwgen 40 1` command to generate a - secret for yourself. -- `smtp` - If you have access to an SMTP service, set up the information here to - active outgoing emails. - -``` yml +- Any instances of `example.com` should be replaced by your domain. +- `jwt_secret` - Use the `pwgen 40 1` command to generate a secret for + yourself. +- `access_control` - Set the Authelia domain to bypass here, as well as any + subdomains you want to protect. +- `session` > `secret` - Use the `pwgen 40 1` command to generate a secret for + yourself. +- `regulation` - Set the variables here to restrict login attempts and bans. +- `storage` > `encryption_key` - Use the `pwgen 40 1` command to generate a + secret for yourself. +- `smtp` - If you have access to an SMTP service, set up the information here + to active outgoing emails. + +```yml # yamllint disable rule:comments-indentation --- ############################################################################### # Authelia Configuration # ############################################################################### -theme: dark +theme: dark jwt_secret: aiS5iedaiv6eeVaideeLeich5roo6ohvaf3Vee1a # pwgen 40 1 default_redirection_url: https://example.com server: - host: 0.0.0.0 - port: 9091 - path: "" - read_buffer_size: 4096 - write_buffer_size: 4096 - enable_pprof: false - enable_expvars: false - disable_healthcheck: false - tls: - key: "" - certificate: "" + host: 0.0.0.0 + port: 9091 + path: "" + read_buffer_size: 4096 + write_buffer_size: 4096 + enable_pprof: false + enable_expvars: false + disable_healthcheck: false + tls: + key: "" + certificate: "" log: - level: debug + level: debug totp: - issuer: example.com - period: 30 - skew: 1 + issuer: example.com + period: 30 + skew: 1 authentication_backend: - disable_reset_password: false - refresh_interval: 5m - file: - path: /config/users_database.yml - password: - algorithm: argon2id - iterations: 1 - key_length: 32 - salt_length: 16 - memory: 1024 - parallelism: 8 + disable_reset_password: false + refresh_interval: 5m + file: + path: /config/users_database.yml + password: + algorithm: argon2id + iterations: 1 + key_length: 32 + salt_length: 16 + memory: 1024 + parallelism: 8 access_control: - default_policy: deny - rules: - - domain: - - "auth.example.com" - policy: bypass - - domain: "teddit.example.com" - policy: one_factor + default_policy: deny + rules: + - domain: + - "auth.example.com" + policy: bypass + - domain: "teddit.example.com" + policy: one_factor session: - name: authelia_session - secret: aiS5iedaiv6eeVaideeLeich5roo6ohvaf3Vee1a # pwgen 40 1 - expiration: 3600 - inactivity: 300 - domain: example.com + name: authelia_session + secret: aiS5iedaiv6eeVaideeLeich5roo6ohvaf3Vee1a # pwgen 40 1 + expiration: 3600 + inactivity: 300 + domain: example.com regulation: - max_retries: 5 - find_time: 10m - ban_time: 12h + max_retries: 5 + find_time: 10m + ban_time: 12h storage: - local: - path: /config/db.sqlite3 - encryption_key: aiS5iedaiv6eeVaideeLeich5roo6ohvaf3Vee1a # pwgen 40 1 + local: + path: /config/db.sqlite3 + encryption_key: aiS5iedaiv6eeVaideeLeich5roo6ohvaf3Vee1a # pwgen 40 1 notifier: - disable_startup_check: true - smtp: - username: user@example.com - password: password - host: smtp.example.com - port: 465 - sender: user@example.com - identifier: example.com - subject: "[Authelia] {title}" - startup_check_address: user@example.com - disable_require_tls: false - disable_html_emails: true - tls: - skip_verify: false - minimum_version: TLS1.2 -... + disable_startup_check: true + smtp: + username: user@example.com + password: password + host: smtp.example.com + port: 465 + sender: user@example.com + identifier: example.com + subject: "[Authelia] {title}" + startup_check_address: user@example.com + disable_require_tls: false + disable_html_emails: true + tls: + skip_verify: false + minimum_version: TLS1.2 ``` ## Authelia Users @@ -212,17 +212,17 @@ To generate the password, go to [Argon2 Hash Generator](https://argon2.online), generate a random salt, and make sure the rest of the settings match the `authentication_backend` section of `configuration.yml` file. -``` yaml +```yaml users: - my_username: - displayname: "My User" - # Generated at https://argon2.online/ -- match the settings in - # the `authentication_backend` section of configuration.yml - password: "" - email: email@example.com - groups: - - admins - - dev + my_username: + displayname: "My User" + # Generated at https://argon2.online/ -- match the settings in + # the `authentication_backend` section of configuration.yml + password: "" + email: email@example.com + groups: + - admins + - dev ``` Once the app is configured, restart the container from scratch. @@ -247,7 +247,7 @@ Within this file, paste the following information and be sure to update `example.com` to your domain. Make sure the `$upstream_authelia` variable matches the location of your Authelia container. -``` conf +```conf server { if ($host ~ ^[^.]+\.example\.com$) { return 301 https://$host$request_uri; @@ -322,7 +322,7 @@ variables. sudo nano /etc/nginx/sites-available/teddit ``` -``` conf +```conf server { if ($host ~ ^[^.]+\.example\.com$) { return 301 https://$host$request_uri; @@ -441,9 +441,9 @@ authentication domain and presented with the Authelia login portal.  -Once you've successfully authenticated, you can visit your authentication -domain directly and see that you're currently authenticated to any domain -protected by Authelia. +Once you've successfully authenticated, you can visit your authentication domain +directly and see that you're currently authenticated to any domain protected by +Authelia.  diff --git a/content/blog/2023-10-15-alpine-ssh-hardening.md b/content/blog/2023-10-15-alpine-ssh-hardening.md index b81dc12..bb7e71b 100644 --- a/content/blog/2023-10-15-alpine-ssh-hardening.md +++ b/content/blog/2023-10-15-alpine-ssh-hardening.md @@ -68,7 +68,7 @@ ssh-audit localhost If everything succeeded, the results will show as all green. If anything is yellow, orange, or red, you may need to tweak additional settings. -``` txt +```txt #+caption: ssh audit ``` diff --git a/content/blog/2023-10-17-self-hosting-anonymousoverflow.md b/content/blog/2023-10-17-self-hosting-anonymousoverflow.md index eea1fbe..b8f3733 100644 --- a/content/blog/2023-10-17-self-hosting-anonymousoverflow.md +++ b/content/blog/2023-10-17-self-hosting-anonymousoverflow.md @@ -28,19 +28,19 @@ nano docker-compose.yml Within this file, paste the following information. Be sure to change the `APP_URL`, `JWT_SIGNING_SECRET`, and `ports` to match your needs. -``` yaml -version: '3' +```yaml +version: "3" services: anonymousoverflow: - container_name: 'app' - image: 'ghcr.io/httpjamesm/anonymousoverflow:release' + container_name: "app" + image: "ghcr.io/httpjamesm/anonymousoverflow:release" environment: - APP_URL=https://ao.example.com - JWT_SIGNING_SECRET=secret #pwgen 40 1 ports: - - '9380:8080' - restart: 'always' + - "9380:8080" + restart: "always" ``` Save and exit the file when complete. You can now launch the container and @@ -65,7 +65,7 @@ Within this file, paste the following content and repace `ao.example.com` with your URL. You may need to update the SSL certificate statements if your certificates are in a different location. -``` conf +```conf server { if ($host ~ ^[^.]+\.cleberg\.net$) { return 301 https://$host$request_uri; diff --git a/content/blog/2023-11-08-scli.md b/content/blog/2023-11-08-scli.md index 0d01ea4..363e77b 100644 --- a/content/blog/2023-11-08-scli.md +++ b/content/blog/2023-11-08-scli.md @@ -20,15 +20,15 @@ and download the packaged binaries for an easier installation process. In order to use `scli`, you need a few dependencies: -- `openjdk17-jre` - Used as a dependency for the `signal-cli` tool. Version may - vary. -- `signal-cli` - Used as the backbone of the `scli` tool. -- `findutils` - Replaces the standard Busybox version of `xargs`. -- `urwid` - A console user interface library for Python. -- `urwid-readline` - For GNU emacs-like keybinds on the input line. -- `qrencode` - Displays a QR code in the terminal to link the device using your - phone. Not necessary if you're only linking on desktop and can copy/paste the - connection URL. +- `openjdk17-jre` - Used as a dependency for the `signal-cli` tool. Version + may vary. +- `signal-cli` - Used as the backbone of the `scli` tool. +- `findutils` - Replaces the standard Busybox version of `xargs`. +- `urwid` - A console user interface library for Python. +- `urwid-readline` - For GNU emacs-like keybinds on the input line. +- `qrencode` - Displays a QR code in the terminal to link the device using + your phone. Not necessary if you're only linking on desktop and can + copy/paste the connection URL. Let's start by installing the packages available via Alpine's repositories. Be sure to install the latest version of `openjdk`. If you run into Java-related @@ -102,8 +102,8 @@ signal-cli -u USERNAME receive ``` Also be sure to test the daemon to ensure it works properly. If no errors occur, -it's working. If you run into errors because you're not running a DBUS -session, see my notes below. +it's working. If you run into errors because you're not running a DBUS session, +see my notes below. ```sh signal-cli -u USERNAME daemon @@ -115,8 +115,8 @@ This process will differ depending on your desktop environment (DE). If you are running a DE, you likely have a DBUS session running already and can simply launch the program. -However, if you're like me and running your computer straight on the TTY -without a DE, you'll need to start a DBUS session for this program. +However, if you're like me and running your computer straight on the TTY without +a DE, you'll need to start a DBUS session for this program. ```sh # If you're not running a DBUS session yet, you need to start one for scli @@ -136,7 +136,7 @@ information on configuration options. nano ~/.config/sclirc ``` -``` conf +```conf # ~/.config/sclirc wrap-at = 80 diff --git a/content/blog/2023-12-03-unifi-nextdns.md b/content/blog/2023-12-03-unifi-nextdns.md index b004fb8..b00e243 100644 --- a/content/blog/2023-12-03-unifi-nextdns.md +++ b/content/blog/2023-12-03-unifi-nextdns.md @@ -25,12 +25,12 @@ Install instructions for Unifi Dream Machine (UDM) standard and pro routers. Enable SSH: -- Go to your unifi admin interface and select your device (not the controller - settings, but the Dream Machine settings) -- Click on "Settings" at the bottom of the page -- Go to the "Advanced" section on the left pan -- Enable SSH -- Set a SSH password +- Go to your unifi admin interface and select your device (not the controller + settings, but the Dream Machine settings) +- Click on "Settings" at the bottom of the page +- Go to the "Advanced" section on the left pan +- Enable SSH +- Set a SSH password Connect to your router using `ssh root@xxx.xxx.xxx.xxx` with the password you configured. diff --git a/content/blog/2024-01-08-dont-say-hello.md b/content/blog/2024-01-08-dont-say-hello.md index c918cbe..811823a 100644 --- a/content/blog/2024-01-08-dont-say-hello.md +++ b/content/blog/2024-01-08-dont-say-hello.md @@ -20,10 +20,10 @@ Therefore, I have always held a deep displeasure for conversations where people start with "Hello" and then. I searched back through my work messages and found that I received ~50 messages -from ~10 people last year from people that contained "hi", "hey", or -"hello" and did not contain any indication of the purpose of the conversation. -I also noticed that a few of the users were responsible for the large majority -of the cliffhangers. +from ~10 people last year from people that contained "hi", "hey", or "hello" and +did not contain any indication of the purpose of the conversation. I also +noticed that a few of the users were responsible for the large majority of the +cliffhangers. There's no real point to this post, just a desparate request for people to please stop doing this. diff --git a/content/blog/2024-01-09-macos-customization.md b/content/blog/2024-01-09-macos-customization.md index da8f086..ac2ddfd 100644 --- a/content/blog/2024-01-09-macos-customization.md +++ b/content/blog/2024-01-09-macos-customization.md @@ -61,7 +61,7 @@ Integrity Protection (SIP). However, I chose not to do this and it hasn't affected my basic usage of yabai at all. Refer to the [yabai -wiki](https://github.com/koekeishiya/yabai/wiki/Installing-yabai-(latest-release)) +wiki](<https://github.com/koekeishiya/yabai/wiki/Installing-yabai-(latest-release)>) for installation instructions. You will need to ensure that yabai is allowed to access the accessibility and screen recording APIs. @@ -94,7 +94,7 @@ nano ~/.config/skhd/skhdrc For example, I have hotkeys to open my browser and terminal: -``` conf +```conf # Terminal cmd - return : /Applications/iTerm.app/Contents/MacOS/iTerm2 @@ -159,8 +159,8 @@ them by following this process. 2. Navigate to the `Applications` folder. 3. Right-click an application of your choice, and select `Get Info`. 4. Drag the image you downloaded on top of the application's icon at the top of - information window (you will see a green "plus" symbol when you're - hovering over it). + information window (you will see a green "plus" symbol when you're hovering + over it). 5. Release the new icon on top of the old icon and it will update! You can see an example of me dragging a new `signal.icns` file onto my diff --git a/content/blog/2024-01-13-local-llm.md b/content/blog/2024-01-13-local-llm.md index 5f1ca3b..ede130e 100644 --- a/content/blog/2024-01-13-local-llm.md +++ b/content/blog/2024-01-13-local-llm.md @@ -14,10 +14,10 @@ without sacrificing privacy or requiring in-depth technical setup. My requirements for this test: -- Open source platform -- On-device model files -- Minimal required configuration -- Preferably pre-built, but a simple build process is acceptable +- Open source platform +- On-device model files +- Minimal required configuration +- Preferably pre-built, but a simple build process is acceptable I tested a handful of apps and have summarized my favorite (so far) for macOS and iOS below. @@ -25,8 +25,8 @@ and iOS below. > TL;DR - Here are the two that met my requirements and I have found the easiest > to install and use so far: -- macOS: [Ollama](https://ollama.ai/) -- iOS : [LLM Farm](https://llmfarm.site/) +- macOS: [Ollama](https://ollama.ai/) +- iOS : [LLM Farm](https://llmfarm.site/) # macOS @@ -86,8 +86,8 @@ repository](https://github.com/guinmoon/LLMFarm) if you wish. The caveat is that you will have to manually download the model files from the links in the [models.md](https://github.com/guinmoon/LLMFarm/blob/main/models.md) file to -your iPhone to use the app - there's currently no option in the app to reach -out and grab the latest version of any supported model. +your iPhone to use the app - there's currently no option in the app to reach out +and grab the latest version of any supported model. Once you have a file downloaded, you simply create a new chat and select the downloaded model file and ensure the inference matches the requirement in the @@ -96,10 +96,10 @@ downloaded model file and ensure the inference matches the requirement in the See below for a test of the ORCA Mini v3 model: | Chat List | Chat | -|-------------------------------------------------------------------------|-------------------------------------------------------------------| +| ----------------------------------------------------------------------- | ----------------------------------------------------------------- | |  |  | [Enchanted](https://github.com/AugustDev/enchanted) is also an iOS for private -AI models, but it requires a public-facing Ollama API, which did not meet my -"on device requirement." Nonetheless, it's an interesting looking app and I -will likely set it up to test soon. +AI models, but it requires a public-facing Ollama API, which did not meet my "on +device requirement." Nonetheless, it's an interesting looking app and I will +likely set it up to test soon. diff --git a/content/blog/2024-01-26-audit-dashboard.md b/content/blog/2024-01-26-audit-dashboard.md index d274eb1..73cc0a6 100644 --- a/content/blog/2024-01-26-audit-dashboard.md +++ b/content/blog/2024-01-26-audit-dashboard.md @@ -18,11 +18,11 @@ With these tools, we are going to build the following dashboard: This project assumes the following: -- You have access to Alteryx Designer and Power BI Desktop. - - If you only have Power BI Desktop, you may need to perform some analysis - in Power BI instead of Alteryx. -- Your data is in a format that can be imported into Alteryx and/or Power BI. -- You have a basic understanding of data types and visualization. +- You have access to Alteryx Designer and Power BI Desktop. + - If you only have Power BI Desktop, you may need to perform some analysis + in Power BI instead of Alteryx. +- Your data is in a format that can be imported into Alteryx and/or Power BI. +- You have a basic understanding of data types and visualization. # Alteryx: Data Preparation & Analysis @@ -42,25 +42,24 @@ Import](https://img.cleberg.net/blog/20240126-audit-dashboard/alteryx_import.png ## Transform Data -Next, let's replace null data and remove whitespace to clean up our data. We -can do this with the `Data Cleansing` tool in the `Preparation` tab in the -Ribbon. +Next, let's replace null data and remove whitespace to clean up our data. We can +do this with the `Data Cleansing` tool in the `Preparation` tab in the Ribbon. Ensure that the following options are enabled: -- Replace Nulls - - Replace with Blanks (String Fields) - - Replace with 0 (Numeric Fields) -- Remove Unwanted Characters - - Leading and Trailing Whitespace +- Replace Nulls + - Replace with Blanks (String Fields) + - Replace with 0 (Numeric Fields) +- Remove Unwanted Characters + - Leading and Trailing Whitespace 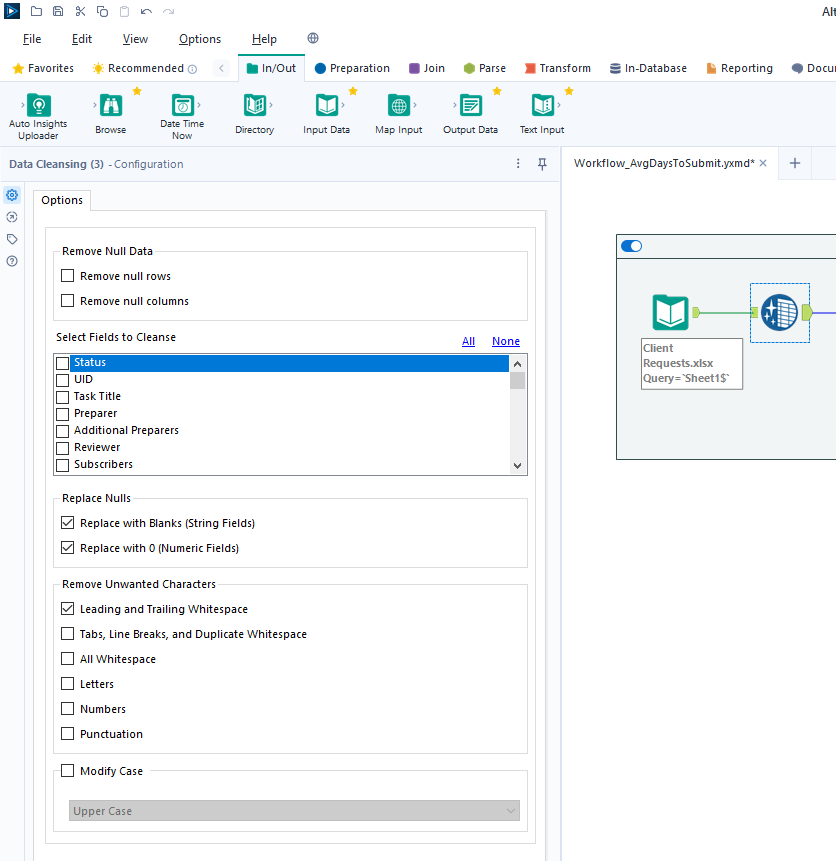 For our next step, we will transform the date fields from strings to datetime format. Add a `Datetime` tool for each field you want to transform - in the -example below, I am using the tool twice for the "Started On" and "Submitted -On" fields. +example below, I am using the tool twice for the "Started On" and "Submitted On" +fields. 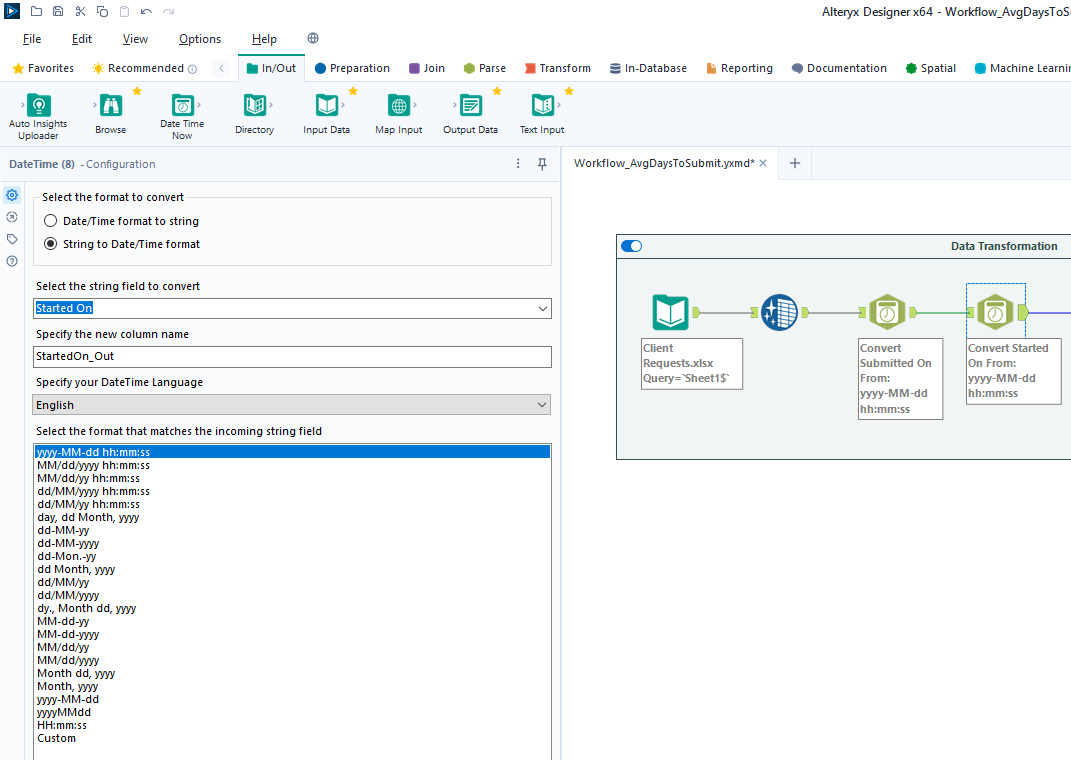 @@ -70,7 +69,7 @@ on those fields. Start by adding a `Filter` tool, naming a new Output Column, and pasting the formula below into it (the two fields used in this formula must match the output of the `Datetime` tools above): -``` txt +```txt DateTimeDiff([SubmittedOn_Out],[StartedOn_Out], "days") ``` @@ -93,8 +92,8 @@ To start, open the Power BI Desktop application. Upon first use, Power BI will ask if you want to open an existing dashboard or import new data. As we are creating our first dashboard, let's import our data. In my example -below, I'm importing data from the "Tracker" sheet of the Excel file I'm -using for this project. +below, I'm importing data from the "Tracker" sheet of the Excel file I'm using +for this project. During this process, I also imported the export from the Alteryx workflow above. Therefore, we have two different files available for use in our dashboard. @@ -115,25 +114,25 @@ below and format as needed: Instructions to create the visuals above: -- `Text Box`: Explain the name and purpose of the dashboard. You can also add - images and logos at the top of the dashboard. -- `Donut Chart`: Overall status of the project. - - `Legend`: Status - - `Values`: Count of Status -- `Stacked Column Chart`: Task count by assignee. - - `X-axis`: Preparer - - `Y-axis`: Count of Control ID - - `Legend`: Status -- `Treemap`: Top N client submitters by average days to submit. - - `Details`: Preparer - - `Values`: Sum of Avg~DaysToSubmit~ -- `Line Chart`: Projected vs. actual hours over time. -- `Clustered Bar Chart`: Projected vs. actual hours per person. -- `Slicer & Table` - Upcoming due dates. - - `Slicer`: - - `Values`: Date Due - - `Table`: - - `Columns`: Count of Control ID, Date Due, Preparer, Status +- `Text Box`: Explain the name and purpose of the dashboard. You can also add + images and logos at the top of the dashboard. +- `Donut Chart`: Overall status of the project. + - `Legend`: Status + - `Values`: Count of Status +- `Stacked Column Chart`: Task count by assignee. + - `X-axis`: Preparer + - `Y-axis`: Count of Control ID + - `Legend`: Status +- `Treemap`: Top N client submitters by average days to submit. + - `Details`: Preparer + - `Values`: Sum of Avg~DaysToSubmit~ +- `Line Chart`: Projected vs. actual hours over time. +- `Clustered Bar Chart`: Projected vs. actual hours per person. +- `Slicer & Table` - Upcoming due dates. + - `Slicer`: + - `Values`: Date Due + - `Table`: + - `Columns`: Count of Control ID, Date Due, Preparer, Status ## Format the Dashboard @@ -144,18 +143,18 @@ created by your organization. For each visual, you can click the `Format` button in the `Visualizations` side pane and explore the options. You can custom options such as: -- Visual - - Legend - - Colors - - Data labels - - Category labels -- General - - Properties - - Title - - Effects - - Header icons - - Tooltips - - Alt text +- Visual + - Legend + - Colors + - Data labels + - Category labels +- General + - Properties + - Title + - Effects + - Header icons + - Tooltips + - Alt text You can always look online for inspiration when trying to decide how best to organize and style your dashboard. diff --git a/content/blog/2024-01-27-tableau-dashboard.md b/content/blog/2024-01-27-tableau-dashboard.md index 71721fd..2f1e73d 100644 --- a/content/blog/2024-01-27-tableau-dashboard.md +++ b/content/blog/2024-01-27-tableau-dashboard.md @@ -42,7 +42,7 @@ nano data_processing.py Within the Python script, paste the following: -``` python +```python # Import modules import pandas as pd import glob @@ -122,12 +122,12 @@ drag it into the `Columns` or `Rows` area of the canvas. See below for the map visualization. You can recreate this by adding the following fields: -- `Columns`: Lon -- `Rows`: Lat -- `Marks`: - - Description - - Datetime -- `Filters`: Datetime +- `Columns`: Lon +- `Rows`: Lat +- `Marks`: + - Description + - Datetime +- `Filters`: Datetime 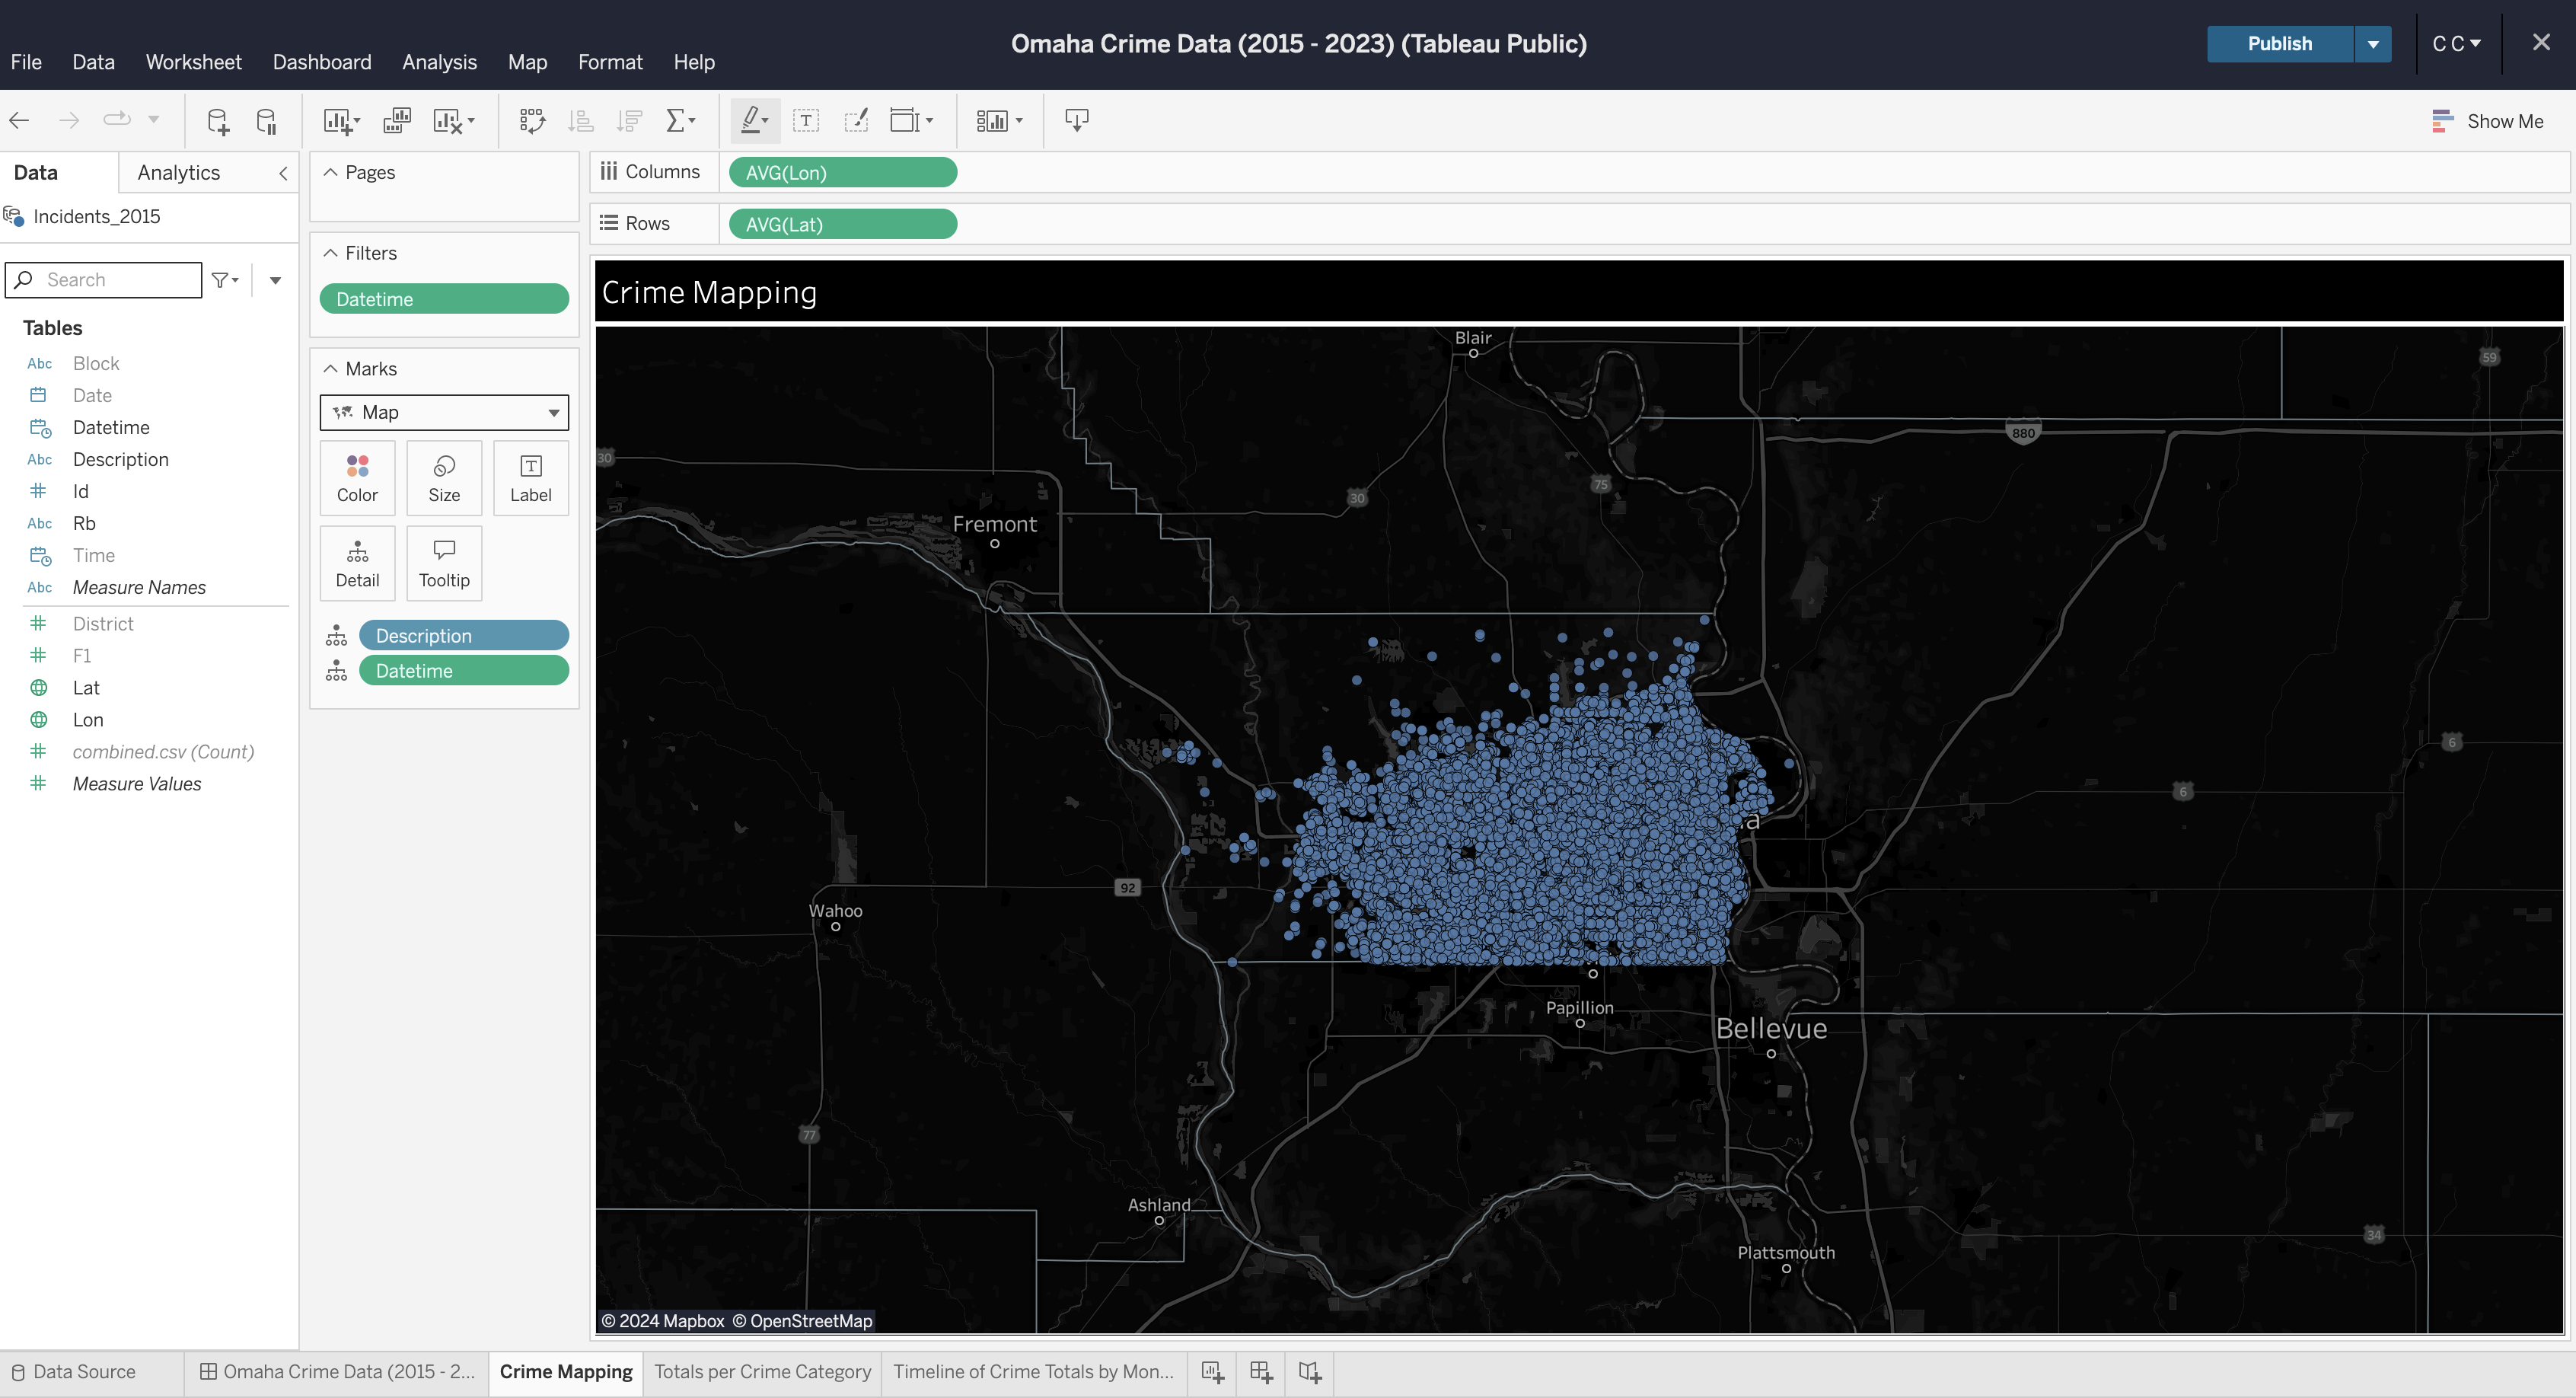 diff --git a/content/blog/2024-02-06-zfs.md b/content/blog/2024-02-06-zfs.md index fa482b1..9ab7ee5 100644 --- a/content/blog/2024-02-06-zfs.md +++ b/content/blog/2024-02-06-zfs.md @@ -10,10 +10,11 @@ snapshots on Ubuntu Server. I found the following pages very helpful while going through this process: -- [Setup a ZFS storage - pool](https://ubuntu.com/tutorials/setup-zfs-storage-pool) -- [Kernel/Reference/ZFS](https://wiki.ubuntu.com/Kernel/Reference/ZFS) -- [ZFS for Dummies](https://blog.victormendonca.com/2020/11/03/zfs-for-dummies/) +- [Setup a ZFS storage + pool](https://ubuntu.com/tutorials/setup-zfs-storage-pool) +- [Kernel/Reference/ZFS](https://wiki.ubuntu.com/Kernel/Reference/ZFS) +- [ZFS for + Dummies](https://blog.victormendonca.com/2020/11/03/zfs-for-dummies/) # Installation @@ -40,13 +41,13 @@ You have various options for configuring ZFS pools that all come different pros and cons. I suggest visiting the links at the top of this post or searching online for the best configuration for your use-case. -- Striped VDEVs (Raid0) -- Mirrored VDEVs (Raid1) -- Striped Mirrored VDEVs (Raid10) -- RAIDz (Raid5) -- RAIDz2 (Raidd6) -- RAIDz3 -- Nested RAIDz (Raid50, Raid60) +- Striped VDEVs (Raid0) +- Mirrored VDEVs (Raid1) +- Striped Mirrored VDEVs (Raid10) +- RAIDz (Raid5) +- RAIDz2 (Raidd6) +- RAIDz3 +- Nested RAIDz (Raid50, Raid60) I will be using Raid10 in this guide. However, the majority of the steps are the same regardless of your chosen pool configuration. @@ -84,8 +85,8 @@ sudo umount /dev/sda1 sudo umount /dev/sdb1 ``` -Now that I've identified the disks I want to use and have them unmounted, -let's create the pool. For this example, I will call it `tank`. +Now that I've identified the disks I want to use and have them unmounted, let's +create the pool. For this example, I will call it `tank`. ```sh sudo zpool create -f -m /mnt/pool tank mirror /dev/sda /dev/sdb @@ -176,10 +177,10 @@ command. See below for instructions on how to use `fdisk`. Here's what I did to create basic Linux formatted disks: -- `g` : Create GPT partition table -- `n` : Create a new partition, hit Enter for all default options -- `t` : Change partition type to `20` for `Linux filesystem` -- `w` : Write the changes to disk and exit +- `g` : Create GPT partition table +- `n` : Create a new partition, hit Enter for all default options +- `t` : Change partition type to `20` for `Linux filesystem` +- `w` : Write the changes to disk and exit I repeated this process for both disks. @@ -314,10 +315,10 @@ no datasets available # My Thoughts on ZFS So Far -- I sacrificed 25TB to be able to mirror my data, but I feel more comfortable - with the potential to save my data by quickly replacing a disk if I need to. -- The set-up was surprisingly easy and fast. -- Disk I/O is fast as well. I was worried that the data transfer speeds would be - slower due to the RAID configuration. -- Media streaming and transcoding has seen no noticeable drop in performance. -- My only limitation really is the number of HDD bays in my server HDD cage. +- I sacrificed 25TB to be able to mirror my data, but I feel more comfortable + with the potential to save my data by quickly replacing a disk if I need to. +- The set-up was surprisingly easy and fast. +- Disk I/O is fast as well. I was worried that the data transfer speeds would + be slower due to the RAID configuration. +- Media streaming and transcoding has seen no noticeable drop in performance. +- My only limitation really is the number of HDD bays in my server HDD cage. diff --git a/content/blog/2024-02-13-ubuntu-emergency-mode.md b/content/blog/2024-02-13-ubuntu-emergency-mode.md index 4b41406..073b665 100644 --- a/content/blog/2024-02-13-ubuntu-emergency-mode.md +++ b/content/blog/2024-02-13-ubuntu-emergency-mode.md @@ -14,7 +14,7 @@ creating the ZFS pool. My server was stuck in the boot process and showed the following error on the screen: -``` txt +```txt You are in emergency mode. After logging in, type "journalctl -xb" to view system logs, "systemctl reboot" to reboot, "systemctl default" @@ -25,7 +25,7 @@ After rebooting the server and watching the logs scroll on a monitor, I noticed the root cause was related to a very long search for certain drives. I kept seeing errors like this: -``` txt +```txt [ TIME ] Timed out waiting of device dev-disk-by/[disk-uuid] ``` @@ -49,7 +49,7 @@ Within the `fstab` file, I needed to comment/remove the following lines at the bottom of the file. You can comment-out a line by prepending a `#` symbol at the beginning of the line. You can also delete the line entirely. -``` conf +```conf # What it looked like when running into the issue: UUID=B64E53824E5339F7 /mnt/white-01 ntfs-3g uid=1000,gid=1000 0 0 UUID=E69867E59867B32B /mnt/white-02 ntfs-3g uid=1000,gid=1000 0 0 diff --git a/content/blog/2024-02-21-self-hosting-otter-wiki.md b/content/blog/2024-02-21-self-hosting-otter-wiki.md index c1e9259..c087292 100644 --- a/content/blog/2024-02-21-self-hosting-otter-wiki.md +++ b/content/blog/2024-02-21-self-hosting-otter-wiki.md @@ -24,8 +24,7 @@ Start by creating a directory for the container's files. mkdir ~/otterwiki ``` -Next, create the `docker-compose.yml` file to define the container's -parameters. +Next, create the `docker-compose.yml` file to define the container's parameters. ```sh nano ~/otterwiki/docker-compose.yml @@ -34,7 +33,7 @@ nano ~/otterwiki/docker-compose.yml Within the file, paste the following content. You can read the project's documentation if you want to further override or customize the container. -``` conf +```conf version: '3' services: otterwiki: @@ -72,7 +71,7 @@ have a TLS/SSL cert to use with this subdomain. If not, simply remove the `ssl_*` variables, remove the `80` server block, and change the `443` server block to `80` to serve the app without SSL. -``` conf +```conf server { if ($host ~ ^[^.]+\.example\.com$) { return 301 https://$host$request_uri; @@ -129,8 +128,8 @@ Wiki. Start by creating your admin account and configure the app as necessary. 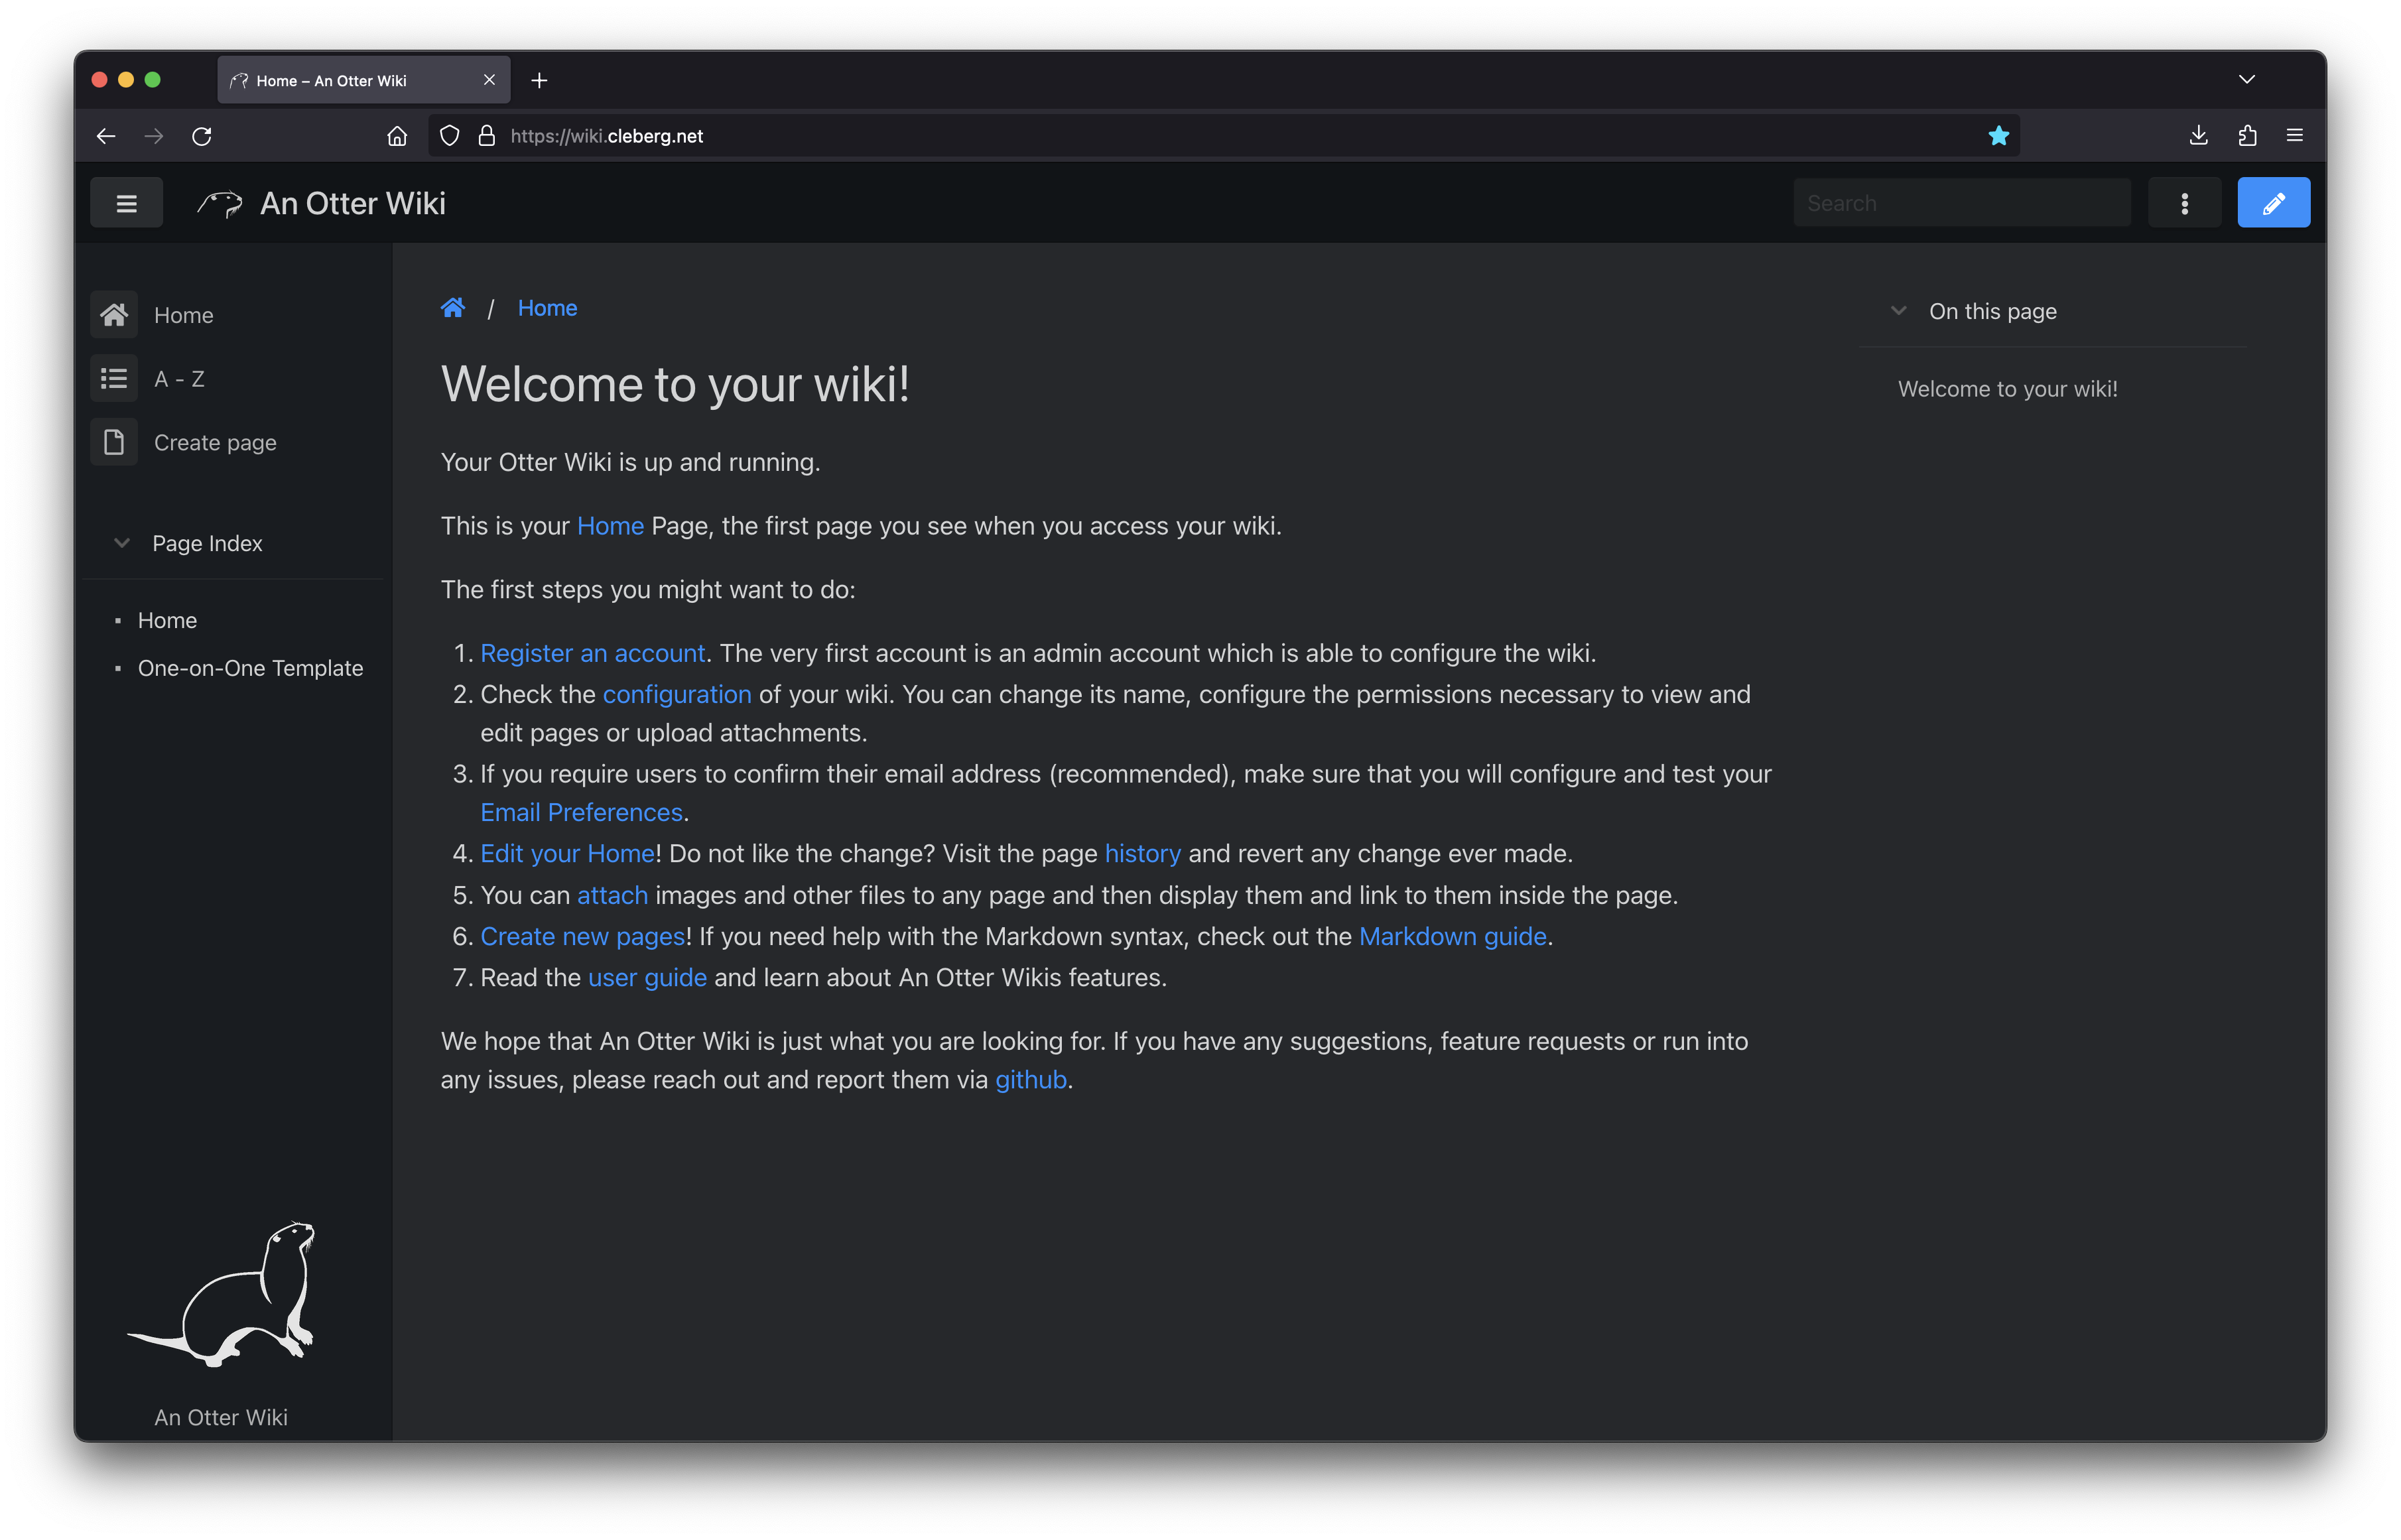 -You can also see the default editing screen for creating and editing pages. -It's as easy as typing Markdown and hitting the save button. +You can also see the default editing screen for creating and editing pages. It's +as easy as typing Markdown and hitting the save button. 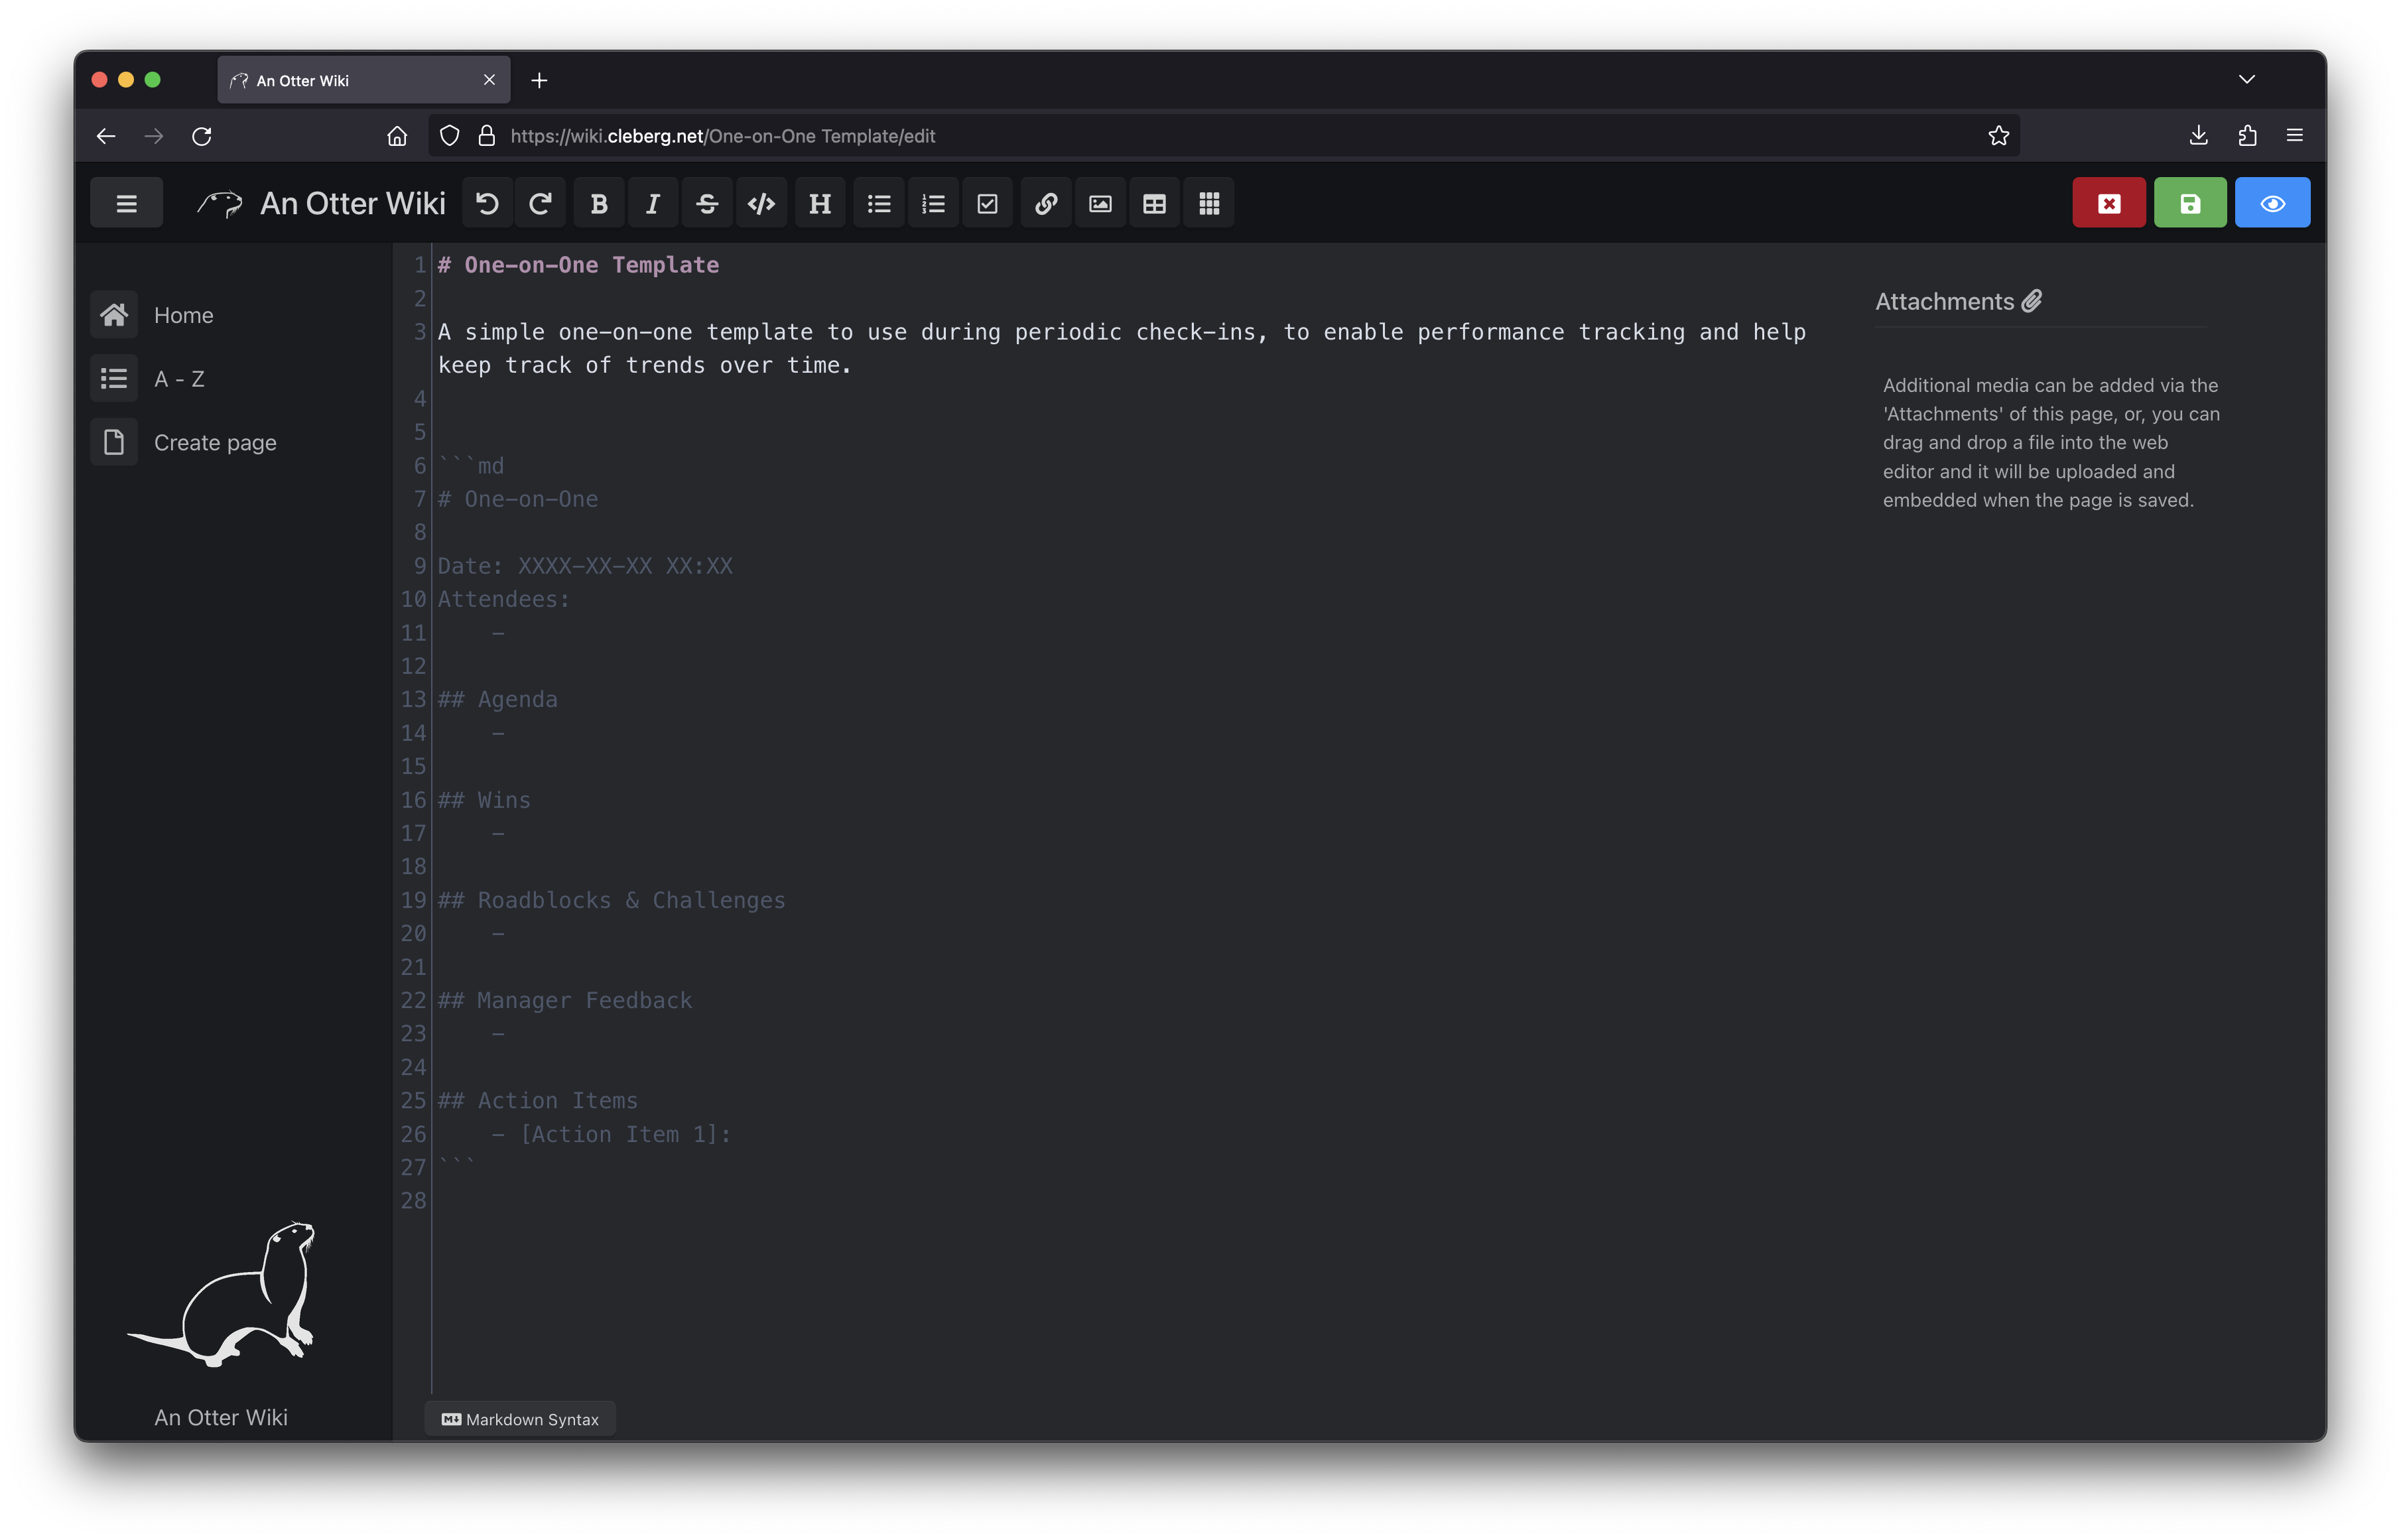 diff --git a/content/blog/2024-03-13-doom-emacs.md b/content/blog/2024-03-13-doom-emacs.md index 0475a78..9a6106e 100644 --- a/content/blog/2024-03-13-doom-emacs.md +++ b/content/blog/2024-03-13-doom-emacs.md @@ -66,7 +66,7 @@ Once installed, you can configure Doom by editing the files within the 3. `init.el` - Doom modules and load order, must run `doom sync` after modifying 4. `packages.el` - Declare packages to install in this file, then run `doom - sync` to install +sync` to install I only needed a few customizations for my configuration, so I'll list them below. @@ -167,7 +167,7 @@ changes, close files, and switch between open files. Here are some example shortcuts I've written down in order to accomplish file-based actions. | Doom Hotkey | Emacs Hotkey | Description | -|-----------------|--------------|----------------------------------------| +| --------------- | ------------ | -------------------------------------- | | `SPC :` | `C-x` | Run functions | | `SPC f f` | `C-x f` | Open file in buffer | | `SPC f d` | `C-x d` | Open directory with `dired` | @@ -178,8 +178,8 @@ shortcuts I've written down in order to accomplish file-based actions. | `SPC w h/j/k/l` | `C-x o`[^1] | Move left/down/up/right to next buffer | [^1]: Doom's evil-window functionality is a bit different from GNU Emacs, but -you can always switch to the "other" buffer with `C-x o` or `C-x b` to get a -list of buffers to select. + you can always switch to the "other" buffer with `C-x o` or `C-x b` to get a + list of buffers to select. In general, when in Doom, you can press `SPC` and wait a second for the help pane to appear with all available hotkey options. For example, you can press @@ -205,7 +205,7 @@ expands further, allowing you to insert various markdown elements and toggle things like link hiding. | Doom Hotkey | Function | -|------------------------------|--------------------------| +| ---------------------------- | ------------------------ | | `SPC m '` | markdown-edit-code-block | | `SPC m e` | markdown-export | | `SPC m i` | +insert | @@ -226,7 +226,7 @@ are 865 possible org-related functions you can run. I won't possibly be able to list them all, so I will simply cover a few of the basic commands I use myself. | Doom Hotkey | Function | -|----------------|---------------------------------------| +| -------------- | ------------------------------------- | | `SPC m t` | org-todo | | `SPC n t` | org-todo-list | | `SPC o A` | org-agenda | @@ -262,8 +262,8 @@ list them all, so I will simply cover a few of the basic commands I use myself. 2. Add an empty `.projectile` file in the project root. Once a project has been created, you can create custom publishing actions - within your `~/.doom.d/config.el` file. For example, here's a test project - I created to try and convert this blog to org-mode recently. + within your `~/.doom.d/config.el` file. For example, here's a test project I + created to try and convert this blog to org-mode recently. ```lisp ;; org-publish diff --git a/content/blog/2024-03-15-self-hosting-ddns-updater.md b/content/blog/2024-03-15-self-hosting-ddns-updater.md index 8517151..672de09 100644 --- a/content/blog/2024-03-15-self-hosting-ddns-updater.md +++ b/content/blog/2024-03-15-self-hosting-ddns-updater.md @@ -43,30 +43,31 @@ nano ~/ddns-updater/data/config.json When setting up the configuration for Cloudflare, you'll need the following: -- Required Parameters - - `"zone_identifier"` is the Zone ID of your site from the domain overview - page - - `"host"` is your host and can be `"@"`, a subdomain or the wildcard `"*"`. - See [this issue comment for - context](https://github.com/qdm12/ddns-updater/issues/243#issuecomment-928313949). - - `"ttl"` integer value for record TTL in seconds (specify 1 for automatic) - - One of the following ([how to find API - keys](https://developers.cloudflare.com/fundamentals/api/get-started/)): - - Email `"email"` and Global API Key `"key"` - - User service key `"user_service_key"` - - API Token `"token"`, configured with DNS edit permissions for your DNS - name's zone -- Optional Parameters - - `"proxied"` can be set to `true` to use the proxy services of Cloudflare - - `"ip_version"` can be `ipv4` (A records), or `ipv6` (AAAA records) or - `ipv4 or ipv6` (update one of the two, depending on the public ip - found). It defaults to `ipv4 or ipv6`. - - `"ipv6_suffix"` is the IPv6 interface identifier suffix to use. It can be - for example `0:0:0:0:72ad:8fbb:a54e:bedd/64`. If left empty, it defaults - to no suffix and the raw public IPv6 address obtained is used in the - record updating. - -``` conf +- Required Parameters + - `"zone_identifier"` is the Zone ID of your site from the domain overview + page + - `"host"` is your host and can be `"@"`, a subdomain or the wildcard + `"*"`. See [this issue comment for + context](https://github.com/qdm12/ddns-updater/issues/243#issuecomment-928313949). + - `"ttl"` integer value for record TTL in seconds (specify 1 for + automatic) + - One of the following ([how to find API + keys](https://developers.cloudflare.com/fundamentals/api/get-started/)): + - Email `"email"` and Global API Key `"key"` + - User service key `"user_service_key"` + - API Token `"token"`, configured with DNS edit permissions for your + DNS name's zone +- Optional Parameters + - `"proxied"` can be set to `true` to use the proxy services of Cloudflare + - `"ip_version"` can be `ipv4` (A records), or `ipv6` (AAAA records) or + `ipv4 or ipv6` (update one of the two, depending on the public ip + found). It defaults to `ipv4 or ipv6`. + - `"ipv6_suffix"` is the IPv6 interface identifier suffix to use. It can + be for example `0:0:0:0:72ad:8fbb:a54e:bedd/64`. If left empty, it + defaults to no suffix and the raw public IPv6 address obtained is used + in the record updating. + +```conf { "settings": [ { @@ -106,7 +107,7 @@ file. nano ~/ddns_-pdater/docker-compose.yml ``` -``` config +```config version: "3.7" services: ddns-updater: @@ -169,7 +170,7 @@ sudo nano /etc/nginx/sites-available/ddns Here's a basic example that should work properly. -``` conf +```conf server { # If using 443, remember to include your ssl_certificate # and ssl_certificate_key @@ -190,7 +191,7 @@ server { Here's a full example that uses my Authelia authentication service to require authentication before someone can access the web page. -``` conf +```conf server { if ($host ~ ^[^.]+\.example\.com$) { return 301 https://$host$request_uri; diff --git a/content/blog/2024-03-29-org-blog.md b/content/blog/2024-03-29-org-blog.md index 714f8db..fac2c47 100644 --- a/content/blog/2024-03-29-org-blog.md +++ b/content/blog/2024-03-29-org-blog.md @@ -62,8 +62,8 @@ Either re-open Emacs or hit `SPC h r r` to reload the changes. ## Configuration -Now that I've installed weblorg, I need to configure the project. I'll start -by navigating to my site's source code and creating a `publish.el` file. +Now that I've installed weblorg, I need to configure the project. I'll start by +navigating to my site's source code and creating a `publish.el` file. ```sh cd ~/Source/cleberg.net && nano publish.el @@ -187,7 +187,7 @@ restriction is that the `publish.el` file must point to the correct paths. For my blog, I prefer to keep the blog content out of the top-level directory. This results in the following structure (shortened for brevity): -``` txt +```txt .build/ content/ blog/ diff --git a/content/blog/2024-04-08-docker-local-web-server.md b/content/blog/2024-04-08-docker-local-web-server.md index 597a5ab..b6f5354 100644 --- a/content/blog/2024-04-08-docker-local-web-server.md +++ b/content/blog/2024-04-08-docker-local-web-server.md @@ -84,7 +84,7 @@ docker run -it -d -p 8000:80 --name web -v ~/Source/cleberg.net/.build:/usr/shar Here's an example of my development configuration file. -``` conf +```conf # nginx-config.conf server { server_name cleberg.net www.cleberg.net; diff --git a/content/blog/2024-04-18-mu4e.md b/content/blog/2024-04-18-mu4e.md index c91cc65..0c6a0ed 100644 --- a/content/blog/2024-04-18-mu4e.md +++ b/content/blog/2024-04-18-mu4e.md @@ -112,7 +112,7 @@ information and customize it to match your mail provider's information. nano ~/.maildir/.mbsyncrc ``` -``` conf +```conf IMAPAccount example Host imap.example.com User dummy@example.com @@ -299,8 +299,7 @@ The emails will now to be ready to use! You can now launch Doom and open Mu4e with `SPC o m`. You can also explore the Mu4e options with `SPC : mu4e`. -The home page shows various options and metdata about the account you've -opened. +The home page shows various options and metdata about the account you've opened. 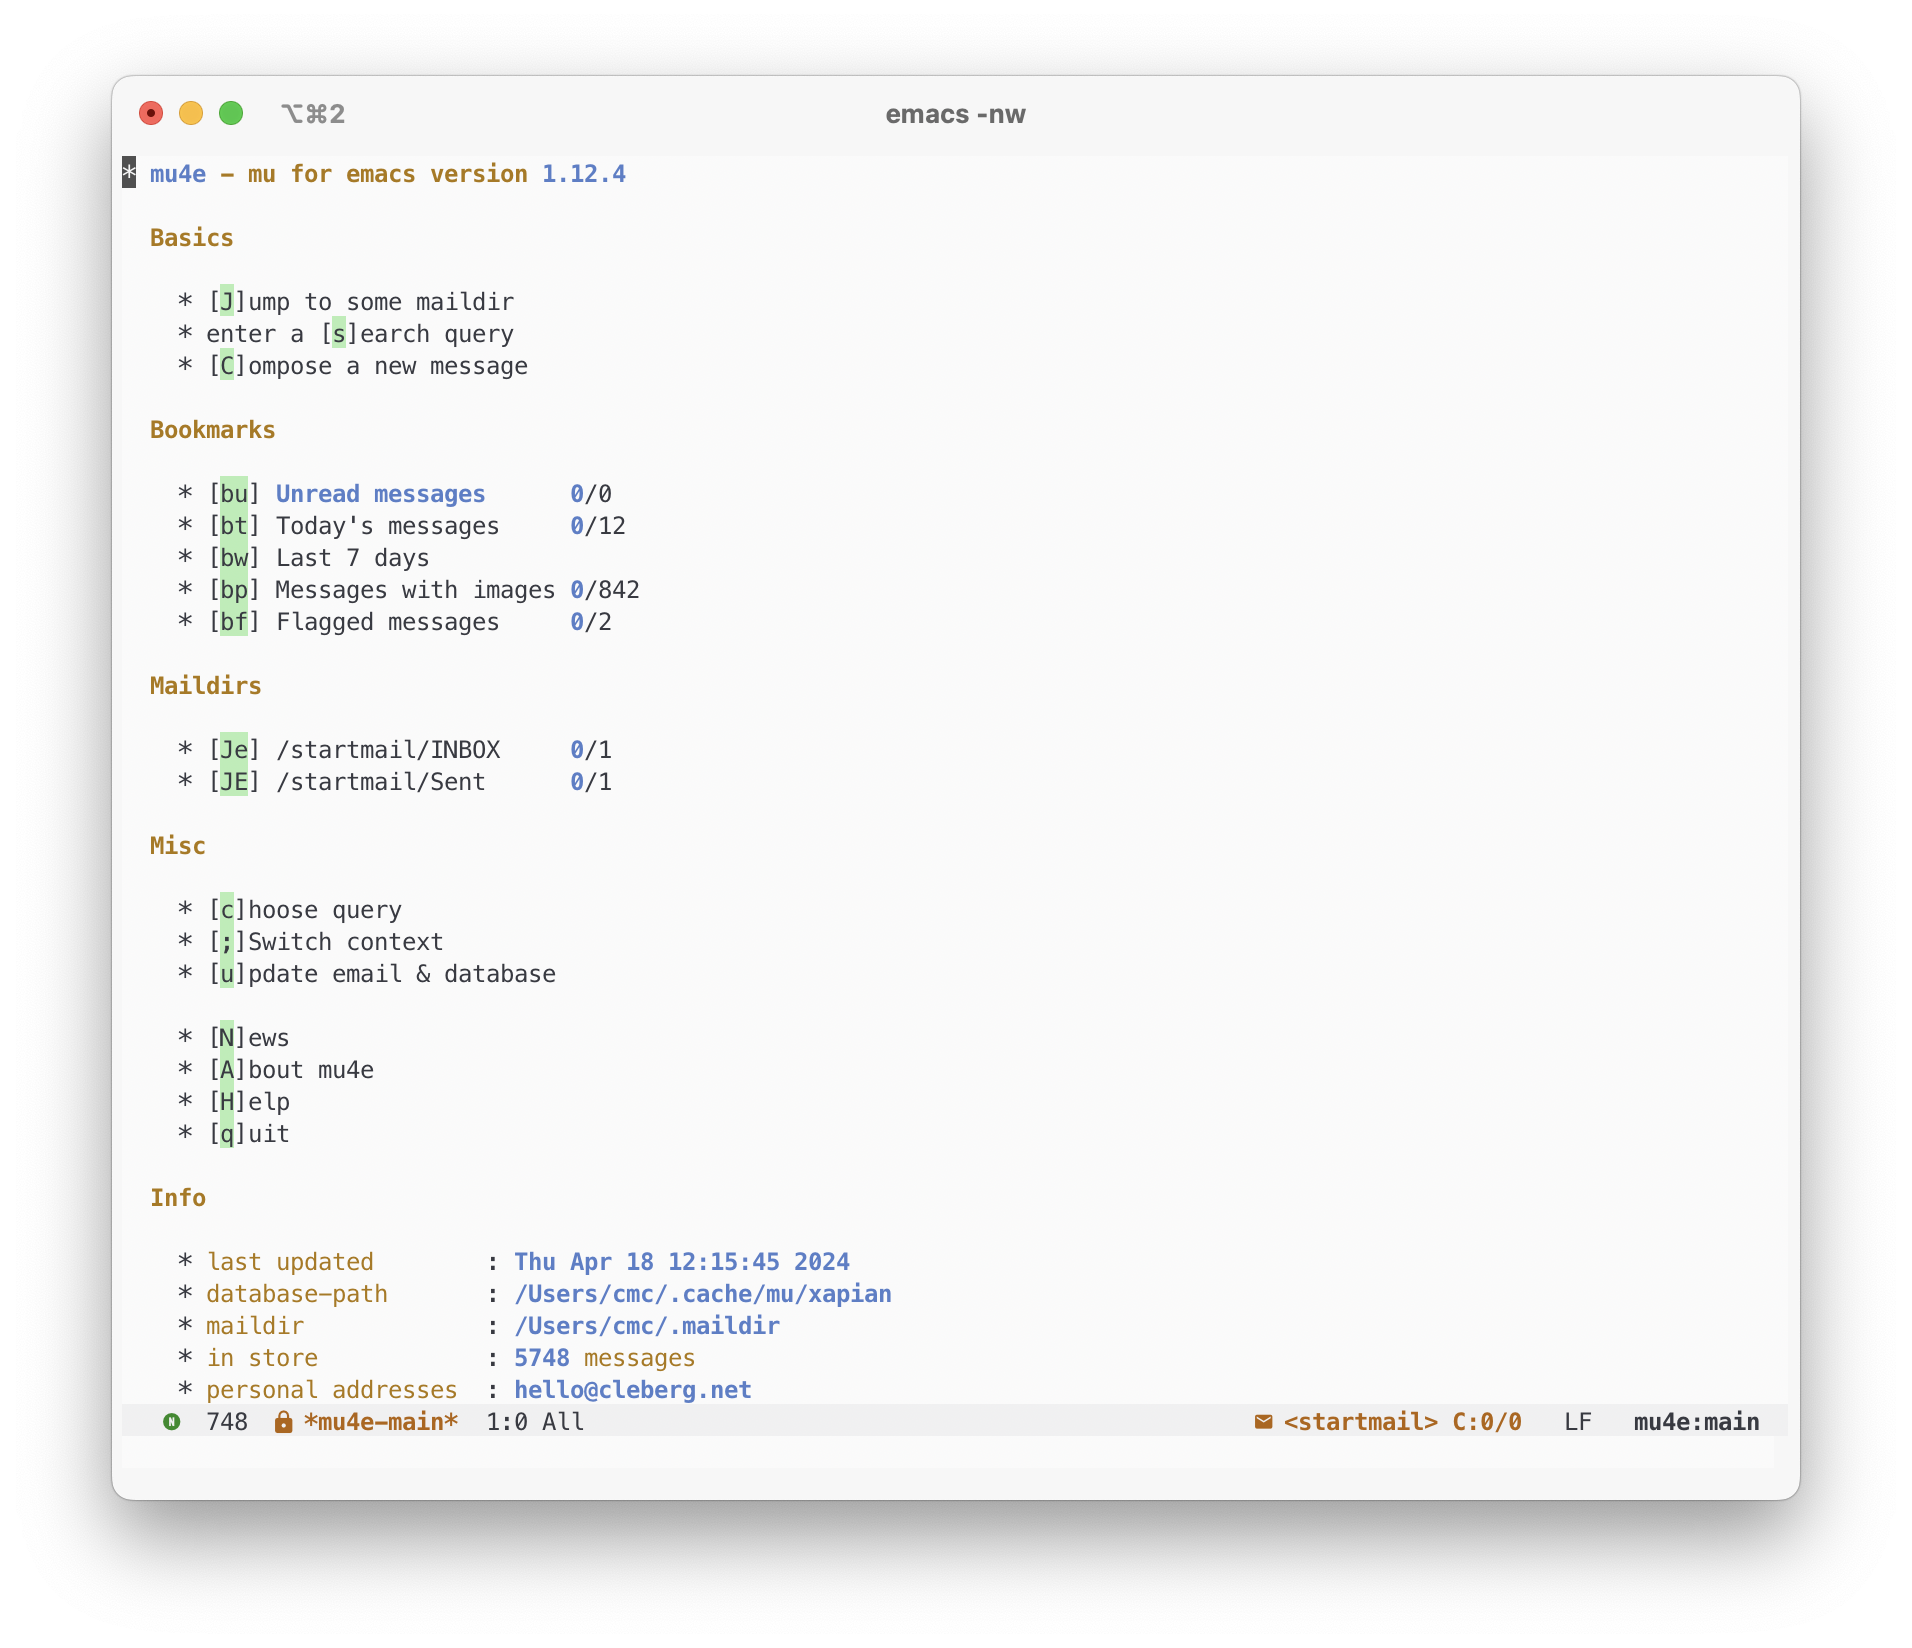 diff --git a/content/salary.md b/content/salary.md index 9619eb3..f82a2ee 100644 --- a/content/salary.md +++ b/content/salary.md @@ -5,20 +5,33 @@ draft = false # Salary Transparency -The data below details the base salary information for each job I've held. This information is posted publicly to ensure others in my position have a solid reference point when determining if their current or proposed salary is appropriate. +The data below details the base salary information for each job I've held. This +information is posted publicly to ensure others in my position have a solid +reference point when determining if their current or proposed salary is +appropriate. -While sites like Glassdoor are locking salary data behind a paywall, LinkedIn is discontinuing LinkedIn Salary, and helpful websites like Big 4 Transparency are extremely rare, I wanted to provide my personal data publicly and freely to those who need it. +While sites like Glassdoor are locking salary data behind a paywall, LinkedIn is +discontinuing LinkedIn Salary, and helpful websites like Big 4 Transparency are +extremely rare, I wanted to provide my personal data publicly and freely to +those who need it. -I have seen what can happen when great employees don't know the market values for their skills and I happily help those in my teams, so I'm happy to extend this information to the online community. +I have seen what can happen when great employees don't know the market values +for their skills and I happily help those in my teams, so I'm happy to extend +this information to the online community. -As a final note, there are numerous reasons that people in the same role are paid differently (expertise, years of experience, certifications, education, etc.) and that the data in this table should only be used as a single point of reference, not the whole story. +As a final note, there are numerous reasons that people in the same role are +paid differently (expertise, years of experience, certifications, education, +etc.) and that the data in this table should only be used as a single point of +reference, not the whole story. # Salary Data -Note: When in a role that gives periodic raises, I will create a new record with the new base salary in the table below. See the KPMG records for an example of a raise while in the same role. +Note: When in a role that gives periodic raises, I will create a new record with +the new base salary in the table below. See the KPMG records for an example of a +raise while in the same role. | Title | Company | Location | Start | End | Salary | -|------------------------------------------------|------------------------|----------------|---------|---------|----------| +| ---------------------------------------------- | ---------------------- | -------------- | ------- | ------- | -------- | | Senior Associate, Technology Assurance - Audit | KPMG | Omaha, NE | 2023-10 | Current | $116,700 | | Senior Associate, Technology Assurance - Audit | KPMG | Omaha, NE | 2022-06 | 2023-10 | $110,000 | | Senior Technology Risk Consultant | Ernst & Young | Des Moines, IA | 2021-09 | 2022-06 | $89,500 | @@ -30,6 +43,11 @@ Note: When in a role that gives periodic raises, I will create a new record with | Teaching Assistant | University of Nebraska | Lincoln, NE | 2017-08 | 2018-05 | $7/hour | | Community Management Intern | Walgreens | Lincoln, NE | 2017-06 | 2018-02 | $14/hour | -This page was inspired by [Xe](https://xeiaso.net/salary-transparency/), and I'm quoting the following wording from them as I want to reiterate this piece: +This page was inspired by [Xe](https://xeiaso.net/salary-transparency/), and I'm +quoting the following wording from them as I want to reiterate this piece: -> Please consider publishing your salary data like this as well. By open, voluntary transparency we can help to end stigmas around discussing pay and help ensure that the next generations of people in tech are treated fairly. Stigmas thrive in darkness but die in the light of day. You can help end the stigma by playing your cards out in the open like this. +> Please consider publishing your salary data like this as well. By open, +> voluntary transparency we can help to end stigmas around discussing pay and +> help ensure that the next generations of people in tech are treated fairly. +> Stigmas thrive in darkness but die in the light of day. You can help end the +> stigma by playing your cards out in the open like this. diff --git a/content/services.md b/content/services.md index 84ebd57..037fbf3 100644 --- a/content/services.md +++ b/content/services.md @@ -3,15 +3,20 @@ title = "Services" draft = false +++ -- [AnonymousOverflow](https://ao.cleberg.net/) - A StackOverflow proxy -- [CyberChef](https://cyberchef.cleberg.net/) - The Cyber Swiss Army Knife -- [FileArchive](https://files.cleberg.net/) - An interesting file archive -- [FlashPaper](https://paste.cleberg.net/) - One-time encrypted password/secret sharing -- [GotHub](https://gh.cleberg.net/) - An alternative front-end for GitHub -- [ifconfig.php](https://ip.cleberg.net/) - A "whatsmyip" tool -- [Invidious](https://invidious.cleberg.net/) - A YouTube proxy -- [Office](https://office.cleberg.net/) - The world's smallest office suite -- [Org-Live](https://org.cleberg.net/) - A basic org-mode editor for the web I built -- [SearXNG](https://search.cleberg.net/) - A privacy-respecting, open metasearch engine +- [AnonymousOverflow](https://ao.cleberg.net/) - A StackOverflow proxy +- [CyberChef](https://cyberchef.cleberg.net/) - The Cyber Swiss Army Knife +- [FileArchive](https://files.cleberg.net/) - An interesting file archive +- [FlashPaper](https://paste.cleberg.net/) - One-time encrypted + password/secret sharing +- [GotHub](https://gh.cleberg.net/) - An alternative front-end for GitHub +- [ifconfig.php](https://ip.cleberg.net/) - A "whatsmyip" tool +- [Invidious](https://invidious.cleberg.net/) - A YouTube proxy +- [Office](https://office.cleberg.net/) - The world's smallest office suite +- [Org-Live](https://org.cleberg.net/) - A basic org-mode editor for the web I + built +- [SearXNG](https://search.cleberg.net/) - A privacy-respecting, open + metasearch engine -See the [git log](https://git.cleberg.net/?p=cleberg.net.git;a=history;f=content/services/index.org;h=b9ecca2567a02711a33bb633d45f790610ed9214;hb=HEAD) if you want to see changes that have been made. +See the [git +log](https://git.cleberg.net/?p=cleberg.net.git;a=history;f=content/services/index.org;h=b9ecca2567a02711a33bb633d45f790610ed9214;hb=HEAD) +if you want to see changes that have been made. diff --git a/content/wiki/blogroll.md b/content/wiki/blogroll.md index 3002a4b..6b6934d 100644 --- a/content/wiki/blogroll.md +++ b/content/wiki/blogroll.md @@ -6,30 +6,34 @@ draft = false ## Aggregators - - [1MB Club](https://1mb.club/) - - [250KB Club](https://250kb.club/) - - [512KB Club](https://512kb.club/) - - [Darktheme Club](https://darktheme.club/) - - [No CSS Club](https://nocss.club/) - - [No-JS Club](https://no-js.club/) - - [Ye Olde Blogroll](https://blogroll.org/) +- [1MB Club](https://1mb.club/) +- [250KB Club](https://250kb.club/) +- [512KB Club](https://512kb.club/) +- [Darktheme Club](https://darktheme.club/) +- [No CSS Club](https://nocss.club/) +- [No-JS Club](https://no-js.club/) +- [Ye Olde Blogroll](https://blogroll.org/) ## Plain Text A list of various plaintext websites and lists. - - [A List Of Text-Only & Minimalist News Sites](https://greycoder.com/a-list-of-text-only-new-sites/) - - [Harvard Law Review](https://harvardlawreview.org/) - - [Hyperlinked Text](https://sjmulder.nl/en/textonly.html) - - [Plain-text web design](https://medium.com/@letsworkshop/plain-text-web-design-a78ccaf9dbc0) - - [Plaintext World](https://plaintextworld.com/) - - [Words](https://justinjackson.ca/words.html) +- [A List Of Text-Only & Minimalist News + Sites](https://greycoder.com/a-list-of-text-only-new-sites/) +- [Harvard Law Review](https://harvardlawreview.org/) +- [Hyperlinked Text](https://sjmulder.nl/en/textonly.html) +- [Plain-text web + design](https://medium.com/@letsworkshop/plain-text-web-design-a78ccaf9dbc0) +- [Plaintext World](https://plaintextworld.com/) +- [Words](https://justinjackson.ca/words.html) ## Webrings -Instead of listing my personal favorites, I'm just going to drop a link to [brisay's webring list](https://brisray.com/web/webring-list.htm), which contains 237 webrings for a total of 7078 websites, as of 2024-03-15. +Instead of listing my personal favorites, I'm just going to drop a link to +[brisay's webring list](https://brisray.com/web/webring-list.htm), which +contains 237 webrings for a total of 7078 websites, as of 2024-03-15. ## Everything Else - - [Dead Simple Sites](https://deadsimplesites.com/) - - [Planet Emacslife](https://planet.emacslife.com/) +- [Dead Simple Sites](https://deadsimplesites.com/) +- [Planet Emacslife](https://planet.emacslife.com/) diff --git a/content/wiki/hardware.md b/content/wiki/hardware.md index c930b2d..4ceb04c 100644 --- a/content/wiki/hardware.md +++ b/content/wiki/hardware.md @@ -11,7 +11,7 @@ draft = false Probably should have added more RAM but Macbooks are stupid expensive. | Category | Details | -|----------|-------------------------------------------------------| +| -------- | ----------------------------------------------------- | | Model | [Macbook Pro 16"](https://www.apple.com/macbook-pro/) | | CPU | Apple M2 Pro | | RAM | 16GB | @@ -21,19 +21,19 @@ Probably should have added more RAM but Macbooks are stupid expensive. A beauty. -| Category | Details | -|----------|--------------------------------------------------------------------------------------------------------------------------------------------------------| -| Model | [Lenovo ThinkPad E15 Gen 4, model 21ED0048US](https://www.lenovo.com/us/en/p/laptops/thinkpad/thinkpade/thinkpad--e15-gen-4-(15-inch-amd)/len101t0023) | -| CPU | AMD Ryzen 5 5625U with Radeon Graphics | -| RAM | 16 GB | -| Storage | 256 GB SSD | +| Category | Details | +| -------- | -------------------------------------------------------------------------------------------------------------------------------------------------------- | +| Model | [Lenovo ThinkPad E15 Gen 4, model 21ED0048US](<https://www.lenovo.com/us/en/p/laptops/thinkpad/thinkpade/thinkpad--e15-gen-4-(15-inch-amd)/len101t0023>) | +| CPU | AMD Ryzen 5 5625U with Radeon Graphics | +| RAM | 16 GB | +| Storage | 256 GB SSD | ## Mobile Previously used a Pixel 6 & Pixel 7 with GrapheneOS. | Category | Details | -|----------|-----------------------------------------------------------| +| -------- | --------------------------------------------------------- | | Model | [iPhone 15 Pro Max](https://www.apple.com/iphone-15-pro/) | | CPU | A17 Pro | | RAM | 8GB | @@ -41,55 +41,77 @@ Previously used a Pixel 6 & Pixel 7 with GrapheneOS. ## Homelab -I run a small homelab with a mix of consumer (compute/storage) and -enterprise (network) hardware. I try to keep the lab energy efficient -and quiet as my top priorities. +I run a small homelab with a mix of consumer (compute/storage) and enterprise +(network) hardware. I try to keep the lab energy efficient and quiet as my top +priorities. ### IoT -A collection of mainly smart lights, sensors, and smart appliances. My first preference is to disable all networking for new smart devices or simply not connect internet in the first place (e.g. I never enable internet on my smart TVs). If the smart device requires LAN access, I will connect the device to my guest-restricted IoT network. As a last resort, I will set-up the internet but monitor the DNS lookups via NextDNS and forcibly block any domains I do not want the device to be using. If the device is egregious or shady, I'll just sell it and either replace it or live without it. +A collection of mainly smart lights, sensors, and smart appliances. My first +preference is to disable all networking for new smart devices or simply not +connect internet in the first place (e.g. I never enable internet on my smart +TVs). If the smart device requires LAN access, I will connect the device to my +guest-restricted IoT network. As a last resort, I will set-up the internet but +monitor the DNS lookups via NextDNS and forcibly block any domains I do not want +the device to be using. If the device is egregious or shady, I'll just sell it +and either replace it or live without it. - Other Appliances (washer, dryer, humidifier, fans, etc.) - - [Roomba i7+](https://about.irobot.com/sitecore/content/north-america/irobot-us/home/roomba/i7-series) - - [Philips Hue A19 Bulbs](https://www.philips-hue.com/en-us/p/hue-white-and-color-ambiance-a19---e26-smart-bulb---60-w--3-pack-/046677562786) x 15 - - [Philips Hue Play Light Bars](https://www.philips-hue.com/en-us/p/hue-bundle-play-blk-ext/33001) - - [Philips Hue Smart Bridge](https://www.philips-hue.com/en-us/p/hue-bridge/046677458478) + play light bars and a ton of bulbs - - [UP Chime](https://store.ui.com/us/en/collections/unifi-camera-security-special-chime) - - [UP-Sense](https://store.ui.com/us/en/collections/unifi-camera-security-special-sensor) x 2 - - [USP-Plug](https://store.ui.com/us/en/products/unifi-smart-power) - - [UVC G4 Instant](https://store.ui.com/us/en/collections/unifi-camera-security-compact-wifi-connected) x 3 - - [UVC G4 Doorbell Pro](https://store.ui.com/us/en/collections/unifi-camera-security-special-wifi-doorbell) +- [Roomba + i7+](https://about.irobot.com/sitecore/content/north-america/irobot-us/home/roomba/i7-series) +- [Philips Hue A19 + Bulbs](https://www.philips-hue.com/en-us/p/hue-white-and-color-ambiance-a19---e26-smart-bulb---60-w--3-pack-/046677562786) + x 15 +- [Philips Hue Play Light + Bars](https://www.philips-hue.com/en-us/p/hue-bundle-play-blk-ext/33001) +- [Philips Hue Smart + Bridge](https://www.philips-hue.com/en-us/p/hue-bridge/046677458478) + play + light bars and a ton of bulbs +- [UP + Chime](https://store.ui.com/us/en/collections/unifi-camera-security-special-chime) +- [UP-Sense](https://store.ui.com/us/en/collections/unifi-camera-security-special-sensor) + x 2 +- [USP-Plug](https://store.ui.com/us/en/products/unifi-smart-power) +- [UVC G4 + Instant](https://store.ui.com/us/en/collections/unifi-camera-security-compact-wifi-connected) + x 3 +- [UVC G4 Doorbell + Pro](https://store.ui.com/us/en/collections/unifi-camera-security-special-wifi-doorbell) ### Network -A rack-mounted Dream Machine Pro, connected downstream to an access point, mesh extender, and a couple ethernet switches. +A rack-mounted Dream Machine Pro, connected downstream to an access point, mesh +extender, and a couple ethernet switches. - - [UDM-Pro](https://store.ui.com/us/en/collections/unifi-dream-machine/products/udm-pro) - - [USW-24-PoE](https://store.ui.com/us/en/collections/unifi-switching-standard-power-over-ethernet/products/usw-24-poe) - - [USW-Lite-8-PoE](https://store.ui.com/us/en/collections/unifi-switching-utility-poe/products/usw-lite-8-poe) - - [U6-Pro](https://store.ui.com/us/en/collections/unifi-wifi-flagship-high-capacity/products/u6-pro) - - [U6-Extender](https://store.ui.com/us/en/collections/unifi-wifi-inwall-outlet-mesh) - - [USW 24-Port Patch Panel](https://store.ui.com/us/en/collections/unifi-accessory-tech-installations-rackmount/products/uacc-rack-panel-patch-blank-24) +- [UDM-Pro](https://store.ui.com/us/en/collections/unifi-dream-machine/products/udm-pro) +- [USW-24-PoE](https://store.ui.com/us/en/collections/unifi-switching-standard-power-over-ethernet/products/usw-24-poe) +- [USW-Lite-8-PoE](https://store.ui.com/us/en/collections/unifi-switching-utility-poe/products/usw-lite-8-poe) +- [U6-Pro](https://store.ui.com/us/en/collections/unifi-wifi-flagship-high-capacity/products/u6-pro) +- [U6-Extender](https://store.ui.com/us/en/collections/unifi-wifi-inwall-outlet-mesh) +- [USW 24-Port Patch + Panel](https://store.ui.com/us/en/collections/unifi-accessory-tech-installations-rackmount/products/uacc-rack-panel-patch-blank-24) ### Servers 1. Rack-Mount Server - I wasn't happy with using low-powered PCs as servers and I knew I did not want the ear-shattering enterprise rack-mounted servers, so I built my own. + I wasn't happy with using low-powered PCs as servers and I knew I did not + want the ear-shattering enterprise rack-mounted servers, so I built my own. - | Category | Details | - |--------------------|----------------------------------------| - | Case | Rosewill RSV-R4100U 4U | - | Motherboard | NZXT B550 | - | CPU | AMD Ryzen 7 5700G with Radeon Graphics | - | RAM | 64GB RAM (2x32GB) | - | Storage (On-board) | Western Digital 500GB M.2 NVME SSD | - | Storage (HDD Bay) | 48TB HDD | - | PSU | Corsair RM850 PSU | + | Category | Details | + | ------------------ | -------------------------------------- | + | Case | Rosewill RSV-R4100U 4U | + | Motherboard | NZXT B550 | + | CPU | AMD Ryzen 7 5700G with Radeon Graphics | + | RAM | 64GB RAM (2x32GB) | + | Storage (On-board) | Western Digital 500GB M.2 NVME SSD | + | Storage (HDD Bay) | 48TB HDD | + | PSU | Corsair RM850 PSU | 2. Other - These ran as my main servers before I built the rack-mounted server above. I have shut these down indefinitely for now as I have no use for them. + These ran as my main servers before I built the rack-mounted server above. I + have shut these down indefinitely for now as I have no use for them. - - Dell OptiPlex - - Raspberry Pi 4 + - Dell OptiPlex + - Raspberry Pi 4 diff --git a/content/wiki/ios.md b/content/wiki/ios.md index a67a8f2..2108d16 100644 --- a/content/wiki/ios.md +++ b/content/wiki/ios.md @@ -6,9 +6,10 @@ draft = false Related: -- [Hardware](/wiki/hardware.html) +- [Hardware](/wiki/hardware.html) -My primary mobile OS. Currently running iOS 17. This wiki page contains most of the apps I have used at one point or another across my different iPhones. +My primary mobile OS. Currently running iOS 17. This wiki page contains most of +the apps I have used at one point or another across my different iPhones. (`*`) = My favorites @@ -16,141 +17,188 @@ My primary mobile OS. Currently running iOS 17. This wiki page contains most of ### Display -- Light Mode - - 10:00 to 16:00 -- Dark Mode - - 16:00 to 10:00 +- Light Mode + - 10:00 to 16:00 +- Dark Mode + - 16:00 to 10:00 ### Focus Modes -- Personal Focus - - 06:00 to 21:00 - - Allow Notifications From: - - Alarms - - Calendar - - Contacts (1 person) - - Messages - - Phone - - Reminders - - Signal - - UniFi Protect -- Sleep Focus - - 21:00 to 06:00 - - Allow Notifications From: - - Alarms - - Contacts (1 person) - - Reminders - - Signal +- Personal Focus + - 06:00 to 21:00 + - Allow Notifications From: + - Alarms + - Calendar + - Contacts (1 person) + - Messages + - Phone + - Reminders + - Signal + - UniFi Protect +- Sleep Focus + - 21:00 to 06:00 + - Allow Notifications From: + - Alarms + - Contacts (1 person) + - Reminders + - Signal ### Privacy & Security -I generally follow the [principle of least privilege](https://en.wikipedia.org/wiki/Principle_of_least_privilege) by only permitting the bare minimum privileges and revoking as soon as they are no longer required. +I generally follow the [principle of least +privilege](https://en.wikipedia.org/wiki/Principle_of_least_privilege) by only +permitting the bare minimum privileges and revoking as soon as they are no +longer required. Here's the baseline I start with: -- Disable: - - Analytics & Improvements - - Apple Advertising - - Apple ID > Sign-In & Security > Two-Factor Authentication - - Location Services > System Services > Product Improvement - - Tracking > Allow Apps to Request to Track - - Safari > Advanced > Privacy Preserving Ad Measurement -- Enable: - - Apple ID > iCloud > Advanced Data Protection - - Apple ID > Personal Information > Communication Preferences - - App Privacy Report - - Location Services only for Camera, Find My, UDisc, & WiFiman - (`While Using`) - - Safari > Prevent Cross-Site Tracking - - Safari > Hide IP Address - - Safari > Advanced > Advanced Tracking and Fingerprinting - Protection +- Disable: + - Analytics & Improvements + - Apple Advertising + - Apple ID > Sign-In & Security > Two-Factor Authentication + - Location Services > System Services > Product Improvement + - Tracking > Allow Apps to Request to Track + - Safari > Advanced > Privacy Preserving Ad Measurement +- Enable: + - Apple ID > iCloud > Advanced Data Protection + - Apple ID > Personal Information > Communication Preferences + - App Privacy Report + - Location Services only for Camera, Find My, UDisc, & WiFiman (`While + Using`) + - Safari > Prevent Cross-Site Tracking + - Safari > Hide IP Address + - Safari > Advanced > Advanced Tracking and Fingerprinting Protection ## Native Apps ### Business -- [Element](https://apps.apple.com/us/app/element-messenger/id1083446067) - A cross-platform messenger, based on Matrix -- [LinkedIn](https://apps.apple.com/us/app/linkedin-network-job-finder/id288429040) - One of the only social media apps I use +- [Element](https://apps.apple.com/us/app/element-messenger/id1083446067) - A + cross-platform messenger, based on Matrix +- [LinkedIn](https://apps.apple.com/us/app/linkedin-network-job-finder/id288429040) + - One of the only social media apps I use ### Developer Tools -- [Harbour](https://testflight.apple.com/join/F2vK7xo4) - Easily manage your Portainer service -- [iSH](https://apps.apple.com/us/app/ish-shell/id1436902243) - A local shell with SSH functionality +- [Harbour](https://testflight.apple.com/join/F2vK7xo4) - Easily manage your + Portainer service +- [iSH](https://apps.apple.com/us/app/ish-shell/id1436902243) - A local shell + with SSH functionality ### Entertainment -- [Plex](https://apps.apple.com/us/app/plex-watch-live-tv-and-movies/id383457673) - A client for the Plex Media Server -- [Steam](https://apps.apple.com/us/app/steam-mobile/id495369748) - The top gaming marketplace for computers +- [Plex](https://apps.apple.com/us/app/plex-watch-live-tv-and-movies/id383457673) + - A client for the Plex Media Server +- [Steam](https://apps.apple.com/us/app/steam-mobile/id495369748) - The top + gaming marketplace for computers ### Lifestyle -- [Home](https://apps.apple.com/us/app/home/id1110145103) (`*`) - Apple homekit powered smart home manager -- [Hue](https://apps.apple.com/us/app/philips-hue/id1055281310) - Philips Hue smart home manager -- [iRobot](https://apps.apple.com/us/app/irobot-home/id1012014442) - Manage iRobot Roomba devices -- [UniFi Protect](https://apps.apple.com/us/app/unifi-protect/id1392492235) - View and manage most UniFi Protect cameras and settings +- [Home](https://apps.apple.com/us/app/home/id1110145103) (`*`) - Apple + homekit powered smart home manager +- [Hue](https://apps.apple.com/us/app/philips-hue/id1055281310) - Philips Hue + smart home manager +- [iRobot](https://apps.apple.com/us/app/irobot-home/id1012014442) - Manage + iRobot Roomba devices +- [UniFi Protect](https://apps.apple.com/us/app/unifi-protect/id1392492235) - + View and manage most UniFi Protect cameras and settings ### Music -- [Apple Music](https://apps.apple.com/us/app/apple-music/id1108187390) (`*`) - Apple's native music streaming app -- [Plexamp](https://apps.apple.com/us/app/plexamp/id1500797510) (`*`) - Top-notch music app for your Plex Media Server, with a neural network that provides excellent radio/shuffle suggestions +- [Apple Music](https://apps.apple.com/us/app/apple-music/id1108187390) (`*`) + - Apple's native music streaming app +- [Plexamp](https://apps.apple.com/us/app/plexamp/id1500797510) (`*`) - + Top-notch music app for your Plex Media Server, with a neural network that + provides excellent radio/shuffle suggestions ### Navigation -- [deedum](https://apps.apple.com/us/app/deedum/id1546810946) - A Gemini Protocol browser +- [deedum](https://apps.apple.com/us/app/deedum/id1546810946) - A Gemini + Protocol browser ### News -- [NetNewsWire](https://apps.apple.com/us/app/netnewswire-rss-reader/id1480640210) - A free and open source RSS reader for Mac, iPhone, and iPad +- [NetNewsWire](https://apps.apple.com/us/app/netnewswire-rss-reader/id1480640210) + - A free and open source RSS reader for Mac, iPhone, and iPad ### Photo & Video -- [Aislingeach](https://testflight.apple.com/join/Q6WyyEpS) - A quick way to generate and rate images from the Stable Horde -- [Unsplash](https://apps.apple.com/us/app/unsplash/id1290631746) - Premium images, mostly free +- [Aislingeach](https://testflight.apple.com/join/Q6WyyEpS) - A quick way to + generate and rate images from the Stable Horde +- [Unsplash](https://apps.apple.com/us/app/unsplash/id1290631746) - Premium + images, mostly free ### Productivity -- [beorg](https://apps.apple.com/us/app/beorg-to-do-list-agenda/id1238649962) - An org-mode editor, outline, and scheduler with paid extensions -- [Bitwarden](https://apps.apple.com/us/app/bitwarden-password-manager/id1137397744) (`*`) - An open source password manager -- [Bitwarden Authenticator](https://apps.apple.com/us/app/bitwarden-authenticator/id6497335175) (`*`) - Generate 2FA on your device -- [Cryptomator](https://apps.apple.com/us/app/cryptomator/id1560822163) - A cross-platform encryption program -- [Obsidian](https://apps.apple.com/us/app/obsidian-connected-notes/id1557175442) (`*`) - A nice Markdown-based editor based on a "vault" structure. Offers a paid sync solution and community extensions -- [Strongbox](https://apps.apple.com/us/app/strongbox-password-manager/id897283731) - Keepass password manager for iOS & macOS -- [UniFi Network](https://apps.apple.com/us/app/unifi/id1057750338) - View and manage most UniFi Network settings +- [beorg](https://apps.apple.com/us/app/beorg-to-do-list-agenda/id1238649962) + - An org-mode editor, outline, and scheduler with paid extensions +- [Bitwarden](https://apps.apple.com/us/app/bitwarden-password-manager/id1137397744) + (`*`) - An open source password manager +- [Bitwarden + Authenticator](https://apps.apple.com/us/app/bitwarden-authenticator/id6497335175) + (`*`) - Generate 2FA on your device +- [Cryptomator](https://apps.apple.com/us/app/cryptomator/id1560822163) - A + cross-platform encryption program +- [Obsidian](https://apps.apple.com/us/app/obsidian-connected-notes/id1557175442) + (`*`) - A nice Markdown-based editor based on a "vault" structure. Offers a + paid sync solution and community extensions +- [Strongbox](https://apps.apple.com/us/app/strongbox-password-manager/id897283731) + - Keepass password manager for iOS & macOS +- [UniFi Network](https://apps.apple.com/us/app/unifi/id1057750338) - View and + manage most UniFi Network settings ### Safari Extensions -- [AdGuard](https://apps.apple.com/us/app/adguard-adblock-privacy/id1047223162) - - Ad blocker -- [Dark Reader](https://apps.apple.com/us/app/dark-reader-for-safari/id1438243180) - Dark mode for all the sites -- [PiPifier](https://apps.apple.com/us/app/pipifier/id1234771095) - Force videos to support PiP -- [Privacy Redirect](https://apps.apple.com/us/app/privacy-redirect/id1578144015) - Redirect select websites to others, usually to privacy-focused alternatives +- [AdGuard](https://apps.apple.com/us/app/adguard-adblock-privacy/id1047223162) + - Ad blocker +- [Dark + Reader](https://apps.apple.com/us/app/dark-reader-for-safari/id1438243180) - + Dark mode for all the sites +- [PiPifier](https://apps.apple.com/us/app/pipifier/id1234771095) - Force + videos to support PiP +- [Privacy + Redirect](https://apps.apple.com/us/app/privacy-redirect/id1578144015) - + Redirect select websites to others, usually to privacy-focused alternatives ### Social Networking -- [MultiTab T](https://apps.apple.com/us/app/multitab-for-tumblr/id1071533778) (`*`) - A gallery-based Tumblr client with some unique features, such as tab history and sync -- [Signal](https://apps.apple.com/us/app/signal-private-messenger/id874139669) (`*`) - A simple, powerful, and secure messenger -- [Three Cheers](https://testflight.apple.com/join/mpVk1qIy) - A client for Tildes.net with a design focus that matches the intent of Tildes -- [Voyager](https://apps.apple.com/us/app/voyager-for-lemmy/id6451429762) - A Lemmy client +- [MultiTab T](https://apps.apple.com/us/app/multitab-for-tumblr/id1071533778) + (`*`) - A gallery-based Tumblr client with some unique features, such as tab + history and sync +- [Signal](https://apps.apple.com/us/app/signal-private-messenger/id874139669) + (`*`) - A simple, powerful, and secure messenger +- [Three Cheers](https://testflight.apple.com/join/mpVk1qIy) - A client for + Tildes.net with a design focus that matches the intent of Tildes +- [Voyager](https://apps.apple.com/us/app/voyager-for-lemmy/id6451429762) - A + Lemmy client ### Sports -- [Apple Sports](https://apps.apple.com/us/app/apple-sports/id6446788829) - Apple's new sports app - lacks notifications and live events -- [UDisc](https://apps.apple.com/us/app/udisc-disc-golf/id1072228953) - Disc golf course maps, score cards, and more +- [Apple Sports](https://apps.apple.com/us/app/apple-sports/id6446788829) - + Apple's new sports app - lacks notifications and live events +- [UDisc](https://apps.apple.com/us/app/udisc-disc-golf/id1072228953) - Disc + golf course maps, score cards, and more ### Utilities -- [Backblaze](https://apps.apple.com/us/app/backblaze/id628638330) - Quickly view and manage Backblaze b2 cloud storage -- [Mullvad VPN](https://apps.apple.com/us/app/mullvad-vpn/id1488466513) (`*`) - A private VPN service -- [OTP Auth](https://apps.apple.com/us/app/otp-auth/id659877384) (`*`) - A minimalistic OTP app with support for biometrics, custom icons, import/export, and iCloud sync -- [Plex Dash](https://apps.apple.com/us/app/plex-dash/id1500797677) - Stats about your Plex Media Server -- [Safari](https://apps.apple.com/us/app/safari/id1146562112) - iOS default browser -- [Unifi WiFiman](https://apps.apple.com/us/app/ubiquiti-wifiman/id1385561119) - Create visual layouts of WiFi strength and save heat maps to your phone +- [Backblaze](https://apps.apple.com/us/app/backblaze/id628638330) - Quickly + view and manage Backblaze b2 cloud storage +- [Mullvad VPN](https://apps.apple.com/us/app/mullvad-vpn/id1488466513) (`*`) + - A private VPN service +- [OTP Auth](https://apps.apple.com/us/app/otp-auth/id659877384) (`*`) - A + minimalistic OTP app with support for biometrics, custom icons, + import/export, and iCloud sync +- [Plex Dash](https://apps.apple.com/us/app/plex-dash/id1500797677) - Stats + about your Plex Media Server +- [Safari](https://apps.apple.com/us/app/safari/id1146562112) - iOS default + browser +- [Unifi WiFiman](https://apps.apple.com/us/app/ubiquiti-wifiman/id1385561119) + - Create visual layouts of WiFi strength and save heat maps to your phone ## Web Apps & Shortcuts -- [Brutalist Report](https://brutalist.report/) - Minimal news aggregator -- [_Cyber.Report](https://cyber.report/) - Cybersecurity news aggregator -- [Hacker News](https://news.ycombinator.com/) - Mostly technical news -- [NextDNS](https://nextdns.io/) - NextDNS statistics dashboard -- [Readspike](https://readspike.com/) - Minimal news aggregator +- [Brutalist Report](https://brutalist.report/) - Minimal news aggregator +- [\_Cyber.Report](https://cyber.report/) - Cybersecurity news aggregator +- [Hacker News](https://news.ycombinator.com/) - Mostly technical news +- [NextDNS](https://nextdns.io/) - NextDNS statistics dashboard +- [Readspike](https://readspike.com/) - Minimal news aggregator diff --git a/content/wiki/macos.md b/content/wiki/macos.md index e69ee4c..085718f 100644 --- a/content/wiki/macos.md +++ b/content/wiki/macos.md @@ -6,9 +6,10 @@ draft = false Related: -- [Hardware](/wiki/hardware/) +- [Hardware](/wiki/hardware/) -My primary OS. Currently running macOS Sonoma 14. This wiki page contains most of the apps I have used at one point or another across my different Macbooks. +My primary OS. Currently running macOS Sonoma 14. This wiki page contains most +of the apps I have used at one point or another across my different Macbooks. (`*`) = My favorites @@ -16,13 +17,14 @@ My primary OS. Currently running macOS Sonoma 14. This wiki page contains most o ### Disable System Services -- [Disabling and Enabling System Integrity +- [Disabling and Enabling System Integrity Protection](https://developer.apple.com/documentation/security/disabling_and_enabling_system_integrity_protection) -- Disable Gatekeeper: `sudo spctl --master-disable` +- Disable Gatekeeper: `sudo spctl --master-disable` ### Dotfiles -These are probably out of date, but they give a general idea of how I configure my machine. +These are probably out of date, but they give a general idea of how I configure +my machine. ```conf # ~/.zshrc @@ -81,70 +83,113 @@ echo "yabai configuration loaded.." ### Browsers -- [Librewolf](https://librewolf.net/) (`*`) - Custom version of Firefox, focused on privacy and security - - [Bitwarden](https://bitwarden.com/) - An open source password manager - - [Dark Reader](https://darkreader.org/) - Dark mode for all the websites - - [Libredirect](https://libredirect.github.io/) - Automatic web redirections - - [Strongbox](https://strongboxsafe.com/) - Keepass password manager for iOS & macOS - - [uBlock Origin](https://ublockorigin.com/) - Free, open-source ad content blocker -- [Ungoogled Chromium](https://github.com/ungoogled-software/ungoogled-chromium) - Google Chromium, sans integration with Google -- [eww](https://www.gnu.org/software/emacs/manual/html_mono/eww.html) - Emacs Web Wowser, for TUI browsing +- [Librewolf](https://librewolf.net/) (`*`) - Custom version of Firefox, + focused on privacy and security + - [Bitwarden](https://bitwarden.com/) - An open source password manager + - [Dark Reader](https://darkreader.org/) - Dark mode for all the websites + - [Libredirect](https://libredirect.github.io/) - Automatic web + redirections + - [Strongbox](https://strongboxsafe.com/) - Keepass password manager for + iOS & macOS + - [uBlock Origin](https://ublockorigin.com/) - Free, open-source ad + content blocker +- [Ungoogled + Chromium](https://github.com/ungoogled-software/ungoogled-chromium) - Google + Chromium, sans integration with Google +- [eww](https://www.gnu.org/software/emacs/manual/html_mono/eww.html) - Emacs + Web Wowser, for TUI browsing ### Communications -- [Element](https://element.io/) (`*`) - Matrix's default GUI client -- [gomuks](https://github.com/tulir/gomuks) - A terminal based Matrix client -- [Thunderbird](https://www.thunderbird.net/) (`*`) - An open source email client by Mozilla -- [Signal](https://signal.org/) (`*`) - A simple, powerful, and secure messenger +- [Element](https://element.io/) (`*`) - Matrix's default GUI client +- [gomuks](https://github.com/tulir/gomuks) - A terminal based Matrix client +- [Thunderbird](https://www.thunderbird.net/) (`*`) - An open source email + client by Mozilla +- [Signal](https://signal.org/) (`*`) - A simple, powerful, and secure + messenger ### Development -- [Docker Desktop](https://www.docker.com/products/docker-desktop/) - Docker containers for your desktop - - [open-webui](https://github.com/open-webui/open-webui) - User-friendly WebUI for LLMs -- [iTerm2](https://iterm2.com/) (`*`) - The best terminal for macOS, hands down -- [Podman Desktop](https://podman-desktop.io/) (`*`) - Open source tool for containers and Kubernetes -- [Xcode](https://developer.apple.com/xcode/) - Apple's IDE -- [zsh](https://en.wikipedia.org/wiki/Z_shell) (`*`) - My shell preference due to its plugin and theme community - - [zsh-autosuggestions](https://github.com/zsh-users/zsh-autosuggestions) - Fish-like autosuggestions for zsh - - [zsh-syntax-highlighting](https://github.com/zsh-users/zsh-syntax-highlighting) - Fish shell like syntax highlighting for Zsh +- [Docker Desktop](https://www.docker.com/products/docker-desktop/) - Docker + containers for your desktop + - [open-webui](https://github.com/open-webui/open-webui) - User-friendly + WebUI for LLMs +- [iTerm2](https://iterm2.com/) (`*`) - The best terminal for macOS, hands + down +- [Podman Desktop](https://podman-desktop.io/) (`*`) - Open source tool for + containers and Kubernetes +- [Xcode](https://developer.apple.com/xcode/) - Apple's IDE +- [zsh](https://en.wikipedia.org/wiki/Z_shell) (`*`) - My shell preference due + to its plugin and theme community + - [zsh-autosuggestions](https://github.com/zsh-users/zsh-autosuggestions) + - Fish-like autosuggestions for zsh + - [zsh-syntax-highlighting](https://github.com/zsh-users/zsh-syntax-highlighting) + - Fish shell like syntax highlighting for Zsh ### Editors -- [Doom Emacs](https://github.com/doomemacs/doomemacs) (`*`) - An Emacs framework, great for working in org-mode -- [Obsidian](https://obsidian.md/) - A nice Markdown-based editor based on a "vault" structure. Offers a paid sync solution and community extensions -- [Standard Notes](https://standardnotes.com/) - A simple text editor focused on privacy and security. Offers a paid sync solution and community extensions -- [VSCodium](https://vscodium.com/) - VS Code without proprietary blobs +- [Doom Emacs](https://github.com/doomemacs/doomemacs) (`*`) - An Emacs + framework, great for working in org-mode +- [Obsidian](https://obsidian.md/) - A nice Markdown-based editor based on a + "vault" structure. Offers a paid sync solution and community extensions +- [Standard Notes](https://standardnotes.com/) - A simple text editor focused + on privacy and security. Offers a paid sync solution and community + extensions +- [VSCodium](https://vscodium.com/) - VS Code without proprietary blobs ### Media -- [Luminar](https://skylum.com/luminar) - Luminar offers top-notch photo editing features -- [Minecraft](https://www.minecraft.net/) - Block mining simulator -- [NetNewsWire](https://netnewswire.com/) - A free and open source RSS reader for Mac, iPhone, and iPad -- [Plex](https://www.plex.tv/) (`*`) - Desktop client for the Plex Media Server -- [Steam](https://store.steampowered.com/) - The top gaming marketplace for computers -- [Transmission](https://transmissionbt.com/) (`*`) - A Fast, Easy and Free Bittorrent Client -- [VLC](https://www.videolan.org/vlc/) - A free and open source cross-platform multimedia player +- [Luminar](https://skylum.com/luminar) - Luminar offers top-notch photo + editing features +- [Minecraft](https://www.minecraft.net/) - Block mining simulator +- [NetNewsWire](https://netnewswire.com/) - A free and open source RSS reader + for Mac, iPhone, and iPad +- [Plex](https://www.plex.tv/) (`*`) - Desktop client for the Plex Media + Server +- [Steam](https://store.steampowered.com/) - The top gaming marketplace for + computers +- [Transmission](https://transmissionbt.com/) (`*`) - A Fast, Easy and Free + Bittorrent Client +- [VLC](https://www.videolan.org/vlc/) - A free and open source cross-platform + multimedia player ### Package Management -- [Homebrew](https://brew.sh/) (`*`) - The Missing Package Manager for macOS (or Linux) -- [MacPorts](https://www.macports.org/) - A system to compile, install, and manage open source software +- [Homebrew](https://brew.sh/) (`*`) - The Missing Package Manager for macOS + (or Linux) +- [MacPorts](https://www.macports.org/) - A system to compile, install, and + manage open source software ### Utilities -- [Bartender 5](https://www.macbartender.com/Bartender5/) (`*`) - Easy control and customization over the native macOS menu bar -- [BetterDisplay](https://betterdisplay.pro/) - Allows you to tweak a ton of features of built-in and external screens, such as scaling, configuration overrides, and color/brightness upscaling -- [Bitwarden](https://bitwarden.com/) - An open source password manager -- [LittleSnitch](https://obdev.at/products/littlesnitch/index.html) - Shows all network connections on your Macbook, including system and privileged services -- [MicroSnitch](https://obdev.at/products/microsnitch/index.html) - Camera & microphone monitoring and alterting service -- [Mullvad](https://mullvad.net/) (`*`) - A private VPN service -- [Ollama](https://ollama.com/) - Run Llama 2, Code Llama, and other models locally on your machine - - [Ollama Swift](https://github.com/kghandour/Ollama-SwiftUI) - User Interface made for Ollama.ai using Swift -- [OrbStack](https://orbstack.dev/) - A fast and convenient GUI to manage Docker contains and Linux VMs -- [Raycast](https://www.raycast.com/) - A collection of tools and shortcuts, an alternative to Spotlight -- [skhd](https://github.com/koekeishiya/skhd) (`*`) - Simple hotkey daemon for macOS -- [Strongbox](https://strongboxsafe.com/) - Keepass password manager for iOS & macOS -- [Syncthing](https://syncthing.net/) (`*`) - Continuous file synchronization -- [TinkerTool](https://www.bresink.com/osx/TinkerTool.html) - Unlock hidden configuration options for macOS -- [yabai](https://github.com/koekeishiya/yabai) (`*`) - Automatic window tiling -- [yt-dlp](https://github.com/yt-dlp/yt-dlp) - A youtube-dl fork with additional features and fixes +- [Bartender 5](https://www.macbartender.com/Bartender5/) (`*`) - Easy control + and customization over the native macOS menu bar +- [BetterDisplay](https://betterdisplay.pro/) - Allows you to tweak a ton of + features of built-in and external screens, such as scaling, configuration + overrides, and color/brightness upscaling +- [Bitwarden](https://bitwarden.com/) - An open source password manager +- [LittleSnitch](https://obdev.at/products/littlesnitch/index.html) - Shows + all network connections on your Macbook, including system and privileged + services +- [MicroSnitch](https://obdev.at/products/microsnitch/index.html) - Camera & + microphone monitoring and alterting service +- [Mullvad](https://mullvad.net/) (`*`) - A private VPN service +- [Ollama](https://ollama.com/) - Run Llama 2, Code Llama, and other models + locally on your machine + - [Ollama Swift](https://github.com/kghandour/Ollama-SwiftUI) - User + Interface made for Ollama.ai using Swift +- [OrbStack](https://orbstack.dev/) - A fast and convenient GUI to manage + Docker contains and Linux VMs +- [Raycast](https://www.raycast.com/) - A collection of tools and shortcuts, + an alternative to Spotlight +- [skhd](https://github.com/koekeishiya/skhd) (`*`) - Simple hotkey daemon for + macOS +- [Strongbox](https://strongboxsafe.com/) - Keepass password manager for iOS & + macOS +- [Syncthing](https://syncthing.net/) (`*`) - Continuous file synchronization +- [TinkerTool](https://www.bresink.com/osx/TinkerTool.html) - Unlock hidden + configuration options for macOS +- [yabai](https://github.com/koekeishiya/yabai) (`*`) - Automatic window + tiling +- [yt-dlp](https://github.com/yt-dlp/yt-dlp) - A youtube-dl fork with + additional features and fixes |