
diff options
| author | Christian Cleberg <hello@cleberg.net> | 2024-04-27 17:01:13 -0500 |
|---|---|---|
| committer | Christian Cleberg <hello@cleberg.net> | 2024-04-27 17:01:13 -0500 |
| commit | 74992aaa27eb384128924c4a3b93052961a3eaab (patch) | |
| tree | d5193997d72a52f7a6d6338ea5da8a6c80b4eddc | |
| parent | 3def68d80edf87e28473609c31970507d9f03467 (diff) | |
| download | cleberg.net-74992aaa27eb384128924c4a3b93052961a3eaab.tar.gz cleberg.net-74992aaa27eb384128924c4a3b93052961a3eaab.tar.bz2 cleberg.net-74992aaa27eb384128924c4a3b93052961a3eaab.zip | |
test conversion back to markdown
265 files changed, 16601 insertions, 14157 deletions
@@ -1,3 +1,3 @@ .DS_Store -.build .vscode +public
\ No newline at end of file diff --git a/README.md b/README.md new file mode 100644 index 0000000..3c9c055 --- /dev/null +++ b/README.md @@ -0,0 +1,39 @@ +# cleberg.net + +[cleberg.net](https://cleberg.net) is my personal webpage. + +This README is viewable on [git.cleberg.net](https://git.cleberg.net/?p=cleberg.net.git;a=blob;f=README.org;h=155f4696a09503411730afc422b7fb49acbef8f3;hb=HEAD). + +## Overview + +This website & blog uses [Markdown](https://spec.commonmark.org/current/), published with [Zola](https://www.getzola.org/). + +## Configuration + +All configuration options are available within the `config.toml` file. Refer to the Zola documentation for further configuration options. + +## Building + +To get running: + +```sh +git clone https://git.cleberg.net/cleberg.net.git && \ +cd cleberg.net && \ +zola build +``` + +## Publishing + +Use `zola build` and deploy to whichever deployment target you prefer. + +## Tasks + +- [ ] Format all blog posts + - [ ] 2018 + - [ ] 2019 + - [ ] 2020 + - [ ] 2021 + - [ ] 2022 + - [ ] 2023 + - [ ] 2024 +- [ ] Figure out how to get file tags to show up diff --git a/README.org b/README.org deleted file mode 100644 index 2d1a7fb..0000000 --- a/README.org +++ /dev/null @@ -1,61 +0,0 @@ -#+title: README -#+description: Project README. - -* cleberg.net - -[[https://cleberg.net][cleberg.net]] is my personal webpage. - -This README is viewable on [[https://git.cleberg.net/?p=cleberg.net.git;a=blob;f=README.org;h=155f4696a09503411730afc422b7fb49acbef8f3;hb=HEAD][git.cleberg.net]]. - -** Overview - -This website & blog uses [[https://orgmode.org/][Org-Mode]], published with [[https://github.com/emacs-love/weblorg][weblorg]]. - -** Configuration - -All configuration options are available within the =publish.el= file. Refer to -the weblorg documentation for further configuration options. - -** Building - -Local testing is available via [[https://www.gnu.org/software/emacs/][Emacs]] or through the command line. - -To get running: - -#+begin_src shell -git clone https://git.cleberg.net/cleberg.net.git && \ -cd cleberg.net && \ -emacs -nw -#+end_src - -Within Emacs, open any of the repository files. In Doom, I do this with =Spc f -f= and selecting =README.org=. Make any changes necessary to customize the -project. - -To publish, you can use the =build.sh= script (change the deployment target!) or -you can run the following commands. - -Use the =ENV= environment variable to determine which base URL weblorg will use. -If ENV is ommitted, it will default to =localhost:8000=. If =ENV=prod=, weblorg -will look in the =publish.el= file for the production base URL. - -#+begin_src sh -ENV=prod emacs --script publish.el -#+end_src - -The files will be published to the =.build= directory. You can deploy these -files to the target through any number of methods, such as =scp= or SFTP. - -** Tasks - -*** DONE Create RSS feed -*** TODO Format all blog posts with =M q= -**** DONE 2018 -**** DONE 2019 -**** DONE 2020 -**** TODO 2021 -**** TODO 2022 -**** TODO 2023 -**** TODO 2024 -*** DONE Create script to auto-generate the =/blog/= list and =/= most recent posts -*** TODO Figure out how to get filetags to show up @@ -1,12 +1,13 @@ #!/bin/bash if [ "$ENV" == "prod" ]; then - echo "Environment = Production" && \ + echo "Environment: Production" && \ rm -rf .build/* && \ - emacs --script publish.el && \ + zola build && \ rsync -avzP .build/ ubuntu:/var/www/cleberg.net/ else - echo "Environment = Development" && \ + echo "Environment: Development" && \ rm -rf .build/* && \ - emacs --script publish.el + zola build && \ + zola serve fi diff --git a/config.toml b/config.toml new file mode 100644 index 0000000..e9eed0c --- /dev/null +++ b/config.toml @@ -0,0 +1,21 @@ +# Site settings +base_url = "https://cleberg.net" +title = "cleberg.net" +description = "The personal website of Christian Cleberg." +author = "Christian Cleberg" + +# RSS settings +generate_feed = true +feed_filename = "atom.xml" + +[markdown] +highlight_code = true +highlight_theme = "css" +highlight_themes_css = [ + { theme = "ayu-dark", filename = "syntax-theme-dark.css" }, + { theme = "inspired-github", filename = "syntax-theme-light.css" }, +] +external_links_target_blank = true +lazy_async_image = true + +[extra] diff --git a/content/blog/2018-11-28-aes-encryption.md b/content/blog/2018-11-28-aes-encryption.md new file mode 100644 index 0000000..8d39b1d --- /dev/null +++ b/content/blog/2018-11-28-aes-encryption.md @@ -0,0 +1,125 @@ ++++ +date = 2018-11-28 +title = "AES Encryption" +description = "" +draft = false ++++ + +# Basic AES + +If you\'re not familiar with encryption techniques, +[AES](https://en.wikipedia.org/wiki/Advanced_Encryption_Standard) is the +**Advanced Encryption Standard**. This specification was established by +the National Institute of Standards and Technology, sub-selected from +the Rijndael family of ciphers (128, 192, and 256 bits) in 2001. +Furthering its popularity and status, the US government chose AES as +their default encryption method for top-secret data, removing the +previous standard which had been in place since 1977. + +AES has proven to be an extremely safe encryption method, with 7-round +and 8-round attacks making no material improvements since the release of +this encryption standard almost two decades ago. + +> Though many papers have been published on the cryptanalysis of AES, +> the fastest single-key attacks on round-reduced AES variants \[20, +> 33\] so far are only slightly more powerful than those proposed 10 +> years ago \[23,24\]. +> +> - [Bogdonav, et +> al.](http://research.microsoft.com/en-us/projects/cryptanalysis/aesbc.pdf) + +# How Secure is AES? + +In theory, AES-256 is non-crackable due to the massive number of +combinations that can be produced. However, AES-128 is no longer +recommended as a viable implementation to protect important data. + +A semi-short [comic +strip](http://www.moserware.com/2009/09/stick-figure-guide-to-advanced.html) +from Moserware quickly explains AES for the public to understand. +Basically AES encrypts the data by obscuring the relationship between +the data and the encrypted data. Additionally, this method spreads the +message out. Lastly, the key produced by AES is the secret to decrypting +it. Someone may know the method of AES, but without the key, they are +powerless. + +To obscure and spread the data out, AES creates a +substitution-permutation network. Wikipedia has a wonderful [example of +an SP +network](https://upload.wikimedia.org/wikipedia/commons/thumb/c/cd/SubstitutionPermutationNetwork2.png/468px-SubstitutionPermutationNetwork2.png) +available. This network sends the data through a set of S boxes (using +the unique key) to substitute the bits with another block of bits. Then, +a P box will permutate, or rearrange, the bits. This is done over and +over, with the key being derived from the last round. For AES, the key +size specifies the number of transformation rounds: 10, 12, and 14 +rounds for 128-bit, 192-bit, and 256-bit keys, respectively. + +# The Process + +1. \*KeyExpansion=: Using [Rijndael\'s key + schedule](https://en.m.wikipedia.org/wiki/Advanced_Encryption_Standard), + the keys are dynamically generated. +2. **AddRoundKey**: Each byte of the data is combined with this key + using bitwise xor. +3. **SubBytes**: This is followed by the substitution of each byte of + data. +4. **ShiftRows**: Then, the final three rows are shifted a certain + number of steps, dictated by the cipher. +5. **MixColumns**: After the rows have been shifted, the columns are + mixed and combined. + +This process does not necessarily stop after one full round. Steps 2 +through 5 will repeat for the number of rounds specified by the key. +However, the final round excludes the MixColumns step. As you can see, +this is a fairly complex process. One must have a solid understanding of +general mathematic principles to fully understand how the sequence works +(and to even attempt to find a weakness). + +According to research done by Bogdanov et al., it would take billions of +years to brute force a 126-bit key with current hardware. Additionally, +this brute force attack would require storing 2^88^ bits of data! +However, there are a few different attacks that have been used to show +vulnerabilities with the use of this technology. Side-channel attacks +use inadvertent leaks of data from the hardware or software, which can +allow attackers to obtain the key or run programs on a user\'s hardware. + +Please note that this is not something you should run out and try to +implement in your `Hello, World!` app after only a few hours +of research. While AES (basically all encryption methods) is extremely +efficient in what it does, it takes a lot of time and patience to +understand. If you\'re looking for something which currently implements +AES, check out the [Legion of the Bouncy +Castle](https://www.bouncycastle.org/documentation.html) for Java +implementations of cryptographic algorithms. + +# Why Does Encryption Matter? + +There are limitless reasons to enable encryption at-rest or in-transit +for various aspects of your digital life. You can research specific +examples, such as [Australia passes new law to thwart strong +encryption](https://arstechnica.com/tech-policy/2018/12/australia-passes-new-law-to-thwart-strong-encryption/). +However, I will simply list a few basic reasons to always enable +encryption, where feasible: + +1. Privacy is a human right and is recognized as a national right in + some countries (e.g., [US Fourth + Amendment](https://www.law.cornell.edu/wex/fourth_amendment)). +2. \"Why not?\" Encryption rarely affects performance or speed, so + there\'s usually not a reason to avoid it in the first place. +3. Your digital identity and activity (texts, emails, phone calls, + online accounts, etc.) are extremely valuable and can result in + terrible consequences, such as identity theft, if leaked to other + parties. Encrypting this data prevents such leaks from ruining + lives. +4. Wiping or factory-resetting does not actually wipe all data from the + storage device. There are methods to read data from the physical + disks/boards inside devices. +5. Corporations, governments, and other nefarious groups/individuals + are actively looking for ways to collect personal information about + anyone they can. If someone\'s data is unencrypted, that person may + become a target due to the ease of data collection. + +**Read More:** + +- [Federal Information Processing Standards Publication + 197](http://nvlpubs.nist.gov/nistpubs/FIPS/NIST.FIPS.197.pdf) diff --git a/content/blog/2018-11-28-aes-encryption.org b/content/blog/2018-11-28-aes-encryption.org deleted file mode 100644 index 03dcbf9..0000000 --- a/content/blog/2018-11-28-aes-encryption.org +++ /dev/null @@ -1,103 +0,0 @@ -#+title: AES Encryption -#+description: Learn how the AES Encryption algorithm works. -#+date: <2018-11-28 Wed> -#+filetags: :security: - -* Basic AES -If you're not familiar with encryption techniques, [[https://en.wikipedia.org/wiki/Advanced_Encryption_Standard][AES]] is the *Advanced -Encryption Standard*. This specification was established by the National -Institute of Standards and Technology, sub-selected from the Rijndael family of -ciphers (128, 192, and 256 bits) in 2001. Furthering its popularity and status, -the US government chose AES as their default encryption method for top-secret -data, removing the previous standard which had been in place since 1977. - -AES has proven to be an extremely safe encryption method, with 7-round and -8-round attacks making no material improvements since the release of this -encryption standard almost two decades ago. - -#+begin_quote -Though many papers have been published on the cryptanalysis of AES, the fastest -single-key attacks on round-reduced AES variants [20, 33] so far are only -slightly more powerful than those proposed 10 years ago [23,24]. - -- [[http://research.microsoft.com/en-us/projects/cryptanalysis/aesbc.pdf][Bogdonav, et al.]] -#+end_quote - -* How Secure is AES? -In theory, AES-256 is non-crackable due to the massive number of combinations -that can be produced. However, AES-128 is no longer recommended as a viable -implementation to protect important data. - -A semi-short [[http://www.moserware.com/2009/09/stick-figure-guide-to-advanced.html][comic strip]] from Moserware quickly explains AES for the public to -understand. Basically AES encrypts the data by obscuring the relationship -between the data and the encrypted data. Additionally, this method spreads the -message out. Lastly, the key produced by AES is the secret to decrypting it. -Someone may know the method of AES, but without the key, they are powerless. - -To obscure and spread the data out, AES creates a substitution-permutation -network. Wikipedia has a wonderful [[https://upload.wikimedia.org/wikipedia/commons/thumb/c/cd/SubstitutionPermutationNetwork2.png/468px-SubstitutionPermutationNetwork2.png][example of an SP network]] available. This -network sends the data through a set of S boxes (using the unique key) to -substitute the bits with another block of bits. Then, a P box will permutate, or -rearrange, the bits. This is done over and over, with the key being derived from -the last round. For AES, the key size specifies the number of transformation -rounds: 10, 12, and 14 rounds for 128-bit, 192-bit, and 256-bit keys, -respectively. - -* The Process -1. *KeyExpansion=: Using [[https://en.m.wikipedia.org/wiki/Advanced_Encryption_Standard][Rijndael's key schedule]], the keys are dynamically - generated. -2. *AddRoundKey*: Each byte of the data is combined with this key using bitwise - xor. -3. *SubBytes*: This is followed by the substitution of each byte of data. -4. *ShiftRows*: Then, the final three rows are shifted a certain number of - steps, dictated by the cipher. -5. *MixColumns*: After the rows have been shifted, the columns are mixed and - combined. - -This process does not necessarily stop after one full round. Steps 2 through 5 -will repeat for the number of rounds specified by the key. However, the final -round excludes the MixColumns step. As you can see, this is a fairly complex -process. One must have a solid understanding of general mathematic principles to -fully understand how the sequence works (and to even attempt to find a -weakness). - -According to research done by Bogdanov et al., it would take billions of years -to brute force a 126-bit key with current hardware. Additionally, this brute -force attack would require storing 2^{88} bits of data! However, there are a few -different attacks that have been used to show vulnerabilities with the use of -this technology. Side-channel attacks use inadvertent leaks of data from the -hardware or software, which can allow attackers to obtain the key or run -programs on a user's hardware. - -Please note that this is not something you should run out and try to implement -in your =Hello, World!= app after only a few hours of research. While AES -(basically all encryption methods) is extremely efficient in what it does, it -takes a lot of time and patience to understand. If you're looking for something -which currently implements AES, check out the [[https://www.bouncycastle.org/documentation.html][Legion of the Bouncy Castle]] for -Java implementations of cryptographic algorithms. - -* Why Does Encryption Matter? -There are limitless reasons to enable encryption at-rest or in-transit for -various aspects of your digital life. You can research specific examples, such -as [[https://arstechnica.com/tech-policy/2018/12/australia-passes-new-law-to-thwart-strong-encryption/][Australia passes new law to thwart strong encryption]]. However, I will simply -list a few basic reasons to always enable encryption, where feasible: - -1. Privacy is a human right and is recognized as a national right in some - countries (e.g., [[https://www.law.cornell.edu/wex/fourth_amendment][US Fourth Amendment]]). -2. "Why not?" Encryption rarely affects performance or speed, so there's usually - not a reason to avoid it in the first place. -3. Your digital identity and activity (texts, emails, phone calls, online - accounts, etc.) are extremely valuable and can result in terrible - consequences, such as identity theft, if leaked to other parties. Encrypting - this data prevents such leaks from ruining lives. -4. Wiping or factory-resetting does not actually wipe all data from the storage - device. There are methods to read data from the physical disks/boards inside - devices. -5. Corporations, governments, and other nefarious groups/individuals are - actively looking for ways to collect personal information about anyone they - can. If someone's data is unencrypted, that person may become a target due to - the ease of data collection. - -*Read More:* - -- [[http://nvlpubs.nist.gov/nistpubs/FIPS/NIST.FIPS.197.pdf][Federal Information Processing Standards Publication 197]] diff --git a/content/blog/2018-11-28-cpp-compiler.md b/content/blog/2018-11-28-cpp-compiler.md new file mode 100644 index 0000000..abad6a5 --- /dev/null +++ b/content/blog/2018-11-28-cpp-compiler.md @@ -0,0 +1,140 @@ ++++ +date = 2018-11-28 +title = "The C++ Compiler" +description = "" +draft = false ++++ + +# A Brief Introduction + +[C++](https://en.wikipedia.org/wiki/C%2B%2B) is a general-purpose +programming language with object-oriented, generic, and functional +features in addition to facilities for low-level memory manipulation. + +The source code, shown in the snippet below, must be compiled before it +can be executed. There are many steps and intricacies to the compilation +process, and this post was a personal exercise to learn and remember as +much information as I can. + +``` cpp +#include <iostream> + +int main() +{ + std::cout << "Hello, world!\n"; +} +``` + +## Compilation Process + +### An Overview + +Compiling C++ projects is a frustrating task most days. Seemingly +nonexistent errors keeping your program from successfully compiling can +be annoying (especially since you know you wrote it perfectly the first +time, right?). + +I\'m learning more and more about C++ these days and decided to write +this concept down so that I can cement it even further in my own head. +However, C++ is not the only compiled language. Check out [the Wikipedia +entry for compiled +languages](https://en.wikipedia.org/wiki/Compiled_language) for more +examples of compiled languages. + +I\'ll start with a wonderful, graphical way to conceptualize the C++ +compiler. View [The C++ Compilation +Process](https://web.archive.org/web/20190419035048/http://faculty.cs.niu.edu/~mcmahon/CS241/Notes/compile.html) +by Kurt MacMahon, an NIU professor, to see the graphic and an +explanation. The goal of the compilation process is to take the C++ code +and produce a shared library, dynamic library, or an executable file. + +## Compilation Phases + +Let\'s break down the compilation process. There are four major steps to +compiling C++ code. + +### Step 1 + +The first step is to expand the source code file to meet all +dependencies. The C++ preprocessor includes the code from all the header +files, such as `#include +<iostream>`. Now, what does that mean? The previous example +includes the `iostream` header. This tells the computer that +you want to use the `iostream` standard library, which +contains classes and functions written in the core language. This +specific header allows you to manipulate input/output streams. After all +this, you\'ll end up which a temporary file that contains the expanded +source code. + +In the example of the C++ code above, the `iostream` class +would be included in the expanded code. + +### Step 2 + +After the code is expanded, the compiler comes into play. The compiler +takes the C++ code and converts this code into the assembly language, +understood by the platform. You can see this in action if you head over +to the [GodBolt Compiler Explorer](https://godbolt.org), which shows C++ +being converted into assembly dynamically. + +For example, the `Hello, world!` code snippet above compiles +into the following assembly code: + +``` asm +.LC0: + .string "Hello, world!\n" +main: + push rbp + mov rbp, rsp + mov esi, OFFSET FLAT:.LC0 + mov edi, OFFSET FLAT:_ZSt4cout + call std::basic_ostream<char, std::char_traits<char> >& std::operator<< <std::char_traits<char> >(std::basic_ostream<char, std::char_traits<char> >&, char const*) + mov eax, 0 + pop rbp + ret +__static_initialization_and_destruction_0(int, int): + push rbp + mov rbp, rsp + sub rsp, 16 + mov DWORD PTR [rbp-4], edi + mov DWORD PTR [rbp-8], esi + cmp DWORD PTR [rbp-4], 1 + jne .L5 + cmp DWORD PTR [rbp-8], 65535 + jne .L5 + mov edi, OFFSET FLAT:_ZStL8__ioinit + call std::ios_base::Init::Init() [complete object constructor] + mov edx, OFFSET FLAT:__dso_handle + mov esi, OFFSET FLAT:_ZStL8__ioinit + mov edi, OFFSET FLAT:_ZNSt8ios_base4InitD1Ev + call __cxa_atexit +.L5: + nop + leave + ret +_GLOBAL__sub_I_main: + push rbp + mov rbp, rsp + mov esi, 65535 + mov edi, 1 + call __static_initialization_and_destruction_0(int, int) + pop rbp + ret +``` + +### Step 3 + +Third, the assembly code generated by the compiler is assembled into the +object code for the platform. Essentially, this is when the compiler +takes the assembly code and assembles it into machine code in a binary +format. After researching this online, I figured out that a lot of +compilers will allow you to stop compilation at this step. This would be +useful for compiling each source code file separately. This saves time +later if a single file changes; only that file needs to be recompiled. + +### Step 4 + +Finally, the object code file generated by the assembler is linked +together with the object code files for any library functions used to +produce a shared library, dynamic library, or an executable file. It +replaces all references to undefined symbols with the correct addresses. diff --git a/content/blog/2018-11-28-cpp-compiler.org b/content/blog/2018-11-28-cpp-compiler.org deleted file mode 100644 index 09aeb50..0000000 --- a/content/blog/2018-11-28-cpp-compiler.org +++ /dev/null @@ -1,121 +0,0 @@ -#+title: The C++ Compiler -#+date: 2018-11-28 -#+description: Learn basics about the C++ compilation process. -#+filetags: :dev: - -* A Brief Introduction -[[https://en.wikipedia.org/wiki/C%2B%2B][C++]] is a general-purpose programming language with object-oriented, generic, and -functional features in addition to facilities for low-level memory manipulation. - -The source code, shown in the snippet below, must be compiled before it can be -executed. There are many steps and intricacies to the compilation process, and -this post was a personal exercise to learn and remember as much information as I -can. - -#+begin_src cpp -#include <iostream> - -int main() -{ - std::cout << "Hello, world!\n"; -} -#+end_src - -** Compilation Process -*** An Overview -Compiling C++ projects is a frustrating task most days. Seemingly nonexistent -errors keeping your program from successfully compiling can be annoying -(especially since you know you wrote it perfectly the first time, right?). - -I'm learning more and more about C++ these days and decided to write this -concept down so that I can cement it even further in my own head. However, C++ -is not the only compiled language. Check out [[https://en.wikipedia.org/wiki/Compiled_language][the Wikipedia entry for compiled -languages]] for more examples of compiled languages. - -I'll start with a wonderful, graphical way to conceptualize the C++ compiler. -View [[https://web.archive.org/web/20190419035048/http://faculty.cs.niu.edu/~mcmahon/CS241/Notes/compile.html][The C++ Compilation Process]] by Kurt MacMahon, an NIU professor, to see the -graphic and an explanation. The goal of the compilation process is to take the -C++ code and produce a shared library, dynamic library, or an executable file. - -** Compilation Phases -Let's break down the compilation process. There are four major steps to -compiling C++ code. - -*** Step 1 -The first step is to expand the source code file to meet all dependencies. The -C++ preprocessor includes the code from all the header files, such as =#include -<iostream>=. Now, what does that mean? The previous example includes the -=iostream= header. This tells the computer that you want to use the =iostream= -standard library, which contains classes and functions written in the core -language. This specific header allows you to manipulate input/output streams. -After all this, you'll end up which a temporary file that contains the expanded -source code. - -In the example of the C++ code above, the =iostream= class would be included in -the expanded code. - -*** Step 2 -After the code is expanded, the compiler comes into play. The compiler takes the -C++ code and converts this code into the assembly language, understood by the -platform. You can see this in action if you head over to the [[https://godbolt.org][GodBolt Compiler -Explorer]], which shows C++ being converted into assembly dynamically. - -For example, the =Hello, world!= code snippet above compiles into the following -assembly code: - -#+begin_src asm -.LC0: - .string "Hello, world!\n" -main: - push rbp - mov rbp, rsp - mov esi, OFFSET FLAT:.LC0 - mov edi, OFFSET FLAT:_ZSt4cout - call std::basic_ostream<char, std::char_traits<char> >& std::operator<< <std::char_traits<char> >(std::basic_ostream<char, std::char_traits<char> >&, char const*) - mov eax, 0 - pop rbp - ret -__static_initialization_and_destruction_0(int, int): - push rbp - mov rbp, rsp - sub rsp, 16 - mov DWORD PTR [rbp-4], edi - mov DWORD PTR [rbp-8], esi - cmp DWORD PTR [rbp-4], 1 - jne .L5 - cmp DWORD PTR [rbp-8], 65535 - jne .L5 - mov edi, OFFSET FLAT:_ZStL8__ioinit - call std::ios_base::Init::Init() [complete object constructor] - mov edx, OFFSET FLAT:__dso_handle - mov esi, OFFSET FLAT:_ZStL8__ioinit - mov edi, OFFSET FLAT:_ZNSt8ios_base4InitD1Ev - call __cxa_atexit -.L5: - nop - leave - ret -_GLOBAL__sub_I_main: - push rbp - mov rbp, rsp - mov esi, 65535 - mov edi, 1 - call __static_initialization_and_destruction_0(int, int) - pop rbp - ret -#+end_src - -*** Step 3 -Third, the assembly code generated by the compiler is assembled into the object -code for the platform. Essentially, this is when the compiler takes the assembly -code and assembles it into machine code in a binary format. After researching -this online, I figured out that a lot of compilers will allow you to stop -compilation at this step. This would be useful for compiling each source code -file separately. This saves time later if a single file changes; only that file -needs to be recompiled. - -*** Step 4 -Finally, the object code file generated by the assembler is linked together with -the object code files for any library functions used to produce a shared -library, dynamic library, or an executable file. It replaces all references to -undefined symbols with the correct addresses. diff --git a/content/blog/2019-01-07-useful-css.md b/content/blog/2019-01-07-useful-css.md new file mode 100644 index 0000000..687be03 --- /dev/null +++ b/content/blog/2019-01-07-useful-css.md @@ -0,0 +1,200 @@ ++++ +date = 2019-01-07 +title = "Useful CSS Snippets" +description = "" +draft = false ++++ + +# Introduction to CSS + +[CSS](https://en.wikipedia.org/wiki/CSS), the language used to markup +HTML code and make it \"pretty\", is one of the most effective ways to +increase the attractiveness of a website. It can also lead to increased +user engagement, retention, and satisfaction. In fact, there are whole +career fields are dedicated to the improvement of user experiences, +known as UI design and UX design. + +Some web developers are used to the common CSS properties, such as +element sizing, fonts, colors, etc., but are not as well versed in +less-used properties and values such as `flexbox`, +`clip-path`, and `transform`. This article will +provide some insight into the less-used and unique CSS properties. + +# CSS Variables + +The first topic today is CSS variables. Variables are not often used by +smaller developers. CSS variables allow you to give your website a +well-defined structure, where you can easily reuse CSS properties +throughout the project. + +You can use variables to define things, such as color palettes. Then, +you can use these colors for backgrounds anywhere else in the HTML. This +could be extended, where extra variables could be defined for +`primary-text`, `quoted-text`, etc. Variables can +also be used to define spacing (e.g. `32px` or +`2rem`), which can then be applied to margins, padding, font +sizes, and more. + +For example, here are some variables defined at the root of the website, +which allows for any subsequent CSS rules to use those variables: + +``` css +:root { + --primary-color: black; + --secondary-color: white; +} + +body { + background-color: var(--primary-color); + color: var(--secondary-color); +} +``` + +# CSS Box Shadows + +Box shadows were once my mortal enemy. No matter how hard I tried, I +just couldn\'t get them to work how I wanted. Because of this, my +favorite discovery has been CSSMatic\'s [box shadow +generator](https://www.cssmatic.com/box-shadow). It provides an +excellent tool to generate box shadows using their simple sliders. +Surprisingly, this is the reason I learned how box shadows work! You can +use the sliders and watch how the CSS code changes in the image that is +displayed. Through this, you should understand that the basic structure +for box shadows is: + +``` css +box-shadow: inset horizontal vertical blur spread color; +``` + +Now, let\'s look at some basic examples! You can copy and paste the +following code into a site like CodePen or your own HTML files. Feel +free to play around with the code, experiment, and learn. + +**Box Shadow #1** + +``` html +<div class="shadow-examples"> + <div class="box effect1"> + <h3>Effect 1</h3> + </div> +</div> +``` + +``` css +.box h3 { + text-align: center; + position: relative; + top: 80px; +} +.box { + width: 70%; + height: 200px; + background: #fff; + margin: 40px auto; +} +.effect1 { + box-shadow: 0 10px 6px -6px #777; +} +``` + +**Box Shadow #2** + +``` html +<div class="shadow-examples"> + <div class="box effect2"> + <h3>Effect 2</h3> + </div> +</div> +``` + +``` css +.box h3 { + text-align: center; + position: relative; + top: 80px; +} +.box { + width: 70%; + height: 200px; + background: #fff; + margin: 40px auto; +} +.effect2 { + box-shadow: 10px 10px 5px -5px rgba(0, 0, 0, 0.75); +} +``` + +Try these box shadows out on your own and see how changing each shadow +value works. + +# CSS Flexbox + +Now, let\'s move on to the best part of this article: flexbox. The +flexbox is by far my favorite new toy. I originally stumbled across this +solution after looking for more efficient ways of centering content +horizontally AND vertically. I had used a few hack-ish methods before, +but flexbox throws those out the window. The best part of it all is that +flexbox is *dead simple*. + +Flexbox pertains to the parent div of any element. You want the parent +to be the flexbox in which items are arranged to use the flex methods. +It\'s easier to see this in action that explained, so let\'s see an +example. + +**Flexbox** + +``` html +<div class="flex-examples"> + <div class="sm-box"> + <h3>1</h3> + </div> + <div class="sm-box"> + <h3>2</h3> + </div> +</div> +``` + +``` css +.flex-examples { + display: flex; + flex-wrap: wrap; + justify-content: flex-start; + align-items: center; + padding: 10px; + background-color: #f2f2f2; +} +.sm-box { + display: flex; + justify-content: center; + align-items: center; + width: 20%; + height: 100px; + background: #fff; + margin: 40px 10px; +} +``` + +You may notice that we no longer need to use the `top` +property for the `h3` elements in our code. This is because +we set the display box to be a flex container for the small boxes, AND +we made the small boxes flex containers for their elements (the h3 +tags). Flex boxes can be nested like this to center content that is +inside centered content. + +For the example above, we designated the `justify-content` +property to be `flex-start` so that the boxes stack from the +left side of the screen. This property can be changed to +`center` to make the boxes appear in the center of the +screen. + +For an interactive example, [check out this +CodePen](https://codepen.io/LandonSchropp/pen/KpzzGo) from +[LandonScropp](https://codepen.io/LandonSchropp/). Resize the window +with dice to see how they collapse and re-align. + +# Even More CSS + +For more inspiration, you can visit [CodePen](https://www.codepen.io), +[Dribbble](https://dribbble.com), or [UI +Movement](https://uimovement.com) to browse the collections of many +amazing web designers. diff --git a/content/blog/2019-01-07-useful-css.org b/content/blog/2019-01-07-useful-css.org deleted file mode 100644 index c3c4b19..0000000 --- a/content/blog/2019-01-07-useful-css.org +++ /dev/null @@ -1,178 +0,0 @@ -#+title: Useful CSS Snippets -#+date: 2019-01-07 -#+description: Explore some useful CSS snippets. -#+filetags: :dev: - -* Introduction to CSS -[[https://en.wikipedia.org/wiki/CSS][CSS]], the language used to markup HTML code and make it "pretty", is one of the -most effective ways to increase the attractiveness of a website. It can also -lead to increased user engagement, retention, and satisfaction. In fact, there -are whole career fields are dedicated to the improvement of user experiences, -known as UI design and UX design. - -Some web developers are used to the common CSS properties, such as element -sizing, fonts, colors, etc., but are not as well versed in less-used properties -and values such as =flexbox=, =clip-path=, and =transform=. This article will -provide some insight into the less-used and unique CSS properties. - -* CSS Variables -The first topic today is CSS variables. Variables are not often used by smaller -developers. CSS variables allow you to give your website a well-defined -structure, where you can easily reuse CSS properties throughout the project. - -You can use variables to define things, such as color palettes. Then, you can -use these colors for backgrounds anywhere else in the HTML. This could be -extended, where extra variables could be defined for =primary-text=, -=quoted-text=, etc. Variables can also be used to define spacing (e.g. =32px= or -=2rem=), which can then be applied to margins, padding, font sizes, and more. - -For example, here are some variables defined at the root of the website, which -allows for any subsequent CSS rules to use those variables: - -#+begin_src css -:root { - --primary-color: black; - --secondary-color: white; -} - -body { - background-color: var(--primary-color); - color: var(--secondary-color); -} -#+end_src - -* CSS Box Shadows -Box shadows were once my mortal enemy. No matter how hard I tried, I just -couldn't get them to work how I wanted. Because of this, my favorite discovery -has been CSSMatic's [[https://www.cssmatic.com/box-shadow][box shadow generator]]. It provides an excellent tool to -generate box shadows using their simple sliders. Surprisingly, this is the -reason I learned how box shadows work! You can use the sliders and watch how the -CSS code changes in the image that is displayed. Through this, you should -understand that the basic structure for box shadows is: - -#+begin_src css -box-shadow: inset horizontal vertical blur spread color; -#+end_src - -Now, let's look at some basic examples! You can copy and paste the following -code into a site like CodePen or your own HTML files. Feel free to play around -with the code, experiment, and learn. - -*Box Shadow #1* - -#+begin_src html -<div class="shadow-examples"> - <div class="box effect1"> - <h3>Effect 1</h3> - </div> -</div> -#+end_src - -#+begin_src css -.box h3 { - text-align: center; - position: relative; - top: 80px; -} -.box { - width: 70%; - height: 200px; - background: #fff; - margin: 40px auto; -} -.effect1 { - box-shadow: 0 10px 6px -6px #777; -} -#+end_src - -*Box Shadow #2* - -#+begin_src html -<div class="shadow-examples"> - <div class="box effect2"> - <h3>Effect 2</h3> - </div> -</div> -#+end_src - -#+begin_src css -.box h3 { - text-align: center; - position: relative; - top: 80px; -} -.box { - width: 70%; - height: 200px; - background: #fff; - margin: 40px auto; -} -.effect2 { - box-shadow: 10px 10px 5px -5px rgba(0, 0, 0, 0.75); -} -#+end_src - -Try these box shadows out on your own and see how changing each shadow value -works. - -* CSS Flexbox -Now, let's move on to the best part of this article: flexbox. The flexbox is by -far my favorite new toy. I originally stumbled across this solution after -looking for more efficient ways of centering content horizontally AND -vertically. I had used a few hack-ish methods before, but flexbox throws those -out the window. The best part of it all is that flexbox is /dead simple/. - -Flexbox pertains to the parent div of any element. You want the parent to be the -flexbox in which items are arranged to use the flex methods. It's easier to see -this in action that explained, so let's see an example. - -*Flexbox* - -#+begin_src html -<div class="flex-examples"> - <div class="sm-box"> - <h3>1</h3> - </div> - <div class="sm-box"> - <h3>2</h3> - </div> -</div> -#+end_src - -#+begin_src css -.flex-examples { - display: flex; - flex-wrap: wrap; - justify-content: flex-start; - align-items: center; - padding: 10px; - background-color: #f2f2f2; -} -.sm-box { - display: flex; - justify-content: center; - align-items: center; - width: 20%; - height: 100px; - background: #fff; - margin: 40px 10px; -} -#+end_src - -You may notice that we no longer need to use the =top= property for the =h3= -elements in our code. This is because we set the display box to be a flex -container for the small boxes, AND we made the small boxes flex containers for -their elements (the h3 tags). Flex boxes can be nested like this to center -content that is inside centered content. - -For the example above, we designated the =justify-content= property to be -=flex-start= so that the boxes stack from the left side of the screen. This -property can be changed to =center= to make the boxes appear in the center of -the screen. - -For an interactive example, [[https://codepen.io/LandonSchropp/pen/KpzzGo][check out this CodePen]] from [[https://codepen.io/LandonSchropp/][LandonScropp]]. Resize the -window with dice to see how they collapse and re-align. - -* Even More CSS -For more inspiration, you can visit [[https://www.codepen.io][CodePen]], [[https://dribbble.com][Dribbble]], or [[https://uimovement.com][UI Movement]] to browse -the collections of many amazing web designers. diff --git a/content/blog/2019-09-09-audit-analytics.md b/content/blog/2019-09-09-audit-analytics.md new file mode 100644 index 0000000..80a1ffb --- /dev/null +++ b/content/blog/2019-09-09-audit-analytics.md @@ -0,0 +1,233 @@ ++++ +date = 2019-09-09 +title = "Audit Analytics" +description = "" +draft = false ++++ + +# What Are Data Analytics? + +A quick aside before I dive into this post: `data analytics` +is a vague term that has become popular in recent years. Think of a +`data analytic` as the output of any data analysis you +perform. For example, a pivot table or a pie chart could be a data +analytic. + +[Data analysis](https://en.wikipedia.org/wiki/Data_analysis) is a +process that utilizes statistics and other mathematical methods to +discover useful information within datasets. This involves examining, +cleaning, transforming, and modeling data so that you can use the data +to support an opinion, create more useful viewpoints, and gain knowledge +to implement into audit planning or risk assessments. + +One of the common mistakes that managers (and anyone new to the process) +make is assuming that everything involved with this process is \"data +analytics\". In fact, data analytics are only a small part of the +process. + +See **Figure 1\*** for a more accurate representation of where data +analysis sits within the full process. This means that data analysis +does not include querying or extracting data, selecting samples, or +performing audit tests. These steps can be necessary for an audit (and +may even be performed by the same associates), but they are not data +analytics. + + + +# Current Use of Analytics in Auditing + +While data analysis has been an integral part of most businesses and +departments for the better part of the last century, only recently have +internal audit functions been adopting this practice. The internal audit +function works exclusively to provide assurance and consulting services +to the business areas within the firm (except for internal auditing +firms who are hired by different companies to perform their roles). + +> Internal Auditing helps an organization accomplish its objectives by +> bringing a systematic, disciplined approach to evaluate and improve +> the effectiveness of risk management, control and governance +> processes. +> +> - The IIA\'s Definition of Internal Audit + +Part of the blame for the slow adoption of data analysis can be +attributed to the fact that internal auditing is strongly based on +tradition and following the precedents set by previous auditors. +However, there can be no progress without auditors who are willing to +break the mold and test new audit techniques. In fact, as of 2018, [only +63% of internal audit departments currently utilize data +analytics](https://www.cpapracticeadvisor.com/accounting-audit/news/12404086/internal-audit-groups-are-lagging-in-data-analytics) +in North America. This number should be as close as possible to 100%. I +have never been part of an audit that would not have benefited from data +analytics. + +So, how do internal audit functions remedy this situation? It\'s +definitely not as easy as walking into work on Monday and telling your +Chief Audit Executive that you\'re going to start implementing analytics +in the next audit. You need a plan and a system to make the analysis +process as effective as possible. + +# The DELTA Model + +One of the easiest ways to experiment with data analytics and gain an +understanding of the processes is to implement them within your own +department. But how do we do this if we\'ve never worked with analysis +before? One of the most common places to start is to research some data +analysis models currently available. For this post, we\'ll take a look +at the DELTA model. You can take a look at **\*\*\*Figure 2\*\*\*\*** +for a quick overview of the model. + +The DELTA model sets a few guidelines for areas wanting to implement +data analytics so that the results can be as comprehensive as possible: + +- **Data**: Must be clean, accessible, and (usually) unique. +- **Enterprise-Wide Focus**: Key data systems and analytical resources + must be available for use (by the Internal Audit Function). +- **Leaders**: Must promote a data analytics approach and show the + value of analytical results. +- **Targets**: Must be set for key areas and risks that the analytics + can be compared against (KPIs). +- **Analysts**: There must be auditors willing and able to perform + data analytics or else the system cannot be sustained. + + + +# Finding the Proper KPIs + +Once the Internal Audit Function has decided that they want to start +using data analytics internally and have ensured they\'re properly set +up to do so, they need to figure out what they will be testing against. +Key Performance Indicators (KPIs) are qualitative or quantitative +factors that can be evaluated and assessed to determine if the +department is performing well, usually compared to historical or +industry benchmarks. Once KPIs have been agreed upon and set, auditors +can use data analytics to assess and report on these KPIs. This allows +the person performing the analytics the freedom to express opinions on +the results, whereas the results are ambiguous if no KPIs exist. + +It should be noted that tracking KPIs in the department can help ensure +you have a rigorous Quality Assurance and Improvement Program (QAIP) in +accordance with some applicable standards, such as IPPF Standard 1300. + +> The chief audit executive must develop and maintain a quality +> assurance and improvement program that covers all aspects of the +> internal audit activity. +> +> - IPPF Standard 1300 + +Additionally, IPPF Standard 2060 discusses reporting: + +> The chief audit executive must report periodically to senior +> management and the board on the internal audit activity\'s purpose, +> authority, responsibility, and performance relative to its plan and on +> its conformance with the Code of Ethics and the Standards. Reporting +> must also include significant risk and control issues, including fraud +> risks, governance issues, and other matters that require the attention +> of senior management and/or the board. +> +> - IPPF Standard 2060 + +The hardest part of finding KPIs is to determine which KPIs are +appropriate for your department. Since every department is different and +has different goals, KPIs will vary drastically between companies. To +give you an idea of where to look, here are some ideas I came up with +when discussing the topic with a few colleagues. + +- Efficiency/Budgeting: + - Audit hours to staff utilization ratio (annual hours divided by + total annual work hours). + - Audit hours compared to the number of audits completed. + - Time between audit steps or to complete the whole audit. E.g., + time from fieldwork completion to audit report issuance. +- Reputation: + - The frequency that management has requested the services of the + IAF. + - Management, audit committee, or external audit satisfaction + survey results. + - Education, experience, certifications, tenure, and training of + the auditors on staff. +- Quality: + - Number and frequency of audit findings. Assign monetary or + numerical values, if possible. + - Percentage of recommendations issued and implemented. +- Planning: + - Percentage or number of key risks audited per year or per audit. + - Proportion of audit universe audited per year. + +# Data Analysis Tools + +Finally, to be able to analyze and report on the data analysis, auditors +need to evaluate the tools at their disposal. There are many options +available, but a few of the most common ones can easily get the job +done. For example, almost every auditor already has access to Microsoft +Excel. Excel is more powerful than most people give it credit for and +can accomplish a lot of basic statistics without much work. If you +don\'t know a lot about statistics but still want to see some of the +more basic results, Excel is a great option. + +To perform more in-depth statistical analysis or to explore large +datasets that Excel cannot handle, auditors will need to explore other +options. The big three that have had a lot of success in recent years +are Python, R, and ACL. ACL can be used as either a graphical tool +(point and click) or as a scripting tool, where the auditor must write +the scripts manually. Python and the R-language are solely scripting +languages. + +The general trend in the data analytics environment is that if the tool +allows you to do everything by clicking buttons or dragging elements, +you won\'t be able to fully utilize the analytics you need. The most +robust solutions are created by those who understand how to write the +scripts manually. It should be noted that as the utility of a tool +increases, it usually means that the learning curve for that tool will +also be higher. It will take auditors longer to learn how to utilize +Python, R, or ACL versus learning how to utilize Excel. + +# Visualization + +Once an auditor has finally found the right data, KPIs, and tools, they +must report these results so that actions can be taken. Performing +in-depth data analysis is only useful if the results are understood by +the audiences of the data. The best way to create this understanding is +to visualize the results of the data. Let\'s take a look at some of the +best options to visualize and report the results you\'ve found. + +Some of the most popular commercial tools for visualization are +Microsoft PowerBI and Tableau Desktop. However, other tools exist such +as JMP, Plotly, Qlikview, Alteryx, or D3. Some require commercial +licenses while others are simply free to use. For corporate data, you +may want to make sure that the tool does not communicate any of the data +outside the company (such as cloud storage). I won\'t be going into +depth on any of these tools since visualization is largely a subjective +and creative experience, but remember to constantly explore new options +as you repeat the process. + +Lastly, let\'s take a look at an example of data visualization. This +example comes from a [blog post written by Kushal +Chakrabarti](https://talent.works/2018/03/28/the-science-of-the-job-search-part-iii-61-of-entry-level-jobs-require-3-years-of-experience/) +in 2018 about the percent of entry-level US jobs that require +experience. **Figure 3\*** shows us an easy-to-digest picture of the +data. We can quickly tell that only about 12.5% of entry-level jobs +don\'t require experience. + +This is the kind of result that easily describes the data for you. +However, make sure to include an explanation of what the results mean. +Don\'t let the reader assume what the data means, especially if it +relates to a complex subject. *Tell a story* about the data and why the +results matter. For example, **Figure 4\*** shows a part of the +explanation the author gives to illustrate his point. + + + + + +# Wrap-Up + +While this is not an all-encompassing program that you can just adopt +into your department, it should be enough to get anyone started on the +process of understanding and implementing data analytics. Always +remember to continue learning and exploring new options as your +processes grow and evolve. diff --git a/content/blog/2019-09-09-audit-analytics.org b/content/blog/2019-09-09-audit-analytics.org deleted file mode 100644 index 5621b5f..0000000 --- a/content/blog/2019-09-09-audit-analytics.org +++ /dev/null @@ -1,211 +0,0 @@ -#+title: Data Analysis in Auditing -#+date: 2019-09-09 -#+description: Learn how to use data analysis in the world of auditing. -#+filetags: :audit: - -* What Are Data Analytics? -A quick aside before I dive into this post: =data analytics= is a vague term -that has become popular in recent years. Think of a =data analytic= as the -output of any data analysis you perform. For example, a pivot table or a pie -chart could be a data analytic. - -[[https://en.wikipedia.org/wiki/Data_analysis][Data analysis]] is a process that utilizes statistics and other mathematical -methods to discover useful information within datasets. This involves examining, -cleaning, transforming, and modeling data so that you can use the data to -support an opinion, create more useful viewpoints, and gain knowledge to -implement into audit planning or risk assessments. - -One of the common mistakes that managers (and anyone new to the process) make is -assuming that everything involved with this process is "data analytics". In -fact, data analytics are only a small part of the process. - -See *Figure 1** for a more accurate representation of where data analysis sits -within the full process. This means that data analysis does not include querying -or extracting data, selecting samples, or performing audit tests. These steps -can be necessary for an audit (and may even be performed by the same -associates), but they are not data analytics. - -#+caption: The Intelligence Cycle -[[https://img.cleberg.net/blog/20190909-data-analysis-in-auditing/intelligence_cycle-min.png]] - -* Current Use of Analytics in Auditing -While data analysis has been an integral part of most businesses and departments -for the better part of the last century, only recently have internal audit -functions been adopting this practice. The internal audit function works -exclusively to provide assurance and consulting services to the business areas -within the firm (except for internal auditing firms who are hired by different -companies to perform their roles). - -#+begin_quote -Internal Auditing helps an organization accomplish its objectives by bringing a -systematic, disciplined approach to evaluate and improve the effectiveness of -risk management, control and governance processes. - -- The IIA's Definition of Internal Audit - -#+end_quote - -Part of the blame for the slow adoption of data analysis can be attributed to -the fact that internal auditing is strongly based on tradition and following the -precedents set by previous auditors. However, there can be no progress without -auditors who are willing to break the mold and test new audit techniques. In -fact, as of 2018, [[https://www.cpapracticeadvisor.com/accounting-audit/news/12404086/internal-audit-groups-are-lagging-in-data-analytics][only 63% of internal audit departments currently utilize data -analytics]] in North America. This number should be as close as possible to 100%. -I have never been part of an audit that would not have benefited from data -analytics. - -So, how do internal audit functions remedy this situation? It's definitely not -as easy as walking into work on Monday and telling your Chief Audit Executive -that you're going to start implementing analytics in the next audit. You need a -plan and a system to make the analysis process as effective as possible. - -* The DELTA Model -One of the easiest ways to experiment with data analytics and gain an -understanding of the processes is to implement them within your own department. -But how do we do this if we've never worked with analysis before? One of the -most common places to start is to research some data analysis models currently -available. For this post, we'll take a look at the DELTA model. You can take a -look at ****Figure 2***** for a quick overview of the model. - -The DELTA model sets a few guidelines for areas wanting to implement data -analytics so that the results can be as comprehensive as possible: - -- *Data*: Must be clean, accessible, and (usually) unique. -- *Enterprise-Wide Focus*: Key data systems and analytical resources must be - available for use (by the Internal Audit Function). -- *Leaders*: Must promote a data analytics approach and show the value of - analytical results. -- *Targets*: Must be set for key areas and risks that the analytics can be - compared against (KPIs). -- *Analysts*: There must be auditors willing and able to perform data analytics - or else the system cannot be sustained. - -#+caption: The Delta Model -[[https://img.cleberg.net/blog/20190909-data-analysis-in-auditing/delta-min.png]] - -* Finding the Proper KPIs -Once the Internal Audit Function has decided that they want to start using data -analytics internally and have ensured they're properly set up to do so, they -need to figure out what they will be testing against. Key Performance Indicators -(KPIs) are qualitative or quantitative factors that can be evaluated and -assessed to determine if the department is performing well, usually compared to -historical or industry benchmarks. Once KPIs have been agreed upon and set, -auditors can use data analytics to assess and report on these KPIs. This allows -the person performing the analytics the freedom to express opinions on the -results, whereas the results are ambiguous if no KPIs exist. - -It should be noted that tracking KPIs in the department can help ensure you have -a rigorous Quality Assurance and Improvement Program (QAIP) in accordance with -some applicable standards, such as IPPF Standard 1300. - -#+begin_quote -The chief audit executive must develop and maintain a quality assurance and -improvement program that covers all aspects of the internal audit activity. - -- IPPF Standard 1300 - -#+end_quote - -Additionally, IPPF Standard 2060 discusses reporting: - -#+begin_quote -The chief audit executive must report periodically to senior management and the -board on the internal audit activity's purpose, authority, responsibility, and -performance relative to its plan and on its conformance with the Code of Ethics -and the Standards. Reporting must also include significant risk and control -issues, including fraud risks, governance issues, and other matters that require -the attention of senior management and/or the board. - -- IPPF Standard 2060 - -#+end_quote - -The hardest part of finding KPIs is to determine which KPIs are appropriate for -your department. Since every department is different and has different goals, -KPIs will vary drastically between companies. To give you an idea of where to -look, here are some ideas I came up with when discussing the topic with a few -colleagues. - -- Efficiency/Budgeting: - - Audit hours to staff utilization ratio (annual hours divided by total annual - work hours). - - Audit hours compared to the number of audits completed. - - Time between audit steps or to complete the whole audit. E.g., time from - fieldwork completion to audit report issuance. -- Reputation: - - The frequency that management has requested the services of the IAF. - - Management, audit committee, or external audit satisfaction survey results. - - Education, experience, certifications, tenure, and training of the auditors - on staff. -- Quality: - - Number and frequency of audit findings. Assign monetary or numerical values, - if possible. - - Percentage of recommendations issued and implemented. -- Planning: - - Percentage or number of key risks audited per year or per audit. - - Proportion of audit universe audited per year. - -* Data Analysis Tools -Finally, to be able to analyze and report on the data analysis, auditors need to -evaluate the tools at their disposal. There are many options available, but a -few of the most common ones can easily get the job done. For example, almost -every auditor already has access to Microsoft Excel. Excel is more powerful than -most people give it credit for and can accomplish a lot of basic statistics -without much work. If you don't know a lot about statistics but still want to -see some of the more basic results, Excel is a great option. - -To perform more in-depth statistical analysis or to explore large datasets that -Excel cannot handle, auditors will need to explore other options. The big three -that have had a lot of success in recent years are Python, R, and ACL. ACL can -be used as either a graphical tool (point and click) or as a scripting tool, -where the auditor must write the scripts manually. Python and the R-language are -solely scripting languages. - -The general trend in the data analytics environment is that if the tool allows -you to do everything by clicking buttons or dragging elements, you won't be able -to fully utilize the analytics you need. The most robust solutions are created -by those who understand how to write the scripts manually. It should be noted -that as the utility of a tool increases, it usually means that the learning -curve for that tool will also be higher. It will take auditors longer to learn -how to utilize Python, R, or ACL versus learning how to utilize Excel. - -* Visualization -Once an auditor has finally found the right data, KPIs, and tools, they must -report these results so that actions can be taken. Performing in-depth data -analysis is only useful if the results are understood by the audiences of the -data. The best way to create this understanding is to visualize the results of -the data. Let's take a look at some of the best options to visualize and report -the results you've found. - -Some of the most popular commercial tools for visualization are Microsoft -PowerBI and Tableau Desktop. However, other tools exist such as JMP, Plotly, -Qlikview, Alteryx, or D3. Some require commercial licenses while others are -simply free to use. For corporate data, you may want to make sure that the tool -does not communicate any of the data outside the company (such as cloud -storage). I won't be going into depth on any of these tools since visualization -is largely a subjective and creative experience, but remember to constantly -explore new options as you repeat the process. - -Lastly, let's take a look at an example of data visualization. This example -comes from a [[https://talent.works/2018/03/28/the-science-of-the-job-search-part-iii-61-of-entry-level-jobs-require-3-years-of-experience/][blog post written by Kushal Chakrabarti]] in 2018 about the percent -of entry-level US jobs that require experience. *Figure 3** shows us an -easy-to-digest picture of the data. We can quickly tell that only about 12.5% of -entry-level jobs don't require experience. - -This is the kind of result that easily describes the data for you. However, make -sure to include an explanation of what the results mean. Don't let the reader -assume what the data means, especially if it relates to a complex subject. /Tell -a story/ about the data and why the results matter. For example, *Figure 4** -shows a part of the explanation the author gives to illustrate his point. - -#+caption: Entry-Level Visualization -[[https://img.cleberg.net/blog/20190909-data-analysis-in-auditing/vis_example-min.png]] - -#+caption: Visualization Explanation -[[https://img.cleberg.net/blog/20190909-data-analysis-in-auditing/vis_example_explanation-min.png]] - -* Wrap-Up -While this is not an all-encompassing program that you can just adopt into your -department, it should be enough to get anyone started on the process of -understanding and implementing data analytics. Always remember to continue -learning and exploring new options as your processes grow and evolve. diff --git a/content/blog/2019-12-03-the-ansoff-matrix.md b/content/blog/2019-12-03-the-ansoff-matrix.md new file mode 100644 index 0000000..da3fa11 --- /dev/null +++ b/content/blog/2019-12-03-the-ansoff-matrix.md @@ -0,0 +1,128 @@ ++++ +date = 2019-12-03 +title = "The Ansoff Matrix" +description = "" +draft = false ++++ + +# Overview + +As the world of business evolves, managers must approach business +planning and strategy with a contemporary mindset. According to Dess, +McNamara, Eisner, and Lee, managers must be willing to adapt to the +modern business environment by going beyond \"\'incremental +management\', whereby they view their job as making a series of small, +minor changes to improve the efficiency of the firm\'s +operations\"(2019). + +One reason that strategic management is crucial is because most +businesses that fail in the United States each year fail due to a lack +of strategic focus or direction(2019). The rate of failure for +businesses with poor strategies shows that strategic planning and +management are crucial to a business\'s strength and longevity, +injecting the critical factors of growth and direction into a company\'s +business plan. + +One of the most significant strategic planning and management frameworks +that companies can use is the [Ansoff +Matrix](https://en.wikipedia.org/wiki/Ansoff_matrix). While this +framework has unique purposes and use-cases, it can effectively help an +organization grow and compete. Specifically, the Ansoff matrix is one of +the most effective frameworks for companies who want to focus on +increasing sales revenue or profitability(2019). + +This framework uses a two-by-two figure to show the four strategic +options for companies to use in this framework: market penetration, +market development, product development, and diversification (see +**Figure 1**). The x-axis of the matrix focuses on the firm\'s markets +and also determines if the firm is looking to enter new markets or +innovate in its current markets. The y-axis of the matrix focuses on the +firm\'s products and determines if the firm wants to pursue strategies +around their existing products or explore new products. + + + +# Strategic Options + +## Market Penetration + +The most straightforward strategy in the Ansoff matrix is to focus on +existing products in existing markets, also known as market +penetration(2019). Companies such as Coca-Cola have used market +penetration successfully by investing a lot of money to get further +value out of their current markets. Coca-Cola does this by introducing +new features such as Christmas-themed bottles, personal names on the +bottles, and other marketing schemes. + +## Market Development + +Market development extends existing products into new markets in an +attempt to increase the number of buyers. One interesting way that +Coca-Cola used this strategy comes from the stigma that Diet Coke is a +woman\'s drink(2019). Coca-Cola introduced Coca-Cola Zero, which +contained the same nutritional content as Diet Coke, but was packaged in +a dark black can to appear more \"manly\"(2019). + +## Product Development + +Product development uses existing markets to introduce new products so +that the firm can better meet customer needs(2019). The extreme end of +diversification is home to companies such as Johnson & Johnson, a +healthcare company that has developed a business portfolio of more than +60,000 different products(2019). Johnson & Johnson\'s dedication to +continuous diversification has led them to a balance sheet rating of +\"AAA\", industry recognition for diversification, and increases in +their investor dividends for 57 consecutive years(2019). + +## Related Diversification + +Diversification, the final strategy of the Ansoff Matrix, is more +difficult than the others since it involves exploring both new markets +and new products. Related diversification is a diversification strategy +that closely relates to the firm\'s core business. Coca-Cola\'s best +example of related diversification is its acquisition of Glaceau and +Vitamin Water, which expanded their drinking lines of business(2019). + +## Unrelated Diversification + +Unrelated diversification is a diversification strategy that does not +really relate to the firm\'s core business but still diversifies their +business portfolio. A good example of this would be a coffee company who +has decided to enter the market for bicycle sales. The main purpose of +this strategy is to an extremely diverse company that will not go +bankrupt if one market goes through difficult times. However, this +requires a lot of independent skills and heavy investments since the +company most likely cannot easily transfer knowledge between the markets +they compete in. + +# Requirements for Success + +To use the Ansoff Matrix framework, managers need to formulate corporate +goals and objectives. Without goals and direction, management frameworks +do not present much practical utility. Further, the Ansoff Matrix +requires the managers involved to make tactical decisions and create a +path for the company to take toward their goals. Lastly, both the Ansoff +Matrix needs to consider both internal and external perspectives +throughout the strategy formulation process. + +One interesting probability is that companies will be using multiple +strategic planning and management frameworks at the same time. While +this may sound like it could crowd the management process, there are +numerous reasons to do so. For example, the Ansoff Matrix and the +Balanced Scorecard are relatively popular, and they cover entirely +different parts of a company\'s strategy. Using the results from the +Balanced Scorecard could inform a company of the potential product and +market demands, such as from customer or supplier survey results, to +help the company determine which Ansoff Matrix strategy to pursue. +However, a combined approach at this level would require mature +frameworks and focused managers who are able to strategize at a high +level. + +Lastly, it should be noted that the author of the Ansoff matrix, Igor +Ansoff, often used the term [paralysis by +analysis](https://en.wikipedia.org/wiki/Analysis_paralysis) to explain +the mistake of companies who overuse analysis and spend too much time +planning. Companies need to understand the utility of a strategic +management framework while ensuring that the company is poised to +execute as efficiently as they have planned. diff --git a/content/blog/2019-12-03-the-ansoff-matrix.org b/content/blog/2019-12-03-the-ansoff-matrix.org deleted file mode 100644 index 1bee6a8..0000000 --- a/content/blog/2019-12-03-the-ansoff-matrix.org +++ /dev/null @@ -1,105 +0,0 @@ -#+title: The Ansoff Matrix -#+date: 2019-12-03 -#+description: Learn about the Ansoff Matrix, a strategic management tool. -#+filetags: :business: - -* Overview -As the world of business evolves, managers must approach business planning and -strategy with a contemporary mindset. According to Dess, McNamara, Eisner, and -Lee, managers must be willing to adapt to the modern business environment by -going beyond "'incremental management', whereby they view their job as making a -series of small, minor changes to improve the efficiency of the firm's -operations"(2019). - -One reason that strategic management is crucial is because most businesses that -fail in the United States each year fail due to a lack of strategic focus or -direction(2019). The rate of failure for businesses with poor strategies shows -that strategic planning and management are crucial to a business's strength and -longevity, injecting the critical factors of growth and direction into a -company's business plan. - -One of the most significant strategic planning and management frameworks that -companies can use is the [[https://en.wikipedia.org/wiki/Ansoff_matrix][Ansoff Matrix]]. While this framework has unique purposes -and use-cases, it can effectively help an organization grow and compete. -Specifically, the Ansoff matrix is one of the most effective frameworks for -companies who want to focus on increasing sales revenue or profitability(2019). - -This framework uses a two-by-two figure to show the four strategic options for -companies to use in this framework: market penetration, market development, -product development, and diversification (see *Figure 1*). The x-axis of the -matrix focuses on the firm's markets and also determines if the firm is looking -to enter new markets or innovate in its current markets. The y-axis of the -matrix focuses on the firm's products and determines if the firm wants to pursue -strategies around their existing products or explore new products. - -#+caption: The Ansoff Matrix by JaisonAbeySabu, Own work, CC BY-SA 3.0 -[[https://img.cleberg.net/blog/20191203-the-ansoff-matrix/ansoff_matrix-min.png]] - -* Strategic Options -** Market Penetration -The most straightforward strategy in the Ansoff matrix is to focus on existing -products in existing markets, also known as market penetration(2019). Companies -such as Coca-Cola have used market penetration successfully by investing a lot -of money to get further value out of their current markets. Coca-Cola does this -by introducing new features such as Christmas-themed bottles, personal names on -the bottles, and other marketing schemes. - -** Market Development -Market development extends existing products into new markets in an attempt to -increase the number of buyers. One interesting way that Coca-Cola used this -strategy comes from the stigma that Diet Coke is a woman's drink(2019). -Coca-Cola introduced Coca-Cola Zero, which contained the same nutritional -content as Diet Coke, but was packaged in a dark black can to appear more -"manly"(2019). - -** Product Development -Product development uses existing markets to introduce new products so that the -firm can better meet customer needs(2019). The extreme end of diversification is -home to companies such as Johnson & Johnson, a healthcare company that has -developed a business portfolio of more than 60,000 different products(2019). -Johnson & Johnson's dedication to continuous diversification has led them to a -balance sheet rating of "AAA", industry recognition for diversification, and -increases in their investor dividends for 57 consecutive years(2019). - -** Related Diversification -Diversification, the final strategy of the Ansoff Matrix, is more difficult than -the others since it involves exploring both new markets and new products. -Related diversification is a diversification strategy that closely relates to -the firm's core business. Coca-Cola's best example of related diversification is -its acquisition of Glaceau and Vitamin Water, which expanded their drinking -lines of business(2019). - -** Unrelated Diversification -Unrelated diversification is a diversification strategy that does not really -relate to the firm's core business but still diversifies their business -portfolio. A good example of this would be a coffee company who has decided to -enter the market for bicycle sales. The main purpose of this strategy is to an -extremely diverse company that will not go bankrupt if one market goes through -difficult times. However, this requires a lot of independent skills and heavy -investments since the company most likely cannot easily transfer knowledge -between the markets they compete in. - -* Requirements for Success -To use the Ansoff Matrix framework, managers need to formulate corporate goals -and objectives. Without goals and direction, management frameworks do not -present much practical utility. Further, the Ansoff Matrix requires the managers -involved to make tactical decisions and create a path for the company to take -toward their goals. Lastly, both the Ansoff Matrix needs to consider both -internal and external perspectives throughout the strategy formulation process. - -One interesting probability is that companies will be using multiple strategic -planning and management frameworks at the same time. While this may sound like -it could crowd the management process, there are numerous reasons to do so. For -example, the Ansoff Matrix and the Balanced Scorecard are relatively popular, -and they cover entirely different parts of a company's strategy. Using the -results from the Balanced Scorecard could inform a company of the potential -product and market demands, such as from customer or supplier survey results, to -help the company determine which Ansoff Matrix strategy to pursue. However, a -combined approach at this level would require mature frameworks and focused -managers who are able to strategize at a high level. - -Lastly, it should be noted that the author of the Ansoff matrix, Igor Ansoff, -often used the term [[https://en.wikipedia.org/wiki/Analysis_paralysis][paralysis by analysis]] to explain the mistake of companies -who overuse analysis and spend too much time planning. Companies need to -understand the utility of a strategic management framework while ensuring that -the company is poised to execute as efficiently as they have planned. diff --git a/content/blog/2019-12-16-password-security.md b/content/blog/2019-12-16-password-security.md new file mode 100644 index 0000000..bb4ab1d --- /dev/null +++ b/content/blog/2019-12-16-password-security.md @@ -0,0 +1,127 @@ ++++ +date = 2019-12-16 +title = "Password Security" +description = "" +draft = false ++++ + +# Users + +## Why Does It Matter? + +Information security, including passwords and identities, has become one +of the most important digital highlights of the last decade. With +[billions of people affected by data breaches each +year](https://www.usatoday.com/story/money/2018/12/28/data-breaches-2018-billions-hit-growing-number-cyberattacks/2413411002/), +there\'s a greater need to introduce strong information security +systems. If you think you\'ve been part of a breach, or you want to +check and see, you can use [Have I Been +Pwned](https://haveibeenpwned.com/) to see if your email has been +involved in any public breaches. Remember that there\'s a possibility +that a company experienced a breach and did not report it to anyone. + +## How Do I Protect Myself? + +The first place to start with any personal security check-up is to +gather a list of all the different websites, apps, or programs that +require you to have login credentials. Optionally, once you know where +your information is being stored, you can sort the list from the +most-important items such as banks or government logins to less +important items such as your favorite meme site. You will want to ensure +that your critical logins are secure before getting to the others. + +Once you think you have a good idea of all your different authentication +methods, I recommend using a password manager such as +[Bitwarden](https://bitwarden.com/). Using a password manager allows you +to automatically save your logins, create randomized passwords, and +transfer passwords across devices. However, you\'ll need to memorize +your \"vault password\" that allows you to open the password manager. +It\'s important to make this something hard to guess since it would +allow anyone who has it to access every password you\'ve stored in +there. + +Personally, I recommend using a +[passphrase](https://en.wikipedia.org/wiki/Passphrase) instead of a +[password](https://en.wikipedia.org/wiki/Password) for your vault +password. Instead of using a string of characters (whether random or +simple), use a phrase and add in symbols and a number. For example, your +vault password could be `Racing-Alphabet-Gourd-Parrot3`. Swap +the symbols out for whichever symbol you want, move the number around, +and fine-tune the passphrase until you are confident that you can +remember it whenever necessary. + +Once you\'ve stored your passwords, make sure you continually check up +on your account and make sure you aren\'t following bad password +practices. Krebs on Security has a great [blog post on password +recommendations](https://krebsonsecurity.com/password-dos-and-donts/). +Any time that a data breach happens, make sure you check to see if you +were included, and if you need to reset any account passwords. + +# Developers + +## What Are the Basic Requirements? + +When developing any password-protected application, there are a few +basic rules that anyone should follow even if they do not follow any +official guidelines such as NIST. The foremost practice is to require +users to use passwords that are at least 8 characters and cannot easily +be guessed. This sounds extremely simple, but it requires quite a few +different strategies. First, the application should check the potential +passwords against a dictionary of insecure passwords such +`password`, `1234abc`, or +`application_name`. + +Next, the application should offer guidance on the strength of passwords +being entered during enrollment. Further, NIST officially recommends +**not\*** implementing any composition rules that make passwords hard to +remember (e.g. passwords with letters, numbers, and special characters) +and instead encouraging the use of long pass phrases which can include +spaces. It should be noted that to be able to keep spaces within +passwords, all unicode characters should be supported, and passwords +should not be truncated. + +## What Does NIST Recommend? + +The National Institute of Standards and Technology +([NIST](https://www.nist.gov)) in the US Department of Commerce +regularly publishes information around information security and digital +identity guidelines. Recently, NIST published [Special Publication +800-63b](https://pages.nist.gov/800-63-3/sp800-63b.html): Digital +Identity Guidelines and Authentication and Lifecycle Management. + +> A Memorized Secret authenticator - commonly referred to as a password +> or, if numeric, a PIN - is a secret value intended to be chosen and +> memorized by the user. Memorized secrets need to be of sufficient +> complexity and secrecy that it would be impractical for an attacker to +> guess or otherwise discover the correct secret value. A memorized +> secret is something you know. +> +> - NIST Special Publication 800-63B + +NIST offers a lot of guidance on passwords, but I\'m going to highlight +just a few of the important factors: + +- Require passwords to be a minimum of 8 characters (6 characters if + randomly generated and be generated using an approved random bit + generator). +- Compare potential passwords against a list that contains values + known to be commonly-used, expected, or compromised. +- Offer guidance on password strength, such as a strength meter. +- Implement a rate-limiting mechanism to limit the number of failed + authentication attempts for each user account. +- Do not require composition rules for passwords and do not require + passwords to be changed periodically (unless compromised). +- Allow pasting of user identification and passwords to facilitate the + use of password managers. +- Allow users to view the password as it is being entered. +- Use secure forms of communication and storage, including salting and + hashing passwords using a one-way key derivation function. + +NIST offers further guidance on other devices that require specific +security policies, querying for passwords, and more. All the information +discussed so far comes from [NIST +SP800-63b](https://pages.nist.gov/800-63-3/sp800-63b.html) but NIST +offers a lot of information on digital identities, enrollment, identity +proofing, authentication, lifecycle management, federation, and +assertions in the total [NIST SP800-63 Digital Identity +Guidelines](https://pages.nist.gov/800-63-3/). diff --git a/content/blog/2019-12-16-password-security.org b/content/blog/2019-12-16-password-security.org deleted file mode 100644 index 465afdc..0000000 --- a/content/blog/2019-12-16-password-security.org +++ /dev/null @@ -1,103 +0,0 @@ -#+title: Password Security -#+date: 2019-12-16 -#+description: Password security basics. -#+filetags: :security: - -* Users -** Why Does It Matter? -Information security, including passwords and identities, has become one of the -most important digital highlights of the last decade. With [[https://www.usatoday.com/story/money/2018/12/28/data-breaches-2018-billions-hit-growing-number-cyberattacks/2413411002/][billions of people -affected by data breaches each year]], there's a greater need to introduce strong -information security systems. If you think you've been part of a breach, or you -want to check and see, you can use [[https://haveibeenpwned.com/][Have I Been Pwned]] to see if your email has -been involved in any public breaches. Remember that there's a possibility that a -company experienced a breach and did not report it to anyone. - -** How Do I Protect Myself? -The first place to start with any personal security check-up is to gather a list -of all the different websites, apps, or programs that require you to have login -credentials. Optionally, once you know where your information is being stored, -you can sort the list from the most-important items such as banks or government -logins to less important items such as your favorite meme site. You will want to -ensure that your critical logins are secure before getting to the others. - -Once you think you have a good idea of all your different authentication -methods, I recommend using a password manager such as [[https://bitwarden.com/][Bitwarden]]. Using a -password manager allows you to automatically save your logins, create randomized -passwords, and transfer passwords across devices. However, you'll need to -memorize your "vault password" that allows you to open the password manager. -It's important to make this something hard to guess since it would allow anyone -who has it to access every password you've stored in there. - -Personally, I recommend using a [[https://en.wikipedia.org/wiki/Passphrase][passphrase]] instead of a [[https://en.wikipedia.org/wiki/Password][password]] for your vault -password. Instead of using a string of characters (whether random or simple), -use a phrase and add in symbols and a number. For example, your vault password -could be =Racing-Alphabet-Gourd-Parrot3=. Swap the symbols out for whichever -symbol you want, move the number around, and fine-tune the passphrase until you -are confident that you can remember it whenever necessary. - -Once you've stored your passwords, make sure you continually check up on your -account and make sure you aren't following bad password practices. Krebs on -Security has a great [[https://krebsonsecurity.com/password-dos-and-donts/][blog post on password recommendations]]. Any time that a data -breach happens, make sure you check to see if you were included, and if you need -to reset any account passwords. - -* Developers -** What Are the Basic Requirements? -When developing any password-protected application, there are a few basic rules -that anyone should follow even if they do not follow any official guidelines -such as NIST. The foremost practice is to require users to use passwords that -are at least 8 characters and cannot easily be guessed. This sounds extremely -simple, but it requires quite a few different strategies. First, the application -should check the potential passwords against a dictionary of insecure passwords -such =password=, =1234abc=, or =application_name=. - -Next, the application should offer guidance on the strength of passwords being -entered during enrollment. Further, NIST officially recommends *not** -implementing any composition rules that make passwords hard to remember (e.g. -passwords with letters, numbers, and special characters) and instead encouraging -the use of long pass phrases which can include spaces. It should be noted that -to be able to keep spaces within passwords, all unicode characters should be -supported, and passwords should not be truncated. - -** What Does NIST Recommend? -The National Institute of Standards and Technology ([[https://www.nist.gov][NIST]]) in the US Department -of Commerce regularly publishes information around information security and -digital identity guidelines. Recently, NIST published [[https://pages.nist.gov/800-63-3/sp800-63b.html][Special Publication -800-63b]]: Digital Identity Guidelines and Authentication and Lifecycle -Management. - -#+begin_quote -A Memorized Secret authenticator - commonly referred to as a password or, if -numeric, a PIN - is a secret value intended to be chosen and memorized by the -user. Memorized secrets need to be of sufficient complexity and secrecy that it -would be impractical for an attacker to guess or otherwise discover the correct -secret value. A memorized secret is something you know. - -- NIST Special Publication 800-63B -#+end_quote - -NIST offers a lot of guidance on passwords, but I'm going to highlight just a -few of the important factors: - -- Require passwords to be a minimum of 8 characters (6 characters if randomly - generated and be generated using an approved random bit generator). -- Compare potential passwords against a list that contains values known to be - commonly-used, expected, or compromised. -- Offer guidance on password strength, such as a strength meter. -- Implement a rate-limiting mechanism to limit the number of failed - authentication attempts for each user account. -- Do not require composition rules for passwords and do not require passwords to - be changed periodically (unless compromised). -- Allow pasting of user identification and passwords to facilitate the use of - password managers. -- Allow users to view the password as it is being entered. -- Use secure forms of communication and storage, including salting and hashing - passwords using a one-way key derivation function. - -NIST offers further guidance on other devices that require specific security -policies, querying for passwords, and more. All the information discussed so far -comes from [[https://pages.nist.gov/800-63-3/sp800-63b.html][NIST SP800-63b]] but NIST offers a lot of information on digital -identities, enrollment, identity proofing, authentication, lifecycle management, -federation, and assertions in the total [[https://pages.nist.gov/800-63-3/][NIST SP800-63 Digital Identity -Guidelines]]. diff --git a/content/blog/2020-01-25-linux-software.md b/content/blog/2020-01-25-linux-software.md new file mode 100644 index 0000000..a240731 --- /dev/null +++ b/content/blog/2020-01-25-linux-software.md @@ -0,0 +1,282 @@ ++++ +date = 2020-01-25 +title = "My Favorite Linux Software" +description = "" +draft = false ++++ + +# GUI Applications + +## Etcher + + + +[Etcher](https://www.balena.io/etcher/) is a quick and easy way to burn +ISO images to CDs and USB devices. There are two different ways you can +install this program. First, you can navigate to the [official +website](https://www.balena.io/etcher/) and download the AppImage file, +which can run without installation. + +However, AppImage files are not executable by default, so you\'ll either +need to right-click to open the properties of the file and click the +\"Allow executing file as program\" box in the Permissions tab or use +the following command: + +```sh +chmod u+x FILE_NAME +``` + +If you don\'t like AppImage files or just prefer repositories, you can +use the following commands to add the author\'s repository and install +it through the command-line only. + +First, you\'ll have to echo the repo and write it to a list file: + +```sh +echo "deb https://deb.etcher.io stable etcher" | sudo tee /etc/apt/sources.list.d/balena-etcher.list +``` + +Next, add the application keys to Ubuntu\'s keyring: + +```sh +sudo apt-key adv --keyserver keyserver.ubuntu.com --recv-keys 379CE192D401AB61 +``` + +Finally, update the repositories and install the app. + +```sh +sudo apt update && sudo apt install balena-etcher-electron +``` + +Using Arch, Manjaro, or another distro using the AUR? Use this command +instead: + +```sh +sudo pacman -S etcher +``` + +## Atom + + + +[Atom](https://atom.io) is the self-proclaimed \"hackable text editor +for the 21st century\". This text editor is made by GitHub, [now owned +by +Microsoft](https://news.microsoft.com/2018/06/04/microsoft-to-acquire-github-for-7-5-billion/), +and has some of the best add-ons available to customize the layout and +abilities of the app. + +First, add the Atom repository to your sources. + +```sh +sudo add-apt-repository ppa:webupd8team/atom +``` + +Next, update your package listings and install atom. + +```sh +sudo apt update && sudo apt install atom +``` + +If you have issues updating your packages with the Atom repository, +you\'ll need to use the snap package described below instead of the +repository. To remove the repository we just added, use this command: + +```sh +sudo add-apt-repository -r ppa:webupd8team/atom +``` + +You can also install Atom as a snap package, but it must be installed +with the `--classic` flag. A [full explanation is +available](https://language-bash.com/blog/how-to-snap-introducing-classic-confinement) +if you\'d like to read more about why you need the classic flag. + +```sh +snap install atom --classic +``` + +Using Arch, Manjaro, or another distro using the AUR? Use this command +instead: + +```sh +sudo pacman -S atom +``` + +## Visual Studio Code + + + +[Visual Studio Code](https://code.visualstudio.com) is yet another +fantastic choice for programming on Linux, especially if you need those +extra add-ons to spice up your late-night coding sessions. The theme +used in the screenshot is +[Mars](https://marketplace.visualstudio.com/items?itemName=EliverLara.mars) +by theme creator [Eliver Lara](https://github.com/EliverLara), who makes +a ton of great themes for VS Code, Atom, and various Linux desktop +environments. + +To install VS Code, you\'ll need to download the `.deb` file +from the official website. Once you\'ve downloaded the file, either +double-click it to install through the Software Center or run the +following command: + +```sh +sudo dpkg -i FILE_NAME.deb +``` + +You can also install VS Code as a snap package, but it must be installed +with the `--classic` flag. A [full explanation is +available](https://language-bash.com/blog/how-to-snap-introducing-classic-confinement) +if you\'d like to read more about why you need the classic flag. + +```sh +snap install code --classic +``` + +Using Arch, Manjaro, or another distro using the AUR? Use these commands +instead: + +```sh +sudo pacman -S yay binutils make gcc pkg-config fakeroot yay -S visual-studio-code-bin +``` + +## GNOME Tweaks + + + +[Gnome Tweaks](https://gitlab.gnome.org/GNOME/gnome-tweaks) is the +ultimate tool to use if you want to customize your GNOME desktop +environment. This is how you can switch application themes (GTK), shell +themes, icons, fonts, and more. To install GNOME Tweaks on Ubuntu, you +just need to install the official package. + +```sh +sudo apt install gnome-tweaks +``` + +If you\'ve installed Manjaro or Arch with Gnome, you should have the +tweak tool pre-installed. If you\'re on Fedora, this tool is available +as an official package: + +```sh +sudo dnf install gnome-tweaks +``` + +## Steam + + + +[Steam](https://steampowered.com) is one of the most popular gaming +libraries for computers and is one of the main reasons that many people +have been able to switch to Linux in recent years, thanks to Steam +Proton, which makes it easier to play games not officially created for +Linux platforms. + +To install Steam on Ubuntu, you just need to install the official +package. + +```sh +sudo apt install steam-installer +``` + +For Arch-based systems, you\'ll simply need to install the +`steam` package. However, this requires that you enable the +`multilib` source. To do so, use the following command: + +```sh +sudo nano /etc/pacman.conf +``` + +Now, scroll down and uncomment the `multilib` section. + +``` config +# Before: +#[multilib] +#Include = /etc/pacman.d/mirrorlist + +# After: +[multilib] +Include = /etc/pacman.d/mirrorlist +``` + +Finally, install the program: + +```sh +sudo pacman -S steam +``` + +[Problem Launching Steam Games? Click +Here.](./2020-01-26-steam-on-ntfs-drives.html) + +# Command-Line Packages + +## neofetch + + + +[Neofetch](https://github.com/dylanaraps/neofetch) is a customizable +tool used in the command-line to show system information. This is +exceptionally useful if you want to see your system\'s information +quickly without the clutter of some resource-heavy GUI apps. + +This is an official package if you\'re running Ubuntu 17.04 or later, so +simply use the following command: + +```sh +sudo apt install neofetch +``` + +If you\'re running Ubuntu 16.10 or earlier, you\'ll have to use a series +of commands: + +```sh +sudo add-apt-repository ppa:dawidd0811/neofetch; sudo apt update; sudo apt install neofetch +``` + +Using Arch, Manjaro, or another distro using the AUR? Use this command +instead: + +```sh +sudo pacman -S neofetch +``` + +## yt-dlp + + + +[yt-dlp](https://github.com/yt-dlp/yt-dlp) is an extremely handy +command-line tool that allows you to download video or audio files from +various websites, such as YouTube. There are a ton of different options +when running this package, so be sure to run `yt-dlp --help` +first to look through everything you can do (or give up and search for +the best config online). + +While this shouldn\'t be a problem for most users, yt-dlp requires +Python 2.6, 2.7, or 3.2+ to work correctly, so install Python if you +don\'t have it already. You can check to see if you have Python +installed by running: + +```sh +python -V +``` + +To get the youtube-dl package, simply curl the URL and output the +results. + +```sh +sudo curl -L https://github.com/yt-dlp/yt-dlp/releases/latest/download/yt-dlp -o /usr/local/bin/yt-dlp +``` + +Finally, make the file executable so that it can be run from the +command-line. + +```sh +sudo chmod a+rx /usr/local/bin/yt-dlp +``` diff --git a/content/blog/2020-01-25-linux-software.org b/content/blog/2020-01-25-linux-software.org deleted file mode 100644 index 54d7b85..0000000 --- a/content/blog/2020-01-25-linux-software.org +++ /dev/null @@ -1,249 +0,0 @@ -#+title: Linux Software -#+date: 2020-01-25 -#+description: A look at some useful Linux applications. -#+filetags: :linux: - -* GUI Applications -** Etcher -#+caption: Etcher Screenshot -[[https://img.cleberg.net/blog/20200125-the-best-linux-software/etcher.png]] - -[[https://www.balena.io/etcher/][Etcher]] is a quick and easy way to burn ISO images to CDs and USB devices. There -are two different ways you can install this program. First, you can navigate to -the [[https://www.balena.io/etcher/][official website]] and download the AppImage file, which can run without -installation. - -However, AppImage files are not executable by default, so you'll either need to -right-click to open the properties of the file and click the "Allow executing -file as program" box in the Permissions tab or use the following command: - -#+begin_src sh -chmod u+x FILE_NAME -#+end_src - -If you don't like AppImage files or just prefer repositories, you can use the -following commands to add the author's repository and install it through the -command-line only. - -First, you'll have to echo the repo and write it to a list file: - -#+begin_src sh -echo "deb https://deb.etcher.io stable etcher" | sudo tee /etc/apt/sources.list.d/balena-etcher.list -#+end_src - -Next, add the application keys to Ubuntu's keyring: - -#+begin_src sh -sudo apt-key adv --keyserver keyserver.ubuntu.com --recv-keys 379CE192D401AB61 -#+end_src - -Finally, update the repositories and install the app. - -#+begin_src sh -sudo apt update && sudo apt install balena-etcher-electron -#+end_src - -Using Arch, Manjaro, or another distro using the AUR? Use this command instead: - -#+begin_src sh -sudo pacman -S etcher -#+end_src - -** Atom -#+caption: Atom Screenshot -[[https://img.cleberg.net/blog/20200125-the-best-linux-software/atom.png]] - -[[https://atom.io][Atom]] is the self-proclaimed "hackable text editor for the 21st century". This -text editor is made by GitHub, [[https://news.microsoft.com/2018/06/04/microsoft-to-acquire-github-for-7-5-billion/][now owned by Microsoft]], and has some of the best -add-ons available to customize the layout and abilities of the app. - -First, add the Atom repository to your sources. - -#+begin_src sh -sudo add-apt-repository ppa:webupd8team/atom -#+end_src - -Next, update your package listings and install atom. - -#+begin_src sh -sudo apt update && sudo apt install atom -#+end_src - -If you have issues updating your packages with the Atom repository, you'll need -to use the snap package described below instead of the repository. To remove the -repository we just added, use this command: - -#+begin_src sh -sudo add-apt-repository -r ppa:webupd8team/atom -#+end_src - -You can also install Atom as a snap package, but it must be installed with the -=--classic= flag. A [[https://language-bash.com/blog/how-to-snap-introducing-classic-confinement][full explanation is available]] if you'd like to read more -about why you need the classic flag. - -#+begin_src sh -snap install atom --classic -#+end_src - -Using Arch, Manjaro, or another distro using the AUR? Use this command instead: - -#+begin_src sh -sudo pacman -S atom -#+end_src - -** Visual Studio Code -#+caption: Visual Studio Code Code -[[https://img.cleberg.net/blog/20200125-the-best-linux-software/vscode.png]] - -[[https://code.visualstudio.com][Visual Studio Code]] is yet another fantastic choice for programming on Linux, -especially if you need those extra add-ons to spice up your late-night coding -sessions. The theme used in the screenshot is [[https://marketplace.visualstudio.com/items?itemName=EliverLara.mars][Mars]] by theme creator [[https://github.com/EliverLara][Eliver Lara]], -who makes a ton of great themes for VS Code, Atom, and various Linux desktop -environments. - -To install VS Code, you'll need to download the =.deb= file from the official -website. Once you've downloaded the file, either double-click it to install -through the Software Center or run the following command: - -#+begin_src sh -sudo dpkg -i FILE_NAME.deb -#+end_src - -You can also install VS Code as a snap package, but it must be installed with -the =--classic= flag. A [[https://language-bash.com/blog/how-to-snap-introducing-classic-confinement][full explanation is available]] if you'd like to read more -about why you need the classic flag. - -#+begin_src sh -snap install code --classic -#+end_src - -Using Arch, Manjaro, or another distro using the AUR? Use these commands -instead: - -#+begin_src sh -sudo pacman -S yay binutils make gcc pkg-config fakeroot yay -S visual-studio-code-bin -#+end_src - -** GNOME Tweaks -#+caption: Gnome Tweaks Screenshot -[[https://img.cleberg.net/blog/20200125-the-best-linux-software/gnome-tweaks.png]] - -[[https://gitlab.gnome.org/GNOME/gnome-tweaks][Gnome Tweaks]] is the ultimate tool to use if you want to customize your GNOME -desktop environment. This is how you can switch application themes (GTK), shell -themes, icons, fonts, and more. To install GNOME Tweaks on Ubuntu, you just need -to install the official package. - -#+begin_src sh -sudo apt install gnome-tweaks -#+end_src - -If you've installed Manjaro or Arch with Gnome, you should have the tweak tool -pre-installed. If you're on Fedora, this tool is available as an official -package: - -#+begin_src sh -sudo dnf install gnome-tweaks -#+end_src - -** Steam -#+caption: Steam Screenshot -[[https://img.cleberg.net/blog/20200125-the-best-linux-software/steam.png]] - -[[https://steampowered.com][Steam]] is one of the most popular gaming libraries for computers and is one of -the main reasons that many people have been able to switch to Linux in recent -years, thanks to Steam Proton, which makes it easier to play games not -officially created for Linux platforms. - -To install Steam on Ubuntu, you just need to install the official package. - -#+begin_src sh -sudo apt install steam-installer -#+end_src - -For Arch-based systems, you'll simply need to install the =steam= package. -However, this requires that you enable the =multilib= source. To do so, use the -following command: - -#+begin_src sh -sudo nano /etc/pacman.conf -#+end_src - -Now, scroll down and uncomment the =multilib= section. - -#+begin_src config -# Before: -#[multilib] -#Include = /etc/pacman.d/mirrorlist - -# After: -[multilib] -Include = /etc/pacman.d/mirrorlist -#+end_src - -Finally, install the program: - -#+begin_src sh -sudo pacman -S steam -#+end_src - -[[./2020-01-26-steam-on-ntfs-drives.html][Problem Launching Steam Games? -Click Here.]] - -* Command-Line Packages -** neofetch -#+caption: Neofetch Screenshot -[[https://img.cleberg.net/blog/20200125-the-best-linux-software/neofetch.png]] - -[[https://github.com/dylanaraps/neofetch][Neofetch]] is a customizable tool used in the command-line to show system -information. This is exceptionally useful if you want to see your system's -information quickly without the clutter of some resource-heavy GUI apps. - -This is an official package if you're running Ubuntu 17.04 or later, so simply -use the following command: - -#+begin_src sh -sudo apt install neofetch -#+end_src - -If you're running Ubuntu 16.10 or earlier, you'll have to use a series of -commands: - -#+begin_src sh -sudo add-apt-repository ppa:dawidd0811/neofetch; sudo apt update; sudo apt install neofetch -#+end_src - -Using Arch, Manjaro, or another distro using the AUR? Use this command instead: - -#+begin_src sh -sudo pacman -S neofetch -#+end_src - -** yt-dlp -#+caption: yt-dlp Screenshot -[[https://img.cleberg.net/blog/20200125-the-best-linux-software/yt-dlp.png]] - -[[https://github.com/yt-dlp/yt-dlp][yt-dlp]] is an extremely handy command-line tool that allows you to download video -or audio files from various websites, such as YouTube. There are a ton of -different options when running this package, so be sure to run =yt-dlp --help= -first to look through everything you can do (or give up and search for the best -config online). - -While this shouldn't be a problem for most users, yt-dlp requires Python 2.6, -2.7, or 3.2+ to work correctly, so install Python if you don't have it already. -You can check to see if you have Python installed by running: - -#+begin_src sh -python -V -#+end_src - -To get the youtube-dl package, simply curl the URL and output the results. - -#+begin_src sh -sudo curl -L https://github.com/yt-dlp/yt-dlp/releases/latest/download/yt-dlp -o /usr/local/bin/yt-dlp -#+end_src - -Finally, make the file executable so that it can be run from the command-line. - -#+begin_src sh -sudo chmod a+rx /usr/local/bin/yt-dlp -#+end_src diff --git a/content/blog/2020-01-26-steam-on-ntfs.md b/content/blog/2020-01-26-steam-on-ntfs.md new file mode 100644 index 0000000..dbc6060 --- /dev/null +++ b/content/blog/2020-01-26-steam-on-ntfs.md @@ -0,0 +1,97 @@ ++++ +date = 2020-01-26 +title = "Linux Gaming Tweak: Steam on NTFS Drives" +description = "" +draft = false ++++ + +# Auto-Mount Steam Drives + + + +If you want to see how to install Steam on Linux, see my other post: +[Linux Software](../linux-software/). + +Are you having trouble launching games, even though they\'ve installed +correctly? This may happen if you\'re storing your games on an +NTFS-formatted drive. This shouldn\'t be an issue if you\'re storing +your games on the same drive that Steam is on, but some gamers prefer to +put Steam on their main drive and game files on another SSD or HDD. + +To fix this problem, you\'ll need to try a few things. First, you\'ll +need to install the `ntfs-3g` package, which is meant for +better interoperability with Linux. + +```sh +sudo apt install ntfs-3g +``` + +Next, you should set up the `/etc/fstab` file to +automatically mount your drives on boot. To automatically mount your +drives when the computer boots up, you\'ll have to create the folders +you want to mount your drive to first. I store mine in the +`/mnt` folder using names that I\'ll recognize, but you can +create your folders wherever you want. + +```sh +mkdir /path/to/folder +``` + +For example: + +```sh +mkdir /mnt/steam_library +``` + +To automatically mount drives upon system boot, you will need to collect +a few items. The UUID is the identification number connected to +whichever drive you\'re using to store Steam games. + +Drives are usually labeled similar to `/dev/nvme0n1p1` or +`/dev/sda1`, so you\'ll need to find the line in the output +of the command below that correlates to your drive and copy the UUID +over to the `/etc/fstab` file. + +```sh +sudo blkid | grep UUID= +``` + +Next, you\'ll need your `uid` and `gid`. To find +these, run the following command: + +```sh +id -u && id -g +``` + +Now that you have collected the necessary information, open the +`/etc/fstab` file: + +```sh +sudo nano /etc/fstab +``` + +Each drive you want to mount on boot should have its own line in the +`/etc/fstab` file that looks similar to this: + +``` config +UUID=B64E53824E5339F7 /mnt/steam_library ntfs-3g uid=1000,gid=1000 0 0 +``` + +Now all you need to do is unmount your drive and re-mount it. You can +unmount the drive by doing this (be sure to use the correct drive name +here): + +```sh +sudo umount /dev/sdxX +``` + +You can re-mount all your drives by executing the following: + +```sh +sudo mount -a +``` + +If you don\'t know what your drive name is, or you\'re nervous about +unmounting and re-mounting, simply reboot your computer, and it will be +done for you automatically. diff --git a/content/blog/2020-01-26-steam-on-ntfs.org b/content/blog/2020-01-26-steam-on-ntfs.org deleted file mode 100644 index 6dffb3d..0000000 --- a/content/blog/2020-01-26-steam-on-ntfs.org +++ /dev/null @@ -1,91 +0,0 @@ -#+title: Linux Gaming Tweak: Steam on NTFS Drives -#+date: 2020-01-26 -#+description: Learn how to fix Steam NTFS issues on Linux. -#+filetags: :gaming:linux: - -* Auto-Mount Steam Drives -#+caption: Steam Screenshot -[[https://img.cleberg.net/blog/20200125-the-best-linux-software/steam.png]] - -If you want to see how to install Steam on Linux, see my other post: [[../linux-software/][Linux -Software]]. - -Are you having trouble launching games, even though they've installed correctly? -This may happen if you're storing your games on an NTFS-formatted drive. This -shouldn't be an issue if you're storing your games on the same drive that Steam -is on, but some gamers prefer to put Steam on their main drive and game files on -another SSD or HDD. - -To fix this problem, you'll need to try a few things. First, you'll need to -install the =ntfs-3g= package, which is meant for better interoperability with -Linux. - -#+begin_src sh -sudo apt install ntfs-3g -#+end_src - -Next, you should set up the =/etc/fstab= file to automatically mount your drives -on boot. To automatically mount your drives when the computer boots up, you'll -have to create the folders you want to mount your drive to first. I store mine -in the =/mnt= folder using names that I'll recognize, but you can create your -folders wherever you want. - -#+begin_src sh -mkdir /path/to/folder -#+end_src - -For example: - -#+begin_src sh -mkdir /mnt/steam_library -#+end_src - -To automatically mount drives upon system boot, you will need to collect a few -items. The UUID is the identification number connected to whichever drive you're -using to store Steam games. - -Drives are usually labeled similar to =/dev/nvme0n1p1= or =/dev/sda1=, so you'll -need to find the line in the output of the command below that correlates to your -drive and copy the UUID over to the =/etc/fstab= file. - -#+begin_src sh -sudo blkid | grep UUID= -#+end_src - -Next, you'll need your =uid= and =gid=. To find these, run the following -command: - -#+begin_src sh -id -u && id -g -#+end_src - -Now that you have collected the necessary information, open the =/etc/fstab= -file: - -#+begin_src sh -sudo nano /etc/fstab -#+end_src - -Each drive you want to mount on boot should have its own line in the -=/etc/fstab= file that looks similar to this: - -#+begin_src config -UUID=B64E53824E5339F7 /mnt/steam_library ntfs-3g uid=1000,gid=1000 0 0 -#+end_src - -Now all you need to do is unmount your drive and re-mount it. You can unmount -the drive by doing this (be sure to use the correct drive name here): - -#+begin_src sh -sudo umount /dev/sdxX -#+end_src - -You can re-mount all your drives by executing the following: - -#+begin_src sh -sudo mount -a -#+end_src - -If you don't know what your drive name is, or you're nervous about unmounting -and re-mounting, simply reboot your computer, and it will be done for you -automatically. diff --git a/content/blog/2020-02-09-cryptography-basics.md b/content/blog/2020-02-09-cryptography-basics.md new file mode 100644 index 0000000..dee2174 --- /dev/null +++ b/content/blog/2020-02-09-cryptography-basics.md @@ -0,0 +1,180 @@ ++++ +date = 2020-02-09 +title = "Cryptography Basics" +description = "" +draft = false ++++ + +# Similar Article Available + +If you haven\'t already, feel free to read my post on [AES +Encryption](../aes-encryption/). + +# What is Cryptography? + +In layman\'s terms, cryptography is a process that can change data from +a readable format into an unreadable format (and vice-versa) through a +series of processes and secrets. More technically, this is the Internet +Security Glossary\'s definition: + +> \[Cryptography is\] the mathematical science that deals with +> transforming data to render its meaning unintelligible (i.e., to hide +> its semantic content), prevent its undetected alteration, or prevent +> its unauthorized use. If the transformation is reversible, +> cryptography also deals with restoring encrypted data to an +> intelligible form. +> +> - [Internet Security Glossary +> (2000)](https://tools.ietf.org/html/rfc2828) + +Cryptography cannot offer protection against the loss of data; it simply +offers encryption methods to protect data at-rest and data in-traffic. +At a high-level, encrypted is when plaintext data is encrypted to +ciphertext (a secure form of text that cannot be understood unless +decrypted back to plaintext). The encryption process is completed +through the use of a mathematical function that utilizes one or more +values called keys to encrypt or decrypt the data. + +# Key Elements of Cryptographic Systems + +To create or evaluate a cryptographic system, you need to know the +essential pieces to the system: + +- **Encryption Algorithm (Primitive):\*** A mathematical process that + encrypts and decrypts data. +- **Encryption Key:\*** A string of bits used within the encryption + algorithm as the secret that allows successful encryption or + decryption of data. +- **Key Length (Size):\*** The maximum number of bits within the + encryption key. It\'s important to remember that key size is + regulated in many countries. +- **Message Digest:\*** A smaller, fixed-size bit string version of + the original message. This is practically infeasible to reverse, + which is why it\'s commonly used to verify integrity. + +# Symmetric Systems (Secret Key Cryptography) + +Symmetric cryptography utilizes a secret, bidirectional key to perform +both encryption and decryption of the data. The most common +implementation of symmetric cryptography is the Advanced Encryption +Standard, which uses keys that are 128 bits to 256 bits in size. This +standard came after the National Institute of Standards and Technology +(NIST) decided to retire the Data Encryption Standard (DES) in 2001. + +Since brute force attacks strongly correlate with key length, the 56-bit +key length of DES was considered insecure after it was publicly broken +in under 24 hours. However, there is a modern implementation of DES +called Triple DES where the DES method is applied three times to each +data block. + +The main advantages to symmetric systems are the ease of use, since only +one key is required for both encryption and decryption, and the +simplicity of the algorithms. This helps with bulk data encryption that +may unnecessarily waste time and power using asymmetric systems. + +However, symmetric systems have disadvantages to keep in mind. Since the +key is private, it can be difficult to safely distribute keys to +communication partners. Additionally, the key cannot be used to sign +messages since it\'s necessary to keep the key private. + +# Asymmetric Systems (Public Key Cryptography) + +Asymmetric cryptography utilizes two keys within the system: a secret +key that is privately-held and a public key that can be distributed +freely. The interesting aspect of asymmetric cryptography is that either +key can be used to encrypt the data, there\'s no rule that dictates +which key must be used for encryption. Once one key is used to encrypt +the data, only the other key can be used to decrypt the data. This means +that if the private key encrypts the data, only the public key can +decrypt the data. + +An advantage of this system is that if you successfully decrypt data +using one of the keys, you can be sure of the sender since only the +other key could have encrypted the data. + +One of the major implementations of an asymmetric system is a digital +signature. A digital signature can be generated using the sender\'s +private key, or a one-way hash function and is used to provide assurance +for the integrity and authenticity of the message. A couple common +message digest algorithms are SHA-256 and SHA-512, which securely +compress data and produce a 128-bit message digest. + +It should be noted that man-in-the-middle attacks are one of the risks +with digital signatures and public keys. To combat this, applications +often use a public key infrastructure (PKI) to independently +authenticate the validity of signatures and keys. + +Due to the large key size and [inefficient mathematical +functions](https://crypto.stackexchange.com/a/591) of asymmetric +encryption, elliptical curve cryptography (ECC) is often used to +increase security while using fewer resources. + +# Applications of Cryptographic Systems + +There are quite a few implementations of cryptographic systems around +the world. Here are a few popular examples: + +**Transport Layer Security (TLS):\*** One of the most famous +cryptographic solutions created is TLS, a session-layered or +connection-layered internet protocol that allows for secure +communications between browsers and servers. Using handshakes, peer +negotiation, and authentication allows TLS to prevent eavesdropping and +malicious transformation of data. The major reason for TLS popularity is +that a major vulnerability was found in the SSL protocol in 2014. +Instead of SSL, TLS can be used with HTTP to form HTTPS and is the +preferred method for modern web development due to its increased +security. + +**Secure Hypertext Transfer Protocol (HTTPS):\*** An application layer +protocol that allows for secure transport of data between servers and +web clients. One of the unique parts of HTTPS is that it uses a secured +port number instead of the default web port address. + +**Virtual Private Network (VPN):\*** VPNs are made to securely extend a +private network across public networks by utilizing an encrypted layered +tunneling protocol paired with an authentication method, such as +usernames and passwords. This technology originally allowed remote +employees to access their company\'s data but have evolved into one of +the top choices for anyone who wishes to mask their sensitive personal +data. + +**Internet Protocol Security (IPSec):\*** This protocol suite +facilitates communication between two or more hosts or subnets by +authenticating and encrypting the data packets. IPSec is used in a lot +of VPNs to establish the VPN connection through the transport and tunnel +mode encryption methods. IPSec encrypts just the data portion of packets +in the transport methods, but it encrypts both the data and headers in +the tunnel method (introducing an additional header for authentication). + +**Secure Shell (SSH):\*** SSH is another network protocol used to +protect network services by authenticating users through a secure +channel. This protocol is often used for command-line (shell) functions +such as remote shell commands, logins, and file transfers. + +**Kerberos:\*** Developed by MIT, Kerberos is a computer-network +authentication protocol that works on the basis of tickets to allow +nodes communicating over a non-secure network to prove their identity to +one another securely. This is most commonly used in business +environments when used as the authentication and encryption method for +Windows Active Directory (AD). + +# Cybersecurity Controls + +If you\'re someone who needs solutions on how to control risks +associated with utilizing a crytograhpic system, start with a few basic +controls: + +- **Policies:\*** A policy on the use of cryptographic controls for + protection of information is implemented and is in accordance with + organizational objectives. +- **Key management:\*** A policy on the use, protection and lifetime + of cryptographic keys is implemented through the entire application + lifecycle. +- **Key size:\*** The organization has researched the optimal key size + for their purposes, considering national laws, required processing + power, and longevity of the solution. +- **Algorithm selection:\*** Implemented algorithms are sufficiently + appropriate for the business of the organization, robust, and align + with recommended guidelines. +- **Protocol configuration:\*** Protocols have been reviewed and + configured suitable to the purpose of the business. diff --git a/content/blog/2020-02-09-cryptography-basics.org b/content/blog/2020-02-09-cryptography-basics.org deleted file mode 100644 index 43229da..0000000 --- a/content/blog/2020-02-09-cryptography-basics.org +++ /dev/null @@ -1,158 +0,0 @@ -#+title: Cryptography Basics -#+date: 2020-02-09 -#+description: Learn about the basics of cryptography. -#+filetags: :security: - -* Similar Article Available -If you haven't already, feel free to read my post on [[../aes-encryption/][AES Encryption]]. - -* What is Cryptography? -In layman's terms, cryptography is a process that can change data from a -readable format into an unreadable format (and vice-versa) through a series of -processes and secrets. More technically, this is the Internet Security -Glossary's definition: - -#+begin_quote -[Cryptography is] the mathematical science that deals with transforming data to -render its meaning unintelligible (i.e., to hide its semantic content), prevent -its undetected alteration, or prevent its unauthorized use. If the -transformation is reversible, cryptography also deals with restoring encrypted -data to an intelligible form. - -- [[https://tools.ietf.org/html/rfc2828][Internet Security Glossary (2000)]] -#+end_quote - -Cryptography cannot offer protection against the loss of data; it simply offers -encryption methods to protect data at-rest and data in-traffic. At a high-level, -encrypted is when plaintext data is encrypted to ciphertext (a secure form of -text that cannot be understood unless decrypted back to plaintext). The -encryption process is completed through the use of a mathematical function that -utilizes one or more values called keys to encrypt or decrypt the data. - -* Key Elements of Cryptographic Systems -To create or evaluate a cryptographic system, you need to know the essential -pieces to the system: - -- *Encryption Algorithm (Primitive):** A mathematical process that encrypts and - decrypts data. -- *Encryption Key:** A string of bits used within the encryption algorithm as - the secret that allows successful encryption or decryption of data. -- *Key Length (Size):** The maximum number of bits within the encryption key. - It's important to remember that key size is regulated in many countries. -- *Message Digest:** A smaller, fixed-size bit string version of the original - message. This is practically infeasible to reverse, which is why it's commonly - used to verify integrity. - -* Symmetric Systems (Secret Key Cryptography) -Symmetric cryptography utilizes a secret, bidirectional key to perform both -encryption and decryption of the data. The most common implementation of -symmetric cryptography is the Advanced Encryption Standard, which uses keys that -are 128 bits to 256 bits in size. This standard came after the National -Institute of Standards and Technology (NIST) decided to retire the Data -Encryption Standard (DES) in 2001. - -Since brute force attacks strongly correlate with key length, the 56-bit key -length of DES was considered insecure after it was publicly broken in under 24 -hours. However, there is a modern implementation of DES called Triple DES where -the DES method is applied three times to each data block. - -The main advantages to symmetric systems are the ease of use, since only one key -is required for both encryption and decryption, and the simplicity of the -algorithms. This helps with bulk data encryption that may unnecessarily waste -time and power using asymmetric systems. - -However, symmetric systems have disadvantages to keep in mind. Since the key is -private, it can be difficult to safely distribute keys to communication -partners. Additionally, the key cannot be used to sign messages since it's -necessary to keep the key private. - -* Asymmetric Systems (Public Key Cryptography) -Asymmetric cryptography utilizes two keys within the system: a secret key that -is privately-held and a public key that can be distributed freely. The -interesting aspect of asymmetric cryptography is that either key can be used to -encrypt the data, there's no rule that dictates which key must be used for -encryption. Once one key is used to encrypt the data, only the other key can be -used to decrypt the data. This means that if the private key encrypts the data, -only the public key can decrypt the data. - -An advantage of this system is that if you successfully decrypt data using one -of the keys, you can be sure of the sender since only the other key could have -encrypted the data. - -One of the major implementations of an asymmetric system is a digital signature. -A digital signature can be generated using the sender's private key, or a -one-way hash function and is used to provide assurance for the integrity and -authenticity of the message. A couple common message digest algorithms are -SHA-256 and SHA-512, which securely compress data and produce a 128-bit message -digest. - -It should be noted that man-in-the-middle attacks are one of the risks with -digital signatures and public keys. To combat this, applications often use a -public key infrastructure (PKI) to independently authenticate the validity of -signatures and keys. - -Due to the large key size and [[https://crypto.stackexchange.com/a/591][inefficient mathematical functions]] of asymmetric -encryption, elliptical curve cryptography (ECC) is often used to increase -security while using fewer resources. - -* Applications of Cryptographic Systems -There are quite a few implementations of cryptographic systems around the world. -Here are a few popular examples: - -*Transport Layer Security (TLS):** One of the most famous cryptographic -solutions created is TLS, a session-layered or connection-layered internet -protocol that allows for secure communications between browsers and servers. -Using handshakes, peer negotiation, and authentication allows TLS to prevent -eavesdropping and malicious transformation of data. The major reason for TLS -popularity is that a major vulnerability was found in the SSL protocol in 2014. -Instead of SSL, TLS can be used with HTTP to form HTTPS and is the preferred -method for modern web development due to its increased security. - -*Secure Hypertext Transfer Protocol (HTTPS):** An application layer protocol -that allows for secure transport of data between servers and web clients. One of -the unique parts of HTTPS is that it uses a secured port number instead of the -default web port address. - -*Virtual Private Network (VPN):** VPNs are made to securely extend a private -network across public networks by utilizing an encrypted layered tunneling -protocol paired with an authentication method, such as usernames and passwords. -This technology originally allowed remote employees to access their company's -data but have evolved into one of the top choices for anyone who wishes to mask -their sensitive personal data. - -*Internet Protocol Security (IPSec):** This protocol suite facilitates -communication between two or more hosts or subnets by authenticating and -encrypting the data packets. IPSec is used in a lot of VPNs to establish the VPN -connection through the transport and tunnel mode encryption methods. IPSec -encrypts just the data portion of packets in the transport methods, but it -encrypts both the data and headers in the tunnel method (introducing an -additional header for authentication). - -*Secure Shell (SSH):** SSH is another network protocol used to protect network -services by authenticating users through a secure channel. This protocol is -often used for command-line (shell) functions such as remote shell commands, -logins, and file transfers. - -*Kerberos:** Developed by MIT, Kerberos is a computer-network authentication -protocol that works on the basis of tickets to allow nodes communicating over a -non-secure network to prove their identity to one another securely. This is most -commonly used in business environments when used as the authentication and -encryption method for Windows Active Directory (AD). - -* Cybersecurity Controls -If you're someone who needs solutions on how to control risks associated with -utilizing a crytograhpic system, start with a few basic controls: - -- *Policies:** A policy on the use of cryptographic controls for protection of - information is implemented and is in accordance with organizational - objectives. -- *Key management:** A policy on the use, protection and lifetime of - cryptographic keys is implemented through the entire application lifecycle. -- *Key size:** The organization has researched the optimal key size for their - purposes, considering national laws, required processing power, and longevity - of the solution. -- *Algorithm selection:** Implemented algorithms are sufficiently appropriate - for the business of the organization, robust, and align with recommended - guidelines. -- *Protocol configuration:** Protocols have been reviewed and configured - suitable to the purpose of the business. diff --git a/content/blog/2020-03-25-session-manager.org b/content/blog/2020-03-25-session-manager.org deleted file mode 100644 index 3635e4a..0000000 --- a/content/blog/2020-03-25-session-manager.org +++ /dev/null @@ -1,120 +0,0 @@ -#+title: Session Private Messenger -#+date: 2020-03-25 -#+description: Exploring the Session Private Messenger application. -#+filetags: :privacy: - -* Privacy Warning -The company behind Session (Loki Foundation) is from Australia. If you didn't -know, Australia has introduced [[https://parlinfo.aph.gov.au/parlInfo/download/legislation/bills/r6195_aspassed/toc_pdf/18204b01.pdf][legislation]] mandating companies comply with -government requests to build backdoor access into applications. For more -information, read my article on [[./2020-01-25-aes-encryption.html][AES Encryption]]. - -* About Session -[[https://getsession.org][Session]] is a private, cross-platform messaging app from the [[https://loki.foundation][Loki Foundation]]. As -someone who has spent years looking for quality alternatives to major messaging -apps, I was excited when I first heard about Session. Reading through [[https://arxiv.org/pdf/2002.04609.pdf][Session's -white paper]], you can learn the technologies behind the Session app. Part of the -security of Session comes from the Signal protocol, which was forked as the -origin of Session. - -#+begin_quote -Session is an end-to-end encrypted messenger that removes sensitive metadata -collection, and is designed for people who want privacy and freedom from any -forms of surveillance. -#+end_quote - -In general, this app promises security through end-to-end encryption, -decentralized onion routing, and private identities. The biggest change that the -Loki Foundation has made to the Signal protocol is removing the need for a phone -number. Instead, a random identification string is generated for any session you -create. This means you can create a new session for each device if you want to, -or link new devices with your ID. - -Since Session's website and white paper describe the details of Session's -security, I'm going to focus on using the app in this post. - -* Features -Since most people are looking for an alternative to a popular chat app, I am -going to list out the features that Session has so that you are able to -determine if the app would suit your needs: - -- Multiple device linking (via QR code or ID) -- App locking via device screen lock, password, or fingerprint -- Screenshot blocking -- Incognito keyboard -- Read receipts and typing indicators -- Mobile notification customization -- Old message deletion and conversation limit -- Backups -- Recovery phrase -- Account deletion, including ID, messages, sessions, and contacts - -* Downloads -I have tested this app on Ubuntu 19.10, Android 10, macOS Monterey, and iOS 15. -All apps have worked well without many issues. - -Below is a brief overview of the Session app on Linux. To get this app, you'll -need to go to the [[https://getsession.org/download/][Downloads]] page and click to link to the operating system -you're using. - -For Linux, it will download an AppImage that you'll need to enable with the -following command: - -#+begin_src sh -sudo chmod u+x session-messenger-desktop-linux-x86_64-1.0.5.AppImage -#+end_src - -#+caption: Session Download Options -[[https://img.cleberg.net/blog/20200325-session-private-messenger/session_downloads.png]] - -* Creating an Account -Once you've installed the app, simply run the app and create your unique Session -ID. It will look something like this: -=05af1835afdd63c947b47705867501d6373f486aa1ae05b1f2f3fcd24570eba608=. - -You'll need to set a display name and, optionally, a password. If you set a -password, you will need to enter it every time you open the app. - -#+caption: Session Login (Linux) -[[https://img.cleberg.net/blog/20200325-session-private-messenger/session_linux_login.png]] - -#+caption: Session Login (macOS) -[[https://img.cleberg.net/blog/20200325-session-private-messenger/session_macos_login.png]] - -#+caption: Password Authentication -[[https://img.cleberg.net/blog/20200325-session-private-messenger/session_password_authentication.png]] - -* Start Messaging -Once you've created your account and set up your profile details, the next step -is to start messaging other people. To do so, you'll need to share your Session -ID with other people. From this point, it's fairly straightforward and acts like -any other messaging app, so I won't dive into much detail here. - -** macOS -#+caption: macOS Conversations -[[https://img.cleberg.net/blog/20200325-session-private-messenger/session_macos_conversations.png]] - -One key feature to note is that the desktop application now provides a helpful -pop-up box explaining the process that Session uses to hide your IP address: - -#+caption: IP Address Help Box -[[https://img.cleberg.net/blog/20200325-session-private-messenger/session_ip.png]] - -** iOS -The mobile app is quite simple and effective, giving you all the standard mobile -messaging options you'd expect. - -#+caption: iOS App -[[https://img.cleberg.net/blog/20200325-session-private-messenger/session_ios.png]] - -* Potential Issues -I've discovered one annoying issue that would prevent from using this app -regularly. On a mobile device, there have been issues with receiving messages on -time. Even with battery optimization disabled and no network restrictions, -Session notifications sometimes do not display until I open the app or the -conversation itself and wait a few moments. This is actually one of the reasons -I stopped using Signal (this seems fixed as of my updates in 2021/2022, so I -wouldn't worry about this issue anymore). - -Looking for another messenger instead of Session? I recommend Signal, Matrix, -and IRC. diff --git a/content/blog/2020-03-25-session-messenger.md b/content/blog/2020-03-25-session-messenger.md new file mode 100644 index 0000000..805cbd8 --- /dev/null +++ b/content/blog/2020-03-25-session-messenger.md @@ -0,0 +1,137 @@ ++++ +date = 2020-03-25 +title = "Session Private Messenger" +description = "" +draft = false ++++ + +# Privacy Warning + +The company behind Session (Loki Foundation) is from Australia. If you +didn\'t know, Australia has introduced +[legislation](https://parlinfo.aph.gov.au/parlInfo/download/legislation/bills/r6195_aspassed/toc_pdf/18204b01.pdf) +mandating companies comply with government requests to build backdoor +access into applications. For more information, read my article on [AES +Encryption](./2020-01-25-aes-encryption.html). + +# About Session + +[Session](https://getsession.org) is a private, cross-platform messaging +app from the [Loki Foundation](https://loki.foundation). As someone who +has spent years looking for quality alternatives to major messaging +apps, I was excited when I first heard about Session. Reading through +[Session\'s white paper](https://arxiv.org/pdf/2002.04609.pdf), you can +learn the technologies behind the Session app. Part of the security of +Session comes from the Signal protocol, which was forked as the origin +of Session. + +> Session is an end-to-end encrypted messenger that removes sensitive +> metadata collection, and is designed for people who want privacy and +> freedom from any forms of surveillance. + +In general, this app promises security through end-to-end encryption, +decentralized onion routing, and private identities. The biggest change +that the Loki Foundation has made to the Signal protocol is removing the +need for a phone number. Instead, a random identification string is +generated for any session you create. This means you can create a new +session for each device if you want to, or link new devices with your +ID. + +Since Session\'s website and white paper describe the details of +Session\'s security, I\'m going to focus on using the app in this post. + +# Features + +Since most people are looking for an alternative to a popular chat app, +I am going to list out the features that Session has so that you are +able to determine if the app would suit your needs: + +- Multiple device linking (via QR code or ID) +- App locking via device screen lock, password, or fingerprint +- Screenshot blocking +- Incognito keyboard +- Read receipts and typing indicators +- Mobile notification customization +- Old message deletion and conversation limit +- Backups +- Recovery phrase +- Account deletion, including ID, messages, sessions, and contacts + +# Downloads + +I have tested this app on Ubuntu 19.10, Android 10, macOS Monterey, and +iOS 15. All apps have worked well without many issues. + +Below is a brief overview of the Session app on Linux. To get this app, +you\'ll need to go to the [Downloads](https://getsession.org/download/) +page and click to link to the operating system you\'re using. + +For Linux, it will download an AppImage that you\'ll need to enable with +the following command: + +```sh +sudo chmod u+x session-messenger-desktop-linux-x86_64-1.0.5.AppImage +``` + + + +# Creating an Account + +Once you\'ve installed the app, simply run the app and create your +unique Session ID. It will look something like this: +`05af1835afdd63c947b47705867501d6373f486aa1ae05b1f2f3fcd24570eba608`. + +You\'ll need to set a display name and, optionally, a password. If you +set a password, you will need to enter it every time you open the app. + + + + + + + +# Start Messaging + +Once you\'ve created your account and set up your profile details, the +next step is to start messaging other people. To do so, you\'ll need to +share your Session ID with other people. From this point, it\'s fairly +straightforward and acts like any other messaging app, so I won\'t dive +into much detail here. + +## macOS + + + +One key feature to note is that the desktop application now provides a +helpful pop-up box explaining the process that Session uses to hide your +IP address: + + + +## iOS + +The mobile app is quite simple and effective, giving you all the +standard mobile messaging options you\'d expect. + + + +# Potential Issues + +I\'ve discovered one annoying issue that would prevent from using this +app regularly. On a mobile device, there have been issues with receiving +messages on time. Even with battery optimization disabled and no network +restrictions, Session notifications sometimes do not display until I +open the app or the conversation itself and wait a few moments. This is +actually one of the reasons I stopped using Signal (this seems fixed as +of my updates in 2021/2022, so I wouldn\'t worry about this issue +anymore). + +Looking for another messenger instead of Session? I recommend Signal, +Matrix, and IRC. diff --git a/content/blog/2020-05-03-homelab.md b/content/blog/2020-05-03-homelab.md new file mode 100644 index 0000000..d02e9e8 --- /dev/null +++ b/content/blog/2020-05-03-homelab.md @@ -0,0 +1,166 @@ ++++ +date = 2020-05-03 +title = "An Inside Look at My Home Lab" +description = "" +draft = false ++++ + +# What is a Homelab? + +Starting as a developer, I have largely stayed away from hardware-based +hobbies (other than building a gaming desktop). However, as the +quarantine for COVID-19 stretches out further and further, I found +myself bored and in search of new hobbies. After spending the last few +months browsing the [r/homelab](https://www.reddit.com/r/homelab/) +subreddit, I decided it was time to jump in and try things out for +myself. + +Since I am a beginner and just recently graduated from college, +everything I\'ve done so far in my homelab is fairly low-budget. + +# Hardware + + + +### Raspberry Pi 4 + +Luckily, I had actually purchased a [Raspberry Pi +4](https://www.raspberrypi.org/products/raspberry-pi-4-model-b/) before +the quarantine started so that I could try to keep Plex Media Center +running, even while my desktop computer was turned off. I started here, +using the Pi to hold Plex and Pi-hole until I grew tired with the slow +performance. + +Here are the specifications for the Pi 4: + +- Broadcom BCM2711, Quad core Cortex-A72 (ARM v8) 64-bit SoC @ 1.5GHz +- 4GB LPDDR4-3200 SDRAM +- Gigabit Ethernet +- H.265 (4kp60 decode), H264 (1080p60 decode, 1080p30 encode) +- 64 GB MicroSD Card + +## Dell Optiplex 5040 + +Since I wasn\'t happy with the Pi as my main server, I turned to +Craigslist. I know a lot of other homelabbers use Ebay, but I can\'t +seem to ever trust it enough to purchase items on there. So I used +Craigslist and found a Dell Optiplex 5040 desktop computer on sale for +\$90. While this computer might be underpowered, it was one of the few +computers under \$100 that was available during quarantine. + +Here are the specifications for the Dell Optiplex 5040: + +- Intel Core i3 6100 +- 8GB RAM DDR3 +- Intel HD Graphics +- Gigabit Ethernet +- 500GB Hard Drive + +While this hardware would be awful for a work computer or a gaming rig, +it turned out to be wonderful for my server purposes. The only +limitation I have found so far is the CPU. The i3-6100 only has enough +power for a single 4k video transcode at a time. I haven\'t tested more +than three 1080p streams at a time, but the maximum amount of streams +I\'ve ever actually used is two. + +## WD easystore 10TB & 8TB + +Application storage and temporary files are stored on the internal hard +drive of the server, but all media files (movies, tv, games, books, etc) +are stored externally on my WD easystore hard drive. Creating auto-boot +configurations in the `/etc/fstab` file on my server allows +the hard drives to automatically mount whenever I need to restart my +server. + +> Update: In March 2022, I shucked the hard drives out of their external +> cases, put some Kapton tape on the third power pin to prevent power +> shutdowns, and stuck them inside my server tower using internal SATA +> cables. + +## Netgear Unmanaged Switch + +To manage all the ethernet cords used by my homelab, my desktop, and my +living room media center, I purchased an 8-port gigabit ethernet switch +for \$50 at my local computer store. This is probably much more than I +should have spent on an unmanaged switch, but I am comfortable with the +choice. + +## TP-Link Managed Switch + +Since I use the unmanaged switch to group all living room devices +together, I use the managed switch to configure VLANs and secure my +network. + +## Arris TM1602A Modem & Sagecom Fast 5280 Router + +My default modem and router, provided by my ISP, are fairly standard. +The Arris modem supports DOCSIS 3.0, which is something that I +definitely wanted as a minimum. The Sagecom router is also standard, no +fancy bells or whistles. However, it does support DHCP and DHCPv6, which +is something you can use to route all household traffic through a +pi-hole or firewall. + +## TP-Link EAP + +In order to gain better control over the network, I use my own wireless +access point instead of the one included in the Sagecom router above. +Now I can control and organize all of my ethernet connections through +the VLANs on the managed switch and wireless connections through the +VLANS on the EAP. + +## Generic Printer + +The last piece to my homelab is a standard wireless printer. Nothing +special here. + +# Software + +## Ubuntu Server 20.04 + +While the 20.04 version of Ubuntu was just released, I always like to +experiment with new features (and I don\'t mind breaking my system - it +just gives me more experience learning how to fix things). So, I have +Ubuntu Server 20.04 installed on the Dell Optiplex server and Ubuntu +Server 19.10 installed on the Raspberry Pi. Once I find an acceptable +use for the Pi, I will most likely switch the operating system. + +## Docker + +I am *very* new to Docker, but I have had a lot of fun playing with it +so far. Docker is used to create containers that can hold all the +contents of a system without interfering with other software on the same +system. So far, I have successfully installed pi-hole, GitLab, Gogs, and +Nextcloud in containers. However, I opted to delete all of those so that +I can reconfigure them more professionally at a later time. + +## Plex Media Server + +Plex is a media center software that allows you to organize your movies, +TV shows, music, photos, and videos automatically. It will even download +metadata for you so that you can easily browse these collections. + +## Pi-hole + +Pi-hole is an alternative ad-blocker that runs at the DNS level, +allowing you to block traffic when it hits your network, so that you can +reject any traffic you deem to be bad. Pi-hole uses blacklists and +whitelists to decide which traffic block and, luckily, there are a lot +of pre-made lists out there on Reddit, GitHub, etc. + +## Nextcloud + +While I had trouble with the Docker version of Nextcloud, I was very +successful when setting up the snap version. Using this, I was able to +map Nextcloud to a subdomain of a domain I own in Namecheap. +Additionally, Nextcloud has an integration with Let\'s Encrypt that +allows me to issue certificates automatically to any new domain I +authorize. + +## Webmin + +To monitor my servers, and the processes running on them, I use the +Webmin dashboard. This was fairly painless to set up, and I currently +access it straight through the server\'s IP address. In the future, I +will be looking to configure Webmin to use a custom domain just like +Nextcloud. diff --git a/content/blog/2020-05-03-homelab.org b/content/blog/2020-05-03-homelab.org deleted file mode 100644 index 1b2b12e..0000000 --- a/content/blog/2020-05-03-homelab.org +++ /dev/null @@ -1,136 +0,0 @@ -#+title: An Inside Look at My Homelab -#+date: 2020-05-03 -#+description: A retrospective on the first iteration of my home lab. -#+filetags: :sysadmin: - -* What is a Homelab? -Starting as a developer, I have largely stayed away from hardware-based hobbies -(other than building a gaming desktop). However, as the quarantine for COVID-19 -stretches out further and further, I found myself bored and in search of new -hobbies. After spending the last few months browsing the [[https://www.reddit.com/r/homelab/][r/homelab]] subreddit, I -decided it was time to jump in and try things out for myself. - -Since I am a beginner and just recently graduated from college, everything I've -done so far in my homelab is fairly low-budget. - -* Hardware -#+caption: HomeLab Diagram -[[https://img.cleberg.net/blog/20200503-homelab/homelab-min.png]] - -*** Raspberry Pi 4 -Luckily, I had actually purchased a [[https://www.raspberrypi.org/products/raspberry-pi-4-model-b/][Raspberry Pi 4]] before the quarantine started -so that I could try to keep Plex Media Center running, even while my desktop -computer was turned off. I started here, using the Pi to hold Plex and Pi-hole -until I grew tired with the slow performance. - -Here are the specifications for the Pi 4: - -- Broadcom BCM2711, Quad core Cortex-A72 (ARM v8) 64-bit SoC @ 1.5GHz -- 4GB LPDDR4-3200 SDRAM -- Gigabit Ethernet -- H.265 (4kp60 decode), H264 (1080p60 decode, 1080p30 encode) -- 64 GB MicroSD Card - -** Dell Optiplex 5040 -Since I wasn't happy with the Pi as my main server, I turned to Craigslist. I -know a lot of other homelabbers use Ebay, but I can't seem to ever trust it -enough to purchase items on there. So I used Craigslist and found a Dell -Optiplex 5040 desktop computer on sale for $90. While this computer might be -underpowered, it was one of the few computers under $100 that was available -during quarantine. - -Here are the specifications for the Dell Optiplex 5040: - -- Intel Core i3 6100 -- 8GB RAM DDR3 -- Intel HD Graphics -- Gigabit Ethernet -- 500GB Hard Drive - -While this hardware would be awful for a work computer or a gaming rig, it -turned out to be wonderful for my server purposes. The only limitation I have -found so far is the CPU. The i3-6100 only has enough power for a single 4k video -transcode at a time. I haven't tested more than three 1080p streams at a time, -but the maximum amount of streams I've ever actually used is two. - -** WD easystore 10TB & 8TB -Application storage and temporary files are stored on the internal hard drive of -the server, but all media files (movies, tv, games, books, etc) are stored -externally on my WD easystore hard drive. Creating auto-boot configurations in -the =/etc/fstab= file on my server allows the hard drives to automatically mount -whenever I need to restart my server. - -#+begin_quote -Update: In March 2022, I shucked the hard drives out of their external cases, -put some Kapton tape on the third power pin to prevent power shutdowns, and -stuck them inside my server tower using internal SATA cables. -#+end_quote - -** Netgear Unmanaged Switch -To manage all the ethernet cords used by my homelab, my desktop, and my living -room media center, I purchased an 8-port gigabit ethernet switch for $50 at my -local computer store. This is probably much more than I should have spent on an -unmanaged switch, but I am comfortable with the choice. - -** TP-Link Managed Switch -Since I use the unmanaged switch to group all living room devices together, I -use the managed switch to configure VLANs and secure my network. - -** Arris TM1602A Modem & Sagecom Fast 5280 Router -My default modem and router, provided by my ISP, are fairly standard. The Arris -modem supports DOCSIS 3.0, which is something that I definitely wanted as a -minimum. The Sagecom router is also standard, no fancy bells or whistles. -However, it does support DHCP and DHCPv6, which is something you can use to -route all household traffic through a pi-hole or firewall. - -** TP-Link EAP -In order to gain better control over the network, I use my own wireless access -point instead of the one included in the Sagecom router above. Now I can control -and organize all of my ethernet connections through the VLANs on the managed -switch and wireless connections through the VLANS on the EAP. - -** Generic Printer -The last piece to my homelab is a standard wireless printer. Nothing special -here. - -* Software -** Ubuntu Server 20.04 -While the 20.04 version of Ubuntu was just released, I always like to experiment -with new features (and I don't mind breaking my system - it just gives me more -experience learning how to fix things). So, I have Ubuntu Server 20.04 installed -on the Dell Optiplex server and Ubuntu Server 19.10 installed on the Raspberry -Pi. Once I find an acceptable use for the Pi, I will most likely switch the -operating system. - -** Docker -I am /very/ new to Docker, but I have had a lot of fun playing with it so far. -Docker is used to create containers that can hold all the contents of a system -without interfering with other software on the same system. So far, I have -successfully installed pi-hole, GitLab, Gogs, and Nextcloud in containers. -However, I opted to delete all of those so that I can reconfigure them more -professionally at a later time. - -** Plex Media Server -Plex is a media center software that allows you to organize your movies, TV -shows, music, photos, and videos automatically. It will even download metadata -for you so that you can easily browse these collections. - -** Pi-hole -Pi-hole is an alternative ad-blocker that runs at the DNS level, allowing you to -block traffic when it hits your network, so that you can reject any traffic you -deem to be bad. Pi-hole uses blacklists and whitelists to decide which traffic -block and, luckily, there are a lot of pre-made lists out there on Reddit, -GitHub, etc. - -** Nextcloud -While I had trouble with the Docker version of Nextcloud, I was very successful -when setting up the snap version. Using this, I was able to map Nextcloud to a -subdomain of a domain I own in Namecheap. Additionally, Nextcloud has an -integration with Let's Encrypt that allows me to issue certificates -automatically to any new domain I authorize. - -** Webmin -To monitor my servers, and the processes running on them, I use the Webmin -dashboard. This was fairly painless to set up, and I currently access it -straight through the server's IP address. In the future, I will be looking to -configure Webmin to use a custom domain just like Nextcloud. diff --git a/content/blog/2020-05-19-customizing-ubuntu.md b/content/blog/2020-05-19-customizing-ubuntu.md new file mode 100644 index 0000000..6137467 --- /dev/null +++ b/content/blog/2020-05-19-customizing-ubuntu.md @@ -0,0 +1,211 @@ ++++ +date = 2020-05-19 +title = "A Beginner's Guide: Customizing Ubuntu" +description = "" +draft = false ++++ + +# More Information + +For inspiration on designing your \*nix computer, check out the +[r/unixporn](https://libredd.it/r/unixporn) subreddit! + +# Customizing Ubuntu + +New to Linux and want to add a personal touch to your machine? One of +the best perks of Linux is that it is **extremely\*** customizable. You +can change the styles of the windows, shell (status bars/docks), icons, +fonts, terminals, and more. + +In this post, I\'m going to go through customization on Ubuntu 20.04 +(GNOME) since most new users tend to choose Ubuntu-based distros. If +you\'ve found a way to install Arch with i3-gaps, I\'m assuming you know +how to find more advanced tutorials out there on customizations. + +## Required Tools + + + +Ubuntu 20.04 ships with the default desktop environment +[Gnome](https://www.gnome.org/), which includes the handy +`gnome-tweaks` tool to quickly change designs. To install +this, just open your terminal and enter the following command: + +```sh +sudo apt install gnome-tweaks +``` + +After you\'ve finished installing the tool, simply launch the Tweaks +application, and you\'ll be able to access the various customization +options available by default on Ubuntu. You might even like some of the +pre-installed options. + +## GNOME Application Themes + +To change the themes applied to applications in GNOME, you will need to +change the Applications dropdown in the Appearance section of Tweaks. To +add more themes, you will have to find your preferred theme online and +follow the steps below to have it show up in the Tweaks tool. While you +may find themes anywhere, one of the most popular sites for GNOME themes +is [gnome-look.org](https://www.gnome-look.org/). This website contains +themes for applications, shells, icons, and cursors. + +Steps to import themes into Tweaks: + +1. Download the theme. +2. These files are usually compressed (.zip, .tar.gz, .tar.xz), so you + will need to extract the contents. This is easiest when opening the + file explorer, right-clicking the compressed file, and choosing + \"Extract here.\" +3. Move the theme folder to `/usr/share/themes/`. You can do + so with the following command: + `sudo mv theme-folder/ /usr/share/themes/`. + - Icons and cursors will be moved to the + `/usr/share/icons/` folder. + - Fonts will be moved to the `/usr/share/fonts/` folder + Alternatively, you can move them to the + `/usr/share/fonts/opentype/` or + `/usr/share/fonts/opentype/` folders, if you have a + specific font type. +4. Close tweaks if it is open. Re-open Tweaks and your new theme will + be available in the Applications dropdown in the Appearance section + of Tweaks. + +If the theme is not showing up after you\'ve moved it into the themes +folder, you may have uncompressed the folder into a sub-folder. You can +check this by entering the theme folder and listing the contents: + +```sh +cd /usr/share/themes/Mojave-Dark && ls -la +``` + +This is an example of what the contents of your theme folder should look +like. If you just see another folder there, you should move that folder +up into the `/usr/share/themes/` folder. + +```sh +cinnamon COPYING gnome-shell gtk-2.0 gtk-3.0 index.theme metacity-1 plank xfwm4 +``` + +## GNOME Shell Themes + +To change the appearance of the title bar, default dock, app menu, and +other parts of the GNOME shell, you\'ll need to install the [user +themes](https://extensions.gnome.org/extension/19/user-themes/) +extension on [Gnome Extensions](https://extensions.gnome.org/). To be +able to install extensions, you will first need to install the browser +extension that the website instructs you to. See this screenshot for the +blue box with a link to the extension. + + + +After the browser extension is installed, you will need to install the +native host connector: + +```sh +sudo apt install chrome-gnome-shell +``` + +Finally, you can go the [user +themes](https://extensions.gnome.org/extension/19/user-themes/) +extension page and click the installation button. This will enable the +Shell option in Tweaks. Now you can move shell themes to the +`/usr/share/themes` directory, using the same steps mentioned +in the previous section, and enable the new theme in Tweaks. + +## Icons & Cursors + +Icons and cursors are installed exactly the same way, so I\'m grouping +these together in this post. Both of these items will need to follow the +same process as installing themes, except you will want to move your +font folders to the `/usr/share/icons/` directory instead. + +## Fonts + +Fonts are one of the overlooked parts of customization, but a good font +can make the whole screen look different. For example, I have installed +the [IBM Plex](https://github.com/IBM/plex/releases) fonts on my system. +This follows the same process as installing themes, except you will want +to move your font folders to the `/usr/share/fonts/` +directory instead. + +## Terminal + +If you spend a lot of time typing commands, you know how important the +style and functionality of the terminal is. After spending a lot of time +using the default GNOME terminal with [unix +shell](https://en.wikipedia.org/wiki/Bash_(Unix_shell)), I decided to +try some different options. I ended up choosing +[Terminator](https://terminator-gtk3.readthedocs.io/en/latest/) with +[zsh](https://en.wikipedia.org/wiki/Z_shell). + +Terminator is great if you need to open multiple terminals at one time +by simply right-clicking and splitting the screen into as many terminals +as you want. While this project hasn\'t been updated in a while, [it is +coming under new +development](https://github.com/gnome-terminator/terminator/issues/1). +However, this terminal is great and I haven\'t experienced any errors +yet. + +For the shell choice, I decided to choose zsh after trying it out on a +fresh Manjaro installation. Zsh is great if you like to change the +themes of your terminal, include icons, or add plugins. + +The desktop uses the +[zsh-autosuggestions](https://github.com/zsh-users/zsh-autosuggestions) +to suggest past commands as you type. In addition, it suggests +corrections if you misspell a command. Lastly, it uses the +`af-magic` theme, which adds dashed lines between commands, +moving the user@host tag to the right side of the terminal, and changes +the colors. There are plenty of plugins and themes to choose from. Just +figure out what you like and add it to your `~/.zshrc` file! + +### Steps to Replicate My Terminal + +To install zsh on Ubuntu, enter the following command into a terminal: + +```sh +sudo apt install zsh +``` + +Then, enter the next command to activate zsh: + +```sh +sudo chsh -s $(which zsh) $(whoami) +``` + +To install Terminator on Ubuntu: + +```sh +sudo apt install terminator +``` + +To install Oh My Zsh on Ubuntu: + +```sh +sh -c "$(curl -fsSL https://raw.github.com/ohmyzsh/ohmyzsh/master/tools/install.sh)" +``` + +To install zsh-autosuggestions via Oh My Zsh: + +```sh +git clone https://github.com/zsh-users/zsh-autosuggestions ${ZSH_CUSTOM:-~/.oh-my-zsh/custom}/plugins/zsh-autosuggestions +``` + +Then, add the following plugin wording to your `~/.zshrc` +file (the default config usually has the `git` plugin +activated, so just add any other plugins to the parentheses separated by +a space): + +```sh +nano ~/.zshrc +``` + +```sh +plugins=(git zsh-autosuggestions) +``` + +Finally, you need to log out of your computer and log back in so your +user shell can refresh. diff --git a/content/blog/2020-05-19-customizing-ubuntu.org b/content/blog/2020-05-19-customizing-ubuntu.org deleted file mode 100644 index 468edc8..0000000 --- a/content/blog/2020-05-19-customizing-ubuntu.org +++ /dev/null @@ -1,178 +0,0 @@ -#+title: Beginner's Guide: Customizing Ubuntu -#+date: 2020-05-19 -#+description: A beginner's guide to customizing the Ubuntu operating system. -#+filetags: :linux: - -* More Information -For inspiration on designing your *nix computer, check out the -[[https://libredd.it/r/unixporn][r/unixporn]] subreddit! - -* Customizing Ubuntu -New to Linux and want to add a personal touch to your machine? One of the best -perks of Linux is that it is *extremely** customizable. You can change the -styles of the windows, shell (status bars/docks), icons, fonts, terminals, and -more. - -In this post, I'm going to go through customization on Ubuntu 20.04 (GNOME) -since most new users tend to choose Ubuntu-based distros. If you've found a way -to install Arch with i3-gaps, I'm assuming you know how to find more advanced -tutorials out there on customizations. - -** Required Tools -#+caption: Gnome Tweaks -[[https://img.cleberg.net/blog/20200519-customizing-ubuntu/gnome-tweaks-min.png]] - -Ubuntu 20.04 ships with the default desktop environment [[https://www.gnome.org/][Gnome]], which includes -the handy =gnome-tweaks= tool to quickly change designs. To install this, just -open your terminal and enter the following command: - -#+begin_src sh -sudo apt install gnome-tweaks -#+end_src - -After you've finished installing the tool, simply launch the Tweaks application, -and you'll be able to access the various customization options available by -default on Ubuntu. You might even like some of the pre-installed options. - -** GNOME Application Themes -To change the themes applied to applications in GNOME, you will need to change -the Applications dropdown in the Appearance section of Tweaks. To add more -themes, you will have to find your preferred theme online and follow the steps -below to have it show up in the Tweaks tool. While you may find themes anywhere, -one of the most popular sites for GNOME themes is [[https://www.gnome-look.org/][gnome-look.org]]. This website -contains themes for applications, shells, icons, and cursors. - -Steps to import themes into Tweaks: - -1. Download the theme. -2. These files are usually compressed (.zip, .tar.gz, .tar.xz), so you will need - to extract the contents. This is easiest when opening the file explorer, - right-clicking the compressed file, and choosing "Extract here." -3. Move the theme folder to =/usr/share/themes/=. You can do so with the - following command: =sudo mv theme-folder/ /usr/share/themes/=. - - Icons and cursors will be moved to the =/usr/share/icons/= folder. - - Fonts will be moved to the =/usr/share/fonts/= folder Alternatively, you - can move them to the =/usr/share/fonts/opentype/= or - =/usr/share/fonts/opentype/= folders, if you have a specific font type. -4. Close tweaks if it is open. Re-open Tweaks and your new theme will be - available in the Applications dropdown in the Appearance section of Tweaks. - -If the theme is not showing up after you've moved it into the themes folder, you -may have uncompressed the folder into a sub-folder. You can check this by -entering the theme folder and listing the contents: - -#+begin_src sh -cd /usr/share/themes/Mojave-Dark && ls -la -#+end_src - -This is an example of what the contents of your theme folder should look like. -If you just see another folder there, you should move that folder up into the -=/usr/share/themes/= folder. - -#+begin_src sh -cinnamon COPYING gnome-shell gtk-2.0 gtk-3.0 index.theme metacity-1 plank xfwm4 -#+end_src - -** GNOME Shell Themes -To change the appearance of the title bar, default dock, app menu, and other -parts of the GNOME shell, you'll need to install the [[https://extensions.gnome.org/extension/19/user-themes/][user themes]] extension on -[[https://extensions.gnome.org/][Gnome Extensions]]. To be able to install extensions, you will first need to -install the browser extension that the website instructs you to. See this -screenshot for the blue box with a link to the extension. - -#+caption: Gnome Extensions -[[https://img.cleberg.net/blog/20200519-customizing-ubuntu/gnome-extensions-min.png]] - -After the browser extension is installed, you will need to install the native -host connector: - -#+begin_src sh -sudo apt install chrome-gnome-shell -#+end_src - -Finally, you can go the [[https://extensions.gnome.org/extension/19/user-themes/][user themes]] extension page and click the installation -button. This will enable the Shell option in Tweaks. Now you can move shell -themes to the =/usr/share/themes= directory, using the same steps mentioned in -the previous section, and enable the new theme in Tweaks. - -** Icons & Cursors -Icons and cursors are installed exactly the same way, so I'm grouping these -together in this post. Both of these items will need to follow the same process -as installing themes, except you will want to move your font folders to the -=/usr/share/icons/= directory instead. - -** Fonts -Fonts are one of the overlooked parts of customization, but a good font can make -the whole screen look different. For example, I have installed the [[https://github.com/IBM/plex/releases][IBM Plex]] -fonts on my system. This follows the same process as installing themes, except -you will want to move your font folders to the =/usr/share/fonts/= directory -instead. - -** Terminal -If you spend a lot of time typing commands, you know how important the style and -functionality of the terminal is. After spending a lot of time using the default -GNOME terminal with [[https://en.wikipedia.org/wiki/Bash_(Unix_shell)][unix shell]], I decided to try some different options. I ended -up choosing [[https://terminator-gtk3.readthedocs.io/en/latest/][Terminator]] with [[https://en.wikipedia.org/wiki/Z_shell][zsh]]. - -Terminator is great if you need to open multiple terminals at one time by simply -right-clicking and splitting the screen into as many terminals as you want. -While this project hasn't been updated in a while, [[https://github.com/gnome-terminator/terminator/issues/1][it is coming under new -development]]. However, this terminal is great and I haven't experienced any -errors yet. - -For the shell choice, I decided to choose zsh after trying it out on a fresh -Manjaro installation. Zsh is great if you like to change the themes of your -terminal, include icons, or add plugins. - -The desktop uses the [[https://github.com/zsh-users/zsh-autosuggestions][zsh-autosuggestions]] to suggest past commands as you type. -In addition, it suggests corrections if you misspell a command. Lastly, it uses -the =af-magic= theme, which adds dashed lines between commands, moving the -user@host tag to the right side of the terminal, and changes the colors. There -are plenty of plugins and themes to choose from. Just figure out what you like -and add it to your =~/.zshrc= file! - -*** Steps to Replicate My Terminal -To install zsh on Ubuntu, enter the following command into a terminal: - -#+begin_src sh -sudo apt install zsh -#+end_src - -Then, enter the next command to activate zsh: - -#+begin_src sh -sudo chsh -s $(which zsh) $(whoami) -#+end_src - -To install Terminator on Ubuntu: - -#+begin_src sh -sudo apt install terminator -#+end_src - -To install Oh My Zsh on Ubuntu: - -#+begin_src sh -sh -c "$(curl -fsSL https://raw.github.com/ohmyzsh/ohmyzsh/master/tools/install.sh)" -#+end_src - -To install zsh-autosuggestions via Oh My Zsh: - -#+begin_src sh -git clone https://github.com/zsh-users/zsh-autosuggestions ${ZSH_CUSTOM:-~/.oh-my-zsh/custom}/plugins/zsh-autosuggestions -#+end_src - -Then, add the following plugin wording to your =~/.zshrc= file (the default -config usually has the =git= plugin activated, so just add any other plugins to -the parentheses separated by a space): - -#+begin_src sh -nano ~/.zshrc -#+end_src - -#+begin_src sh -plugins=(git zsh-autosuggestions) -#+end_src - -Finally, you need to log out of your computer and log back in so your user shell -can refresh. diff --git a/content/blog/2020-07-20-video-game-sales.md b/content/blog/2020-07-20-video-game-sales.md new file mode 100644 index 0000000..24ca14b --- /dev/null +++ b/content/blog/2020-07-20-video-game-sales.md @@ -0,0 +1,183 @@ ++++ +date = 2020-07-20 +title = "Data Exploration: Video Games Sales" +description = "" +draft = false ++++ + +# Background Information + +This dataset (obtained from +[Kaggle](https://www.kaggle.com/gregorut/videogamesales/data)) contains +a list of video games with sales greater than 100,000 copies. It was +generated by a scrape of vgchartz.com. + +Fields include: + +- Rank: Ranking of overall sales +- Name: The game name +- Platform: Platform of the game release (i.e. PC,PS4, etc.) +- Year: Year of the game\'s release +- Genre: Genre of the game +- Publisher: Publisher of the game +- NA~Sales~: Sales in North America (in millions) +- EU~Sales~: Sales in Europe (in millions) +- JP~Sales~: Sales in Japan (in millions) +- Other~Sales~: Sales in the rest of the world (in millions) +- Global~Sales~: Total worldwide sales. + +There are 16,598 records. 2 records were dropped due to incomplete +information. + +# Import the Data + +``` python +# Import the Python libraries we will be using +import pandas as pd +import numpy as np +import seaborn as sns; sns.set() +import matplotlib.pyplot as plt + +# Load the file using the path to the downloaded file +file = r'video_game_sales.csv' +df = pd.read_csv(file) +df +``` + + + +# Explore the Data + +``` python +# With the description function, we can see the basic stats. For example, we can +# also see that the 'Year' column has some incomplete values. +df.describe() +``` + + + +``` python +# This function shows the rows and columns of NaN values. For example, df[179,3] = nan +np.where(pd.isnull(df)) + +(array([179, ..., 16553], dtype=int64), + array([3, ..., 5], dtype=int64)) +``` + +# Visualize the Data + +``` python +# This function plots the global sales by platform +sns.catplot(x='Platform', y='Global_Sales', data=df, jitter=False).set_xticklabels(rotation=90) +``` + +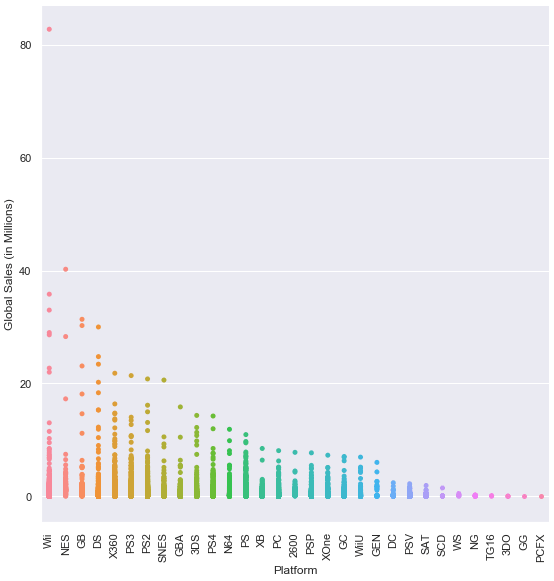 + +``` python +# This function plots the global sales by genre +sns.catplot(x='Genre', y='Global_Sales', data=df, jitter=False).set_xticklabels(rotation=45) +``` + + + +``` python +# This function plots the global sales by year +sns.lmplot(x='Year', y='Global_Sales', data=df).set_xticklabels(rotation=45) +``` + + + +``` python +# This function plots four different lines to show sales from different regions. +# The global sales plot line is commented-out, but can be included for comparison +df2 = df.groupby('Year').sum() +years = range(1980,2019) + +a = df2['NA_Sales'] +b = df2['EU_Sales'] +c = df2['JP_Sales'] +d = df2['Other_Sales'] +# e = df2['Global_Sales'] + +fig, ax = plt.subplots(figsize=(12,12)) +ax.set_ylabel('Region Sales (in Millions)') +ax.set_xlabel('Year') + +ax.plot(years, a, label='NA_Sales') +ax.plot(years, b, label='EU_Sales') +ax.plot(years, c, label='JP_Sales') +ax.plot(years, d, label='Other_Sales') +# ax.plot(years, e, label='Global_Sales') + +ax.legend() +plt.show() +``` + + + +## Investigate Outliers + +``` python +# Find the game with the highest sales in North America +df.loc[df['NA_Sales'].idxmax()] + +Rank 1 +Name Wii Sports +Platform Wii +Year 2006 +Genre Sports +Publisher Nintendo +NA_Sales 41.49 +EU_Sales 29.02 +JP_Sales 3.77 +Other_Sales 8.46 +Global_Sales 82.74 +Name: 0, dtype: object + +# Explore statistics in the year 2006 (highest selling year) +df3 = df[(df['Year'] == 2006)] +df3.describe() +``` + + + +``` python +# Plot the results of the previous dataframe (games from 2006) - we can see the year's results were largely carried by Wii Sports +sns.catplot(x="Genre", y="Global_Sales", data=df3, jitter=False).set_xticklabels(rotation=45) +``` + + + +``` python +# We can see 4 outliers in the graph above, so let's get the top 5 games from that dataframe +# The results below show that Nintendo had all top 5 games (3 on the Wii and 2 on the DS) +df3.sort_values(by=['Global_Sales'], ascending=False).head(5) +``` + + + +# Discussion + +The purpose of exploring datasets is to ask questions, answer questions, +and discover intelligence that can be used to inform decision-making. +So, what have we found in this dataset? + +Today we simply explored a publicly-available dataset to see what kind +of information it contained. During that exploration, we found that +video game sales peaked in 2006. That peak was largely due to Nintendo, +who sold the top 5 games in 2006 and has a number of games in the top-10 +list for the years 1980-2020. Additionally, the top four platforms by +global sales (Wii, NES, GB, DS) are owned by Nintendo. + +We didn\'t explore everything this dataset has to offer, but we can tell +from a brief analysis that Nintendo seems to rule sales in the video +gaming world. Further analysis could provide insight into which genres, +regions, publishers, or world events are correlated with sales. diff --git a/content/blog/2020-07-20-video-game-sales.org b/content/blog/2020-07-20-video-game-sales.org deleted file mode 100644 index 2967c17..0000000 --- a/content/blog/2020-07-20-video-game-sales.org +++ /dev/null @@ -1,173 +0,0 @@ -#+title: Data Exploration: Video Game Sales -#+date: 2020-07-20 -#+description: Exploring and visualizing data with Python. -#+filetags: :data: - -* Background Information -This dataset (obtained from [[https://www.kaggle.com/gregorut/videogamesales/data][Kaggle]]) contains a list of video games with sales -greater than 100,000 copies. It was generated by a scrape of vgchartz.com. - -Fields include: - -- Rank: Ranking of overall sales -- Name: The game name -- Platform: Platform of the game release (i.e. PC,PS4, etc.) -- Year: Year of the game's release -- Genre: Genre of the game -- Publisher: Publisher of the game -- NA_{Sales}: Sales in North America (in millions) -- EU_{Sales}: Sales in Europe (in millions) -- JP_{Sales}: Sales in Japan (in millions) -- Other_{Sales}: Sales in the rest of the world (in millions) -- Global_{Sales}: Total worldwide sales. - -There are 16,598 records. 2 records were dropped due to incomplete information. - -* Import the Data -#+begin_src python -# Import the Python libraries we will be using -import pandas as pd -import numpy as np -import seaborn as sns; sns.set() -import matplotlib.pyplot as plt - -# Load the file using the path to the downloaded file -file = r'video_game_sales.csv' -df = pd.read_csv(file) -df -#+end_src - -#+caption: Dataframe Results -[[https://img.cleberg.net/blog/20200720-data-exploration-video-game-sales/01_dataframe-min.png]] - -* Explore the Data -#+begin_src python -# With the description function, we can see the basic stats. For example, we can -# also see that the 'Year' column has some incomplete values. -df.describe() -#+end_src - -#+caption: df.describe() -[[https://img.cleberg.net/blog/20200720-data-exploration-video-game-sales/02_describe-min.png]] - -#+begin_src python -# This function shows the rows and columns of NaN values. For example, df[179,3] = nan -np.where(pd.isnull(df)) - -(array([179, ..., 16553], dtype=int64), - array([3, ..., 5], dtype=int64)) -#+end_src - -* Visualize the Data -#+begin_src python -# This function plots the global sales by platform -sns.catplot(x='Platform', y='Global_Sales', data=df, jitter=False).set_xticklabels(rotation=90) -#+end_src - -#+caption: Plot of Global Sales by Platform -[[https://img.cleberg.net/blog/20200720-data-exploration-video-game-sales/03_plot-min.png]] - -#+begin_src python -# This function plots the global sales by genre -sns.catplot(x='Genre', y='Global_Sales', data=df, jitter=False).set_xticklabels(rotation=45) -#+end_src - -#+caption: Plot of Global Sales by Genre -[[https://img.cleberg.net/blog/20200720-data-exploration-video-game-sales/04_plot-min.png]] - -#+begin_src python -# This function plots the global sales by year -sns.lmplot(x='Year', y='Global_Sales', data=df).set_xticklabels(rotation=45) -#+end_src - -#+caption: Plot of Global Sales by Year -[[https://img.cleberg.net/blog/20200720-data-exploration-video-game-sales/05_plot-min.png]] - -#+begin_src python -# This function plots four different lines to show sales from different regions. -# The global sales plot line is commented-out, but can be included for comparison -df2 = df.groupby('Year').sum() -years = range(1980,2019) - -a = df2['NA_Sales'] -b = df2['EU_Sales'] -c = df2['JP_Sales'] -d = df2['Other_Sales'] -# e = df2['Global_Sales'] - -fig, ax = plt.subplots(figsize=(12,12)) -ax.set_ylabel('Region Sales (in Millions)') -ax.set_xlabel('Year') - -ax.plot(years, a, label='NA_Sales') -ax.plot(years, b, label='EU_Sales') -ax.plot(years, c, label='JP_Sales') -ax.plot(years, d, label='Other_Sales') -# ax.plot(years, e, label='Global_Sales') - -ax.legend() -plt.show() -#+end_src - -#+caption: Plot of Regional Sales by Year -[[https://img.cleberg.net/blog/20200720-data-exploration-video-game-sales/06_plot-min.png]] - -** Investigate Outliers -#+begin_src python -# Find the game with the highest sales in North America -df.loc[df['NA_Sales'].idxmax()] - -Rank 1 -Name Wii Sports -Platform Wii -Year 2006 -Genre Sports -Publisher Nintendo -NA_Sales 41.49 -EU_Sales 29.02 -JP_Sales 3.77 -Other_Sales 8.46 -Global_Sales 82.74 -Name: 0, dtype: object - -# Explore statistics in the year 2006 (highest selling year) -df3 = df[(df['Year'] == 2006)] -df3.describe() -#+end_src - -#+caption: Descriptive Statistics of 2006 Sales -[[https://img.cleberg.net/blog/20200720-data-exploration-video-game-sales/07_2006_stats-min.png]] - -#+begin_src python -# Plot the results of the previous dataframe (games from 2006) - we can see the year's results were largely carried by Wii Sports -sns.catplot(x="Genre", y="Global_Sales", data=df3, jitter=False).set_xticklabels(rotation=45) -#+end_src - -#+caption: Plot of 2006 Sales -[[https://img.cleberg.net/blog/20200720-data-exploration-video-game-sales/08_plot-min.png]] - -#+begin_src python -# We can see 4 outliers in the graph above, so let's get the top 5 games from that dataframe -# The results below show that Nintendo had all top 5 games (3 on the Wii and 2 on the DS) -df3.sort_values(by=['Global_Sales'], ascending=False).head(5) -#+end_src - -#+caption: Outliers of 2006 Sales -[[https://img.cleberg.net/blog/20200720-data-exploration-video-game-sales/09_outliers-min.png]] - -* Discussion -The purpose of exploring datasets is to ask questions, answer questions, and -discover intelligence that can be used to inform decision-making. So, what have -we found in this dataset? - -Today we simply explored a publicly-available dataset to see what kind of -information it contained. During that exploration, we found that video game -sales peaked in 2006. That peak was largely due to Nintendo, who sold the top 5 -games in 2006 and has a number of games in the top-10 list for the years -1980-2020. Additionally, the top four platforms by global sales (Wii, NES, GB, -DS) are owned by Nintendo. - -We didn't explore everything this dataset has to offer, but we can tell from a -brief analysis that Nintendo seems to rule sales in the video gaming world. -Further analysis could provide insight into which genres, regions, publishers, -or world events are correlated with sales. diff --git a/content/blog/2020-07-26-business-analysis.org b/content/blog/2020-07-26-business-analysis.md index 098dce7..7f96ac1 100644 --- a/content/blog/2020-07-26-business-analysis.org +++ b/content/blog/2020-07-26-business-analysis.md @@ -1,28 +1,32 @@ -#+title: Algorithmically Analyzing Local Businesses -#+date: 2020-07-26 -#+description: Exploring and visualizing data with Python. -#+filetags: :data: ++++ +date = 2020-07-26 +title = "Algorithmically Analyzing Local Businesses " +description = "" +draft = false ++++ -* Background Information -This project aims to help investors learn more about a random city in order to -determine optimal locations for business investments. The data used in this -project was obtained using Foursquare's developer API. +# Background Information + +This project aims to help investors learn more about a random city in +order to determine optimal locations for business investments. The data +used in this project was obtained using Foursquare\'s developer API. Fields include: -- Venue Name -- Venue Category -- Venue Latitude -- Venue Longitude +- Venue Name +- Venue Category +- Venue Latitude +- Venue Longitude + +There are 232 records found using the center of Lincoln as the area of +interest with a radius of 10,000. -There are 232 records found using the center of Lincoln as the area of interest -with a radius of 10,000. +# Import the Data -* Import the Data -The first step is the simplest: import the applicable libraries. We will be -using the libraries below for this project. +The first step is the simplest: import the applicable libraries. We will +be using the libraries below for this project. -#+begin_src python +``` python # Import the Python libraries we will be using import pandas as pd import requests @@ -31,32 +35,32 @@ import math import json from pandas.io.json import json_normalize from sklearn.cluster import KMeans -#+end_src +``` -To begin our analysis, we need to import the data for this project. The data we -are using in this project comes directly from the Foursquare API. The first step -is to get the latitude and longitude of the city being studied (Lincoln, NE) and -setting up the folium map. +To begin our analysis, we need to import the data for this project. The +data we are using in this project comes directly from the Foursquare +API. The first step is to get the latitude and longitude of the city +being studied (Lincoln, NE) and setting up the folium map. -#+begin_src python +``` python # Define the latitude and longitude, then map the results latitude = 40.806862 longitude = -96.681679 map_LNK = folium.Map(location=[latitude, longitude], zoom_start=12) map_LNK -#+end_src +``` -#+caption: Blank Map -[[https://img.cleberg.net/blog/20200726-ibm-data-science/01_blank_map-min.png]] + -Now that we have defined our city and created the map, we need to go get the -business data. The Foursquare API will limit the results to 100 per API call, so -we use our first API call below to determine the total results that Foursquare -has found. Since the total results are 232, we perform the API fetching process -three times (100 + 100 + 32 = 232). +Now that we have defined our city and created the map, we need to go get +the business data. The Foursquare API will limit the results to 100 per +API call, so we use our first API call below to determine the total +results that Foursquare has found. Since the total results are 232, we +perform the API fetching process three times (100 + 100 + 32 = 232). -#+begin_src python +``` python # Foursquare API credentials CLIENT_ID = 'your-client-id' CLIENT_SECRET = 'your-client-secret' @@ -114,17 +118,19 @@ url3 = 'https://api.foursquare.com/v2/venues/explore?&client_id={}&client_secret # Fetch the final results (201 - 232) results3 = requests.get(url3).json() -#+end_src +``` -* Clean the Data -Now that we have our data in three separate dataframes, we need to combine them -into a single dataframe and make sure to reset the index so that we have a -unique ID for each business. The =get~categorytype~= function below will pull -the categories and name from each business's entry in the Foursquare data -automatically. Once all the data has been labeled and combined, the results are -stored in the =nearby_venues= dataframe. +# Clean the Data -#+begin_src python +Now that we have our data in three separate dataframes, we need to +combine them into a single dataframe and make sure to reset the index so +that we have a unique ID for each business. The +`get~categorytype~` function below will pull the categories +and name from each business\'s entry in the Foursquare data +automatically. Once all the data has been labeled and combined, the +results are stored in the `nearby_venues` dataframe. + +``` python # This function will extract the category of the venue from the API dictionary def get_category_type(row): try: @@ -187,17 +193,18 @@ nearby_venues3.columns = [col.split(".")[-1] for col in nearby_venues3.columns] nearby_venues = nearby_venues.append(nearby_venues3) nearby_venues = nearby_venues.reset_index(drop=True) nearby_venues -#+end_src +``` + + -#+caption: Clean Data -[[https://img.cleberg.net/blog/20200726-ibm-data-science/02_clean_data-min.png]] +# Visualize the Data -* Visualize the Data -We now have a complete, clean data set. The next step is to visualize this data -onto the map we created earlier. We will be using folium's =CircleMarker()= -function to do this. +We now have a complete, clean data set. The next step is to visualize +this data onto the map we created earlier. We will be using folium\'s +`CircleMarker()` function to do this. -#+begin_src python +``` python # add markers to map for lat, lng, name, categories in zip(nearby_venues['lat'], nearby_venues['lng'], nearby_venues['name'], nearby_venues['categories']): label = '{} ({})'.format(name, categories) @@ -213,22 +220,24 @@ for lat, lng, name, categories in zip(nearby_venues['lat'], nearby_venues['lng'] ).add_to(map_LNK) map_LNK -#+end_src +``` -![[https://img.cleberg.net/blog/20200726-ibm-data-science/03_data_map-min.png][Initial -data map]] +\ -* Clustering: /k-means/ -To cluster the data, we will be using the /k-means/ algorithm. This algorithm is -iterative and will automatically make sure that data points in each cluster are -as close as possible to each other, while being as far as possible away from -other clusters. +# Clustering: *k-means* -However, we first have to figure out how many clusters to use (defined as the -variable /'k'/). To do so, we will use the next two functions to calculate the -sum of squares within clusters and then return the optimal number of clusters. +To cluster the data, we will be using the *k-means* algorithm. This +algorithm is iterative and will automatically make sure that data points +in each cluster are as close as possible to each other, while being as +far as possible away from other clusters. -#+begin_src python +However, we first have to figure out how many clusters to use (defined +as the variable *\'k\'*). To do so, we will use the next two functions +to calculate the sum of squares within clusters and then return the +optimal number of clusters. + +``` python # This function will return the sum of squares found in the data def calculate_wcss(data): wcss = [] @@ -262,13 +271,13 @@ def optimal_number_of_clusters(wcss): # calculating the optimal number of clusters n = optimal_number_of_clusters(sum_of_squares) -#+end_src +``` -Now that we have found that our optimal number of clusters is six, we need to -perform k-means clustering. When this clustering occurs, each business is -assigned a cluster number from 0 to 5 in the dataframe. +Now that we have found that our optimal number of clusters is six, we +need to perform k-means clustering. When this clustering occurs, each +business is assigned a cluster number from 0 to 5 in the dataframe. -#+begin_src python +``` python # set number of clusters equal to the optimal number kclusters = n @@ -277,12 +286,13 @@ kmeans = KMeans(n_clusters=kclusters, random_state=0).fit(cluster_df) # add clustering labels to dataframe nearby_venues.insert(0, 'Cluster Labels', kmeans.labels_) -#+end_src +``` -Success! We now have a dataframe with clean business data, along with a cluster -number for each business. Now let's map the data using six different colors. +Success! We now have a dataframe with clean business data, along with a +cluster number for each business. Now let\'s map the data using six +different colors. -#+begin_src python +``` python # create map with clusters map_clusters = folium.Map(location=[latitude, longitude], zoom_start=12) colors = ['#0F9D58', '#DB4437', '#4285F4', '#800080', '#ce12c0', '#171717'] @@ -301,35 +311,37 @@ for lat, lng, name, categories, cluster in zip(nearby_venues['lat'], nearby_venu fill_opacity=0.7).add_to(map_clusters) map_clusters -#+end_src +``` + +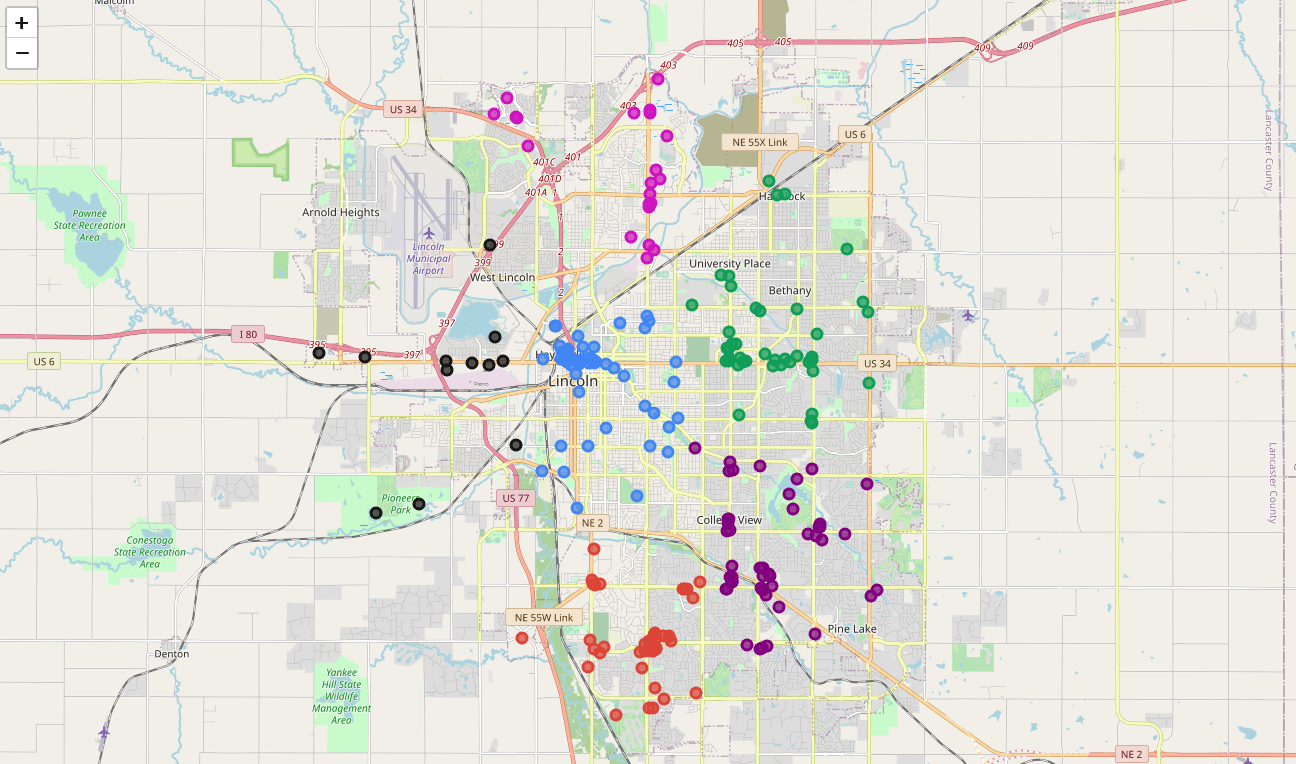 -#+caption: Clustered Map -[[https://img.cleberg.net/blog/20200726-ibm-data-science/04_clusters-min.png]] +# Investigate Clusters -* Investigate Clusters -Now that we have figured out our clusters, let's do a little more analysis to -provide more insight into the clusters. With the information below, we can see -which clusters are more popular for businesses and which are less popular. The -results below show us that clusters 0 through 3 are popular, while clusters 4 -and 5 are not very popular at all. +Now that we have figured out our clusters, let\'s do a little more +analysis to provide more insight into the clusters. With the information +below, we can see which clusters are more popular for businesses and +which are less popular. The results below show us that clusters 0 +through 3 are popular, while clusters 4 and 5 are not very popular at +all. -#+begin_src python +``` python # Show how many venues are in each cluster color_names = ['Dark Green', 'Red', 'Blue', 'Purple', 'Pink', 'Black'] for x in range(0,6): print("Color of Cluster", x, ":", color_names[x]) print("Venues found in Cluster", x, ":", nearby_venues.loc[nearby_venues['Cluster Labels'] == x, nearby_venues.columns[:]].shape[0]) print("---") -#+end_src +``` -#+caption: Venues per Cluster -[[https://img.cleberg.net/blog/20200726-ibm-data-science/05_venues_per_cluster-min.png]] +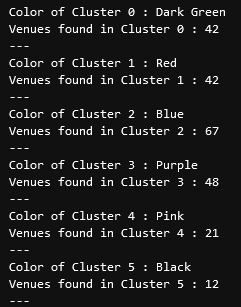 -Our last piece of analysis is to summarize the categories of businesses within -each cluster. With these results, we can clearly see that restaurants, coffee -shops, and grocery stores are the most popular. +Our last piece of analysis is to summarize the categories of businesses +within each cluster. With these results, we can clearly see that +restaurants, coffee shops, and grocery stores are the most popular. -#+begin_src python +``` python # Calculate how many venues there are in each category # Sort from largest to smallest temp_df = nearby_venues.drop(columns=['name', 'lat', 'lng']) @@ -349,26 +361,29 @@ with pd.option_context('display.max_rows', None, 'display.max_columns', None): print("\n\n", "Cluster 3:", "\n", cluster3_grouped.loc[cluster3_grouped['Cluster Labels'] > 1]) print("\n\n", "Cluster 4:", "\n", cluster4_grouped.loc[cluster4_grouped['Cluster Labels'] > 1]) print("\n\n", "Cluster 5:", "\n", cluster5_grouped.loc[cluster5_grouped['Cluster Labels'] > 1]) -#+end_src +``` + +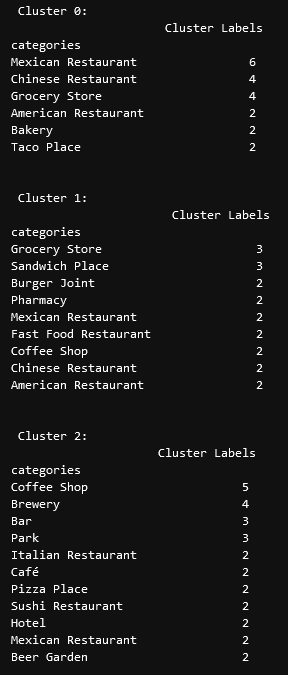 -#+caption: Venues per Cluster, pt. 1 -[[https://img.cleberg.net/blog/20200726-ibm-data-science/06_categories_per_cluster_pt1-min.png]] +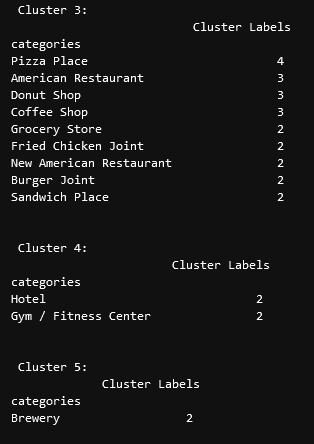 -#+caption: Venues per Cluster, pt. 2 -[[https://img.cleberg.net/blog/20200726-ibm-data-science/07_categories_per_cluster_pt2-min.png]] +# Discussion -* Discussion -In this project, we gathered location data for Lincoln, Nebraska, USA and -clustered the data using the k-means algorithm in order to identify the unique -clusters of businesses in Lincoln. Through these actions, we found that there -are six unique business clusters in Lincoln and that two of the clusters are -likely unsuitable for investors. The remaining four clusters have a variety of -businesses, but are largely dominated by restaurants and grocery stores. +In this project, we gathered location data for Lincoln, Nebraska, USA +and clustered the data using the k-means algorithm in order to identify +the unique clusters of businesses in Lincoln. Through these actions, we +found that there are six unique business clusters in Lincoln and that +two of the clusters are likely unsuitable for investors. The remaining +four clusters have a variety of businesses, but are largely dominated by +restaurants and grocery stores. -Using this project, investors can now make more informed decisions when deciding -the location and category of business in which to invest. +Using this project, investors can now make more informed decisions when +deciding the location and category of business in which to invest. -Further studies may involve other attributes for business locations, such as -population density, average wealth across the city, or crime rates. In addition, -further studies may include additional location data and businesses by utilizing -multiple sources, such as Google Maps and OpenStreetMap. +Further studies may involve other attributes for business locations, +such as population density, average wealth across the city, or crime +rates. In addition, further studies may include additional location data +and businesses by utilizing multiple sources, such as Google Maps and +OpenStreetMap. diff --git a/content/blog/2020-08-22-redirect-github-pages.md b/content/blog/2020-08-22-redirect-github-pages.md new file mode 100644 index 0000000..f92ae07 --- /dev/null +++ b/content/blog/2020-08-22-redirect-github-pages.md @@ -0,0 +1,137 @@ ++++ +date = 2020-08-22 +title = "Redirect GitHub Pages from Subdomain to the Top-Level Domain" +description = "" +draft = false ++++ + +# Short answer + +## Step 1 + +Add a new file CNAME to your GitHub Pages repository containing only one +line: your top-level domain name. E.g.: `example.com` + +## Step 2 + +\[Optional\] but highly recommended + +2.1: Remove all other top-level records (prefixed with @) of type A from +your DNS configuration. + +2.2: Remove a CNAME record for the second-level domain www if it is +present. + +## Step 3 + +Add these 5 entries to the very top of your DNS configuration: + +``` txt +@ A 185.199.108.153 +@ A 185.199.109.153 +@ A 185.199.110.153 +@ A 185.199.111.153 +www CNAME your_github_username.github.io. +``` + +Replace `your_github_username` with your actual GitHub +username. + +## Step 4 + +Wait for your DNS changes to propagate. DNS changes aren\'t effective +immediately. They can take up to a full day to propagate. + +# Long answer + +This issue has two sides. One is the DNS configuration itself. Another +one is the way GitHub Pages will forward HTTP requests. + +We need to know a few things to understand what GitHub is trying to say +in their documentation. + +## DNS Entry Types + +There are two types of DNS records which interest us: CNAME and A. + +`A` is also known as `Apex` or sometimes as +`root entry`. It forwards requests to a specified fixed IP +address. `CNAME` entry forwards requests to a specified URL +(actual valid plain text URL, not an IP address). + +## DNS Load balancing + +GitHub has one central URL address which accepts all DNS requests for +GitHub Pages: `http://username.github.io`. That URL is +resolved to different IP addresses based on your geographical location. +Website hosted on GitHub Pages is a simple collection of +`HTML`, `CSS` and `JS` files. GitHub +distributes these files to different servers across the globe. So that +when your browser sends a request from Europe, it receives data from a +server in Europe. The same is valid for the requests from Asia and the +USA. + +## What GitHub is trying to say + +Since `A` records in DNS must contain IP addresses, and they +must be either `185.199.108.153` or +`185.199.109.153` or `185.199.110.153` or +`185.199.111.153`, there is no way to forward requests to a +server located somewhere in Europe or Asia. Your website hosted at +GitHub Pages will be downloaded from a central GitHub Pages server. +There is a minor risk that if GitHub Pages DNS servers +(`x.x.x.153`) are down for some reason, all custom domains +which use fixed GitHub Pages IP addresses will not be accessible (their +DNS requests will not be resolvable). + +That is why GitHub strongly suggests to either use a second-level domain +for your GitHub Pages (e.g. `blog.example.com`) or use a DNS +service provider that supports a record type `ALIAS` that +acts as `A` record but forwards request to a URL address +(e.g. `username.github.io`) instead of a fixed IP address. + +## How GitHub Pages treats HTTP requests + +After a DNS request for `your_github_username.github.io` is +resolved into an IP address, e.g. `185.199.108.153` your +browser sends an HTTP request to that server with an HTTP header +`Host`. Below are `curl` examples that load the +same website (these examples might not work if you are behind a proxy +server): + +```sh +curl --header "Host: your_github_username.github.io" http://185.199.108.153/ +curl --header "Host: www.example.com" http://185.199.108.153/ +curl --header "Host: example.com" http://185.199.108.153/ +``` + +This way GitHub Pages servers know which user website to serve. + +> GitHub Pages server will automatically redirect HTTP requests to the +> top-level domain if your `CNAME` file contains +> `example.com` but `www.example.com` is +> requested. +> +> The same is valid if your `CNAME` file contains +> `www.example.com` but the header `Host` in the +> `HTTP` request contains `example.com`. + +## Why can\'t I add a `CNAME` record entry that accepts a top-level request (`@`) to my DNS configuration? + +Quote from the GitHub Pages documentation: + +> Warning: Do not create a CNAME record for your custom apex domain! +> Doing so may cause issues with other services, such as email, on that +> domain. + +## References: + +1. [Setting up a custom domain with GitHub + Pages](https://docs.github.com/en/github/working-with-github-pages/configuring-a-custom-domain-for-your-github-pages-site) +2. [My custom domain isn\'t + working](https://docs.github.com/en/github/working-with-github-pages/troubleshooting-custom-domains-and-github-pages) +3. [Cannot access my GitHub Pages website by IP + Address](https://serverfault.com/questions/589370/cannot-access-my-github-pages-website-by-ip-address) +4. [How do I set up GitHub Pages to redirect DNS requests from a + subdomain (e.g. www) to the top-level domain (TLD, Apex + record)?](https://stackoverflow.com/questions/23375422/how-do-i-set-up-github-pages-to-redirect-dns-requests-from-a-subdomain-e-g-www) diff --git a/content/blog/2020-08-22-redirect-github-pages.org b/content/blog/2020-08-22-redirect-github-pages.org deleted file mode 100644 index 562249d..0000000 --- a/content/blog/2020-08-22-redirect-github-pages.org +++ /dev/null @@ -1,110 +0,0 @@ -#+title: Redirect GitHub Pages from Subdomain to the Top-Level Domain -#+date: 2020-08-22 -#+description: Learn how to redirect Github pages to the TLD. -#+filetags: :sysadmin: - -* Short answer -** Step 1 -Add a new file CNAME to your GitHub Pages repository containing only one line: -your top-level domain name. E.g.: =example.com= - -** Step 2 -[Optional] but highly recommended - -2.1: Remove all other top-level records (prefixed with @) of type A from your -DNS configuration. - -2.2: Remove a CNAME record for the second-level domain www if it is present. - -** Step 3 -Add these 5 entries to the very top of your DNS configuration: - -#+begin_src txt -@ A 185.199.108.153 -@ A 185.199.109.153 -@ A 185.199.110.153 -@ A 185.199.111.153 -www CNAME your_github_username.github.io. -#+end_src - -Replace =your_github_username= with your actual GitHub username. - -** Step 4 -Wait for your DNS changes to propagate. DNS changes aren't effective -immediately. They can take up to a full day to propagate. - -* Long answer -This issue has two sides. One is the DNS configuration itself. Another one is -the way GitHub Pages will forward HTTP requests. - -We need to know a few things to understand what GitHub is trying to say in their -documentation. - -** DNS Entry Types -There are two types of DNS records which interest us: CNAME and A. - -=A= is also known as =Apex= or sometimes as =root entry=. It forwards requests -to a specified fixed IP address. =CNAME= entry forwards requests to a specified -URL (actual valid plain text URL, not an IP address). - -** DNS Load balancing -GitHub has one central URL address which accepts all DNS requests for GitHub -Pages: =http://username.github.io=. That URL is resolved to different IP -addresses based on your geographical location. Website hosted on GitHub Pages is -a simple collection of =HTML=, =CSS= and =JS= files. GitHub distributes these -files to different servers across the globe. So that when your browser sends a -request from Europe, it receives data from a server in Europe. The same is valid -for the requests from Asia and the USA. - -** What GitHub is trying to say -Since =A= records in DNS must contain IP addresses, and they must be either -=185.199.108.153= or =185.199.109.153= or =185.199.110.153= or -=185.199.111.153=, there is no way to forward requests to a server located -somewhere in Europe or Asia. Your website hosted at GitHub Pages will be -downloaded from a central GitHub Pages server. There is a minor risk that if -GitHub Pages DNS servers (=x.x.x.153=) are down for some reason, all custom -domains which use fixed GitHub Pages IP addresses will not be accessible (their -DNS requests will not be resolvable). - -That is why GitHub strongly suggests to either use a second-level domain for -your GitHub Pages (e.g. =blog.example.com=) or use a DNS service provider that -supports a record type =ALIAS= that acts as =A= record but forwards request to a -URL address (e.g. =username.github.io=) instead of a fixed IP address. - -** How GitHub Pages treats HTTP requests -After a DNS request for =your_github_username.github.io= is resolved into an IP -address, e.g. =185.199.108.153= your browser sends an HTTP request to that -server with an HTTP header =Host=. Below are =curl= examples that load the same -website (these examples might not work if you are behind a proxy server): - -#+begin_src sh -curl --header "Host: your_github_username.github.io" http://185.199.108.153/ -curl --header "Host: www.example.com" http://185.199.108.153/ -curl --header "Host: example.com" http://185.199.108.153/ -#+end_src - -This way GitHub Pages servers know which user website to serve. - -#+begin_quote -GitHub Pages server will automatically redirect HTTP requests to the top-level -domain if your =CNAME= file contains =example.com= but =www.example.com= is -requested. - -The same is valid if your =CNAME= file contains =www.example.com= but the header -=Host= in the =HTTP= request contains =example.com=. -#+end_quote - -** Why can't I add a =CNAME= record entry that accepts a top-level request (=@=) to my DNS configuration? -Quote from the GitHub Pages documentation: - -#+begin_quote -Warning: Do not create a CNAME record for your custom apex domain! Doing so may -cause issues with other services, such as email, on that domain. -#+end_quote - -** References: -1. [[https://docs.github.com/en/github/working-with-github-pages/configuring-a-custom-domain-for-your-github-pages-site][Setting up a custom domain with GitHub Pages]] -2. [[https://docs.github.com/en/github/working-with-github-pages/troubleshooting-custom-domains-and-github-pages][My custom domain isn't working]] -3. [[https://serverfault.com/questions/589370/cannot-access-my-github-pages-website-by-ip-address][Cannot access my GitHub Pages website by IP Address]] -4. [[https://stackoverflow.com/questions/23375422/how-do-i-set-up-github-pages-to-redirect-dns-requests-from-a-subdomain-e-g-www][How do I set up GitHub Pages to redirect DNS requests from a subdomain (e.g. - www) to the top-level domain (TLD, Apex record)?]] diff --git a/content/blog/2020-08-29-php-auth-flow.org b/content/blog/2020-08-29-php-auth-flow.md index 558ad2c..499eada 100644 --- a/content/blog/2020-08-29-php-auth-flow.org +++ b/content/blog/2020-08-29-php-auth-flow.md @@ -1,20 +1,24 @@ -#+title: PHP Authentication Flow -#+date: 2020-08-29 -#+description: Learn how to establish and maintain a basic user authentication flow in PHP. -#+filetags: :dev: - -* Introduction -When creating websites that will allow users to create accounts, the developer -always needs to consider the proper authentication flow for their app. For -example, some developers will utilize an API for authentication, some will use -OAuth, and some may just use their own simple database. - -For those using pre-built libraries, authentication may simply be a problem of -copying and pasting the code from their library's documentation. For example, -here's the code I use to authenticate users with the Tumblr OAuth API for my -Tumblr client, Vox Populi: - -#+begin_src php ++++ +date = 2020-08-29 +title = "PHP Authentication Flow" +description = "" +draft = false ++++ + +# Introduction + +When creating websites that will allow users to create accounts, the +developer always needs to consider the proper authentication flow for +their app. For example, some developers will utilize an API for +authentication, some will use OAuth, and some may just use their own +simple database. + +For those using pre-built libraries, authentication may simply be a +problem of copying and pasting the code from their library\'s +documentation. For example, here\'s the code I use to authenticate users +with the Tumblr OAuth API for my Tumblr client, Vox Populi: + +``` php // Start the session session_start(); @@ -35,26 +39,28 @@ $client = new Tumblr\API\Client( $token, $token_secret ); -#+end_src +``` -However, developers creating authentication flows from scratch will need to -think carefully about when to make sure a web page will check the user's -authenticity. +However, developers creating authentication flows from scratch will need +to think carefully about when to make sure a web page will check the +user\'s authenticity. -In this article, we're going to look at a simple authentication flow using a -MySQL database and PHP. +In this article, we\'re going to look at a simple authentication flow +using a MySQL database and PHP. -* Creating User Accounts -The beginning to any type of user authentication is to create a user account. -This process can take many formats, but the simplest is to accept user input -from a form (e.g., username and password) and send it over to your database. For -example, here's a snippet that shows how to get username and password parameters -that would come when a user submits a form to your PHP script. +# Creating User Accounts -*Note*: Ensure that your password column is large enough to hold the hashed -value (at least 60 characters or longer). +The beginning to any type of user authentication is to create a user +account. This process can take many formats, but the simplest is to +accept user input from a form (e.g., username and password) and send it +over to your database. For example, here\'s a snippet that shows how to +get username and password parameters that would come when a user submits +a form to your PHP script. -#+begin_src php +**Note**: Ensure that your password column is large enough to hold the +hashed value (at least 60 characters or longer). + +``` php // Get the values from the URL $username = $_POST['username']; $raw_password = $_POST['password']; @@ -87,14 +93,15 @@ if ($conn->query($sql) === TRUE) { } $conn->close(); -#+end_src +``` + +## Validate Returning Users -** Validate Returning Users -To be able to verify that a returning user has a valid username and password in -your database is as simple as having users fill out a form and comparing their -inputs to your database. +To be able to verify that a returning user has a valid username and +password in your database is as simple as having users fill out a form +and comparing their inputs to your database. -#+begin_src php +``` php // Query the database for username and password // ... @@ -105,39 +112,42 @@ if(password_verify($password_input, $hashed_password)) { // Else, Redirect them back to the login page. ... -#+end_src +``` + +# Storing Authentication State -* Storing Authentication State -Once you've created the user's account, now you're ready to initialize the -user's session. *You will need to do this on every page you load while the user -is logged in.** To do so, simply enter the following code snippet: +Once you\'ve created the user\'s account, now you\'re ready to +initialize the user\'s session. **You will need to do this on every page +you load while the user is logged in.\*** To do so, simply enter the +following code snippet: -#+begin_src php +``` php session_start(); -#+end_src +``` -Once you've initialized the session, the next step is to store the session in a -cookie so that you can access it later. +Once you\'ve initialized the session, the next step is to store the +session in a cookie so that you can access it later. -#+begin_src php +``` php setcookie(session_name()); -#+end_src +``` -Now that the session name has been stored, you'll be able to check if there's an -active session whenever you load a page. +Now that the session name has been stored, you\'ll be able to check if +there\'s an active session whenever you load a page. -#+begin_src php +``` php if(isset(session_name())) { // The session is active } -#+end_src +``` -** Removing User Authentication -The next logical step is to give your users the option to log out once they are -done using your application. This can be tricky in PHP since a few of the -standard ways do not always work. +## Removing User Authentication -#+begin_src php +The next logical step is to give your users the option to log out once +they are done using your application. This can be tricky in PHP since a +few of the standard ways do not always work. + +``` php // Initialize the session. // If you are using session_name("something"), don't forget it now! session_start(); @@ -169,13 +179,18 @@ session_write_close(); // Go back to sign-in page header('Location: https://example.com/logged-out/'); die(); -#+end_src +``` + +# Wrapping Up -* Wrapping Up -Now you should be ready to begin your authentication programming with PHP. You -can create user accounts, create sessions for users across different pages of -your site, and then destroy the user data when they're ready to leave. +Now you should be ready to begin your authentication programming with +PHP. You can create user accounts, create sessions for users across +different pages of your site, and then destroy the user data when +they\'re ready to leave. -For more information on this subject, I recommend reading the [[https://www.php.net/][PHP Documentation]]. -Specifically, you may want to look at [[https://www.php.net/manual/en/features.http-auth.php][HTTP Authentication with PHP]], [[https://www.php.net/manual/en/book.session.php][session -handling]], and [[https://www.php.net/manual/en/function.hash.php][hash]]. +For more information on this subject, I recommend reading the [PHP +Documentation](https://www.php.net/). Specifically, you may want to look +at [HTTP Authentication with +PHP](https://www.php.net/manual/en/features.http-auth.php), [session +handling](https://www.php.net/manual/en/book.session.php), and +[hash](https://www.php.net/manual/en/function.hash.php). diff --git a/content/blog/2020-09-01-visual-recognition.md b/content/blog/2020-09-01-visual-recognition.md new file mode 100644 index 0000000..8329a5a --- /dev/null +++ b/content/blog/2020-09-01-visual-recognition.md @@ -0,0 +1,205 @@ ++++ +date = 2020-09-01 +title = "IBM Watson Visual Recognition" +description = "" +draft = false ++++ + +# What is IBM Watson? + +If you\'ve never heard of [Watson](https://www.ibm.com/watson), this +service is a suite of enterprise-ready AI services, applications, and +tooling provided by IBM. Watson contains quite a few useful tools for +data scientists and students, including the subject of this post today: +visual recognition. + +If you\'d like to view the official documentation for the Visual +Recognition API, visit the [API +Docs](https://cloud.ibm.com/apidocs/visual-recognition/visual-recognition-v3?code=python). + +# Prerequisites + +To be able to use Watson Visual Recognition, you\'ll need the following: + +1. Create a free account on [IBM Watson + Studio](https://www.ibm.com/cloud/watson-studio). +2. Add the [Watson Visual + Recognition](https://www.ibm.com/cloud/watson-visual-recognition) + service to your IBM Watson account. +3. Get your API key and URL. To do this, first go to the [profile + dashboard](https://dataplatform.cloud.ibm.com/home2?context=cpdaas) + for your IBM account and click on the Watson Visual Recognition + service you created. This will be listed in the section titled + **Your services**. Then click the **Credentials\*** tab and open the + **Auto-generated credentials\*** dropdown. Copy your API key and URL + so that you can use them in the Python script later. +4. **\[Optional\]\*** While not required, you can also create the + Jupyter Notebook for this project right inside [Watson + Studio](https://www.ibm.com/cloud/watson-studio). Watson Studio will + save your notebooks inside an organized project and allow you to use + their other integrated products, such as storage containers, AI + models, documentation, external sharing, etc. + +# Calling the IBM Watson Visual Recognition API + +Okay, now let\'s get started. + +To begin, we need to install the proper Python package for IBM Watson. + +```sh +pip install --upgrade --user "ibm-watson>=4.5.0" +``` + +Next, we need to specify the API key, version, and URL given to us when +we created the Watson Visual Recognition service. + +``` python +apikey = "<your-apikey>" +version = "2018-03-19" +url = "<your-url>" +``` + +Now, let\'s import the necessary libraries and authenticate our service. + +``` python +import json +from ibm_watson import VisualRecognitionV3 +from ibm_cloud_sdk_core.authenticators import IAMAuthenticator + +authenticator = IAMAuthenticator(apikey) +visual_recognition = VisualRecognitionV3( + version=version, + authenticator=authenticator +) + +visual_recognition.set_service_url(url) +``` + +**\[Optional\]** If you\'d like to tell the API not to use any data to +improve their products, set the following header. + +``` python +visual_recognition.set_default_headers({'x-watson-learning-opt-out': "true"}) +``` + +Now we have our API all set and ready to go. For this example, I\'m +going to include a `dict` of photos to load as we test out +the API. + +``` python +data = [ + { + "title": "Grizzly Bear", + "url": "https://example.com/photos/image1.jpg" + }, + { + "title": "Nature Lake", + "url": "https://example.com/photos/image2.jpg" + }, + { + "title": "Welcome Sign", + "url": "https://example.com/photos/image3.jpg" + }, + { + "title": "Honey Badger", + "url": "https://example.com/photos/image4.jpg" + }, + { + "title": "Grand Canyon Lizard", + "url": "https://example.com/photos/image5.jpg" + }, + { + "title": "Castle", + "url": "https://example.com/photos/image6.jpg" + } +] +``` + +Now that we\'ve set up our libraries and have the photos ready, let\'s +create a loop to call the API for each image. The code below shows a +loop that calls the URL of each image and sends it to the API, +requesting results with at least 60% confidence. The results are output +to the console with dotted lines separating each section. + +In the case of an API error, the codes and explanations are output to +the console. + +``` python +from ibm_watson import ApiException + +for x in range(len(data)): +try: + url = data[x]["url"] + images_filename = data[x]["title"] + classes = visual_recognition.classify( + url=url, + images_filename=images_filename, + threshold='0.6', + owners=["IBM"]).get_result() + print("-----------------------------------------------") + print("Image Title: ", data[x]["title"], "\n") + print("Image URL: ", data[x]["url"], "\n") + classification_results = classes["images"][0]["classifiers"][0]["classes"] + for result in classification_results: + print(result["class"], "(", result["score"], ")") + print("-----------------------------------------------") +except ApiException as ex: + print("Method failed with status code " + str(ex.code) + ": " + ex.message) +``` + +# The Results + +Here we can see the full result set of our function above. If you view +each of the URLs that we sent to the API, you\'ll be able to see that it +was remarkably accurate. To be fair, these are clear high-resolution, +clear photos shot with a professional camera. In reality, you will most +likely be processing images that are lower quality and may have a lot of +noise in the photo. + +However, we can clearly see the benefit of being able to call this API +instead of attempting to write our own image recognition function. Each +of the classifications returned was a fair description of the image. + +If you wanted to restrict the results to those that are at least 90% +confident or greater, you would simply adjust the `threshold` +in the `visual_recognition.classify()` function. + +When your program runs, it should show the output below for each photo +you provide. + +``` txt +---------------------------------------------------------------- +Image Title: Grizzly Bear +Image URL: https://example.com/photos/image1.jpg + +brown bear ( 0.944 ) +bear ( 1 ) +carnivore ( 1 ) +mammal ( 1 ) +animal ( 1 ) +Alaskan brown bear ( 0.759 ) +greenishness color ( 0.975 ) +---------------------------------------------------------------- +``` + +# Discussion + +Now, this was a very minimal implementation of the API. We simply +supplied some images and looked to see how accurate the results were. +However, you could implement this type of API into many machine learning +(ML) models. + +For example, you could be working for a company that scans their +warehouses or inventory using drones. Would you want to pay employees to +sit there and watch drone footage all day in order to identify or count +things in the video? Probably not. Instead, you could use a +classification system similar to this one in order to train your machine +learning model to correctly identify items that the drones show through +video. More specifically, you could have your machine learning model +watch a drone fly over a field of sheep in order to count how many sheep +are living in that field. + +There are many ways to implement machine learning functionality, but +hopefully this post helped inspire some deeper thought about the tools +that can help propel us further into the future of machine learning and +AI. diff --git a/content/blog/2020-09-01-visual-recognition.org b/content/blog/2020-09-01-visual-recognition.org deleted file mode 100644 index 1e0f3b5..0000000 --- a/content/blog/2020-09-01-visual-recognition.org +++ /dev/null @@ -1,186 +0,0 @@ -#+title: IBM Watson Visual Recognition -#+date: 2020-09-01 -#+description: Exploring and visualizing data with Python. -#+filetags: :dev: - -* What is IBM Watson? -If you've never heard of [[https://www.ibm.com/watson][Watson]], this service is a suite of enterprise-ready AI -services, applications, and tooling provided by IBM. Watson contains quite a few -useful tools for data scientists and students, including the subject of this -post today: visual recognition. - -If you'd like to view the official documentation for the Visual Recognition API, -visit the [[https://cloud.ibm.com/apidocs/visual-recognition/visual-recognition-v3?code=python][API Docs]]. - -* Prerequisites -To be able to use Watson Visual Recognition, you'll need the following: - -1. Create a free account on [[https://www.ibm.com/cloud/watson-studio][IBM Watson Studio]]. -2. Add the [[https://www.ibm.com/cloud/watson-visual-recognition][Watson Visual Recognition]] service to your IBM Watson account. -3. Get your API key and URL. To do this, first go to the [[https://dataplatform.cloud.ibm.com/home2?context=cpdaas][profile dashboard]] for - your IBM account and click on the Watson Visual Recognition service you - created. This will be listed in the section titled *Your services*. Then - click the *Credentials** tab and open the *Auto-generated credentials** - dropdown. Copy your API key and URL so that you can use them in the Python - script later. -4. *[Optional]** While not required, you can also create the Jupyter Notebook - for this project right inside [[https://www.ibm.com/cloud/watson-studio][Watson Studio]]. Watson Studio will save your - notebooks inside an organized project and allow you to use their other - integrated products, such as storage containers, AI models, documentation, - external sharing, etc. - -* Calling the IBM Watson Visual Recognition API -Okay, now let's get started. - -To begin, we need to install the proper Python package for IBM Watson. - -#+begin_src sh -pip install --upgrade --user "ibm-watson>=4.5.0" -#+end_src - -Next, we need to specify the API key, version, and URL given to us when we -created the Watson Visual Recognition service. - -#+begin_src python -apikey = "<your-apikey>" -version = "2018-03-19" -url = "<your-url>" -#+end_src - -Now, let's import the necessary libraries and authenticate our service. - -#+begin_src python -import json -from ibm_watson import VisualRecognitionV3 -from ibm_cloud_sdk_core.authenticators import IAMAuthenticator - -authenticator = IAMAuthenticator(apikey) -visual_recognition = VisualRecognitionV3( - version=version, - authenticator=authenticator -) - -visual_recognition.set_service_url(url) -#+end_src - -*[Optional]* If you'd like to tell the API not to use any data to improve their -products, set the following header. - -#+begin_src python -visual_recognition.set_default_headers({'x-watson-learning-opt-out': "true"}) -#+end_src - -Now we have our API all set and ready to go. For this example, I'm going to -include a =dict= of photos to load as we test out the API. - -#+begin_src python -data = [ - { - "title": "Grizzly Bear", - "url": "https://example.com/photos/image1.jpg" - }, - { - "title": "Nature Lake", - "url": "https://example.com/photos/image2.jpg" - }, - { - "title": "Welcome Sign", - "url": "https://example.com/photos/image3.jpg" - }, - { - "title": "Honey Badger", - "url": "https://example.com/photos/image4.jpg" - }, - { - "title": "Grand Canyon Lizard", - "url": "https://example.com/photos/image5.jpg" - }, - { - "title": "Castle", - "url": "https://example.com/photos/image6.jpg" - } -] -#+end_src - -Now that we've set up our libraries and have the photos ready, let's create a -loop to call the API for each image. The code below shows a loop that calls the -URL of each image and sends it to the API, requesting results with at least 60% -confidence. The results are output to the console with dotted lines separating -each section. - -In the case of an API error, the codes and explanations are output to the -console. - -#+begin_src python -from ibm_watson import ApiException - -for x in range(len(data)): -try: - url = data[x]["url"] - images_filename = data[x]["title"] - classes = visual_recognition.classify( - url=url, - images_filename=images_filename, - threshold='0.6', - owners=["IBM"]).get_result() - print("-----------------------------------------------") - print("Image Title: ", data[x]["title"], "\n") - print("Image URL: ", data[x]["url"], "\n") - classification_results = classes["images"][0]["classifiers"][0]["classes"] - for result in classification_results: - print(result["class"], "(", result["score"], ")") - print("-----------------------------------------------") -except ApiException as ex: - print("Method failed with status code " + str(ex.code) + ": " + ex.message) -#+end_src - -* The Results -Here we can see the full result set of our function above. If you view each of -the URLs that we sent to the API, you'll be able to see that it was remarkably -accurate. To be fair, these are clear high-resolution, clear photos shot with a -professional camera. In reality, you will most likely be processing images that -are lower quality and may have a lot of noise in the photo. - -However, we can clearly see the benefit of being able to call this API instead -of attempting to write our own image recognition function. Each of the -classifications returned was a fair description of the image. - -If you wanted to restrict the results to those that are at least 90% confident -or greater, you would simply adjust the =threshold= in the -=visual_recognition.classify()= function. - -When your program runs, it should show the output below for each photo you -provide. - -#+begin_src txt ----------------------------------------------------------------- -Image Title: Grizzly Bear -Image URL: https://example.com/photos/image1.jpg - -brown bear ( 0.944 ) -bear ( 1 ) -carnivore ( 1 ) -mammal ( 1 ) -animal ( 1 ) -Alaskan brown bear ( 0.759 ) -greenishness color ( 0.975 ) ----------------------------------------------------------------- -#+end_src - -* Discussion -Now, this was a very minimal implementation of the API. We simply supplied some -images and looked to see how accurate the results were. However, you could -implement this type of API into many machine learning (ML) models. - -For example, you could be working for a company that scans their warehouses or -inventory using drones. Would you want to pay employees to sit there and watch -drone footage all day in order to identify or count things in the video? -Probably not. Instead, you could use a classification system similar to this one -in order to train your machine learning model to correctly identify items that -the drones show through video. More specifically, you could have your machine -learning model watch a drone fly over a field of sheep in order to count how -many sheep are living in that field. - -There are many ways to implement machine learning functionality, but hopefully -this post helped inspire some deeper thought about the tools that can help -propel us further into the future of machine learning and AI. diff --git a/content/blog/2020-09-22-internal-audit.md b/content/blog/2020-09-22-internal-audit.md new file mode 100644 index 0000000..b700062 --- /dev/null +++ b/content/blog/2020-09-22-internal-audit.md @@ -0,0 +1,264 @@ ++++ +date = 2020-09-22 +title = "Who is Internal Audit?" +description = "" +draft = false ++++ + + + +# Definitions + +One of the many reasons that Internal Audit needs such thorough +explaining to non-auditors is that Internal Audit can serve many +purposes, depending on the organization\'s size and needs. However, the +Institute of Internal Auditors (IIA) defines Internal Auditing as: + +> Internal auditing is an independent, objective assurance and +> consulting activity designed to add value and improve an +> organization\'s operations. It helps an organization accomplish its +> objectives by bringing a systematic, disciplined approach to evaluate +> and improve the effectiveness of risk management, control, and +> governance processes. + +However, this definition uses quite a few terms that aren\'t clear +unless the reader already has a solid understanding of the auditing +profession. To further explain, the following is a list of definitions +that can help supplement understanding of internal auditing. + +## Independent + +Independence is the freedom from conditions that threaten the ability of +the internal audit activity to carry out internal audit responsibilities +in an unbiased manner. To achieve the degree of independence necessary +to effectively carry out the responsibilities of the internal audit +activity, the chief audit executive has direct and unrestricted access +to senior management and the board. This can be achieved through a +dual-reporting relationship. Threats to independence must be managed at +the individual auditor, engagement, functional, and organizational +levels. + +## Objective + +Objectivity is an unbiased mental attitude that allows internal auditors +to perform engagements in such a manner that they believe in their work +product and that no quality compromises are made. Objectivity requires +that internal auditors do not subordinate their judgment on audit +matters to others. Threats to objectivity must be managed at the +individual auditor, engagement, functional, and organizational levels. + +## Assurance + +Assurance services involve the internal auditor\'s objective assessment +of evidence to provide opinions or conclusions regarding an entity, +operation, function, process, system, or other subject matters. The +internal auditor determines the nature and scope of an assurance +engagement. Generally, three parties are participants in assurance +services: (1) the person or group directly involved with the entity, +operation, function, process, system, or other subject - (the process +owner), (2) the person or group making the assessment - (the internal +auditor), and (3) the person or group using the assessment - (the user). + +## Consulting + +Consulting services are advisory in nature and are generally performed +at the specific request of an engagement client. The nature and scope of +the consulting engagement are subject to agreement with the engagement +client. Consulting services generally involve two parties: (1) the +person or group offering the advice (the internal auditor), and (2) the +person or group seeking and receiving the advice (the engagement +client). When performing consulting services, the internal auditor +should maintain objectivity and not assume management responsibility. + +## Governance, Risk Management, & Compliance (GRC) + +The integrated collection of capabilities that enable an organization to +reliably achieve objectives, address uncertainty and act with integrity. + +# Audit Charter & Standards + +First, it\'s important to note that not every organization needs +internal auditors. In fact, it\'s unwise for an organization to hire +internal auditors unless they have regulatory requirements for auditing +and have the capital to support the department. Internal audit is a cost +center that can only affect revenue indirectly. + +Once an organization determines the need for internal assurance +services, they will hire a Chief Audit Executive and create the audit +charter. This charter is a document, approved by the company\'s +governing body, that will define internal audit\'s purpose, authority, +responsibility, and position within the organization. Fortunately, the +IIA has model charters available to IIA members for those developing or +improving their charter. + +Beyond the charter and organizational documents, internal auditors +follow a few different standards in order to perform their job. First is +the International Professional Practices Framework (IPPF) by the IIA, +which is the model of standards for internal auditing. In addition, +ISACA\'s Information Technology Assurance Framework (ITAF) helps guide +auditors in reference to information technology (IT) compliance and +assurance. Finally, additional standards such as FASB, GAAP, and +industry-specific standards are used when performing internal audit +work. + +# Three Lines of Defense + +[The IIA](https://theiia.org) released the original Three Lines of +Defense model in 2013, but have released an updated version in 2020. +Here is what the Three Lines of Defense model has historically looked +like: + +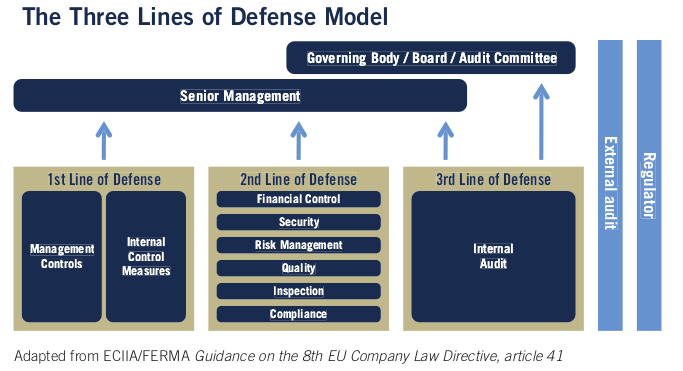 + +I won\'t go into depth about the changes made to the model in this +article. Instead, let\'s take a look at the most current model. + +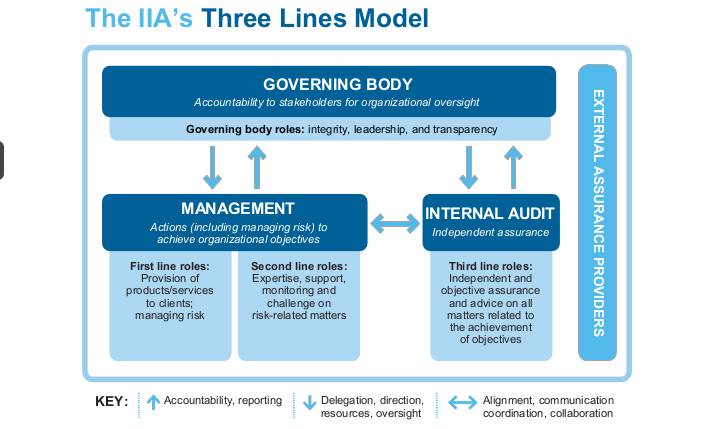 + +The updated model forgets the strict idea of areas performing their own +functions or line of defense. Instead of talking about management, risk, +and internal audit as 1-2-3, the new model creates a more fluid and +cooperative model. + +Looking at this model from an auditing perspective shows us that +auditors will need to align, communicate, and collaborate with +management, including business area managers and chief officers, as well +as reporting to the governing body. The governing body will instruct +internal audit *functionally* on their goals and track their progress +periodically. + +However, the internal audit department will report *administratively* to +a chief officer in the company for the purposes of collaboration, +direction, and assistance with the business. Note that in most +situations, the governing body is the audit committee on the company\'s +board of directors. + +The result of this structure is that internal audit is an independent +and objective function that can provide assurance over the topics they +audit. + +# Audit Process + +A normal audit will generally follow the same process, regardless of the +topic. However, certain special projects or abnormal business areas may +call for changes to the audit process. The audit process is not set in +stone, it\'s simply a set of best practices so that audits can be +performed consistently. + + + +While different organizations may tweak the process, it will generally +follow this flow: + +## 1. Risk Assessment + +The risk assessment part of the process has historically been performed +annually, but many organizations have moved to performing this process +much more frequently. In fact, some organizations are moving to an agile +approach that can take new risks into the risk assessment and +re-prioritize risk areas on-the-go. To perform a risk assessment, +leaders in internal audit will research industry risks, consult with +business leaders around the company, and perform analyses on company +data. + +Once a risk assessment has been documented, the audit department has a +prioritized list of risks that can be audited. This is usually in the +form of auditable entities, such as business areas or departments. + +## 2. Planning + +During the planning phase of an audit, auditors will meet with the +business area to discuss the various processes, controls, and risks +applicable to the business. This helps the auditors determine the scope +limits for the audit, as well as timing and subject-matter experts. +Certain documents will be created in this phase that will be used to +keep the audit on-track an in-scope as it goes forward. + +## 3. Testing + +The testing phase, also known as fieldwork or execution, is where +internal auditors will take the information they\'ve discovered and test +it against regulations, industry standards, company rules, best +practices, as well as validating that any processes are complete and +accurate. For example, an audit of HR would most likely examine +processes such as employee on-boarding, employee termination, security +of personally identifiable information (PII), or the IT systems involved +in these processes. Company standards would be examined and compared +against how the processes are actually being performed day-to-day, as +well as compared against regulations such as the Equal Employment +Opportunity (EEO), American with Disabilities Act, and National Labor +Relations Act. + +## 4. Reporting + +Once all the tests have been completed, the audit will enter the +reporting phase. This is when the audit team will conclude on the +evidence they\'ve collected, interviews they\'ve held, and any opinions +they\'ve formed on the controls in place. A summary of the audit +findings, conclusions, and specific recommendations are officially +communicated to the client through a draft report. Clients have the +opportunity to respond to the report and submit an action plan and time +frame. These responses become part of the final report which is +distributed to the appropriate level of administration. + +## 5. Follow-Up + +After audits have been completed and management has formed action plans +and time frames for audit issues, internal audit will follow up once +that due date has arrived. In most cases, the follow-up will simply +consist of a meeting to discuss how the action plan has been completed +and to request documentation to prove it. + +# Audit Department Structure + +While an internal audit department is most often thought of as a team of +full-time employees, there are actually many different ways in which a +department can be structured. As the world becomes more digital and +fast-paced, outsourcing has become a more attractive option for some +organizations. Internal audit can be fully outsourced or partially +outsourced, allowing for flexibility in cases where turnover is high. + +In addition, departments can implement a rotational model. This allows +for interested employees around the organization to rotate into the +internal audit department for a period of time, allowing them to obtain +knowledge of risks and controls and allowing the internal audit team to +obtain more business area knowledge. This program is popular in very +large organizations, but organizations tend to rotate lower-level audit +staff instead of managers. This helps prevent any significant knowledge +loss as auditors rotate out to business areas. + +# Consulting + +Consulting is not an easy task at any organization, especially for a +department that can have negative perceptions within the organization as +the \"compliance police.\" However, once an internal audit department +has delivered value to organization, adding consulting to their suite of +services is a smart move. In most cases, Internal Audit can insert +themselves into a consulting role without affecting the process of +project management at the company. This means that internal audit can +add objective assurance and opinions to business areas as they develop +new processes, instead of coming in periodically to audit an area and +file issues that could have been fixed at the beginning. + +# Data Science & Data Analytics + +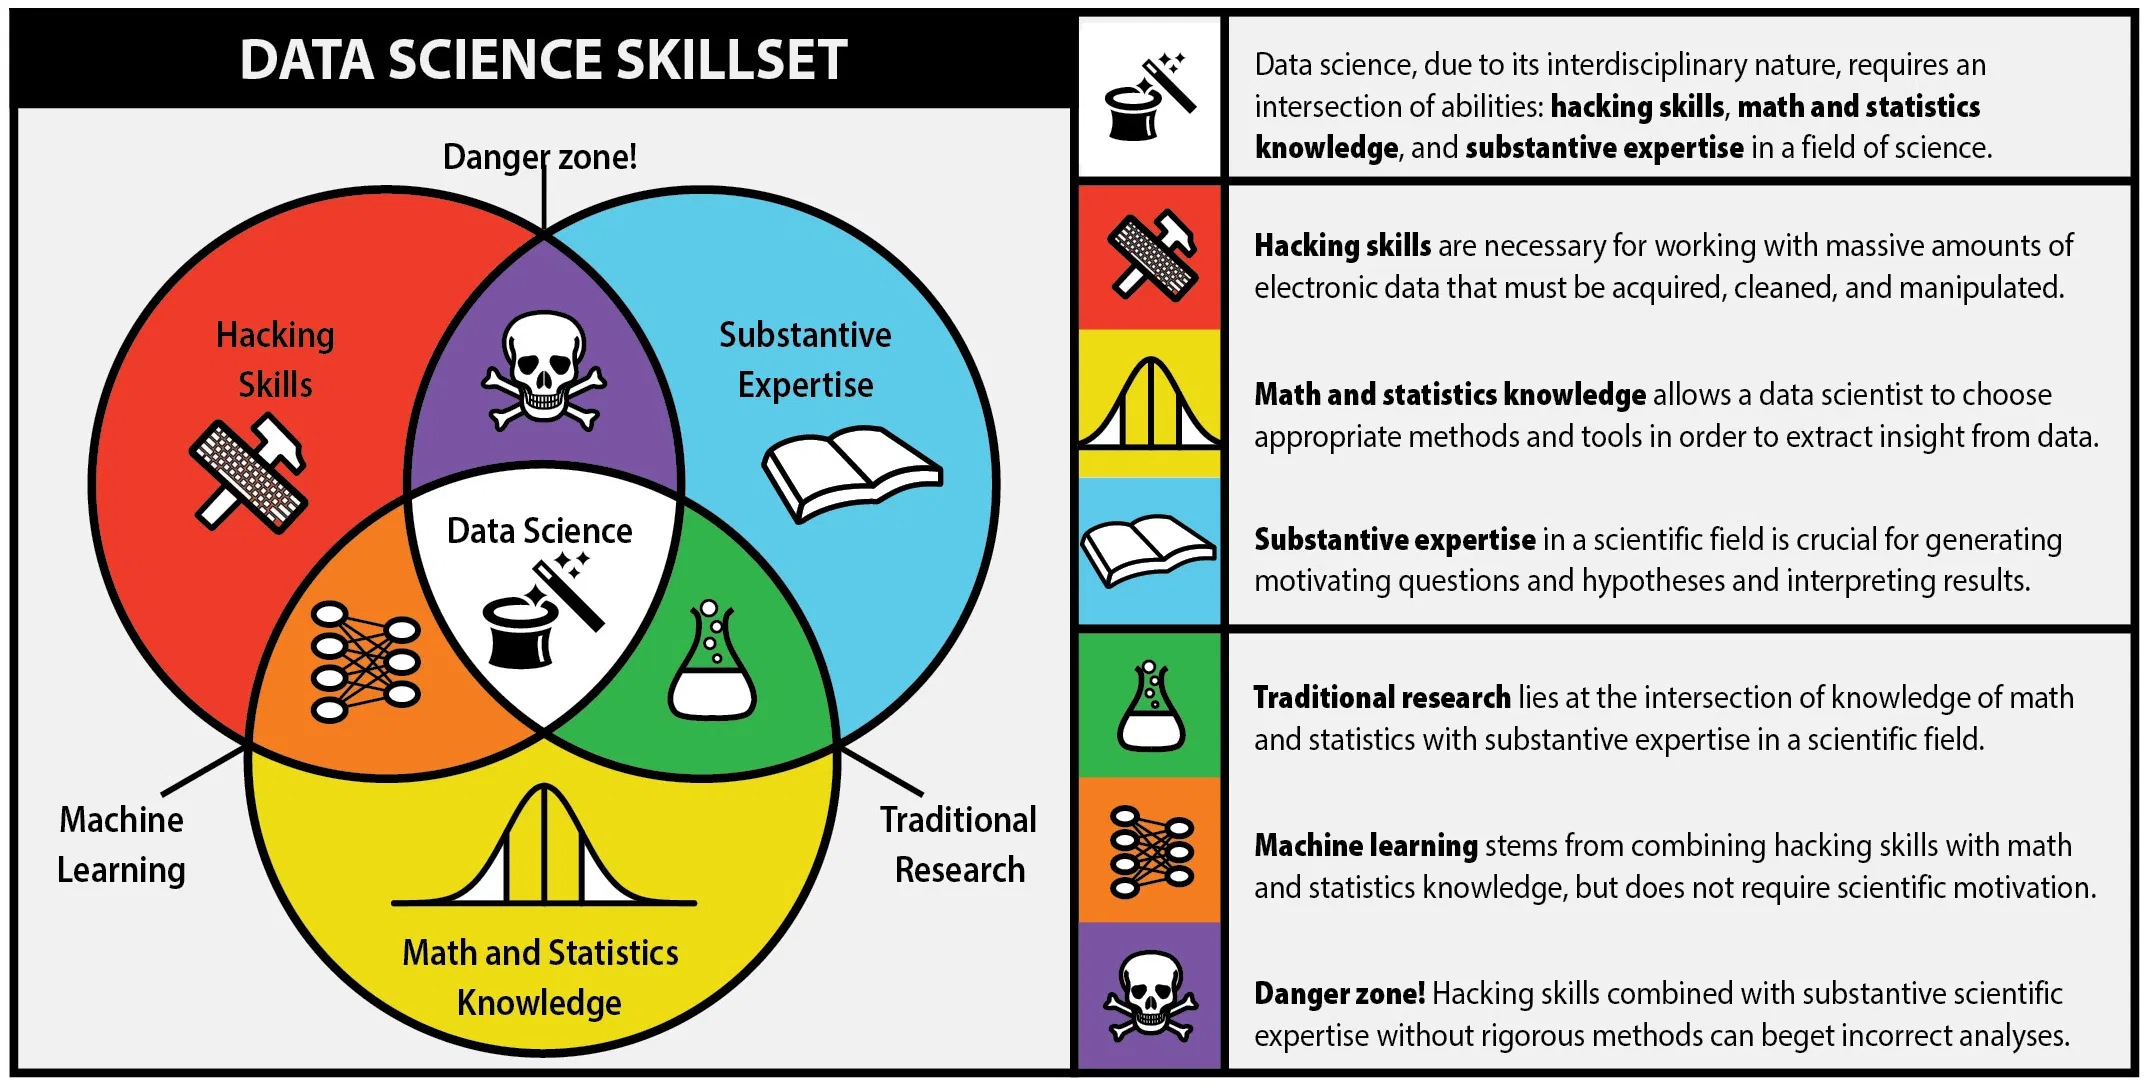 + +One major piece of the internal audit function in the modern world is +data science. While the process is data science, most auditors will +refer to anything in this realm as data analytics. Hot topics such as +robotic process automation (RPA), machine learning (ML), and data mining +have taken over the auditing world in recent years. These technologies +have been immensely helpful with increasing the effectiveness and +efficiency of auditors. + +For example, mundane and repetitive tasks can be automated in order for +auditors to make more room in their schedules for labor-intensive work. +Further, auditors will need to adapt technologies like machine learning +in order to extract more value from the data they\'re using to form +conclusions. diff --git a/content/blog/2020-09-22-internal-audit.org b/content/blog/2020-09-22-internal-audit.org deleted file mode 100644 index b90b461..0000000 --- a/content/blog/2020-09-22-internal-audit.org +++ /dev/null @@ -1,232 +0,0 @@ -#+title: What is Internal Audit? -#+date: 2020-09-22 -#+description: Learn about the Internal Audit function and their purpose. -#+filetags: :audit: - -#+caption: Internal Audit Overview -[[https://img.cleberg.net/blog/20200922-what-is-internal-audit/internal-audit-overview.jpg]] - -* Definitions -One of the many reasons that Internal Audit needs such thorough explaining to -non-auditors is that Internal Audit can serve many purposes, depending on the -organization's size and needs. However, the Institute of Internal Auditors (IIA) -defines Internal Auditing as: - -#+begin_quote -Internal auditing is an independent, objective assurance and consulting activity -designed to add value and improve an organization's operations. It helps an -organization accomplish its objectives by bringing a systematic, disciplined -approach to evaluate and improve the effectiveness of risk management, control, -and governance processes. - -#+end_quote - -However, this definition uses quite a few terms that aren't clear unless the -reader already has a solid understanding of the auditing profession. To further -explain, the following is a list of definitions that can help supplement -understanding of internal auditing. - -** Independent -Independence is the freedom from conditions that threaten the ability of the -internal audit activity to carry out internal audit responsibilities in an -unbiased manner. To achieve the degree of independence necessary to effectively -carry out the responsibilities of the internal audit activity, the chief audit -executive has direct and unrestricted access to senior management and the board. -This can be achieved through a dual-reporting relationship. Threats to -independence must be managed at the individual auditor, engagement, functional, -and organizational levels. - -** Objective -Objectivity is an unbiased mental attitude that allows internal auditors to -perform engagements in such a manner that they believe in their work product and -that no quality compromises are made. Objectivity requires that internal -auditors do not subordinate their judgment on audit matters to others. Threats -to objectivity must be managed at the individual auditor, engagement, -functional, and organizational levels. - -** Assurance -Assurance services involve the internal auditor's objective assessment of -evidence to provide opinions or conclusions regarding an entity, operation, -function, process, system, or other subject matters. The internal auditor -determines the nature and scope of an assurance engagement. Generally, three -parties are participants in assurance services: (1) the person or group directly -involved with the entity, operation, function, process, system, or other -subject - (the process owner), (2) the person or group making the assessment - -(the internal auditor), and (3) the person or group using the assessment - (the -user). - -** Consulting -Consulting services are advisory in nature and are generally performed at the -specific request of an engagement client. The nature and scope of the consulting -engagement are subject to agreement with the engagement client. Consulting -services generally involve two parties: (1) the person or group offering the -advice (the internal auditor), and (2) the person or group seeking and receiving -the advice (the engagement client). When performing consulting services, the -internal auditor should maintain objectivity and not assume management -responsibility. - -** Governance, Risk Management, & Compliance (GRC) -The integrated collection of capabilities that enable an organization to -reliably achieve objectives, address uncertainty and act with integrity. - -* Audit Charter & Standards -First, it's important to note that not every organization needs internal -auditors. In fact, it's unwise for an organization to hire internal auditors -unless they have regulatory requirements for auditing and have the capital to -support the department. Internal audit is a cost center that can only affect -revenue indirectly. - -Once an organization determines the need for internal assurance services, they -will hire a Chief Audit Executive and create the audit charter. This charter is -a document, approved by the company's governing body, that will define internal -audit's purpose, authority, responsibility, and position within the -organization. Fortunately, the IIA has model charters available to IIA members -for those developing or improving their charter. - -Beyond the charter and organizational documents, internal auditors follow a few -different standards in order to perform their job. First is the International -Professional Practices Framework (IPPF) by the IIA, which is the model of -standards for internal auditing. In addition, ISACA's Information Technology -Assurance Framework (ITAF) helps guide auditors in reference to information -technology (IT) compliance and assurance. Finally, additional standards such as -FASB, GAAP, and industry-specific standards are used when performing internal -audit work. - -* Three Lines of Defense -[[https://theiia.org][The IIA]] released the original Three Lines of Defense model in 2013, but have -released an updated version in 2020. Here is what the Three Lines of Defense -model has historically looked like: - -#+caption: 2013 Three Lines of Defense Model -[[https://img.cleberg.net/blog/20200922-what-is-internal-audit/three_lines_model.png]] - -I won't go into depth about the changes made to the model in this article. -Instead, let's take a look at the most current model. - -#+caption: 2020 Three Lines of Defense Model -[[https://img.cleberg.net/blog/20200922-what-is-internal-audit/updated_three_lines_model.png]] - -The updated model forgets the strict idea of areas performing their own -functions or line of defense. Instead of talking about management, risk, and -internal audit as 1-2-3, the new model creates a more fluid and cooperative -model. - -Looking at this model from an auditing perspective shows us that auditors will -need to align, communicate, and collaborate with management, including business -area managers and chief officers, as well as reporting to the governing body. -The governing body will instruct internal audit /functionally/ on their goals -and track their progress periodically. - -However, the internal audit department will report /administratively/ to a chief -officer in the company for the purposes of collaboration, direction, and -assistance with the business. Note that in most situations, the governing body -is the audit committee on the company's board of directors. - -The result of this structure is that internal audit is an independent and -objective function that can provide assurance over the topics they audit. - -* Audit Process -A normal audit will generally follow the same process, regardless of the topic. -However, certain special projects or abnormal business areas may call for -changes to the audit process. The audit process is not set in stone, it's simply -a set of best practices so that audits can be performed consistently. - -#+caption: The Internal Audit Process -[[https://img.cleberg.net/blog/20200922-what-is-internal-audit/internal-audit-process.jpg]] - -While different organizations may tweak the process, it will generally follow -this flow: - -** 1. Risk Assessment -The risk assessment part of the process has historically been performed -annually, but many organizations have moved to performing this process much more -frequently. In fact, some organizations are moving to an agile approach that can -take new risks into the risk assessment and re-prioritize risk areas on-the-go. -To perform a risk assessment, leaders in internal audit will research industry -risks, consult with business leaders around the company, and perform analyses on -company data. - -Once a risk assessment has been documented, the audit department has a -prioritized list of risks that can be audited. This is usually in the form of -auditable entities, such as business areas or departments. - -** 2. Planning -During the planning phase of an audit, auditors will meet with the business area -to discuss the various processes, controls, and risks applicable to the -business. This helps the auditors determine the scope limits for the audit, as -well as timing and subject-matter experts. Certain documents will be created in -this phase that will be used to keep the audit on-track an in-scope as it goes -forward. - -** 3. Testing -The testing phase, also known as fieldwork or execution, is where internal -auditors will take the information they've discovered and test it against -regulations, industry standards, company rules, best practices, as well as -validating that any processes are complete and accurate. For example, an audit -of HR would most likely examine processes such as employee on-boarding, employee -termination, security of personally identifiable information (PII), or the IT -systems involved in these processes. Company standards would be examined and -compared against how the processes are actually being performed day-to-day, as -well as compared against regulations such as the Equal Employment Opportunity -(EEO), American with Disabilities Act, and National Labor Relations Act. - -** 4. Reporting -Once all the tests have been completed, the audit will enter the reporting -phase. This is when the audit team will conclude on the evidence they've -collected, interviews they've held, and any opinions they've formed on the -controls in place. A summary of the audit findings, conclusions, and specific -recommendations are officially communicated to the client through a draft -report. Clients have the opportunity to respond to the report and submit an -action plan and time frame. These responses become part of the final report -which is distributed to the appropriate level of administration. - -** 5. Follow-Up -After audits have been completed and management has formed action plans and time -frames for audit issues, internal audit will follow up once that due date has -arrived. In most cases, the follow-up will simply consist of a meeting to -discuss how the action plan has been completed and to request documentation to -prove it. - -* Audit Department Structure -While an internal audit department is most often thought of as a team of -full-time employees, there are actually many different ways in which a -department can be structured. As the world becomes more digital and fast-paced, -outsourcing has become a more attractive option for some organizations. Internal -audit can be fully outsourced or partially outsourced, allowing for flexibility -in cases where turnover is high. - -In addition, departments can implement a rotational model. This allows for -interested employees around the organization to rotate into the internal audit -department for a period of time, allowing them to obtain knowledge of risks and -controls and allowing the internal audit team to obtain more business area -knowledge. This program is popular in very large organizations, but -organizations tend to rotate lower-level audit staff instead of managers. This -helps prevent any significant knowledge loss as auditors rotate out to business -areas. - -* Consulting -Consulting is not an easy task at any organization, especially for a department -that can have negative perceptions within the organization as the "compliance -police." However, once an internal audit department has delivered value to -organization, adding consulting to their suite of services is a smart move. In -most cases, Internal Audit can insert themselves into a consulting role without -affecting the process of project management at the company. This means that -internal audit can add objective assurance and opinions to business areas as -they develop new processes, instead of coming in periodically to audit an area -and file issues that could have been fixed at the beginning. - -* Data Science & Data Analytics -#+caption: Data Science Skill Set -[[https://img.cleberg.net/blog/20200922-what-is-internal-audit/data-science-skillset.png]] - -One major piece of the internal audit function in the modern world is data -science. While the process is data science, most auditors will refer to anything -in this realm as data analytics. Hot topics such as robotic process automation -(RPA), machine learning (ML), and data mining have taken over the auditing world -in recent years. These technologies have been immensely helpful with increasing -the effectiveness and efficiency of auditors. - -For example, mundane and repetitive tasks can be automated in order for auditors -to make more room in their schedules for labor-intensive work. Further, auditors -will need to adapt technologies like machine learning in order to extract more -value from the data they're using to form conclusions. diff --git a/content/blog/2020-09-25-happiness-map.org b/content/blog/2020-09-25-happiness-map.md index 1f2b56f..a9ba336 100644 --- a/content/blog/2020-09-25-happiness-map.org +++ b/content/blog/2020-09-25-happiness-map.md @@ -1,86 +1,95 @@ -#+title: Data Visualization: World Choropleth Map of Happiness -#+date: 2020-09-25 -#+description: Exploring and visualizing data with Python. -#+filetags: :data: ++++ +date = 2020-09-25 +title = "Data Visualization: World Choropleth Map of Happiness" +description = "" +draft = false ++++ -* Background Information -The dataset (obtained from [[https://www.kaggle.com/unsdsn/world-happiness][Kaggle]]) used in this article contains a list of -countries around the world, their happiness rankings and scores, as well as -other national scoring measures. +# Background Information + +The dataset (obtained from +[Kaggle](https://www.kaggle.com/unsdsn/world-happiness)) used in this +article contains a list of countries around the world, their happiness +rankings and scores, as well as other national scoring measures. Fields include: -- Overall rank -- Country or region -- GDP per capita -- Social support -- Healthy life expectancy -- Freedom to make life choices -- Generosity -- Perceptions of corruption +- Overall rank +- Country or region +- GDP per capita +- Social support +- Healthy life expectancy +- Freedom to make life choices +- Generosity +- Perceptions of corruption + +There are 156 records. Since there are \~195 countries in the world, we +can see that around 40 countries will be missing from this dataset. -There are 156 records. Since there are ~195 countries in the world, we can see -that around 40 countries will be missing from this dataset. +# Install Packages -* Install Packages -As always, run the =install= command for all packages needed to perform -analysis. +As always, run the `install` command for all packages needed +to perform analysis. -#+begin_src python +``` python !pip install folium geopandas matplotlib numpy pandas -#+end_src +``` -* Import the Data -We only need a couple packages to create a choropleth map. We will use [[https://python-visualization.github.io/folium/][Folium]], -which provides map visualizations in Python. We will also use geopandas and -pandas to wrangle our data before we put it on a map. +# Import the Data -#+begin_src python +We only need a couple packages to create a choropleth map. We will use +[Folium](https://python-visualization.github.io/folium/), which provides +map visualizations in Python. We will also use geopandas and pandas to +wrangle our data before we put it on a map. + +``` python # Import the necessary Python packages import folium import geopandas as gpd import pandas as pd -#+end_src +``` -To get anything to show up on a map, we need a file that will specify the -boundaries of each country. Luckily, GeoJSON files exist (for free!) on the -internet. To get the boundaries of every country in the world, we will use the -GeoJSON link shown below. +To get anything to show up on a map, we need a file that will specify +the boundaries of each country. Luckily, GeoJSON files exist (for free!) +on the internet. To get the boundaries of every country in the world, we +will use the GeoJSON link shown below. -GeoPandas will take this data and load it into a dataframe so that we can easily -match it to the data we're trying to analyze. Let's look at the GeoJSON -dataframe: +GeoPandas will take this data and load it into a dataframe so that we +can easily match it to the data we\'re trying to analyze. Let\'s look at +the GeoJSON dataframe: -#+begin_src python +``` python # Load the GeoJSON data with geopandas geo_data = gpd.read_file('https://raw.githubusercontent.com/datasets/geo-countries/master/data/countries.geojson') geo_data.head() -#+end_src +``` -#+caption: GeoJSON Dataframe -[[https://img.cleberg.net/blog/20200925-world-choropleth-map/geojson_df.png]] +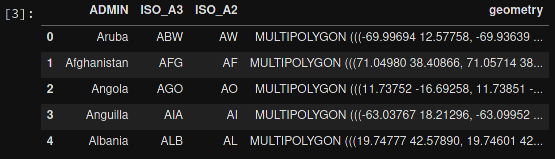 -Next, let's load the data from the Kaggle dataset. I've downloaded this file, so -update the file path if you have it somewhere else. After loading, let's take a -look at this dataframe: +Next, let\'s load the data from the Kaggle dataset. I\'ve downloaded +this file, so update the file path if you have it somewhere else. After +loading, let\'s take a look at this dataframe: -#+begin_src python +``` python # Load the world happiness data with pandas happy_data = pd.read_csv(r'~/Downloads/world_happiness_data_2019.csv') happy_data.head() -#+end_src +``` + + -#+caption: Happiness Dataframe -[[https://img.cleberg.net/blog/20200925-world-choropleth-map/happiness_df.png]] +# Clean the Data -* Clean the Data -Some countries need to be renamed, or they will be lost when you merge the -happiness and GeoJSON dataframes. This is something I discovered when the map -below showed empty countries. I searched both data frames for the missing -countries to see the naming differences. Any countries that do not have records -in the =happy_data= df will not show up on the map. +Some countries need to be renamed, or they will be lost when you merge +the happiness and GeoJSON dataframes. This is something I discovered +when the map below showed empty countries. I searched both data frames +for the missing countries to see the naming differences. Any countries +that do not have records in the `happy_data` df will not show +up on the map. -#+begin_src python +``` python # Rename some countries to match our GeoJSON data # Rename USA @@ -98,35 +107,38 @@ happy_data.at[republic_congo_index, 'Country or region'] = 'Republic of Congo' # Rename the DRC democratic_congo_index = happy_data.index[happy_data['Country or region'] == 'Congo (Kinshasa)'] happy_data.at[democratic_congo_index, 'Country or region'] = 'Democratic Republic of the Congo' -#+end_src +``` + +# Merge the Data -* Merge the Data Now that we have clean data, we need to merge the GeoJSON data with the -happiness data. Since we've stored them both in dataframes, we just need to call -the =.merge()= function. +happiness data. Since we\'ve stored them both in dataframes, we just +need to call the `.merge()` function. -We will also rename a couple columns, just so that they're a little easier to -use when we create the map. +We will also rename a couple columns, just so that they\'re a little +easier to use when we create the map. -#+begin_src python +``` python # Merge the two previous dataframes into a single geopandas dataframe merged_df = geo_data.merge(happy_data,left_on='ADMIN', right_on='Country or region') # Rename columns for ease of use merged_df = merged_df.rename(columns = {'ADMIN':'GeoJSON_Country'}) merged_df = merged_df.rename(columns = {'Country or region':'Country'}) -#+end_src +``` + + -#+caption: Merged Dataframe -[[https://img.cleberg.net/blog/20200925-world-choropleth-map/merged_df.png]] +# Create the Map -* Create the Map The data is finally ready to be added to a map. The code below shows the -simplest way to find the center of the map and create a Folium map object. The -important part is to remember to reference the merged dataframe for our GeoJSON -data and value data. The columns specify which geo data and value data to use. +simplest way to find the center of the map and create a Folium map +object. The important part is to remember to reference the merged +dataframe for our GeoJSON data and value data. The columns specify which +geo data and value data to use. -#+begin_src python +``` python # Assign centroids to map x_map = merged_df.centroid.x.mean() y_map = merged_df.centroid.y.mean() @@ -150,19 +162,21 @@ folium.Choropleth( smooth_factor=0, highlight=True ).add_to(world_map) -#+end_src +``` + +Let\'s look at the resulting map. -Let's look at the resulting map. + -#+caption: Choropleth Map -[[https://img.cleberg.net/blog/20200925-world-choropleth-map/map.png]] +# Create a Tooltip on Hover -* Create a Tooltip on Hover -Now that we have a map set up, we could stop. However, I want to add a tooltip -so that I can see more information about each country. The =tooltip_data= code -below will show a popup on hover with all the data fields shown. +Now that we have a map set up, we could stop. However, I want to add a +tooltip so that I can see more information about each country. The +`tooltip_data` code below will show a popup on hover with all +the data fields shown. -#+begin_src python +``` python # Adding labels to map style_function = lambda x: {'fillColor': '#ffffff', 'color':'#000000', @@ -203,10 +217,10 @@ folium.LayerControl().add_to(world_map) # Display the map world_map -#+end_src +``` -The final image below will show you what the tooltip looks like whenever you -hover over a country. +The final image below will show you what the tooltip looks like whenever +you hover over a country. -#+caption: Choropleth Map Tooltip -[[https://img.cleberg.net/blog/20200925-world-choropleth-map/tooltip_map.png]] + diff --git a/content/blog/2020-10-12-mediocrity.org b/content/blog/2020-10-12-mediocrity.md index a653f80..c13a5ea 100644 --- a/content/blog/2020-10-12-mediocrity.org +++ b/content/blog/2020-10-12-mediocrity.md @@ -1,10 +1,13 @@ -#+title: On the Pursuit of Mediocrity -#+date: 2020-10-12 -#+description: Musings on mediocrity. -#+filetags: :personal: ++++ +date = 2020-10-12 +title = "On the Pursuit of Mediocrity" +description = "" +draft = false ++++ -* Perfect is the Enemy of Good -As the saying goes, "the best is the enemy of the good." As we strive +# Perfect is the Enemy of Good + +As the saying goes, \"the best is the enemy of the good.\" As we strive for perfection, we often fail to realize the implications of such an undertaking. Attempting to reach perfection is often unrealistic. Even worse, it can get in the way of achieving a good outcome. In certain @@ -13,37 +16,36 @@ burned the bridges that would have allowed us to reach a lesser yet still superb solution. Philosophers throughout history have inspected this plight from many -viewpoints. Greek mythology speaks of the -[[https://en.wikipedia.org/wiki/Golden_mean_(philosophy)][golden mean]], -which uses the story of Icarus to illustrate that sometimes "the middle -course" is the best solution. In this story, Daedalus, a famous artist +viewpoints. Greek mythology speaks of the [golden +mean](https://en.wikipedia.org/wiki/Golden_mean_(philosophy)), which +uses the story of Icarus to illustrate that sometimes \"the middle +course\" is the best solution. In this story, Daedalus, a famous artist of his time, built feathered wings for himself and his son so that they might escape the clutches of King Minos. Daedalus warns his beloved son -whom he loved so much to "fly the middle course", between the sea spray -and the sun's heat. Icarus did not heed his father; he flew up and up -until the sun melted the wax off his wings. For not heeding the middle -course, he fell into the sea and drowned. - -More recently, management scholars have explored the -[[https://en.wikipedia.org/wiki/Pareto_principle][Pareto principle]] and -found that as we increase the frequency of something, or strive to -perform actions to achieve some form of perfection, we run into -[[https://en.wikipedia.org/wiki/Diminishing_returns][diminishing -returns]]. - -Even further, Harold Demsetz is noted as coining the term -[[https://en.wikipedia.org/wiki/Nirvana_fallacy][the Nirvana fallacy]] -in 1969, which shows the fallacy of comparing actual things with -unrealistic, idealized alternatives. This is another trap that we may -fall into, where we are constantly thinking of the ultimate solutions to -problems, when something more realistic needs to be considered. - -Over and over throughout history, we've found that perfection is often +whom he loved so much to \"fly the middle course\", between the sea +spray and the sun\'s heat. Icarus did not heed his father; he flew up +and up until the sun melted the wax off his wings. For not heeding the +middle course, he fell into the sea and drowned. + +More recently, management scholars have explored the [Pareto +principle](https://en.wikipedia.org/wiki/Pareto_principle) and found +that as we increase the frequency of something, or strive to perform +actions to achieve some form of perfection, we run into [diminishing +returns](https://en.wikipedia.org/wiki/Diminishing_returns). + +Even further, Harold Demsetz is noted as coining the term [the Nirvana +fallacy](https://en.wikipedia.org/wiki/Nirvana_fallacy) in 1969, which +shows the fallacy of comparing actual things with unrealistic, idealized +alternatives. This is another trap that we may fall into, where we are +constantly thinking of the ultimate solutions to problems, when +something more realistic needs to be considered. + +Over and over throughout history, we\'ve found that perfection is often unrealistic and unachievable. However, we push ourselves and our peers -to "give 100%" or "go the extra mile," while it may be that the better -course is to give a valuable level of effort while considering the -effects of further effort on the outcome. Working harder does not always -help us achieve loftier goals. +to \"give 100%\" or \"go the extra mile,\" while it may be that the +better course is to give a valuable level of effort while considering +the effects of further effort on the outcome. Working harder does not +always help us achieve loftier goals. This has presented itself to me most recently during my time studying at my university. I was anxious and feeling the stresses of my courses, @@ -52,44 +54,41 @@ how well I was doing at school and my level of effort at work. One day, I happened to be talking to my father when he said something simple that hit home: -#+begin_quote -All you can do is show up and do your best. Worrying about the outcomes -won't affect the outcome itself. -#+end_quote +> All you can do is show up and do your best. Worrying about the +> outcomes won\'t affect the outcome itself. The thought was extremely straightforward and uncomplicated, yet it was something that I had lost sight of during my stress-filled years at -school. Ever since then, I've found myself pausing and remembering that +school. Ever since then, I\'ve found myself pausing and remembering that quote every time I get anxious or stressed. It helps to stop and think -"Can I do anything to affect the outcome, or am I simply worrying over -something I can't change?" +\"Can I do anything to affect the outcome, or am I simply worrying over +something I can\'t change?\" + +# When Mediocrity Isn\'t Enough -* When Mediocrity Isn't Enough One problem with the philosophies presented in this post is that they are implemented far too often in situations where mediocrity simply -isn't adequate. For example, let's take a look at digital user data, +isn\'t adequate. For example, let\'s take a look at digital user data, specifically personally-identifiable information (PII). As a cybersecurity auditor in the United States, I have found that most companies are concerned more with compliance than any actual safeguards over the privacy or protection of user data. Other than companies who have built their reputation on privacy and security, most companies will -use [[https://en.wikipedia.org/wiki/Satisficing][satisficing]] as their +use [satisficing](https://en.wikipedia.org/wiki/Satisficing) as their primary decision-making strategy around user data. -#+begin_quote -Satisficing is a decision-making strategy or cognitive heuristic that -entails searching through the available alternatives until an -acceptability threshold is met. -#+end_quote +> Satisficing is a decision-making strategy or cognitive heuristic that +> entails searching through the available alternatives until an +> acceptability threshold is met. This means that each decision will be met with certain possible solutions until one of the solutions meets their minimum acceptable standards. For companies that deal with user data, the minimum-acceptable standards come from three areas: -1. Laws and regulations -2. Competitive pressure -3. Risk of monetary or reputation loss +1. Laws and regulations +2. Competitive pressure +3. Risk of monetary or reputation loss Working with project management or auditing, the primary concern here is the risk of legal ramifications. Since the primary risk comes from laws @@ -109,14 +108,14 @@ satisficing, which states that they have met the minimum acceptable standards and can now move on to other decisions. Modern business culture in the United States dictates that profits are the golden measure of how well a company or manager is performing, so we often -don't think about our responsibilities beyond these basic standards. +don\'t think about our responsibilities beyond these basic standards. Not all situations demand excellence, but I believe that applying any -philosophy as a broad stroke across one's life can be a mistake. We must -be able to think critically about what we are doing as we do it and ask -ourselves a few questions. Have I done everything I can in this +philosophy as a broad stroke across one\'s life can be a mistake. We +must be able to think critically about what we are doing as we do it and +ask ourselves a few questions. Have I done everything I can in this situation? Is mediocrity an acceptable outcome, or should we strive for -perfection, even if we can't attain it? +perfection, even if we can\'t attain it? Taking a few moments to think critically throughout our day, as we make decisions, can have a tremendous effect on the outcomes we create. diff --git a/content/blog/2020-12-27-website-redesign.org b/content/blog/2020-12-27-website-redesign.md index cfa8795..9224348 100644 --- a/content/blog/2020-12-27-website-redesign.org +++ b/content/blog/2020-12-27-website-redesign.md @@ -1,85 +1,93 @@ -#+title: Redesigning My Website: The 5 KB Result -#+date: 2020-12-27 -#+description: A retrospective on my recent website redesign. -#+filetags: :sysadmin: ++++ +date = 2020-12-27 +title = "Redesigning My Website: The 5 KB Result" +description = "" +draft = false ++++ -* A Brief History -As a form of continuous learning and entertainment, I've been running a +# A Brief History + +As a form of continuous learning and entertainment, I\'ve been running a handful of websites since 2016 when I took my first programming courses in college. I maintain one main website, the place I consider the official website to represent me. Under this site, I have a handful of subdirectories and subdomains. -One of the parts I've enjoyed the most about web development is the +One of the parts I\'ve enjoyed the most about web development is the aspect of designing an identity for a web page and working to find -exciting ways to display the site's content. Inevitably, this means I've -changed the designs for my websites more times than I could possibly -count. Since I don't really host anything on my main webpage that's -vital, it allows me the freedom to change things as inspiration strikes. +exciting ways to display the site\'s content. Inevitably, this means +I\'ve changed the designs for my websites more times than I could +possibly count. Since I don\'t really host anything on my main webpage +that\'s vital, it allows me the freedom to change things as inspiration +strikes. -Historically, I've relied on core utilities for spacing, components, and -layouts from [[https://getbootstrap.com][Bootstrap]] and added custom +Historically, I\'ve relied on core utilities for spacing, components, +and layouts from [Bootstrap](https://getbootstrap.com) and added custom CSS for fonts, accents, colors, and other items. I also tend to create sites with no border radius on items, visible borders, and content that takes up the entire screen (using whitespace inside components instead of whitespace around my components). -* The Redesign Process +# The Redesign Process + About a week ago, I found myself wishing for a new design yet again. The -prior design was largely inspired by IBM's -[[https://www.carbondesignsystem.com][Carbon Design System]] and relied -on jQuery, Bootstrap, along with some compressed -[[https://en.wikipedia.org/wiki/WebP][.webp]] images. +prior design was largely inspired by IBM\'s [Carbon Design +System](https://www.carbondesignsystem.com) and relied on jQuery, +Bootstrap, along with some compressed +[.webp](https://en.wikipedia.org/wiki/WebP) images. To anyone who knows my preferences toward web design - and even in my personal life - it should be no surprise that I immediately started looking for inspiration on minimalism. While there are some decent minimalistic designs on sites like -[[https://dribbble.com/search/shots/popular/web-design?q=minimalism][Dribbble]], -people seem to mostly discuss [[https://brutalist-web.design][brutalist -web design]] when you ask about minimalism. While brutalist web design -doesn't have to be minimal, it often is. +[Dribbble](https://dribbble.com/search/shots/popular/web-design?q=minimalism), +people seem to mostly discuss [brutalist web +design](https://brutalist-web.design) when you ask about minimalism. +While brutalist web design doesn\'t have to be minimal, it often is. I suppose, in a way, I did create a brutalist website since my HTML is semantic and accessible, hyperlinks are colored and underlined, and all native browser functions like scrolling and the back button work as -expected. However, I didn't think about brutalism while designing these +expected. However, I didn\'t think about brutalism while designing these sites. The new design followed a simple design process. I walked through the -screens on my blog and asked myself: "Is this element necessary for a -user?" This allowed me to first start by removing all javascript, which +screens on my blog and asked myself: \"Is this element necessary for a +user?\" This allowed me to first start by removing all javascript, which had the sole purpose of allowing users to open a collapsed navbar on mobile. Replacing the collapsible navbar allowed me to remove both -jQuery and Bootstrap's javascript. +jQuery and Bootstrap\'s javascript. -Next, I removed things like author names (since I'm literally the only +Next, I removed things like author names (since I\'m literally the only person who will ever write on this site), multiple ways to click on a blog post card, blog post descriptions, and the scroll-to-top button. It also helped to move all categories to a single page, rather than have each category on its own page. The final big piece to finish the -"[[https://en.wikipedia.org/wiki/Marie_Kondo#KonMari_method][KonMari]]"-like +\"[KonMari](https://en.wikipedia.org/wiki/Marie_Kondo#KonMari_method)\"-like part of my process was to remove Bootstrap CSS in its entirety. However, -this meant pulling out a few very useful classes, such as =.img-fluid= -and the default font stacks to keep in my custom CSS. +this meant pulling out a few very useful classes, such as +`.img-fluid` and the default font stacks to keep in my custom +CSS. After removing all the unnecessary pieces, I was finally able to reorganize my content and add a very small amount of custom CSS to make everything pretty. This took a brief amount of time, effectively just -consisting of me converting =<div>= tags into things like =<ul>= lists -and choosing accent colors. +consisting of me converting `<div>` tags into things like +`<ul>` lists and choosing accent colors. + +# The Results + +## Reflection -* The Results -** Reflection So, what did all of this reorganizing do to my webpages? Well, first, my -websites are now *ridiculously fast*. Since the prior designs were also -minimal and didn't have many images, they measured up in Firefox's -Network Monitor around 300 KB - 600KB. After making the changes, my main -site is at 5 KB transferred (22 KB total), and my blog is at 6.5 KB -transferred (13 KB total). *That means the redesigned pages are less -than 2% the size of the old designs.* +websites are now **ridiculously fast**. Since the prior designs were +also minimal and didn\'t have many images, they measured up in +Firefox\'s Network Monitor around 300 KB - 600KB. After making the +changes, my main site is at 5 KB transferred (22 KB total), and my blog +is at 6.5 KB transferred (13 KB total). **That means the redesigned +pages are less than 2% the size of the old designs.** Google Lighthouse ranks the new webpage as 100 in performance, accessibility, and best practices, with SEO at 92 since they think tap @@ -91,6 +99,6 @@ of blocking time, due to the fact that the CSS for my blog is within a separate CSS file, and the CSS for my main website is simply embedded in the HTML file. -Now that everything is complete, I can confidently say I'm happy with -the result and proud to look at the fastest set of websites I've created -so far. +Now that everything is complete, I can confidently say I\'m happy with +the result and proud to look at the fastest set of websites I\'ve +created so far. diff --git a/content/blog/2020-12-28-neon-drive.md b/content/blog/2020-12-28-neon-drive.md new file mode 100644 index 0000000..bce7223 --- /dev/null +++ b/content/blog/2020-12-28-neon-drive.md @@ -0,0 +1,95 @@ ++++ +date = 2020-12-28 +title = "Neon Drive: A Nostalgic 80s Arcade Racing Game" +description = "" +draft = false ++++ + +# Game Description + +[Neon Drive](https://store.steampowered.com/app/433910/Neon_Drive/) +presents itself as a simple arcade-style game inspired by the arcade +race games of the 1980s, yet it has managed to take up hours of my life +without much effort. The game description, directly from the Steam page, +is intriguing enough to entice anyone who\'s been looking for a good +arcade racing game: + +> Neon Drive is a slick retro-futuristic arcade game that will make your +> brain melt. You\'ve been warned. From beautiful cityscapes and ocean +> roads to exploding enemy spaceships, Neon Drive has it all. + +# Gameplay + +The game holds true to the +[retro-futurism](https://en.wikipedia.org/wiki/Retrofuturism) style, +including chrome female robots, pixelated arcade machines, and +[outrun](https://teddit.net/r/outrun/) aesthetics. + +Each level of the game is shown as a separate arcade machine. Each +arcade machine lets you play on Normal, Hard, Insane, Practice, and Free +Run. To beat each arcade, you must reach the end of the level without +crashing your car into the various obstacles on the course. Basic levels +let you move left or right to avoid blocks in the road. Later levels put +you through other tests, such as dodging traffic or blasting asteroids. + +The game uses synthwave music to keep you on track to make the correct +moves by timing the beats of the songs to the correct moves on the +screen. It reminds me of the early Guitar Hero games, as well as mobile +apps like VOEZ - repetition and staying on-beat is the only way to win. + +# In-Game Screenshots + +Taking a look at the main menu, you can see that Neon Drive plays into +every stereotype you can think of around retro-futuristic, synthwave +arcades (in a good way). + + + +Once you get into the first level, we see that the choice of car fits +right in with the stereotypical cars of the 80s, like the +[DeLorean](https://en.wikipedia.org/wiki/DMC_DeLorean) or the [Ferrari +F40](https://en.wikipedia.org/wiki/Ferrari_F40). Each new level comes +with new color schemes and cars, so you should never get tired of the +aesthetic. + + + +Personally, I love the orange and blue colors used in level 2: + + + +If you\'re the competitive type and getting 100% on all arcade machines +isn\'t enough, there are leaderboards for the regular part of the game, +and the endurance game mode. + + + +# Other Suggestions + +Neon Drive sits nicely within the well-founded cult genre of Outrun. +Other games that I\'ve enjoyed in this same spectrum are: + +- [Far Cry 3: Blood + Dragon](https://store.steampowered.com/app/233270/Far_Cry_3__Blood_Dragon/) +- [Retrowave](https://store.steampowered.com/app/1239690/Retrowave/) +- [Slipstream](https://store.steampowered.com/app/732810/Slipstream/) + +Although these games aren\'t necessarily in the same genre, they do have +aspects that place them close enough to interest gamers that enjoyed +Neon Drive: + +- [Black Ice](https://store.steampowered.com/app/311800/Black_Ice/) +- [Cloudpunk](https://store.steampowered.com/app/746850/Cloudpunk/) +- [Need for Speed: + Heat](https://store.steampowered.com/app/1222680/Need_for_Speed_Heat/) +- [VirtuaVerse](https://store.steampowered.com/app/1019310/VirtuaVerse/) + +Of course, if all you really care about is the arcade aspect of these +games, you can check out the [Atari +Vault](https://store.steampowered.com/app/400020/Atari_Vault/) or any of +the other classic games sold on Steam by companies like Namco, Atari. +For something like Nintendo, you\'d have to settle for buying used +classic consoles or delve into the world of emulation. diff --git a/content/blog/2020-12-28-neon-drive.org b/content/blog/2020-12-28-neon-drive.org deleted file mode 100644 index 9160b7f..0000000 --- a/content/blog/2020-12-28-neon-drive.org +++ /dev/null @@ -1,83 +0,0 @@ -#+title: Neon Drive: A Nostalgic 80s Arcade Racing Game -#+date: 2020-12-28 -#+description: A video game review for Neon Drive. -#+filetags: :gaming: - -* Game Description -[[https://store.steampowered.com/app/433910/Neon_Drive/][Neon Drive]] presents itself as a simple arcade-style game inspired by the arcade -race games of the 1980s, yet it has managed to take up hours of my life without -much effort. The game description, directly from the Steam page, is intriguing -enough to entice anyone who's been looking for a good arcade racing game: - -#+begin_quote -Neon Drive is a slick retro-futuristic arcade game that will make your brain -melt. You've been warned. From beautiful cityscapes and ocean roads to exploding -enemy spaceships, Neon Drive has it all. -#+end_quote - -* Gameplay -The game holds true to the [[https://en.wikipedia.org/wiki/Retrofuturism][retro-futurism]] style, including chrome female robots, -pixelated arcade machines, and [[https://teddit.net/r/outrun/][outrun]] aesthetics. - -Each level of the game is shown as a separate arcade machine. Each arcade -machine lets you play on Normal, Hard, Insane, Practice, and Free Run. To beat -each arcade, you must reach the end of the level without crashing your car into -the various obstacles on the course. Basic levels let you move left or right to -avoid blocks in the road. Later levels put you through other tests, such as -dodging traffic or blasting asteroids. - -The game uses synthwave music to keep you on track to make the correct moves by -timing the beats of the songs to the correct moves on the screen. It reminds me -of the early Guitar Hero games, as well as mobile apps like VOEZ - repetition -and staying on-beat is the only way to win. - -* In-Game Screenshots -Taking a look at the main menu, you can see that Neon Drive plays into every -stereotype you can think of around retro-futuristic, synthwave arcades (in a -good way). - -#+caption: Neon Drive Menu -[[https://img.cleberg.net/blog/20201228-neon-drive/neon_drive_menu.png]] - -Once you get into the first level, we see that the choice of car fits right in -with the stereotypical cars of the 80s, like the [[https://en.wikipedia.org/wiki/DMC_DeLorean][DeLorean]] or the [[https://en.wikipedia.org/wiki/Ferrari_F40][Ferrari F40]]. -Each new level comes with new color schemes and cars, so you should never get -tired of the aesthetic. - -#+caption: Neon Drive Race -[[https://img.cleberg.net/blog/20201228-neon-drive/neon_drive_race.png]] - -Personally, I love the orange and blue colors used in level 2: - -#+caption: Level 2 -[[https://img.cleberg.net/blog/20201228-neon-drive/neon_drive_level_2.png]] - -If you're the competitive type and getting 100% on all arcade machines isn't -enough, there are leaderboards for the regular part of the game, and the -endurance game mode. - -#+caption: Leaderboard -[[https://img.cleberg.net/blog/20201228-neon-drive/neon_drive_leaderboard.png]] - -* Other Suggestions -Neon Drive sits nicely within the well-founded cult genre of Outrun. Other games -that I've enjoyed in this same spectrum are: - -- [[https://store.steampowered.com/app/233270/Far_Cry_3__Blood_Dragon/][Far - Cry 3: Blood Dragon]] -- [[https://store.steampowered.com/app/1239690/Retrowave/][Retrowave]] -- [[https://store.steampowered.com/app/732810/Slipstream/][Slipstream]] - -Although these games aren't necessarily in the same genre, they do have aspects -that place them close enough to interest gamers that enjoyed Neon Drive: - -- [[https://store.steampowered.com/app/311800/Black_Ice/][Black Ice]] -- [[https://store.steampowered.com/app/746850/Cloudpunk/][Cloudpunk]] -- [[https://store.steampowered.com/app/1222680/Need_for_Speed_Heat/][Need - for Speed: Heat]] -- [[https://store.steampowered.com/app/1019310/VirtuaVerse/][VirtuaVerse]] - -Of course, if all you really care about is the arcade aspect of these games, you -can check out the [[https://store.steampowered.com/app/400020/Atari_Vault/][Atari Vault]] or any of the other classic games sold on Steam by -companies like Namco, Atari. For something like Nintendo, you'd have to settle -for buying used classic consoles or delve into the world of emulation. diff --git a/content/blog/2020-12-29-zork.md b/content/blog/2020-12-29-zork.md new file mode 100644 index 0000000..06ccd77 --- /dev/null +++ b/content/blog/2020-12-29-zork.md @@ -0,0 +1,96 @@ ++++ +date = 2020-12-29 +title = "Zork: Let's Explore a Classic" +description = "" +draft = false ++++ + +# Download (Free) + +Before we get into the game itself, you should know that you can +download Zork for free from Infocom\'s [download +page](http://infocom-if.org/downloads/downloads.html). So feel free to +boot it up and take a ride back to the 1980s with this masterpiece. + +# Game Description + +Zork is an interactive, text-based computer game originally released in +1980. This series, split into three separate games, introduced a robust +and sophisticated text parser to gamers. People were largely used to the +simple commands used in the popular game [Colossal Cave +Adventure](https://en.wikipedia.org/wiki/Colossal_Cave_Adventure), but +Zork allowed users to send more complex commands that included +prepositions and conjunctions. + +Zork tracks your score as you explore the map, find tools, and collect +trophy items (e.g., a jewel-encrusted egg). When you place your trophy +items in the trophy case found in the Living Room area, you gain score +points. Collecting the Twenty Treasures of Zork and placing them within +the trophy case wins the game. However, you must explore the map, solve +puzzles, and avoid being eaten by a grue to collect these treasures. + +# The Map + +Since Zork is a vast and complex game, it helps to have a map as you +explore and collect your trophies. However, if you want to play the game +as it was truly intended, you should try to play it without using the +map. + + + +*[Map Source](https://www.filfre.net/2012/01/exploring-zork-part-1/)* + +# In-Game Screenshots + +After playing the game (for the first time ever) for several weeks +around 2014, I was finally able to beat the game with some online help +to find the last couple items. As I was writing this post, I installed +the game again to grab some screenshots to show off the true glory of +this game. As noted in [Jimmy Maher\'s +playthrough](https://www.filfre.net/2012/01/exploring-zork-part-1/), the +original Zork games looked quite a bit different due to the older +hardware of computers like the Apple II and multiple bug fixes that +Infocom pushed out after the game\'s initial release. My play-through +uses the [Zork +Anthology](https://store.steampowered.com/app/570580/Zork_Anthology/) +version, which utilizes DOSBox on Windows. + +The first screenshot here shows the introductory information, which +doesn\'t include instructions of any kind for the player. If you +haven\'t played text adventures before, try to use simple commands like +\"go west,\" \"look around,\" or \"hit troll with elvish sword.\" + + + +In this second screenshot, we see the player has entered the house and +found the trophy case in the living room. The lantern and sword in this +room allow the player to explore dark areas and attack enemies. If you +don\'t use the lantern, you won\'t be able to see anything in dark +areas, and you may be eaten by a grue. + + + +Finally, we see that the player has found the first treasure: a +jewel-encrusted egg. These treasures can be taken back to the house and +placed in the trophy case or carried until you feel like you want to put +things away. + + + +# Conclusion + +It\'s been quite a few years since I first played Zork, but I clearly +remember the late nights and bloodshot eyes that helped me find all the +treasures. This game is well worth the time and effort, even though the +text-based aspect may be off-putting to gamers who didn\'t have to grow +up playing games without graphics. However, I believe that the strategy +and skills learned in early video games like Zork can actually help you, +even when playing newer games. + +If you do decide to play Zork, you can download Zork I, II, and III from +Infocom\'s [download +page](http://infocom-if.org/downloads/downloads.html) for free or search +the internet for an online version. diff --git a/content/blog/2020-12-29-zork.org b/content/blog/2020-12-29-zork.org deleted file mode 100644 index 5225517..0000000 --- a/content/blog/2020-12-29-zork.org +++ /dev/null @@ -1,77 +0,0 @@ -#+title: Zork: Let's Explore a Classic -#+date: 2020-12-29 -#+description: A video game review for Zork. -#+filetags: :gaming: - -* Download (Free) -Before we get into the game itself, you should know that you can download Zork -for free from Infocom's [[http://infocom-if.org/downloads/downloads.html][download page]]. So feel free to boot it up and take a -ride back to the 1980s with this masterpiece. - -* Game Description -Zork is an interactive, text-based computer game originally released in 1980. -This series, split into three separate games, introduced a robust and -sophisticated text parser to gamers. People were largely used to the simple -commands used in the popular game [[https://en.wikipedia.org/wiki/Colossal_Cave_Adventure][Colossal Cave Adventure]], but Zork allowed -users to send more complex commands that included prepositions and conjunctions. - -Zork tracks your score as you explore the map, find tools, and collect trophy -items (e.g., a jewel-encrusted egg). When you place your trophy items in the -trophy case found in the Living Room area, you gain score points. Collecting the -Twenty Treasures of Zork and placing them within the trophy case wins the game. -However, you must explore the map, solve puzzles, and avoid being eaten by a -grue to collect these treasures. - -* The Map -Since Zork is a vast and complex game, it helps to have a map as you explore and -collect your trophies. However, if you want to play the game as it was truly -intended, you should try to play it without using the map. - -#+caption: Zork Map -[[https://img.cleberg.net/blog/20201229-zork/zork_map.png]] - -/[[https://www.filfre.net/2012/01/exploring-zork-part-1/][Map Source]]/ - -* In-Game Screenshots -After playing the game (for the first time ever) for several weeks around 2014, -I was finally able to beat the game with some online help to find the last -couple items. As I was writing this post, I installed the game again to grab -some screenshots to show off the true glory of this game. As noted in [[https://www.filfre.net/2012/01/exploring-zork-part-1/][Jimmy -Maher's playthrough]], the original Zork games looked quite a bit different due to -the older hardware of computers like the Apple II and multiple bug fixes that -Infocom pushed out after the game's initial release. My play-through uses the -[[https://store.steampowered.com/app/570580/Zork_Anthology/][Zork Anthology]] version, which utilizes DOSBox on Windows. - -The first screenshot here shows the introductory information, which doesn't -include instructions of any kind for the player. If you haven't played text -adventures before, try to use simple commands like "go west," "look around," or -"hit troll with elvish sword." - -#+caption: Zork Screen, pt. 1 -[[https://img.cleberg.net/blog/20201229-zork/zork_01.png]] - -In this second screenshot, we see the player has entered the house and found the -trophy case in the living room. The lantern and sword in this room allow the -player to explore dark areas and attack enemies. If you don't use the lantern, -you won't be able to see anything in dark areas, and you may be eaten by a grue. - -#+caption: Zork Screen, pt. 2 -[[https://img.cleberg.net/blog/20201229-zork/zork_02.png]] - -Finally, we see that the player has found the first treasure: a jewel-encrusted -egg. These treasures can be taken back to the house and placed in the trophy -case or carried until you feel like you want to put things away. - -#+caption: Zork Screen, pt 3. -[[https://img.cleberg.net/blog/20201229-zork/zork_03.png]] - -* Conclusion -It's been quite a few years since I first played Zork, but I clearly remember -the late nights and bloodshot eyes that helped me find all the treasures. This -game is well worth the time and effort, even though the text-based aspect may be -off-putting to gamers who didn't have to grow up playing games without graphics. -However, I believe that the strategy and skills learned in early video games -like Zork can actually help you, even when playing newer games. - -If you do decide to play Zork, you can download Zork I, II, and III from -Infocom's [[http://infocom-if.org/downloads/downloads.html][download page]] for free or search the internet for an online version. diff --git a/content/blog/2021-01-01-seum.md b/content/blog/2021-01-01-seum.md new file mode 100644 index 0000000..49cac88 --- /dev/null +++ b/content/blog/2021-01-01-seum.md @@ -0,0 +1,93 @@ ++++ +date = 2021-01-01 +title = "SEUM: Spreedrunners from Hell" +description = "" +draft = false ++++ + +# Game Description + +[SEUM: Speedrunners from +Hell](https://store.steampowered.com/app/457210/SEUM_Speedrunners_from_Hell/) +is an incredibly fast-paced mashup of a puzzle game and a free-running +game. Created by [Pine Studio](https://pinestudio.co) in early 2016 and +first released as a [demo on +GameJolt](https://gamejolt.com/games/seum-speedrunners-from-hell-demo/154868), +this game was successfully green-lit on Steam and has amassed a cult +following on multiple consoles. + +Here\'s the game description straight from the developers: + +> Like a bastard child of Quake 3 and Super Meat Boy, SEUM: Speedrunners +> from Hell is truly hardcore and focuses on speed and fast reaction. + +# Story + +SEUM does a great job setting the stage when you open the game for the +first time, playing an animated video in the form of comic book images. +You see Marty, the protagonist, sitting around drinking his beer as +Satan busts down the door, cuts his hand off, and steals all his beer +and bacon. As Satan is leaving, Marty whips a vinyl record across the +room and cuts off one of Satan\'s hands. This hand is what allows you to +use all the powers in the game. + +Check out the screenshot below for one of the first panels of the +storyline: + + + +# Gameplay + +To accomplish each level, you will need to get to the final blue portal +under a certain time limit. You can beat a level by getting to the +portal before the time meter runs out or \"Dominate\" a level by beating +it within a shorter time limit (noted by a bright red/orange color in +the time meter). + +The portal is usually set behind locked gates, protected by dangerous +defenses, or in hard-to-reach places. To reach the portal, you\'ll need +to go through any existing orange portals, light all yellow beacons, +avoid things like fireballs and blades, or use any satanic power orbs +lying around. These special abilities include: + +- Gravity +- Teleport +- Rewind +- Spawn platform +- Roar (DLC) +- Rocket (DLC) +- Shadow world (DLC) + +For the main storyline, there are nine floors to beat. Each floor +contains nine regular levels, one boss level, and one bonus level; +although you don\'t technically need to beat all levels to advance to +the next floor. + + + +# In-Game Screenshots + +The main menu gives you plenty of options for tuning your system, +playing main levels, playing the DLC, or exploring the other game modes. + + + +Once you enter a level, you can look around and strategize before +starting. Clicking any button will start the menu, and you\'ll have to +restart if you die. One of the great things about SEUM is that it has +great keyboard shortcuts. You can quickly smash `R` to +restart the level or `M` to return to the level menu. + + + +Once you\'re able to win a level, you\'ll see the high scores and can +watch replays of the best scores. + + + +Each regular level contains a beer in a disguised location that may take +some out-of-the-box thinking. + + diff --git a/content/blog/2021-01-01-seum.org b/content/blog/2021-01-01-seum.org deleted file mode 100644 index 4e483a8..0000000 --- a/content/blog/2021-01-01-seum.org +++ /dev/null @@ -1,92 +0,0 @@ -#+title: SEUM: Speedrunners from Hell -#+date: 2021-01-01 -#+description: A video game review for SEUM: Speedrunners from Hell. -#+filetags: :gaming: - -* Game Description -[[https://store.steampowered.com/app/457210/SEUM_Speedrunners_from_Hell/][SEUM: -Speedrunners from Hell]] is an incredibly fast-paced mashup of a puzzle -game and a free-running game. Created by [[https://pinestudio.co][Pine -Studio]] in early 2016 and first released as a -[[https://gamejolt.com/games/seum-speedrunners-from-hell-demo/154868][demo -on GameJolt]], this game was successfully green-lit on Steam and has -amassed a cult following on multiple consoles. - -Here's the game description straight from the developers: - -#+begin_quote -Like a bastard child of Quake 3 and Super Meat Boy, SEUM: Speedrunners -from Hell is truly hardcore and focuses on speed and fast reaction. -#+end_quote - -* Story -SEUM does a great job setting the stage when you open the game for the -first time, playing an animated video in the form of comic book images. -You see Marty, the protagonist, sitting around drinking his beer as -Satan busts down the door, cuts his hand off, and steals all his beer -and bacon. As Satan is leaving, Marty whips a vinyl record across the -room and cuts off one of Satan's hands. This hand is what allows you to -use all the powers in the game. - -Check out the screenshot below for one of the first panels of the -storyline: - -#+caption: SEUM Story -[[https://img.cleberg.net/blog/20210101-seum/seum_story.png]] - -* Gameplay -To accomplish each level, you will need to get to the final blue portal -under a certain time limit. You can beat a level by getting to the -portal before the time meter runs out or "Dominate" a level by beating -it within a shorter time limit (noted by a bright red/orange color in -the time meter). - -The portal is usually set behind locked gates, protected by dangerous -defenses, or in hard-to-reach places. To reach the portal, you'll need -to go through any existing orange portals, light all yellow beacons, -avoid things like fireballs and blades, or use any satanic power orbs -lying around. These special abilities include: - -- Gravity -- Teleport -- Rewind -- Spawn platform -- Roar (DLC) -- Rocket (DLC) -- Shadow world (DLC) - -For the main storyline, there are nine floors to beat. Each floor -contains nine regular levels, one boss level, and one bonus level; -although you don't technically need to beat all levels to advance to the -next floor. - -#+caption: SEUM Floor Menu -[[https://img.cleberg.net/blog/20210101-seum/seum_floor.png]] - -* In-Game Screenshots -The main menu gives you plenty of options for tuning your system, -playing main levels, playing the DLC, or exploring the other game modes. - -#+caption: SEUM Main Menu -[[https://img.cleberg.net/blog/20210101-seum/seum_menu.png]] - -Once you enter a level, you can look around and strategize before -starting. Clicking any button will start the menu, and you'll have to -restart if you die. One of the great things about SEUM is that it has -great keyboard shortcuts. You can quickly smash =R= to restart the level -or =M= to return to the level menu. - -#+caption: SEUM Level -[[https://img.cleberg.net/blog/20210101-seum/seum_level.png]] - -Once you're able to win a level, you'll see the high scores and can -watch replays of the best scores. - -#+caption: SEUM Win -[[https://img.cleberg.net/blog/20210101-seum/seum_win.png]] - -Each regular level contains a beer in a disguised location that may take -some out-of-the-box thinking. - -#+caption: SEUM Beer -[[https://img.cleberg.net/blog/20210101-seum/seum_beer.png]] diff --git a/content/blog/2021-01-04-fediverse.org b/content/blog/2021-01-04-fediverse.md index 5224b17..e663f45 100644 --- a/content/blog/2021-01-04-fediverse.org +++ b/content/blog/2021-01-04-fediverse.md @@ -1,9 +1,12 @@ -#+title: A Simple Guide to the Fediverse -#+date: 2021-01-04 -#+description: Learn about the basics of the Fediverse. -#+filetags: :social: ++++ +date = 2021-01-04 +title = "A Simple Guide to the Fediverse" +description = "" +draft = false ++++ + +# What is the Fediverse? -* What is the Fediverse? The fediverse is a federated universe of servers commonly used for sharing content, like social media. So, instead of having to rely on a single organization to run the server (e.g. Facebook), the fediverse is @@ -20,26 +23,27 @@ and communicate back and forth without having to be on the same server. However, responsible email admins are there to set rules and control the traffic going in/out of the server. -#+caption: Federated services diagram -[[https://img.cleberg.net/blog/20210104-a-simple-guide-to-the-fediverse/federated-example.svg]] + The main objective of this architecture is to decentralize the control within the internet connections. For example, if you run your own -Mastodon instance, you and your users can't be censored or impacted in +Mastodon instance, you and your users can\'t be censored or impacted in any way by authorities of another Mastodon instance. Some users have praised these features due to recent criticism of popular social media websites that may be over-censoring their users. -This strategy is great for making sure control of the social web isn't +This strategy is great for making sure control of the social web isn\'t controlled by a single organization, but it also has some downsides. If I create a Mastodon instance and get a ton of users to sign up, I can -shut the server down at any time. That means you're at risk of losing -the content you've created unless you back it up, or the server backs it -up for you. Also, depending on the software used (e.g. Mastodon, +shut the server down at any time. That means you\'re at risk of losing +the content you\'ve created unless you back it up, or the server backs +it up for you. Also, depending on the software used (e.g. Mastodon, Pixelfed, etc.), censorship may still be an issue if the server admins -decide they want to censor their users. Now, censorship isn't always a -bad thing and can even benefit the community as a whole, but you'll want -to determine which servers align with your idea of proper censorship. +decide they want to censor their users. Now, censorship isn\'t always a +bad thing and can even benefit the community as a whole, but you\'ll +want to determine which servers align with your idea of proper +censorship. However, these are risks that we take when we sign up for any online platform. Whatever your reason is for trying out federated social @@ -49,44 +53,55 @@ with the increased difficulty understanding and signing up for these platforms. Perhaps increased regulation and litigation against current social media sites will push more users into the fediverse. -* Federated Alternatives to Popular Sites +# Federated Alternatives to Popular Sites + The list below is a small guide that will show you federated alternatives to current popular websites. There are many more out there, so go and explore: you might just find the perfect home. -** Reddit -- [[https://lemmy.ml/instances][Lemmy]] +## Reddit + +- [Lemmy](https://lemmy.ml/instances) + +## Twitter/Facebook/Tumblr + +- [Mastodon](https://joinmastodon.org) +- [Diaspora](https://diasporafoundation.org) +- [Friendica](https://friendi.ca) +- [GNU Social](https://gnusocial.network) +- [Pleroma](https://pleroma.social) + +## Instagram + +- [Pixelfed](https://pixelfed.org) + +## Slack/Discord + +- [Matrix](https://element.io) + +## Youtube/Vimeo + +- [Peertube](https://joinpeertube.org) -** Twitter/Facebook/Tumblr -- [[https://joinmastodon.org][Mastodon]] -- [[https://diasporafoundation.org][Diaspora]] -- [[https://friendi.ca][Friendica]] -- [[https://gnusocial.network][GNU Social]] -- [[https://pleroma.social][Pleroma]] +## Spotify/Soundcloud -** Instagram -- [[https://pixelfed.org][Pixelfed]] +- [Funkwhale](https://funkwhale.audio) -** Slack/Discord -- [[https://element.io][Matrix]] +## Podcasting -** Youtube/Vimeo -- [[https://joinpeertube.org][Peertube]] +- [Pubcast](https://pubcast.pub) -** Spotify/Soundcloud -- [[https://funkwhale.audio][Funkwhale]] +## Medium/Blogger -** Podcasting -- [[https://pubcast.pub][Pubcast]] +- [WriteFreely](https://writefreely.org) -** Medium/Blogger -- [[https://writefreely.org][WriteFreely]] +# Get Started -* Get Started The best way to get started is to simply sign up and learn as you go. If -you're comfortable signing up through a Mastodon, Pleroma, or Friendica -server, here is [[https://fediverse.party/en/portal/servers][a list of -themed servers]] to choose from. If you're looking for something else, -try a web search for a federated alternative to your favorite sites. +you\'re comfortable signing up through a Mastodon, Pleroma, or Friendica +server, here is [a list of themed +servers](https://fediverse.party/en/portal/servers) to choose from. If +you\'re looking for something else, try a web search for a federated +alternative to your favorite sites. Find a server that focuses on your passions and start there! diff --git a/content/blog/2021-01-07-ufw.org b/content/blog/2021-01-07-ufw.md index b1e9adf..da62aac 100644 --- a/content/blog/2021-01-07-ufw.org +++ b/content/blog/2021-01-07-ufw.md @@ -1,152 +1,163 @@ -#+title: Secure Your Network with the Uncomplicated Firewall (ufw) -#+date: 2021-01-07 -#+description: A simple guide to the UFW. -#+filetags: :sysadmin: ++++ +date = 2021-01-07 +title = "Secure Your Network with the Uncomplicated Firewall (ufw)" +description = "" +draft = false ++++ + +# Uncomplicated Firewall -* Uncomplicated Firewall Uncomplicated Firewall, also known as ufw, is a convenient and beginner-friendly way to enforce OS-level firewall rules. For those who are hosting servers or any device that is accessible to the world (i.e., -by public IP or domain name), it's critical that a firewall is properly +by public IP or domain name), it\'s critical that a firewall is properly implemented and active. Ufw is available by default in all Ubuntu installations after 8.04 LTS. For other distributions, you can look to install ufw or check if there are alternative firewalls installed already. There are usually -alternatives available, such as Fedora's =firewall= and the package -available on most distributions: =iptables=. Ufw is considered a -beginner-friendly front-end to iptables. +alternatives available, such as Fedora\'s `firewall` and the +package available on most distributions: `iptables`. Ufw is +considered a beginner-friendly front-end to iptables. -[[https://gufw.org][Gufw]] is available as a graphical user interface +[Gufw](https://gufw.org) is available as a graphical user interface (GUI) application for users who are uncomfortable setting up a firewall through a terminal. -#+caption: Gufw Screenshot -[[https://img.cleberg.net/blog/20210107-secure-your-network-with-the-uncomplicated-firewall/gufw.png]] + + +# Getting Help -* Getting Help If you need help figuring out commands, remember that you can run the -=--help= flag to get a list of options. +`--help` flag to get a list of options. -#+begin_src sh +```sh sudo ufw --help -#+end_src +``` + +# Set Default State -* Set Default State The proper way to run a firewall is to set a strict default state and slowly open up ports that you want to allow. This helps prevent anything malicious from slipping through the cracks. The following command prevents all incoming traffic (other than the rules we specify later), but you can also set this for outgoing connections, if necessary. -#+begin_src sh +```sh sudo ufw default deny incoming -#+end_src +``` You should also allow outgoing traffic if you want to allow the device to communicate back to you or other parties. For example, media servers like Plex need to be able to send out data related to streaming the media. -#+begin_src sh +```sh sudo ufw default allow outgoing -#+end_src +``` -* Adding Port Rules -Now that we've disabled all incoming traffic by default, we need to open -up some ports (or else no traffic would be able to come in). If you need -to be able to =ssh= into the machine, you'll need to open up port 22. +# Adding Port Rules -#+begin_src sh +Now that we\'ve disabled all incoming traffic by default, we need to +open up some ports (or else no traffic would be able to come in). If you +need to be able to `ssh` into the machine, you\'ll need to +open up port 22. + +```sh sudo ufw allow 22 -#+end_src +``` You can also issue more restrictive rules. The following rule will allow -=ssh= connections only from machines on the local subnet. +`ssh` connections only from machines on the local subnet. -#+begin_src sh +```sh sudo ufw allow proto tcp from 192.168.0.0/24 to any port 22 -#+end_src +``` -If you need to set a rule that isn't tcp, just append your connection +If you need to set a rule that isn\'t tcp, just append your connection type to the end of the rule. -#+begin_src sh +```sh sudo ufw allow 1900/udp -#+end_src +``` + +# Enable ufw -* Enable ufw Now that the firewall is configured and ready to go, you can enable the firewall. -#+begin_src sh +```sh sudo ufw enable -#+end_src +``` A restart may be required for the firewall to begin operating. -#+begin_src sh +```sh sudo reboot now -#+end_src +``` -* Checking Status -Now that the firewall is enabled, let's check and see what the rules +# Checking Status + +Now that the firewall is enabled, let\'s check and see what the rules look like. -#+begin_src sh +```sh sudo ufw status numbered -#+end_src +``` -#+begin_src txt +``` txt Status: active To Action From -- ------ ---- [ 1] 22 ALLOW IN Anywhere [ 2] 22 (v6) ALLOW IN Anywhere (v6) -#+end_src +``` + +# Deleting Rules -* Deleting Rules If you need to delete a rule, you need to know the number associated -with that rule. Let's delete the first rule in the table above. You'll +with that rule. Let\'s delete the first rule in the table above. You\'ll be asked to confirm the deletion as part of this process. -#+begin_src sh +```sh sudo ufw delete 1 -#+end_src +``` -* Managing App Rules -Luckily, there's a convenient way for installed applications to create -files that ufw can easily implement so that you don't have to search and -find which ports your application requires. To see if your device has -any applications with pre-installed ufw rules, execute the following +# Managing App Rules + +Luckily, there\'s a convenient way for installed applications to create +files that ufw can easily implement so that you don\'t have to search +and find which ports your application requires. To see if your device +has any applications with pre-installed ufw rules, execute the following command: -#+begin_src sh +```sh sudo ufw app list -#+end_src +``` The results should look something like this: -#+begin_src txt +``` txt Available applications: OpenSSH Samba plexmediaserver plexmediaserver-all plexmediaserver-dlna -#+end_src +``` If you want to get more information on a specific app rule, use the -=info= command. +`info` command. -#+begin_src sh +```sh sudo ufw app info plexmediaserver-dlna -#+end_src +``` -You'll get a blurb of info back like this: +You\'ll get a blurb of info back like this: -#+begin_src txt +``` txt Profile: plexmediaserver-dlna Title: Plex Media Server (DLNA) Description: The Plex Media Server (additional DLNA capability only) @@ -154,28 +165,29 @@ Description: The Plex Media Server (additional DLNA capability only) Ports: 1900/udp 32469/tcp -#+end_src +``` -You can add or delete app rules the same way that you'd add or delete +You can add or delete app rules the same way that you\'d add or delete specific port rules. -#+begin_src sh +```sh sudo ufw allow plexmediaserver-dlna -#+end_src +``` -#+begin_src sh +```sh sudo ufw delete RULE|NUM -#+end_src +``` + +# Creating App Rules -* Creating App Rules -If you'd like to create you own app rule, you'll need to create a file -in the =/etc/ufw/applications.d= directory. Within the file you create, -you need to make sure the content is properly formatted. +If you\'d like to create you own app rule, you\'ll need to create a file +in the `/etc/ufw/applications.d` directory. Within the file +you create, you need to make sure the content is properly formatted. -For example, here are the contents my =plexmediaserver= file, which -creates three distinct app rules for ufw: +For example, here are the contents my `plexmediaserver` file, +which creates three distinct app rules for ufw: -#+begin_src config +``` config [plexmediaserver] title=Plex Media Server (Standard) description=The Plex Media Server @@ -190,24 +202,24 @@ ports=1900/udp|32469/tcp title=Plex Media Server (Standard + DLNA) description=The Plex Media Server (with additional DLNA capability) ports=32400/tcp|3005/tcp|5353/udp|8324/tcp|32410:32414/udp|1900/udp|32469/tcp -#+end_src +``` -So, if I wanted to create a custom app rule called "mycustomrule," I'd -create a file and add my content like this: +So, if I wanted to create a custom app rule called \"mycustomrule,\" +I\'d create a file and add my content like this: -#+begin_src sh +```sh sudo nano /etc/ufw/applications.d/mycustomrule -#+end_src +``` -#+begin_src config +``` config [mycustomrule] title=My Custom Rule description=This is a temporary ufw app rule. ports=88/tcp|9100/udp -#+end_src +``` Then, I would just enable this rule in ufw. -#+begin_src sh +```sh sudo ufw allow mycustomrule -#+end_src +``` diff --git a/content/blog/2021-02-19-macos.md b/content/blog/2021-02-19-macos.md new file mode 100644 index 0000000..26fdaa7 --- /dev/null +++ b/content/blog/2021-02-19-macos.md @@ -0,0 +1,215 @@ ++++ +date = 2021-02-19 +title = "macOS: Testing Out a New OS" +description = "" +draft = false ++++ + +# Diving into macOS + +After spending nearly 15 years working with Windows and 8 years on +Linux, I have experienced macOS for the first time. By chance, my spouse +happened to buy a new MacBook and gifted me their 2013 model. Of course, +I still consider my Linux desktop to be my daily driver and keep Windows +around for gaming needs, but over the past week I\'ve found myself using +the MacBook more and more for things that don\'t require gaming specs or +advanced dev tools. + +# Initial Thoughts + +Before I move on to the technical aspects of my set-up, I want to take +some time and express my thoughts on the overall OS. + + + +As expected, the initial computer setup is a breeze with Mac\'s guided +GUI installer. + +The desktop itself reminds me of GNOME more than anything else I\'ve +seen: even Pantheon from [ElementaryOS](https://elementary.io/), which +people commonly refer to as the closest Linux distro to macOS. The +desktop toolbar is great and far surpasses the utility of the GNOME +toolbar due to the fact that the extensions and icons *actually work*. I +launch macOS and immediately see my shortcuts for Tresorit, Bitwarden, +and Mullvad pop up as the computer loads. + +Even further, the app dock is very useful and will be yet another +familiarity for GNOME users. I know many people like panels instead of +docks, but I\'ve always found docks to have a more pleasing UI. However, +I had to disable the \"Show recent applications in Dock\" preference; I +can\'t stand items taking up precious screen space if I\'m not currently +using them. On that same note, it\'s taking me some time to get use to +the fact that I have to manually quit an app or else it will still stay +open/active in the dock, even if I\'ve closed out all windows for that +app (e.g. Firefox). + +Overall, I\'m having a lot of fun and for users who spend a large +majority of their time performing basic tasks like web browsing, +writing, watching media, etc., macOS is a fantastic option. + +The rest of this post explains the technicalities of how I set up my CLI +environment to make me feel more at-home, similar to the environments I +set up on Fedora, Ubuntu, etc. + +# Making it Feel Like Home + +If you\'re someone who uses Linux primarily, no doubt your first thought +when booting macOS will be the same as mine was: \"Where is the terminal +and how do I set up my favorite utilities?\" + +Luckily, macOS hasn\'t completely hidden away the development tools from +the average user. You can easily find the Terminal app in the Launchpad +area, but it\'s probably not what you\'re used to. I was surprised (and +happy) to see that the default shell is `zsh`, the shell I +use on all of my Linux distros. However, the commands are not the same - +even the ones you may think are native to the shell. Commands like +`dir` do not exist, so other native commands like +`ls -la` or `pwd` are more useful here. + +With only a few minutes of installing and tweaking a few packages, I was +able to recreate a terminal environment that I feel very comfortable +using. See the image below for a preview of the iTerm2 app with a split +view between my macOS desktop shell and an SSH session into my server. + + + +# Xcode + +My first step was to search the web for any hints on how to get +`zsh` back up to the state I like, with extensions, themes, +etc. My first step was to install the CLI tools for +[Xcode](https://developer.apple.com/xcode/), Apple\'s suite of +development tools. + +```sh +sudo xcode-select -r +``` + +```sh +sudo xcode-select --install +``` + +# Homebrew + +Next up is to install [Homebrew](https://brew.sh), a nifty package +manager for macOS. + +```sh +/bin/bash -c "$(curl -fsSL https://raw.githubusercontent.com/Homebrew/install/HEAD/install.sh)" +``` + +I ran into a permission error when installing Homebrew: + +```sh +Error: Failed to link all completions, docs and manpages: + Permission denied @ rb_file_s_symlink - (../../../Homebrew/completions/zsh/_brew, /usr/local/share/zsh/site-functions/_brew) +Failed during: /usr/local/bin/brew update --force --quiet +``` + +I found that the following permission modification worked like a charm. +However, I noted that some users online discussed the fact that this +solution may not work if your system has multiple users who use +Homebrew. + +```sh +sudo chown -R $(whoami) $(brew --prefix)/* +``` + +Next up is to ensure Homebrew is updated and cleaned. + +```sh +brew update +``` + +```sh +brew cleanup +``` + +# iTerm2 + +Now that I\'ve installed the basic utilities for development, I moved +onto installing iTerm2, a much better terminal than the default. + +```sh +brew install --cask iterm2 +``` + +I also used the `Make iTerm2 Default Term` and +`Install Shell Integration` options in the iTerm2 application +menu to make sure I don\'t run into any issues later on with different +terminals. + +We will also install `zsh` so we can use it in iTerm2. + +```sh +brew install zsh +``` + +# Oh-My-Zsh + +I\'ve shown the great aspects of [Oh My Zsh](https://ohmyz.sh) in other +blog posts, so I\'ll skip over that speech for now. Simply install it +and run an update. + +```sh +sh -c "$(curl -fsSL https://raw.githubusercontent.com/robbyrussell/oh-my-zsh/master/tools/install.sh)" +``` + +```sh +omz update +``` + +Finally, restart the iTerm2 application to ensure all changes go into +effect. + +# Oh-My-Zsh Themes + +Let\'s change the theme of the terminal to make it a little more +friendly. + +```sh +open ~/.zshrc +``` + +The third section of this file should contain a line like the code +below. Change that theme to [any theme you +want](https://github.com/ohmyzsh/ohmyzsh/wiki/Themes), save the file, +and exit. + +```sh +ZSH_THEME="af-magic" +``` + +After changing the `.zshrc` file, you\'ll need to close your +terminal and re-open it to see the changes. Optionally, just open a new +tab if you\'re using iTerm2, and you\'ll see the new shell config. + +# Oh-My-Zsh Plugins + +Of course, my customization of `zsh` would not be complete +without +[zsh-autosuggestions](https://github.com/zsh-users/zsh-autosuggestions). +This will bring up commands you\'ve run in the past as you type them. +For example, if you\'ve run `ssh user@192.168.1.99` before, +the terminal will show this command as soon as you start typing it (e.g. +`zsh u`), and you can hit the right arrow to autocomplete the +command. + +```sh +git clone https://github.com/zsh-users/zsh-autosuggestions ${ZSH_CUSTOM:-~/.oh-my-zsh/custom}/plugins/zsh-autosuggestions +``` + +```sh +open ~/.zshrc +``` + +```sh +# Scroll down the script and edit this line to add zsh-autosuggestions +plugins=(git zsh-autosuggestions) +``` + +Remember: After changing the `.zshrc` file, you\'ll need to +close your terminal and re-open it to see the changes. Optionally, just +open a new tab if you\'re using iTerm2, and you\'ll see the new shell +config. diff --git a/content/blog/2021-02-19-macos.org b/content/blog/2021-02-19-macos.org deleted file mode 100644 index 37aca9d..0000000 --- a/content/blog/2021-02-19-macos.org +++ /dev/null @@ -1,200 +0,0 @@ -#+title: macOS: Testing Out A New OS -#+date: 2021-02-19 -#+description: A retrospective on my migration from Linux to macOS. -#+filetags: :apple: - -* Diving into macOS -After spending nearly 15 years working with Windows and 8 years on -Linux, I have experienced macOS for the first time. By chance, my spouse -happened to buy a new MacBook and gifted me their 2013 model. Of course, -I still consider my Linux desktop to be my daily driver and keep Windows -around for gaming needs, but over the past week I've found myself using -the MacBook more and more for things that don't require gaming specs or -advanced dev tools. - -* Initial Thoughts -Before I move on to the technical aspects of my set-up, I want to take -some time and express my thoughts on the overall OS. - -#+caption: macOS Desktop -[[https://img.cleberg.net/blog/20210219-macos-testing-out-a-new-os/macos-desktop.png]] - -As expected, the initial computer setup is a breeze with Mac's guided -GUI installer. - -The desktop itself reminds me of GNOME more than anything else I've -seen: even Pantheon from [[https://elementary.io/][ElementaryOS]], which -people commonly refer to as the closest Linux distro to macOS. The -desktop toolbar is great and far surpasses the utility of the GNOME -toolbar due to the fact that the extensions and icons /actually work/. I -launch macOS and immediately see my shortcuts for Tresorit, Bitwarden, -and Mullvad pop up as the computer loads. - -Even further, the app dock is very useful and will be yet another -familiarity for GNOME users. I know many people like panels instead of -docks, but I've always found docks to have a more pleasing UI. However, -I had to disable the "Show recent applications in Dock" preference; I -can't stand items taking up precious screen space if I'm not currently -using them. On that same note, it's taking me some time to get use to -the fact that I have to manually quit an app or else it will still stay -open/active in the dock, even if I've closed out all windows for that -app (e.g. Firefox). - -Overall, I'm having a lot of fun and for users who spend a large -majority of their time performing basic tasks like web browsing, -writing, watching media, etc., macOS is a fantastic option. - -The rest of this post explains the technicalities of how I set up my CLI -environment to make me feel more at-home, similar to the environments I -set up on Fedora, Ubuntu, etc. - -* Making it Feel Like Home -If you're someone who uses Linux primarily, no doubt your first thought -when booting macOS will be the same as mine was: "Where is the terminal -and how do I set up my favorite utilities?" - -Luckily, macOS hasn't completely hidden away the development tools from -the average user. You can easily find the Terminal app in the Launchpad -area, but it's probably not what you're used to. I was surprised (and -happy) to see that the default shell is =zsh=, the shell I use on all of -my Linux distros. However, the commands are not the same - even the ones -you may think are native to the shell. Commands like =dir= do not exist, -so other native commands like =ls -la= or =pwd= are more useful here. - -With only a few minutes of installing and tweaking a few packages, I was -able to recreate a terminal environment that I feel very comfortable -using. See the image below for a preview of the iTerm2 app with a split -view between my macOS desktop shell and an SSH session into my server. - -#+caption: iTerm2 -[[https://img.cleberg.net/blog/20210219-macos-testing-out-a-new-os/iterm2.png]] - -* Xcode -My first step was to search the web for any hints on how to get =zsh= -back up to the state I like, with extensions, themes, etc. My first step -was to install the CLI tools for -[[https://developer.apple.com/xcode/][Xcode]], Apple's suite of -development tools. - -#+begin_src sh -sudo xcode-select -r -#+end_src - -#+begin_src sh -sudo xcode-select --install -#+end_src - -* Homebrew -Next up is to install [[https://brew.sh][Homebrew]], a nifty package -manager for macOS. - -#+begin_src sh -/bin/bash -c "$(curl -fsSL https://raw.githubusercontent.com/Homebrew/install/HEAD/install.sh)" -#+end_src - -I ran into a permission error when installing Homebrew: - -#+begin_src sh -Error: Failed to link all completions, docs and manpages: - Permission denied @ rb_file_s_symlink - (../../../Homebrew/completions/zsh/_brew, /usr/local/share/zsh/site-functions/_brew) -Failed during: /usr/local/bin/brew update --force --quiet -#+end_src - -I found that the following permission modification worked like a charm. -However, I noted that some users online discussed the fact that this -solution may not work if your system has multiple users who use -Homebrew. - -#+begin_src sh -sudo chown -R $(whoami) $(brew --prefix)/* -#+end_src - -Next up is to ensure Homebrew is updated and cleaned. - -#+begin_src sh -brew update -#+end_src - -#+begin_src sh -brew cleanup -#+end_src - -* iTerm2 -Now that I've installed the basic utilities for development, I moved -onto installing iTerm2, a much better terminal than the default. - -#+begin_src sh -brew install --cask iterm2 -#+end_src - -I also used the =Make iTerm2 Default Term= and -=Install Shell Integration= options in the iTerm2 application menu to -make sure I don't run into any issues later on with different terminals. - -We will also install =zsh= so we can use it in iTerm2. - -#+begin_src sh -brew install zsh -#+end_src - -* Oh-My-Zsh -I've shown the great aspects of [[https://ohmyz.sh][Oh My Zsh]] in other -blog posts, so I'll skip over that speech for now. Simply install it and -run an update. - -#+begin_src sh -sh -c "$(curl -fsSL https://raw.githubusercontent.com/robbyrussell/oh-my-zsh/master/tools/install.sh)" -#+end_src - -#+begin_src sh -omz update -#+end_src - -Finally, restart the iTerm2 application to ensure all changes go into -effect. - -* Oh-My-Zsh Themes -Let's change the theme of the terminal to make it a little more -friendly. - -#+begin_src sh -open ~/.zshrc -#+end_src - -The third section of this file should contain a line like the code -below. Change that theme to -[[https://github.com/ohmyzsh/ohmyzsh/wiki/Themes][any theme you want]], -save the file, and exit. - -#+begin_src sh -ZSH_THEME="af-magic" -#+end_src - -After changing the =.zshrc= file, you'll need to close your terminal and -re-open it to see the changes. Optionally, just open a new tab if you're -using iTerm2, and you'll see the new shell config. - -* Oh-My-Zsh Plugins -Of course, my customization of =zsh= would not be complete without -[[https://github.com/zsh-users/zsh-autosuggestions][zsh-autosuggestions]]. -This will bring up commands you've run in the past as you type them. For -example, if you've run =ssh user@192.168.1.99= before, the terminal will -show this command as soon as you start typing it (e.g. =zsh u=), and you -can hit the right arrow to autocomplete the command. - -#+begin_src sh -git clone https://github.com/zsh-users/zsh-autosuggestions ${ZSH_CUSTOM:-~/.oh-my-zsh/custom}/plugins/zsh-autosuggestions -#+end_src - -#+begin_src sh -open ~/.zshrc -#+end_src - -#+begin_src sh -# Scroll down the script and edit this line to add zsh-autosuggestions -plugins=(git zsh-autosuggestions) -#+end_src - -Remember: After changing the =.zshrc= file, you'll need to close your -terminal and re-open it to see the changes. Optionally, just open a new -tab if you're using iTerm2, and you'll see the new shell config. diff --git a/content/blog/2021-03-19-clone-github-repos.org b/content/blog/2021-03-19-clone-github-repos.md index 3814e9f..f5db436 100644 --- a/content/blog/2021-03-19-clone-github-repos.org +++ b/content/blog/2021-03-19-clone-github-repos.md @@ -1,55 +1,60 @@ -#+title: How to Clone All Repositories from a GitHub or Sourcehut Account -#+date: 2021-03-19 -#+description: Learn how to clone all GitHub or Sourcehut repositories. -#+filetags: :dev: ++++ +date = 2021-03-19 +title = "How to Clonse All Repositories from a GitHub or Sourcehut Account" +description = "" +draft = false ++++ -* Cloning from GitHub -If you're like me and use a lot of different devices (and sometimes +# Cloning from GitHub + +If you\'re like me and use a lot of different devices (and sometimes decide to just wipe your device and start with a new OS), you probably know the pain of cloning all your old code repositories down to your local file system. -If you're using GitHub, you can easily clone all of your code back down +If you\'re using GitHub, you can easily clone all of your code back down in just seconds. First, create a bash script. I do so by opening a new -file in =nano=, but you can use =gedit=, =vim=, or something else: +file in `nano`, but you can use `gedit`, +`vim`, or something else: -#+begin_src sh +```sh nano clone_github_repos.sh -#+end_src +``` Next, paste in the following information. Note that you can replace the -word =users= in the first line with =orgs= and type an organization's -name instead of a user's name. +word `users` in the first line with `orgs` and +type an organization\'s name instead of a user\'s name. -#+begin_src sh +```sh CNTX=users; NAME=YOUR-USERNAME; PAGE=1 curl "https://api.github.com/$CNTX/$NAME/repos?page=$PAGE&per_page=100" | grep -e 'git_url*' | cut -d \" -f 4 | xargs -L1 git clone -#+end_src +``` Finally, save the bash script and make it executable. -#+begin_src sh +```sh chmod a+x clone_github_repos.sh -#+end_src +``` Now you can run the script and should see the cloning process begin. -#+begin_src sh +```sh ./clone_github_repos.sh -#+end_src +``` + +# Cloning from Sourcehut -* Cloning from Sourcehut -I haven't fully figured out how to directly incorporate Sourcehut's +I haven\'t fully figured out how to directly incorporate Sourcehut\'s GraphQL API into a bash script yet, so this one will take two steps. -First, log-in to Sourcehut and go to their -[[https://git.sr.ht/graphql][GraphQL playground for Git]]. Next, paste -the following query into the left box: +First, log-in to Sourcehut and go to their [GraphQL playground for +Git](https://git.sr.ht/graphql). Next, paste the following query into +the left box: -#+begin_src sh +```sh query { me { canonicalName @@ -61,27 +66,28 @@ query { } } } -#+end_src +``` The output on the right side will give you an object of all your repositories. Just grab that text and remove all the characters such as quotation marks and curly brackets. You will need a single-line list of space-separated values for the next step. -Now let's create the bash script: +Now let\'s create the bash script: -#+begin_src sh +```sh nano clone_sourcehut_repos.sh -#+end_src +``` Next, paste the following bash script in with the list of repositories -you obtained above and replace =your-username= with your username. +you obtained above and replace `your-username` with your +username. -Note that this uses the SSH-based Git cloning method -(e.g. =git@git...=), so you'll need to ensure you have set up Sourcehut -with your SSH key. +Note that this uses the SSH-based Git cloning method (e.g. +`git@git...`), so you\'ll need to ensure you have set up +Sourcehut with your SSH key. -#+begin_src sh +```sh repos=(repo1 repo2 repo3) # List all sub-directories in the current directory @@ -90,35 +96,37 @@ do # Clone git clone git@git.sr.ht:~your-username/$repo done -#+end_src +``` Finally, save the bash script and make it executable. -#+begin_src sh +```sh chmod a+x clone_sourcehut_repos.sh -#+end_src +``` Now you can run the script and should see the cloning process begin. -#+begin_src sh +```sh ./clone_sourcehut_repos.sh -#+end_src +``` + +# Moving Repositories to a New Host -* Moving Repositories to a New Host Now that you have all of your code repositories cloned to your local computer, you may want to change the remote host (e.g., moving from -GitHub to GitLab). To do this, let's create another bash script: +GitHub to GitLab). To do this, let\'s create another bash script: -#+begin_src sh +```sh nano change_remote_urls.sh -#+end_src +``` Past the following information and be sure to change the URL information to whichever host you are moving to. For this example, I am looping through all of my cloned GitHub directories and changing them to -Sourcehut (e.g. =<YOUR_NEW_REMOTE_URL>= -> =git@git.sr.ht:~myusername=). +Sourcehut (e.g. `<YOUR_NEW_REMOTE_URL>` -\> +`git@git.sr.ht:~myusername`). -#+begin_src sh +```sh # List all sub-directories in the current directory for dir in */ do @@ -133,16 +141,16 @@ do # Go back to main directory cd .. done -#+end_src +``` Finally, save the bash script and make it executable. -#+begin_src sh +```sh chmod a+x change_remote_urls.sh -#+end_src +``` Now you can run the script and should see the cloning process begin. -#+begin_src sh +```sh ./change_remote_urls.sh -#+end_src +``` diff --git a/content/blog/2021-03-28-gemini-capsule.md b/content/blog/2021-03-28-gemini-capsule.md new file mode 100644 index 0000000..0fb2a2c --- /dev/null +++ b/content/blog/2021-03-28-gemini-capsule.md @@ -0,0 +1,186 @@ ++++ +date = 2021-03-28 +title = "Launching a Gemini Capsule" +description = "" +draft = false ++++ + +# What is Gemini? + +[Gemini](https://gemini.circumlunar.space/) is an internet protocol +introduced in June 2019 as an alternative to HTTP(S) or Gopher. In +layman\'s terms, it\'s an alternative way to browse sites (called +capsules) that requires a special browser. Since Gemini is not +standardized as an internet standard, normal web browsers won\'t be able +to load a Gemini capsule. Instead, you\'ll need to use [a +Gemini-specific +browser](https://gemini.%20circumlunar.space/clients.html). + +The content found within a Gemini page is called +[Gemtext](https://gemini.circumlunar.space/docs/cheatsheet.gmi) and is +*extremely* basic (on purpose). Gemini only processes the text, no media +content like images. However, you\'re able to style 3 levels of +headings, regular text, links (which will display on their own line), +quotes, and an unordered list. + +Here\'s a complete listing of valid Gemtext: + +``` txt +# Heading 1 +## Heading 2 +### Heading 3 + +Regular text! Lorem ipsum dolor sit amet. + +=> https://example.com My Website +=> gemini://example.com My Gemini Capsule + +> "If life were predictable it would cease to be life, and be without flavor." - Eleanor Roosevelt + +My List: +** Item +** Item + +```Anything between three backticks will be rendered as code.``` +``` + +### Free Option + +There are probably numerous websites that allow you to create your +personal Gemini capsule, but I\'m going to focus on the two sites that I +have personally tested. The first option below, Midnight Pub, allows you +to create/edit any Gemini files you want in your account. This is +essentially a GUI option with a built-in text box for editing. The +second option below, Sourcehut, allows you to use a Git repository and +automatic build process to deploy your personal Gemini capsule every +time you push a commit. + +## Midnight Pub - Beginner Friendly + +[Midnight Pub](https://midnight.pub/) is a small, virtual community +meant to reflect the atmosphere of wandering into a small alley pub. The +site is built in Gemtext and has a server-side process to convert +Gemtext to HTML if someone loads the site in an HTTP(S) browser. + +To create an account, you\'ll need to email the owner of the website to +obtain a key. You can find their email on the Midnight Pub homepage. +Once registered, head to [your account](https://midnight.pub/account) +and select [manage site](https://midnight.pub/site). This is the screen +where you can upload or create any files to be displayed on the +internet. + +For example, I\'ve created both an HTML file and a Gemini file. Remember +that Gemini is automatically converted to HTML on the Pub, so you don\'t +need an HTML version. For example, I created an HTML version to add in +some extra styling. + +All you need to do is create a page like `index.gmi` and use +your Gemini browser to head over to your-username.midnight.pub to see +the result. + +That\'s all there is to it! Easy enough, right? Let\'s check out a more +advanced version in the next section. + +# Paid Option + +As of 2021, Sourcehut has decided to require users to have a paid +account in order to utilize their automated build system. For now, paid +accounts can be as low as \$2/month. + +## Sourcehut + +[Sourcehut](https://sourcehut.org/) is a collection of software +development tools, but mostly surrounds their hosted Git repository +service. Simply put, it\'s a minimal and more private alternative to +services like GitHub. + +This walkthrough is more advanced and involves things like Git, SSH, the +command line. If you don\'t think you know enough to do this, check out +my walkthrough on creating a Gemini capsule for the Midnight Pub +instead. + +The first thing you\'ll need to do is create an SSH key pair, if you +don\'t already have one on your system. Once created, grab the contents +of `id_rsa.pub` and add it to your Sourcehut account +settings - this will allow you to push and pull code changes without +using a username/password. + +```sh +ssh keygen +``` + +Next up, let\'s create a repository with the proper name so that the +Sourcehut build system will know we want them to host a website for us. +Use the following format exactly: + +```sh +mkdir your-username.srht.site && cd your-username.srht.site +``` + +Now that we\'ve created the repo, let\'s initialize Git and add the +proper remote URL. + +```sh +git init +``` + +```sh +git remote add origin git@git.sr.ht:~your-username/your-username.srht.site +``` + +Now that our repository is set up and configured, we will need to create +at least two files: + +- `index.gmi` +- `.build.yml` + +For your `.build.yml` file, use the following content and be +sure to update the `site` line with your username! + +``` yaml +image: alpine/latest +oauth: pages.sr.ht/PAGES:RW +environment: + site: your-username.srht.site +tasks: + - package: | + cd $site + tar -cvz . > ../site.tar.gz + - upload: | + acurl -f https://pages.sr.ht/publish/$site -Fcontent=@site.tar.gz -Fprotocol=GEMINI +``` + +For the `index.gmi` file, put whatever you want in there and +save it. You could even just copy and paste the Gemtext cheatsheet. + +If you want to serve both HTML and Gemini files from this repository, +just add a second command to the `upload` section: + +``` yaml +- upload: | + acurl -f https://pages.sr.ht/publish/$site -Fcontent=@site.tar.gz -Fprotocol=GEMINI + acurl -f https://pages.sr.ht/publish/$site -Fcontent=@site.tar.gz +``` + +Lastly, commit your changes and push them to the remote repo. + +```sh +git add .; git commit -m "initial commit"; git push --set-upstream origin HEAD +``` + +If you\'ve successfully created the files with the proper format, +you\'ll see the terminal print a message that lets you know where the +automatic build is taking place. For example, here\'s what the terminal +tells me: + +```sh +remote: Build started: +remote: https://builds.sr.ht/~user/job/689803 [.build.yml] +``` + +Now that you\'ve properly built your Sourcehut page, you can browse to +your-username.srht.site in a Gemini browser and view the final results. +Take a look at the image below for my Sourcehut Gemini capsule. + + diff --git a/content/blog/2021-03-28-gemini-capsule.org b/content/blog/2021-03-28-gemini-capsule.org deleted file mode 100644 index 69fd8f2..0000000 --- a/content/blog/2021-03-28-gemini-capsule.org +++ /dev/null @@ -1,177 +0,0 @@ -#+title: Launching a Gemini Capsule -#+date: 2021-03-28 -#+description: A guide to self-hosting a Gemini capsule on your own server. -#+filetags: :dev: - -* What is Gemini? -[[https://gemini.circumlunar.space/][Gemini]] is an internet protocol -introduced in June 2019 as an alternative to HTTP(S) or Gopher. In -layman's terms, it's an alternative way to browse sites (called -capsules) that requires a special browser. Since Gemini is not -standardized as an internet standard, normal web browsers won't be able -to load a Gemini capsule. Instead, you'll need to use -[[https://gemini.%20circumlunar.space/clients.html][a Gemini-specific -browser]]. - -The content found within a Gemini page is called -[[https://gemini.circumlunar.space/docs/cheatsheet.gmi][Gemtext]] and is -/extremely/ basic (on purpose). Gemini only processes the text, no media -content like images. However, you're able to style 3 levels of headings, -regular text, links (which will display on their own line), quotes, and -an unordered list. - -Here's a complete listing of valid Gemtext: - -#+begin_src txt -# Heading 1 -## Heading 2 -### Heading 3 - -Regular text! Lorem ipsum dolor sit amet. - -=> https://example.com My Website -=> gemini://example.com My Gemini Capsule - -> "If life were predictable it would cease to be life, and be without flavor." - Eleanor Roosevelt - -My List: -,** Item -,** Item - -```Anything between three backticks will be rendered as code.``` -#+end_src - -*** Free Option -There are probably numerous websites that allow you to create your -personal Gemini capsule, but I'm going to focus on the two sites that I -have personally tested. The first option below, Midnight Pub, allows you -to create/edit any Gemini files you want in your account. This is -essentially a GUI option with a built-in text box for editing. The -second option below, Sourcehut, allows you to use a Git repository and -automatic build process to deploy your personal Gemini capsule every -time you push a commit. - -** Midnight Pub - Beginner Friendly -[[https://midnight.pub/][Midnight Pub]] is a small, virtual community -meant to reflect the atmosphere of wandering into a small alley pub. The -site is built in Gemtext and has a server-side process to convert -Gemtext to HTML if someone loads the site in an HTTP(S) browser. - -To create an account, you'll need to email the owner of the website to -obtain a key. You can find their email on the Midnight Pub homepage. -Once registered, head to [[https://midnight.pub/account][your account]] -and select [[https://midnight.pub/site][manage site]]. This is the -screen where you can upload or create any files to be displayed on the -internet. - -For example, I've created both an HTML file and a Gemini file. Remember -that Gemini is automatically converted to HTML on the Pub, so you don't -need an HTML version. For example, I created an HTML version to add in -some extra styling. - -All you need to do is create a page like =index.gmi= and use your Gemini -browser to head over to your-username.midnight.pub to see the result. - -That's all there is to it! Easy enough, right? Let's check out a more -advanced version in the next section. - -* Paid Option -As of 2021, Sourcehut has decided to require users to have a paid -account in order to utilize their automated build system. For now, paid -accounts can be as low as $2/month. - -** Sourcehut -[[https://sourcehut.org/][Sourcehut]] is a collection of software -development tools, but mostly surrounds their hosted Git repository -service. Simply put, it's a minimal and more private alternative to -services like GitHub. - -This walkthrough is more advanced and involves things like Git, SSH, the -command line. If you don't think you know enough to do this, check out -my walkthrough on creating a Gemini capsule for the Midnight Pub -instead. - -The first thing you'll need to do is create an SSH key pair, if you -don't already have one on your system. Once created, grab the contents -of =id_rsa.pub= and add it to your Sourcehut account settings - this -will allow you to push and pull code changes without using a -username/password. - -#+begin_src sh -ssh keygen -#+end_src - -Next up, let's create a repository with the proper name so that the -Sourcehut build system will know we want them to host a website for us. -Use the following format exactly: - -#+begin_src sh -mkdir your-username.srht.site && cd your-username.srht.site -#+end_src - -Now that we've created the repo, let's initialize Git and add the proper -remote URL. - -#+begin_src sh -git init -#+end_src - -#+begin_src sh -git remote add origin git@git.sr.ht:~your-username/your-username.srht.site -#+end_src - -Now that our repository is set up and configured, we will need to create -at least two files: - -- =index.gmi= -- =.build.yml= - -For your =.build.yml= file, use the following content and be sure to -update the =site= line with your username! - -#+begin_src yaml -image: alpine/latest -oauth: pages.sr.ht/PAGES:RW -environment: - site: your-username.srht.site -tasks: - - package: | - cd $site - tar -cvz . > ../site.tar.gz - - upload: | - acurl -f https://pages.sr.ht/publish/$site -Fcontent=@site.tar.gz -Fprotocol=GEMINI -#+end_src - -For the =index.gmi= file, put whatever you want in there and save it. -You could even just copy and paste the Gemtext cheatsheet. - -If you want to serve both HTML and Gemini files from this repository, -just add a second command to the =upload= section: - -#+begin_src yaml -- upload: | - acurl -f https://pages.sr.ht/publish/$site -Fcontent=@site.tar.gz -Fprotocol=GEMINI - acurl -f https://pages.sr.ht/publish/$site -Fcontent=@site.tar.gz -#+end_src - -Lastly, commit your changes and push them to the remote repo. - -#+begin_src sh -git add .; git commit -m "initial commit"; git push --set-upstream origin HEAD -#+end_src - -If you've successfully created the files with the proper format, you'll -see the terminal print a message that lets you know where the automatic -build is taking place. For example, here's what the terminal tells me: - -#+begin_src sh -remote: Build started: -remote: https://builds.sr.ht/~user/job/689803 [.build.yml] -#+end_src - -Now that you've properly built your Sourcehut page, you can browse to -your-username.srht.site in a Gemini browser and view the final results. -Take a look at the image below for my Sourcehut Gemini capsule. - -#+caption: Gemini page on the amfora browser -[[https://img.cleberg.net/blog/20210328-launching-a-gemini-capsule/amfora.png]] diff --git a/content/blog/2021-03-28-vaporwave-vs-outrun.md b/content/blog/2021-03-28-vaporwave-vs-outrun.md new file mode 100644 index 0000000..1ac49e9 --- /dev/null +++ b/content/blog/2021-03-28-vaporwave-vs-outrun.md @@ -0,0 +1,133 @@ ++++ +date = 2021-03-28 +title = "Vaporware vs. Outrun" +description = "" +draft = false ++++ + +# Overview + +When it comes to an aesthetic that originated primarily online, there +tends to be a lot of confusion around what falls into each specific +genre. This post discusses Vaporwave and Outrun, which have become +almost synonymous in the minds of those online who aren\'t hardcore into +these genres of media. More specifically, Outrun is largely an unknown +term while all aesthetics in these two genres are usually attributed to +Vaporwave. For example, take a look at the image search results for +Vaporwave: the results include **a lot\*** of Outrun-themed images. +You\'ll find a similar trend almost everywhere. + + + +# Vaporwave + + + +Okay, so what is Vaporwave? I\'m going to just copy-and-paste some +general info from the Wikipedia article on +[Vaporwave](https://en.wikipedia.org/wiki/Vaporwave), so that I\'m not +repeating everything you can already search for online: + +> Vaporwave is a microgenre of electronic music, a visual art style, and +> an Internet meme that emerged in the early 2010s. It is defined partly +> by its slowed-down, chopped and screwed samples of smooth jazz, +> elevator, R&B, and lounge music from the 1980s and 1990s. The +> surrounding subculture is sometimes associated with an ambiguous or +> satirical take on consumer capitalism and pop culture, and tends to be +> characterized by a nostalgic or surrealist engagement with the popular +> entertainment, technology and advertising of previous decades. +> Visually, it incorporates early Internet imagery, late 1990s web +> design, glitch art, anime, 3D-rendered objects, and cyberpunk tropes +> in its cover artwork and music videos. + +This is an excellent summary, and it helps address my point here: there +are specific aspects that make Vaporwave unique: + +## Time Frame + +The time frame for references, logos, etc. focuses mostly on the 1990s +in Vaporwave. You\'ll see old school Pepsi logos, Microsoft 95 screens, +tropical plants, classic marble sculptures, and many references from +Japan\'s influence in the 90s. + +## Art + +The color scheme is generally a soft, light palette that uses pastel +colors. The backdrop will often be in a light-pink or teal blue. + +## Music + +The musical genre of Vaporwave incorporates soft tunes, lounge music, +and sound effects that will make the listener reminisce of the 90s. The +sounds of the genre are generally slower-paced and calming. The major +breakthrough artist for Vaporwave was [Macintosh +Plus](https://en.wikipedia.org/wiki/Vektroid), who released the album +[Floral +Shoppe](https://archive.org/details/MACINTOSHPLUS-FLORALSHOPPE_complete) +in 2011. Another more recent example is the artist +[sadbert](https://sadbert.bandcamp.com/), whose latest album +incorporates the upbeat tones of the 1999 Dilbert TV series. + +Notice that Vaporwave doesn\'t include things like racing cars, +futuristic technology, chrome, or the deep orange/purple color scheme. +Vaporwave is a focus on the idyllic state of the world when technology +was becoming common in households, a reality that we have already +experienced. Focus on the most aesthetically-pleasing parts of that past +is a large part of Vaporwave. + +# Outrun + + + +Now, let\'s get to Outrun. This one is a little trickier since the genre +has largely been lumped under the Vaporwave title for so long. However, +it stems from the [Synthwave](https://en.wikipedia.org/wiki/Synthwave) +music genre and is likely named after the 1986 racer game, [Out +Run](https://en.wikipedia.org/wiki/Out_Run). + +## Time Frame + +Outrun can be thought of as a retro-futuristic aesthetic born from the +1980s. + +## Art + +The color scheme uses a very dark color palette with the main colors +being deep oranges, blues, and purples. Red edges are common around +objects in Outrun art. The background of the Outrun aesthetic is almost +always a neon grid like you\'d expect to see in Tron or a 1980s arcade +machine. + +Classic sports cars, chrome robots, computer generated graphics and +fonts, and the occasional use of rain or palm trees can be found in +Outrun art. + +## Music + +This aesthetic has a more aggressive and fast-paced style of music, +which tends to match the subject of the art in this aesthetic. + +Outrun enthusiasts love what people in the 1980s thought the future +would look like. Take a look at a common video game discussed in Outrun +circles, Far Cry 3: Blood Dragon: + + + +Another example that doesn\'t force the color scheme as hard as some +online art does is Kung Fury: + + + + + +# Conclusion + +While Vaporwave and Outrun share similarities, they are two distinct +aesthetics with many important distinctions. Someone who enjoys one may +not necessarily enjoy the other, so it\'s important to make sure we +properly describe the aesthetic we\'re looking for. diff --git a/content/blog/2021-03-28-vaporwave-vs-outrun.org b/content/blog/2021-03-28-vaporwave-vs-outrun.org deleted file mode 100644 index e268a3d..0000000 --- a/content/blog/2021-03-28-vaporwave-vs-outrun.org +++ /dev/null @@ -1,124 +0,0 @@ -#+title: Vaporwave vs Outrun -#+date: 2021-03-28 -#+description: Learn the differences between the vaporwave and Outrun aesthetics. -#+filetags: :personal: - -* Overview -When it comes to an aesthetic that originated primarily online, there -tends to be a lot of confusion around what falls into each specific -genre. This post discusses Vaporwave and Outrun, which have become -almost synonymous in the minds of those online who aren't hardcore into -these genres of media. More specifically, Outrun is largely an unknown -term while all aesthetics in these two genres are usually attributed to -Vaporwave. For example, take a look at the image search results for -Vaporwave: the results include *a lot** of Outrun-themed images. You'll -find a similar trend almost everywhere. - -#+caption: Vaporwave Search Results -[[https://img.cleberg.net/blog/20210328-vaporwave-vs-outrun/vaporwave-search-results.png]] - -* Vaporwave -#+caption: Macintosh Plus Album Cover -[[https://img.cleberg.net/blog/20210328-vaporwave-vs-outrun/macintosh-plus.png]] - -Okay, so what is Vaporwave? I'm going to just copy-and-paste some -general info from the Wikipedia article on -[[https://en.wikipedia.org/wiki/Vaporwave][Vaporwave]], so that I'm not -repeating everything you can already search for online: - -#+begin_quote -Vaporwave is a microgenre of electronic music, a visual art style, and -an Internet meme that emerged in the early 2010s. It is defined partly -by its slowed-down, chopped and screwed samples of smooth jazz, -elevator, R&B, and lounge music from the 1980s and 1990s. The -surrounding subculture is sometimes associated with an ambiguous or -satirical take on consumer capitalism and pop culture, and tends to be -characterized by a nostalgic or surrealist engagement with the popular -entertainment, technology and advertising of previous decades. Visually, -it incorporates early Internet imagery, late 1990s web design, glitch -art, anime, 3D-rendered objects, and cyberpunk tropes in its cover -artwork and music videos. -#+end_quote - -This is an excellent summary, and it helps address my point here: there -are specific aspects that make Vaporwave unique: - -** Time Frame -The time frame for references, logos, etc. focuses mostly on the 1990s -in Vaporwave. You'll see old school Pepsi logos, Microsoft 95 screens, -tropical plants, classic marble sculptures, and many references from -Japan's influence in the 90s. - -** Art -The color scheme is generally a soft, light palette that uses pastel -colors. The backdrop will often be in a light-pink or teal blue. - -** Music -The musical genre of Vaporwave incorporates soft tunes, lounge music, -and sound effects that will make the listener reminisce of the 90s. The -sounds of the genre are generally slower-paced and calming. The major -breakthrough artist for Vaporwave was -[[https://en.wikipedia.org/wiki/Vektroid][Macintosh Plus]], who released -the album -[[https://archive.org/details/MACINTOSHPLUS-FLORALSHOPPE_complete][Floral -Shoppe]] in 2011. Another more recent example is the artist -[[https://sadbert.bandcamp.com/][sadbert]], whose latest album -incorporates the upbeat tones of the 1999 Dilbert TV series. - -Notice that Vaporwave doesn't include things like racing cars, -futuristic technology, chrome, or the deep orange/purple color scheme. -Vaporwave is a focus on the idyllic state of the world when technology -was becoming common in households, a reality that we have already -experienced. Focus on the most aesthetically-pleasing parts of that past -is a large part of Vaporwave. - -* Outrun -#+caption: Outrun -[[https://img.cleberg.net/blog/20210328-vaporwave-vs-outrun/outrun.png]] - -Now, let's get to Outrun. This one is a little trickier since the genre -has largely been lumped under the Vaporwave title for so long. However, -it stems from the [[https://en.wikipedia.org/wiki/Synthwave][Synthwave]] -music genre and is likely named after the 1986 racer game, -[[https://en.wikipedia.org/wiki/Out_Run][Out Run]]. - -** Time Frame -Outrun can be thought of as a retro-futuristic aesthetic born from the -1980s. - -** Art -The color scheme uses a very dark color palette with the main colors -being deep oranges, blues, and purples. Red edges are common around -objects in Outrun art. The background of the Outrun aesthetic is almost -always a neon grid like you'd expect to see in Tron or a 1980s arcade -machine. - -Classic sports cars, chrome robots, computer generated graphics and -fonts, and the occasional use of rain or palm trees can be found in -Outrun art. - -** Music -This aesthetic has a more aggressive and fast-paced style of music, -which tends to match the subject of the art in this aesthetic. - -Outrun enthusiasts love what people in the 1980s thought the future -would look like. Take a look at a common video game discussed in Outrun -circles, Far Cry 3: Blood Dragon: - -#+caption: Fry Cry 3: Blood Dragon -[[https://img.cleberg.net/blog/20210328-vaporwave-vs-outrun/far-cry.png]] - -Another example that doesn't force the color scheme as hard as some -online art does is Kung Fury: - -#+caption: Kung Fury -[[https://img.cleberg.net/blog/20210328-vaporwave-vs-outrun/kung-fury.png]] - -#+caption: Kung Fury Hacker Scene -[[https://img.cleberg.net/blog/20210328-vaporwave-vs-outrun/kung-fury-hacker.png]] - -* Conclusion -While Vaporwave and Outrun share similarities, they are two distinct -aesthetics with many important distinctions. Someone who enjoys one may -not necessarily enjoy the other, so it's important to make sure we -properly describe the aesthetic we're looking for. diff --git a/content/blog/2021-03-30-vps-web-server.md b/content/blog/2021-03-30-vps-web-server.md new file mode 100644 index 0000000..f3a29bf --- /dev/null +++ b/content/blog/2021-03-30-vps-web-server.md @@ -0,0 +1,418 @@ ++++ +date = 2021-03-30 +title = "How to Set Up a VPS Web Server" +description = "" +draft = false ++++ + +# Shared Hosting vs. VPS + +Choosing a place to host a website is one of the most confusing +decisions for beginner web developers. Even for experienced web devs, +choosing between different forms of web hosting can be a daunting +choice. + +First, let\'s take a look at [shared web +hosting](https://en.wikipedia.org/wiki/Shared_web_hosting_service). +Shared web hosting is a product where you are purchasing a small piece +of a web server that is being shared between many websites. As a result, +the cost of shared hosting is extremely low. You won\'t have access to +the server itself, which means you can\'t install your own software on +the server, such as Docker. Usually, you are simply allowed to connect +your domains to the server, set up domain security, and other small +utilities. + +In contrast, a [virtual private +server](https://en.wikipedia.org/wiki/Virtual_private_server) (VPS) is a +virtual machine that replicates the environment of having a dedicated +server to yourself. You are able to control the virtual server\'s host +names, base file system, package manager, etc. Another great upside of a +VPS is that since it\'s virtual, the company providing the VPS can +dynamically increase the disk size, RAM size, or number of CPUs at any +time. However, the virtual server is still physically located on a +server that is shared between multiple virtual servers. + +The choice between shared hosting and VPS mostly depends on your skill +level with system administration. If you\'re comforting working on a +server that is mostly left up to you (or you\'re willing to learn), then +a VPS is usually a better option. However, shared hosting is a fantastic +option for people who don\'t want to have to learn how to manage their +server. + +# My Situation + +I had used shared hosting for approximately 5 years before trying my +first VPS. I manage a homelab and have had success running a server and +performing typical sysadmin duties, but I was still hesitant to get a +VPS. One fear was that I always struggled to properly set up the +networking part of a server - DNS and hostname configurations were not +my friend. + +As a little bit of background, I originally used +[Siteground](https://www.siteground.com) for my initially shared hosting +and stayed on that platform for at least a year. However, the UI was +clunky, and I didn\'t like how they handled certain technical aspects, +so I switched to [Namecheap](https://www.namecheap.com). Namecheap was +great because it is the service I primarily use for purchasing domain +names, which made it incredibly easy to link them to my hosting service. +However, it was still mediocre shared hosting, and Namecheap is +notorious for not letting you use [Let\'s +Encrypt](https://letsencrypt.org) to obtain free SSL/TLS certificates; +Namecheap wants to make you purchase certificates through their store. + +Finally, I settled down with [iWebFusion](https://www.iwebfusion.net) +for about the last year of my shared hosting. This service was pretty +great, came with free SSL/TLS, and I never had any complaints. + +However, I finally grew tired of not being able to install software on +my own web server. I wanted to be able to try out things like +[Postmill](https://postmill.xyz) or [Matrix](https://matrix.org). This +is possible with a VPS, so I decided to grab a new domain name to try it +out. + +# Getting Started: Buying a VPS + +The first step to moving over to a VPS is (you guessed it): finding a +VPS provider. For my VPSs, I use [1984](https://1984hosting.com) and +prefer their services much more than any alternative, due to their +location (Iceland), their [privacy +policy](https://1984hosting.com/GDPR/), their respect for GDPR, and the +ability to remain anonymous if you pay in Bitcoin or Monero. + +[Njalla](https://njal.la) is another good, privacy-oriented option for +VPS services. + +You\'ll have to decide what specifications you want on your VPS. For me, +I only build and deploy low-resource HTML, PHP, and Python websites. +This means I can survive on the smallest VPS: 1 CPU, 1GB of RAM, and +25GB SSD for \$5.00 per month. + +As noted above, the great thing about a VPS is you can request your +provider to increase the resources at any time. + +# Configuring DNS Settings + +Okay, so now let\'s get into some actual work that has to be done to get +content moved from a shared host to a VPS. At this point, I\'m assuming +you have a shared host with website content that you can still access, +and you\'ve purchased a new VPS and can SSH into that server. + +The first change is minor, but it should be done immediately in order to +get things moving: DNS settings. Go to wherever your DNS settings are +handled. If your shared host also managed your DNS settings, you\'ll +need to first move that DNS over to your new VPS provider. For me, I +route my DNS through [Gandi](https://www.gandi.net). + +Once you know where your DNS settings are, go ahead and update the +`A` records to match the public IP address of your VPS. For +example: + +``` txt +A example.com xxx.xxx.xxx.xxx +A subdomain xxx.xxx.xxx.xxx +CNAME www example.com. +``` + +If you have any other records that require updates, such as MX or TXT +records for a mail server, be sure to update those accordingly. +Personally, I don\'t host my own mail server. I route all mail on my +custom domains to [Migadu](https://www.migadu.com). Hosting your own +email server can become complex quickly and is not for beginners. + +DNS changes can take up to 48 hours to propagate, so be sure to give it +some time before assuming you\'ve made an error. + +# Server Updates and Packages + +Now that the DNS settings have been changed, let\'s set up our server +while we wait for the DNS to propagate. First up is to ssh into your +server. If you\'ve signed up with a service like DigitalOcean, you can +add your SSH key to your account and to your VPS droplet so that you +don\'t need a password in order to SSH. + +```sh +ssh root@xxx.xxx.xxx.xxx +``` + +The VPS that is used in this blog post runs Ubuntu 20.04 with an Apache +web server. If you\'re working on a different operating system (OS) or +want a different web server, such as Nginx, you\'ll have to use +different commands to set it up. + +First, let\'s update and upgrade our server. + +**NOTE:** Since we have logged in to the server as `root` for +now, we don\'t need to use the `sudo` modifier before our +commands. + +```sh +apt update && apt upgrade -y +``` + +# Create A User Account + +While being able to use `root` can be beneficial at times, +you shouldn\'t use `root` unless you have to. + +So let\'s set up a new user in our system. The `-m` option +below tells the OS to create a home directory for the new user. + +```sh +adduser USERNAME +``` + +Now, create a password for that user. + +```sh +passwd USERNAME +``` + +Finally, add the user to the sudoers file, so they can perform +priveleged commands. + +```sh +usermod -a -G sudo USERNAME +``` + +If you are using SSH keys and not passwords, you\'ll need to copy your +SSH key from your local machine to the VPS. If you haven\'t disabled +password-based SSH yet, the easiest way to do this is +`ssh-copy-id` from your local computer (not from the VPS): + +```sh +ssh-copy-id testuser@xxx.xxx.xxx.xxx +``` + +If you\'ve disabled password-based SSH, you\'ll need to manually copy +your SSH key into the `~/.ssh/authorized_keys` file. + +# Install Software + +Our goal here is to host a web server, so the next step is to install +the Apache web server and any other packages we need. + +From this point on, I will be logged in as a user (not +`root`) and will need to use the `sudo` modifier +for most commands. + +```sh +sudo apt update; sudo apt upgrade -y; sudo apt autoremove -y +sudo apt install apache2 +``` + +If you need other language support, such as PHP, you\'ll need to install +that too. + +```sh +sudo apt install libapache2-mod-php php-dom +sudo a2enmod php +sudo systemctl restart apache2 +``` + +# Website Files & Folders + +Next up is to create the directories for the domain(s) we want to be +hosted on this web server. + +```sh +cd /var/www +sudo mkdir example.com +``` + +We have a folder for `example.com` now, so let\'s add an +`index.html` file and put it within a specific +`public_html` folder. You don\'t need this +`public_html` if you don\'t want it, but it helps with +organizing items related to `example.com` that you don\'t +want to publish to the internet. + +```sh +cd example.com +sudo mkdir public_html && cd public_html +sudo nano index.html +``` + +You can put anything you want in this `index.html` file. If +you can\'t think of anything, paste this in there: + +``` html +<!DOCTYPE html> +<html lang="en"> + <head> + <meta charset="utf-8" /> + <meta name="viewport" content="width=device-width, initial-scale=1" /> + <title>Hello, world!</title> + </head> + <body> + <h1>Hello, world!</h1> + </body> +</html> +``` + +If you want something to be served at +`example.com/page01/file.txt`, you\'ll have to create the +`page01` directory under the `example.com` +directory. For example: + +```sh +cd /var/www/example.com/public_html +sudo mkdir page01 +sudo nano file.txt +``` + +# Apache Configuration + +Now, let\'s set up the files that will tell the server where to find the +files for `example.com`. We will copy the default +configuration file and create our own. + +```sh +cd /etc/apache2/sites-available +sudo cp 000-default.conf example.com.conf +sudo nano example.com.conf +``` + +This configuration file will have a few default lines, but you\'ll need +to edit it to look similar to this (settings may change based on your +personal needs): + +``` config +<VirtualHost *:80> + ServerAdmin your-email@email-provider.com + ServerName example.com + ServerAlias www.example.com + DocumentRoot /var/www/example.com/public_html + ErrorLog ${APACHE_LOG_DIR}/error.log + CustomLog ${APACHE_LOG_DIR}/access.log combined +</VirtualHost> +``` + +Now, enable the configuration for your new site, disable the default +configuration, and reload the web server. + +```sh +sudo a2ensite example.com.conf +sudo a2dissite 000-default.conf +sudo systemctl reload apache2 +``` + +You can always run a test to make sure no errors or warnings are found +in your configuration files. + +```sh +sudo apache2ctl configtest +``` + +Now, restart the web server entirely. After this, you should be able to +browse to `http://example.com` and see the HTML content you +provided earlier. Note that SSL/TLS has not been enabled yet, so you +won\'t be able to use the secure version yet +(`https://example.com`). + +```sh +sudo systemctl restart apache2 +``` + +You can repeat this for as many websites as you need. Just create the +domain folders in `/var/www/`, add the configuration file, +enable the configuration, and restart `apache2`. + +# SSL/TLS Certificates: Serve Websites Over HTTPS + +In order to serve secure content, you\'ll need to obtain SSL/TLS +certificates. Luckily, there\'s a free tool called +[Certbot](https://certbot.eff.org) that helps us with the process. + +The first step is to install `snapd` and `core` +for Ubuntu. + +```sh +sudo apt install snapd +sudo snap install core +sudo snap refresh core +``` + +Next, install the `certbot` snap package. + +```sh +sudo snap install --classic certbot +``` + +Execute the following command to ensure that the `certbot` +command can be run. + +```sh +sudo ln -s /snap/bin/certbot /usr/bin/certbot +``` + +Finally, you can run `certbot` one of two ways: + +1. run it and let it alter your Apache configuration files + automatically to enable HTTPS redirects. +2. run it and only allow it to create certificates. You\'ll need to + manually alter the config files to enable HTTPS redirects. + +Run certbot and allow automatic config changes: + +```sh +sudo certbot --apache +``` + +Run certbot for certificates only and don\'t allow it to alter config +files: + +```sh +sudo certbot certonly --apache +``` + +The Certbot packages on your system come with a cron job or systemd +timer that will renew your certificates automatically before they +expire. You will not need to run Certbot again unless you change your +configuration. You can test automatic renewal for your certificates by +running this command: + +```sh +sudo certbot renew --dry-run +``` + +Now, test your domains by going to `https://example.com`. + +# Firewall Security + +To enable better security on your server, you\'ll need to enable a basic +firewall. For Ubuntu, we\'ll use [the uncomplicated +firewall](../secure-your-network-with-the-uncomplicated-firewall/). + +Now, add the following rules to the firewall allow SSH, Apache, and +HTTP(S) connections. If you need to, you can enable different ports for +specifics applications, SFTP, etc. + +```sh +sudo ufw default deny incoming +sudo ufw default allow outgoing +sudo ufw allow OpenSSH +sudo ufw allow Apache +sudo ufw allow proto tcp from any to any port 80,443 +``` + +Once you\'ve added all the rules you need, enable the firewall. + +```sh +sudo ufw enable +``` + +# Troubleshooting + +If you run into any issues during your VPS set-up, be sure to walk back +through your actions and make sure you didn\'t miss any steps. + +Many websites have fantastic guides to setting up various web servers. +This is one of the areas [where DigitalOcean +shines](https://www.digitalocean.%20com/community/tutorials). For +simpler or more Linux-oriented questions, I suggest using \[Linuxize\] +(<https://linuxize.com>). + +If you\'re getting certain errors (e.g. +`500 Internal Server Error`) and need to debug locally, you +can view the `access.log` and `error.log` files in +the `/var/log/apache/` directory. diff --git a/content/blog/2021-03-30-vps-web-server.org b/content/blog/2021-03-30-vps-web-server.org deleted file mode 100644 index d0c1b4f..0000000 --- a/content/blog/2021-03-30-vps-web-server.org +++ /dev/null @@ -1,399 +0,0 @@ -#+title: How to Set Up a VPS Web Server -#+date: 2021-03-30 -#+description: A beginner's guide to setting up a virtual private server (VPS). -#+filetags: :sysadmin: - -* Shared Hosting vs. VPS -Choosing a place to host a website is one of the most confusing -decisions for beginner web developers. Even for experienced web devs, -choosing between different forms of web hosting can be a daunting -choice. - -First, let's take a look at -[[https://en.wikipedia.org/wiki/Shared_web_hosting_service][shared web -hosting]]. Shared web hosting is a product where you are purchasing a -small piece of a web server that is being shared between many websites. -As a result, the cost of shared hosting is extremely low. You won't have -access to the server itself, which means you can't install your own -software on the server, such as Docker. Usually, you are simply allowed -to connect your domains to the server, set up domain security, and other -small utilities. - -In contrast, a -[[https://en.wikipedia.org/wiki/Virtual_private_server][virtual private -server]] (VPS) is a virtual machine that replicates the environment of -having a dedicated server to yourself. You are able to control the -virtual server's host names, base file system, package manager, etc. -Another great upside of a VPS is that since it's virtual, the company -providing the VPS can dynamically increase the disk size, RAM size, or -number of CPUs at any time. However, the virtual server is still -physically located on a server that is shared between multiple virtual -servers. - -The choice between shared hosting and VPS mostly depends on your skill -level with system administration. If you're comforting working on a -server that is mostly left up to you (or you're willing to learn), then -a VPS is usually a better option. However, shared hosting is a fantastic -option for people who don't want to have to learn how to manage their -server. - -* My Situation -I had used shared hosting for approximately 5 years before trying my -first VPS. I manage a homelab and have had success running a server and -performing typical sysadmin duties, but I was still hesitant to get a -VPS. One fear was that I always struggled to properly set up the -networking part of a server - DNS and hostname configurations were not -my friend. - -As a little bit of background, I originally used -[[https://www.siteground.com][Siteground]] for my initially shared -hosting and stayed on that platform for at least a year. However, the UI -was clunky, and I didn't like how they handled certain technical -aspects, so I switched to [[https://www.namecheap.com][Namecheap]]. -Namecheap was great because it is the service I primarily use for -purchasing domain names, which made it incredibly easy to link them to -my hosting service. However, it was still mediocre shared hosting, and -Namecheap is notorious for not letting you use -[[https://letsencrypt.org][Let's Encrypt]] to obtain free SSL/TLS -certificates; Namecheap wants to make you purchase certificates through -their store. - -Finally, I settled down with [[https://www.iwebfusion.net][iWebFusion]] -for about the last year of my shared hosting. This service was pretty -great, came with free SSL/TLS, and I never had any complaints. - -However, I finally grew tired of not being able to install software on -my own web server. I wanted to be able to try out things like -[[https://postmill.xyz][Postmill]] or [[https://matrix.org][Matrix]]. -This is possible with a VPS, so I decided to grab a new domain name to -try it out. - -* Getting Started: Buying a VPS -The first step to moving over to a VPS is (you guessed it): finding a -VPS provider. For my VPSs, I use [[https://1984hosting.com][1984]] and -prefer their services much more than any alternative, due to their -location (Iceland), their [[https://1984hosting.com/GDPR/][privacy -policy]], their respect for GDPR, and the ability to remain anonymous if -you pay in Bitcoin or Monero. - -[[https://njal.la][Njalla]] is another good, privacy-oriented option for -VPS services. - -You'll have to decide what specifications you want on your VPS. For me, -I only build and deploy low-resource HTML, PHP, and Python websites. -This means I can survive on the smallest VPS: 1 CPU, 1GB of RAM, and -25GB SSD for $5.00 per month. - -As noted above, the great thing about a VPS is you can request your -provider to increase the resources at any time. - -* Configuring DNS Settings -Okay, so now let's get into some actual work that has to be done to get -content moved from a shared host to a VPS. At this point, I'm assuming -you have a shared host with website content that you can still access, -and you've purchased a new VPS and can SSH into that server. - -The first change is minor, but it should be done immediately in order to -get things moving: DNS settings. Go to wherever your DNS settings are -handled. If your shared host also managed your DNS settings, you'll need -to first move that DNS over to your new VPS provider. For me, I route my -DNS through [[https://www.gandi.net][Gandi]]. - -Once you know where your DNS settings are, go ahead and update the =A= -records to match the public IP address of your VPS. For example: - -#+begin_src txt -A example.com xxx.xxx.xxx.xxx -A subdomain xxx.xxx.xxx.xxx -CNAME www example.com. -#+end_src - -If you have any other records that require updates, such as MX or TXT -records for a mail server, be sure to update those accordingly. -Personally, I don't host my own mail server. I route all mail on my -custom domains to [[https://www.migadu.com][Migadu]]. Hosting your own -email server can become complex quickly and is not for beginners. - -DNS changes can take up to 48 hours to propagate, so be sure to give it -some time before assuming you've made an error. - -* Server Updates and Packages -Now that the DNS settings have been changed, let's set up our server -while we wait for the DNS to propagate. First up is to ssh into your -server. If you've signed up with a service like DigitalOcean, you can -add your SSH key to your account and to your VPS droplet so that you -don't need a password in order to SSH. - -#+begin_src sh -ssh root@xxx.xxx.xxx.xxx -#+end_src - -The VPS that is used in this blog post runs Ubuntu 20.04 with an Apache -web server. If you're working on a different operating system (OS) or -want a different web server, such as Nginx, you'll have to use different -commands to set it up. - -First, let's update and upgrade our server. - -*NOTE:* Since we have logged in to the server as =root= for now, we -don't need to use the =sudo= modifier before our commands. - -#+begin_src sh -apt update && apt upgrade -y -#+end_src - -* Create A User Account -While being able to use =root= can be beneficial at times, you shouldn't -use =root= unless you have to. - -So let's set up a new user in our system. The =-m= option below tells -the OS to create a home directory for the new user. - -#+begin_src sh -adduser USERNAME -#+end_src - -Now, create a password for that user. - -#+begin_src sh -passwd USERNAME -#+end_src - -Finally, add the user to the sudoers file, so they can perform -priveleged commands. - -#+begin_src sh -usermod -a -G sudo USERNAME -#+end_src - -If you are using SSH keys and not passwords, you'll need to copy your -SSH key from your local machine to the VPS. If you haven't disabled -password-based SSH yet, the easiest way to do this is =ssh-copy-id= from -your local computer (not from the VPS): - -#+begin_src sh -ssh-copy-id testuser@xxx.xxx.xxx.xxx -#+end_src - -If you've disabled password-based SSH, you'll need to manually copy your -SSH key into the =~/.ssh/authorized_keys= file. - -* Install Software -Our goal here is to host a web server, so the next step is to install -the Apache web server and any other packages we need. - -From this point on, I will be logged in as a user (not =root=) and will -need to use the =sudo= modifier for most commands. - -#+begin_src sh -sudo apt update; sudo apt upgrade -y; sudo apt autoremove -y -sudo apt install apache2 -#+end_src - -If you need other language support, such as PHP, you'll need to install -that too. - -#+begin_src sh -sudo apt install libapache2-mod-php php-dom -sudo a2enmod php -sudo systemctl restart apache2 -#+end_src - -* Website Files & Folders -Next up is to create the directories for the domain(s) we want to be -hosted on this web server. - -#+begin_src sh -cd /var/www -sudo mkdir example.com -#+end_src - -We have a folder for =example.com= now, so let's add an =index.html= -file and put it within a specific =public_html= folder. You don't need -this =public_html= if you don't want it, but it helps with organizing -items related to =example.com= that you don't want to publish to the -internet. - -#+begin_src sh -cd example.com -sudo mkdir public_html && cd public_html -sudo nano index.html -#+end_src - -You can put anything you want in this =index.html= file. If you can't -think of anything, paste this in there: - -#+begin_src html -<!DOCTYPE html> -<html lang="en"> - <head> - <meta charset="utf-8" /> - <meta name="viewport" content="width=device-width, initial-scale=1" /> - <title>Hello, world!</title> - </head> - <body> - <h1>Hello, world!</h1> - </body> -</html> -#+end_src - -If you want something to be served at =example.com/page01/file.txt=, -you'll have to create the =page01= directory under the =example.com= -directory. For example: - -#+begin_src sh -cd /var/www/example.com/public_html -sudo mkdir page01 -sudo nano file.txt -#+end_src - -* Apache Configuration -Now, let's set up the files that will tell the server where to find the -files for =example.com=. We will copy the default configuration file and -create our own. - -#+begin_src sh -cd /etc/apache2/sites-available -sudo cp 000-default.conf example.com.conf -sudo nano example.com.conf -#+end_src - -This configuration file will have a few default lines, but you'll need -to edit it to look similar to this (settings may change based on your -personal needs): - -#+begin_src config -<VirtualHost *:80> - ServerAdmin your-email@email-provider.com - ServerName example.com - ServerAlias www.example.com - DocumentRoot /var/www/example.com/public_html - ErrorLog ${APACHE_LOG_DIR}/error.log - CustomLog ${APACHE_LOG_DIR}/access.log combined -</VirtualHost> -#+end_src - -Now, enable the configuration for your new site, disable the default -configuration, and reload the web server. - -#+begin_src sh -sudo a2ensite example.com.conf -sudo a2dissite 000-default.conf -sudo systemctl reload apache2 -#+end_src - -You can always run a test to make sure no errors or warnings are found -in your configuration files. - -#+begin_src sh -sudo apache2ctl configtest -#+end_src - -Now, restart the web server entirely. After this, you should be able to -browse to =http://example.com= and see the HTML content you provided -earlier. Note that SSL/TLS has not been enabled yet, so you won't be -able to use the secure version yet (=https://example.com=). - -#+begin_src sh -sudo systemctl restart apache2 -#+end_src - -You can repeat this for as many websites as you need. Just create the -domain folders in =/var/www/=, add the configuration file, enable the -configuration, and restart =apache2=. - -* SSL/TLS Certificates: Serve Websites Over HTTPS -In order to serve secure content, you'll need to obtain SSL/TLS -certificates. Luckily, there's a free tool called -[[https://certbot.eff.org][Certbot]] that helps us with the process. - -The first step is to install =snapd= and =core= for Ubuntu. - -#+begin_src sh -sudo apt install snapd -sudo snap install core -sudo snap refresh core -#+end_src - -Next, install the =certbot= snap package. - -#+begin_src sh -sudo snap install --classic certbot -#+end_src - -Execute the following command to ensure that the =certbot= command can -be run. - -#+begin_src sh -sudo ln -s /snap/bin/certbot /usr/bin/certbot -#+end_src - -Finally, you can run =certbot= one of two ways: - -1. run it and let it alter your Apache configuration files automatically - to enable HTTPS redirects. -2. run it and only allow it to create certificates. You'll need to - manually alter the config files to enable HTTPS redirects. - -Run certbot and allow automatic config changes: - -#+begin_src sh -sudo certbot --apache -#+end_src - -Run certbot for certificates only and don't allow it to alter config -files: - -#+begin_src sh -sudo certbot certonly --apache -#+end_src - -The Certbot packages on your system come with a cron job or systemd -timer that will renew your certificates automatically before they -expire. You will not need to run Certbot again unless you change your -configuration. You can test automatic renewal for your certificates by -running this command: - -#+begin_src sh -sudo certbot renew --dry-run -#+end_src - -Now, test your domains by going to =https://example.com=. - -* Firewall Security -To enable better security on your server, you'll need to enable a basic -firewall. For Ubuntu, we'll use -[[../secure-your-network-with-the-uncomplicated-firewall/][the -uncomplicated firewall]]. - -Now, add the following rules to the firewall allow SSH, Apache, and -HTTP(S) connections. If you need to, you can enable different ports for -specifics applications, SFTP, etc. - -#+begin_src sh -sudo ufw default deny incoming -sudo ufw default allow outgoing -sudo ufw allow OpenSSH -sudo ufw allow Apache -sudo ufw allow proto tcp from any to any port 80,443 -#+end_src - -Once you've added all the rules you need, enable the firewall. - -#+begin_src sh -sudo ufw enable -#+end_src - -* Troubleshooting -If you run into any issues during your VPS set-up, be sure to walk back -through your actions and make sure you didn't miss any steps. - -Many websites have fantastic guides to setting up various web servers. -This is one of the areas -[[https://www.digitalocean.%20com/community/tutorials][where -DigitalOcean shines]]. For simpler or more Linux-oriented questions, I -suggest using [Linuxize] ([[https://linuxize.com]]). - -If you're getting certain errors (e.g. =500 Internal Server Error=) and -need to debug locally, you can view the =access.log= and =error.log= -files in the =/var/log/apache/= directory. diff --git a/content/blog/2021-04-17-gemini-server.md b/content/blog/2021-04-17-gemini-server.md new file mode 100644 index 0000000..7b4aafe --- /dev/null +++ b/content/blog/2021-04-17-gemini-server.md @@ -0,0 +1,165 @@ ++++ +date = 2021-04-17 +title = "Hosting a Gemini Server" +description = "" +draft = false ++++ + +# Similar Article Available + +To read more about Gemini and ways to test out this new protocol without +your own server, see my previous post [Launching a Gemini +Capsule](../launching-a-gemini-capsule/). + +# Preparation + +This guide assumes you have access to a server accessible to the world +through a public IP address and that you own a domain name used for this +Gemini capsule. + +# Getting Started with Agate + +We are going to use [Agate](https://github.com/mbrubeck/agate) for this +tutorial. This is a basic Gemini server written in Rust. It takes very +little time and maintenance to get it running. + +# Install Dependencies + +First, you will need to install the Rust package for your system. On +Ubuntu, use the following commands (remember to use `sudo` if +you are not the root user). The Rust installation will give you options +to customize the installation; I used the default installation options. + +```sh +sudo apt update && sudo apt upgrade -y +curl https://sh.rustup.rs -sSf | sh +``` + +Remember to configure your shell with the new configuration: + +```sh +source $HOME/.cargo/env +``` + +Before we install agate, make sure you have the `gcc` package +installed: + +```sh +sudo apt install gcc +``` + +Next, you\'ll need to install the agate executable with Rust\'s Cargo +package maintainer: + +```sh +cargo install agate +``` + +# Create Symlinks + +Once Cargo has finished installing all the required packages, symlink +the executable to your \$PATH. + +```sh +sudo ln -s $HOME/.cargo/bin/agate /usr/local/bin/agate +``` + +# Using Agate\'s Built-In Installation Tool + +If you\'re running Ubuntu or Debian, use the Debian installation script +found in Agate\'s GitHub repository, under the `tools/debian` +folder. + +```sh +git clone https://github.com/mbrubeck/agate +cd agate/tools/debian +sudo ./install.sh +``` + +# Configure the Gemini Service + +We have a little more to do, but since this script tries to immediately +run the service, it will likely fail with an exit code. Let\'s add our +finishing touches. Edit the following file and replace the hostname with +your desired URL. You can also change the directory where content will +be served. + +```sh +sudo nano /etc/systemd/system/gemini.service +``` + +```sh +# Edit these lines to whatever you want - see the next code block for my personal configuration. +WorkingDirectory=/srv/gemini +ExecStart=agate --hostname $(uname -n) --lang en +``` + +This is my personal config: + +```sh +WorkingDirectory=/var/gemini/ +ExecStart=agate --hostname gemini.example.com --lang en +``` + +Since we\'ve altered the systemd configuration files, we have to reload +the daemon. Let\'s do that, restart our service, and check its status. + +```sh +sudo systemctl daemon-reload +sudo systemctl restart gemini.service +sudo systemctl status gemini.service +``` + +# Fixing Systemd Errors + +If you\'re still getting errors, the installation process may not have +properly enabled the gemini service. Fix it with the following commands. + +```sh +sudo systemctl enable gemini.service +sudo systemctl restart gemini.service +sudo systemctl status gemini.service +``` + +# Firewall Rules + +Great! Our server is now functional and running. The first consideration +now is that you need to be able to access port 1965 on the server. If +you have a firewall enabled, you\'ll need to open that port up. + +```sh +sudo ufw allow 1965 +sudo ufw reload +``` + +# Creating Content + +Let\'s create the Gemini capsule. Note that wherever you set the +WorkingDirectory variable to earlier, Agate will expect you to put your +Gemini capsule contents in a sub-folder called \"content.\" So, I place +my files in \"/var/gmi/content.\" I\'m going to create that folder now +and put a file in there. + +```sh +sudo mkdir /var/gemini/content +sudo nano /var/gemini/content/index.gmi +``` + +You can put whatever you want in the \"index.gmi\" file, just make sure +it\'s valid Gemtext. + +# The Results + +Here are some screenshots of the Gemini page I just created in the +[Lagrange](https://gmi.skyjake.fi/lagrange/) browser and the +[amfora](https://github.com/makeworld-the-better-one/amfora) browser. + + + +*Lagrange* + + + +*Amfora* diff --git a/content/blog/2021-04-17-gemini-server.org b/content/blog/2021-04-17-gemini-server.org deleted file mode 100644 index fd50c20..0000000 --- a/content/blog/2021-04-17-gemini-server.org +++ /dev/null @@ -1,150 +0,0 @@ -#+title: Hosting a Gemini Server -#+date: 2021-04-17 -#+description: A guide to self-hosting a Gemini web server on your own server. -#+filetags: :sysadmin: - -* Similar Article Available -To read more about Gemini and ways to test out this new protocol without -your own server, see my previous post -[[../launching-a-gemini-capsule/][Launching a Gemini Capsule]]. - -* Preparation -This guide assumes you have access to a server accessible to the world -through a public IP address and that you own a domain name used for this -Gemini capsule. - -* Getting Started with Agate -We are going to use [[https://github.com/mbrubeck/agate][Agate]] for -this tutorial. This is a basic Gemini server written in Rust. It takes -very little time and maintenance to get it running. - -* Install Dependencies -First, you will need to install the Rust package for your system. On -Ubuntu, use the following commands (remember to use =sudo= if you are -not the root user). The Rust installation will give you options to -customize the installation; I used the default installation options. - -#+begin_src sh -sudo apt update && sudo apt upgrade -y -curl https://sh.rustup.rs -sSf | sh -#+end_src - -Remember to configure your shell with the new configuration: - -#+begin_src sh -source $HOME/.cargo/env -#+end_src - -Before we install agate, make sure you have the =gcc= package installed: - -#+begin_src sh -sudo apt install gcc -#+end_src - -Next, you'll need to install the agate executable with Rust's Cargo -package maintainer: - -#+begin_src sh -cargo install agate -#+end_src - -* Create Symlinks -Once Cargo has finished installing all the required packages, symlink -the executable to your $PATH. - -#+begin_src sh -sudo ln -s $HOME/.cargo/bin/agate /usr/local/bin/agate -#+end_src - -* Using Agate's Built-In Installation Tool -If you're running Ubuntu or Debian, use the Debian installation script -found in Agate's GitHub repository, under the =tools/debian= folder. - -#+begin_src sh -git clone https://github.com/mbrubeck/agate -cd agate/tools/debian -sudo ./install.sh -#+end_src - -* Configure the Gemini Service -We have a little more to do, but since this script tries to immediately -run the service, it will likely fail with an exit code. Let's add our -finishing touches. Edit the following file and replace the hostname with -your desired URL. You can also change the directory where content will -be served. - -#+begin_src sh -sudo nano /etc/systemd/system/gemini.service -#+end_src - -#+begin_src sh -# Edit these lines to whatever you want - see the next code block for my personal configuration. -WorkingDirectory=/srv/gemini -ExecStart=agate --hostname $(uname -n) --lang en -#+end_src - -This is my personal config: - -#+begin_src sh -WorkingDirectory=/var/gemini/ -ExecStart=agate --hostname gemini.example.com --lang en -#+end_src - -Since we've altered the systemd configuration files, we have to reload -the daemon. Let's do that, restart our service, and check its status. - -#+begin_src sh -sudo systemctl daemon-reload -sudo systemctl restart gemini.service -sudo systemctl status gemini.service -#+end_src - -* Fixing Systemd Errors -If you're still getting errors, the installation process may not have -properly enabled the gemini service. Fix it with the following commands. - -#+begin_src sh -sudo systemctl enable gemini.service -sudo systemctl restart gemini.service -sudo systemctl status gemini.service -#+end_src - -* Firewall Rules -Great! Our server is now functional and running. The first consideration -now is that you need to be able to access port 1965 on the server. If -you have a firewall enabled, you'll need to open that port up. - -#+begin_src sh -sudo ufw allow 1965 -sudo ufw reload -#+end_src - -* Creating Content -Let's create the Gemini capsule. Note that wherever you set the -WorkingDirectory variable to earlier, Agate will expect you to put your -Gemini capsule contents in a sub-folder called "content." So, I place my -files in "/var/gmi/content." I'm going to create that folder now and put -a file in there. - -#+begin_src sh -sudo mkdir /var/gemini/content -sudo nano /var/gemini/content/index.gmi -#+end_src - -You can put whatever you want in the "index.gmi" file, just make sure -it's valid Gemtext. - -* The Results -Here are some screenshots of the Gemini page I just created in the -[[https://gmi.skyjake.fi/lagrange/][Lagrange]] browser and the -[[https://github.com/makeworld-the-better-one/amfora][amfora]] browser. - -#+caption: GUI Gemini browser -[[https://img.cleberg.net/blog/20210417-hosting-a-gemini-server/lagrange.png]] - -/Lagrange/ - -#+caption: CLI Gemini browser -[[https://img.cleberg.net/blog/20210417-hosting-a-gemini-server/amfora.png]] - -/Amfora/ diff --git a/content/blog/2021-04-23-php-comment-system.org b/content/blog/2021-04-23-php-comment-system.md index 92dd984..f369d0c 100644 --- a/content/blog/2021-04-23-php-comment-system.org +++ b/content/blog/2021-04-23-php-comment-system.md @@ -1,11 +1,14 @@ -#+title: Roll Your Own Static Commenting System in PHP -#+date: 2021-04-23 -#+description: A simple guide to creating a commenting system in PHP. -#+filetags: :dev: ++++ +date = 2021-04-23 +title = "Roll Your Own Static Commenting System in PHP" +description = "" +draft = false ++++ + +# The Terrible-ness of Commenting Systems -* The Terrible-ness of Commenting Systems The current state of affairs regarding interactive comment systems is, -well, terrible. It is especially awful if you're a privacy conscious +well, terrible. It is especially awful if you\'re a privacy conscious person who does not generally load third-party scripts or frames on the websites you visit. @@ -14,75 +17,78 @@ something that should be standard. Of course, there are some really terrible options: -- Facebook Comments -- Discourse +- Facebook Comments +- Discourse There are some options that are better but still use too many scripts, frames, or social integrations on your web page that could impact some users: -- Disqus -- Isso -- Remark42 +- Disqus +- Isso +- Remark42 Lastly, I looked into a few unique ways of generating blog comments, such as using Twitter threads or GitHub issues to automatically post issues. However, these both rely on external third-party sites that I -don't currently use. +don\'t currently use. + +# Stay Static with Server-Side Comments -* Stay Static with Server-Side Comments The main issue for my personal use-case is that my blog is completely, 100% static. I use PHP on the back-end but website visitors only see HTML and a single CSS file. No external javascript and no embedded frames. So, how do we keep a site static and still allow users to interact with -blog posts? The key actually pretty simple - I'm already using PHP, so -why not rely on the classic HTML =<form>= and a PHP script to save the -comments somewhere? As it turns out, this was a perfect solution for me. +blog posts? The key actually pretty simple - I\'m already using PHP, so +why not rely on the classic HTML `<form>` and a PHP script to +save the comments somewhere? As it turns out, this was a perfect +solution for me. The second issue for my personal use-case is that I am trying to keep the contents of my website accessible over time, as described by -[cite/t:@brandur], in his post entitled -[[https://brandur.org/fragments/graceful-degradation-time][Blog with -Markdown + Git, and degrade gracefully through time]] . +@brandur, in his post entitled [Blog with Markdown + Git, and degrade +gracefully through +time](https://brandur.org/fragments/graceful-degradation-time) . This means I cannot rely on a database for comments, since I do not rely on a database for any other part of my websites. I blog in plain Markdown files, commit all articles to Git, and ensure -that future readers will be able to see the source data long after I'm -gone, or the website has gone offline. However, I still haven't -committed any images served on my blog to Git, as I'm not entirely sold +that future readers will be able to see the source data long after I\'m +gone, or the website has gone offline. However, I still haven\'t +committed any images served on my blog to Git, as I\'m not entirely sold on Git LFS yet - for now, images can be found at -[[https://img.cleberg.net][img.cleberg.net]]. +[img.cleberg.net](https://img.cleberg.net). Saving my comments back to the Git repository ensures that another aspect of my site will degrade gracefully. -* Create a Comment Form -Okay, let's get started. The first step is to create an HTML form that +# Create a Comment Form + +Okay, let\'s get started. The first step is to create an HTML form that users can see and utilize to submit comments. This is fairly easy and can be changed depending on your personal preferences. Take a look at the code block below for the form I currently use. Note -that =<current-url>= is replaced automatically in PHP with the current -post's URL, so that my PHP script used later will know which blog post -the comment is related to. +that `<current-url>` is replaced automatically in PHP with +the current post\'s URL, so that my PHP script used later will know +which blog post the comment is related to. The form contains the following structure: -1. =<form>= - This is the form and will determine which PHP script to - send the comment to. -2. =<section hidden>= - This section is hidden from the user and is used - to ensure that we know which blog post sent the comment. -3. =<section>= Display Name (Optional) - Used to accept a display name, - if entered. -4. =<section>= Comment (Required) - Used to accept the user's full - comment. Markdown is allowed. -5. =<button>= - A button to submit the form. - -#+begin_src html +1. `<form>` - This is the form and will determine which PHP + script to send the comment to. +2. `<section hidden>` - This section is hidden from the user + and is used to ensure that we know which blog post sent the comment. +3. `<section>` Display Name (Optional) - Used to accept a + display name, if entered. +4. `<section>` Comment (Required) - Used to accept the + user\'s full comment. Markdown is allowed. +5. `<button>` - A button to submit the form. + +``` html <form action="/comment.php" method="POST"> <h3>Leave a Comment</h3> <section hidden> @@ -122,30 +128,32 @@ The form contains the following structure: </section> <button type="submit">Submit</button> </form> -#+end_src +``` + +# Handle Comments via POST -* Handle Comments via POST Now that we have a form and can submit comments, we need to create a PHP script so that the server can fetch the comment data and save it. Make -sure your PHP script name matches the name you entered in the =action= -field in your form. - -See the code block below for the contents of my =comment.php= script. We -perform the following tasks in this script: - -1. Grab the POST data from the HTML form. -2. Sanitize the comment data with =htmlentities=. -3. Set the display name to =Anonymous= if it was left blank. -4. Create a PHP object that combines all of this data. -5. Check if our destination file =comments.json= exists. -6. If so, convert the PHP object to JSON and save it to the file. -7. If the =comments.json= file does not exist, the script will exit with - an error. You can alter this to ensure it creates the script, but my - source code includes the file by default, so it will always exist. -8. Finally, send the user back to the =#comments= section of the blog - post they just read. - -#+begin_src php +sure your PHP script name matches the name you entered in the +`action` field in your form. + +See the code block below for the contents of my `comment.php` +script. We perform the following tasks in this script: + +1. Grab the POST data from the HTML form. +2. Sanitize the comment data with `htmlentities`. +3. Set the display name to `Anonymous` if it was left blank. +4. Create a PHP object that combines all of this data. +5. Check if our destination file `comments.json` exists. +6. If so, convert the PHP object to JSON and save it to the file. +7. If the `comments.json` file does not exist, the script + will exit with an error. You can alter this to ensure it creates the + script, but my source code includes the file by default, so it will + always exist. +8. Finally, send the user back to the `#comments` section of + the blog post they just read. + +``` php // Get the content sent from the comment form $comment = htmlentities($_POST['userContent']); $post_url = $_POST['postURL']; @@ -180,32 +188,33 @@ if (file_exists($file_name)) { // Send the user back header('Location: ' . $post_url . '#comments'); -#+end_src +``` -If you're using Apache, make sure the =www-data= user on your server has -the correct permissions to your website directory or else it will not be -able to write to =comments.json=. +If you\'re using Apache, make sure the `www-data` user on +your server has the correct permissions to your website directory or +else it will not be able to write to `comments.json`. -#+begin_src sh +```sh chgrp -R www-data /path/to/website/ chmod -R g+w comments.json -#+end_src +``` + +# Display User Comments -* Display User Comments Now that we can submit comments, and they are saved to the -=comments.json= file, let's make sure we can show those comments in each -blog post. +`comments.json` file, let\'s make sure we can show those +comments in each blog post. The code block below shows the function I use to decode my -=comments.json= file, check if the comments apply to the current post, -and then display them. +`comments.json` file, check if the comments apply to the +current post, and then display them. -This piece of code should *really** be inside a function (or at least in -an organized PHP workflow). Don't just copy-and-paste and expect it to -work. You need to at least supply a =$query= variable depending on the -page visited. +This piece of code should **really\*** be inside a function (or at least +in an organized PHP workflow). Don\'t just copy-and-paste and expect it +to work. You need to at least supply a `$query` variable +depending on the page visited. -#+begin_src php +``` php $query = 'your-blog-post.html'; // Load saved comments @@ -237,29 +246,32 @@ foreach ($comments as $comment) { } echo $comment_section; -#+end_src +``` + +# Bonus: Create a \'Recent Comments\' Page -* Bonus: Create a 'Recent Comments' Page Finally, the last part of my current system is to create a Recent Comments page so that I can easily check-in on my blog and moderate any -spam. As an alternative, you could use PHP's =mail()= function to email -you for each blog comment. +spam. As an alternative, you could use PHP\'s `mail()` +function to email you for each blog comment. The code to do this is literally the same code as the previous section, I just make sure it is printed when someone visits -=https://example.com/comments/=. +`https://example.com/comments/`. + +# Possible Enhancements -* Possible Enhancements This comment system is by no means a fully-developed system. I have noted a few possible enhancements here that I may implement in the future: -- Create a secure moderator page with user authentication at - =https://blog.example.com/mod/=. This page could have the option to - edit or delete any comment found in =comments.json=. -- Create a temporary file, such as =pending_comments.json=, that will - store newly-submitted comments and won't display on blog posts until - approved by a moderator. -- Create a =/modlog/= page with a chronological log, showing which - moderator approved which comments and why certain comments were - rejected. +- Create a secure moderator page with user authentication at + `https://blog.example.com/mod/`. This page could have the + option to edit or delete any comment found in + `comments.json`. +- Create a temporary file, such as `pending_comments.json`, + that will store newly-submitted comments and won\'t display on blog + posts until approved by a moderator. +- Create a `/modlog/` page with a chronological log, + showing which moderator approved which comments and why certain + comments were rejected. diff --git a/content/blog/2021-04-28-photography.md b/content/blog/2021-04-28-photography.md new file mode 100644 index 0000000..e2a1fac --- /dev/null +++ b/content/blog/2021-04-28-photography.md @@ -0,0 +1,73 @@ ++++ +date = 2021-04-28 +title = "Jumping Back Into Photography" +description = "" +draft = false ++++ + +# Why Photography? + +I\'ve often wondered why photography is as enticing as it is. You can +see billions of people around the world taking photographs every single +moment of the day. New technology often boasts about their photographic +capabilities, especially smartphones. I would even assume that we live +in a world where there is never a moment in which a photograph is not +being taken somewhere on Earth. + +As for myself, I would simply say that I enjoy preserving a memory in +physical (or digital) form. I\'ve never had the best memory when it +comes to recalling details of places and people gone by, so it helps to +have a frame of reference lying around. + +Regardless of the reason, I think most people would agree that you +simply cannot have too many hobbies. + +# Older Cameras + +I started playing around with the idea of photography when my family +purchased a Fujifilm camera for family-specific events. I don\'t recall +the specific model, but I do recall it was a point-and-shoot camera +without an interchangeable lens. However, it was of great value to +someone, like myself, who couldn\'t afford any other camera. I took +about 10,000 shots with that camera over a 3-5 year span. Most notably, +all of my trips to California were documented through this camera. + +When possible, I would borrow my sister\'s camera, which is a Sony +SLT-A58. This camera was great and allowed for some of my best early +shots, especially those taken in Utah\'s and Nevada\'s parks. + +# My Current Kit + +I\'ve finally come to a point in my life where I have the disposable +income to invest in a solid photography kit. I played around with the +idea of a lot of different cameras, different types, new vs used, etc. +Finally, I settled on the [Sony α7 +III](https://en.wikipedia.org/wiki/Sony_%CE%B17_III). This camera is +mirror-less and uses a full-frame image sensor at 24 megapixels. I +don\'t create large prints, and I am mostly focused on preserving +memories in high quality for the next 5-10 years with this camera, so +the specifications here are just perfect for me. + +For lenses, I decided to buy two lenses that could carry me through most +situations: + +- [Vario-Tessar T\*\* FE 24-70 mm F4 ZA + OSS](https://electronics.sony.com/imaging/lenses/full-frame-e-mount/p/sel2470z) +- [Tamron 70-300mm f4.5-6.3 Di III + RXD](https://www.tamron-usa.com/product/lenses/a047.html) + +In addition, I grabbed a couple [HGX Prime +67mm](https://www.promaster.com/Product/6725) protection filters for the +lenses. + +As I delve further into photography and pick up more skills, I will most +likely go back and grab a lens with a higher f-stop value, such as +f/1.8. I toyed with the idea of grabbing a 50 mm at `f/1.8`, +but decided to keep things in a reasonable price range instead. + +Finally, I made sure to buy a photography-specific backpack with a rain +guard, and the zipper on the back panel, to protect the equipment while +wearing the bag. If you\'ve ever had to haul around a DSLR (or camera of +similar heft) in a bag that only has a shoulder strap, you\'ll know the +pain it can cause. Putting all my equipment in a backpack was an easy +decision. diff --git a/content/blog/2021-04-28-photography.org b/content/blog/2021-04-28-photography.org deleted file mode 100644 index cc5f388..0000000 --- a/content/blog/2021-04-28-photography.org +++ /dev/null @@ -1,68 +0,0 @@ -#+title: Jumping Back Into Photography -#+date: 2021-04-28 -#+description: Some thoughts on photography. -#+filetags: :personal: - -* Why Photography? -I've often wondered why photography is as enticing as it is. You can see -billions of people around the world taking photographs every single -moment of the day. New technology often boasts about their photographic -capabilities, especially smartphones. I would even assume that we live -in a world where there is never a moment in which a photograph is not -being taken somewhere on Earth. - -As for myself, I would simply say that I enjoy preserving a memory in -physical (or digital) form. I've never had the best memory when it comes -to recalling details of places and people gone by, so it helps to have a -frame of reference lying around. - -Regardless of the reason, I think most people would agree that you -simply cannot have too many hobbies. - -* Older Cameras -I started playing around with the idea of photography when my family -purchased a Fujifilm camera for family-specific events. I don't recall -the specific model, but I do recall it was a point-and-shoot camera -without an interchangeable lens. However, it was of great value to -someone, like myself, who couldn't afford any other camera. I took about -10,000 shots with that camera over a 3-5 year span. Most notably, all of -my trips to California were documented through this camera. - -When possible, I would borrow my sister's camera, which is a Sony -SLT-A58. This camera was great and allowed for some of my best early -shots, especially those taken in Utah's and Nevada's parks. - -* My Current Kit -I've finally come to a point in my life where I have the disposable -income to invest in a solid photography kit. I played around with the -idea of a lot of different cameras, different types, new vs used, etc. -Finally, I settled on the -[[https://en.wikipedia.org/wiki/Sony_%CE%B17_III][Sony α7 III]]. This -camera is mirror-less and uses a full-frame image sensor at 24 -megapixels. I don't create large prints, and I am mostly focused on -preserving memories in high quality for the next 5-10 years with this -camera, so the specifications here are just perfect for me. - -For lenses, I decided to buy two lenses that could carry me through most -situations: - -- [[https://electronics.sony.com/imaging/lenses/full-frame-e-mount/p/sel2470z][Vario-Tessar - T** FE 24-70 mm F4 ZA OSS]] -- [[https://www.tamron-usa.com/product/lenses/a047.html][Tamron 70-300mm - f4.5-6.3 Di III RXD]] - -In addition, I grabbed a couple -[[https://www.promaster.com/Product/6725][HGX Prime 67mm]] protection -filters for the lenses. - -As I delve further into photography and pick up more skills, I will most -likely go back and grab a lens with a higher f-stop value, such as -f/1.8. I toyed with the idea of grabbing a 50 mm at =f/1.8=, but decided -to keep things in a reasonable price range instead. - -Finally, I made sure to buy a photography-specific backpack with a rain -guard, and the zipper on the back panel, to protect the equipment while -wearing the bag. If you've ever had to haul around a DSLR (or camera of -similar heft) in a bag that only has a shoulder strap, you'll know the -pain it can cause. Putting all my equipment in a backpack was an easy -decision. diff --git a/content/blog/2021-05-30-changing-git-authors.org b/content/blog/2021-05-30-changing-git-authors.md index b06660d..6c31b08 100644 --- a/content/blog/2021-05-30-changing-git-authors.org +++ b/content/blog/2021-05-30-changing-git-authors.md @@ -1,30 +1,33 @@ -#+title: Changing Git Authors -#+date: 2021-05-30 -#+description: A guide to change Git author names and emails in old commits. -#+filetags: :dev: ++++ +date = 2021-05-30 +title = "Changing Git Authors" +description = "" +draft = false ++++ -* Changing Git Author/Email Based on Previously Committed Email -Here's the dilemma: You've been committing changes to your git +# Changing Git Author/Email Based on Previously Committed Email + +Here\'s the dilemma: You\'ve been committing changes to your git repository with an incorrect name or email (or multiple repositories), -and now you want to fix it. Luckily, there's a semi-reliable way to fix +and now you want to fix it. Luckily, there\'s a semi-reliable way to fix that. While I have never experienced issues with this method, some people have warned that it can mess with historical hashes and integrity -of commits, so use this method only if you're okay accepting that risk. +of commits, so use this method only if you\'re okay accepting that risk. -Okay, let's create the bash script: +Okay, let\'s create the bash script: -#+begin_src sh +```sh nano change_git_authors.sh -#+end_src +``` The following information can be pasted directly into your bash script. The only changes you need to make are to the following variables: -- =OLD_EMAIL= -- =CORRECT_NAME= -- =CORRECT_EMAIL= +- `OLD_EMAIL` +- `CORRECT_NAME` +- `CORRECT_EMAIL` -#+begin_src sh +```sh #!/bin/sh # List all sub-directories in the current directory @@ -57,16 +60,16 @@ do cd .. done -#+end_src +``` Finally, save the bash script and make it executable. -#+begin_src sh +```sh chmod a+x change_git_authors.sh -#+end_src +``` Now you can run the script and should see the process begin. -#+begin_src sh +```sh ./change_git_authors.sh -#+end_src +``` diff --git a/content/blog/2021-07-15-delete-gitlab-repos.org b/content/blog/2021-07-15-delete-gitlab-repos.md index e8ea28f..748630e 100644 --- a/content/blog/2021-07-15-delete-gitlab-repos.org +++ b/content/blog/2021-07-15-delete-gitlab-repos.md @@ -1,47 +1,53 @@ -#+title: How to Delete All GitLab Repositories -#+date: 2021-07-15 -#+description: Learn how to delete all GitLab repositories in your account. -#+filetags: :dev: ++++ +date = 2021-07-15 +title = "How t oDelete All GitLab Repositories" +description = "" +draft = false ++++ + +# Background -* Background Have you ever used GitLab to host your source code, moved to a different host, and wanted to delete everything from your GitLab account? Well, this post covers any scenario where you would want to delete all repositories from your GitLab account. -For me, I currently maintain around 30 repositories and don't like to +For me, I currently maintain around 30 repositories and don\'t like to manually delete them whenever I switch host. GitHub has a few different tools online to delete all repositories for you, but I have not found anything similar for GitLab, so I needed an alternative solution. -* Use a Python Script -** Requirements +# Use a Python Script + +## Requirements + Before we look at the script, make sure you know your GitLab username. -Next, [[https://gitlab.com/-/profile/personal_access_tokens][create an -authorization token]] so that the Python script can delete your -repositories. Don't lose this token or else you'll need to create a new -one. +Next, [create an authorization +token](https://gitlab.com/-/profile/personal_access_tokens) so that the +Python script can delete your repositories. Don\'t lose this token or +else you\'ll need to create a new one. + +## Create the Script -** Create the Script To run a Python script, you must first create it. Open a terminal and enter the following commands in whichever directory you prefer to store the script. You can do the same things in a file manager if you prefer. -#+begin_src sh +```sh mkdir delete-gitlab -#+end_src +``` -#+begin_src sh +```sh cd delete-gitlab -#+end_src +``` -#+begin_src sh +```sh nano main.py -#+end_src +``` -Enter the following code into your =main.py= script. +Enter the following code into your `main.py` script. -#+begin_src python +``` python import request import json @@ -95,16 +101,16 @@ def main(): if __name__ == "__main__": main() -#+end_src +``` -Now that you have the proper information, replace ={user-id}= with your -GitLab username and ={auth-token}= with the authorization token you -created earlier. +Now that you have the proper information, replace `{user-id}` +with your GitLab username and `{auth-token}` with the +authorization token you created earlier. Finally, simply run the script and watch the output. You can also use -PyCharm Community Edition to edit and run the Python script if you don't -want to work in a terminal. +PyCharm Community Edition to edit and run the Python script if you +don\'t want to work in a terminal. -#+begin_src sh +```sh python3 main.py -#+end_src +``` diff --git a/content/blog/2021-08-25-audit-sampling.org b/content/blog/2021-08-25-audit-sampling.md index 9882fb2..2a7073a 100644 --- a/content/blog/2021-08-25-audit-sampling.org +++ b/content/blog/2021-08-25-audit-sampling.md @@ -1,9 +1,12 @@ -#+title: Audit Sampling with Python -#+date: 2021-08-25 -#+description: Learn how to sample populations with Python. -#+filetags: :audit: ++++ +date = 2021-08-25 +title = "Audit Sampling with Python" +description = "" +draft = false ++++ + +# Introduction -* Introduction For anyone who is familiar with internal auditing, external auditing, or consulting, you will understand how tedious audit testing can become when you are required to test large swaths of data. When we cannot @@ -16,33 +19,35 @@ However, sampling data within the world of audit still seems to confuse quite a lot of people. While some audit-focused tools have introduced sampling functionality (e.g. Wdesk), many audit departments and firms cannot use software like this due to certain constraints, such as the -team's budget or knowledge. Here is where this article comes in: we're -going to use [[https://www.python.org][Python]], a free and open-source +team\'s budget or knowledge. Here is where this article comes in: we\'re +going to use [Python](https://www.python.org), a free and open-source programming language, to generate random samples from a dataset in order to suffice numerous audit situations. -* Audit Requirements for Sampling +# Audit Requirements for Sampling + Before we get into the details of how to sample with Python, I want to make sure I discuss the different requirements that auditors may have of samples used within their projects. -** Randomness -First, let's discuss randomness. When testing out new technology to help -assist with audit sampling, you need to understand exactly how your +## Randomness + +First, let\'s discuss randomness. When testing out new technology to +help assist with audit sampling, you need to understand exactly how your samples are being generated. For example, if the underlying function is -just picking every 57th element from a list, that's not truly random; -it's a systematic form of sampling. Luckily, since Python is +just picking every 57th element from a list, that\'s not truly random; +it\'s a systematic form of sampling. Luckily, since Python is open-source, we have access to its codebase. Through this blog post, I -will be using the [[https://pandas.pydata.org][pandas]] module in order -to generate the random samples. More specifically, I will be using the -[[https://pandas.pydata.org/pandas-docs/stable/reference/api/pandas.DataFrame.sample.html][pandas.DataFrame.sample]] +will be using the [pandas](https://pandas.pydata.org) module in order to +generate the random samples. More specifically, I will be using the +[pandas.DataFrame.sample](https://pandas.pydata.org/pandas-docs/stable/reference/api/pandas.DataFrame.sample.html) function provided by Pandas. -Now that you know what you're using, you can always check out the code -behind =pandas.DataFrame.sample=. This function does a lot of work, but -we really only care about the following snippets of code: +Now that you know what you\'re using, you can always check out the code +behind `pandas.DataFrame.sample`. This function does a lot of +work, but we really only care about the following snippets of code: -#+begin_src python +``` python # Process random_state argument rs = com.random_state(random_state) @@ -54,22 +59,24 @@ if ignore_index: result.index = ibase.default_index(len(result)) return result -#+end_src - -The block of code above shows you that if you assign a =random_state= -argument when you run the function, that will be used as a seed number -in the random generation and will allow you to reproduce a sample, given -that nothing else changes. This is critical to the posterity of audit -work. After all, how can you say your audit process is adequately -documented if the next person can't run the code and get the same -sample? The final piece here on randomness is to look at the -[[https://docs.%20python.org/3/library/random.html#random.choice][choice]] +``` + +The block of code above shows you that if you assign a +`random_state` argument when you run the function, that will +be used as a seed number in the random generation and will allow you to +reproduce a sample, given that nothing else changes. This is critical to +the posterity of audit work. After all, how can you say your audit +process is adequately documented if the next person can\'t run the code +and get the same sample? The final piece here on randomness is to look +at the +[choice](https://docs.%20python.org/3/library/random.html#random.choice) function used above. This is the crux of the generation and can also be examined for more detailed analysis on its reliability. As far as auditing goes, we will trust that these functions are mathematically random. -** Sample Sizes +## Sample Sizes + As mentioned in the intro, sampling is only an effective method of auditing when it truly represents the entire population. While some audit departments or firms may consider certain judgmental sample sizes @@ -88,32 +95,35 @@ proprietary, table that will instruct auditors which sample sizes to choose. This allows for uniform testing and reduces overall workload. See the table below for a common implementation of sample sizes: -| Control Frequency | Sample Size - High Risk | Sample Size - Low Risk | -|-------------------+-------------------------+------------------------| -| More Than Daily | 40 | 25 | -| Daily | 40 | 25 | -| Weekly | 12 | 5 | -| Monthly | 5 | 3 | -| Quarterly | 2 | 2 | -| Semi-Annually | 1 | 1 | -| Annually | 1 | 1 | -| Ad-hoc | 1 | 1 | - -*** Sampling with Python & Pandas + Control Frequency Sample Size - High Risk Sample Size - Low Risk + ------------------- ------------------------- ------------------------ + More Than Daily 40 25 + Daily 40 25 + Weekly 12 5 + Monthly 5 3 + Quarterly 2 2 + Semi-Annually 1 1 + Annually 1 1 + Ad-hoc 1 1 + +### Sampling with Python & Pandas + In this section, I am going to cover a few basic audit situations that require sampling. While some situations may require more effort, the syntax, organization, and intellect used remain largely the same. If -you've never used Python before, note that lines starting with a '=#=' -symbol are called comments, and they will be skipped by Python. I highly -recommend taking a quick tutorial online to understand the basics of -Python if any of the code below is confusing to you. +you\'ve never used Python before, note that lines starting with a +\'`#`\' symbol are called comments, and they will be skipped +by Python. I highly recommend taking a quick tutorial online to +understand the basics of Python if any of the code below is confusing to +you. + +## Simple Random Sample -** Simple Random Sample -First, let's look at a simple, random sample. The code block below will -import the =pandas= module, load a data file, sample the data, and -export the sample to a file. +First, let\'s look at a simple, random sample. The code block below will +import the `pandas` module, load a data file, sample the +data, and export the sample to a file. -#+begin_src python +``` python # Import the Pandas module import pandas @@ -131,13 +141,14 @@ sample = df.sample(n=25, random_state=0) # Save the sample to Excel sample.to_excel(file_output) -#+end_src +``` + +## Simple Random Sample: Using Multiple Input Files -** Simple Random Sample: Using Multiple Input Files -Now that we've created a simple sample, let's create a sample from +Now that we\'ve created a simple sample, let\'s create a sample from multiple files. -#+begin_src python +``` python # Import the Pandas module import pandas @@ -164,14 +175,15 @@ sample = pandas.concat([sample_01, sample_02, sample_03], ignore_index=True) # Save the sample to Excel sample.to_excel(file_output) -#+end_src +``` + +## Stratified Random Sample -** Stratified Random Sample Well, what if you need to sample distinct parts of a single file? For -example, let's write some code to separate our data by "Region" and +example, let\'s write some code to separate our data by \"Region\" and sample those regions independently. -#+begin_src python +``` python # Import the Pandas module import pandas @@ -197,15 +209,16 @@ sample = pandas.concat([sample_east, sample_west], ignore_index=True) # Save the sample to Excel sample.to_excel(file_output) -#+end_src +``` + +## Stratified Systematic Sample -** Stratified Systematic Sample This next example is quite useful if you need audit coverage over a certain time period. This code will generate samples for each month in the data and combine them all together at the end. Obviously, this code can be modified to stratify by something other than months, if needed. -#+begin_src python +``` python # Import the Pandas module import pandas @@ -245,20 +258,21 @@ def monthly_stratified_sample(df: pandas.DataFrame, date_column: str, num_select sample_size = 3 sample = monthly_stratified_sample(df, 'Date of Sale', sample_size) sample.to_excel(file_output) -#+end_src - -*** Documenting the Results -Once you've generated a proper sample, there are a few things left to do -in order to properly ensure your process is reproducible. - -1. Document the sample. Make sure the resulting file is readable and - includes the documentation listed in the next bullet. -2. Include documentation around the data source, extraction techniques, - any modifications made to the data, and be sure to include a copy of - the script itself. -3. Whenever possible, perform a completeness and accuracy test to ensure - your sample is coming from a complete and accurate population. To - ensure completeness, compare the record count from the data source to - the record count loaded into Python. To ensure accuracy, test a small - sample against the source data (e.g., test 5 sales against the - database to see if the details are accurate). +``` + +### Documenting the Results + +Once you\'ve generated a proper sample, there are a few things left to +do in order to properly ensure your process is reproducible. + +1. Document the sample. Make sure the resulting file is readable and + includes the documentation listed in the next bullet. +2. Include documentation around the data source, extraction techniques, + any modifications made to the data, and be sure to include a copy of + the script itself. +3. Whenever possible, perform a completeness and accuracy test to + ensure your sample is coming from a complete and accurate + population. To ensure completeness, compare the record count from + the data source to the record count loaded into Python. To ensure + accuracy, test a small sample against the source data (e.g., test 5 + sales against the database to see if the details are accurate). diff --git a/content/blog/2021-10-09-apache-redirect.md b/content/blog/2021-10-09-apache-redirect.md new file mode 100644 index 0000000..13794f0 --- /dev/null +++ b/content/blog/2021-10-09-apache-redirect.md @@ -0,0 +1,47 @@ ++++ +date = 2021-10-09 +title = "Apache Redirect HTML Files to a Directory" +description = "" +draft = false ++++ + +# The Problem + +After recently switching static site generators (SSG), my blog URLs +changed with no option to preserve the classic `.html` +extension at the end of my blog post URLs. + +I really disliked using my old SSG ([Jekyll](https://jekyllrb.com)) and +prefer my new tool ([Zola](https://www.getzola.org)) much more, so I was +determined to figure out a way to get the proper redirect set up so that +people who find my posts online aren\'t constantly met by 404 errors. + +# The Solution + +To solve this problem, I really needed to solve two pieces: + +1. Redirect all blog post URL requests from + `/blog/some-post.html` to `/blog/some-post/`. +2. Ensure that no other `.html` files are redirected, such + as `index.html`. + +After *a lot* of tweaking and testing, I believe I have finally found +the solution. The solution is shown below. + +``` conf +RewriteEngine On +RewriteCond %{REQUEST_URI} !\index.html$ [NC] +RewriteRule ^(.*).html$ https://example.com/$1 [R=301,L] +``` + +This piece of code in the Apache `.conf` or +`.htaccess` file will do the following: + +1. Turn on the RewriteEngine so that we can modify URLs. +2. Ignore any `index.html` files from the rule we are about + to specify. +3. Find any `.html` files within the website directory and + redirect it to exclude the file extension. +4. The final piece is adding the trailing slash (`/`) at the + end of the URL - you\'ll notice that I don\'t have an Apache rule + for that since Apache handles that automatically. diff --git a/content/blog/2021-10-09-apache-redirect.org b/content/blog/2021-10-09-apache-redirect.org deleted file mode 100644 index 25fb7ba..0000000 --- a/content/blog/2021-10-09-apache-redirect.org +++ /dev/null @@ -1,43 +0,0 @@ -#+title: Apache Redirect HTML Files to a Directory -#+date: 2021-10-09 -#+description: A guide on redirecting HTML files to directory in Apache. -#+filetags: :apache: - -* The Problem -After recently switching static site generators (SSG), my blog URLs -changed with no option to preserve the classic =.html= extension at the -end of my blog post URLs. - -I really disliked using my old SSG ([[https://jekyllrb.com][Jekyll]]) -and prefer my new tool ([[https://www.getzola.org][Zola]]) much more, so -I was determined to figure out a way to get the proper redirect set up -so that people who find my posts online aren't constantly met by 404 -errors. - -* The Solution -To solve this problem, I really needed to solve two pieces: - -1. Redirect all blog post URL requests from =/blog/some-post.html= to - =/blog/some-post/=. -2. Ensure that no other =.html= files are redirected, such as - =index.html=. - -After /a lot/ of tweaking and testing, I believe I have finally found -the solution. The solution is shown below. - -#+begin_src conf -RewriteEngine On -RewriteCond %{REQUEST_URI} !\index.html$ [NC] -RewriteRule ^(.*).html$ https://example.com/$1 [R=301,L] -#+end_src - -This piece of code in the Apache =.conf= or =.htaccess= file will do the -following: - -1. Turn on the RewriteEngine so that we can modify URLs. -2. Ignore any =index.html= files from the rule we are about to specify. -3. Find any =.html= files within the website directory and redirect it - to exclude the file extension. -4. The final piece is adding the trailing slash (=/=) at the end of the - URL - you'll notice that I don't have an Apache rule for that since - Apache handles that automatically. diff --git a/content/blog/2021-12-04-cisa.md b/content/blog/2021-12-04-cisa.md new file mode 100644 index 0000000..7060d5e --- /dev/null +++ b/content/blog/2021-12-04-cisa.md @@ -0,0 +1,215 @@ ++++ +date = 2021-12-04 +title = "I Passed the CISA!" +description = "" +draft = false ++++ + +# What is the CISA? + +For those of you lucky enough not to be knee-deep in the world of IT/IS +Auditing, [CISA](https://www.isaca.org/credentialing/cisa) stands for +Certified Information Systems Auditor. This certification and exam are +part of ISACA\'s suite of certifications. As I often explain it to +people like my family, it basically means you\'re employed to use your +knowledge of information systems, regulations, common threats, risks, +etc. in order to assess an organization\'s current control of their +risk. If a risk isn\'t controlled (and the company doesn\'t want to +accept the risk), an IS auditor will suggest implementing a control to +address that risk. + +Now, the CISA certification itself is, in my opinion, the main +certification for this career. While certifications such as the CPA or +CISSP are beneficial, nothing matches the power of the CISA for an IS +auditor when it comes to getting hired, getting a raise/bonus, or +earning respect in the field. + +However, to be honest, I am a skeptic of most certifications. I +understand the value they hold in terms of how much you need to commit +to studying or learning on the job, as well as the market value for +certifications such as the CISA. But I also have known some very +~~incompetent~~ *less than stellar* auditors who have CPAs, CISAs, CIAs, +etc. + +The same goes for most industries: if a person is good at studying, they +can earn the certification. However, that knowledge means nothing unless +you\'re actually able to use it in real life and perform as expected of +a certification holder. The challenge comes when people are hired or +connected strictly because of their certifications or resume; you need +to see a person work before you can assume them having a CISA means +they\'re better than someone without the CISA. + +Okay, rant over. Certifications are generally accepted as a measuring +stick of commitment and quality of an employee, so I am accepting it +too. + +# Exam Content + +The CISA is broken down into five sections, each weighted with a +percentage of test questions that may appear. + + + +Since the exam contains 150 questions, here\'s how those sections break +down: + + Exam Section Percentage of Exam Questions + ----------------- -------------------- ----------- + 1 21% 32 + 2 17% 26 + 3 12% 18 + 4 23% 34 + 5 27% 40 + **Grand Total** **100%** **150** + +# My Studying Habits + +This part is a little hard for me to break down into specific detail due +to the craziness of the last year. While I officially purchased my +studying materials in December 2020 and opened them to \"start +studying\" in January 2021, I really wasn\'t able to study much due to +the demands of my job and personal life. + +Let me approach this from a few different viewpoints. + +## Study Materials + +Let\'s start by discussing the study materials I purchased. I\'ll be +referring to #1 as the CRM and #2 as the QAE. + +1. [CISA Review Manual, 27th Edition \| + Print](https://store.isaca.org/s/store#/store/browse/detail/a2S4w000004KoCbEAK) +2. \[\[<https://store.isaca.org/s/store#/store/browse/detail/a2S4w000004KoCcEAK>\]\[CISA + Review Questions, Answers & Explanations Manual, 12th Edition \| + Print\]\] + +The CRM is an excellent source of information and could honestly be used +as a reference for most IS auditors as a learning reference during their +daily audit responsibilities. However, it is **full\*** of information +and can be overloading if you\'re not good at filtering out useless +information while studying. + +The QAE is the real star of the show here. This book contains 1000 +questions, separated by exam section, and a practice exam. My only +complaint about the QAE is that each question is immediately followed +with the correct answer and explanations below it, which means I had to +use something to constantly cover the answers while I was studying. + +I didn\'t use the online database version of the QAE, but I\'ve heard +that it\'s easier to use than the printed book. However, it is more +expensive (\$299 database vs \$129 book) which might be important if +you\'re paying for materials yourself. + +In terms of question difficulty, I felt that the QAE was a good +representation of the actual exam. I\'ve seen a lot of people online say +it wasn\'t accurate to the exam or that it was much easier/harder, but I +disagree with all of those. The exam was fairly similar to the QAE, just +focusing on whichever topics they chose for my version of the exam. + +If you understand the concepts, skim the CRM (and read in-depth on +topics you struggle with), and use the QAE to continue practicing +exam-like questions, you should be fine. I didn\'t use any online +courses, videos, etc. - the ISACA materials are more than enough. + +## Studying Process + +While I was able to briefly read through sections 1 and 2 in early 2021, +I had to stop and take a break from February/March to September. I +switched jobs in September, which allowed me a lot more free time to +study. + +In September, I studied sections 3-5, took notes, and did a quick review +of the section topics. Once I felt comfortable with my notes, I took a +practice exam from the QAE manual and scored 70% (105/150). + +Here\'s a breakdown of my initial practice exam: + + Exam Section Incorrect Correct Grand Total Percent + ------------------- ----------- ----------- ------------- ----------- + 1 8 25 33 76% + 2 5 20 25 80% + 3 6 12 18 67% + 4 10 23 33 70% + 5 16 25 41 61% + **Grand Total\*** **45\*** **105\*** **150\*** **70%\*** + +As I expected, my toughest sections were related to project management, +development, implementation, and security. + +This just leaves October and November. For these months, I tried to +practice every few days, doing 10 questions for each section, until the +exam. This came out to 13 practice sessions, \~140 questions per +section, and \~700 questions total. + +While some practice sessions were worse and some were better, the final +results were similar to my practice exam results. As you can see below, +my averages were slightly worse than my practice exam. However, I got in +over 700 questions of practice and, most importantly, \*I read through +the explanations every time I answered incorrectly and learned from my +mistakes\*. + + Exam Section Incorrect Correct Grand Total Percent + ------------------- ----------- ----------- ------------- ----------- + 1 33 108 141 77% + 2 33 109 142 77% + 3 55 89 144 62% + 4 52 88 140 63% + 5 55 85 140 61% + **Grand Total\*** **228\*** **479\*** **707\*** **68%\*** + + + +# Results + +Now, how do the practice scores reflect my actual results? After all, +it\'s hard to tell how good a practice regimen is unless you see how it +turns out. + + Exam Section Section Name Score + -------------- ------------------------------------------------------------------ --------- + 1 Information Systems Auditing Process 678 + 2 Governance and Management of IT 590 + 3 Information Systems Acquisition, Development, and Implementation 721 + 4 Information Systems Operations and Business Resilience 643 + 5 Protection of Information Assets 511 + **TOTAL** **616** + +Now, in order to pass the CISA, you need at least 450 on a sliding scale +of 200-800. Personally, I really have no clue what an average CISA score +is. After a *very* brief look online, I can see that the high end is +usually in the low 700s. In addition, only about 50-60% of people pass +the exam. + +Given this information, I feel great about my scores. 616 may not be +phenomenal, and I wish I had done better on sections 2 & 5, but my +practicing seems to have worked very well overall. + +However, the practice results do not conform to the actual results. +Section 2 was one of my highest practice sections and was my +second-lowest score in the exam. Conversely, section 3 was my +second-lowest practice section and turned out to be my highest actual +score! + +After reflecting, it is obvious that if you have any background on the +CISA topics at all, the most important part of studying is doing +practice questions. You really need to understand how to read the +questions critically and pick the best answer. + +# Looking Forward + +I am extremely happy that I was finally able to pass the CISA. Looking +to the future, I\'m not sure what\'s next in terms of professional +learning. My current company offers internal learning courses, so I will +most likely focus on that if I need to gain more knowledge in certain +areas. + +To be fair, even if you pass the CISA, it\'s hard to become an expert on +any specific topic found within. My career may take me in a different +direction, and I might need to focus more on security or networking +certifications (or possibly building a better analysis/visualization +portfolio if I want to go into data analysis/science). + +All I know is that I am content at the moment and extremely proud of my +accomplishment. diff --git a/content/blog/2021-12-04-cisa.org b/content/blog/2021-12-04-cisa.org deleted file mode 100644 index d06eb51..0000000 --- a/content/blog/2021-12-04-cisa.org +++ /dev/null @@ -1,205 +0,0 @@ -#+title: I Passed the CISA! -#+date: 2021-12-04 -#+description: A recap of the CISA certification exam and my results. -#+filetags: :audit: - -* What is the CISA? -For those of you lucky enough not to be knee-deep in the world of IT/IS -Auditing, [[https://www.isaca.org/credentialing/cisa][CISA]] stands for -Certified Information Systems Auditor. This certification and exam are -part of ISACA's suite of certifications. As I often explain it to people -like my family, it basically means you're employed to use your knowledge -of information systems, regulations, common threats, risks, etc. in -order to assess an organization's current control of their risk. If a -risk isn't controlled (and the company doesn't want to accept the risk), -an IS auditor will suggest implementing a control to address that risk. - -Now, the CISA certification itself is, in my opinion, the main -certification for this career. While certifications such as the CPA or -CISSP are beneficial, nothing matches the power of the CISA for an IS -auditor when it comes to getting hired, getting a raise/bonus, or -earning respect in the field. - -However, to be honest, I am a skeptic of most certifications. I -understand the value they hold in terms of how much you need to commit -to studying or learning on the job, as well as the market value for -certifications such as the CISA. But I also have known some very -+incompetent+ /less than stellar/ auditors who have CPAs, CISAs, CIAs, -etc. - -The same goes for most industries: if a person is good at studying, they -can earn the certification. However, that knowledge means nothing unless -you're actually able to use it in real life and perform as expected of a -certification holder. The challenge comes when people are hired or -connected strictly because of their certifications or resume; you need -to see a person work before you can assume them having a CISA means -they're better than someone without the CISA. - -Okay, rant over. Certifications are generally accepted as a measuring -stick of commitment and quality of an employee, so I am accepting it -too. - -* Exam Content -The CISA is broken down into five sections, each weighted with a -percentage of test questions that may appear. - -#+caption: CISA exam sections -[[https://img.cleberg.net/blog/20211204-i-passed-the-cisa/cisa-exam-sections.png]] - -Since the exam contains 150 questions, here's how those sections break -down: - -| Exam Section | Percentage of Exam | Questions | -|---------------+--------------------+-----------| -| 1 | 21% | 32 | -| 2 | 17% | 26 | -| 3 | 12% | 18 | -| 4 | 23% | 34 | -| 5 | 27% | 40 | -| *Grand Total* | *100%* | *150* | - -* My Studying Habits -This part is a little hard for me to break down into specific detail due -to the craziness of the last year. While I officially purchased my -studying materials in December 2020 and opened them to "start studying" -in January 2021, I really wasn't able to study much due to the demands -of my job and personal life. - -Let me approach this from a few different viewpoints. - -** Study Materials -Let's start by discussing the study materials I purchased. I'll be -referring to #1 as the CRM and #2 as the QAE. - -1. [[https://store.isaca.org/s/store#/store/browse/detail/a2S4w000004KoCbEAK][CISA - Review Manual, 27th Edition | Print]] -2. [[[[https://store.isaca.org/s/store#/store/browse/detail/a2S4w000004KoCcEAK]]][CISA - Review Questions, Answers & Explanations Manual, 12th Edition | - Print]] - -The CRM is an excellent source of information and could honestly be used -as a reference for most IS auditors as a learning reference during their -daily audit responsibilities. However, it is *full** of information and -can be overloading if you're not good at filtering out useless -information while studying. - -The QAE is the real star of the show here. This book contains 1000 -questions, separated by exam section, and a practice exam. My only -complaint about the QAE is that each question is immediately followed -with the correct answer and explanations below it, which means I had to -use something to constantly cover the answers while I was studying. - -I didn't use the online database version of the QAE, but I've heard that -it's easier to use than the printed book. However, it is more expensive -($299 database vs $129 book) which might be important if you're paying -for materials yourself. - -In terms of question difficulty, I felt that the QAE was a good -representation of the actual exam. I've seen a lot of people online say -it wasn't accurate to the exam or that it was much easier/harder, but I -disagree with all of those. The exam was fairly similar to the QAE, just -focusing on whichever topics they chose for my version of the exam. - -If you understand the concepts, skim the CRM (and read in-depth on -topics you struggle with), and use the QAE to continue practicing -exam-like questions, you should be fine. I didn't use any online -courses, videos, etc. - the ISACA materials are more than enough. - -** Studying Process -While I was able to briefly read through sections 1 and 2 in early 2021, -I had to stop and take a break from February/March to September. I -switched jobs in September, which allowed me a lot more free time to -study. - -In September, I studied sections 3-5, took notes, and did a quick review -of the section topics. Once I felt comfortable with my notes, I took a -practice exam from the QAE manual and scored 70% (105/150). - -Here's a breakdown of my initial practice exam: - -| Exam Section | Incorrect | Correct | Grand Total | Percent | -|---------------+-----------+---------+-------------+---------| -| 1 | 8 | 25 | 33 | 76% | -| 2 | 5 | 20 | 25 | 80% | -| 3 | 6 | 12 | 18 | 67% | -| 4 | 10 | 23 | 33 | 70% | -| 5 | 16 | 25 | 41 | 61% | -| *Grand Total** | *45** | *105** | *150** | *70%** | - -As I expected, my toughest sections were related to project management, -development, implementation, and security. - -This just leaves October and November. For these months, I tried to -practice every few days, doing 10 questions for each section, until the -exam. This came out to 13 practice sessions, ~140 questions per section, -and ~700 questions total. - -While some practice sessions were worse and some were better, the final -results were similar to my practice exam results. As you can see below, -my averages were slightly worse than my practice exam. However, I got in -over 700 questions of practice and, most importantly, *I read through -the explanations every time I answered incorrectly and learned from my -mistakes*. - -| Exam Section | Incorrect | Correct | Grand Total | Percent | -|---------------+-----------+---------+-------------+---------| -| 1 | 33 | 108 | 141 | 77% | -| 2 | 33 | 109 | 142 | 77% | -| 3 | 55 | 89 | 144 | 62% | -| 4 | 52 | 88 | 140 | 63% | -| 5 | 55 | 85 | 140 | 61% | -| *Grand Total** | *228** | *479** | *707** | *68%** | - -#+caption: CISA practice question results -[[https://img.cleberg.net/blog/20211204-i-passed-the-cisa/cisa-practice-questions-results.png]] - -* Results -Now, how do the practice scores reflect my actual results? After all, -it's hard to tell how good a practice regimen is unless you see how it -turns out. - -| Exam Section | Section Name | Score | -|--------------+------------------------------------------------------------------+-------| -| 1 | Information Systems Auditing Process | 678 | -| 2 | Governance and Management of IT | 590 | -| 3 | Information Systems Acquisition, Development, and Implementation | 721 | -| 4 | Information Systems Operations and Business Resilience | 643 | -| 5 | Protection of Information Assets | 511 | -| *TOTAL* | | *616* | - -Now, in order to pass the CISA, you need at least 450 on a sliding scale -of 200-800. Personally, I really have no clue what an average CISA score -is. After a /very/ brief look online, I can see that the high end is -usually in the low 700s. In addition, only about 50-60% of people pass -the exam. - -Given this information, I feel great about my scores. 616 may not be -phenomenal, and I wish I had done better on sections 2 & 5, but my -practicing seems to have worked very well overall. - -However, the practice results do not conform to the actual results. -Section 2 was one of my highest practice sections and was my -second-lowest score in the exam. Conversely, section 3 was my -second-lowest practice section and turned out to be my highest actual -score! - -After reflecting, it is obvious that if you have any background on the -CISA topics at all, the most important part of studying is doing -practice questions. You really need to understand how to read the -questions critically and pick the best answer. - -* Looking Forward -I am extremely happy that I was finally able to pass the CISA. Looking -to the future, I'm not sure what's next in terms of professional -learning. My current company offers internal learning courses, so I will -most likely focus on that if I need to gain more knowledge in certain -areas. - -To be fair, even if you pass the CISA, it's hard to become an expert on -any specific topic found within. My career may take me in a different -direction, and I might need to focus more on security or networking -certifications (or possibly building a better analysis/visualization -portfolio if I want to go into data analysis/science). - -All I know is that I am content at the moment and extremely proud of my -accomplishment. diff --git a/content/blog/2022-02-10-leaving-the-office.org b/content/blog/2022-02-10-leaving-the-office.md index 34db40a..76adad3 100644 --- a/content/blog/2022-02-10-leaving-the-office.org +++ b/content/blog/2022-02-10-leaving-the-office.md @@ -1,9 +1,12 @@ -#+title: Leaving Office-Based Work in the Past -#+date: 2022-02-10 -#+description: My thoughts on the current surge of remote work and what that means for full-time office-based roles. -#+filetags: :audit: ++++ +date = 2022-02-10 +title = "Leaving Office-Based Work in the Past" +description = "" +draft = false ++++ + +# The Working World is Changing -* The Working World is Changing There has been a trend for the past few years of companies slowly realizing that the pandemic is not just a temporary state that will go away eventually and let everything return to the way it was before. In @@ -19,28 +22,31 @@ operate in select states). I decided to take a look back at my relatively short career so far and compare the positive and negative effects of the different work -environments I've been in. +environments I\'ve been in. + +# In-Person Offices + +## Retail Internship -* In-Person Offices -** Retail Internship I started my first job as a management intern at a busy retail pharmacy, -working my 40-hour weeks on my feet. As these retail stores don't +working my 40-hour weeks on my feet. As these retail stores don\'t believe in resting or sitting down, you can guarantee that you will spend entire shifts standing, walking, or running around the store. -Unfortunately, I worked at a time when our store didn't have enough +Unfortunately, I worked at a time when our store didn\'t have enough managers, so I spent the majority of my tenure at the store running and breaking a sweat. -Now, things aren't all bad in retail stores like this. It is definitely +Now, things aren\'t all bad in retail stores like this. It is definitely tiring and inefficient to force employees to work constantly, or pretend -to work if there's nothing to do, and not allow anyone to sit down. +to work if there\'s nothing to do, and not allow anyone to sit down. However, if you are able to operate a retail store with a limited crew and provide enough comfort and support, I believe these jobs could be both comfortable and efficient. -** Semi-Private Cubicles -#+caption: Semi-Private Cubicles -[[https://img.cleberg.net/blog/20220210-leaving-office-based-work-in-the-past/private_cubicles.png]] +## Semi-Private Cubicles + + After about a year, I was able to find another internship - this time, it was in my field of interest: internal auditing. This was for a life @@ -51,22 +57,23 @@ Likewise, they owned a large headquarters in a nice area of town with plenty of space, parking, etc. One upside is that each person gets their own large L-shaped desk, -formed into cubicles that house 4 desks/employees. These "pods" of +formed into cubicles that house 4 desks/employees. These \"pods\" of 4-person cubicles are linked throughout each floor of the headquarters (except the sales people, who had that open-floor concept going on). The walls of the cubicle were tall and provided a lot of privacy and -sound-proofing, except when I used the standing desk feature (I'm over 6 -feet tall, so probably not an issue for most people). +sound-proofing, except when I used the standing desk feature (I\'m over +6 feet tall, so probably not an issue for most people). I loved this environment, it allowed me to focus on my work with minimal distractions, but also allowed easy access, so I could spin around in my chair and chat with my friends without leaving my chair. This is the -closest I've been to a home office environment (which is my personal -favorite, as I'll get to later in this post). +closest I\'ve been to a home office environment (which is my personal +favorite, as I\'ll get to later in this post). + +## Semi-Open Floor Concept -** Semi-Open Floor Concept -#+caption: Semi-Open Floor Concept -[[https://img.cleberg.net/blog/20220210-leaving-office-based-work-in-the-past/semi_open_office.png]] + When I shifted to my first full-time internal audit job out of college, I was working at a company that was headquartered on a floor in a @@ -74,42 +81,44 @@ downtown high-rise building. The company was only about 20 years old when I worked there and were trying a lot of new things to attract young talent, one of which was a semi-open floor concept for the office. My department worked just around the hallway corner from the executive -offices and used that "modern" layout young tech companies started using -in the 2000s/2010s. +offices and used that \"modern\" layout young tech companies started +using in the 2000s/2010s. Each desk was brief, and you could look most coworkers in the face without moving from your chair, I hated this so much. Directly to my -left was the Chief Audit Executive (our department's leading boss), and +left was the Chief Audit Executive (our department\'s leading boss), and his desk was pointed so that his face would stare straight at my desk all day. I spent more time thinking about who was looking at me or checking on me than actually working. The other annoying part of the open concept they used was that the -kitchen area and pathways were too close to everyone's desks (since the +kitchen area and pathways were too close to everyone\'s desks (since the desks were spread out, to provide space or something), so noise and conversation would be constant throughout the day while you try to work. For someone like me, who needs silence to get work done, that was a non-starter. -** Hotel Office Concept -#+caption: Hotel Office Concept -[[https://img.cleberg.net/blog/20220210-leaving-office-based-work-in-the-past/hotel_desks.png]] +## Hotel Office Concept + + I currently work for a company remotely (for now) and travel to the office every once in a while for events and to help coach the staff underneath me. The office I visit uses the hotel desk concept, where you -need to check in at a touch screen when you enter the office and "rent" -a desk for the day. The same goes for offices and meeting rooms. +need to check in at a touch screen when you enter the office and +\"rent\" a desk for the day. The same goes for offices and meeting +rooms. These desks are flat-top only and do not have any walls at all. In -addition, they're stacked with one row of 4 desks facing another row of +addition, they\'re stacked with one row of 4 desks facing another row of 4 desks. These pairs of desk rows are repeated through the office. This means that when I go, I need to rent a random desk or try to remember the unique ID numbers on desks I like. Once I rent it, I have to make sure no one sat down in that desk without renting it. Then, I can sit down and work, but will probably need to adjust the monitors so -that I'm not staring in the face of the person across from me all day. +that I\'m not staring in the face of the person across from me all day. Finally, I need to wear headphones as this environment does nothing to provide you with peace or quiet. @@ -117,27 +126,26 @@ Luckily, you can rent offices with doors that offer quiet and privacy, which can be very nice if you have a lot of meetings or webinars on a certain day. -* Home Office -#+caption: Home Office -[[https://img.cleberg.net/blog/20220210-leaving-office-based-work-in-the-past/home_office.png]] +# Home Office -Okay, now let's finally get to the home office concept. I have worked + + +Okay, now let\'s finally get to the home office concept. I have worked from home for a little over two years at this point, across three different jobs/employers. Over this time, I have experimented with a plethora of different organizational ideas, desks, and room layouts to find what works best for me. -These things might not apply to you, and that's fine. Everyone has a -different situation, and I really don't think you'll know what works +These things might not apply to you, and that\'s fine. Everyone has a +different situation, and I really don\'t think you\'ll know what works until you try. -** Tip #1 -Let's start with my top rule for a home office: +## Tip #1 -#+begin_quote -If you live with others, working in a shared space is not effective. +Let\'s start with my top rule for a home office: -#+end_quote +> If you live with others, working in a shared space is not effective. It just does not work. If you have another person sleeping in your bedroom, it is difficult to manage your work schedule with their @@ -146,18 +154,16 @@ work, you might wake them up or have to suffer the agony of staring at bright screens in a dark room. In a similar vein, working from a location such as the living room -likely won't work either. Distractions will come far more frequently: -televisions, cooking, cleaning, deliveries, etc. If you're like me, -you'll end up playing a game instead of actually doing any work. +likely won\'t work either. Distractions will come far more frequently: +televisions, cooking, cleaning, deliveries, etc. If you\'re like me, +you\'ll end up playing a game instead of actually doing any work. -** Tip #2 -Okay, the second thing I've discovered that works for me: +## Tip #2 -#+begin_quote -Use the pomodoro method (or something similar) to balance work tasks -with personal tasks. +Okay, the second thing I\'ve discovered that works for me: -#+end_quote +> Use the pomodoro method (or something similar) to balance work tasks +> with personal tasks. I use a very casual version of the pomodoro method where I will work for 1-2 hours (usually set in strict intervals like 1, 1.5, 2 hours) and @@ -165,26 +171,24 @@ then will allow myself 30-60 minutes for personal tasks. This schedule works for me, since my work schedule really only comes to 3-6 hours of work per day. -In this case, I'll work through my list of tasks for an hour or two and +In this case, I\'ll work through my list of tasks for an hour or two and then give myself personal time to get drinks and food, wash dishes, put -clothes in the washer, get the mail, etc. If you're in a convenient +clothes in the washer, get the mail, etc. If you\'re in a convenient location, this usually gives time for things like getting groceries (as -long as you're not a slow shopper). +long as you\'re not a slow shopper). -** Tip #3 -While I listed this one as number three, I don't think I'd accomplish -anything without it: +## Tip #3 -#+begin_quote -Document everything: even things you didn't before - such as task lists -and notes from casual calls or meetings. +While I listed this one as number three, I don\'t think I\'d accomplish +anything without it: -#+end_quote +> Document everything: even things you didn\'t before - such as task +> lists and notes from casual calls or meetings. -I've noticed that staying in an office gave me more constant reminders +I\'ve noticed that staying in an office gave me more constant reminders of outstanding tasks or facts I had learned in a conversation. Translating everything to a digital world has made me lose a bit of that -focus (perhaps since I don't have visual reminders?). +focus (perhaps since I don\'t have visual reminders?). Keeping a running task list of all things I have to do - even potential tasks! - has helped me keep up without missing anything small. Likewise, @@ -193,13 +197,11 @@ has improved my retention immensely. Beyond helping my mental recollection, it has saved me numerous times when I need to do a keyword search for some topic that was discussed 6+ months ago. -** Tip #4 -Okay, last one for now. +## Tip #4 -#+begin_quote -Keep your work area clean. +Okay, last one for now. -#+end_quote +> Keep your work area clean. This one is straightforward, but I know some people struggle with cleanliness or may not believe it makes a difference. Trust me, keeping @@ -210,20 +212,21 @@ Just think about it, you walk into your home office and see a clean desk with a laptop, dock, monitors, keyboard, mouse, and a notepad with a pen on top. -Now imagine the opposite, there's an office with the same equipment, but -there are clothes hanging on the chair, empty drink bottles, candy +Now imagine the opposite, there\'s an office with the same equipment, +but there are clothes hanging on the chair, empty drink bottles, candy wrappers and dirty plates. This can take both a mental and emotional toll by bringing constant disarray and stress into your working environment. -Just keep things clean each day, and you won't need to do any big +Just keep things clean each day, and you won\'t need to do any big cleaning days to recover. -* My Preferences -I've talked about the different environments I've worked in and +# My Preferences + +I\'ve talked about the different environments I\'ve worked in and expressed some honest thoughts on pros or cons to each, but what do I -prefer? Well, if you're reading along, you should be able to tell that I -much prefer a home office above all else. +prefer? Well, if you\'re reading along, you should be able to tell that +I much prefer a home office above all else. Being able to control my own day and allot my time as needed has brought a calmness to my life and has allowed me to maximize each day. I feel @@ -236,5 +239,5 @@ my work done. Cubicles are good! I agree with Alice (from the comic Dilbert): -#+caption: Dilbert comic strip -[[https://img.cleberg.net/blog/20220210-leaving-office-based-work-in-the-past/dilbert_120109.png]] + diff --git a/content/blog/2022-02-10-njalla-dns-api.org b/content/blog/2022-02-10-njalla-dns-api.md index 363e9e3..67b4ebf 100644 --- a/content/blog/2022-02-10-njalla-dns-api.org +++ b/content/blog/2022-02-10-njalla-dns-api.md @@ -1,13 +1,16 @@ -#+title: Dynamic DNS with Njalla API -#+date: 2022-02-10 -#+description: Learn how to dynamically update DNS records for changing IPs with Njalla. -#+filetags: :sysadmin: ++++ +date = 2022-02-10 +title = "Dynamic DNS with Njalla API" +description = "" +draft = false ++++ -* Njalla's API -As noted in my recent post about [[/blog/ditching-cloudflare/][switching -to Njalla from Cloudflare]], I was searching for a way to replace my -very easy-to-use bash script to [[/blog/cloudflare-dns-api/][update -Cloudflare's DNS via their API]]. +# Njalla\'s API + +As noted in my recent post about [switching to Njalla from +Cloudflare](file:///blog/ditching-cloudflare/), I was searching for a +way to replace my very easy-to-use bash script to [update Cloudflare\'s +DNS via their API](file:///blog/cloudflare-dns-api/). To reiterate what I said in those posts, this is a common necessity for those of us who have non-static IP addresses that can change at any @@ -15,86 +18,93 @@ moment due to ISP policy. In order to keep a home server running smoothly, the server admin needs to have a process to constantly monitor their public IP address and -update their domain's DNS records if it changes. +update their domain\'s DNS records if it changes. + +This post explains how to use Python to update Njalla\'s DNS records +whenever a machine\'s public IP address changes. -This post explains how to use Python to update Njalla's DNS records -whenever a machine's public IP address changes. +## Creating a Token -** Creating a Token -To use Njalla's API, you will first need to create a token that will be +To use Njalla\'s API, you will first need to create a token that will be used to authenticate you every time you call the API. Luckily, this is very easy to do if you have an account with Njalla. -Simply go the [[https://njal.la/settings/api/][API Settings]] page and -click the =Add Token= button. Next, enter a name for the token and click -=Add=. +Simply go the [API Settings](https://njal.la/settings/api/) page and +click the `Add Token` button. Next, enter a name for the +token and click `Add`. -Finally, click the =Manage= button next to your newly created token and -copy the =API Token= field. +Finally, click the `Manage` button next to your newly created +token and copy the `API Token` field. -** Finding the Correct API Request -Once you have a token, you're ready to call the Njalla API for any +## Finding the Correct API Request + +Once you have a token, you\'re ready to call the Njalla API for any number of requests. For a full listing of available requests, see the -[[https://njal.la/api/][Njalla API Documentation]]. +[Njalla API Documentation](https://njal.la/api/). -For this demo, we are using the =list-records= and =edit-record= -requests. +For this demo, we are using the `list-records` and +`edit-record` requests. -The =list-records= request requires the following payload to be sent -when calling the API: +The `list-records` request requires the following payload to +be sent when calling the API: -#+begin_src txt +``` txt params: { domain: string } -#+end_src +``` -The =edit-record= request requires the following payload to be sent when -calling the API: +The `edit-record` request requires the following payload to +be sent when calling the API: -#+begin_src txt +``` txt params: { domain: string id: int content: string } -#+end_src +``` + +# Server Set-Up -* Server Set-Up To create this script, we will be using Python. By default, I use Python 3 on my servers, so please note that I did not test this in Python 2, and I do not know if Python 2 will work for this. -** Creating the Script +## Creating the Script + First, find a suitable place to create your script. Personally, I just -create a directory called =ddns= in my home directory: +create a directory called `ddns` in my home directory: -#+begin_src sh +```sh mkdir ~/ddns -#+end_src +``` Next, create a Python script file: -#+begin_src sh +```sh nano ~/ddns/ddns.py -#+end_src +``` -The following code snippet is quite long, so I won't go into depth on +The following code snippet is quite long, so I won\'t go into depth on each part. However, I suggest you read through the entire script before running it; it is quite simple and contains comments to help explain each code block. -:warning: *Note*: You will need to update the following variables for +:warning: **Note**: You will need to update the following variables for this to work: -- =token=: This is the Njalla API token you created earlier. -- =user_domain=: This is the top-level domain you want to modify. -- =include_subdomains=: Set this to =True= if you also want to modify - subdomains found under the TLD. -- =subdomains=: If =include_subdomains= = =True=, you can include your - list of subdomains to be modified here. - -#+begin_src python +- `token`: This is the Njalla API token you created + earlier. +- `user_domain`: This is the top-level domain you want to + modify. +- `include_subdomains`: Set this to `True` if + you also want to modify subdomains found under the TLD. +- `subdomains`: If `include_subdomains` = + `True`, you can include your list of subdomains to be + modified here. + +``` python #!/usr/bin/python # -*- coding: utf-8 -*- # Import Python modules @@ -173,27 +183,30 @@ for record in data['records']: 'does not match Njalla's value of', record['content'], '. Updating...') update_record(user_domain, record['id'], ipv6) -#+end_src +``` -** Running the Script -Once you've created the script and are ready to test it, run the +## Running the Script + +Once you\'ve created the script and are ready to test it, run the following command: -#+begin_src sh +```sh python3 ~/ddns/ddns.py -#+end_src +``` + +## Setting the Script to Run Automatically -** Setting the Script to Run Automatically -To make sure the scripts run automatically, add it to the =cron= file so -that it will run on a schedule. To do this, open the =cron= file: +To make sure the scripts run automatically, add it to the +`cron` file so that it will run on a schedule. To do this, +open the `cron` file: -#+begin_src sh +```sh crontab -e -#+end_src +``` In the cron file, paste the following at the bottom of the editor in order to check the IP every five minutes: -#+begin_src sh -,*/5 ** ** ** ** python3 /home/<your_username>/ddns/ddns.py -#+end_src +```sh +*/5 ** ** ** ** python3 /home/<your_username>/ddns/ddns.py +``` diff --git a/content/blog/2022-02-16-debian-and-nginx.org b/content/blog/2022-02-16-debian-and-nginx.md index d346f82..8c9bb31 100644 --- a/content/blog/2022-02-16-debian-and-nginx.org +++ b/content/blog/2022-02-16-debian-and-nginx.md @@ -1,74 +1,78 @@ -#+title: Migrating to a New Web Server Setup with Debian, Nginx, and Agate -#+date: 2022-02-16 -#+description: A retrospective on my recent server migration. -#+filetags: :sysadmin: ++++ +date = 2022-02-16 +title = "Migrating to a New Web Server Setup with Debian, Nginx, and Agate" +description = "" +draft = false ++++ -* Server OS: Debian -#+caption: Debian + neofetch -[[https://img.cleberg.net/blog/20220216-migrating-to-debian-and-nginx/neofetch.png]] +# Server OS: Debian -I've used various Linux distributions throughout the years, but I've + + +I\'ve used various Linux distributions throughout the years, but I\'ve never used anything except Ubuntu for my servers. Why? I really have no idea, mostly just comfort around the commands and software availability. However, I have always wanted to try Debian as a server OS after testing -it out in a VM a few years ago (side-note: I'd love to try Alpine too, +it out in a VM a few years ago (side-note: I\'d love to try Alpine too, but I always struggle with compatibility). So, I decided to launch a new -VPS and use [[https://www.debian.org][Debian]] 11 as the OS. Spoiler +VPS and use [Debian](https://www.debian.org) 11 as the OS. Spoiler alert: it feels identical to Ubuntu for my purposes. I did the normal things when first launching the VPS, such as adding a new user, locking down SSH, etc. If you want to see that level of -detail, read my other post about -[[https://cleberg.net/blog/how-to-set-up-a-vps-web-server/][How to Set -Up a VPS Web Server]]. +detail, read my other post about [How to Set Up a VPS Web +Server](https://cleberg.net/blog/how-to-set-up-a-vps-web-server/). All of this has been similar, apart from small things such as the -location of users' home folders. No complaints at all from me - Debian +location of users\' home folders. No complaints at all from me - Debian seems great. -* Web Server: Nginx -#+caption: Nginx status -[[https://img.cleberg.net/blog/20220216-migrating-to-debian-and-nginx/nginx.png]] +# Web Server: Nginx + + Once I had the baseline server configuration set-up for Debian, I moved -on to trying out [[https://nginx.org][Nginx]] as my web server software. -This required me to install the =nginx= and =ufw= packages, as well as -setting up the initial UFW config: +on to trying out [Nginx](https://nginx.org) as my web server software. +This required me to install the `nginx` and `ufw` +packages, as well as setting up the initial UFW config: -#+begin_src sh +```sh sudo apt install nginx ufw sudo ufw allow 'Nginx Full' sudo ufw allow SSH sudo ufw enable sudo ufw status sudo systemctl status nginx -#+end_src +``` Once I had the firewall set, I moved on to creating the directories and files for my website. This is very easy and is basically the same as setting up an Apache server, so no struggles here. -#+begin_src sh +```sh sudo mkdir -p /var/www/your_domain/html sudo chown -R $USER:$USER /var/www/your_domain/html sudo chmod -R 755 /var/www/your_domain nano /var/www/your_domain/html/index.html -#+end_src +``` The next part, creating the Nginx configuration files, is quite a bit different from Apache. First, you need to create the files in the -=sites-available= folder and symlink it the =sites-enabled= folder. +`sites-available` folder and symlink it the +`sites-enabled` folder. Creating the config file for your domain: -#+begin_src sh +```sh sudo nano /etc/nginx/sites-available/your_domain -#+end_src +``` Default content for an Nginx config file: -#+begin_src sh +```sh server { listen 80; listen [::]:80; @@ -82,43 +86,45 @@ server { try_files $uri $uri/ =404; } } -#+end_src +``` Finally, symlink it together: -#+begin_src sh +```sh sudo ln -s /etc/nginx/sites-available/your_domain /etc/nginx/sites-enabled/ -#+end_src +``` This will make your site available to the public (as long as you have -=your_domain= DNS records pointed at the server's IP address)! +`your_domain` DNS records pointed at the server\'s IP +address)! -Next, I used [[https://certbot.eff.org/][certbot]] to issue an HTTPS +Next, I used [certbot](https://certbot.eff.org/) to issue an HTTPS certificate for my domains using the following commands: -#+begin_src sh +```sh sudo apt install snapd; sudo snap install core; sudo snap refresh core sudo snap install --classic certbot sudo ln -s /snap/bin/certbot /usr/bin/certbot sudo certbot --nginx -#+end_src +``` Now that certbot ran successfully and updated my Nginx config files to -include a =443= server block of code, I went back in and edited the -config file to include security HTTP headers. This part is optional, but -is recommended for security purposes; you can even test a website's HTTP -header security at [[https://securityheaders.com/][Security Headers]]. +include a `443` server block of code, I went back in and +edited the config file to include security HTTP headers. This part is +optional, but is recommended for security purposes; you can even test a +website\'s HTTP header security at [Security +Headers](https://securityheaders.com/). The configuration below shows a set-up where you only want your website to serve content from its own domain, except for images and scripts, -which may come from =nullitics.com=. All other content would be blocked -from loading in a browser. +which may come from `nullitics.com`. All other content would +be blocked from loading in a browser. -#+begin_src sh +```sh sudo nano /etc/nginx/sites-available/your_domain -#+end_src +``` -#+begin_src sh +```sh server { ... add_header Content-Security-Policy "default-src 'none'; img-src 'self' https://nullitics.com; script-src 'self' https://nullitics.com; style-src 'self'; font-src 'self'"; @@ -129,44 +135,47 @@ server { add_header Referrer-Policy "no-referrer"; ... } -#+end_src +``` -#+begin_src sh +```sh sudo systemctl restart nginx -#+end_src +``` + +## Nginx vs. Apache -** Nginx vs. Apache As I stated at the beginning, my historical hesitation with trying Nginx was that the differences in configuration formats scared me away from leaving Apache. However, I prefer Nginx to Apache for a few reasons: -1. Nginx uses only one config file (=your_domain=) vs. Apache's two-file - approach for HTTP vs. HTTPS (=your_domain.conf= and - =your_domain-le-ssl.conf=). -2. Symlinking new configurations files and reloading Nginx are way - easier than Apache's process of having to enable headers with - =a2enmod mod_headers=, enable PHP with =a2enmod php= (plus any other - mods you need), and then enabling sites with =a2ensite=, and THEN - reloading Apache. -3. The contents of the Nginx config files seem more organized and - logical with the curly-bracket approach. This is a minor reason, but - everything just felt cleaner while I was installing my sites and that - had a big quality of life impact on the installation for me. - -They're both great software packages, but Nginx just seems more +1. Nginx uses only one config file (`your_domain`) vs. + Apache\'s two-file approach for HTTP vs. HTTPS + (`your_domain.conf` and + `your_domain-le-ssl.conf`). +2. Symlinking new configurations files and reloading Nginx are way + easier than Apache\'s process of having to enable headers with + `a2enmod mod_headers`, enable PHP with + `a2enmod php` (plus any other mods you need), and then + enabling sites with `a2ensite`, and THEN reloading + Apache. +3. The contents of the Nginx config files seem more organized and + logical with the curly-bracket approach. This is a minor reason, but + everything just felt cleaner while I was installing my sites and + that had a big quality of life impact on the installation for me. + +They\'re both great software packages, but Nginx just seems more organized and easier to use these days. I will certainly be exploring the Nginx docs to see what other fun things I can do with all of this. -* Gemini Server: Agate -#+caption: Agate status -[[https://img.cleberg.net/blog/20220216-migrating-to-debian-and-nginx/agate.png]] +# Gemini Server: Agate + + Finally, I set up the Agate software on this server again to host my Gemini server content, using Rust as I have before. You can read my -other post for more information on installing Agate: -[[https://cleberg.net/blog/hosting-a-gemini-server/][Hosting a Gemini -Server]]. +other post for more information on installing Agate: [Hosting a Gemini +Server](https://cleberg.net/blog/hosting-a-gemini-server/). All in all, Debian + Nginx is very slick and I prefer it over my old -combination of Ubuntu + Apache (although it's really just Nginx > Apache -for me, since Debian seems mostly the same as Ubuntu is so far). +combination of Ubuntu + Apache (although it\'s really just Nginx \> +Apache for me, since Debian seems mostly the same as Ubuntu is so far). diff --git a/content/blog/2022-02-17-exiftool.md b/content/blog/2022-02-17-exiftool.md new file mode 100644 index 0000000..2fa9adb --- /dev/null +++ b/content/blog/2022-02-17-exiftool.md @@ -0,0 +1,68 @@ ++++ +date = 2022-02-17 +title = "Stripping Image Metadata with Exiftool" +description = "" +draft = false ++++ + +## Why Strip Metadata? + +Okay, so you want to strip metadata from your photos. Perhaps you take +pictures of very rare birds, and the location metadata is a gold mine +for poachers, or perhaps you\'re just privacy-oriented like me and +prefer to strip metadata from publicly-available images. + +There are various components of image metadata that you may want to +delete before releasing a photo to the public. Here\'s an incomplete +list of things I could easily see just by inspecting a photo on my +laptop: + +- Location (Latitude & Longitude) +- Dimensions +- Device Make & Model +- Color Space +- Color Profile +- Focal Length +- Alpha Channel +- Red Eye +- Metering Mode +- F Number + +Regardless of your reasoning, I\'m going to explain how I used the +`exiftool` package in Linux to automatically strip metadata +from all images in a directory (+ subdirectories). + +## Installing `exiftool` + +First things first: we need to install the tool. I\'m running Debian 11 +on my server (Ubuntu will work the same), so the command is as simple +as: + +```sh +sudo apt install exiftool +``` + +There are different tools that can accomplish the same thing across +distributions, but I really only care to test out this one package. + +## Recursively Strip Data + +I actually use this tool extensively to strip any photos uploaded to the +website that serves all the images for my blog +(`img.cleberg.net`). + +The following command is incredibly useful and can be modified to +include any image extensions that `exiftool` supports: + +```sh +exiftool -r -all= -ext jpg -ext png /path/to/directory/ +``` + +See below for the results of my most recent usage of +`exiftool` after I uploaded the image for this blog post. You +can see that the command will let you know how many directories were +scanned, how many images were updated, and how many images were +unchanged. + + diff --git a/content/blog/2022-02-17-exiftool.org b/content/blog/2022-02-17-exiftool.org deleted file mode 100644 index 5735125..0000000 --- a/content/blog/2022-02-17-exiftool.org +++ /dev/null @@ -1,60 +0,0 @@ -#+title: Stripping Image Metadata with exiftool -#+date: 2022-02-17 -#+description: A simple guide to remove exif data with exiftool. -#+filetags: :privacy: - -** Why Strip Metadata? -Okay, so you want to strip metadata from your photos. Perhaps you take -pictures of very rare birds, and the location metadata is a gold mine -for poachers, or perhaps you're just privacy-oriented like me and prefer -to strip metadata from publicly-available images. - -There are various components of image metadata that you may want to -delete before releasing a photo to the public. Here's an incomplete list -of things I could easily see just by inspecting a photo on my laptop: - -- Location (Latitude & Longitude) -- Dimensions -- Device Make & Model -- Color Space -- Color Profile -- Focal Length -- Alpha Channel -- Red Eye -- Metering Mode -- F Number - -Regardless of your reasoning, I'm going to explain how I used the -=exiftool= package in Linux to automatically strip metadata from all -images in a directory (+ subdirectories). - -** Installing =exiftool= -First things first: we need to install the tool. I'm running Debian 11 -on my server (Ubuntu will work the same), so the command is as simple -as: - -#+begin_src sh -sudo apt install exiftool -#+end_src - -There are different tools that can accomplish the same thing across -distributions, but I really only care to test out this one package. - -** Recursively Strip Data -I actually use this tool extensively to strip any photos uploaded to the -website that serves all the images for my blog (=img.cleberg.net=). - -The following command is incredibly useful and can be modified to -include any image extensions that =exiftool= supports: - -#+begin_src sh -exiftool -r -all= -ext jpg -ext png /path/to/directory/ -#+end_src - -See below for the results of my most recent usage of =exiftool= after I -uploaded the image for this blog post. You can see that the command will -let you know how many directories were scanned, how many images were -updated, and how many images were unchanged. - -#+caption: exiftool results -[[https://img.cleberg.net/blog/20220217-stripping-metadata-with-exiftool/exiftool.png]] diff --git a/content/blog/2022-02-20-nginx-caching.md b/content/blog/2022-02-20-nginx-caching.md new file mode 100644 index 0000000..2df95e3 --- /dev/null +++ b/content/blog/2022-02-20-nginx-caching.md @@ -0,0 +1,73 @@ ++++ +date = 2022-02-20 +title = "Caching Static Content with Nginx" +description = "" +draft = false ++++ + +# Update Your Nginx Config to Cache Static Files + +If you run a website on Nginx that serves static content (i.e., content +that is not dynamic and changing with interactions from the user), you +would likely benefit from caching that content on the client-side. If +you\'re used to Apache and looking for the Nginx equivalent, this post +should help. + +Luckily, setting up the cache is as easy as identifying the file types +you want to cache and determining the expiration length. To include more +file types, simply use the bar separator (`|`) and type the +new file extension you want to include. + +``` config +server { + ... + + location ~** .(css|js|jpg|jpeg|gif|png|ico)$ { + expires 30d; + } + + ... +} +``` + +I have seen some people who prefer to set `expires` as +`365d` or even `max`, but that is only for stable, +infrequently changing websites. As my site often changes (i.e., I\'m +never content with my website), I need to know that my readers are +seeing the new content without waiting too long. + +So, I went ahead and set the expiration date at `30d`, which +is short enough to refresh for readers but long enough that +clients/browsers won\'t be re-requesting the static files too often, +hopefully resulting in faster loading times, as images should be the +only thing slowing down my site. + +# Testing Results + +To test my changes to the Nginx configuration, I used the [HTTP Header +Live](https://addons.mozilla.org/en-US/firefox/addon/http-header-live/) +extension on my Gecko browser and used the sidebar to inspect the +headers of a recent image from my blog. + +In the image below, you can see that the `Cache-Control` +header is now present and set to 2592000, which is 30 days represented +in seconds (30 days \_ 24 hours/day \_ 60 minutes/hour \*\* 60 +seconds/minute = 2,592,000 seconds). + +The `Expires` field is now showing 22 March 2022, which is 30 +days from the day of this post, 20 February 2022. + + + +# Caveats + +Remember that this caching system is **client-side**, which means that +content is only cached for as long as a client allows it. For example, +my browser purges all caches, data, etc. upon exit, so this caching +policy will only work as long as my browser remains open and running. + +If you need to test updates to your site, you\'ll need to clear the +cache to see updates for any file extension you configured. This can +often be done with the `Shift + F5` or `Ctrl + F5` +key combinations in most browsers. diff --git a/content/blog/2022-02-20-nginx-caching.org b/content/blog/2022-02-20-nginx-caching.org deleted file mode 100644 index 5e815d9..0000000 --- a/content/blog/2022-02-20-nginx-caching.org +++ /dev/null @@ -1,68 +0,0 @@ -#+title: Caching Static Content with Nginx -#+date: 2022-02-20 -#+description: Learn how to enable the static content cache in Nginx. -#+filetags: :nginx: - -* Update Your Nginx Config to Cache Static Files -If you run a website on Nginx that serves static content (i.e., content -that is not dynamic and changing with interactions from the user), you -would likely benefit from caching that content on the client-side. If -you're used to Apache and looking for the Nginx equivalent, this post -should help. - -Luckily, setting up the cache is as easy as identifying the file types -you want to cache and determining the expiration length. To include more -file types, simply use the bar separator (=|=) and type the new file -extension you want to include. - -#+begin_src config -server { - ... - - location ~** .(css|js|jpg|jpeg|gif|png|ico)$ { - expires 30d; - } - - ... -} -#+end_src - -I have seen some people who prefer to set =expires= as =365d= or even -=max=, but that is only for stable, infrequently changing websites. As -my site often changes (i.e., I'm never content with my website), I need -to know that my readers are seeing the new content without waiting too -long. - -So, I went ahead and set the expiration date at =30d=, which is short -enough to refresh for readers but long enough that clients/browsers -won't be re-requesting the static files too often, hopefully resulting -in faster loading times, as images should be the only thing slowing down -my site. - -* Testing Results -To test my changes to the Nginx configuration, I used the -[[https://addons.mozilla.org/en-US/firefox/addon/http-header-live/][HTTP -Header Live]] extension on my Gecko browser and used the sidebar to -inspect the headers of a recent image from my blog. - -In the image below, you can see that the =Cache-Control= header is now -present and set to 2592000, which is 30 days represented in seconds (30 -days _ 24 hours/day _ 60 minutes/hour ** 60 seconds/minute = 2,592,000 -seconds). - -The =Expires= field is now showing 22 March 2022, which is 30 days from -the day of this post, 20 February 2022. - -#+caption: Image Headers -[[https://img.cleberg.net/blog/20220220-caching-static-content-with-nginx/image_headers.png]] - -* Caveats -Remember that this caching system is *client-side*, which means that -content is only cached for as long as a client allows it. For example, -my browser purges all caches, data, etc. upon exit, so this caching -policy will only work as long as my browser remains open and running. - -If you need to test updates to your site, you'll need to clear the cache -to see updates for any file extension you configured. This can often be -done with the =Shift + F5= or =Ctrl + F5= key combinations in most -browsers. diff --git a/content/blog/2022-02-22-tuesday.md b/content/blog/2022-02-22-tuesday.md new file mode 100644 index 0000000..d4664cd --- /dev/null +++ b/content/blog/2022-02-22-tuesday.md @@ -0,0 +1,42 @@ ++++ +date = 2022-02-22 +title = "Tuesday" +description = "" +draft = false ++++ + +# Tuesday, Twosday + +I\'m taking a break from my usual technology-related posts and writing +about something a little more enjoyable today. + +Today is Tuesday, February 22nd, 2022. Today is 02-22-2022. Today is +Twosday. + +Let\'s look at everything that fell in place today: + +1. Written in the `m-dd-yy` or `dd-m-yy` formats, + today is 2-22-22 or 22-2-22, which is a neat little palindrome in + either format. (The last ubiquitous six-digit palindrome was + 1-11-11.) +2. Today is Tuesday, which is why everyone is using the nickname + Twosday to call out these similarities. +3. Falling on Tuesday means today is the 2nd day of the week (for most + cultures. For the US, it\'s the 3rd day of the week since we start + on Sunday). +4. The only culture I could find with a connection to a `2` + is that some Slavic languages derived their version of Tuesday from + the Old Church Slavonic word `въторъ`, meaning \"the + second.\" +5. Written in the classic monospaced, digital font (think of digital + clocks from the 80s/90s), there is nice symmetry to the numbers + ([view the image + here](https://img.cleberg.net/blog/20220222-tuesday/digital_font.png)!). +6. This one isn\'t naturally-occurring, but it seems people around the + world are celebrating the day. For example, a group is putting + together + \[\[<https://www.eventbrite.com/e/2-22-22-a-collective-wedding-ceremony-at-the-state-capitol-tickets-211434605597>\]\[a + wedding of 222 couples at the California State Capitol in + Sacramento\]\], concluding at exactly 2:22 PM. These couples will + record their marriage dates as 2-22-22 2:22 PM. Tickets were on sale + for \$222.22. diff --git a/content/blog/2022-02-22-tuesday.org b/content/blog/2022-02-22-tuesday.org deleted file mode 100644 index 3fa72f9..0000000 --- a/content/blog/2022-02-22-tuesday.org +++ /dev/null @@ -1,37 +0,0 @@ -#+title: Tuesday -#+date: 2022-02-22 -#+description: 2-22-22 || 22-2-22 -#+filetags: :personal: - -* Tuesday, Twosday -I'm taking a break from my usual technology-related posts and writing -about something a little more enjoyable today. - -Today is Tuesday, February 22nd, 2022. Today is 02-22-2022. Today is -Twosday. - -Let's look at everything that fell in place today: - -1. Written in the =m-dd-yy= or =dd-m-yy= formats, today is 2-22-22 or - 22-2-22, which is a neat little palindrome in either format. (The - last ubiquitous six-digit palindrome was 1-11-11.) -2. Today is Tuesday, which is why everyone is using the nickname Twosday - to call out these similarities. -3. Falling on Tuesday means today is the 2nd day of the week (for most - cultures. For the US, it's the 3rd day of the week since we start on - Sunday). -4. The only culture I could find with a connection to a =2= is that some - Slavic languages derived their version of Tuesday from the Old Church - Slavonic word =въторъ=, meaning "the second." -5. Written in the classic monospaced, digital font (think of digital - clocks from the 80s/90s), there is nice symmetry to the numbers - ([[https://img.cleberg.net/blog/20220222-tuesday/digital_font.png][view - the image here]]!). -6. This one isn't naturally-occurring, but it seems people around the - world are celebrating the day. For example, a group is putting - together - [[[[https://www.eventbrite.com/e/2-22-22-a-collective-wedding-ceremony-at-the-state-capitol-tickets-211434605597]]][a - wedding of 222 couples at the California State Capitol in - Sacramento]], concluding at exactly 2:22 PM. These couples will - record their marriage dates as 2-22-22 2:22 PM. Tickets were on sale - for $222.22. diff --git a/content/blog/2022-03-02-reliable-notes.org b/content/blog/2022-03-02-reliable-notes.md index 16c23d0..b2681bb 100644 --- a/content/blog/2022-03-02-reliable-notes.org +++ b/content/blog/2022-03-02-reliable-notes.md @@ -1,17 +1,17 @@ -#+title: Easy, Reliable Note-Taking -#+date: 2022-03-02 -#+description: My personal preferences to ensure notes are clear, portable, and long-lasting. -#+filetags: :personal: ++++ +date = 2022-03-02 +title = "Easy, Reliable Note-Taking" +description = "" +draft = false ++++ -* Choosing Durable File Formats +# Choosing Durable File Formats -#+begin_quote -TL;DR: Write in a format that can be easily rendered and read in -plain-text mode (e.g., =.txt=, =.md=, etc.). -#+end_quote +> TL;DR: Write in a format that can be easily rendered and read in +> plain-text mode (e.g., `.txt`, `.md`, etc.). -As I've written more and more over the years, I've found that my love of -note-taking is always growing. Everything I learn or need to remember +As I\'ve written more and more over the years, I\'ve found that my love +of note-taking is always growing. Everything I learn or need to remember can be written down in a note and saved digitally, with no cost to myself. Unlike paper copies that need physical storage space, digital files simply need space on your local disk or cloud storage, which is @@ -23,8 +23,8 @@ styling. This meant that I had to go through each note during migration and edit the file to look presentable again. For the last year or two, I have written everything exclusively in -[[https://en.wikipedia.org/wiki/Markdown][Markdown]] format. Small -notes, long-form writings, and even these blog posts are all written in +[Markdown](https://en.wikipedia.org/wiki/Markdown) format. Small notes, +long-form writings, and even these blog posts are all written in Markdown. Why Markdown? While I do appreciate the simplicity of plain-text files @@ -32,18 +32,19 @@ without any formatting, I often need visual cues such as heading and code blocks to keep my thoughts straight. Markdown provides a minimal set of styling indicators for me to style my notes without adding any proprietary, embedded data into the files. If I want a top-level -heading, I simply add a hash (=#=) before the line. An added bonus is -that even if a system doesn't understand Markdown, it will render it as -plain-text and I can read it just as easily. +heading, I simply add a hash (`#`) before the line. An added +bonus is that even if a system doesn\'t understand Markdown, it will +render it as plain-text and I can read it just as easily. -For example, here's how TextEdit on macOS will open and display a +For example, here\'s how TextEdit on macOS will open and display a Markdown file in plain-text, since it does contain any features to preview Markdown as HTML: -#+caption: Plain Text Markdown -[[https://img.cleberg.net/blog/20220302-easy-reliable-note-taking/plain_markdown.png]] + + +## Saving & Syncing Files -** Saving & Syncing Files In order to read and edit my notes across platforms, I use my personal cloud storage through Tresorit due to its native integration with macOS and iOS file managers. In addition, Tresorit works well on Debian-based @@ -59,17 +60,19 @@ me to sync anything manually or kick-off a sync job to update my files. This means that I can edit on mobile, and it takes about 5-10 seconds to see the changes on desktop. -*** Version Control with Git -A different approach I've contemplated is storing my notes and +### Version Control with Git + +A different approach I\'ve contemplated is storing my notes and attachments is using a hosted Git repository to track changes to the -files. However, I don't want to rely on an external service that could +files. However, I don\'t want to rely on an external service that could potentially see into my data, even if the repository is private. -I might just do =git init= locally and then commit my changes each time -I write or update a note, but that seems to be a lot of work just for -tracking changes - which I don't necessarily care to know. +I might just do `git init` locally and then commit my changes +each time I write or update a note, but that seems to be a lot of work +just for tracking changes - which I don\'t necessarily care to know. + +### Backups! -*** Backups! One small addition to the storage/sync conversation is the idea of backups. Personally, I manually create periodic backups of my entire cloud storage, compress it into an archive, and store it on my home @@ -79,46 +82,44 @@ To improve my workflow, I am going to be exploring options to automatically compress the mounted cloud directory and send it over to my server on a set schedule. -** Writing on Desktop +## Writing on Desktop -#+begin_quote -*Update (06.14.22)*: Since writing this post, I have reverted to simply -keeping my =notes= folder open and opening notes individually in -TextEdit for a more minimal and relaxing writing experience on the -desktop. - -#+end_quote +> **Update (06.14.22)**: Since writing this post, I have reverted to +> simply keeping my `notes` folder open and opening notes +> individually in TextEdit for a more minimal and relaxing writing +> experience on the desktop. The bulk of my writing occurs in a desktop environment, with a full -keyboard layout and wide screen. I don't illustrate with a smart pen, I +keyboard layout and wide screen. I don\'t illustrate with a smart pen, I rarely use embedded images, and I love being able to see all of my notes/directories in a sidebar. With this simple set of requirements, I chose -[[https://obsidian.md][Obsidian]] as my desktop text editor. Obsidian -has some in-depth tools like a graph view, command palette, mentions, -etc., but I've found that using it as a simple Markdown editor is -incredibly easy and straightforward. +[Obsidian](https://obsidian.md) as my desktop text editor. Obsidian has +some in-depth tools like a graph view, command palette, mentions, etc., +but I\'ve found that using it as a simple Markdown editor is incredibly +easy and straightforward. -Here's an example of how my Markdown notes look when opened in +Here\'s an example of how my Markdown notes look when opened in plain-text mode: -#+caption: Obsidian Markdown Source Mode -[[https://img.cleberg.net/blog/20220302-easy-reliable-note-taking/obsidian_source_mode.png]] + + +Here\'s the \"live preview\" version, where the Markdown is rendered +into its HTML format: -Here's the "live preview" version, where the Markdown is rendered into -its HTML format: + -#+caption: Obsidian Markdown Live Preview -[[https://img.cleberg.net/blog/20220302-easy-reliable-note-taking/obsidian_live_preview.png]] +### Programming on Desktop -*** Programming on Desktop -While I was writing this, I realized I should specify that I don't use +While I was writing this, I realized I should specify that I don\'t use the same editor for writing notes and for writing code. For programming -purposes, I use [[https://vscodium.com][VSCodium]] as my development -IDE. +purposes, I use [VSCodium](https://vscodium.com) as my development IDE. + +## Writing on Mobile -** Writing on Mobile Personally, I write very little on mobile, except when needing to take important notes on-the-go. Any long-form writing, journals, etc. are done at home, where I always have my laptop available. @@ -126,9 +127,9 @@ done at home, where I always have my laptop available. I wanted a simple and foolproof editor for iOS, preferably open-source. After a long journey of testing the few (& terrible) open-source iOS note-taking apps, I finally found a phenomenal one: -[[https://github.com/simonbs/runestone][Runestone]]. This app is -fantastic for note-taking, has plenty of optional features, and -integrates natively with the iOS file manager. +[Runestone](https://github.com/simonbs/runestone). This app is fantastic +for note-taking, has plenty of optional features, and integrates +natively with the iOS file manager. This app opens the iOS file manager and allows you to click any file you want, opens it up in an editor, and lets me save and close out of that diff --git a/content/blog/2022-03-03-financial-database.md b/content/blog/2022-03-03-financial-database.md new file mode 100644 index 0000000..49ffc7b --- /dev/null +++ b/content/blog/2022-03-03-financial-database.md @@ -0,0 +1,272 @@ ++++ +date = 2022-03-03 +title = "Maintaining a Personal Financial Database" +description = "" +draft = false ++++ + +# Personal Financial Tracking + +For the last 6-ish years, I\'ve tracked my finances in a spreadsheet. +This is common practice in the business world, but any good dev will +cringe at the thought of storing long-term data in a spreadsheet. A +spreadsheet is not for long-term storage or as a source of data to pull +data/reports. + +As I wanted to expand the functionality of my financial data (e.g., +adding more reports), I decided to migrate the data into a database. To +run reports, I would query the database and use a language like Python +or Javascript to process the data, perform calculations, and visualize +the data. + +# SQLite + +When choosing the type of database I wanted to use for this project, I +was split between three options: + +1. MySQL: The database I have the most experience with and have used + for years. +2. PostgreSQL: A database I\'m new to, but want to learn. +3. SQLite: A database that I\'ve used for a couple projects and have + moderate experience. + +I ended up choosing SQLite since it can be maintained within a single +`.sqlite` file, which allows me more flexibility for storage +and backup. I keep this file in my cloud storage and pull it up whenever +needed. + +## GUI Editing + +Since I didn\'t want to try and import 1000--1500 records into my new +database via the command line, I opted to use [DB Browser for SQLite +(DB4S)](https://sqlitebrowser.org/) as a GUI tool. This application is +excellent, and I don\'t see myself going back to the CLI when working in +this database. + +DB4S allows you to copy a range of cells from a spreadsheet and paste it +straight into the SQL table. I used this process for all 36 accounts, +1290 account statements, and 126 pay statements. Overall, I\'m guessing +this took anywhere between 4--8 hours. In comparison, it probably took +me 2-3 days to initially create the spreadsheet. + + + +## Schema + +The schema for this database is actually extremely simple and involves +only three tables (for now): + +1. Accounts +2. Statements +3. Payroll + +**Accounts** + +The Accounts table contains summary information about an account, such +as a car loan or a credit card. By viewing this table, you can find +high-level data, such as interest rate, credit line, or owner. + +``` sql +CREATE TABLE "Accounts" ( + "AccountID" INTEGER NOT NULL UNIQUE, + "AccountType" TEXT, + "AccountName" TEXT, + "InterestRate" NUMERIC, + "CreditLine" NUMERIC, + "State" TEXT, + "Owner" TEXT, + "Co-Owner" TEXT, + PRIMARY KEY("AccountID" AUTOINCREMENT) +) +``` + +**Statements** + +The Statements table uses the same unique identifier as the Accounts +table, meaning you can join the tables to find a monthly statement for +any of the accounts listed in the Accounts table. Each statement has an +account ID, statement date, and total balance. + +``` sql +CREATE TABLE "Statements" ( + "StatementID" INTEGER NOT NULL UNIQUE, + "AccountID" INTEGER, + "StatementDate" INTEGER, + "Balance" NUMERIC, + PRIMARY KEY("StatementID" AUTOINCREMENT), + FOREIGN KEY("AccountID") REFERENCES "Accounts"("AccountID") +) +``` + +**Payroll** + +The Payroll table is a separate entity, unrelated to the Accounts or +Statements tables. This table contains all information you would find on +a pay statement from an employer. As you change employers or obtain new +perks/benefits, just add new columns to adapt to the new data. + +``` sql +CREATE TABLE "Payroll" ( + "PaycheckID" INTEGER NOT NULL UNIQUE, + "PayDate" TEXT, + "Payee" TEXT, + "Employer" TEXT, + "JobTitle" TEXT, + "IncomeRegular" NUMERIC, + "IncomePTO" NUMERIC, + "IncomeHoliday" NUMERIC, + "IncomeBonus" NUMERIC, + "IncomePTOPayout" NUMERIC, + "IncomeReimbursements" NUMERIC, + "FringeHSA" NUMERIC, + "FringeStudentLoan" NUMERIC, + "Fringe401k" NUMERIC, + "PreTaxMedical" NUMERIC, + "PreTaxDental" NUMERIC, + "PreTaxVision" NUMERIC, + "PreTaxLifeInsurance" NUMERIC, + "PreTax401k" NUMERIC, + "PreTaxParking" NUMERIC, + "PreTaxStudentLoan" NUMERIC, + "PreTaxOther" NUMERIC, + "TaxFederal" NUMERIC, + "TaxSocial" NUMERIC, + "TaxMedicare" NUMERIC, + "TaxState" NUMERIC, + PRIMARY KEY("PaycheckID" AUTOINCREMENT) +) +``` + +## Python Reporting + +Once I created the database tables and imported all my data, the only +step left was to create a process to report and visualize on various +aspects of the data. + +In order to explore and create the reports I\'m interested in, I +utilized a two-part process involving Jupyter Notebooks and Python +scripts. + +1. Step 1: Jupyter Notebooks + + When I need to explore data, try different things, and re-run my + code cell-by-cell, I use Jupyter Notebooks. For example, I explored + the `Accounts` table until I found the following useful + information: + + ``` python + import sqlite3 + import pandas as pd + import matplotlib + + # Set up database filename and connect + db = "finances.sqlite" + connection = sqlite3.connect(db) + df = pd.read_sql_query("SELECT ** FROM Accounts", connection) + + # Set global matplotlib variables + %matplotlib inline + matplotlib.rcParams['text.color'] = 'white' + matplotlib.rcParams['axes.labelcolor'] = 'white' + matplotlib.rcParams['xtick.color'] = 'white' + matplotlib.rcParams['ytick.color'] = 'white' + matplotlib.rcParams['legend.labelcolor'] = 'black' + + # Display graph + df.groupby(['AccountType']).sum().plot.pie(title='Credit Line by Account Type', y='CreditLine', figsize=(5,5), autopct='%1.1f%%') + ``` + +2. Step 2: Python Scripts + + Once I explored enough through the notebooks and had a list of + reports I wanted, I moved on to create a Python project with the + following structure: + + ``` txt + finance/ + ├── notebooks/ + │ │ ├── account_summary.ipynb + │ │ ├── account_details.ipynb + │ │ └── payroll.ipynb + ├── public/ + │ │ ├── image-01.png + │ │ └── image-0X.png + ├── src/ + │ └── finance.sqlite + ├── venv/ + ├── _init.py + ├── database.py + ├── process.py + ├── requirements.txt + └── README.md + ``` + + This structure allows me to: + + 1. Compile all required python packages into + `requirements.txt` for easy installation if I move to + a new machine. + 2. Activate a virtual environment in `venv/` so I don\'t + need to maintain a system-wide Python environment just for this + project. + 3. Keep my `notebooks/` folder to continuously explore + the data as I see fit. + 4. Maintain a local copy of the database in `src/` for + easy access. + 5. Export reports, images, HTML files, etc. to + `public/`. + + Now, onto the differences between the code in a Jupyter Notebook and + the actual Python files. To create the report in the Notebook + snippet above, I created the following function inside + `process.py`: + + ``` python + # Create summary pie chart + def summary_data(accounts: pandas.DataFrame) -> None: + accounts_01 = accounts[accounts["Owner"] == "Person01"] + accounts_02 = accounts[accounts["Owner"] == "Person02"] + for x in range(1, 4): + if x == 1: + df = accounts + account_string = "All Accounts" + elif x == 2: + df = accounts_01 + account_string = "Person01's Accounts" + elif x == 3: + df = accounts_02 + account_string = "Person02's Accounts" + print(f"Generating pie chart summary image for {account_string}...") + summary_chart = ( + df.groupby(["AccountType"]) + .sum() + .plot.pie( + title=f"Credit Line by Type for {account_string}", + y="CreditLine", + autopct="%1.1f%%", + ) + ) + summary_chart.figure.savefig(f"public/summary_chart_{x}.png", dpi=1200) + ``` + + The result? A high-quality pie chart that is read directly by the + `public/index.html` template I use. + +  + + Other charts generated by this project include: + + - Charts of account balances over time. + - Line chart of effective tax rate (taxes divided by taxable + income). + - Salary projections and error limits using past income and + inflation rates. + - Multi-line chart of gross income, taxable income, and net + income. + + The best thing about this project? I can improve it at any given + time, shaping it into whatever helps me the most for that time. I + imagine that I will be introducing an asset tracking table soon to + track the depreciating value of cars, houses, etc. Who knows what\'s + next? diff --git a/content/blog/2022-03-03-financial-database.org b/content/blog/2022-03-03-financial-database.org deleted file mode 100644 index 55a6473..0000000 --- a/content/blog/2022-03-03-financial-database.org +++ /dev/null @@ -1,256 +0,0 @@ -#+title: Maintaining a Personal Financial Database -#+date: 2022-03-03 -#+description: An example project showing to build and maintain a simple financial database. -#+filetags: :personal: - -* Personal Financial Tracking -For the last 6-ish years, I've tracked my finances in a spreadsheet. -This is common practice in the business world, but any good dev will -cringe at the thought of storing long-term data in a spreadsheet. A -spreadsheet is not for long-term storage or as a source of data to pull -data/reports. - -As I wanted to expand the functionality of my financial data (e.g., -adding more reports), I decided to migrate the data into a database. To -run reports, I would query the database and use a language like Python -or Javascript to process the data, perform calculations, and visualize -the data. - -* SQLite -When choosing the type of database I wanted to use for this project, I -was split between three options: - -1. MySQL: The database I have the most experience with and have used for - years. -2. PostgreSQL: A database I'm new to, but want to learn. -3. SQLite: A database that I've used for a couple projects and have - moderate experience. - -I ended up choosing SQLite since it can be maintained within a single -=.sqlite= file, which allows me more flexibility for storage and backup. -I keep this file in my cloud storage and pull it up whenever needed. - -** GUI Editing -Since I didn't want to try and import 1000--1500 records into my new -database via the command line, I opted to use -[[https://sqlitebrowser.org/][DB Browser for SQLite (DB4S)]] as a GUI -tool. This application is excellent, and I don't see myself going back -to the CLI when working in this database. - -DB4S allows you to copy a range of cells from a spreadsheet and paste it -straight into the SQL table. I used this process for all 36 accounts, -1290 account statements, and 126 pay statements. Overall, I'm guessing -this took anywhere between 4--8 hours. In comparison, it probably took -me 2-3 days to initially create the spreadsheet. - -#+caption: DB4S -[[https://img.cleberg.net/blog/20220303-maintaining-a-personal-financial-database/db4s.png]] - -** Schema -The schema for this database is actually extremely simple and involves -only three tables (for now): - -1. Accounts -2. Statements -3. Payroll - -*Accounts* - -The Accounts table contains summary information about an account, such -as a car loan or a credit card. By viewing this table, you can find -high-level data, such as interest rate, credit line, or owner. - -#+begin_src sql -CREATE TABLE "Accounts" ( - "AccountID" INTEGER NOT NULL UNIQUE, - "AccountType" TEXT, - "AccountName" TEXT, - "InterestRate" NUMERIC, - "CreditLine" NUMERIC, - "State" TEXT, - "Owner" TEXT, - "Co-Owner" TEXT, - PRIMARY KEY("AccountID" AUTOINCREMENT) -) -#+end_src - -*Statements* - -The Statements table uses the same unique identifier as the Accounts -table, meaning you can join the tables to find a monthly statement for -any of the accounts listed in the Accounts table. Each statement has an -account ID, statement date, and total balance. - -#+begin_src sql -CREATE TABLE "Statements" ( - "StatementID" INTEGER NOT NULL UNIQUE, - "AccountID" INTEGER, - "StatementDate" INTEGER, - "Balance" NUMERIC, - PRIMARY KEY("StatementID" AUTOINCREMENT), - FOREIGN KEY("AccountID") REFERENCES "Accounts"("AccountID") -) -#+end_src - -*Payroll* - -The Payroll table is a separate entity, unrelated to the Accounts or -Statements tables. This table contains all information you would find on -a pay statement from an employer. As you change employers or obtain new -perks/benefits, just add new columns to adapt to the new data. - -#+begin_src sql -CREATE TABLE "Payroll" ( - "PaycheckID" INTEGER NOT NULL UNIQUE, - "PayDate" TEXT, - "Payee" TEXT, - "Employer" TEXT, - "JobTitle" TEXT, - "IncomeRegular" NUMERIC, - "IncomePTO" NUMERIC, - "IncomeHoliday" NUMERIC, - "IncomeBonus" NUMERIC, - "IncomePTOPayout" NUMERIC, - "IncomeReimbursements" NUMERIC, - "FringeHSA" NUMERIC, - "FringeStudentLoan" NUMERIC, - "Fringe401k" NUMERIC, - "PreTaxMedical" NUMERIC, - "PreTaxDental" NUMERIC, - "PreTaxVision" NUMERIC, - "PreTaxLifeInsurance" NUMERIC, - "PreTax401k" NUMERIC, - "PreTaxParking" NUMERIC, - "PreTaxStudentLoan" NUMERIC, - "PreTaxOther" NUMERIC, - "TaxFederal" NUMERIC, - "TaxSocial" NUMERIC, - "TaxMedicare" NUMERIC, - "TaxState" NUMERIC, - PRIMARY KEY("PaycheckID" AUTOINCREMENT) -) -#+end_src - -** Python Reporting -Once I created the database tables and imported all my data, the only -step left was to create a process to report and visualize on various -aspects of the data. - -In order to explore and create the reports I'm interested in, I utilized -a two-part process involving Jupyter Notebooks and Python scripts. - -1. Step 1: Jupyter Notebooks - - When I need to explore data, try different things, and re-run my code - cell-by-cell, I use Jupyter Notebooks. For example, I explored the - =Accounts= table until I found the following useful information: - - #+begin_src python - import sqlite3 - import pandas as pd - import matplotlib - - # Set up database filename and connect - db = "finances.sqlite" - connection = sqlite3.connect(db) - df = pd.read_sql_query("SELECT ** FROM Accounts", connection) - - # Set global matplotlib variables - %matplotlib inline - matplotlib.rcParams['text.color'] = 'white' - matplotlib.rcParams['axes.labelcolor'] = 'white' - matplotlib.rcParams['xtick.color'] = 'white' - matplotlib.rcParams['ytick.color'] = 'white' - matplotlib.rcParams['legend.labelcolor'] = 'black' - - # Display graph - df.groupby(['AccountType']).sum().plot.pie(title='Credit Line by Account Type', y='CreditLine', figsize=(5,5), autopct='%1.1f%%') - #+end_src - -2. Step 2: Python Scripts - - Once I explored enough through the notebooks and had a list of - reports I wanted, I moved on to create a Python project with the - following structure: - - #+begin_src txt - finance/ - ├── notebooks/ - │ │ ├── account_summary.ipynb - │ │ ├── account_details.ipynb - │ │ └── payroll.ipynb - ├── public/ - │ │ ├── image-01.png - │ │ └── image-0X.png - ├── src/ - │ └── finance.sqlite - ├── venv/ - ├── _init.py - ├── database.py - ├── process.py - ├── requirements.txt - └── README.md - #+end_src - - This structure allows me to: - - 1. Compile all required python packages into =requirements.txt= for - easy installation if I move to a new machine. - 2. Activate a virtual environment in =venv/= so I don't need to - maintain a system-wide Python environment just for this project. - 3. Keep my =notebooks/= folder to continuously explore the data as I - see fit. - 4. Maintain a local copy of the database in =src/= for easy access. - 5. Export reports, images, HTML files, etc. to =public/=. - - Now, onto the differences between the code in a Jupyter Notebook and - the actual Python files. To create the report in the Notebook snippet - above, I created the following function inside =process.py=: - - #+begin_src python - # Create summary pie chart - def summary_data(accounts: pandas.DataFrame) -> None: - accounts_01 = accounts[accounts["Owner"] == "Person01"] - accounts_02 = accounts[accounts["Owner"] == "Person02"] - for x in range(1, 4): - if x == 1: - df = accounts - account_string = "All Accounts" - elif x == 2: - df = accounts_01 - account_string = "Person01's Accounts" - elif x == 3: - df = accounts_02 - account_string = "Person02's Accounts" - print(f"Generating pie chart summary image for {account_string}...") - summary_chart = ( - df.groupby(["AccountType"]) - .sum() - .plot.pie( - title=f"Credit Line by Type for {account_string}", - y="CreditLine", - autopct="%1.1f%%", - ) - ) - summary_chart.figure.savefig(f"public/summary_chart_{x}.png", dpi=1200) - #+end_src - - The result? A high-quality pie chart that is read directly by the - =public/index.html= template I use. - - #+caption: Summary Pie Chart - [[https://img.cleberg.net/blog/20220303-maintaining-a-personal-financial-database/summary_chart.png]] - - Other charts generated by this project include: - - - Charts of account balances over time. - - Line chart of effective tax rate (taxes divided by taxable income). - - Salary projections and error limits using past income and inflation - rates. - - Multi-line chart of gross income, taxable income, and net income. - - The best thing about this project? I can improve it at any given - time, shaping it into whatever helps me the most for that time. I - imagine that I will be introducing an asset tracking table soon to - track the depreciating value of cars, houses, etc. Who knows what's - next? diff --git a/content/blog/2022-03-08-plex-migration.md b/content/blog/2022-03-08-plex-migration.md new file mode 100644 index 0000000..c6acd6e --- /dev/null +++ b/content/blog/2022-03-08-plex-migration.md @@ -0,0 +1,248 @@ ++++ +date = 2022-03-08 +title = "Migrating Plex to a New Server with Nvidia GPU Transcoding" +description = "" +draft = false ++++ + +# Migration Phases + +I recently decided to migrate my server from an old OptiPlex desktop +machine to a custom-built tower with better hardware in every category. +In order to do this, I would need to properly migrate a full Plex +installation. + +The second part of this migration is that the new server uses an Nvidia +GPU and does not have any integrated graphics, which requires extra work +for installation, but provides much better hardware transcoding options +for Plex. + +Therefore, I have broken this migration down into three phases: + +1. Configure the New Server +2. Migrate Plex Data & Devices +3. Configure GPU Transcoding + +# Phase 1: Configure the New Server + +## Choosing an OS + +In order to migrate Plex to my new server, I first needed to choose an +appropriate operating system (OS) and install it on the machine. Given +that I have encountered numerous issues installing other Linux +distributions properly with Nvidia graphics, I chose [Ubuntu +Server](https://ubuntu.com/download/server). + +The first step is to create a bootable USB with Ubuntu Server. This is +easy with [Etcher](https://www.balena.io/etcher/), an app that runs on +many different platforms. Just download the Ubuntu Server +`.iso` image, launch Etcher, and install the +`.iso` on the USB. + +Once the USB is created, insert it into my server, reboot, and click +`Esc` (or any of the `F1-12` keys) until the BIOS +menu appears. Finally, launch the USB boot drive. + +## Booting with Nvidia + +In order to install Ubuntu Server with an Nvidia Graphics card (and no +integrated graphics on this device for some reason), you\'ll have to +configure the boot menu to allow different graphics drivers to be +loaded. + +When booting from the USB, the machine will launch the initial +installation menu. From this menu, type `e` to view the +default command options that come with the device - it\'s a good idea to +take a photo of this screen, so you can enter these commands on the next +screen (along with adding support for Nvidia). + +Finally, type `Ctrl + C` to enter the command line. From this +command line, enter the commands found on the `e` screen. +\*Remember to add `nomodeset` to the `linux ...` +line so that your Nvidia device will display the installation screens +properly!\* + +Here\'s an example of the commands I pulled from the `e` +screen and entered on the command line. + +```sh +setparams 'Install Ubuntu Server' +setgfxpayload=keep +linux /casper/vmlinuz quiet nomodeset --- +initrd /casper/initrd +boot +``` + + + + + +Once the machine is rebooted, enter the `e` screen again and +add `nomodeset` to the `linux ...` line again and +press `Ctrl + X` to save the boot options. + +The machine is now fully installed and can properly display on an +external display using the Nvidia GPU. + +Always remember to update and upgrade on a new installation: + +```sh +sudo apt update; sudo apt upgrade -y; sudo apt autoremove -y +``` + +# Phase 2: Migrate Plex Data & Devices + +This phase uses the great Plex article on migrations ([Move an +Installation to Another +System](https://support.plex.tv/articles/201370363-move-an-install-to-another-system/)) +and adds a bit more information to help with commands and context. + +## Terminology + +**Source:\*** The original server that is being replaced.\ +**Destination:\*** The new server.\ +**Client:\*** Any application that can be used to modify settings for +both source/destination. + +## Step 01: \[Client\] Update Settings + +Open up a Plex app and *disable* the `Account` \> +`Library` \> +`Empty trash automatically after every scan` preference for +the source server. + +## Step 02: \[Destination\] Install Plex + +Open up the [Plex Media Server download +page](https://www.plex.tv/media-server-downloads/) and copy the link for +the appropriate platform. + +Execute the following commands on the destination server to install +Plex: + +```sh +wget <url> +sudo dpkg -i <filename> +sudo systemctl stop plexmediaserver.service +``` + +## Step 03: \[Source\] Stop Plex & Migrate Data + +First, stop the Plex service so that no data is created or modified +during the migration. + +```sh +sudo systemctl stop plexmediaserver.service +``` + +Next, copy the data to the new server. To find where the Plex data +directory is located, Plex has another excellent article available: +[Where is the Plex Media Server data directory +located?](https://support.plex.tv/articles/202915258-where-is-the-plex-media-server-data-directory-located/). + +There are many ways to copy the data to the new server and will largely +depend on the size of the folder being copied. Personally, my data +folder was \~23GB and I opted to simply use the `scp` command +to copy the files over SSH. + +This process was throttled by the old server\'s slow HDD and ports and +took approximately 90 minutes to complete. In comparison, moving the +data from the new server\'s `home/user/` directory to the +`/var/.../Plex Media Server` directory took 2-3 minutes. + +```sh +scp -r "/var/lib/plexmediaserver/Library/Application Support/Plex Media Server" your_user@xxx.xxx.xxx.xxx:"'/path/to/destination/'" +``` + +## Step 04: \[Destination\] Update File Permissions + +In case you move the data directory to a common area on the new server, +it will have to be moved to the proper location before Plex can function +properly: + +```sh +mv "Plex Media Server" /var/lib/plexmediaserver/Library/Application Support/ +``` + +To ensure permissions were retained properly, the server will need to +show that all files and folders in the data directory are owned by +`plex:plex` (or whichever user is running the Plex +application). + +```sh +sudo chown -R plex:plex "/var/lib/plexmediaserver/Library/Application Support/Plex Media Server" +``` + +Finally, start the service and check the status. + +```sh +sudo systemctl start plexmediaserver.service +sudo systemctl status plexmediaserver.service +``` + +## Step 05: \[Client\] Update Libraries & Metadata + +The first step - now that the new server is up and running - is to sign +out of the client and sign back in. Once this is done, update any +library locations, if necessary. This was unnecessary in my case since I +simply moved my storage drives from the source server to the destination +server. + +Next, perform the following actions in the client: + +1. On the left sidebar, click `More` \> Three-Dot Menu \> + `Scan Library Files` +2. *Enable* the `Account` \> `Library` \> + `Empty trash automatically after every scan` preference + for the source server. +3. On the left sidebar, click `More` \> Three-Dot Menu \> + `Manage Server` \> `Empty Trash` +4. On the left sidebar, click `More` \> Three-Dot Menu \> + `Manage Server` \> `Clean Bundles` +5. On the left sidebar, click `More` \> Three-Dot Menu \> + `Manage Server` \> `Optimize Database` + +Finally, double-check the Remote Access settings to make sure no changes +have caused issues with accessing the server from outside the network. + +In my case, I use a single port forwarding rule in my router and needed +to update the Local LAN IP Address to the new server IP address. + + + +# Phase 3: Configure GPU Transcoding + +The final piece to the migration is enabling hardware transcoding so +that Plex can fully utilize the new Nvidia GPU available in the server. +The first step is to install Nvidia graphics drivers. This process may +take a few minutes, but the commands are pretty simple: + +```sh +sudo add-apt-repository ppa:graphics-drivers/ppa +sudo apt update +sudo apt-get install ubuntu-drivers-common +sudo ubuntu-drivers autoinstall +``` + +Finally, reboot so that the changes are loaded: + +```sh +sudo reboot now +``` + +To ensure that the Nvidia graphics drivers are working properly, run the +following command to view the available GPUs, statistics, and processes: + +```sh +sudo nvidia-smi +``` + + + +Finally, enable hardware transcoding settings in the Plex application: + + diff --git a/content/blog/2022-03-08-plex-migration.org b/content/blog/2022-03-08-plex-migration.org deleted file mode 100644 index 36aa294..0000000 --- a/content/blog/2022-03-08-plex-migration.org +++ /dev/null @@ -1,230 +0,0 @@ -#+title: Migrating Plex to a New Server (& Nvidia Transcoding) -#+date: 2022-03-08 -#+description: A retrospective on migrating Plex between servers and enabling Nvidia GPU transcoding. -#+filetags: :selfhosting: - -* Migration Phases -I recently decided to migrate my server from an old OptiPlex desktop -machine to a custom-built tower with better hardware in every category. -In order to do this, I would need to properly migrate a full Plex -installation. - -The second part of this migration is that the new server uses an Nvidia -GPU and does not have any integrated graphics, which requires extra work -for installation, but provides much better hardware transcoding options -for Plex. - -Therefore, I have broken this migration down into three phases: - -1. Configure the New Server -2. Migrate Plex Data & Devices -3. Configure GPU Transcoding - -* Phase 1: Configure the New Server -** Choosing an OS -In order to migrate Plex to my new server, I first needed to choose an -appropriate operating system (OS) and install it on the machine. Given -that I have encountered numerous issues installing other Linux -distributions properly with Nvidia graphics, I chose -[[https://ubuntu.com/download/server][Ubuntu Server]]. - -The first step is to create a bootable USB with Ubuntu Server. This is -easy with [[https://www.balena.io/etcher/][Etcher]], an app that runs on -many different platforms. Just download the Ubuntu Server =.iso= image, -launch Etcher, and install the =.iso= on the USB. - -Once the USB is created, insert it into my server, reboot, and click -=Esc= (or any of the =F1-12= keys) until the BIOS menu appears. Finally, -launch the USB boot drive. - -** Booting with Nvidia -In order to install Ubuntu Server with an Nvidia Graphics card (and no -integrated graphics on this device for some reason), you'll have to -configure the boot menu to allow different graphics drivers to be -loaded. - -When booting from the USB, the machine will launch the initial -installation menu. From this menu, type =e= to view the default command -options that come with the device - it's a good idea to take a photo of -this screen, so you can enter these commands on the next screen (along -with adding support for Nvidia). - -Finally, type =Ctrl + C= to enter the command line. From this command -line, enter the commands found on the =e= screen. *Remember to add -=nomodeset= to the =linux ...= line so that your Nvidia device will -display the installation screens properly!* - -Here's an example of the commands I pulled from the =e= screen and -entered on the command line. - -#+begin_src sh -setparams 'Install Ubuntu Server' -setgfxpayload=keep -linux /casper/vmlinuz quiet nomodeset --- -initrd /casper/initrd -boot -#+end_src - -#+caption: Ubuntu Server Installation 01 -[[https://img.cleberg.net/blog/20220308-plex-media-server-migration/ubuntu_server_installation_01.png]] - -#+caption: Ubuntu Server Installation 02 -[[https://img.cleberg.net/blog/20220308-plex-media-server-migration/ubuntu_server_installation_02.png]] - -Once the machine is rebooted, enter the =e= screen again and add -=nomodeset= to the =linux ...= line again and press =Ctrl + X= to save -the boot options. - -The machine is now fully installed and can properly display on an -external display using the Nvidia GPU. - -Always remember to update and upgrade on a new installation: - -#+begin_src sh -sudo apt update; sudo apt upgrade -y; sudo apt autoremove -y -#+end_src - -* Phase 2: Migrate Plex Data & Devices -This phase uses the great Plex article on migrations -([[https://support.plex.tv/articles/201370363-move-an-install-to-another-system/][Move -an Installation to Another System]]) and adds a bit more information to -help with commands and context. - -** Terminology -*Source:** The original server that is being replaced.\\ -*Destination:** The new server.\\ -*Client:** Any application that can be used to modify settings for both -source/destination. - -** Step 01: [Client] Update Settings -Open up a Plex app and /disable/ the =Account= > =Library= > -=Empty trash automatically after every scan= preference for the source -server. - -** Step 02: [Destination] Install Plex -Open up the [[https://www.plex.tv/media-server-downloads/][Plex Media -Server download page]] and copy the link for the appropriate platform. - -Execute the following commands on the destination server to install -Plex: - -#+begin_src sh -wget <url> -sudo dpkg -i <filename> -sudo systemctl stop plexmediaserver.service -#+end_src - -** Step 03: [Source] Stop Plex & Migrate Data -First, stop the Plex service so that no data is created or modified -during the migration. - -#+begin_src sh -sudo systemctl stop plexmediaserver.service -#+end_src - -Next, copy the data to the new server. To find where the Plex data -directory is located, Plex has another excellent article available: -[[https://support.plex.tv/articles/202915258-where-is-the-plex-media-server-data-directory-located/][Where -is the Plex Media Server data directory located?]]. - -There are many ways to copy the data to the new server and will largely -depend on the size of the folder being copied. Personally, my data -folder was ~23GB and I opted to simply use the =scp= command to copy the -files over SSH. - -This process was throttled by the old server's slow HDD and ports and -took approximately 90 minutes to complete. In comparison, moving the -data from the new server's =home/user/= directory to the -=/var/.../Plex Media Server= directory took 2-3 minutes. - -#+begin_src sh -scp -r "/var/lib/plexmediaserver/Library/Application Support/Plex Media Server" your_user@xxx.xxx.xxx.xxx:"'/path/to/destination/'" -#+end_src - -** Step 04: [Destination] Update File Permissions -In case you move the data directory to a common area on the new server, -it will have to be moved to the proper location before Plex can function -properly: - -#+begin_src sh -mv "Plex Media Server" /var/lib/plexmediaserver/Library/Application Support/ -#+end_src - -To ensure permissions were retained properly, the server will need to -show that all files and folders in the data directory are owned by -=plex:plex= (or whichever user is running the Plex application). - -#+begin_src sh -sudo chown -R plex:plex "/var/lib/plexmediaserver/Library/Application Support/Plex Media Server" -#+end_src - -Finally, start the service and check the status. - -#+begin_src sh -sudo systemctl start plexmediaserver.service -sudo systemctl status plexmediaserver.service -#+end_src - -** Step 05: [Client] Update Libraries & Metadata -The first step - now that the new server is up and running - is to sign -out of the client and sign back in. Once this is done, update any -library locations, if necessary. This was unnecessary in my case since I -simply moved my storage drives from the source server to the destination -server. - -Next, perform the following actions in the client: - -1. On the left sidebar, click =More= > Three-Dot Menu > - =Scan Library Files= -2. /Enable/ the =Account= > =Library= > - =Empty trash automatically after every scan= preference for the - source server. -3. On the left sidebar, click =More= > Three-Dot Menu > =Manage Server= - > =Empty Trash= -4. On the left sidebar, click =More= > Three-Dot Menu > =Manage Server= - > =Clean Bundles= -5. On the left sidebar, click =More= > Three-Dot Menu > =Manage Server= - > =Optimize Database= - -Finally, double-check the Remote Access settings to make sure no changes -have caused issues with accessing the server from outside the network. - -In my case, I use a single port forwarding rule in my router and needed -to update the Local LAN IP Address to the new server IP address. - -#+caption: Router port forwarding -[[https://img.cleberg.net/blog/20220308-plex-media-server-migration/port_forwarding.png]] - -* Phase 3: Configure GPU Transcoding -The final piece to the migration is enabling hardware transcoding so -that Plex can fully utilize the new Nvidia GPU available in the server. -The first step is to install Nvidia graphics drivers. This process may -take a few minutes, but the commands are pretty simple: - -#+begin_src sh -sudo add-apt-repository ppa:graphics-drivers/ppa -sudo apt update -sudo apt-get install ubuntu-drivers-common -sudo ubuntu-drivers autoinstall -#+end_src - -Finally, reboot so that the changes are loaded: - -#+begin_src sh -sudo reboot now -#+end_src - -To ensure that the Nvidia graphics drivers are working properly, run the -following command to view the available GPUs, statistics, and processes: - -#+begin_src sh -sudo nvidia-smi -#+end_src - -#+caption: nvidia-smi -[[https://img.cleberg.net/blog/20220308-plex-media-server-migration/nvidia_smi.png]] - -Finally, enable hardware transcoding settings in the Plex application: - -#+caption: Plex transcoding settings -[[https://img.cleberg.net/blog/20220308-plex-media-server-migration/plex_transcoding.png]] diff --git a/content/blog/2022-03-23-cloudflare-dns-api.org b/content/blog/2022-03-23-cloudflare-dns-api.md index 39d6fac..555c6aa 100644 --- a/content/blog/2022-03-23-cloudflare-dns-api.org +++ b/content/blog/2022-03-23-cloudflare-dns-api.md @@ -1,39 +1,42 @@ -#+title: Dynamic DNS with Cloudflare API -#+date: 2022-03-23 -#+description: Learn how to dynamically update DNS records for changing IPs with Cloudflare. -#+filetags: :sysadmin: - -* DDNS: Dynamic DNS -If you're hosting a service from a location with dynamic DNS (where your -IP may change at any time), you must have a solution to update the DNS -so that you can access your service even when the IP of the server ++++ +date = 2022-03-23 +title = "Dynamic DNS with Cloudflare API" +description = "" +draft = false ++++ + +# DDNS: Dynamic DNS + +If you\'re hosting a service from a location with dynamic DNS (where +your IP may change at any time), you must have a solution to update the +DNS so that you can access your service even when the IP of the server changes. -The process below uses the [[https://api.cloudflare.com/][Cloudflare -API]] to update DNS =A= and =AAAA= records with the server's current IP. -If you use another DNS provider, you will have to find a way to update -your DNS (or find a way to get a static IP). +The process below uses the [Cloudflare API](https://api.cloudflare.com/) +to update DNS `A` and `AAAA` records with the +server\'s current IP. If you use another DNS provider, you will have to +find a way to update your DNS (or find a way to get a static IP). -First, install =jq= since we will use it in the next script: +First, install `jq` since we will use it in the next script: -#+begin_src sh +```sh sudo apt install jq -#+end_src +``` Next, create a location for your DDNS update scripts and open the first script: -#+begin_src sh +```sh mkdir ~/ddns nano ~/ddns/update.sh -#+end_src +``` -The following =update.sh= script will take all of your domains and -subdomains and check Cloudflare to see if the current =A= and =AAAA= -records match your server's IP address. If not, it will update the -records. +The following `update.sh` script will take all of your +domains and subdomains and check Cloudflare to see if the current +`A` and `AAAA` records match your server\'s IP +address. If not, it will update the records. -#+begin_src sh +```sh # file: update.sh #!/bin/bash @@ -55,20 +58,21 @@ do echo -e "\nUpdating $subdomain..." zone_name=$domain dns_record=$subdomain /home/<your-username>/ddns/ddns.sh done -#+end_src +``` -Next, open up the =ddns.sh= script. Paste the following into the script -and update the =api_token= and =email= variables. +Next, open up the `ddns.sh` script. Paste the following into +the script and update the `api_token` and `email` +variables. -#+begin_src sh +```sh nano ~/ddns/ddns.sh -#+end_src +``` -*Note*: If you want your DNS records to be proxied through -Cloudflare, find and update the following snippet: ="proxied":false}"= -to say =true= instead of =false=. +**Note**: If you want your DNS records to be proxied through Cloudflare, +find and update the following snippet: `"proxied":false}"` to +say `true` instead of `false`. -#+begin_src sh +```sh # file: ddns.sh #!/bin/bash # based on https://gist.github.com/Tras2/cba88201b17d765ec065ccbedfb16d9a @@ -161,30 +165,31 @@ then else echo "There is a problem with either the email or the password" fi -#+end_src +``` Once the script is saved and closed, make the scripts executable: -#+begin_src sh +```sh chmod +x ~/ddns/ddns.sh chmod +x ~/ddns/update.sh -#+end_src +``` You can test the script by running it manually: -#+begin_src sh +```sh ./update.sh -#+end_src +``` -To make sure the scripts run automatically, add it to the =cron= file so -that it will run on a schedule. To do this, open the cron file: +To make sure the scripts run automatically, add it to the +`cron` file so that it will run on a schedule. To do this, +open the cron file: -#+begin_src sh +```sh crontab -e -#+end_src +``` In the cron file, paste the following at the bottom of the editor: -#+begin_src sh -,*/5 ** ** ** ** bash /home/<your_username>/ddns/update.sh -#+end_src +```sh +*/5 ** ** ** ** bash /home/<your_username>/ddns/update.sh +``` diff --git a/content/blog/2022-03-23-nextcloud-on-ubuntu.org b/content/blog/2022-03-23-nextcloud-on-ubuntu.md index baa7976..66f6a82 100644 --- a/content/blog/2022-03-23-nextcloud-on-ubuntu.org +++ b/content/blog/2022-03-23-nextcloud-on-ubuntu.md @@ -1,77 +1,84 @@ -#+title: Nextcloud on Ubuntu -#+date: 2022-03-23 -#+description: A guide to self-hosting the NextCloud application on your own server. -#+filetags: :selfhosting: ++++ +date = 2022-03-23 +title = "Self-Hosting Nextcloud" +description = "" +draft = false ++++ -* What is Nextcloud? -[[https://nextcloud.com/][Nextcloud]] is a self-hosted solution for +# What is Nextcloud? + +[Nextcloud](https://nextcloud.com/) is a self-hosted solution for storage, communications, editing, calendar, contacts, and more. This tutorial assumes that you have an Ubuntu server and a domain name configured to point toward the server. -* Install Dependencies +# Install Dependencies + To start, you will need to install the packages that Nextcloud requires: -#+begin_src sh +```sh sudo apt install apache2 mariadb-server libapache2-mod-php7.4 sudo apt install php7.4-gd php7.4-mysql php7.4-curl php7.4-mbstring php7.4-intl sudo apt install php7.4-gmp php7.4-bcmath php-imagick php7.4-xml php7.4-zip -#+end_src +``` -* Set Up MySQL -Next, you will need to log in to MySQL as the =root= user of the -machine. +# Set Up MySQL -#+begin_src sh +Next, you will need to log in to MySQL as the `root` user of +the machine. + +```sh sudo mysql -uroot -p -#+end_src +``` -Once you've logged in, you must create a new user so that Nextcloud can -manage the database. You will also create a =nextcloud= database and -assign privileges: +Once you\'ve logged in, you must create a new user so that Nextcloud can +manage the database. You will also create a `nextcloud` +database and assign privileges: -#+begin_src sql +``` sql CREATE USER 'username'@'localhost' IDENTIFIED BY 'password'; CREATE DATABASE IF NOT EXISTS nextcloud CHARACTER SET utf8mb4 COLLATE utf8mb4_general_ci; GRANT ALL PRIVILEGES ON nextcloud.** TO 'username'@'localhost'; FLUSH PRIVILEGES; quit; -#+end_src +``` + +# Download & Install Nextcloud -* Download & Install Nextcloud -To download Nextcloud, go the -[[https://nextcloud.com/install/#instructions-server][Nextcloud -downloads page]], click on =Archive File= and right-click the big blue -button to copy the link. +To download Nextcloud, go the [Nextcloud downloads +page](https://nextcloud.com/install/#instructions-server), click on +`Archive File` and right-click the big blue button to copy +the link. Then, go to your server and enter the following commands to download, unzip, and move the files to your destination directory. This example -uses =example.com= as the destination, but you can put it wherever you -want to server your files from. +uses `example.com` as the destination, but you can put it +wherever you want to server your files from. -#+begin_src sh +```sh wget https://download.nextcloud.com/server/releases/nextcloud-23.0.3.zip sudo apt install unzip unzip nextcloud-23.0.3.zip sudo cp -r nextcloud /var/www/example.com -#+end_src +``` + +# Configure the Apache Web Server -* Configure the Apache Web Server Now that the database is set up and Nextcloud is installed, you need to set up the Apache configuration files to tell the server how to handle -requests for =example.com/nextcloud=. +requests for `example.com/nextcloud`. First, open the following file in the editor: -#+begin_src sh +```sh sudo nano /etc/apache2/sites-available/nextcloud.conf -#+end_src +``` Once the editor is open, paste the following information in. Then, save and close the file. -#+begin_src config +``` config <VirtualHost *:80> DocumentRoot /var/www/example.com ServerName example.com @@ -90,70 +97,74 @@ and close the file. </IfModule> </Directory> </VirtualHost> -#+end_src +``` Once the file is saved, enable it with Apache: -#+begin_src sh +```sh sudo a2ensite nextcloud.conf -#+end_src +``` Next, enable the Apache mods required by Nextcloud: -#+begin_src sh +```sh sudo a2enmod rewrite headers env dir mime -#+end_src +``` Finally, restart Apache. If any errors arise, you must solve those before continuing. -#+begin_src sh +```sh sudo systemctl restart apache2 -#+end_src +``` For the app to work, you must have the correct file permissions on your -=nextcloud= directory. Set the owner to be =www-data=: +`nextcloud` directory. Set the owner to be +`www-data`: -#+begin_src sh +```sh sudo chown -R www-data:www-data /var/www/example.com/nextcloud/ -#+end_src +``` + +# DNS -* DNS If you do not have a static IP address, you will need to update your DNS settings (at your DNS provider) whenever your dynamic IP address changes. For an example on how I do that with Cloudflare, see my other post: -[[../updating-dynamic-dns-with-cloudflare-api/][Updating Dynamic DNS -with Cloudflare API]] +[Updating Dynamic DNS with Cloudflare +API](../updating-dynamic-dns-with-cloudflare-api/) + +# Certbot -* Certbot If you want to serve Nextcloud from HTTPS rather than plain HTTP, use -the following commands to issue Let's Encrypt SSL certificates: +the following commands to issue Let\'s Encrypt SSL certificates: -#+begin_src sh +```sh sudo apt install snapd sudo snap install core sudo snap refresh core sudo snap install --classic certbot sudo ln -s /snap/bin/certbot /usr/bin/certbot sudo certbot --apache -#+end_src +``` + +# Results -* Results -Voilà! You're all done and should be able to access Nextcloud from your +Voilà! You\'re all done and should be able to access Nextcloud from your domain or IP address. See the screenshots below for the dashboard and a settings page on my -instance of Nextcloud, using the =Breeze Dark= theme I installed from -the Apps page. +instance of Nextcloud, using the `Breeze Dark` theme I +installed from the Apps page. -#+caption: Nextcloud Dashboard -[[https://img.cleberg.net/blog/20220323-installing-nextcloud-on-ubuntu/nextcloud_dashboard.png]] + -/Figure 01: Nextcloud Dashboard/ +*Figure 01: Nextcloud Dashboard* -#+caption: Nextcloud Settings -[[https://img.cleberg.net/blog/20220323-installing-nextcloud-on-ubuntu/nextcloud_settings.png]] + -/Figure 02: Nextcloud Security Settings/ +*Figure 02: Nextcloud Security Settings* diff --git a/content/blog/2022-03-24-server-hardening.md b/content/blog/2022-03-24-server-hardening.md new file mode 100644 index 0000000..ffe684d --- /dev/null +++ b/content/blog/2022-03-24-server-hardening.md @@ -0,0 +1,353 @@ ++++ +date = 2022-03-24 +title = "Hardening a Public-Facing Home Server" +description = "" +draft = false ++++ + +# Post Updates + +> After reviewing this post today (2022-10-04), I noticed quite a few +> gaps in my write-up and wanted to add a few things, even though this +> blog is really just a retrospective and knowledge dump for myself. I +> left things intact and simply crossed them out (~~like this~~) for +> posterity. + +# Planning Data Flows & Security + +## My Personal Data Flow + +``` txt + ┌───────┐ ┌─────────────────┐ + ┌──► VLAN1 ├───► Private Devices │ + │ └───────┘ └─────────────────┘ +┌──────────┐ ┌────────┐ ┌──────────┐ ┌────────┐ │ +│ Internet ├───► Router ├───► Firewall ├───► Switch ├──┤ +└──────────┘ └────────┘ └──────────┘ └────────┘ │ + │ ┌───────┐ ┌───────────────┐ + └──► VLAN2 ├───► Public Server │ + └───────┘ └───────────────┘ +``` + +## Thought Process + +To serve content from your home server and harden your security posture, +you have to think about the transport of data from `server` +to `client`. + +Let\'s start with the actual server itself. Think about the following: + +- Do I have a firewall enabled? Do I need to update this to allow new + ports or IPs? +- Do I have an IPS/IDS that may prevent outside traffic? +- Do I have any other security software installed? +- Are the services hosted inside Docker containers, behind a reverse + proxy, or virtualized? If so, are they configured to allow outside + traffic? + +Once the data leaves the server, where does it go? In my case, it goes +to a managed switch. In this case, I asked the following: + +- What configurations is the switch using? +- Am I using VLANs? + - Yes, I am using 802.1Q VLANs. +- Are the VLANs configured properly? + - Yes, as shown in the Switch section below, I have a separate + VLAN to allow outside traffic to and from the server alone. No + other devices, except for a service port, and in that VLAN. + +At this point, the data has been processed through the switch. Where +does it go next? In my case, it\'s pretty simple: it goes to the +router/modem device. + +- Does my ISP block any ports that I need? + - This is an important step that a lot of people run into when + self-hosting at home. Use an online port-checker tool for your + IP or call your ISP if you think ports are blocked. +- Is there a router firewall? + - Yes, I checked that it\'s configured to allow the ports I need + to run my services publicly. Common web servers and reverse + proxies require ports 80 and 443, but other services like media + servers or games can require unique ports, so be sure to check + the documentation for your service(s). +- Are there any other settings affecting inbound/outbound traffic? + - Schedules or access blocks + - Static Routing + - QoS + - Port Forwarding + - DMZ Hosting + - Remote Management (this can sometimes mess with services that + also require the use of ports 80 and 443) + +Once the data leaves my router, it goes to the upstream ISP and can be +accessed publicly. + +### Server + ++The services I run on my server are installed straight into the OS, +without any use of Docker or VMs, so I don\'t need any extra application +configuration to make them accessible to the outside world.+ + +As of 2022-10-04, the paragraph above is no longer true as I now run a +reverse proxy with Nginx and host many services inside Docker. However, +it doesn\'t change anything regarding this post as I still just need to +open ports 80 & 443 and create the necessary website configuration +files. + +When creating new services - either installed directly on bare metal or +within something like Docker - I ensure that I read through the +documentation thoroughly to understand a few key things: - What network +activities should this app perform (if any)? Using which ports and +protocols? - Does this app require any commands/services to be run as +`root`? - Does this app log errors, authentication +failures/successes, or anything else that would be useful for an +investigation? + +For extra security, I use limit all incoming connections to SSH +connections through my server firewall (`ufw`) and disable +common SSH settings. After all of that, I use `fail2ban` as a +preventative measure against brute-force login attempts. + +As another piece of security, you can randomize your SSH port to ensure +that random scanners or attackers can\'t easily try to force their way +into your network. For example, you can edit the port rules in your +server to block all connection requests to port `22` but +forward all remote connections from port `12345` to your +server\'s port `22`. Then you just need to SSH to your +network via your randomized port. + +## `ufw` + +To see how to configure `ufw`, see my other post: [Secure +Your Network with the Uncomplicated +Firewall](../secure-your-network-with-the-uncomplicated-firewall/). + +The general notion with an on-device firewall is that you want to deny +all incoming connections by default and then selectively open certain +ports for services or users that you know need access. + +If you know that you will only be logging into this server from a +certain set or list of IPs, you can always set the firewall to only +allow connections to port 22 from those IPs. + +For a quick start to only allow SSH connections to the server, use this: + +```sh +sudo ufw default deny incoming +sudo ufw default allow outgoing +sudo ufw allow 22 +sudo ufw enable +``` + + + +## `ssh` + +1. Using SSH Keys + + First, make sure you have an SSH keypair generated on the device(s) + that you\'ll be using to log in to the server. If you don\'t have an + SSH key, run this command: + + ```sh + ssh-keygen + ``` + + Now that we have an SSH key, copy it to the server with the + following command, which will ask for the user\'s password before + accepting the key: + + ```sh + ssh-copy-id my_user@my_server + ``` + + If you have multiple keys, you\'ll need to specify which to use. + After it\'s complete, `ssh` back into the server as that + user and make sure it doesn\'t ask for a password. + +2. Disable Password & Root Authentication + + Now that we can access the server without a password, we will + disable password authentication and disable anyone from using + `ssh` to login as `root`. + + To do this, open the `sshd_config` file: + + ```sh + sudo nano /etc/ssh/sshd_config + ``` + + You\'ll need to update the parameters to the values below. If one of + these rules is commented-out or doesn\'t exist, create the rule at + the bottom of the file. + + ``` config + PermitRootLogin no + PasswordAuthentication no + PubkeyAuthentication yes + ``` + + Finally, restart the `ssh` service: + + ```sh + sudo systemctl restart sshd.service + ``` + + To test that everything\'s working so far, open ANOTHER terminal and + try logging in as `root` over SSH. It is very important + that you keep your current SSH session open and test with an + additional session, or you will lock yourself out at some point and + will need to use a recovery method (e.g., hooking monitor up to home + server) to get yourself back in. + +3. Enable MFA for `ssh` + + This part is optional, but I highly recommend it. So far, we\'ve + ensured that no one can log into our user on the server without + using our secret key, and we\'ve ensured that no one can log in + remotely as `root`. Next, you can enable MFA + authentication for `ssh` connections. + + This process involves editing a couple files and installing an MFA + package, so I will not include all the details in this post. To see + how to configure MFA for `ssh`, see my other post: + [Enabling MFA for SSH](../enable-totp-mfa-for-ssh/). + +  + +## `fail2ban` + +I haven\'t written a post on how I use `fail2ban`, but it\'s +quite simple. I use the default `sshd` jail, but you can +always create new jails for respective applications or ports. For +example, if you use Nginx as your web server, you can use the +`nginx-http-auth` jail. + +In order to get it up and running, use the following commands: + +```sh +sudo apt install fail2ban +sudo fail2ban-client start sshd +sudo fail2ban-client status sshd +``` + +This should be used as a last-resort defense and shouldn\'t be a +replacement for the security measures mentioned above. + + + +# Switch + +Between the router and any local devices is my managed switch, which is +used to create VLANs. The example below shows how I would isolate the +VLANs if I were starting to host a single service at home. + +## 802.1Q VLAN Configuration + +In this configuration, port 8 is the public server that needs to be +accessed from the outside. Port 23 is my \'dedicated service port\' for +this server. In order to SSH to this server, I need to plug my laptop +into port 23 or else I cannot SSH. Otherwise, I\'d need to hook up a +monitor and keyboard directly to the server to manage it. + + VLAN ID VLAN Name Member Ports Tagged Ports Untagged Ports + --------- ----------- -------------- -------------- ---------------- + 1 Default 1-24 1-24 + 2 Server 1,8,23 1,8,23 + +## 802.1Q VLAN PVID Setting + +Once the VLAN is created, I simply add the `VLAN ID` of +`2` as the `PVID` for any related ports (in this +case, see that ports `8` and `23` have a PVID of +`2`). + + Port PVID + ------ ------ + 1 1 + 2 1 + 3 1 + 4 1 + 5 1 + 6 1 + 7 1 + 8 2 + 9 1 + 10 1 + 11 1 + 12 1 + 13 1 + 14 1 + 15 1 + 16 1 + 17 1 + 18 1 + 19 1 + 20 1 + 21 1 + 22 1 + 23 2 + 24 1 + +# Router + +On my router, the configuration was as easy as opening the firewall +settings and unblocking the ports I needed for my services (e.g., +HTTP/S, Plex, SSH, MySQL, etc.). + ++Since I\'m relying on an ISP-provided modem/router combo for now (not +by choice), I do not use any other advanced settings on my router that +would inhibit any valid traffic to these services.+ + +The paragraph above regarding the ISP-owned router is no longer accurate +as I now use the Ubiquiti Unifi Dream Machine Pro as my router. Within +this router, I enabled port forwarding/firewall rules, segregate the +network based on the device, and enable traffic restrictions (e.g., +silently drop traffic from certain countries and threat categories). + +If you have the option with your ISP, I recommend using a personal +router with software that you are familiar with so that you can explore +all the options available to you. + +# Physical Security + +One large piece of self-hosting that people generally don\'t discuss +online is physical security. However, physical security is very +important for everyone who hosts a server like this. Exactly *how* +important it is depends on the server use/purpose. + +If you self-host customer applications that hold protected data (HIPAA, +GDPR, COPPA, etc.), then physical security is extremely important and +cannot be ignored. If you simply host a blog and some hobby sites, then +it\'s a relatively minor consideration, but one you still need to think +about. + +## Location + +The first consideration is quite simple: location. - Is the server +within a property you own or housed on someone else\'s property? - Is it +nearby (in your house, in your work office, in your neighbor\'s garage, +in a storage unit, etc.)? - Do you have 24/7 access to the server? - Are +there climate considerations, such as humidity, fires, tornadoes, +monsoons? - Do you have emergency equipment nearby in case of emergency? + +## Hardware Ownership + +Secondly, consider the hardware itself: - Do you own the server in its +entirety? - Are any other users able to access the server, even if your +data/space is segregated? - If you\'re utilizing a third party, do they +have any documentation to show responsibility? This could be a SOC 1/2/3 +report, ISO compliance report, internal security/safety documentation. + +## Physical Controls + +Regardless of who owns the hardware, ensure that there are adequate +safeguards in place, if necessary. These usually don\'t apply to small +home servers and are usually covered already if you\'re utilizing a +third party. + +These can include: - Server bezel locks - Server room locks - physical, +digital, or biometric authentication - Security cameras - Raised +floors/lowered ceilings with proper guards/gates in-place within the +floors or ceilings - Security personnel - Log sheets and/or guest badges diff --git a/content/blog/2022-03-24-server-hardening.org b/content/blog/2022-03-24-server-hardening.org deleted file mode 100644 index ba8a994..0000000 --- a/content/blog/2022-03-24-server-hardening.org +++ /dev/null @@ -1,334 +0,0 @@ -#+title: Hardening a Public-Facing Home Server -#+date: 2022-03-24 -#+description: Learn some basic techniques to harden a home server and network. -#+filetags: :security: - -* Post Updates - -#+begin_quote -After reviewing this post today (2022-10-04), I noticed quite a few gaps -in my write-up and wanted to add a few things, even though this blog is -really just a retrospective and knowledge dump for myself. I left things -intact and simply crossed them out (+like this+) for posterity. -#+end_quote - -* Planning Data Flows & Security -** My Personal Data Flow -#+begin_src txt - ┌───────┐ ┌─────────────────┐ - ┌──► VLAN1 ├───► Private Devices │ - │ └───────┘ └─────────────────┘ -┌──────────┐ ┌────────┐ ┌──────────┐ ┌────────┐ │ -│ Internet ├───► Router ├───► Firewall ├───► Switch ├──┤ -└──────────┘ └────────┘ └──────────┘ └────────┘ │ - │ ┌───────┐ ┌───────────────┐ - └──► VLAN2 ├───► Public Server │ - └───────┘ └───────────────┘ -#+end_src - -** Thought Process -To serve content from your home server and harden your security posture, -you have to think about the transport of data from =server= to =client=. - -Let's start with the actual server itself. Think about the following: - -- Do I have a firewall enabled? Do I need to update this to allow new - ports or IPs? -- Do I have an IPS/IDS that may prevent outside traffic? -- Do I have any other security software installed? -- Are the services hosted inside Docker containers, behind a reverse - proxy, or virtualized? If so, are they configured to allow outside - traffic? - -Once the data leaves the server, where does it go? In my case, it goes -to a managed switch. In this case, I asked the following: - -- What configurations is the switch using? -- Am I using VLANs? - - Yes, I am using 802.1Q VLANs. -- Are the VLANs configured properly? - - Yes, as shown in the Switch section below, I have a - separate VLAN to allow outside traffic to and from the server alone. - No other devices, except for a service port, and in that VLAN. - -At this point, the data has been processed through the switch. Where -does it go next? In my case, it's pretty simple: it goes to the -router/modem device. - -- Does my ISP block any ports that I need? - - This is an important step that a lot of people run into when - self-hosting at home. Use an online port-checker tool for your IP or - call your ISP if you think ports are blocked. -- Is there a router firewall? - - Yes, I checked that it's configured to allow the ports I need to run - my services publicly. Common web servers and reverse proxies require - ports 80 and 443, but other services like media servers or games can - require unique ports, so be sure to check the documentation for your - service(s). -- Are there any other settings affecting inbound/outbound traffic? - - Schedules or access blocks - - Static Routing - - QoS - - Port Forwarding - - DMZ Hosting - - Remote Management (this can sometimes mess with services that also - require the use of ports 80 and 443) - -Once the data leaves my router, it goes to the upstream ISP and can be -accessed publicly. - -*** Server -+The services I run on my server are installed straight into the OS, -without any use of Docker or VMs, so I don't need any extra application -configuration to make them accessible to the outside world.+ - -As of 2022-10-04, the paragraph above is no longer true as I now run a -reverse proxy with Nginx and host many services inside Docker. However, -it doesn't change anything regarding this post as I still just need to -open ports 80 & 443 and create the necessary website configuration -files. - -When creating new services - either installed directly on bare metal or -within something like Docker - I ensure that I read through the -documentation thoroughly to understand a few key things: - What network -activities should this app perform (if any)? Using which ports and -protocols? - Does this app require any commands/services to be run as -=root=? - Does this app log errors, authentication failures/successes, -or anything else that would be useful for an investigation? - -For extra security, I use limit all incoming connections to SSH -connections through my server firewall (=ufw=) and disable common SSH -settings. After all of that, I use =fail2ban= as a preventative measure -against brute-force login attempts. - -As another piece of security, you can randomize your SSH port to ensure -that random scanners or attackers can't easily try to force their way -into your network. For example, you can edit the port rules in your -server to block all connection requests to port =22= but forward all -remote connections from port =12345= to your server's port =22=. Then -you just need to SSH to your network via your randomized port. - -** =ufw= -To see how to configure =ufw=, see my other post: -[[../secure-your-network-with-the-uncomplicated-firewall/][Secure -Your Network with the Uncomplicated Firewall]]. - -The general notion with an on-device firewall is that you want to deny -all incoming connections by default and then selectively open certain -ports for services or users that you know need access. - -If you know that you will only be logging into this server from a -certain set or list of IPs, you can always set the firewall to only -allow connections to port 22 from those IPs. - -For a quick start to only allow SSH connections to the server, use this: - -#+begin_src sh -sudo ufw default deny incoming -sudo ufw default allow outgoing -sudo ufw allow 22 -sudo ufw enable -#+end_src - -#+caption: ufw -[[https://img.cleberg.net/blog/20220324-hardening-a-public-facing-home-server/ufw.png]] - -** =ssh= -1. Using SSH Keys - - First, make sure you have an SSH keypair generated on the device(s) - that you'll be using to log in to the server. If you don't have an - SSH key, run this command: - - #+begin_src sh - ssh-keygen - #+end_src - - Now that we have an SSH key, copy it to the server with the following - command, which will ask for the user's password before accepting the - key: - - #+begin_src sh - ssh-copy-id my_user@my_server - #+end_src - - If you have multiple keys, you'll need to specify which to use. After - it's complete, =ssh= back into the server as that user and make sure - it doesn't ask for a password. - -2. Disable Password & Root Authentication - - Now that we can access the server without a password, we will disable - password authentication and disable anyone from using =ssh= to login - as =root=. - - To do this, open the =sshd_config= file: - - #+begin_src sh - sudo nano /etc/ssh/sshd_config - #+end_src - - You'll need to update the parameters to the values below. If one of - these rules is commented-out or doesn't exist, create the rule at the - bottom of the file. - - #+begin_src config - PermitRootLogin no - PasswordAuthentication no - PubkeyAuthentication yes - #+end_src - - Finally, restart the =ssh= service: - - #+begin_src sh - sudo systemctl restart sshd.service - #+end_src - - To test that everything's working so far, open ANOTHER terminal and - try logging in as =root= over SSH. It is very important that you keep - your current SSH session open and test with an additional session, or - you will lock yourself out at some point and will need to use a - recovery method (e.g., hooking monitor up to home server) to get - yourself back in. - -3. Enable MFA for =ssh= - - This part is optional, but I highly recommend it. So far, we've - ensured that no one can log into our user on the server without using - our secret key, and we've ensured that no one can log in remotely as - =root=. Next, you can enable MFA authentication for =ssh= - connections. - - This process involves editing a couple files and installing an MFA - package, so I will not include all the details in this post. To see - how to configure MFA for =ssh=, see my other post: - [[../enable-totp-mfa-for-ssh/][Enabling MFA for SSH]]. - - #+caption: SSH MFA - [[https://img.cleberg.net/blog/20220324-hardening-a-public-facing-home-server/ssh_mfa.png]] - -** =fail2ban= -I haven't written a post on how I use =fail2ban=, but it's quite simple. -I use the default =sshd= jail, but you can always create new jails for -respective applications or ports. For example, if you use Nginx as your -web server, you can use the =nginx-http-auth= jail. - -In order to get it up and running, use the following commands: - -#+begin_src sh -sudo apt install fail2ban -sudo fail2ban-client start sshd -sudo fail2ban-client status sshd -#+end_src - -This should be used as a last-resort defense and shouldn't be a -replacement for the security measures mentioned above. - -#+caption: fail2ban -[[https://img.cleberg.net/blog/20220324-hardening-a-public-facing-home-server/fail2ban.png]] - -* Switch -Between the router and any local devices is my managed switch, which is -used to create VLANs. The example below shows how I would isolate the -VLANs if I were starting to host a single service at home. - -** 802.1Q VLAN Configuration -In this configuration, port 8 is the public server that needs to be -accessed from the outside. Port 23 is my 'dedicated service port' for -this server. In order to SSH to this server, I need to plug my laptop -into port 23 or else I cannot SSH. Otherwise, I'd need to hook up a -monitor and keyboard directly to the server to manage it. - -| VLAN ID | VLAN Name | Member Ports | Tagged Ports | Untagged Ports | -|---------+-----------+--------------+--------------+----------------| -| 1 | Default | 1-24 | | 1-24 | -| 2 | Server | 1,8,23 | | 1,8,23 | - -** 802.1Q VLAN PVID Setting -Once the VLAN is created, I simply add the =VLAN ID= of =2= as the -=PVID= for any related ports (in this case, see that ports =8= and =23= -have a PVID of =2=). - -| Port | PVID | -|------+------| -| 1 | 1 | -| 2 | 1 | -| 3 | 1 | -| 4 | 1 | -| 5 | 1 | -| 6 | 1 | -| 7 | 1 | -| 8 | 2 | -| 9 | 1 | -| 10 | 1 | -| 11 | 1 | -| 12 | 1 | -| 13 | 1 | -| 14 | 1 | -| 15 | 1 | -| 16 | 1 | -| 17 | 1 | -| 18 | 1 | -| 19 | 1 | -| 20 | 1 | -| 21 | 1 | -| 22 | 1 | -| 23 | 2 | -| 24 | 1 | - -* Router -On my router, the configuration was as easy as opening the firewall -settings and unblocking the ports I needed for my services (e.g., -HTTP/S, Plex, SSH, MySQL, etc.). - -+Since I'm relying on an ISP-provided modem/router combo for now (not by -choice), I do not use any other advanced settings on my router that -would inhibit any valid traffic to these services.+ - -The paragraph above regarding the ISP-owned router is no longer accurate -as I now use the Ubiquiti Unifi Dream Machine Pro as my router. Within -this router, I enabled port forwarding/firewall rules, segregate the -network based on the device, and enable traffic restrictions (e.g., -silently drop traffic from certain countries and threat categories). - -If you have the option with your ISP, I recommend using a personal -router with software that you are familiar with so that you can explore -all the options available to you. - -* Physical Security -One large piece of self-hosting that people generally don't discuss -online is physical security. However, physical security is very -important for everyone who hosts a server like this. Exactly /how/ -important it is depends on the server use/purpose. - -If you self-host customer applications that hold protected data (HIPAA, -GDPR, COPPA, etc.), then physical security is extremely important and -cannot be ignored. If you simply host a blog and some hobby sites, then -it's a relatively minor consideration, but one you still need to think -about. - -** Location -The first consideration is quite simple: location. - Is the server -within a property you own or housed on someone else's property? - Is it -nearby (in your house, in your work office, in your neighbor's garage, -in a storage unit, etc.)? - Do you have 24/7 access to the server? - Are -there climate considerations, such as humidity, fires, tornadoes, -monsoons? - Do you have emergency equipment nearby in case of emergency? - -** Hardware Ownership -Secondly, consider the hardware itself: - Do you own the server in its -entirety? - Are any other users able to access the server, even if your -data/space is segregated? - If you're utilizing a third party, do they -have any documentation to show responsibility? This could be a SOC 1/2/3 -report, ISO compliance report, internal security/safety documentation. - -** Physical Controls -Regardless of who owns the hardware, ensure that there are adequate -safeguards in place, if necessary. These usually don't apply to small -home servers and are usually covered already if you're utilizing a third -party. - -These can include: - Server bezel locks - Server room locks - physical, -digital, or biometric authentication - Security cameras - Raised -floors/lowered ceilings with proper guards/gates in-place within the -floors or ceilings - Security personnel - Log sheets and/or guest badges diff --git a/content/blog/2022-03-26-ssh-mfa.org b/content/blog/2022-03-26-ssh-mfa.md index 85b98de..fd92446 100644 --- a/content/blog/2022-03-26-ssh-mfa.org +++ b/content/blog/2022-03-26-ssh-mfa.md @@ -1,78 +1,84 @@ -#+title: Enable TOTP MFA for SSH -#+date: 2022-03-26 -#+description: Learn how to enable timed one-time passcodes for SSH. -#+filetags: :security: ++++ +date = 2022-03-26 +title = "Enablt TOTP MFA for SSH" +description = "" +draft = false ++++ + +# Why Do I Need MFA for SSH? -* Why Do I Need MFA for SSH? If you are a sysadmin of a server anywhere (that includes at home!), you may want an added layer of protection against intruders. This is not a replacement for other security measures, such as: -- Disable root SSH -- Disable SSH password authentication -- Allow only certain users to login via SSH -- Allow SSH only from certain IPs +- Disable root SSH +- Disable SSH password authentication +- Allow only certain users to login via SSH +- Allow SSH only from certain IPs However, MFA can be added as an additional security measure to ensure that your server is protected. This is especially important if you need to allow password authentication for SSH. For more guidance on server security measures, see my other post: -[[../hardening-a-public-facing-home-server/][Hardening a -Public-Facing Home Server]]. +[Hardening a Public-Facing Home +Server](../hardening-a-public-facing-home-server/). + +# Install MFA PAM Module -* Install MFA PAM Module PAM, which stands for Pluggable Authentication Module, is an authentication infrastructure used on Linux systems to authenticate a -user. In order to use this technology, let's install the -=libpam-google-authenticator= package: +user. In order to use this technology, let\'s install the +`libpam-google-authenticator` package: -#+begin_src sh +```sh sudo apt-get update -#+end_src +``` -#+begin_src sh +```sh sudo apt-get install libpam-google-authenticator -#+end_src +``` + +# Initialize the PAM Module + +## Interactive Method -* Initialize the PAM Module -** Interactive Method Once the package is installed, initialize it and following the interactive prompts to generate your OTP or TOTP: -#+begin_src sh +```sh google-authenticator -#+end_src +``` If you are not sure how to answer, read the prompts carefully and think about having to how each situation would affect your normal login attempts. If you are still not sure, use my default responses below. -#+begin_src txt +``` txt OUTPUT Do you want authentication tokens to be time-based (y/n) y -#+end_src +``` At this point, use an authenticator app somewhere one of your devices to scan the QR code. Any future login attempts after our upcoming configuration changes will require that TOTP. -#+begin_src txt +``` txt OUTPUT Do you want me to update your "/home/user/.google_authenticator" file? (y/n) y -#+end_src +``` -#+begin_src txt +``` txt OUTPUT Do you want to disallow multiple uses of the same authentication token? This restricts you to one login about every 30s, but it increases your chances to notice or even prevent man-in-the-middle attacks (y/n) y -#+end_src +``` -#+begin_src txt +``` txt OUTPUT By default, a new token is generated every 30 seconds by the mobile app. @@ -85,29 +91,30 @@ code, the next code) to 17 permitted codes (the 8 previous codes, the current code, and the 8 next codes). This will permit for a time skew of up to 4 minutes between client and server. Do you want to do so? (y/n) n -#+end_src +``` -#+begin_src txt +``` txt OUTPUT If the computer that you are logging into isn't hardened against brute-force login attempts, you can enable rate-limiting for the authentication module. By default, this limits attackers to no more than 3 login attempts every 30s. Do you want to enable rate-limiting? (y/n) y -#+end_src +``` + +## Non-Interactive Method -** Non-Interactive Method If you need to do this quickly, know your responses to the prompts, or are setting this up for numerous users, the non-interactive method can be much faster: -#+begin_src sh +```sh google-authenticator -t -d -f -r 3 -R 30 -w 3 -#+end_src +``` The options referenced above are as follows: -#+begin_src txt +``` txt google-authenticator [<options>] -h, --help Print this message -c, --counter-based Set up counter-based (HOTP) verification @@ -127,63 +134,66 @@ google-authenticator [<options>] -w, --window-size=W Set window of concurrently valid codes -W, --minimal-window Disable window of concurrently valid codes -e, --emergency-codes=N Number of emergency codes to generate -#+end_src +``` This fully configures the authenticator, saves it to a file, and then outputs the secret key, QR code, and recovery codes. (If you add the -flag =-q=, then there won't be any output). If you use this command in -an automated fashion, make sure your script captures the secret key -and/or recovery codes and makes them available to the user. +flag `-q`, then there won\'t be any output). If you use this +command in an automated fashion, make sure your script captures the +secret key and/or recovery codes and makes them available to the user. + +# PAM Configuration Settings -* PAM Configuration Settings -Once you've enabled the T/OTP and have it saved to an MFA app on your -phone or other device, open the PAM =sshd= file: +Once you\'ve enabled the T/OTP and have it saved to an MFA app on your +phone or other device, open the PAM `sshd` file: -#+begin_src sh +```sh sudo nano /etc/pam.d/sshd -#+end_src +``` You need to do two things in this file. First, add the following lines to the bottom of the file: -#+begin_src config +``` config auth required pam_google_authenticator.so nullok auth required pam_permit.so -#+end_src +``` Second, comment-out the following line near the top of the file. If you leave this line uncommented, every SSH login attempt will ask for the following three authentication factors: -1. Publickey -2. Password -3. T/OTP code +1. Publickey +2. Password +3. T/OTP code -#+begin_src config +``` config #@include common-auth -#+end_src +``` + +# SSH Configuration Settings -* SSH Configuration Settings -Finally, edit the =sshd_config= file again: +Finally, edit the `sshd_config` file again: -#+begin_src sh +```sh sudo nano /etc/ssh/sshd_config -#+end_src +``` -You'll need to change =ChallengeResponseAuthentication= to yes and add -the =AuthenticationMethods= line to the bottom of the file. +You\'ll need to change `ChallengeResponseAuthentication` to +yes and add the `AuthenticationMethods` line to the bottom of +the file. -#+begin_src config +``` config ChallengeResponseAuthentication yes AuthenticationMethods publickey,password publickey,keyboard-interactive -#+end_src +``` -Finally, restart the =ssh= service: +Finally, restart the `ssh` service: -#+begin_src sh +```sh sudo systemctl restart sshd.service -#+end_src +``` The next time you log in, you should be greeted with a verification code request! diff --git a/content/blog/2022-04-02-nginx-reverse-proxy.md b/content/blog/2022-04-02-nginx-reverse-proxy.md new file mode 100644 index 0000000..70b8794 --- /dev/null +++ b/content/blog/2022-04-02-nginx-reverse-proxy.md @@ -0,0 +1,235 @@ ++++ +date = 2022-04-02 +title = "Set-Up a Reverse Proxy with Nginx" +description = "" +draft = false ++++ + +# What is a Reverse Proxy? + +A reverse proxy is a server that is placed between local servers or +services and clients/users (e.g., the internet). The reverse proxy +intercepts all requests from clients at the network edge and uses its +configuration files to determine where each request should be sent. + +## A Brief Example + +For example, let\'s say that I run three servers in my home: + +- Server~01~ (`example.com`) +- Server~02~ (`service01.example.com`) +- Server~03~ (`service02.example.com`) + +I also run a reverse proxy in my home that intercepts all public +traffic: + +- Reverse Proxy + +Assume that I have a domain name (`example.com`) that allows +clients to request websites or services from my home servers. + +In this case, the reverse proxy will intercept all traffic from +`example.com` that enters my network and determine if the +client is requesting valid data, based on my configuration. + +If the user is requesting `example.com` and my configuration +files say that Server~01~ holds that data, Nginx will send the user to +Server~01~. If I were to change the configuration so that +`example.com` is routed to Server~02~, that same user would +be sent to Server~02~ instead. + +``` txt +┌──────┐ ┌───────────┐ +│ User │─┐ ┌──► Server_01 │ +└──────┘ │ │ └───────────┘ + │ ┌──────────┐ ┌───────────────┐ │ ┌───────────┐ + ├────► Internet ├───► Reverse Proxy ├─────├──► Server_02 │ + │ └──────────┘ └───────────────┘ │ └───────────┘ +┌──────┐ │ │ ┌───────────┐ +│ User │─┘ └──► Server_03 │ +└──────┘ └───────────┘ +``` + +# Reverse Proxy Options + +There are a lot of options when it comes to reverse proxy servers, so +I\'m just going to list a few of the options I\'ve heard recommended +over the last few years: + +- [Nginx](https://nginx.com) +- [Caddy](https://caddyserver.com) +- [Traefik](https://traefik.io/) +- [HAProxy](https://www.haproxy.org/) +- [Squid](https://ubuntu.com/server/docs/proxy-servers-squid) + +In this post, we will be using Nginx as our reverse proxy, running on +Ubuntu Server 20.04.4 LTS. + +# Nginx Reverse Proxy Example + +## Local Applications + +You may be like me and have a lot of applications running on your local +network that you\'d like to expose publicly with a domain. + +In my case, I have services running in multiple Docker containers within +a single server and want a way to visit those services from anywhere +with a URL. For example, on my local network, [Dashy](https://dashy.to) +runs through port 4000 (`localhost:4000`) and [Uptime +Kuma](https://github.com/louislam/uptime-kuma) runs through port 3001 +(`localhost:3001`). + +In order to expose these services to the public, I will need to do the +following: + +1. Set up DNS records for a domain or subdomain (one per service) to + point toward the IP address of the server. +2. Open up the server network\'s HTTP and HTTPS ports (80 & 443) so + that the reverse proxy can accept traffic and determine where to + send it. +3. Install the reverse proxy software. +4. Configure the reverse proxy to recognize which service should get + traffic from any of the domains or subdomains. + +## Step 1: DNS Configuration + +To start, update your DNS configuration so that you have an +`A` record for each domain or subdomain. + +The `A` records should point toward the public IP address of +the server. If you don\'t know the public IP address, log in to the +server and run the following command: + +```sh +curl ifconfig.co +``` + +In the DNS example below, `xxx.xxx.xxx.xxx` is the public IP +address of the server. + +``` config +example.com A xxx.xxx.xxx.xxx +uptime.example.com A xxx.xxx.xxx.xxx +dashy.example.com A xxx.xxx.xxx.xxx +www CNAME example.com +``` + +Finally, ensure the DNS has propagated correctly with [DNS +Checker](https://dnschecker.org) by entering your domains or subdomains +in the search box and ensuring the results are showing the correct IP +address. + +## Step 2: Open Network Ports + +This step will be different depending on which router you have in your +home. If you\'re not sure, try to visit +[192.168.1.1](http://192.168.1.1) in your browser. Login credentials are +usually written on a sticker somewhere on your modem/router. + +Once you\'re able to log in to your router, find the Port Forwarding +settings. You will need to forward ports `80` and +`443` to whichever machine is running the reverse proxy. + +In my case, the table below shows the port-forwarding rules I\'ve +created. In this table, `xxx.xxx.xxx.xxx` is the local device +IP of the reverse proxy server, it will probably be an IP between +`192.168.1.1` and `192.168.1.255`. + + NAME FROM PORT DEST PORT/IP ENABLED + ------- ------ ------ ----------------- --------- + HTTP \*\* 80 xxx.xxx.xxx.xxx TRUE + HTTPS \*\* 443 xxx.xxx.xxx.xxx TRUE + +Once configured, these rules will direct all web traffic to your reverse +proxy. + +## Step 3: Nginx Installation + +To install Nginx, simply run the following command: + +```sh +sudo apt install nginx +``` + +If you have a firewall enabled, open up ports `80` and +`443` on your server so that Nginx can accept web traffic +from the router. + +For example, if you want to use `ufw` for web traffic and +SSH, run the following commands: + +```sh +sudo ufw allow 'Nginx Full' +sudo ufw allow SSH +sudo ufw enable +``` + +## Step 4: Nginx Configuration + +Now that we have domains pointing toward the server, the only step left +is to configure the reverse proxy to direct traffic from domains to +local services. + +To start, you\'ll need to create a configuration file for each domain in +`/etc/nginx/sites-available/`. They will look identical +except for the `server_name` variable and the +`proxy_pass` port. + +Dashy: + +```sh +nano /etc/nginx/sites-available/dashy.example.com +``` + +``` config +server { + listen 80; + server_name dashy.example.com; + + location / { + proxy_pass http://localhost:4000; + } +} +``` + +Uptime: + +```sh +nano /etc/nginx/sites-available/uptime.example.com +``` + +``` config +server { + listen 80; + server_name uptime.example.com; + + location / { + proxy_pass http://localhost:3001; + } +} +``` + +Once the configuration files are created, you will need to enable them +with the `symlink` command: + +```sh +sudo ln -s /etc/nginx/sites-available/dashy.example.com /etc/nginx/sites-enabled/ +``` + +Voilà! Your local services should now be available through their URLs. + +# HTTPS with Certbot + +If you\'ve followed along, you\'ll notice that your services are only +available via HTTP (not HTTPS). + +If you want to enable HTTPS for your new domains, you will need to +generate SSL/TLS certificates for them. The easiest way to generate +certificates on Nginx is [Certbot](https://certbot.eff.org): + +```sh +sudo apt install snapd; sudo snap install core; sudo snap refresh core +sudo snap install --classic certbot +sudo ln -s /snap/bin/certbot /usr/bin/certbot +sudo certbot --nginx +``` diff --git a/content/blog/2022-04-02-nginx-reverse-proxy.org b/content/blog/2022-04-02-nginx-reverse-proxy.org deleted file mode 100644 index 6467f29..0000000 --- a/content/blog/2022-04-02-nginx-reverse-proxy.org +++ /dev/null @@ -1,220 +0,0 @@ -#+title: Set-Up a Reverse Proxy with Nginx -#+date: 2022-04-02 -#+description: Learn how to set-up an Nginx reverse proxy from scratch. -#+filetags: :nginx: - -* What is a Reverse Proxy? -A reverse proxy is a server that is placed between local servers or -services and clients/users (e.g., the internet). The reverse proxy -intercepts all requests from clients at the network edge and uses its -configuration files to determine where each request should be sent. - -** A Brief Example -For example, let's say that I run three servers in my home: - -- Server_{01} (=example.com=) -- Server_{02} (=service01.example.com=) -- Server_{03} (=service02.example.com=) - -I also run a reverse proxy in my home that intercepts all public -traffic: - -- Reverse Proxy - -Assume that I have a domain name (=example.com=) that allows clients to -request websites or services from my home servers. - -In this case, the reverse proxy will intercept all traffic from -=example.com= that enters my network and determine if the client is -requesting valid data, based on my configuration. - -If the user is requesting =example.com= and my configuration files say -that Server_{01} holds that data, Nginx will send the user to -Server_{01}. If I were to change the configuration so that =example.com= -is routed to Server_{02}, that same user would be sent to Server_{02} -instead. - -#+begin_src txt -┌──────┐ ┌───────────┐ -│ User │─┐ ┌──► Server_01 │ -└──────┘ │ │ └───────────┘ - │ ┌──────────┐ ┌───────────────┐ │ ┌───────────┐ - ├────► Internet ├───► Reverse Proxy ├─────├──► Server_02 │ - │ └──────────┘ └───────────────┘ │ └───────────┘ -┌──────┐ │ │ ┌───────────┐ -│ User │─┘ └──► Server_03 │ -└──────┘ └───────────┘ -#+end_src - -* Reverse Proxy Options -There are a lot of options when it comes to reverse proxy servers, so -I'm just going to list a few of the options I've heard recommended over -the last few years: - -- [[https://nginx.com][Nginx]] -- [[https://caddyserver.com][Caddy]] -- [[https://traefik.io/][Traefik]] -- [[https://www.haproxy.org/][HAProxy]] -- [[https://ubuntu.com/server/docs/proxy-servers-squid][Squid]] - -In this post, we will be using Nginx as our reverse proxy, running on -Ubuntu Server 20.04.4 LTS. - -* Nginx Reverse Proxy Example -** Local Applications -You may be like me and have a lot of applications running on your local -network that you'd like to expose publicly with a domain. - -In my case, I have services running in multiple Docker containers within -a single server and want a way to visit those services from anywhere -with a URL. For example, on my local network, -[[https://dashy.to][Dashy]] runs through port 4000 (=localhost:4000=) -and [[https://github.com/louislam/uptime-kuma][Uptime Kuma]] runs -through port 3001 (=localhost:3001=). - -In order to expose these services to the public, I will need to do the -following: - -1. Set up DNS records for a domain or subdomain (one per service) to - point toward the IP address of the server. -2. Open up the server network's HTTP and HTTPS ports (80 & 443) so that - the reverse proxy can accept traffic and determine where to send it. -3. Install the reverse proxy software. -4. Configure the reverse proxy to recognize which service should get - traffic from any of the domains or subdomains. - -** Step 1: DNS Configuration -To start, update your DNS configuration so that you have an =A= record -for each domain or subdomain. - -The =A= records should point toward the public IP address of the server. -If you don't know the public IP address, log in to the server and run -the following command: - -#+begin_src sh -curl ifconfig.co -#+end_src - -In the DNS example below, =xxx.xxx.xxx.xxx= is the public IP address of -the server. - -#+begin_src config -example.com A xxx.xxx.xxx.xxx -uptime.example.com A xxx.xxx.xxx.xxx -dashy.example.com A xxx.xxx.xxx.xxx -www CNAME example.com -#+end_src - -Finally, ensure the DNS has propagated correctly with -[[https://dnschecker.org][DNS Checker]] by entering your domains or -subdomains in the search box and ensuring the results are showing the -correct IP address. - -** Step 2: Open Network Ports -This step will be different depending on which router you have in your -home. If you're not sure, try to visit -[[http://192.168.1.1][192.168.1.1]] in your browser. Login credentials -are usually written on a sticker somewhere on your modem/router. - -Once you're able to log in to your router, find the Port Forwarding -settings. You will need to forward ports =80= and =443= to whichever -machine is running the reverse proxy. - -In my case, the table below shows the port-forwarding rules I've -created. In this table, =xxx.xxx.xxx.xxx= is the local device IP of the -reverse proxy server, it will probably be an IP between =192.168.1.1= -and =192.168.1.255=. - -| NAME | FROM | PORT | DEST PORT/IP | ENABLED | -|-------+------+------+-----------------+---------| -| HTTP | ** | 80 | xxx.xxx.xxx.xxx | TRUE | -| HTTPS | ** | 443 | xxx.xxx.xxx.xxx | TRUE | - -Once configured, these rules will direct all web traffic to your reverse -proxy. - -** Step 3: Nginx Installation -To install Nginx, simply run the following command: - -#+begin_src sh -sudo apt install nginx -#+end_src - -If you have a firewall enabled, open up ports =80= and =443= on your -server so that Nginx can accept web traffic from the router. - -For example, if you want to use =ufw= for web traffic and SSH, run the -following commands: - -#+begin_src sh -sudo ufw allow 'Nginx Full' -sudo ufw allow SSH -sudo ufw enable -#+end_src - -** Step 4: Nginx Configuration -Now that we have domains pointing toward the server, the only step left -is to configure the reverse proxy to direct traffic from domains to -local services. - -To start, you'll need to create a configuration file for each domain in -=/etc/nginx/sites-available/=. They will look identical except for the -=server_name= variable and the =proxy_pass= port. - -Dashy: - -#+begin_src sh -nano /etc/nginx/sites-available/dashy.example.com -#+end_src - -#+begin_src config -server { - listen 80; - server_name dashy.example.com; - - location / { - proxy_pass http://localhost:4000; - } -} -#+end_src - -Uptime: - -#+begin_src sh -nano /etc/nginx/sites-available/uptime.example.com -#+end_src - -#+begin_src config -server { - listen 80; - server_name uptime.example.com; - - location / { - proxy_pass http://localhost:3001; - } -} -#+end_src - -Once the configuration files are created, you will need to enable them -with the =symlink= command: - -#+begin_src sh -sudo ln -s /etc/nginx/sites-available/dashy.example.com /etc/nginx/sites-enabled/ -#+end_src - -Voilà! Your local services should now be available through their URLs. - -* HTTPS with Certbot -If you've followed along, you'll notice that your services are only -available via HTTP (not HTTPS). - -If you want to enable HTTPS for your new domains, you will need to -generate SSL/TLS certificates for them. The easiest way to generate -certificates on Nginx is [[https://certbot.eff.org][Certbot]]: - -#+begin_src sh -sudo apt install snapd; sudo snap install core; sudo snap refresh core -sudo snap install --classic certbot -sudo ln -s /snap/bin/certbot /usr/bin/certbot -sudo certbot --nginx -#+end_src diff --git a/content/blog/2022-04-09-pinetime.org b/content/blog/2022-04-09-pinetime.md index d6345ac..98ec7bf 100644 --- a/content/blog/2022-04-09-pinetime.org +++ b/content/blog/2022-04-09-pinetime.md @@ -1,39 +1,45 @@ -#+title: PineTime: An Open-Source Smart Watch -#+date: 2022-04-09 -#+description: Playing with the PineTime smart watch. -#+filetags: :hardware: - -* PineTime Product Information -** Overview -The [[https://www.pine64.org/pinetime/][PineTime]] is an open-source -smartwatch, created by [[https://www.pine64.org][PINE64]]. Originally ++++ +date = 2022-04-09 +title = "PineTime: An Open-Source Smart Watch" +description = "" +draft = false ++++ + +# PineTime Product Information + +## Overview + +The [PineTime](https://www.pine64.org/pinetime/) is an open-source +smartwatch, created by [PINE64](https://www.pine64.org). Originally announced in September 2019, this ARM-based watch is a fantastic option for users who want the benefits of a modern smartwatch with the backing of open-source components and software. -** Product Specifications -I won't dive into too many details that you can find on -[[https://www.pine64.org/pinetime/][the product page]], but I wanted to -point out the prices for each watch and the primary functions: +## Product Specifications -1. Price: +I won\'t dive into too many details that you can find on [the product +page](https://www.pine64.org/pinetime/), but I wanted to point out the +prices for each watch and the primary functions: - - $26.99 (Sealed) - - $24.99 (Dev Kit) - - $51.98 (One Sealed + One Dev Kit) +1. Price: -2. Primary Functionality: + - \$26.99 (Sealed) + - \$24.99 (Dev Kit) + - \$51.98 (One Sealed + One Dev Kit) - - Clock (+ Smartphone Sync) - - Pedometer - - Heart Rate Monitor - - Sleep Monitor - - Calories burned - - Messaging - - Smartphone Notifications - - Media Controls +2. Primary Functionality: + + - Clock (+ Smartphone Sync) + - Pedometer + - Heart Rate Monitor + - Sleep Monitor + - Calories burned + - Messaging + - Smartphone Notifications + - Media Controls + +# Unboxing -* Unboxing Now, my PineTime was ordered on 2022-02-17, shipped on 2022-02-22, and was delivered on 2022-03-23. With the current delays on shipping times around the world (and the semiconductor shortage), a month for delivery @@ -46,76 +52,81 @@ USB wall adapter). The watch itself was able to turn on immediately when I pulled it out of the box, but the battery was depleted and required charging right away. -#+caption: PineTime Box Contents -[[https://img.cleberg.net/blog/20220409-pinetime-smart-watch/pinetime_box_contents.png]] + + +# Software + +## Watch OS: InfiniTime -* Software -** Watch OS: InfiniTime While turning on the watch for the first time, some of the main design choices you can see in the watch OS, -[[https://wiki.pine64.org/wiki/InfiniTime][InfiniTime]], are: +[InfiniTime](https://wiki.pine64.org/wiki/InfiniTime), are: -- A square bezel, not too thin against the sides of the watch. -- A simple, rubber band. -- Basic font and screen pixel design. -- Swipe gestures to access other screens. +- A square bezel, not too thin against the sides of the watch. +- A simple, rubber band. +- Basic font and screen pixel design. +- Swipe gestures to access other screens. -#+caption: PineTime Screens -[[https://img.cleberg.net/blog/20220409-pinetime-smart-watch/pinetime.png]] + The OS itself is fantastic in terms of functionality for me. It does exactly what a smartwatch should do - track time, steps, heart rates, and connect to another smart device, without being overly burdensome to the user. -My only gripe so far is that it's /really/ difficult to swipe to -different screens, such as pulling down the notification tray. I'm not +My only gripe so far is that it\'s *really* difficult to swipe to +different screens, such as pulling down the notification tray. I\'m not sure if this is an OS or hardware issue, but it makes it quite hard to quickly move around the screens. However, my absolute favorite design choice is that the button the side -turns the screen on and off and tilting/waving my wrist doesn't +turns the screen on and off and tilting/waving my wrist doesn\'t accidentally turn on the screen. With other watches, I absolutely hated not being able to turn off the raise-to-wake or wave features (i.e., blinding myself while wearing a watch at night because I moved my arm). -** iOS App: InfiniLink +## iOS App: InfiniLink + Since I am using iOS as my primary mobile device OS, I am using the -[[https://github.com/xan-m/InfiniLink][InfiniLink]] app to connect my +[InfiniLink](https://github.com/xan-m/InfiniLink) app to connect my watch. This app provides the following for PineTime owners: -- Firmware updates -- Steps -- Charts -- Notifications +- Firmware updates +- Steps +- Charts +- Notifications I mashed up a few screenshots to show off the home page, menu, firmware update, and notification test screens: -#+caption: InfiniLink Home -[[https://img.cleberg.net/blog/20220409-pinetime-smart-watch/infinilink_home.png]] + Another big feature of InfiniLink is the ability to track pedometer steps in a collection of beautiful graphs, with the option to change your step goal and add in manual steps. -#+caption: InfiniLink Steps -[[https://img.cleberg.net/blog/20220409-pinetime-smart-watch/infinilink_steps.png]] + Finally, there are charts to display the battery percentage and heart rates over time. This area also comes with an option to clear data. -#+caption: InfiniLink Charts -[[https://img.cleberg.net/blog/20220409-pinetime-smart-watch/infinilink_charts.png]] + + +# Final Thoughts + +## Pros -* Final Thoughts -** Pros After wearing my watch for a few weeks, I have mostly positive thoughts about the watch so far. In the past, I have owned smartwatches by -FitBit, Fossil, Apple, etc. - *but I prefer the PineTime over all of -those watches*. +FitBit, Fossil, Apple, etc. - **but I prefer the PineTime over all of +those watches**. The PineTime strips out all the unnecessary features and performs the functions that it provides effectively and efficiently. @@ -123,11 +134,12 @@ functions that it provides effectively and efficiently. The battery life is amazing on this device. By default, the watch seems to last anywhere from a few days to a week before dying. -And of course, it's open source and backed by some of the most dedicated -enthusiasts and developers I've seen. Watching the Matrix channel, -forums, and website have been exciting to see. +And of course, it\'s open source and backed by some of the most +dedicated enthusiasts and developers I\'ve seen. Watching the Matrix +channel, forums, and website have been exciting to see. + +## Cons -** Cons If I had to complain about anything, it would simply be the small bugs in some features that can be contributed to the companion apps more than the watch itself. @@ -136,8 +148,8 @@ A regular user would want native notification support out-of-the-box, which is the biggest item not working for me at the moment. My only other complaint is that the battery indicator on the watch -doesn't seem accurate when it's nearing depletion - it seems that -there's a bit of battery life left and then my watch is dead very +doesn\'t seem accurate when it\'s nearing depletion - it seems that +there\'s a bit of battery life left and then my watch is dead very suddenly after. This could just be me misinterpreting the battery level icons, but it has fooled me a few times into thinking I had more battery left than I actually did. diff --git a/content/blog/2022-06-01-ditching-cloudflare.md b/content/blog/2022-06-01-ditching-cloudflare.md new file mode 100644 index 0000000..82096b0 --- /dev/null +++ b/content/blog/2022-06-01-ditching-cloudflare.md @@ -0,0 +1,95 @@ ++++ +date = 2022-06-01 +title = "Ditching Cloudflare for Njalla" +description = "" +draft = false ++++ + +# Registrar + +After spending a year or so using Cloudflare for DNS only - no proxying +or applications - I spent the last few months using Cloudflare Tunnels +and Cloudflare Access to protect my self-hosted websites and +applications via their proxy traffic model. + +However, I have never liked using Cloudflare due to their increasingly +large share of control over web traffic, as well as their business model +of being a MITM for all of your traffic. + +So, as of today, I have switched over to [Njalla](https://njal.la) as my +registrar and DNS manager. I was able to easily transfer my domains over +rapidly, with only one domain taking more than 15-30 minutes to +propagate. + ++I do still have two domains sitting at Cloudflare for the moment while +I decide if they\'re worth the higher rates (one domain is 30€ and the +other is 45€).+ + +> **Update (2022.06.03)**: I ended up transferring my final two domains +> over to Njalla, clearing my Cloudflare account of personal data, and +> deleting the Cloudflare account entirely. *I actually feel relieved to +> have moved on to a provider I trust.* + +# DNS + +As noted above, I\'m using Njalla exclusively for DNS configurations on +my domains. + +However, the transfer process was not ideal. As soon as the domains +transferred over, I switched the nameservers from Cloudflare to Njalla +and lost most of the associated DNS records. So, the majority of the +time spent during the migration was simply re-typing all the DNS records +back in one-by-one. + +This would be much simpler if I were able to edit the plain-text format +of the DNS configuration. I was able to do that at a past registrar +(perhaps it was [Gandi.net](https://gandi.net/)?) and it made life a lot +easier. + +## Dynamic DNS Updates + +I have built an easy Python script to run (or set-up in +`cron` to run automatically) that will check my server\'s +IPv4 and IPv6, compare it to Njalla, and update the DNS records if they +don\'t match. You can see the full script and process in my other post: +[Updating Dynamic DNS with Njalla API](../njalla-dns-api/). + +I haven\'t used this other method, but I do know that you can create +`Dynamic` DNS records with Njalla that [work for updating +dynamic subdomains](https://njal.la/docs/ddns/). + +## Njalla\'s DNS Tool + +One neat upside to Njalla is that they have a [DNS lookup +tool](https://check.njal.la/dns/) that provides a lot of great +information for those of you (AKA: me) who hate using the +`dig` command. + +This was very useful for monitoring a couple of my transferred domains +to see when the changes in nameservers, records, and DNSSEC went into +effect. + +# Tunnel + +Cloudflare Tunnel is a service that acts as a reverse-proxy (hosted on +Cloudflare\'s servers) and allowed me to mask the private IP address of +the server hosting my various websites and apps. + +However, as I was moving away from Cloudflare, I was not able to find a +suitable replacement that was both inexpensive and simple. So, I simply +went back to hosting [my own reverse proxy with +Nginx](file:///blog/set-up-nginx-reverse-proxy/). With the recent +additions of Unifi hardware in my server/network rack, I am much more +protected against spam and malicious attacks at the network edge than I +was before I switched to Cloudflare. + +# Access + +Cloudflare Access, another app I used in combination with Cloudflare +Tunnel, provided an authentication screen that required you to enter +valid credentials before Cloudflare would forward you to the actual +website or app (if the website/app has their own authentication, you\'d +then have to authenticate a second time). + +I did not replace this service with anything since I only host a handful +of non-sensitive apps that don\'t require duplicate authentication. diff --git a/content/blog/2022-06-01-ditching-cloudflare.org b/content/blog/2022-06-01-ditching-cloudflare.org deleted file mode 100644 index 51a63c6..0000000 --- a/content/blog/2022-06-01-ditching-cloudflare.org +++ /dev/null @@ -1,89 +0,0 @@ -#+title: Ditching Cloudflare for Njalla -#+date: 2022-06-01 -#+description: A retrospective on my decision to leave Cloudflare and move to Njalla for domain registration and DNS. -#+filetags: :sysadmin: - -* Registrar -After spending a year or so using Cloudflare for DNS only - no proxying -or applications - I spent the last few months using Cloudflare Tunnels -and Cloudflare Access to protect my self-hosted websites and -applications via their proxy traffic model. - -However, I have never liked using Cloudflare due to their increasingly -large share of control over web traffic, as well as their business model -of being a MITM for all of your traffic. - -So, as of today, I have switched over to [[https://njal.la][Njalla]] as -my registrar and DNS manager. I was able to easily transfer my domains -over rapidly, with only one domain taking more than 15-30 minutes to -propagate. - -+I do still have two domains sitting at Cloudflare for the moment while -I decide if they're worth the higher rates (one domain is 30€ and the -other is 45€).+ - -#+begin_quote -*Update (2022.06.03)*: I ended up transferring my final two domains over -to Njalla, clearing my Cloudflare account of personal data, and deleting -the Cloudflare account entirely. /I actually feel relieved to have moved -on to a provider I trust./ - -#+end_quote - -* DNS -As noted above, I'm using Njalla exclusively for DNS configurations on -my domains. - -However, the transfer process was not ideal. As soon as the domains -transferred over, I switched the nameservers from Cloudflare to Njalla -and lost most of the associated DNS records. So, the majority of the -time spent during the migration was simply re-typing all the DNS records -back in one-by-one. - -This would be much simpler if I were able to edit the plain-text format -of the DNS configuration. I was able to do that at a past registrar -(perhaps it was [[https://gandi.net/][Gandi.net]]?) and it made life a -lot easier. - -** Dynamic DNS Updates -I have built an easy Python script to run (or set-up in =cron= to run -automatically) that will check my server's IPv4 and IPv6, compare it to -Njalla, and update the DNS records if they don't match. You can see the -full script and process in my other post: -[[../njalla-dns-api/][Updating Dynamic DNS with Njalla API]]. - -I haven't used this other method, but I do know that you can create -=Dynamic= DNS records with Njalla that -[[https://njal.la/docs/ddns/][work for updating dynamic subdomains]]. - -** Njalla's DNS Tool -One neat upside to Njalla is that they have a -[[https://check.njal.la/dns/][DNS lookup tool]] that provides a lot of -great information for those of you (AKA: me) who hate using the =dig= -command. - -This was very useful for monitoring a couple of my transferred domains -to see when the changes in nameservers, records, and DNSSEC went into -effect. - -* Tunnel -Cloudflare Tunnel is a service that acts as a reverse-proxy (hosted on -Cloudflare's servers) and allowed me to mask the private IP address of -the server hosting my various websites and apps. - -However, as I was moving away from Cloudflare, I was not able to find a -suitable replacement that was both inexpensive and simple. So, I simply -went back to hosting [[/blog/set-up-nginx-reverse-proxy/][my own reverse -proxy with Nginx]]. With the recent additions of Unifi hardware in my -server/network rack, I am much more protected against spam and malicious -attacks at the network edge than I was before I switched to Cloudflare. - -* Access -Cloudflare Access, another app I used in combination with Cloudflare -Tunnel, provided an authentication screen that required you to enter -valid credentials before Cloudflare would forward you to the actual -website or app (if the website/app has their own authentication, you'd -then have to authenticate a second time). - -I did not replace this service with anything since I only host a handful -of non-sensitive apps that don't require duplicate authentication. diff --git a/content/blog/2022-06-07-self-hosting-freshrss.org b/content/blog/2022-06-07-self-hosting-freshrss.md index cb13c17..27e9d09 100644 --- a/content/blog/2022-06-07-self-hosting-freshrss.org +++ b/content/blog/2022-06-07-self-hosting-freshrss.md @@ -1,9 +1,12 @@ -#+title: Self-Hosting FreshRSS -#+date: 2022-06-07 -#+description: A guide to self-hosting the FreshRSS application on your own server. -#+filetags: :selfhosting: ++++ +date = 2022-06-07 +title = "Self-Hosting FreshRSS" +description = "" +draft = false ++++ + +# Why RSS? -* Why RSS? After noticing that I have collected 50+ blogs as bookmarks, I decided to migrate back to using RSS feeds to stay up-to-date with my favorite websites. Using RSS allows me to read all of these posts in a single app @@ -14,49 +17,56 @@ However, I ran into one issue: syncing subscriptions and read/unread posts across devices. Since I want to be able to easily read on both mobile and desktop, I decided to look for a self-hosted RSS solution. -Thus, I found [[https://www.freshrss.org/][FreshRSS]] and was able to +Thus, I found [FreshRSS](https://www.freshrss.org/) and was able to successfully install it on my server in about 30 minutes. -* Documentation -While it's certainly not robust, the -[[https://freshrss.github.io/FreshRSS/][FreshRSS documentation]] is -helpful for figuring out basic information about the service. +# Documentation + +While it\'s certainly not robust, the [FreshRSS +documentation](https://freshrss.github.io/FreshRSS/) is helpful for +figuring out basic information about the service. However, I wanted to install this service as a Docker container and -stumbled across the -[[https://github.com/FreshRSS/FreshRSS/tree/edge/Docker][Docker README]] -within the GitHub repository. +stumbled across the [Docker +README](https://github.com/FreshRSS/FreshRSS/tree/edge/Docker) within +the GitHub repository. + +This README was the documentation I actually needed. However, as you\'ll +see below, I still had to manually edit one file +(`config.php`) to access the API externally via my RSS apps. -This README was the documentation I actually needed. However, as you'll -see below, I still had to manually edit one file (=config.php=) to -access the API externally via my RSS apps. +# Installation + +## DNS -* Installation -** DNS The first step, as required by any external web service, was assigning a -domain name to use. I chose to use a subdomain, like =rss.example.com=. +domain name to use. I chose to use a subdomain, like +`rss.example.com`. -To assign this, I created an =A= record in my DNS settings with the IPv4 -address of the server and an =AAAA= record with the IPv6 address of the -server. Note: assigning an IPv6 (=AAAA=) record is optional, but I like -to enable IPV6 for my services. +To assign this, I created an `A` record in my DNS settings +with the IPv4 address of the server and an `AAAA` record with +the IPv6 address of the server. Note: assigning an IPv6 +(`AAAA`) record is optional, but I like to enable IPV6 for my +services. -#+begin_src config +``` config rss.example.com A xxx.xxx.xxx.xxx rss.example.com AAAA xxxx:xxxx: ... :xxxx -#+end_src +``` + +## Docker -** Docker -I initially tried to set up a =docker-compose.yml= file with a =.env= -file because I prefer to have a file I can look back at later to see how -I initially started the container, but it simply wouldn't work for me. -I'm not sure why, but I assume I wasn't telling =docker-compose= where -the =.env= file was. +I initially tried to set up a `docker-compose.yml` file with +a `.env` file because I prefer to have a file I can look back +at later to see how I initially started the container, but it simply +wouldn\'t work for me. I\'m not sure why, but I assume I wasn\'t telling +`docker-compose` where the `.env` file was. -Regardless, I chose to simply run the service with =docker run=. See the -following command for my =docker run= configuration: +Regardless, I chose to simply run the service with +`docker run`. See the following command for my +`docker run` configuration: -#+begin_src sh +```sh sudo docker run -d --restart unless-stopped --log-opt max-size=10m \ -p 8080:80 \ -e TZ=America/Chicago \ @@ -65,40 +75,44 @@ sudo docker run -d --restart unless-stopped --log-opt max-size=10m \ -v freshrss_extensions:/var/www/FreshRSS/extensions \ --name freshrss \ freshrss/freshrss -#+end_src +``` This started the container successfully and allowed me to visit the -FreshRSS instance at =localhost:8080=. +FreshRSS instance at `localhost:8080`. + +## Fresh RSS Set-Up -** Fresh RSS Set-Up -I *HIGHLY** suggest that you set up your user account prior to exposing -this service to the public. It's unlikely that someone is trying to -access the exact domain or IP/port you're assigning here, but as soon as -you expose this service, the first person to open the URL will be able -to create the admin user. +I **HIGHLY\*** suggest that you set up your user account prior to +exposing this service to the public. It\'s unlikely that someone is +trying to access the exact domain or IP/port you\'re assigning here, but +as soon as you expose this service, the first person to open the URL +will be able to create the admin user. -In order to set up your FreshRSS service, open the =localhost:8080= URL -in your browser (you may need to use a local IP instead of =localhost= -if you're accessing the page from a different machine on the network - -e.g., =192.168.1.20:8080=). +In order to set up your FreshRSS service, open the +`localhost:8080` URL in your browser (you may need to use a +local IP instead of `localhost` if you\'re accessing the page +from a different machine on the network - e.g., +`192.168.1.20:8080`). Once the page loads, set up your default user with a strong username and password. You may also choose to configure other settings prior to exposing this service. -** Nginx Reverse-Proxy +## Nginx Reverse-Proxy + In order to access this service outside my home, I needed to set up a -reverse-proxy to connect =localhost:8080= to =rss.example.com=. +reverse-proxy to connect `localhost:8080` to +`rss.example.com`. First, I created a new Nginx configuration file: -#+begin_src sh +```sh sudo nano /etc/nginx/sites-available/rss.example.com -#+end_src +``` Within the config file, I pasted the following code: -#+begin_src config +``` config upstream freshrss { server 127.0.0.1:8080; keepalive 64; @@ -127,79 +141,87 @@ server { proxy_pass_header Authorization; } } -#+end_src +``` Finally, restart Nginx and you will be able to access your service via HTTP: -#+begin_src sh +```sh sudo systemctl restart nginx.service -#+end_src +``` + +## HTTPS -** HTTPS -However, I don't want to access my RSS feeds via HTTP. I want it +However, I don\'t want to access my RSS feeds via HTTP. I want it available only via HTTPS. In order to do this, I ran the -[[https://certbot.eff.org/][certbot]] program to generate SSL -certificates for me: +[certbot](https://certbot.eff.org/) program to generate SSL certificates +for me: -#+begin_src sh +```sh sudo certbot --nginx -#+end_src +``` This process will automatically generate an SSL certificate for you and modify the Nginx configuration file to include a redirect from HTTP to HTTPS. -* Post-Installation Fixes +# Post-Installation Fixes + At this point, we have a functional FreshRSS website, available from anywhere and secured with HTTPS. However, attempting to connect this service to an RSS app resulted in many errors regarding unavailable URLs and incorrect credentials. -** API Set-Up -First, you need to open your user profile in FreshRSS (=Settings= > -=Profile=) and set an API password in the field at the bottom. This is -the password you will need to provide to your RSS apps. +## API Set-Up + +First, you need to open your user profile in FreshRSS +(`Settings` \> `Profile`) and set an API password +in the field at the bottom. This is the password you will need to +provide to your RSS apps. Once that is set and saved, click the link below the API password field to open the API check tool. It should look something like -=https://localhost:8080/api/= or =https://rss.example.com/api/=. +`https://localhost:8080/api/` or +`https://rss.example.com/api/`. -Within this page, you /should/ see your correct external URL and "PASS" -at the bottom of each API type. This would mean everything is set up -correctly, and you can now move on and login to any RSS apps that +Within this page, you *should* see your correct external URL and +\"PASS\" at the bottom of each API type. This would mean everything is +set up correctly, and you can now move on and login to any RSS apps that support self-hosted options. In my case, the URL showed an internal URL and I had a warning that the -=base_url= variable may be misconfigured. If this is the case, see the -next section for a fix. +`base_url` variable may be misconfigured. If this is the +case, see the next section for a fix. + +## Base URL Fix -** Base URL Fix -In order to fix the =base_url= for the API, I opened up my docker -container with the following command: +In order to fix the `base_url` for the API, I opened up my +docker container with the following command: -#+begin_src sh +```sh sudo docker exec -it freshrss bash -#+end_src +``` Within this container, update the packages and install an editor: -#+begin_src sh +```sh apt-get update apt-get install nano -#+end_src +``` -Finally, open up =config.php= in the =data= directory: +Finally, open up `config.php` in the `data` +directory: -#+begin_src sh +```sh nano data/config.php -#+end_src +``` -Within =config.php=, you will need to update the =base_url= variable and -update it to match your external URL. In my case, I simply commented-out -the incorrect URL with =//= and added the correct one on a new line: +Within `config.php`, you will need to update the +`base_url` variable and update it to match your external URL. +In my case, I simply commented-out the incorrect URL with +`//` and added the correct one on a new line: -#+begin_src php +``` php <?php return array ( ... @@ -208,25 +230,26 @@ the incorrect URL with =//= and added the correct one on a new line: ... ) > -#+end_src +``` -You can now exit the file with =Ctrl + x=, press =y= to save the file, -and then click =Enter= to keep the same file name. +You can now exit the file with `Ctrl + x`, press +`y` to save the file, and then click `Enter` to +keep the same file name. Finally, just exit out of the docker container: -#+begin_src sh +```sh exit -#+end_src +``` Next, just restart the container: -#+begin_src sh +```sh sudo docker restart freshrss -#+end_src +``` -Voilà! Your API check should now "PASS" and you should be able to use +Voilà! Your API check should now \"PASS\" and you should be able to use one of the API URLs in your RSS apps. -In my case, I use [[https://netnewswire.com][NetNewsWire]] on my desktop +In my case, I use [NetNewsWire](https://netnewswire.com) on my desktop and phone. diff --git a/content/blog/2022-06-16-terminal-lifestyle.org b/content/blog/2022-06-16-terminal-lifestyle.md index f96a10a..3935c7b 100644 --- a/content/blog/2022-06-16-terminal-lifestyle.org +++ b/content/blog/2022-06-16-terminal-lifestyle.md @@ -1,38 +1,42 @@ -#+title: A Terminal Lifestyle -#+date: 2022-06-16 -#+description: Explaining how I live my digital life mostly in the console/terminal. -#+filetags: :linux: ++++ +date = 2022-06-16 +title = "A Terminal Lifestyle" +description = "" +draft = false ++++ -* Text-Based Simplicity -I've detailed my views on web-based minimalism and related topics in +# Text-Based Simplicity + +I\'ve detailed my views on web-based minimalism and related topics in other posts throughout the years; e.g., JavaScript/CSS bloat slowing down websites that are essentially a text document. However, I have never really expanded beyond talking about the web and describing how I focus on minimizing distractions in other digital environments. -This post is going to set the baseline for how I /try/ to live my +This post is going to set the baseline for how I *try* to live my digital life. It does not necessarily get into my physical life, which is often harder to control and contain all the noise in our modern world. While there are new things to do every day in our digital world, I find that keeping a core set of values and interests can ground you and keep -you mindful of /why/ you are participating in the digital world. For +you mindful of *why* you are participating in the digital world. For example, if - at your core - you have no interest in what strangers think about random topics, it would be unwise to start participating in social media. However, I am someone who has been dragged in by effective advertising to participate in communities that I realize I do not care for. -I won't dive much further into explaining the philosophy of all this, +I won\'t dive much further into explaining the philosophy of all this, but I will link a few helpful articles that may pique your interest if -you're in search of more meaningful experiences: +you\'re in search of more meaningful experiences: + +- [Mindfulness](https://en.wikipedia.org/wiki/Mindfulness) +- [Minimalism](https://en.wikipedia.org/wiki/Minimalism) +- [Stoicism](https://en.wikipedia.org/wiki/Stoicism) -- [[https://en.wikipedia.org/wiki/Mindfulness][Mindfulness]] -- [[https://en.wikipedia.org/wiki/Minimalism][Minimalism]] -- [[https://en.wikipedia.org/wiki/Stoicism][Stoicism]] +# Living Life in the Terminal -* Living Life in the Terminal My personal approach to reducing digital distractions and increasing my focus on the task at hand is to use a terminal for as much as I possibly can. @@ -40,12 +44,12 @@ can. Most days, this means that I have a few tabs open constantly in my terminal: -1. A web browser -2. A chat client -3. An email client -4. An RSS feed reader -5. A local shell for navigating my computer's files -6. A remote shell for managing servers and other machines +1. A web browser +2. A chat client +3. An email client +4. An RSS feed reader +5. A local shell for navigating my computer\'s files +6. A remote shell for managing servers and other machines Beyond this, I rarely open other tabs or GUI applications, unless absolutely necessary. If you look, you may be surprised what can be @@ -54,55 +58,56 @@ accomplished in the terminal. For example, I have moved my music and entertainment downloads to the terminal, along with my device VPN connections. I am exploring options for moving my RSS subscriptions to something like -[[https://newsboat.org/][Newsboat]], so that I can read my daily -articles without all the fuss. +[Newsboat](https://newsboat.org/), so that I can read my daily articles +without all the fuss. -Now that we have some examples out of the way, let's dive into the +Now that we have some examples out of the way, let\'s dive into the specifics. -** Browsing the Web -I'm going to start off with a hard topic for those who prefer to live in -the terminal: web browsing. This task is made hard mostly by websites +## Browsing the Web + +I\'m going to start off with a hard topic for those who prefer to live +in the terminal: web browsing. This task is made hard mostly by websites and web apps that require JavaScript to run. The other difficult part is -that if you're using a text-based browser, that means images won't load -(hopefully that's obvious). +that if you\'re using a text-based browser, that means images won\'t +load (hopefully that\'s obvious). -I am using [[https://lynx.invisible-island.net][Lynx]], a text-based +I am using [Lynx](https://lynx.invisible-island.net), a text-based browser that runs quickly and easily in the terminal. Lynx allows me to -browser most websites by simply typing =g= and then typing in the URL I -want. +browser most websites by simply typing `g` and then typing in +the URL I want. -#+caption: Lynx -[[https://img.cleberg.net/blog/20220616-terminal-lifestyle/lynx.png]] + -If you need a search engine while in Lynx, I recommend -[[https://lite.duckduckgo.com/lite/][DuckDuckGo (Lite)]], which allows -you to search the web using their text-only interface. +If you need a search engine while in Lynx, I recommend [DuckDuckGo +(Lite)](https://lite.duckduckgo.com/lite/), which allows you to search +the web using their text-only interface. -#+caption: DuckDuckGo !Lite -[[https://img.cleberg.net/blog/20220616-terminal-lifestyle/ddg.png]] + -Eventually, you will run into websites that don't work (or are just too -ugly and messy) in a text-only mode, and you'll be forced to switch over -to a GUI browser to look at that site. Personally, I don't mind this as -it doesn't happen as often as I thought it would. +Eventually, you will run into websites that don\'t work (or are just too +ugly and messy) in a text-only mode, and you\'ll be forced to switch +over to a GUI browser to look at that site. Personally, I don\'t mind +this as it doesn\'t happen as often as I thought it would. The only time I need to do this is when I want to browse an image/video-focused webpage or if I need to log in to a site, and it -doesn't support a text-only login page. For example, I am able to easily -log in to [[https://sr.ht][Sourcehut]] in lynx. +doesn\'t support a text-only login page. For example, I am able to +easily log in to [Sourcehut](https://sr.ht) in lynx. + +## Chatting with Friends -** Chatting with Friends After web browsing activities, my main form of terminal communication is -Matrix. I use the [[https://docs.mau.fi/gomuks/][gomuks]] client +Matrix. I use the [gomuks](https://docs.mau.fi/gomuks/) client currently. This was incredibly easy to install on macOS (but I will need to see if -it'll be just as easy on Linux when my new laptop arrives): +it\'ll be just as easy on Linux when my new laptop arrives): -#+begin_src sh +```sh brew install gomuks -#+end_src +``` Once you launch gomuks, it will sync and require your username and password to login. After doing so, the only problem I ran into was @@ -110,102 +115,102 @@ verifying my gomuks client so that I could participate in rooms with E2EE. Finally, I was able to verify the session by opening the Element desktop -app (I assume you can do this in the browser and mobile app too, but I'm -not sure) and manually verifying myself with this process: +app (I assume you can do this in the browser and mobile app too, but +I\'m not sure) and manually verifying myself with this process: -1. Open the Element desktop app -2. Open a room I was a member of -3. Open the =Room Info= pane -4. Open the =People= menu and search for myself -5. Click on my profile name -6. Click on the session link under the =Security= section and follow the - prompts to manually verify the session +1. Open the Element desktop app +2. Open a room I was a member of +3. Open the `Room Info` pane +4. Open the `People` menu and search for myself +5. Click on my profile name +6. Click on the session link under the `Security` section + and follow the prompts to manually verify the session Overall, I like gomuks and am able to enjoy all the features I was using in Element. The only hiccup I have occurred is manually downloading images to view them, which can be annoying. -#+caption: gomuks -[[https://img.cleberg.net/blog/20220616-terminal-lifestyle/gomuks.png]] + + +## Email -** Email Moving email to the terminal has been the hardest of the tasks for me. Unlike web browsing, where I can simply decide to not look at a website that does not work in the terminal, I cannot simply ignore emails sent to me. -Personally, I am experimenting with [[https://neomutt.org/][neomutt]] as -a potential email client. +Personally, I am experimenting with [neomutt](https://neomutt.org/) as a +potential email client. -However, this requires a *TON** of configuration and tweaking to get +However, this requires a **TON\*** of configuration and tweaking to get right. Even when I was able to set up neomutt, configure my email account, and customize a few personal preferences, a lot of emails still do not display correctly (mostly due to HTML and images). -I won't get into the details of configuring =neomutt=; I mostly followed -this blog post: -[[https://gideonwolfe.com/posts/workflow/neomutt/intro/][Email in the -Terminal: Configuring Neomutt]]. +I won\'t get into the details of configuring `neomutt`; I +mostly followed this blog post: [Email in the Terminal: Configuring +Neomutt](https://gideonwolfe.com/posts/workflow/neomutt/intro/). Finally, I have yet to figure out how to connect my GPG keys to -=neomutt=, but that's a problem for another day. +`neomutt`, but that\'s a problem for another day. + +## RSS Feed Reader -** RSS Feed Reader -I have just started using [[https://newsboat.org/][Newsboat]] to read +I have just started using [Newsboat](https://newsboat.org/) to read articles in my terminal and have found quick success with it. -I'll show you a quick screenshot first: +I\'ll show you a quick screenshot first: -#+caption: Newsboat -[[https://img.cleberg.net/blog/20220616-terminal-lifestyle/newsboat.png]] + The configuration was super easy for this app; I simply installed the app, created a file for URLs, and imported my OPML subscriptions that I had exported out of my old feed reader: -#+begin_src sh +```sh brew install newsboat -#+end_src +``` -#+begin_src sh +```sh touch ~/.newsboat/urls -#+end_src +``` -#+begin_src sh +```sh newsboat -i=my_subscriptions.opml -#+end_src +``` + +## Writing & Programming -** Writing & Programming Unfortunately, the weak link in my terminal-based environment right now is my grasp of the possibilities of editing files within a shell. I am used to the easy extensions found in VSCodium and Kate, so I am slowly learning how to mold the default editing tools to my needs. -Currently, this means I am using =nano= with the following +Currently, this means I am using `nano` with the following configuration: -#+begin_src config +``` config set breaklonglines set autoindent set linenumbers set tabstospaces set tabsize 2 set fill 80 -#+end_src +``` This configuration allows nano to automatically hard-wrap lines at 80 characters, autoindent the wrapped lines (if the previous line was indented), use 2 spaces per tab, and display line numbers within each file I open. -I am currently looking to see if =vim= or =emacs= would be more useful -for my current needs, but I'm not in any rush, so I don't expect to find -an answer anytime soon. +I am currently looking to see if `vim` or `emacs` +would be more useful for my current needs, but I\'m not in any rush, so +I don\'t expect to find an answer anytime soon. With my current life demands, I am not programming at the moment and have not explored the best terminal set-up for programming. However, I -have seen many peers find success configuring =vim= and =emacs=, so -that's where I will start when I pick my projects back up. +have seen many peers find success configuring `vim` and +`emacs`, so that\'s where I will start when I pick my +projects back up. -#+caption: nano -[[https://img.cleberg.net/blog/20220616-terminal-lifestyle/nano.png]] + diff --git a/content/blog/2022-06-22-daily-poetry.org b/content/blog/2022-06-22-daily-poetry.md index a24b3a2..e3a0fba 100644 --- a/content/blog/2022-06-22-daily-poetry.org +++ b/content/blog/2022-06-22-daily-poetry.md @@ -1,64 +1,73 @@ -#+title: Daily Plaintext Poetry via Email -#+date: 2022-06-22 -#+description: A small project to automatically deliver poetry to your inbox daily. -#+filetags: :selfhosting: ++++ +date = 2022-06-22 +title = "Daily Plaintext Poetry via Email" +description = "" +draft = false ++++ -* Source Code -I don't want to bury the lede here, so if you'd like to see the full +# Source Code + +I don\'t want to bury the lede here, so if you\'d like to see the full source code I use to email myself plaintext poems daily, visit the -repository: [[https://git.cleberg.net/?p=daily-poem.git;a=summary][daily-poem.git]]. +repository: +[daily-poem.git](https://git.cleberg.net/?p=daily-poem.git;a=summary). + +# My Daily Dose of Poetry -* My Daily Dose of Poetry Most of my programming projects are small, random projects that are made strictly to fix some small problem I have or enhance my quality of life. In this case, I was looking for a simply and easy way to get a daily dose of literature or poetry to read in the mornings. -However, I don't want to sign up for a random mailing list on just any -website. I also don't want to have to work to find the reading content +However, I don\'t want to sign up for a random mailing list on just any +website. I also don\'t want to have to work to find the reading content each morning, as I know I would simply give up and stop reading daily. Thus, I found a way to deliver poetry to myself in plain-text format, on a daily basis, and scheduled to deliver automatically. -* Prerequisites +# Prerequisites + This solution uses Python and email, so the following process requires the following to be installed: -1. An SMTP server, which can be as easy as installing =mailutils= if - you're on a Debian-based distro. -2. Python (& pip!) -3. The following Python packages: =email=, =smtplib=, =json=, and - =requests= +1. An SMTP server, which can be as easy as installing + `mailutils` if you\'re on a Debian-based distro. +2. Python (& pip!) +3. The following Python packages: `email`, + `smtplib`, `json`, and `requests` + +# Breaking Down the Logic -* Breaking Down the Logic -I want to break down the logic for this program, as it's quite simple +I want to break down the logic for this program, as it\'s quite simple and informational. -** Required Packages +## Required Packages + This program starts with a simple import of the required packages, so I wanted to explain why each package is used: -#+begin_src python +``` python from email.mime.text import MIMEText # Required for translating MIMEText import smtplib # Required to process the SMTP mail delivery import json # Required to parse the poetry API results import requests # Required to send out a request to the API -#+end_src +``` + +## Sending the API Request -** Sending the API Request -Next, we need to actually send the API request. In my case, I'm calling +Next, we need to actually send the API request. In my case, I\'m calling a random poem from the entire API. If you want, you can call specific poems or authors from this API. -#+begin_src python +``` python json_data = requests.get('https://poetrydb.org/random').json() -#+end_src +``` This gives us the following result in JSON: -#+begin_src json +``` json [ { "title": "Sonnet XXII: With Fools and Children", @@ -84,40 +93,40 @@ This gives us the following result in JSON: "linecount": "15" } ] -#+end_src +``` -** Parsing the API Results -In order to parse this into a readable format, we need to use the =json= -package and extract the fields we want. In the example below, I am -grabbing every field presented by the API. - -For the actual poem content, we need to loop over each line in the -=lines= variable since each line is a separate string by default. +## Parsing the API Results -#+begin_quote -You /could/ also extract the title or author and make another call out -to the API to avoid having to build the plaintext poem with a loop, but -it just doesn't make sense to me to send multiple requests when we can -create a simple loop on our local machine to work with the data we -already have. +In order to parse this into a readable format, we need to use the +`json` package and extract the fields we want. In the example +below, I am grabbing every field presented by the API. -For -[[https://poetrydb.org/title/Sonnet%20XXII:%20With%20Fools%20and%20Children/lines.text][example]], -look at the raw data response of this link to see the poem's lines -returned in plaintext. - -#+end_quote - -#+begin_src python +For the actual poem content, we need to loop over each line in the +`lines` variable since each line is a separate string by +default. + +> You *could* also extract the title or author and make another call out +> to the API to avoid having to build the plaintext poem with a loop, +> but it just doesn\'t make sense to me to send multiple requests when +> we can create a simple loop on our local machine to work with the data +> we already have. +> +> For +> [example](https://poetrydb.org/title/Sonnet%20XXII:%20With%20Fools%20and%20Children/lines.text), +> look at the raw data response of this link to see the poem\'s lines +> returned in plaintext. + +``` python title = json_data[0]['title'] author = json_data[0]['author'] line_count = json_data[0]['linecount'] lines = '' for line in json_data[0]['lines']: lines = lines + line + "\n" -#+end_src +``` + +## Composing the Email -** Composing the Email Now that I have all the data I need, I just need to compose it into a message and prepare the message metadata. @@ -126,41 +135,43 @@ by the author, then a blank line, and finally the full poem. This code snippet combines that data and packages it into a MIMEText container, ready to be emailed. -#+begin_src python +``` python msg_body = title + "\n" + author + "\n\n" + lines msg = MIMEText(msg_body) -#+end_src +``` Before we send the email, we need to prepare the metadata (subject, from, to, etc.): -#+begin_src python +``` python sender_email = 'example@server.local' recipient_emails = ['user@example.com'] msg['Subject'] = 'Your Daily Poem (' + line_count + ' lines)' msg['From'] = sender_email msg['To'] = recipient_email -#+end_src +``` + +## Sending the Email -** Sending the Email Now that I have everything ready to be emailed, the last step is to simply connect to an SMTP server and send the email out to the -recipients. In my case, I installed =mailutils= on Ubuntu and let my -SMTP server be =localhost=. +recipients. In my case, I installed `mailutils` on Ubuntu and +let my SMTP server be `localhost`. -#+begin_src python +``` python smtp_server = 'localhost' s = smtplib.SMTP(smtp_server) s.sendmail(sender_email, recipient_emails, msg.as_string()) s.quit() -#+end_src +``` + +# The Result! -* The Result! -Instead of including a screenshot, I've copied the contents of the email -that was delivered to my inbox below since I set this process up in -plaintext format. +Instead of including a screenshot, I\'ve copied the contents of the +email that was delivered to my inbox below since I set this process up +in plaintext format. -#+begin_src txt +``` txt Date: Wed, 22 Jun 2022 14:37:19 +0000 (UTC) From: REDACTED To: REDACTED @@ -186,23 +197,25 @@ You that behold us, laugh us not to scorn; Give Nature thanks you are not such as we. Yet fools and children sometimes tell in play Some, wise in show, more fools indeed than they. -#+end_src +``` + +# Scheduling the Daily Email -* Scheduling the Daily Email -Last, but not least, is scheduling this Python script with =crontab=. To -schedule a script to run daily, you can add it to the =crontab= file. To -do this, open =crontab= in editing mode: +Last, but not least, is scheduling this Python script with +`crontab`. To schedule a script to run daily, you can add it +to the `crontab` file. To do this, open `crontab` +in editing mode: -#+begin_src sh +```sh crontab -e -#+end_src +``` In the file, simply paste the following snippet at the bottom of the file and ensure that the file path is correctly pointing to wherever you saved your Python script: -#+begin_src config +``` config 0 8 ** ** ** python3 /home/<your_user>/dailypoem/main.py -#+end_src +``` We have now set up the script and scheduled it to run daily at 08:00! diff --git a/content/blog/2022-06-24-fedora-i3.md b/content/blog/2022-06-24-fedora-i3.md new file mode 100644 index 0000000..35045c4 --- /dev/null +++ b/content/blog/2022-06-24-fedora-i3.md @@ -0,0 +1,159 @@ ++++ +date = 2022-06-24 +title = "Rebooting My Love Affair with Linux" +description = "" +draft = false ++++ + +# Leaving macOS + +As I noted [in a recent post](../foss-macos-apps), I have been planning +on migrating from macOS back to a Linux-based OS. I am happy to say that +I have finally completed my migration and am now stuck in the wonderful +world of Linux again. + +My decision to leave macOS really came down to just a few important +things: + +- Apple Security (Gatekeeper) restricting me from running any software + I want. Even if you disable Gatekeeper and allow software to bypass + the rest of the device installation security, you still have to + repeat that process every time the allowed software is updated. +- macOS sends out nearly constant connections, pings, telemetry, etc. + to a myriad of mysterious Apple services. I\'m not even going to + dive into how many macOS apps have constant telemetry on, as well. +- Lastly, I just *really* missed the customization and freedom that + comes with Linux. Being able to switch to entirely new kernel, OS, + or desktop within minutes is a freedom I took for granted when I + switched to macOS. + +Now that I\'ve covered macOS, I\'m going to move on to more exciting +topics: my personal choice of OS, DE, and various customizations I\'m +using. + +# Fedora + +After trying a ton of distros (I think I booted and tested around 20-25 +distros), I finally landed on [Fedora Linux](https://getfedora.org/). I +have quite a bit of experience with Fedora and enjoy the +`dnf` package manager. Fedora allows me to keep up-to-date +with recent software (I\'m looking at you, Debian), but still provides a +level of stability you don\'t find in every distro. + +In a very close second place was Arch Linux, as well as its spin-off: +Garuda Linux (Garuda w/ sway is *beautiful*). Arch is great for +compatibility and the massive community it has, but I have just never +had the time to properly sit down and learn the methodology behind their +packaging systems. + +Basically, everything else I tested was unacceptable in at least one way +or another. Void (`glibc`) was great, but doesn\'t support +all the software I need. Slackware worked well as a tui, but I wasn\'t +skilled enough to get a tiling window manager (WM) working on it. + +## i3 + +One of the reasons I settled on Fedora is that it comes with an official +i3 spin. Being able to use a tiling WM, such as i3 or sway, is one of +the biggest things I wanted to do as soon as I adopted Linux again. + +I will probably set up a dotfile repository soon, so that I don\'t lose +any of my configurations, but nothing big has been configured thus far. + +The two main things I have updated in i3wm are natural scrolling and +binding my brightness keys to the `brightnessctl` program. + +1. Natural Scrolling + + You can enable natural scrolling by opening the following file: + + ```sh + sudo nano /usr/share/X11/xorg.conf.d/40-libinput.conf + ``` + + Within the `40-libinput.conf` file, find the following + input sections and enable the natural scrolling option. + + This is the `pointer` section: + + ``` conf + Section "InputClass" + Identifier "libinput pointer catchall" + MatchIsPointer "on" + MatchDevicePath "/dev/input/event*" + Driver "libinput" + Option "NaturalScrolling" "True" + EndSection + ``` + + This is the `touchpad` section: + + ``` conf + Section "InputClass" + Identifier "libinput touchpad catchall" + MatchIsTouchpad "on" + MatchDevicePath "/dev/input/event*" + Driver "libinput" + Option "NaturalScrolling" "True" + EndSection + ``` + +2. Enabling Brightness Keys + + Likewise, enabling brightness key functionality is as simple as + binding the keys to the `brightnessctl` program. + + To do this, open up your i3 config file. Mine is located here: + + ```sh + nano /home/<my-user>/.config/i3/config + ``` + + ``` conf + # Use brightnessctl to adjust brightness. + bindsym XF86MonBrightnessDown exec --no-startup-id brightnessctl --min-val=2 -q set 3%- + bindsym XF86MonBrightnessUp exec --no-startup-id brightnessctl -q set 3%+ + ``` + +3. `polybar` + + Instead of using the default `i3status` bar, I have opted + to use `polybar` instead (as you can also see in the + screenshot above). + + My config for this menu bar is basically just the default settings + with modified colors and an added battery block to quickly show me + the machine\'s battery info. + +4. `alacritty` + + Not much to say on this part yet, as I haven\'t configured it much, + but I installed `alacritty` as my default terminal, and I + am using `zsh` and the shell. + +# Software Choices + +Again, I\'m not going to say much that I haven\'t said yet in other blog +posts, so I\'ll just do a quick rundown of the apps I installed +immediately after I set up the environment. + +Flatpak Apps: + +- Cryptomator +- pCloud +- Signal + +Fedora Packages: + +- gomuks +- neomutt +- neofetch +- Firefox + - uBlock Origin + - Bitwarden + - Stylus + - Privacy Redirect + +Other: + +- exiftool diff --git a/content/blog/2022-06-24-fedora-i3.org b/content/blog/2022-06-24-fedora-i3.org deleted file mode 100644 index f96bbb7..0000000 --- a/content/blog/2022-06-24-fedora-i3.org +++ /dev/null @@ -1,152 +0,0 @@ -#+title: Rebooting My Love Affair with Linux -#+date: 2022-06-24 -#+description: A retrospective on moving from macOS to Linux. -#+filetags: :linux: - -* Leaving macOS -As I noted [[../foss-macos-apps][in a recent post]], I have been -planning on migrating from macOS back to a Linux-based OS. I am happy to -say that I have finally completed my migration and am now stuck in the -wonderful world of Linux again. - -My decision to leave macOS really came down to just a few important -things: - -- Apple Security (Gatekeeper) restricting me from running any software I - want. Even if you disable Gatekeeper and allow software to bypass the - rest of the device installation security, you still have to repeat - that process every time the allowed software is updated. -- macOS sends out nearly constant connections, pings, telemetry, etc. to - a myriad of mysterious Apple services. I'm not even going to dive into - how many macOS apps have constant telemetry on, as well. -- Lastly, I just /really/ missed the customization and freedom that - comes with Linux. Being able to switch to entirely new kernel, OS, or - desktop within minutes is a freedom I took for granted when I switched - to macOS. - -Now that I've covered macOS, I'm going to move on to more exciting -topics: my personal choice of OS, DE, and various customizations I'm -using. - -* Fedora -After trying a ton of distros (I think I booted and tested around 20-25 -distros), I finally landed on [[https://getfedora.org/][Fedora Linux]]. -I have quite a bit of experience with Fedora and enjoy the =dnf= package -manager. Fedora allows me to keep up-to-date with recent software (I'm -looking at you, Debian), but still provides a level of stability you -don't find in every distro. - -In a very close second place was Arch Linux, as well as its spin-off: -Garuda Linux (Garuda w/ sway is /beautiful/). Arch is great for -compatibility and the massive community it has, but I have just never -had the time to properly sit down and learn the methodology behind their -packaging systems. - -Basically, everything else I tested was unacceptable in at least one way -or another. Void (=glibc=) was great, but doesn't support all the -software I need. Slackware worked well as a tui, but I wasn't skilled -enough to get a tiling window manager (WM) working on it. - -** i3 -One of the reasons I settled on Fedora is that it comes with an official -i3 spin. Being able to use a tiling WM, such as i3 or sway, is one of -the biggest things I wanted to do as soon as I adopted Linux again. - -I will probably set up a dotfile repository soon, so that I don't lose -any of my configurations, but nothing big has been configured thus far. - -The two main things I have updated in i3wm are natural scrolling and -binding my brightness keys to the =brightnessctl= program. - -1. Natural Scrolling - - You can enable natural scrolling by opening the following file: - - #+begin_src sh - sudo nano /usr/share/X11/xorg.conf.d/40-libinput.conf - #+end_src - - Within the =40-libinput.conf= file, find the following input sections - and enable the natural scrolling option. - - This is the =pointer= section: - - #+begin_src conf - Section "InputClass" - Identifier "libinput pointer catchall" - MatchIsPointer "on" - MatchDevicePath "/dev/input/event*" - Driver "libinput" - Option "NaturalScrolling" "True" - EndSection - #+end_src - - This is the =touchpad= section: - - #+begin_src conf - Section "InputClass" - Identifier "libinput touchpad catchall" - MatchIsTouchpad "on" - MatchDevicePath "/dev/input/event*" - Driver "libinput" - Option "NaturalScrolling" "True" - EndSection - #+end_src - -2. Enabling Brightness Keys - - Likewise, enabling brightness key functionality is as simple as - binding the keys to the =brightnessctl= program. - - To do this, open up your i3 config file. Mine is located here: - - #+begin_src sh - nano /home/<my-user>/.config/i3/config - #+end_src - - #+begin_src conf - # Use brightnessctl to adjust brightness. - bindsym XF86MonBrightnessDown exec --no-startup-id brightnessctl --min-val=2 -q set 3%- - bindsym XF86MonBrightnessUp exec --no-startup-id brightnessctl -q set 3%+ - #+end_src - -3. =polybar= - - Instead of using the default =i3status= bar, I have opted to use - =polybar= instead (as you can also see in the screenshot above). - - My config for this menu bar is basically just the default settings - with modified colors and an added battery block to quickly show me - the machine's battery info. - -4. =alacritty= - - Not much to say on this part yet, as I haven't configured it much, - but I installed =alacritty= as my default terminal, and I am using - =zsh= and the shell. - -* Software Choices -Again, I'm not going to say much that I haven't said yet in other blog -posts, so I'll just do a quick rundown of the apps I installed -immediately after I set up the environment. - -Flatpak Apps: - -- Cryptomator -- pCloud -- Signal - -Fedora Packages: - -- gomuks -- neomutt -- neofetch -- Firefox - - uBlock Origin - - Bitwarden - - Stylus - - Privacy Redirect - -Other: - -- exiftool diff --git a/content/blog/2022-07-01-git-server.md b/content/blog/2022-07-01-git-server.md new file mode 100644 index 0000000..61c4049 --- /dev/null +++ b/content/blog/2022-07-01-git-server.md @@ -0,0 +1,655 @@ ++++ +date = 2022-07-01 +title = "Self-Hosting a Personal Git Server" +description = "" +draft = false ++++ + +# My Approach to Self-Hosting Git + +I have often tried to self-host my Git repositories, but have always +fallen short when I tried to find a suitable web interface to show on +the front-end. + +After a few years, I have finally found a combination of methods that +allow me to easily self-host my projects, view them on the web, and +access them from anywhere. + +Before I dive into the details, I want to state a high-level summary of +my self-hosted Git approach: + +- This method uses the `ssh://` (read & write) and + `git://` (read-only) protocols for push and pull access. + - For the `git://` protocol, I create a + `git-daemon-export-ok` file in any repository that I + want to be cloneable by anyone. + - The web interface I am using (`cgit`) allows simple + HTTP cloning by default. I do not disable this setting as I want + beginners to be able to clone one of my repositories even if + they don\'t know the proper method. +- I am not enabling Smart HTTPS for any repositories. Updates to + repositories must be pushed via SSH. +- Beyond the actual repository management, I am using + `cgit` for the front-end web interface. + - If you use the `scan-path=<path>` configuration in + the `cgitrc` configuration file to automatically find + repositories, you can\'t exclude a repository from + `cgit` if it\'s stored within the path that + `cgit` reads. To host private repositories, you\'d + need to set up another directory that `cgit` can\'t + read. + +# Assumptions + +For the purposes of this walkthrough, I am assuming you have a URL +(`git.example.com`) or IP address +(`207.84.26.991`) addressed to the server that you will be +using to host your git repositories. + +# Adding a Git User + +In order to use the SSH method associated with git, we will need to add +a user named `git`. If you have used the SSH method for other +git hosting sites, you are probably used to the following syntax: + +```sh +git clone [user@]server:project.git +``` + +The syntax above is an `scp`-like syntax for using SSH on the +`git` user on the server to access your repository. + +Let\'s delete any remnants of an old `git` user, if any, and +create the new user account: + +```sh +sudo deluser --remove-home git +sudo adduser git +``` + +## Import Your SSH Keys to the Git User + +Once the `git` user is created, you will need to copy your +public SSH key on your local development machine to the `git` +user on the server. + +If you don\'t have an SSH key yet, create one with this command: + +```sh +ssh-keygen +``` + +Once you create the key pair, the public should be saved to +`~/.ssh/id_rsa.pub`. + +If your server still has password-based authentication available, you +can copy it over to your user\'s home directory like this: + +```sh +ssh-copy-id git@server +``` + +Otherwise, copy it over to any user that you can access. + +```sh +scp ~/.ssh/id_rsa.pub your_user@your_server: +``` + +Once on the server, you will need to copy the contents into the +`git` user\'s `authorized_keys` file: + +```sh +cat id_rsa.pub > /home/git/.ssh/authorized_keys +``` + +## (Optional) Disable Password-Based SSH + +If you want to lock down your server and ensure that no one can +authenticate in via SSH with a password, you will need to edit your SSH +configuration. + +```sh +sudo nano /etc/ssh/sshd_config +``` + +Within this file, find the following settings and set them to the values +I am showing below: + +``` conf +PermitRootLogin no +PasswordAuthentication no +AuthenticationMethods publickey +``` + +You may have other Authentication Methods required in your personal +set-up, so the key here is just to ensure that +`AuthenticationMethods` does not allow passwords. + +### Setting up the Base Directory + +Now that we have set up a `git` user to handle all transport +methods, we need to set up the directory that we will be using as our +base of all repositories. + +In my case, I am using `/git` as my source folder. To create +this folder and assign it to the user we created, execute the following +commands: + +```sh +sudo mkdir /git +sudo chown -R git:git /git +``` + +### Creating a Test Repository + +On your server, switch over to the `git` user in order to +start managing git files. + +```sh +su git +``` + +Once logged-in as the `git` user, go to your base directory +and create a test repository. + +```sh +cd /git +mkdir test.git && cd test.git +git init --bare +``` + +If you want to make this repo viewable/cloneable to the public via the +`git://` protocol, you need to create a +`git-daemon-export-ok` file inside the repository. + +```sh +touch git-daemon-export-ok +``` + +# Change the Login Shell for `git` + +To make sure that the `git` user is only used for git +operations and nothing else, you need to change the user\'s login shell. +To do this, simply use the `chsh` command: + +```sh +sudo chsh git +``` + +The interactive prompt will ask which shell you want the +`git` user to use. You must use the following value: + +```sh +/usr/bin/git-shell +``` + +Once done, no one will be able to SSH to the `git` user or +execute commands other than the standard git commands. + +# Opening the Firewall + +Don\'t forget to open up ports on the device firewall and network +firewall if you want to access these repositories publicly. If you\'re +using default ports, forward ports `22` (ssh) and +`9418` (git) from your router to your server\'s IP address. + +If your server also has a firewall, ensure that the firewall allows the +same ports that are forwarded from the router. For example, if you use +`ufw`: + +```sh +sudo ufw allow 22 +sudo ufw allow 9418 +``` + +## Non-Standard SSH Ports + +If you use a non-standard port for SSH, such as `9876`, you +will need to create an SSH configuration file on your local development +machine in order to connect to your server\'s git repositories. + +To do this, you\'ll need to define your custom port on your client +machine in your `~/.ssh/config` file: + +```sh +nano ~/.ssh/config +``` + +``` conf +Host git.example.com + # HostName can be a URL or an IP address + HostName git.example.com + Port 9876 + User git +``` + +## Testing SSH + +There are two main syntaxes you can use to manage git over SSH: + +- `git clone [user@]server:project.git` +- `git clone ssh://[user@]server/project.git` + +I prefer the first, which is an `scp`-like syntax. To test +it, try to clone the test repository you set up on the server: + +```sh +git clone git@git.example.com:/git/test.git +``` + +# Enabling Read-Only Access + +If you want people to be able to clone any repository where you\'ve +placed a `git-daemon-export-ok` file, you will need to start +the git daemon. + +To do this on a system with `systemd`, create a service file: + +```sh +sudo nano /etc/systemd/system/git-daemon.service +``` + +Inside the `git-daemon.service` file, paste the following: + +``` conf +[Unit] +Description=Start Git Daemon + +[Service] +ExecStart=/usr/bin/git daemon --reuseaddr --base-path=/git/ /git/ + +Restart=always +RestartSec=500ms + +StandardOutput=syslog +StandardError=syslog +SyslogIdentifier=git-daemon + +User=git +Group=git + +[Install] +WantedBy=multi-user.target +``` + +Once created, enable and start the service: + +```sh +sudo systemctl enable git-daemon.service +sudo systemctl start git-daemon.service +``` + +To clone read-only via the `git://` protocol, you can use the +following syntax: + +```sh +git clone git://git.example.com/test.git +``` + +# Migrating Repositories + +At this point, we have a working git server that works with both SSH and +read-only access. + +For each of the repositories I had hosted a different provider, I +executed the following commands in order to place a copy on my server as +my new source of truth: + +Server: + +```sh +su git +mkdir /git/<REPOSITORY_NAME>.git && cd /git/<REPOSITORY_NAME>.git +git init --bare + +# If you want to make this repo viewable/cloneable to the public +touch git-daemon-export-ok +``` + +Client: + +```sh +git clone git@<PREVIOUS_HOST>:<REPOSITORY_NAME> +git remote set-url origin git@git.EXAMPLE.COM:/git/<REPOSITORY_NAME>.git +git push +``` + +# Optional Web View: `cgit` + +If you want a web viewer for your repositories, you can use various +tools, such as `gitweb`, `cgit`, or +`klaus`. I chose `cgit` due to its simple +interface and fairly easy set-up (compared to others). Not to mention +that the [Linux kernel uses `cgit`](https://git.kernel.org/). + +## Docker Compose + +Instead of using my previous method of using a `docker run` +command, I\'ve updated this section to use `docker-compose` +instead for an easier installation and simpler management and +configuration. + +In order to use Docker Compose, you will set up a +`docker-compose.yml` file to automatically connect resources +like the repositories, `cgitrc`, and various files or folders +to the `cgit` container you\'re creating: + +```sh +mkdir ~/cgit && cd ~/cgit +nano docker-compose.yml +``` + +``` conf +# docker-compose.yml +version: '3' + +services: + cgit: + image: invokr/cgit + volumes: + - /git:/git + - ./cgitrc:/etc/cgitrc + - ./logo.png:/var/www/htdocs/cgit/logo.png + - ./favicon.png:/var/www/htdocs/cgit/favicon.png + - ./filters:/var/www/htdocs/cgit/filters + ports: + - "8763:80" + restart: always +``` + +Then, just start the container: + +```sh +sudo docker-compose up -d +``` + +Once it\'s finished installing, you can access the site at +`<SERVER_IP>:8763` or use a reverse-proxy service to forward +`cgit` to a URL, such as `git.example.com`. See +the next section for more details on reverse proxying a URL to a local +port. + +## Nginx Reverse Proxy + +I am using Nginx as my reverse proxy so that the `cgit` +Docker container can use `git.example.com` as its URL. To do +so, I simply created the following configuration file: + +```sh +sudo nano /etc/nginx/sites-available/git.example.com +``` + +``` conf +server { + listen 80; + server_name git.example.com; + + if ($host = git.example.com) { + return 301 https://$host$request_uri; + } + + return 404; +} + +server { + server_name git.example.com; + listen 443 ssl http2; + + location / { + # The final `/` is important. + proxy_pass http://localhost:8763/; + add_header X-Frame-Options SAMEORIGIN; + add_header X-XSS-Protection "1; mode=block"; + proxy_redirect off; + proxy_buffering off; + proxy_set_header Host $host; + proxy_set_header X-Real-IP $remote_addr; + proxy_set_header X-Forwarded-For $proxy_add_x_forwarded_for; + proxy_set_header X-Forwarded-Proto $scheme; + proxy_set_header X-Forwarded-Port $server_port; + } + + # INCLUDE ANY SSL CERTS HERE + include /etc/letsencrypt/options-ssl-nginx.conf; + ssl_dhparam /etc/letsencrypt/ssl-dhparams.pem; +} +``` + +Once created, symlink it and restart the web server. + +```sh +sudo ln -s /etc/nginx/sites-available/git.example.com /etc/nginx/sites-enabled/ +sudo systemctl restart nginx.service +``` + +As we can see below, my site at `git.example.com` is +available and running: + +## Settings Up Git Details + +Once you have `cgit` running, you can add some small details, +such as repository owners and descriptions by editing the following +files within each repository. + +Alternatively, you can use the `cgitrc` file to edit these +details if you only care to edit them for the purpose of seeing them on +your website. + +The `description` file within the repository on your server +will display the description online. + +```sh +cd /git/example.git +nano description +``` + +You can add a `[gitweb]` block to the `config` +file in order to display the owner of the repository. + +```sh +cd /git/example.git +nano config +``` + +``` conf +[gitweb] + owner = "YourName" +``` + +Note that you can ignore the configuration within each repository and +simply set up this information in the `cgitrc` file, if you +want to do it that way. + +## Editing `cgit` + +In order to edit certain items within `cgit`, you need to +edit the `cgitrc` file. + +```sh +nano ~/cgit/cgitrc +``` + +Below is an example configuration for `cgitrc`. You can find +all the configuration options within the \[configuration manual\] +(<https://git.zx2c4.com/cgit/plain/cgitrc.5.txt>). + +``` conf +css=/cgit.css +logo=/logo.png +favicon=/favicon.png +robots=noindex, nofollow + +enable-index-links=1 +enable-commit-graph=1 +enable-blame=1 +enable-log-filecount=1 +enable-log-linecount=1 +enable-git-config=1 + +clone-url=git://git.example.com/$CGIT_REPO_URL ssh://git@git.example.com:/git/$CGIT_REPO_URL + +root-title=My Git Website +root-desc=My personal git repositories. + +# Allow download of tar.gz, tar.bz2 and zip-files +snapshots=tar.gz tar.bz2 zip + +## +## List of common mimetypes +## +mimetype.gif=image/gif +mimetype.html=text/html +mimetype.jpg=image/jpeg +mimetype.jpeg=image/jpeg +mimetype.pdf=application/pdf +mimetype.png=image/png +mimetype.svg=image/svg+xml + +# Highlight source code +# source-filter=/var/www/htdocs/cgit/filters/syntax-highlighting.sh +source-filter=/var/www/htdocs/cgit/filters/syntax-highlighting.py + +# Format markdown, restructuredtext, manpages, text files, and html files +# through the right converters +about-filter=/var/www/htdocs/cgit/filters/about-formatting.sh + +## +## Search for these files in the root of the default branch of repositories +## for coming up with the about page: +## +readme=:README.md +readme=:readme.md +readme=:README.mkd +readme=:readme.mkd +readme=:README.rst +readme=:readme.rst +readme=:README.html +readme=:readme.html +readme=:README.htm +readme=:readme.htm +readme=:README.txt +readme=:readme.txt +readme=:README +readme=:readme + +# Repositories + +# Uncomment the following line to scan a path instead of adding repositories manually +# scan-path=/git + +## Test Section +section=git/test-section + +repo.url=test.git +repo.path=/git/test.git +repo.readme=:README.md +repo.owner=John Doe +repo.desc=An example repository! +``` + +## Final Fixes: Syntax Highlighting & README Rendering + +After completing my initial install and playing around with it for a few +days, I noticed two issues: + +1. Syntax highlighting did not work when viewing the source code within + a file. +2. The `about` tab within a repository was not rendered to + HTML. + +The following process fixes these issues. To start, let\'s go to the +`cgit` directory where we were editing our configuration file +earlier. + +```sh +cd ~/cgit +``` + +In here, create two folders that will hold our syntax files: + +```sh +mkdir filters && mkdir filters/html-converters && cd filters +``` + +Next, download the default filters: + +```sh +curl https://git.zx2c4.com/cgit/plain/filters/about-formatting.sh > about-formatting.sh +chmod 755 about-formatting.sh +curl https://git.zx2c4.com/cgit/plain/filters/syntax-highlighting.py > syntax-highlighting.py +chmod 755 syntax-highlighting.py +``` + +Finally, download the HTML conversion files you need. The example below +downloads the Markdown converter: + +```sh +cd html-converters +curl https://git.zx2c4.com/cgit/plain/filters/html-converters/md2html > md2html +chmod 755 md2html +``` + +If you need other filters or html-converters found within [the cgit +project files](https://git.zx2c4.com/cgit/tree/filters), repeat the +`curl` and `chmod` process above for whichever +files you need. + +However, formatting will not work quite yet since the Docker cgit +container we\'re using doesn\'t have the formatting package installed. +You can install this easily by install Python 3+ and the +`pygments` package: + +```sh +# Enter the container's command line +sudo docker exec -it cgit bash +``` + +```sh +# Install the necessary packages and then exit +yum update -y && \ +yum upgrade -y && \ +yum install python3 python3-pip -y && \ +pip3 install markdown pygments && \ +exit +``` + +**You will need to enter the cgit docker container and re-run these +`yum` commands every time you kill and restart the +container!** + +If not done already, we need to add the following variables to our +`cgitrc` file in order for `cgit` to know where +our filtering files are: + +``` conf +# Highlight source code with python pygments-based highlighter +source-filter=/var/www/htdocs/cgit/filters/syntax-highlighting.py + +# Format markdown, restructuredtext, manpages, text files, and html files +# through the right converters +about-filter=/var/www/htdocs/cgit/filters/about-formatting.sh +``` + +Now you should see that syntax highlighting and README rendering to the +`about` tab is fixed. + +## Theming + +I won\'t go into much detail in this section, but you can fully theme +your installation of `cgit` since you have access to the +`cgit.css` file in your web root. This is another file you +can add as a volume to the `docker-compose.yml` file if you +want to edit this without entering the container\'s command line. + +### :warning: Remember to Back Up Your Data! + +The last thing to note is that running services on your own equipment +means that you\'re assuming a level of risk that exists regarding data +loss, catastrophes, etc. In order to reduce the impact of any such +occurrence, I suggest backing up your data regularly. + +Backups can be automated via `cron`, by hooking your base +directory up to a cloud provider, or even setting up hooks to push all +repository info to git mirrors on other git hosts. Whatever the method, +make sure that your data doesn\'t vanish in the event that your drives +or servers fail. diff --git a/content/blog/2022-07-01-git-server.org b/content/blog/2022-07-01-git-server.org deleted file mode 100644 index c716484..0000000 --- a/content/blog/2022-07-01-git-server.org +++ /dev/null @@ -1,617 +0,0 @@ -#+title: Self-Hosting a Personal Git Server -#+date: 2022-07-01 -#+description: A guide to self-hosting a Git server on your own server. -#+filetags: :selfhosting: - -* My Approach to Self-Hosting Git -I have often tried to self-host my Git repositories, but have always -fallen short when I tried to find a suitable web interface to show on -the front-end. - -After a few years, I have finally found a combination of methods that -allow me to easily self-host my projects, view them on the web, and -access them from anywhere. - -Before I dive into the details, I want to state a high-level summary of -my self-hosted Git approach: - -- This method uses the =ssh://= (read & write) and =git://= (read-only) - protocols for push and pull access. - - For the =git://= protocol, I create a =git-daemon-export-ok= file in - any repository that I want to be cloneable by anyone. - - The web interface I am using (=cgit=) allows simple HTTP cloning by - default. I do not disable this setting as I want beginners to be - able to clone one of my repositories even if they don't know the - proper method. -- I am not enabling Smart HTTPS for any repositories. Updates to - repositories must be pushed via SSH. -- Beyond the actual repository management, I am using =cgit= for the - front-end web interface. - - If you use the =scan-path=<path>= configuration in the =cgitrc= - configuration file to automatically find repositories, you can't - exclude a repository from =cgit= if it's stored within the path that - =cgit= reads. To host private repositories, you'd need to set up - another directory that =cgit= can't read. - -* Assumptions -For the purposes of this walkthrough, I am assuming you have a URL -(=git.example.com=) or IP address (=207.84.26.991=) addressed to the -server that you will be using to host your git repositories. - -* Adding a Git User -In order to use the SSH method associated with git, we will need to add -a user named =git=. If you have used the SSH method for other git -hosting sites, you are probably used to the following syntax: - -#+begin_src sh -git clone [user@]server:project.git -#+end_src - -The syntax above is an =scp=-like syntax for using SSH on the =git= user -on the server to access your repository. - -Let's delete any remnants of an old =git= user, if any, and create the -new user account: - -#+begin_src sh -sudo deluser --remove-home git -sudo adduser git -#+end_src - -** Import Your SSH Keys to the Git User -Once the =git= user is created, you will need to copy your public SSH -key on your local development machine to the =git= user on the server. - -If you don't have an SSH key yet, create one with this command: - -#+begin_src sh -ssh-keygen -#+end_src - -Once you create the key pair, the public should be saved to -=~/.ssh/id_rsa.pub=. - -If your server still has password-based authentication available, you -can copy it over to your user's home directory like this: - -#+begin_src sh -ssh-copy-id git@server -#+end_src - -Otherwise, copy it over to any user that you can access. - -#+begin_src sh -scp ~/.ssh/id_rsa.pub your_user@your_server: -#+end_src - -Once on the server, you will need to copy the contents into the =git= -user's =authorized_keys= file: - -#+begin_src sh -cat id_rsa.pub > /home/git/.ssh/authorized_keys -#+end_src - -** (Optional) Disable Password-Based SSH -If you want to lock down your server and ensure that no one can -authenticate in via SSH with a password, you will need to edit your SSH -configuration. - -#+begin_src sh -sudo nano /etc/ssh/sshd_config -#+end_src - -Within this file, find the following settings and set them to the values -I am showing below: - -#+begin_src conf -PermitRootLogin no -PasswordAuthentication no -AuthenticationMethods publickey -#+end_src - -You may have other Authentication Methods required in your personal -set-up, so the key here is just to ensure that =AuthenticationMethods= -does not allow passwords. - -*** Setting up the Base Directory -Now that we have set up a =git= user to handle all transport methods, we -need to set up the directory that we will be using as our base of all -repositories. - -In my case, I am using =/git= as my source folder. To create this folder -and assign it to the user we created, execute the following commands: - -#+begin_src sh -sudo mkdir /git -sudo chown -R git:git /git -#+end_src - -*** Creating a Test Repository -On your server, switch over to the =git= user in order to start managing -git files. - -#+begin_src sh -su git -#+end_src - -Once logged-in as the =git= user, go to your base directory and create a -test repository. - -#+begin_src sh -cd /git -mkdir test.git && cd test.git -git init --bare -#+end_src - -If you want to make this repo viewable/cloneable to the public via the -=git://= protocol, you need to create a =git-daemon-export-ok= file -inside the repository. - -#+begin_src sh -touch git-daemon-export-ok -#+end_src - -* Change the Login Shell for =git= -To make sure that the =git= user is only used for git operations and -nothing else, you need to change the user's login shell. To do this, -simply use the =chsh= command: - -#+begin_src sh -sudo chsh git -#+end_src - -The interactive prompt will ask which shell you want the =git= user to -use. You must use the following value: - -#+begin_src sh -/usr/bin/git-shell -#+end_src - -Once done, no one will be able to SSH to the =git= user or execute -commands other than the standard git commands. - -* Opening the Firewall -Don't forget to open up ports on the device firewall and network -firewall if you want to access these repositories publicly. If you're -using default ports, forward ports =22= (ssh) and =9418= (git) from your -router to your server's IP address. - -If your server also has a firewall, ensure that the firewall allows the -same ports that are forwarded from the router. For example, if you use -=ufw=: - -#+begin_src sh -sudo ufw allow 22 -sudo ufw allow 9418 -#+end_src - -** Non-Standard SSH Ports -If you use a non-standard port for SSH, such as =9876=, you will need to -create an SSH configuration file on your local development machine in -order to connect to your server's git repositories. - -To do this, you'll need to define your custom port on your client -machine in your =~/.ssh/config= file: - -#+begin_src sh -nano ~/.ssh/config -#+end_src - -#+begin_src conf -Host git.example.com - # HostName can be a URL or an IP address - HostName git.example.com - Port 9876 - User git -#+end_src - -** Testing SSH -There are two main syntaxes you can use to manage git over SSH: - -- =git clone [user@]server:project.git= -- =git clone ssh://[user@]server/project.git= - -I prefer the first, which is an =scp=-like syntax. To test it, try to -clone the test repository you set up on the server: - -#+begin_src sh -git clone git@git.example.com:/git/test.git -#+end_src - -* Enabling Read-Only Access -If you want people to be able to clone any repository where you've -placed a =git-daemon-export-ok= file, you will need to start the git -daemon. - -To do this on a system with =systemd=, create a service file: - -#+begin_src sh -sudo nano /etc/systemd/system/git-daemon.service -#+end_src - -Inside the =git-daemon.service= file, paste the following: - -#+begin_src conf -[Unit] -Description=Start Git Daemon - -[Service] -ExecStart=/usr/bin/git daemon --reuseaddr --base-path=/git/ /git/ - -Restart=always -RestartSec=500ms - -StandardOutput=syslog -StandardError=syslog -SyslogIdentifier=git-daemon - -User=git -Group=git - -[Install] -WantedBy=multi-user.target -#+end_src - -Once created, enable and start the service: - -#+begin_src sh -sudo systemctl enable git-daemon.service -sudo systemctl start git-daemon.service -#+end_src - -To clone read-only via the =git://= protocol, you can use the following -syntax: - -#+begin_src sh -git clone git://git.example.com/test.git -#+end_src - -* Migrating Repositories -At this point, we have a working git server that works with both SSH and -read-only access. - -For each of the repositories I had hosted a different provider, I -executed the following commands in order to place a copy on my server as -my new source of truth: - -Server: - -#+begin_src sh -su git -mkdir /git/<REPOSITORY_NAME>.git && cd /git/<REPOSITORY_NAME>.git -git init --bare - -# If you want to make this repo viewable/cloneable to the public -touch git-daemon-export-ok -#+end_src - -Client: - -#+begin_src sh -git clone git@<PREVIOUS_HOST>:<REPOSITORY_NAME> -git remote set-url origin git@git.EXAMPLE.COM:/git/<REPOSITORY_NAME>.git -git push -#+end_src - -* Optional Web View: =cgit= -If you want a web viewer for your repositories, you can use various -tools, such as =gitweb=, =cgit=, or =klaus=. I chose =cgit= due to its -simple interface and fairly easy set-up (compared to others). Not to -mention that the [[https://git.kernel.org/][Linux kernel uses =cgit=]]. - -** Docker Compose -Instead of using my previous method of using a =docker run= command, -I've updated this section to use =docker-compose= instead for an easier -installation and simpler management and configuration. - -In order to use Docker Compose, you will set up a =docker-compose.yml= -file to automatically connect resources like the repositories, =cgitrc=, -and various files or folders to the =cgit= container you're creating: - -#+begin_src sh -mkdir ~/cgit && cd ~/cgit -nano docker-compose.yml -#+end_src - -#+begin_src conf -# docker-compose.yml -version: '3' - -services: - cgit: - image: invokr/cgit - volumes: - - /git:/git - - ./cgitrc:/etc/cgitrc - - ./logo.png:/var/www/htdocs/cgit/logo.png - - ./favicon.png:/var/www/htdocs/cgit/favicon.png - - ./filters:/var/www/htdocs/cgit/filters - ports: - - "8763:80" - restart: always -#+end_src - -Then, just start the container: - -#+begin_src sh -sudo docker-compose up -d -#+end_src - -Once it's finished installing, you can access the site at -=<SERVER_IP>:8763= or use a reverse-proxy service to forward =cgit= to a -URL, such as =git.example.com=. See the next section for more details on -reverse proxying a URL to a local port. - -** Nginx Reverse Proxy -I am using Nginx as my reverse proxy so that the =cgit= Docker container -can use =git.example.com= as its URL. To do so, I simply created the -following configuration file: - -#+begin_src sh -sudo nano /etc/nginx/sites-available/git.example.com -#+end_src - -#+begin_src conf -server { - listen 80; - server_name git.example.com; - - if ($host = git.example.com) { - return 301 https://$host$request_uri; - } - - return 404; -} - -server { - server_name git.example.com; - listen 443 ssl http2; - - location / { - # The final `/` is important. - proxy_pass http://localhost:8763/; - add_header X-Frame-Options SAMEORIGIN; - add_header X-XSS-Protection "1; mode=block"; - proxy_redirect off; - proxy_buffering off; - proxy_set_header Host $host; - proxy_set_header X-Real-IP $remote_addr; - proxy_set_header X-Forwarded-For $proxy_add_x_forwarded_for; - proxy_set_header X-Forwarded-Proto $scheme; - proxy_set_header X-Forwarded-Port $server_port; - } - - # INCLUDE ANY SSL CERTS HERE - include /etc/letsencrypt/options-ssl-nginx.conf; - ssl_dhparam /etc/letsencrypt/ssl-dhparams.pem; -} -#+end_src - -Once created, symlink it and restart the web server. - -#+begin_src sh -sudo ln -s /etc/nginx/sites-available/git.example.com /etc/nginx/sites-enabled/ -sudo systemctl restart nginx.service -#+end_src - -As we can see below, my site at =git.example.com= is available and -running: - -** Settings Up Git Details -Once you have =cgit= running, you can add some small details, such as -repository owners and descriptions by editing the following files within -each repository. - -Alternatively, you can use the =cgitrc= file to edit these details if -you only care to edit them for the purpose of seeing them on your -website. - -The =description= file within the repository on your server will display -the description online. - -#+begin_src sh -cd /git/example.git -nano description -#+end_src - -You can add a =[gitweb]= block to the =config= file in order to display -the owner of the repository. - -#+begin_src sh -cd /git/example.git -nano config -#+end_src - -#+begin_src conf -[gitweb] - owner = "YourName" -#+end_src - -Note that you can ignore the configuration within each repository and -simply set up this information in the =cgitrc= file, if you want to do -it that way. - -** Editing =cgit= -In order to edit certain items within =cgit=, you need to edit the -=cgitrc= file. - -#+begin_src sh -nano ~/cgit/cgitrc -#+end_src - -Below is an example configuration for =cgitrc=. You can find all the -configuration options within the [configuration manual] -([[https://git.zx2c4.com/cgit/plain/cgitrc.5.txt]]). - -#+begin_src conf -css=/cgit.css -logo=/logo.png -favicon=/favicon.png -robots=noindex, nofollow - -enable-index-links=1 -enable-commit-graph=1 -enable-blame=1 -enable-log-filecount=1 -enable-log-linecount=1 -enable-git-config=1 - -clone-url=git://git.example.com/$CGIT_REPO_URL ssh://git@git.example.com:/git/$CGIT_REPO_URL - -root-title=My Git Website -root-desc=My personal git repositories. - -# Allow download of tar.gz, tar.bz2 and zip-files -snapshots=tar.gz tar.bz2 zip - -## -## List of common mimetypes -## -mimetype.gif=image/gif -mimetype.html=text/html -mimetype.jpg=image/jpeg -mimetype.jpeg=image/jpeg -mimetype.pdf=application/pdf -mimetype.png=image/png -mimetype.svg=image/svg+xml - -# Highlight source code -# source-filter=/var/www/htdocs/cgit/filters/syntax-highlighting.sh -source-filter=/var/www/htdocs/cgit/filters/syntax-highlighting.py - -# Format markdown, restructuredtext, manpages, text files, and html files -# through the right converters -about-filter=/var/www/htdocs/cgit/filters/about-formatting.sh - -## -## Search for these files in the root of the default branch of repositories -## for coming up with the about page: -## -readme=:README.md -readme=:readme.md -readme=:README.mkd -readme=:readme.mkd -readme=:README.rst -readme=:readme.rst -readme=:README.html -readme=:readme.html -readme=:README.htm -readme=:readme.htm -readme=:README.txt -readme=:readme.txt -readme=:README -readme=:readme - -# Repositories - -# Uncomment the following line to scan a path instead of adding repositories manually -# scan-path=/git - -## Test Section -section=git/test-section - -repo.url=test.git -repo.path=/git/test.git -repo.readme=:README.md -repo.owner=John Doe -repo.desc=An example repository! -#+end_src - -** Final Fixes: Syntax Highlighting & README Rendering -After completing my initial install and playing around with it for a few -days, I noticed two issues: - -1. Syntax highlighting did not work when viewing the source code within - a file. -2. The =about= tab within a repository was not rendered to HTML. - -The following process fixes these issues. To start, let's go to the -=cgit= directory where we were editing our configuration file earlier. - -#+begin_src sh -cd ~/cgit -#+end_src - -In here, create two folders that will hold our syntax files: - -#+begin_src sh -mkdir filters && mkdir filters/html-converters && cd filters -#+end_src - -Next, download the default filters: - -#+begin_src sh -curl https://git.zx2c4.com/cgit/plain/filters/about-formatting.sh > about-formatting.sh -chmod 755 about-formatting.sh -curl https://git.zx2c4.com/cgit/plain/filters/syntax-highlighting.py > syntax-highlighting.py -chmod 755 syntax-highlighting.py -#+end_src - -Finally, download the HTML conversion files you need. The example below -downloads the Markdown converter: - -#+begin_src sh -cd html-converters -curl https://git.zx2c4.com/cgit/plain/filters/html-converters/md2html > md2html -chmod 755 md2html -#+end_src - -If you need other filters or html-converters found within -[[https://git.zx2c4.com/cgit/tree/filters][the cgit project files]], -repeat the =curl= and =chmod= process above for whichever files you -need. - -However, formatting will not work quite yet since the Docker cgit -container we're using doesn't have the formatting package installed. You -can install this easily by install Python 3+ and the =pygments= package: - -#+begin_src sh -# Enter the container's command line -sudo docker exec -it cgit bash -#+end_src - -#+begin_src sh -# Install the necessary packages and then exit -yum update -y && \ -yum upgrade -y && \ -yum install python3 python3-pip -y && \ -pip3 install markdown pygments && \ -exit -#+end_src - -*You will need to enter the cgit docker container and re-run these =yum= -commands every time you kill and restart the container!* - -If not done already, we need to add the following variables to our -=cgitrc= file in order for =cgit= to know where our filtering files are: - -#+begin_src conf -# Highlight source code with python pygments-based highlighter -source-filter=/var/www/htdocs/cgit/filters/syntax-highlighting.py - -# Format markdown, restructuredtext, manpages, text files, and html files -# through the right converters -about-filter=/var/www/htdocs/cgit/filters/about-formatting.sh -#+end_src - -Now you should see that syntax highlighting and README rendering to the -=about= tab is fixed. - -** Theming -I won't go into much detail in this section, but you can fully theme -your installation of =cgit= since you have access to the =cgit.css= file -in your web root. This is another file you can add as a volume to the -=docker-compose.yml= file if you want to edit this without entering the -container's command line. - -*** :warning: Remember to Back Up Your Data! -The last thing to note is that running services on your own equipment -means that you're assuming a level of risk that exists regarding data -loss, catastrophes, etc. In order to reduce the impact of any such -occurrence, I suggest backing up your data regularly. - -Backups can be automated via =cron=, by hooking your base directory up -to a cloud provider, or even setting up hooks to push all repository -info to git mirrors on other git hosts. Whatever the method, make sure -that your data doesn't vanish in the event that your drives or servers -fail. diff --git a/content/blog/2022-07-14-gnupg.org b/content/blog/2022-07-14-gnupg.md index 59e12e7..9bd2e19 100644 --- a/content/blog/2022-07-14-gnupg.org +++ b/content/blog/2022-07-14-gnupg.md @@ -1,27 +1,31 @@ -#+title: GNU Privacy Guard (GPG) -#+date: 2022-07-14 -#+description: Learn how to create a PGP key with GNU Privacy Guard (GPG). -#+filetags: :privacy: - -* The History of GPG -[[https://gnupg.org/][GNU Privacy Guard]], also known as GnuPG and GPG, -is a free ("free" as in both speech and beer) software that fully -implements the OpenPGP Message Format documented in -[[https://www.rfc-editor.org/rfc/rfc4880][RFC 4880]]. - -I won't go in-depth on the full history of the software in this post, ++++ +date = 2022-07-14 +title = "GNU Privacy Guard (GPG)" +description = "" +draft = false ++++ + +# The History of GPG + +[GNU Privacy Guard](https://gnupg.org/), also known as GnuPG and GPG, is +a free (\"free\" as in both speech and beer) software that fully +implements the OpenPGP Message Format documented in [RFC +4880](https://www.rfc-editor.org/rfc/rfc4880). + +I won\'t go in-depth on the full history of the software in this post, but it is important to understand that GPG is not the same as PGP (Pretty Good Privacy), which is a different implementation of RFC 4880. However, GPG was designed to interoperate with PGP. -GPG was originally developed in the late 1990s by -[[https://en.wikipedia.org/wiki/Werner_Koch][Werner Koch]] and has -historically been funded generously by the German government. +GPG was originally developed in the late 1990s by [Werner +Koch](https://en.wikipedia.org/wiki/Werner_Koch) and has historically +been funded generously by the German government. -Now that we have all the high-level info out of the way, let's dive into -the different aspects of GPG and its uses. +Now that we have all the high-level info out of the way, let\'s dive +into the different aspects of GPG and its uses. + +# Encryption Algorithms -* Encryption Algorithms GPG supports a wide range of different encryption algorithms, including public-key, cipher, hash, and compression algorithms. The support for these algorithms has grown since the adoption of the Libgcrypt library @@ -31,7 +35,7 @@ As you will be able to see below in an example of a full key generation with the GPG command line tool, GPG recommends the following algorithms to new users: -#+begin_src sh +```sh Please select what kind of key you want: (1) RSA and RSA (2) DSA and Elgamal @@ -39,66 +43,72 @@ Please select what kind of key you want: (4) RSA (sign only) (9) ECC (sign and encrypt) *default* (10) ECC (sign only) -#+end_src +``` I am not doing an in-depth explanation here in order to keep the focus on GPG and not encryption algorithms. If you want a deep dive into cryptography or encryption algorithms, please read my other posts: -- [[../aes-encryption/][AES Encryption]] (2018) -- [[../cryptography-basics/][Cryptography Basics]] (2020) +- [AES Encryption](../aes-encryption/) (2018) +- [Cryptography Basics](../cryptography-basics/) (2020) + +## Vulnerabilities -** Vulnerabilities As of 2022-07-14, there are a few different vulnerabilities associated with GPG or the libraries it uses: -- GPG versions 1.0.2--1.2.3 contains a bug where "as soon as one - (GPG-generated) ElGamal signature of an arbitrary message is released, - one can recover the signer's private key in less than a second on a - PC." ([[https://www.di.ens.fr/~pnguyen/pub_Ng04.htm][Source]]) -- GPG versions prior to 1.4.2.1 contain a false positive signature - verification bug. - ([[https://lists.gnupg.%20org/pipermail/gnupg-announce/2006q1/000211.html][Source]]) -- GPG versions prior to 1.4.2.2 cannot detect injection of unsigned - data. ( - [[https://lists.gnupg.org/pipermail/gnupg-announce/2006q1/000218.html][Source]]) -- Libgcrypt, a library used by GPG, contained a bug which enabled full - key recovery for RSA-1024 and some RSA-2048 keys. This was resolved in - a GPG update in 2017. ([[https://lwn.net/Articles/727179/][Source]]) -- The [[https://en.wikipedia.org/wiki/ROCA_vulnerability][ROCA - Vulnerability]] affects RSA keys generated by YubiKey 4 tokens. - ([[https://crocs.fi.%20muni.cz/_media/public/papers/nemec_roca_ccs17_preprint.pdf][Source]]) -- The [[https://en.wikipedia.org/wiki/SigSpoof][SigSpoof Attack]] allows - an attacker to spoof digital signatures. - ([[https://arstechnica.%20com/information-technology/2018/06/decades-old-pgp-bug-allowed-hackers-to-spoof-just-about-anyones-signature/][Source]]) -- Libgcrypt 1.9.0 contains a severe flaw related to a heap buffer - overflow, fixed in Libgcrypt 1.9.1 - ([[https://web.archive.%20org/web/20210221012505/https://www.theregister.com/2021/01/29/severe_libgcrypt_bug/][Source]]) - -*** Platforms -Originally developed as a command-line program for *nix systems, GPG now -has a wealth of front-end applications and libraries available for +- GPG versions 1.0.2--1.2.3 contains a bug where \"as soon as one + (GPG-generated) ElGamal signature of an arbitrary message is + released, one can recover the signer\'s private key in less than a + second on a PC.\" + ([Source](https://www.di.ens.fr/~pnguyen/pub_Ng04.htm)) +- GPG versions prior to 1.4.2.1 contain a false positive signature + verification bug. + ([Source](https://lists.gnupg.%20org/pipermail/gnupg-announce/2006q1/000211.html)) +- GPG versions prior to 1.4.2.2 cannot detect injection of unsigned + data. ( + [Source](https://lists.gnupg.org/pipermail/gnupg-announce/2006q1/000218.html)) +- Libgcrypt, a library used by GPG, contained a bug which enabled full + key recovery for RSA-1024 and some RSA-2048 keys. This was resolved + in a GPG update in 2017. + ([Source](https://lwn.net/Articles/727179/)) +- The [ROCA + Vulnerability](https://en.wikipedia.org/wiki/ROCA_vulnerability) + affects RSA keys generated by YubiKey 4 tokens. + ([Source](https://crocs.fi.%20muni.cz/_media/public/papers/nemec_roca_ccs17_preprint.pdf)) +- The [SigSpoof Attack](https://en.wikipedia.org/wiki/SigSpoof) allows + an attacker to spoof digital signatures. + ([Source](https://arstechnica.%20com/information-technology/2018/06/decades-old-pgp-bug-allowed-hackers-to-spoof-just-about-anyones-signature/)) +- Libgcrypt 1.9.0 contains a severe flaw related to a heap buffer + overflow, fixed in Libgcrypt 1.9.1 + ([Source](https://web.archive.%20org/web/20210221012505/https://www.theregister.com/2021/01/29/severe_libgcrypt_bug/)) + +### Platforms + +Originally developed as a command-line program for \*nix systems, GPG +now has a wealth of front-end applications and libraries available for end-users. However, the most recommended programs remain the same: -- [[https://gnupg.org][GnuPG]] for Linux (depending on distro) -- [[https://gpg4win.org][Gpg4win]] for Windows -- [[https://gpgtools.org][GPGTools]] for macOS +- [GnuPG](https://gnupg.org) for Linux (depending on distro) +- [Gpg4win](https://gpg4win.org) for Windows +- [GPGTools](https://gpgtools.org) for macOS + +# Creating a Key Pair -* Creating a Key Pair In order to create a GPG key pair, a user would first need to install -GPG on their system. If we're assuming that the user is on Fedora Linux, -they would execute the following: +GPG on their system. If we\'re assuming that the user is on Fedora +Linux, they would execute the following: -#+begin_src sh +```sh sudo dnf install gpg -#+end_src +``` Once installed, a user can create a new key pair with the following command(s): -#+begin_src sh +```sh gpg --full-generate-key -#+end_src +``` GPG will walk the user through an interactive setup that asks for an algorithm preference, expiration date, name, and email to associate with @@ -107,7 +117,7 @@ this key. See the following example key set-up for a default key generation using the GnuPG command-line interface: -#+begin_src sh +```sh gpg (GnuPG) 2.3.6; Copyright (C) 2021 Free Software Foundation, Inc. This is free software: you are free to change and redistribute it. There is NO WARRANTY, to the extent permitted by law. @@ -159,28 +169,30 @@ pub ed25519 2022-07-14 [SC] E955B7700FFC11EF51C2BA1FE096AACDD4C32E9C uid John Doe (test key) <johndoe@example.com> sub cv25519 2022-07-14 [E] -#+end_src +``` Please note that GUI apps may differ slightly from the GPG command-line interface. -* Common Usage +# Common Usage + As noted in RFC 4880, the general functions of OpenPGP are as follows: -- digital signatures -- encryption -- compression -- Radix-64 conversion -- key management and certificate services +- digital signatures +- encryption +- compression +- Radix-64 conversion +- key management and certificate services From this, you can probably gather that the main use of GPG is for encrypting data and/or signing the data with a key. The purpose of encrypting data with GPG is to ensure that no one except the intended recipient(s) can access the data. -Let's explore some specific GPG use-cases. +Let\'s explore some specific GPG use-cases. + +## Email -** Email One of the more popular uses of GPG is to sign and/or encrypt emails. With the use of a GPG keypair, you can encrypt a message, its subject, and even the attachments within. @@ -188,16 +200,16 @@ and even the attachments within. The first process, regarding the signing of a message without any encryption, is generally used to provide assurance that an email is truly coming from the sender that the message claims. When I send an -email, and it's signed with my public key, the recipient(s) of the +email, and it\'s signed with my public key, the recipient(s) of the message can verify that the message was signed with my personal key. The second process, regarding the actual encryption of the message and -its contents, works by using a combination of the sender's keys and the -recipient's keys. This process may vary slightly by implementation, but +its contents, works by using a combination of the sender\'s keys and the +recipient\'s keys. This process may vary slightly by implementation, but it most commonly uses asymmetric cryptography, also known as public-key -cryptography. In this version of encryption, the sender's private key to -sign the message and a combination of the sender's keys and the -recipient's public key to encrypt the message. +cryptography. In this version of encryption, the sender\'s private key +to sign the message and a combination of the sender\'s keys and the +recipient\'s public key to encrypt the message. If two people each have their own private keys and exchange their public keys, they can send encrypted messages back and forth with GPG. This is @@ -205,60 +217,64 @@ also possible with symmetric cryptography, but the process differs since there are no key pairs. Implementation of email encryption varies greatly between email clients, -so you will need to reference your email client's documentation to +so you will need to reference your email client\'s documentation to ensure you are setting it up correctly for that specific client. -** File Encryption +## File Encryption + As noted in the section above regarding emails, GPG enables users to be able to send a message to each other if they are both set-up with GPG keys. In this example, I am going to show how a user could send a file -called =example_file.txt= to another user via the recipient's email. +called `example_file.txt` to another user via the +recipient\'s email. The sender would find the file they want to send and execute the following command: -#+begin_src sh +```sh gpg --encrypt --output example_file.txt.gpg --recipient \ recipient@example.com example_file.txt -#+end_src +``` Once received, the recipient can decrypt the file with the following command: -#+begin_src sh +```sh gpg --decrypt --output example_file.txt example_file.txt.gpg -#+end_src +``` + +## Ownership Signatures -** Ownership Signatures One important aspect of GPG, especially for developers, is the ability to sign data without encrypting it. For example, developers often sign code changes when they commit the changes back to a central repository, in order to display ownership of who made the changes. This allows other users to look at a code change and determine that the change was valid. -In order to do this using [[https://git-scm.com][Git]], the developer -simply needs to alter the =git commit= command to include the =-S= flag. -Here's an example: +In order to do this using [Git](https://git-scm.com), the developer +simply needs to alter the `git commit` command to include the +`-S` flag. Here\'s an example: -#+begin_src sh +```sh git commit -S -m "my commit message" -#+end_src +``` As an expansion of the example above, Git users can configure their environment with a default key to use by adding their GPG signature: -#+begin_src sh +```sh git config --global user.signingkey XXXXXXXXXXXXXXXX -#+end_src +``` -If you're not sure what your signature is, you can find it titled =sig= -in the output of this command: +If you\'re not sure what your signature is, you can find it titled +`sig` in the output of this command: -#+begin_src sh +```sh gpg --list-signatures -#+end_src +``` + +## File Integrity -** File Integrity When a person generates a signature for data, they are allowing users the ability to verify the signature on that data in the future to ensure the data has not been corrupted. This is most common with software @@ -268,30 +284,31 @@ replaced with dangerous software. In order to verify signed data, a user needs to have: -1. The signed data -2. A signature file -3. The public GPG key of the signer +1. The signed data +2. A signature file +3. The public GPG key of the signer -Once the signer's public key is imported on the user's system, and they -have the data and signature, they can verify the data with the following -commands: +Once the signer\'s public key is imported on the user\'s system, and +they have the data and signature, they can verify the data with the +following commands: -#+begin_src sh +```sh # If the signature is attached to the data gpg --verify [signature-file] # If the signature is detached as a separate file from the data gpg --verify [signature-file] [original-file] -#+end_src +``` + +### Finding Public Keys -*** Finding Public Keys In order to use GPG with others, a user needs to know the other user(s) keys. This is easy to do if the user knows the other user(s) in person, but may be hard if the relationship is strictly digital. Luckily, there -are a few options. The first option is to look at a user's web page or +are a few options. The first option is to look at a user\'s web page or social pages if they have them. Otherwise, the best option is to use a keyserver, such as: -- [[https://pgp.mit.edu][pgp.mit.edu]] -- [[https://keys.openpgp.org][keys.openpgp.org]] +- [pgp.mit.edu](https://pgp.mit.edu) +- [keys.openpgp.org](https://keys.openpgp.org) diff --git a/content/blog/2022-07-25-curseradio.md b/content/blog/2022-07-25-curseradio.md new file mode 100644 index 0000000..683e750 --- /dev/null +++ b/content/blog/2022-07-25-curseradio.md @@ -0,0 +1,107 @@ ++++ +date = 2022-07-25 +title = "CurseRadio: Listening to the Radio on the Command Line" +description = "" +draft = false ++++ + +# Overview + +While exploring some interesting Linux applications, I stumbled across +[curseradio](https://github.com/chronitis/curseradio), a command-line +radio player based on Python. + +This application is fantastic and incredibly easy to install, so I +wanted to dedicate a post today to this app. Let\'s look at the features +within the app and then walk through the installation process I took to +get `curseradio` working. + +# Features + + + +The radio player itself is quite minimal. As you can see in the +screenshot above, it contains a simple plaintext list of all available +categories, which can be broken down further and further. In addition, +radio shows are available for listening, alongside regular radio +stations. + +For example, the `Sports` \> `Pro Basketball` \> +`Shows` category contains a number of specific shows related +to Professional Basketball. + +Aside from being able to play any of the listed stations/shows, you can +make a channel your favorite by pressing `f`. It will now +show up at the top of the radio player in the `Favourites` +category. + +## Commands/Shortcuts + + Key(s) Command + ------------ --------------------------------- + ↑, ↓ navigate + PgUp, PgDn navigate quickly + Home, End to top/bottom + Enter open/close folders, play stream + k stop playing stream + q quit + f toggle favourite + +# Installation + +## Dependencies + +Before installing `curseradio`, a handful of system and +Python packages are required. To get started, install +`python3`, `pip3`, and `mpv` on your +system. In this example, I\'m using Fedora Linux, which uses the +`dnf` package manager. You may need to adjust this if you\'re +using a different system. + +```sh +sudo dnf install python3 pip3 mpv +``` + +Next, use `pip3` to install `requests`, +`xdg`, and `lxml`: + +```sh +pip3 install requests xdg lxml +``` + +## Repository Source Installation + +Once all the dependencies are installed, we can clone the source code +and enter that directory: + +```sh +git clone https://github.com/chronitis/curseradio && cd curseradio +``` + +Once you\'re within the `curseradio` directory, you can +install the application with the provided `setup.py` script. + +```sh +sudo python3 setup.py install +``` + +In my case, I ran into a few errors and needed to create the folders +that curseradio wanted to use for its installation. If you don\'t get +any errors, you can skip this and run the app. + +```sh +sudo mkdir /usr/local/lib/python3.10/ +sudo mkdir /usr/local/lib/python3.10/site-packages/ +``` + +```sh +sudo chown -R $USER:$USER /usr/local/lib/python3.10/ +``` + +# Run the Application + +Once fully installed without errors, you can run the application! + +```sh +python3 /usr/local/bin/curseradio +``` diff --git a/content/blog/2022-07-25-curseradio.org b/content/blog/2022-07-25-curseradio.org deleted file mode 100644 index fb2c55b..0000000 --- a/content/blog/2022-07-25-curseradio.org +++ /dev/null @@ -1,95 +0,0 @@ -#+title: CurseRadio: Listening to the Radio on the Command Line -#+date: 2022-07-25 -#+description: Use Curse Radio to listen to radio on the command line. -#+filetags: :linux: - -* Overview -While exploring some interesting Linux applications, I stumbled across -[[https://github.com/chronitis/curseradio][curseradio]], a command-line -radio player based on Python. - -This application is fantastic and incredibly easy to install, so I -wanted to dedicate a post today to this app. Let's look at the features -within the app and then walk through the installation process I took to -get =curseradio= working. - -* Features -#+caption: curseradio -[[https://img.cleberg.net/blog/20220725-curseradio/curseradio.png]] - -The radio player itself is quite minimal. As you can see in the -screenshot above, it contains a simple plaintext list of all available -categories, which can be broken down further and further. In addition, -radio shows are available for listening, alongside regular radio -stations. - -For example, the =Sports= > =Pro Basketball= > =Shows= category contains -a number of specific shows related to Professional Basketball. - -Aside from being able to play any of the listed stations/shows, you can -make a channel your favorite by pressing =f=. It will now show up at the -top of the radio player in the =Favourites= category. - -** Commands/Shortcuts -| Key(s) | Command | -|------------+---------------------------------| -| ↑, ↓ | navigate | -| PgUp, PgDn | navigate quickly | -| Home, End | to top/bottom | -| Enter | open/close folders, play stream | -| k | stop playing stream | -| q | quit | -| f | toggle favourite | - -* Installation -** Dependencies -Before installing =curseradio=, a handful of system and Python packages -are required. To get started, install =python3=, =pip3=, and =mpv= on -your system. In this example, I'm using Fedora Linux, which uses the -=dnf= package manager. You may need to adjust this if you're using a -different system. - -#+begin_src sh -sudo dnf install python3 pip3 mpv -#+end_src - -Next, use =pip3= to install =requests=, =xdg=, and =lxml=: - -#+begin_src sh -pip3 install requests xdg lxml -#+end_src - -** Repository Source Installation -Once all the dependencies are installed, we can clone the source code -and enter that directory: - -#+begin_src sh -git clone https://github.com/chronitis/curseradio && cd curseradio -#+end_src - -Once you're within the =curseradio= directory, you can install the -application with the provided =setup.py= script. - -#+begin_src sh -sudo python3 setup.py install -#+end_src - -In my case, I ran into a few errors and needed to create the folders -that curseradio wanted to use for its installation. If you don't get any -errors, you can skip this and run the app. - -#+begin_src sh -sudo mkdir /usr/local/lib/python3.10/ -sudo mkdir /usr/local/lib/python3.10/site-packages/ -#+end_src - -#+begin_src sh -sudo chown -R $USER:$USER /usr/local/lib/python3.10/ -#+end_src - -* Run the Application -Once fully installed without errors, you can run the application! - -#+begin_src sh -python3 /usr/local/bin/curseradio -#+end_src diff --git a/content/blog/2022-07-30-flac-to-opus.org b/content/blog/2022-07-30-flac-to-opus.md index adb7763..fe571bb 100644 --- a/content/blog/2022-07-30-flac-to-opus.org +++ b/content/blog/2022-07-30-flac-to-opus.md @@ -1,65 +1,71 @@ -#+title: Recursive Command-Line FLAC to Opus Conversion -#+date: 2022-07-30 -#+description: Learn how to convert all FLAC files to Opus, including recursive files in subdirectories. -#+filetags: :linux: ++++ +date = 2022-07-30 +title = "Recursive Command-Line FLAC to Opus Conversion" +description = "" +draft = false ++++ + +# Converting FLAC to OPUS -* Converting FLAC to OPUS I am currently rebuilding my music library from scratch so that I can -effectively archive all the music I own in the -[[https://en.wikipedia.org/wiki/FLAC][FLAC file format]], a lossless -audio codec. +effectively archive all the music I own in the [FLAC file +format](https://en.wikipedia.org/wiki/FLAC), a lossless audio codec. However, streaming FLAC files outside the home can be difficult due to -the size of the files, especially if you're using a weak connection. +the size of the files, especially if you\'re using a weak connection. So, in order to archive the music in a lossless format and still be able to stream it easily, I opted to create a copy of my FLAC files in the -[[https://en.wikipedia.org/wiki/Opus_(audio_format)][Opus audio codec]]. +[Opus audio codec](https://en.wikipedia.org/wiki/Opus_(audio_format)). This allows me to archive a quality, lossless version of the music and then point my streaming service to the smaller, stream-ready version. -** Dependencies -The process I follow utilizes the =opus-tools= package in Ubuntu. Before -proceeding, install the package: +## Dependencies + +The process I follow utilizes the `opus-tools` package in +Ubuntu. Before proceeding, install the package: -#+begin_src sh +```sh sudo apt install opus-tools -#+end_src +``` + +If you want to use a different conversion method, such as +`ffmpeg` or `avconv`, simply install that package +instead. -If you want to use a different conversion method, such as =ffmpeg= or -=avconv=, simply install that package instead. +## Conversion Process -** Conversion Process -The script I'm using is stored in my home directory, but feel free to +The script I\'m using is stored in my home directory, but feel free to create it wherever you want. It does not need to be in the same directory as your music files. -#+begin_src sh +```sh cd ~ && nano transform.sh -#+end_src +``` Once you have your new bash script opened in an editor, go ahead and paste the following logic into the script. -You *MUST* edit the following variables in order for it to work: +You **MUST** edit the following variables in order for it to work: -- =source=: The source directory where your FLAC files are stored. -- =dest=: The destination directory where you want the resulting Opus - files to be stored. +- `source`: The source directory where your FLAC files are + stored. +- `dest`: The destination directory where you want the + resulting Opus files to be stored. -You *MAY* want to edit the following variables to suit your needs: +You **MAY** want to edit the following variables to suit your needs: -- =filename=: If you are converting to a file format other than Opus, - you'll need to edit this so that your resulting files have the correct - filename extension. -- =reldir=: This variable can be edited to strip out more leading - directories in the file path. As you'll see later, I ignore this for - now and simply clean it up afterward. -- =opusenc=: This is the actual conversion process. You may want to edit - the bitrate to suit your needs. I set mine at 128 but some prefer 160 - or higher. +- `filename`: If you are converting to a file format other + than Opus, you\'ll need to edit this so that your resulting files + have the correct filename extension. +- `reldir`: This variable can be edited to strip out more + leading directories in the file path. As you\'ll see later, I ignore + this for now and simply clean it up afterward. +- `opusenc`: This is the actual conversion process. You may + want to edit the bitrate to suit your needs. I set mine at 128 but + some prefer 160 or higher. -#+begin_src sh +```sh #!/bin/bash ## - The IFS takes care of spaces in file and dirnames ## - your folders may vary @@ -121,49 +127,52 @@ opusenc --vbr --bitrate 128 --date "$DATE" \ ## just for testing # sleep 1 done -#+end_src +``` -Once you're done, simply save the file and exit your editor. Don't +Once you\'re done, simply save the file and exit your editor. Don\'t forget to enable execution of the script: -#+begin_src sh +```sh chmod +x transform.sh -#+end_src +``` Finally, you may now run the script: -#+begin_src sh +```sh ./transform.sh -#+end_src +``` -If you used =opusenc=, you'll see the conversions happen within the -terminal as it progresses. You will also see variables printed if you -uncommented any of the bash script's comments. +If you used `opusenc`, you\'ll see the conversions happen +within the terminal as it progresses. You will also see variables +printed if you uncommented any of the bash script\'s comments. -** Cleanup -As I noted above, I didn't customize my =reldir= variable in the script, -which caused my output directory to be =/mnt/music/library/archives= -instead of =/mnt/music/library=. So, I moved the output up one level and +## Cleanup + +As I noted above, I didn\'t customize my `reldir` variable in +the script, which caused my output directory to be +`/mnt/music/library/archives` instead of +`/mnt/music/library`. So, I moved the output up one level and deleted the accidental directory. -#+begin_src sh +```sh cd /mnt/music/library mv archives/** . rm -rf archives -#+end_src +``` + +## Check the Resulting Size -** Check the Resulting Size -If you want to see what kind of file size savings you've gained, you can -always use the =du= command to check: +If you want to see what kind of file size savings you\'ve gained, you +can always use the `du` command to check: -#+begin_src sh +```sh cd /mnt/music du -h --max-depth=1 . -#+end_src +``` In my case, my small library went from 78GB to 6.3GB! -#+begin_src txt +``` txt 78G ./archives 6.3G ./library -#+end_src +``` diff --git a/content/blog/2022-07-31-bash-it.org b/content/blog/2022-07-31-bash-it.md index 7c1316f..a12054b 100644 --- a/content/blog/2022-07-31-bash-it.org +++ b/content/blog/2022-07-31-bash-it.md @@ -1,113 +1,118 @@ -#+title: Upgrade Bash with Bash-It & Ble.sh -#+date: 2022-07-31 -#+description: Learn how to increase the power of bash with Bash-It and Ble.sh. -#+filetags: :sysadmin: ++++ +date = 2022-07-31 +title = "Upgrade Bash with Bash-It and Ble.sh" +description = "" +draft = false ++++ + +# Bash -* Bash For those who are not familiar, -[[https://en.wikipedia.org/wiki/Bash_(Unix_shell)][Bash]] is a Unix -shell that is used as the default login shell for most Linux -distributions. This shell and command processor should be familiar if -you've used Linux (or older version of macOS) before. +[Bash](https://en.wikipedia.org/wiki/Bash_(Unix_shell)) is a Unix shell +that is used as the default login shell for most Linux distributions. +This shell and command processor should be familiar if you\'ve used +Linux (or older version of macOS) before. However, bash is not the only option. There are numerous other shells that exist. Here are some popular examples: -- [[https://en.wikipedia.org/wiki/Z_shell][zsh]] -- [[https://en.wikipedia.org/wiki/Fish_(Unix_shell)][fish]] -- [[https://github.com/ibara/oksh][oksh]] -- [[https://wiki.gentoo.org/wiki/Mksh][mksh]] -- [[https://en.wikipedia.org/wiki/Debian_Almquist_shell][dash]] +- [zsh](https://en.wikipedia.org/wiki/Z_shell) +- [fish](https://en.wikipedia.org/wiki/Fish_(Unix_shell)) +- [oksh](https://github.com/ibara/oksh) +- [mksh](https://wiki.gentoo.org/wiki/Mksh) +- [dash](https://en.wikipedia.org/wiki/Debian_Almquist_shell) While each shell has its differences, bash is POSIX compliant and the default for many Linux users. Because of this, I am going to explore a -program called =bash-it= below that helps bash users increase the -utility of their shell without installing a completely new shell. +program called `bash-it` below that helps bash users increase +the utility of their shell without installing a completely new shell. + +## Installation -** Installation First, if bash is not already installed on your system, you can -[[https://www.gnu.org/software/bash/][download bash from GNU]] or use -your package manager to install it. +[download bash from GNU](https://www.gnu.org/software/bash/) or use your +package manager to install it. For example, this is how you can install bash on Fedora Linux: -#+begin_src sh +```sh sudo dnf install bash -#+end_src +``` -If you are not using bash as your default shell, use the =chsh= command -to change your shell: +If you are not using bash as your default shell, use the +`chsh` command to change your shell: -#+begin_src sh +```sh chsh -#+end_src +``` -You should see a prompt like the one below. If the brackets (=[]=) -contain =bash= already, you're done, and you can simply continue by -hitting the Enter key. +You should see a prompt like the one below. If the brackets +(`[]`) contain `bash` already, you\'re done, and +you can simply continue by hitting the Enter key. -If the brackets contain another shell path (e.g. =/usr/bin/zsh=), enter -the path to the bash program on your system (it's most likely located at -=/usr/bin/bash=). +If the brackets contain another shell path (e.g. +`/usr/bin/zsh`), enter the path to the bash program on your +system (it\'s most likely located at `/usr/bin/bash`). -#+begin_src sh +```sh Changing shell for <user>. New shell [/usr/bin/bash]: -#+end_src +``` You must log out or restart the machine in order for the login shell to -be refreshed. You can do it now or wait until you're finished +be refreshed. You can do it now or wait until you\'re finished customizing the shell. -#+begin_src sh +```sh sudo reboot now -#+end_src +``` -* Bash-it -As noted on the [[https://github.com/Bash-it/bash-it][Bash-it]] -repository: +# Bash-it -#+begin_quote -Bash-it is a collection of community Bash commands and scripts for Bash -3.2+. (And a shameless ripoff of oh-my-zsh 😃) +As noted on the [Bash-it](https://github.com/Bash-it/bash-it) +repository: -#+end_quote +> Bash-it is a collection of community Bash commands and scripts for +> Bash 3.2+. (And a shameless ripoff of oh-my-zsh 😃) Bash-it makes it easy to install plugins, set up aliases for common commands, and easily change the visual theme of your shell. -** Installation +## Installation + To install the framework, simply copy the repository files and use the -=install.sh= script provided. If you want, you can (and should!) inspect -the contents of the installation script before you run it. +`install.sh` script provided. If you want, you can (and +should!) inspect the contents of the installation script before you run +it. -#+begin_src sh +```sh git clone --depth=1 https://github.com/Bash-it/bash-it.git ~/.bash_it ~/.bash_it/install.sh -#+end_src +``` -If you didn't restart your session after making bash the default, and +If you didn\'t restart your session after making bash the default, and are currently working within another shell, be sure to enter a bash -session before using =bash-it=: +session before using `bash-it`: -#+begin_src sh +```sh bash -#+end_src +``` + +## Aliases -** Aliases Bash-it contains a number of aliases for common commands to help improve efficiency in the terminal. To list all available options, use the following command: -#+begin_src sh +```sh bash-it show aliases -#+end_src +``` This will provide you a list that looks like the following text block. Within this screen, you will be able to see all available options and which ones are currently enabled. -#+begin_src txt +``` txt Alias Enabled? Description ag [ ] the silver searcher (ag) aliases ansible [ ] ansible abbreviations @@ -120,32 +125,33 @@ clipboard [ ] xclip shortcuts composer [ ] common composer abbreviations curl [x] Curl aliases for convenience. ... -#+end_src +``` To enable an alias, do: -#+begin_src sh +```sh bash-it enable alias <alias name> [alias name]... -or- $ bash-it enable alias all -#+end_src +``` To disable an alias, do: -#+begin_src sh +```sh bash-it disable alias <alias name> [alias name]... -or- $ bash-it disable alias all -#+end_src +``` + +## Plugins -** Plugins Similar to aliases, plugins are available with bash-it. You can find a complete list of plugins in the same way as aliases. Simply execute the following: -#+begin_src sh +```sh bash-it show plugins -#+end_src +``` You will see the following output showing enabled and disabled plugins: -#+begin_src txt +``` txt Plugin Enabled? Description alias-completion [ ] autojump [ ] Autojump configuration, see https://github.com/wting/autojump for more details @@ -156,78 +162,82 @@ battery [x] display info about your battery charge level blesh [ ] load ble.sh, the Bash line editor! boot2docker [ ] Helpers to get Docker setup correctly for boot2docker browser [ ] render commandline output in your browser -#+end_src +``` To enable a plugin, do: -#+begin_src sh +```sh bash-it enable plugin <plugin name> [plugin name]... -or- $ bash-it enable plugin all -#+end_src +``` To disable a plugin, do: -#+begin_src sh +```sh bash-it disable plugin <plugin name> [plugin name]... -or- $ bash-it disable plugin all -#+end_src +``` + +## Themes -** Themes There are quite a few pre-defined -[[https://bash-it.readthedocs.io/en/latest/themes-list/#list-of-themes][themes]] +[themes](https://bash-it.readthedocs.io/en/latest/themes-list/#list-of-themes) available with bash-it. To list all themes: -#+begin_src sh +```sh ls ~/.bash_it/themes/ -#+end_src +``` -To use a new theme, you'll need to edit =.bashrc= and alter the -=BASH_IT_THEME= variable to your desired theme. For example, I am using -the =zork= theme. +To use a new theme, you\'ll need to edit `.bashrc` and alter +the `BASH_IT_THEME` variable to your desired theme. For +example, I am using the `zork` theme. -#+begin_src sh +```sh nano ~/.bashrc -#+end_src +``` -#+begin_src sh +```sh export BASH_IT_THEME='zork' -#+end_src +``` Once you save your changes, you just need to exit your terminal and -create a new one in order to see your changes to the =.bashrc= file. You -can also =source= the file to see changes, but I recommend starting a -completely new shell instead. - -*** ble.sh -One big feature I was missing in Bash that both =zsh= and =fish= have is -an autosuggestion feature. To explain: as you type, an autosuggestion -feature in the shell will offer suggestions in a lighter font color -beyond the characters already typed. Once you see the command you want, -you can click the right arrow and have the shell auto-complete that line -for you. - -Luckily, the [[https://github.com/akinomyoga/ble.sh][Bash Line Editor]] +create a new one in order to see your changes to the +`.bashrc` file. You can also `source` the file to +see changes, but I recommend starting a completely new shell instead. + +### ble.sh + +One big feature I was missing in Bash that both `zsh` and +`fish` have is an autosuggestion feature. To explain: as you +type, an autosuggestion feature in the shell will offer suggestions in a +lighter font color beyond the characters already typed. Once you see the +command you want, you can click the right arrow and have the shell +auto-complete that line for you. + +Luckily, the [Bash Line Editor](https://github.com/akinomyoga/ble.sh) (ble.sh) exists! This program provides a wonderful autosuggestions -feature perfectly, among other features that I haven't tested yet. +feature perfectly, among other features that I haven\'t tested yet. In order to install ble.sh, execute the following: -#+begin_src sh +```sh git clone --recursive https://github.com/akinomyoga/ble.sh.git make -C ble.sh install PREFIX=~/.local echo 'source ~/.local/share/blesh/ble.sh' >> ~/.bashrc -#+end_src +``` Again, exit the terminal and open a new one in order to see the newly-configured shell. -* Restart the Session -Finally, as mentioned above, you'll need to restart the session to +# Restart the Session + +Finally, as mentioned above, you\'ll need to restart the session to ensure that your user is using bash by default. You will also need to exit and re-open a shell (e.g., terminal or -terminal tab) any time you make changes to the =.bashrc= file. +terminal tab) any time you make changes to the `.bashrc` +file. -#+begin_src sh +```sh sudo reboot now -#+end_src +``` diff --git a/content/blog/2022-08-31-privacy-com-changes.org b/content/blog/2022-08-31-privacy-com-changes.md index 7cd0eda..1ba6746 100644 --- a/content/blog/2022-08-31-privacy-com-changes.org +++ b/content/blog/2022-08-31-privacy-com-changes.md @@ -1,25 +1,29 @@ -#+title: Concerning Changes on Privacy.com -#+date: 2022-08-31 -#+description: My thoughts on Privacy.com changing from a prepaid model to a credit charge model. -#+filetags: :privacy: ++++ +date = 2022-08-31 +title = "Concerning Changes on Privacy.com" +description = "" +draft = false ++++ + +# Privacy.com Changes Their Terms -* Privacy.com Changes Their Terms Recently, Privacy.com reached out to their customers regarding a change in their terms of use. Further, all customers are required to agree to the changes in order to continue using their accounts. -[[https://privacy.com/commercial-cardholder-agreement][You can view the -new cardholder agreement here]]. +[You can view the new cardholder agreement +here](https://privacy.com/commercial-cardholder-agreement). -When you log in, you'll be greeted with a pop-up window asking you to +When you log in, you\'ll be greeted with a pop-up window asking you to review and agree to the new terms of use. You will also not be able to open any new cards until the terms are agreed to. -** Changing from a "Prepaid Debit" Model to a "Charge Card" Model +## Changing from a \"Prepaid Debit\" Model to a \"Charge Card\" Model + The actual content of the changes is interesting. While the historical model of using Privacy.com was akin to prepaid debit cards, the new -model is very similar to a credit card (they use the term "charge -card"). +model is very similar to a credit card (they use the term \"charge +card\"). I have used Privacy.com for 1-2 years, and the process was always that you would create a single-use or merchant-locked card. This card could @@ -31,17 +35,18 @@ The benefit this service provides with a premium account is masking the merchant names from your funding source. If you have a concern that your bank account uses merchant data from your account, you could direct all charges through Privacy.com and set the merchant as one of their pre-set -options, such as "Smiley's Corner Store" or "NSA Gift Shop." +options, such as \"Smiley\'s Corner Store\" or \"NSA Gift Shop.\" The new model still works with a bank account as a funding source, but -the model is changed so that you get a "line of credit" set according to -a 14-day billing cycle. It seems that Privacy.com will now allow charges -to be incurred without being immediately paid. - -** Daily Payments and Available Credit -Instead of paying as charges are incurred, you must make a "Daily -Payment" and your "Available Credit" will be locked until you make that -payment. There are also "End of Billing Cycle Payments" that are +the model is changed so that you get a \"line of credit\" set according +to a 14-day billing cycle. It seems that Privacy.com will now allow +charges to be incurred without being immediately paid. + +## Daily Payments and Available Credit + +Instead of paying as charges are incurred, you must make a \"Daily +Payment\" and your \"Available Credit\" will be locked until you make +that payment. There are also \"End of Billing Cycle Payments\" that are assigned a due date. Further, Privacy.com will decline charges that would cause you to exceed @@ -49,20 +54,18 @@ your Available Credit or Credit Limit. One particular interesting section states the following: -#+begin_quote -YOUR OBLIGATION TO PAY US BACK FOR ALL CARD TRANSACTIONS AND OTHER -OBLIGATIONS YOU INCUR IS SECURED BY THE SECURED ACCOUNT. IF YOU DO NOT -PAY US BACK FOR ANY AMOUNT YOU OWE US WHEN YOUR PAYMENTS ARE DUE, WE -WILL EXERCISE OUR INTEREST AND DEBIT THE SECURED ACCOUNT, AND YOU WILL -LOSE THE MONEY IN THE SECURED ACCOUNT. SEE SECTION 8: SECURITY AGREEMENT -FOR MORE INFORMATION. +> YOUR OBLIGATION TO PAY US BACK FOR ALL CARD TRANSACTIONS AND OTHER +> OBLIGATIONS YOU INCUR IS SECURED BY THE SECURED ACCOUNT. IF YOU DO NOT +> PAY US BACK FOR ANY AMOUNT YOU OWE US WHEN YOUR PAYMENTS ARE DUE, WE +> WILL EXERCISE OUR INTEREST AND DEBIT THE SECURED ACCOUNT, AND YOU WILL +> LOSE THE MONEY IN THE SECURED ACCOUNT. SEE SECTION 8: SECURITY +> AGREEMENT FOR MORE INFORMATION. -#+end_quote +## Personal Information -** Personal Information Now that Privacy.com is more of a financial institution, they are -obligated to comply with the -[[https://en.wikipedia.org/wiki/Know_your_customer][know your customer]] +obligated to comply with the [know your +customer](https://en.wikipedia.org/wiki/Know_your_customer) guidelines/laws. I did not proceed with the change to my Privacy.com account, but I have @@ -71,11 +74,13 @@ to be submitted, such as SSN. I am not aware of all new personal information required or if the funding source is now required to only be a bank account. -** Fees +## Fees + Luckily, the fees section did not change much. The subscription fees for a premium account are still the only fees. -* My Thoughts +# My Thoughts + Personally, I wiped my personal information from my account and then permanently deleted it when I heard about these changes. I have no interest in yet another method of credit lending offered by private @@ -85,10 +90,10 @@ payments, I have no interest in incurring charges that will need to be paid back at a later date. I also have no interest in submitting personal information to Privacy.com. -This type of change toward a "buy it now, pay us later" model is +This type of change toward a \"buy it now, pay us later\" model is concerning, and I will be watching Privacy.com to see if they further their interests in the credit model as time goes on. -Could we see them start charging interest, fees, etc.? I'm not sure, but -this change does not inspire confidence in their mission as a +Could we see them start charging interest, fees, etc.? I\'m not sure, +but this change does not inspire confidence in their mission as a privacy-focused company. diff --git a/content/blog/2022-09-17-serenity-os.md b/content/blog/2022-09-17-serenity-os.md new file mode 100644 index 0000000..def7737 --- /dev/null +++ b/content/blog/2022-09-17-serenity-os.md @@ -0,0 +1,122 @@ ++++ +date = 2022-09-17 +title = "Serenity OS: Testing Out a Unique System" +description = "" +draft = false ++++ + +# Overview + +[SerenityOS](https://serenityos.org) is a unique operating system (OS) +that I have seen pop up in my news feed a few times over the last few +years, but I have never had time to test it out until now. + +Testing out this system brought back fond memories of yellowed, +modem-screeching, 100-pound computers that brought so many fond memories +to my youth. + +Per their website: + +> A graphical Unix-like operating system for desktop computers! +> +> SerenityOS is a love letter to \'90s user interfaces with a custom +> Unix-like core. It flatters with sincerity by stealing beautiful ideas +> from various other systems. +> +> Roughly speaking, the goal is a marriage between the aesthetic of +> late-1990s productivity software and the power-user accessibility of +> late-2000s \*nix. +> +> This is a system by us, for us, based on the things we like. + +# Building + +Your first question may be \"Where\'s the iso?\" and the answer is... +there are none. SerenityOS does not provide pre-built images for +testing. You must build the images yourself. This seems intentionally to +limit participation to only those who are truly interested enough to +learn how to build the OS. + +## Clone + +In order to get started, you\'ll need to clone the source repository: + +```sh +git clone https://github.com/SerenityOS/serenity && cd serenity +``` + +## Build + +Note that I followed the [Build +Instructions](https://github.com/SerenityOS/serenity/blob/master/Documentation/BuildInstructions.md) +in the SerenityOS repository as of commit +`660d2b53b1206e868d5470eee80b5e62d7e30da7`. Things may have +changed since my installation, and you should double-check the +instructions first. + +Regardless, I want to repeat my steps here to illustrate any errors or +differing commands I needed to run in order to build and run SerenityOS. + +Since I am running Fedora, I needed to install these packages in order +to build the OS images: + +```sh +sudo dnf install texinfo binutils-devel curl cmake mpfr-devel libmpc-devel gmp-devel e2fsprogs ninja-build patch ccache rsync @"C Development Tools and Libraries" @Virtualization +``` + +Next, make sure you\'re inside the `serenity` directory +created earlier during the git cloning process and process to build the +toolchain: + +```sh +Meta/serenity.sh rebuild-toolchain +``` + +Once the toolchain is built, you can Build and run the OS! + +```sh +Meta/serenity.sh run +``` + +After this process is completed, the image should run automatically and +launch. + +# Issues + +I played around in SerenityOS for an hour or two in order to see what I +could do and had a lot of fun with it. The only issue I ran into was a +lack of working internet. I didn\'t try very hard, but I could tell that +the main network link wasn\'t connecting to my Fedora host properly. + +# Screenshots + +The initial launch of the image displays the SerenityOS desktop, with a +simple terminal already launched: + + + +Here you can see the Fire application (literally just shows fire +burning), a browser with the local Serenity Browser page loaded, and a +text editor. + + + +I also poked around the system utilities and found most tools you\'d +expect to find within a standard desktop. + + + +Lastly, I noted that the default desktop contains numerous pre-defined +themes to choose from. This is a small piece, but it\'s actually +wonderful to see desktop developers consider theming directly out of the +box rather than using an addon-based mentality. + + + +I didn\'t take a screenshot of the other pre-installed games, but I did +spend nearly 30 minutes playing Solitaire before remembering that I was +supposed to be writing a post about the OS. diff --git a/content/blog/2022-09-17-serenity-os.org b/content/blog/2022-09-17-serenity-os.org deleted file mode 100644 index ccb9049..0000000 --- a/content/blog/2022-09-17-serenity-os.org +++ /dev/null @@ -1,116 +0,0 @@ -#+title: Serenity OS: Testing Out a Unique System -#+date: 2022-09-17 -#+description: A quick look at the Serenity operating system. -#+filetags: :dev: - -* Overview -[[https://serenityos.org][SerenityOS]] is a unique operating system (OS) -that I have seen pop up in my news feed a few times over the last few -years, but I have never had time to test it out until now. - -Testing out this system brought back fond memories of yellowed, -modem-screeching, 100-pound computers that brought so many fond memories -to my youth. - -Per their website: - -#+begin_quote -A graphical Unix-like operating system for desktop computers! - -SerenityOS is a love letter to '90s user interfaces with a custom -Unix-like core. It flatters with sincerity by stealing beautiful ideas -from various other systems. - -Roughly speaking, the goal is a marriage between the aesthetic of -late-1990s productivity software and the power-user accessibility of -late-2000s *nix. - -This is a system by us, for us, based on the things we like. - -#+end_quote - -* Building -Your first question may be "Where's the iso?" and the answer is... there -are none. SerenityOS does not provide pre-built images for testing. You -must build the images yourself. This seems intentionally to limit -participation to only those who are truly interested enough to learn how -to build the OS. - -** Clone -In order to get started, you'll need to clone the source repository: - -#+begin_src sh -git clone https://github.com/SerenityOS/serenity && cd serenity -#+end_src - -** Build -Note that I followed the -[[https://github.com/SerenityOS/serenity/blob/master/Documentation/BuildInstructions.md][Build -Instructions]] in the SerenityOS repository as of commit -=660d2b53b1206e868d5470eee80b5e62d7e30da7=. Things may have changed -since my installation, and you should double-check the instructions -first. - -Regardless, I want to repeat my steps here to illustrate any errors or -differing commands I needed to run in order to build and run SerenityOS. - -Since I am running Fedora, I needed to install these packages in order -to build the OS images: - -#+begin_src sh -sudo dnf install texinfo binutils-devel curl cmake mpfr-devel libmpc-devel gmp-devel e2fsprogs ninja-build patch ccache rsync @"C Development Tools and Libraries" @Virtualization -#+end_src - -Next, make sure you're inside the =serenity= directory created earlier -during the git cloning process and process to build the toolchain: - -#+begin_src sh -Meta/serenity.sh rebuild-toolchain -#+end_src - -Once the toolchain is built, you can Build and run the OS! - -#+begin_src sh -Meta/serenity.sh run -#+end_src - -After this process is completed, the image should run automatically and -launch. - -* Issues -I played around in SerenityOS for an hour or two in order to see what I -could do and had a lot of fun with it. The only issue I ran into was a -lack of working internet. I didn't try very hard, but I could tell that -the main network link wasn't connecting to my Fedora host properly. - -* Screenshots -The initial launch of the image displays the SerenityOS desktop, with a -simple terminal already launched: - -#+caption: SerenityOS Terminal -[[https://img.cleberg.net/blog/20220917-serenityos/initial_launch.png]] - -Here you can see the Fire application (literally just shows fire -burning), a browser with the local Serenity Browser page loaded, and a -text editor. - -#+caption: SerenityOS Fire -[[https://img.cleberg.net/blog/20220917-serenityos/basic_apps.png]] - -I also poked around the system utilities and found most tools you'd -expect to find within a standard desktop. - -#+caption: SerenityOS System Monitor -[[https://img.cleberg.net/blog/20220917-serenityos/system_monitor.png]] - -Lastly, I noted that the default desktop contains numerous pre-defined -themes to choose from. This is a small piece, but it's actually -wonderful to see desktop developers consider theming directly out of the -box rather than using an addon-based mentality. - -#+caption: SerenityOS Themes -[[https://img.cleberg.net/blog/20220917-serenityos/themes.png]] - -I didn't take a screenshot of the other pre-installed games, but I did -spend nearly 30 minutes playing Solitaire before remembering that I was -supposed to be writing a post about the OS. diff --git a/content/blog/2022-09-21-graphene-os.md b/content/blog/2022-09-21-graphene-os.md new file mode 100644 index 0000000..f36d92f --- /dev/null +++ b/content/blog/2022-09-21-graphene-os.md @@ -0,0 +1,168 @@ ++++ +date = 2022-09-21 +title = "Installing Graphene OS on the Pixel 6 Pro" +description = "" +draft = false ++++ + +# Introduction + +After using iOS for a couple of years, I finally took the plunge and +purchased a Pixel 6 Pro in order to test and use \[GrapheneOS\] +(<https://grapheneos.org>). + +The installation process was rather quick once you have the tools and +files you need. Overall, it can be done in just a few minutes. + +# Gathering Tools & Files + +## Android Tools + +First, in order to interact with the device, we will need the [Android +platform +tools](https://developer.android.com/studio/releases/platform-tools.html). +Find the Linux download and save the ZIP folder to your preferred +location. + +Once we\'ve downloaded the files, we will need to unzip them, enter the +directory, and move the necessary executables to a central location, +such as `/usr/bin/`. For this installation, we only need the +`fastboot` and `adb` executables. + +```sh +cd ~/Downloads +``` + +```sh +unzip platform-tools_r33.0.3-linux.zip +cd platform-tools +sudo mv fastboot /usr/bin/ +sudo mv adb /usr/bin +``` + +## GrapheneOS Files + +Next, we need the [GrapheneOS files](https://grapheneos.org/releases) +for our device and model. For example, the Pixel 6 Pro is codenamed +`raven` on the release page. + +Once we have the links, let\'s download them to our working directory: + +```sh +curl -O https://releases.grapheneos.org/factory.pub +curl -0 https://releases.grapheneos.org/raven-factory-2022091400.zip +curl -0 https://releases.grapheneos.org/raven-factory-2022091400.zip.sig +``` + +1. Validate Integrity + + In order to validate the integrity of the downloaded files, we will + need the `signify` package and Graphene\'s + `factory.pub` file. + + ```sh + sudo dnf install signify + ``` + + ```sh + curl -O https://releases.grapheneos.org/factory.pub + ``` + + Then we can validate the files and ensure that no data was corrupted + or modified before it was saved to our device. + + ```sh + signify -Cqp factory.pub -x raven-factory-2022091400.zip.sig && echo verified + ``` + +2. Unzip Files + + Once the files are verified, we can unzip the Graphene image and + enter the directory: + + ```sh + unzip raven-factory-2022091400.zip && cd raven-factory-2022091400 + ``` + +# Installation Process + +## Enable Developer Debugging & OEM Unlock + +Before we can actually flash anything to the phone, we will need to +enable OEM Unlocking, as well as either USB Debugging or Wireless +Debugging, depending on which method we will be using. + +To start, enable developer mode by going to `Settings` \> +`About` and tapping `Build Number` seven (7) +times. You may need to enter your PIN to enable this mode. + +Once developer mode is enabled, go to `Settings` \> +`System` \> `Devloper Options` and enable OEM +Unlocking, as well as USB or Wireless Debugging. In my case, I chose USB +Debugging and performed all actions via USB cable. + +Once these options are enabled, plug the phone into the computer and +execute the following command: + +```sh +adb devices +``` + +If an unauthorized error occurs, make sure the USB mode on the phone is +changed from charging to something like \"File Transfer\" or \"PTP.\" +You can find the USB mode in the notification tray. + +## Reboot Device + +Once we have found the device via `adb`, we can either boot +into the bootloader interface by holding the volume down button while +the phone reboots or by executing the following command: + +```sh +adb reboot bootloader +``` + +## Unlock the Bootloader + +The phone will reboot and load the bootloader screen upon startup. At +this point, we are ready to start the actual flashing of GrapheneOS onto +the device. + +**NOTE**: In my situation, I needed to use `sudo` with every +`fastboot` command, but not with `adb` commands. I +am not sure if this is standard or a Fedora quirk, but I\'m documenting +my commands verbatim in this post. + +First, we start by unlocking the bootloader so that we can load other +ROMs: + +```sh +sudo fastboot flashing unlock +``` + +## Flashing Factory Images + +Once the phone is unlocked, we can flash it with the +`flash-all.sh` script found inside the +`raven-factory-2022091400` folder we entered earlier: + +```sh +sudo ./flash-all.sh +``` + +This process should take a few minutes and will print informational +messages as things progress. Avoid doing anything on the phone while +this process is operating. + +## Lock the Bootloader + +If everything was successful, the phone should reboot a few times and +finally land back on the bootloader screen. At this point, we can +re-lock the bootloader to enable full verified boot and protect the +device from unwanted flashing or erasure of data. + +```sh +sudo fastboot flashing lock +``` + +Once done, the device will be wiped and ready for a fresh set-up! diff --git a/content/blog/2022-09-21-graphene-os.org b/content/blog/2022-09-21-graphene-os.org deleted file mode 100644 index 2e34a00..0000000 --- a/content/blog/2022-09-21-graphene-os.org +++ /dev/null @@ -1,154 +0,0 @@ -#+title: Installing Graphene OS on the Pixel 6 Pro -#+date: 2022-09-21 -#+description: A retrospective on the successful command-line installation of Graphene OS on a Pixel 6 Pro. -#+filetags: :privacy: - -* Introduction -After using iOS for a couple of years, I finally took the plunge and -purchased a Pixel 6 Pro in order to test and use [GrapheneOS] -([[https://grapheneos.org]]). - -The installation process was rather quick once you have the tools and -files you need. Overall, it can be done in just a few minutes. - -* Gathering Tools & Files -** Android Tools -First, in order to interact with the device, we will need the -[[https://developer.android.com/studio/releases/platform-tools.html][Android -platform tools]]. Find the Linux download and save the ZIP folder to -your preferred location. - -Once we've downloaded the files, we will need to unzip them, enter the -directory, and move the necessary executables to a central location, -such as =/usr/bin/=. For this installation, we only need the =fastboot= -and =adb= executables. - -#+begin_src sh -cd ~/Downloads -#+end_src - -#+begin_src sh -unzip platform-tools_r33.0.3-linux.zip -cd platform-tools -sudo mv fastboot /usr/bin/ -sudo mv adb /usr/bin -#+end_src - -** GrapheneOS Files -Next, we need the [[https://grapheneos.org/releases][GrapheneOS files]] -for our device and model. For example, the Pixel 6 Pro is codenamed -=raven= on the release page. - -Once we have the links, let's download them to our working directory: - -#+begin_src sh -curl -O https://releases.grapheneos.org/factory.pub -curl -0 https://releases.grapheneos.org/raven-factory-2022091400.zip -curl -0 https://releases.grapheneos.org/raven-factory-2022091400.zip.sig -#+end_src - -1. Validate Integrity - - In order to validate the integrity of the downloaded files, we will - need the =signify= package and Graphene's =factory.pub= file. - - #+begin_src sh - sudo dnf install signify - #+end_src - - #+begin_src sh - curl -O https://releases.grapheneos.org/factory.pub - #+end_src - - Then we can validate the files and ensure that no data was corrupted - or modified before it was saved to our device. - - #+begin_src sh - signify -Cqp factory.pub -x raven-factory-2022091400.zip.sig && echo verified - #+end_src - -2. Unzip Files - - Once the files are verified, we can unzip the Graphene image and - enter the directory: - - #+begin_src sh - unzip raven-factory-2022091400.zip && cd raven-factory-2022091400 - #+end_src - -* Installation Process -** Enable Developer Debugging & OEM Unlock -Before we can actually flash anything to the phone, we will need to -enable OEM Unlocking, as well as either USB Debugging or Wireless -Debugging, depending on which method we will be using. - -To start, enable developer mode by going to =Settings= > =About= and -tapping =Build Number= seven (7) times. You may need to enter your PIN -to enable this mode. - -Once developer mode is enabled, go to =Settings= > =System= > -=Devloper Options= and enable OEM Unlocking, as well as USB or Wireless -Debugging. In my case, I chose USB Debugging and performed all actions -via USB cable. - -Once these options are enabled, plug the phone into the computer and -execute the following command: - -#+begin_src sh -adb devices -#+end_src - -If an unauthorized error occurs, make sure the USB mode on the phone is -changed from charging to something like "File Transfer" or "PTP." You -can find the USB mode in the notification tray. - -** Reboot Device -Once we have found the device via =adb=, we can either boot into the -bootloader interface by holding the volume down button while the phone -reboots or by executing the following command: - -#+begin_src sh -adb reboot bootloader -#+end_src - -** Unlock the Bootloader -The phone will reboot and load the bootloader screen upon startup. At -this point, we are ready to start the actual flashing of GrapheneOS onto -the device. - -*NOTE*: In my situation, I needed to use =sudo= with every =fastboot= -command, but not with =adb= commands. I am not sure if this is standard -or a Fedora quirk, but I'm documenting my commands verbatim in this -post. - -First, we start by unlocking the bootloader so that we can load other -ROMs: - -#+begin_src sh -sudo fastboot flashing unlock -#+end_src - -** Flashing Factory Images -Once the phone is unlocked, we can flash it with the =flash-all.sh= -script found inside the =raven-factory-2022091400= folder we entered -earlier: - -#+begin_src sh -sudo ./flash-all.sh -#+end_src - -This process should take a few minutes and will print informational -messages as things progress. Avoid doing anything on the phone while -this process is operating. - -** Lock the Bootloader -If everything was successful, the phone should reboot a few times and -finally land back on the bootloader screen. At this point, we can -re-lock the bootloader to enable full verified boot and protect the -device from unwanted flashing or erasure of data. - -#+begin_src sh -sudo fastboot flashing lock -#+end_src - -Once done, the device will be wiped and ready for a fresh set-up! diff --git a/content/blog/2022-10-04-mtp-linux.org b/content/blog/2022-10-04-mtp-linux.md index 1163e63..03ba991 100644 --- a/content/blog/2022-10-04-mtp-linux.org +++ b/content/blog/2022-10-04-mtp-linux.md @@ -1,73 +1,81 @@ -#+title: How to Mount an MTP Mobile Device on Fedora Linux -#+date: 2022-10-04 -#+description: Learn how to mount an MTP mobile device on Fedora Linux. -#+filetags: :linux: ++++ +date = 2022-10-04 +title = "How to Mount an MTP Mobile Device on Fedora Linux" +description = "" +draft = false ++++ I recently ran into trouble attempting to mount my GrapheneOS phone to -my laptop running Fedora Linux via the -[[https://en.wikipedia.org/wiki/Media_transfer_protocol][Media Transfer -Protocol]] (MTP) and discovered a simple and effective solution. +my laptop running Fedora Linux via the [Media Transfer +Protocol](https://en.wikipedia.org/wiki/Media_transfer_protocol) (MTP) +and discovered a simple and effective solution. + +# Use a USB 3.0 Port -* Use a USB 3.0 Port First, ensure that the device was plugged in to the laptop through a USB 3.0 port, if possible. From a brief glance online, it seems that USB 2.0 ports may cause issues with dropped connections over MTP. This is purely -anecdotal since I don't have any evidence to link showing that USB 2.0 +anecdotal since I don\'t have any evidence to link showing that USB 2.0 causes issues, but I can confirm that switching to a USB 3.0 port seemed to cut out most of my issues. -* Switch USB Preferences to MTP -Secondly, you need to ensure that the phone's USB preferences/mode is +# Switch USB Preferences to MTP + +Secondly, you need to ensure that the phone\'s USB preferences/mode is changed to MTP or File Transfer once the phone is plugged in. Other -modes will not allow you to access the phone's file system. +modes will not allow you to access the phone\'s file system. + +# Install `jmtpfs` -* Install =jmtpfs= -Next, I used the =jmtpfs= package to mount my phone to my laptop. There -are other packages that exist, but this one worked perfectly for me. On -Fedora Linux, you can install it like this: +Next, I used the `jmtpfs` package to mount my phone to my +laptop. There are other packages that exist, but this one worked +perfectly for me. On Fedora Linux, you can install it like this: -#+begin_src sh +```sh sudo dnf install jmtpfs -y -#+end_src +``` + +# Create a Mount Point -* Create a Mount Point Once you have the package installed, you just need to create a folder -for the device to use as a mount point. In my case, I used =/mnt/pixel=: +for the device to use as a mount point. In my case, I used +`/mnt/pixel`: -#+begin_src sh +```sh sudo mkdir /mnt/pixel sudo chown -R $USER:$USER /mnt/pixel -#+end_src +``` + +# Mount & Access the Phone\'s File System -* Mount & Access the Phone's File System Finally, plug-in and mount the device, and you should be able to see all storage (internal and external) inside your new folder! -#+begin_src sh +```sh jmtpfs /mnt/pixel -#+end_src +``` The output should look something like this: -#+begin_src sh +```sh Device 0 (VID=18d1 and PID=4ee1) is a Google Inc Nexus/Pixel (MTP). Android device detected, assigning default bug flags -#+end_src +``` -Now you are mounted and can do anything you'd like with the device's +Now you are mounted and can do anything you\'d like with the device\'s files: -#+begin_src sh +```sh cd /mnt/pixel ls -lha -#+end_src +``` From here, you will be able to see any internal or external storage available on the device: -#+begin_src sh +```sh total 0 drwxr-xr-x. 3 user user 0 Jan 1 1970 . drwxr-xr-x. 1 root root 10 Oct 4 13:29 .. drwxr-xr-x. 16 user user 0 Apr 21 4426383 'Internal shared storage' -#+end_src +``` diff --git a/content/blog/2022-10-04-syncthing.md b/content/blog/2022-10-04-syncthing.md new file mode 100644 index 0000000..58df86e --- /dev/null +++ b/content/blog/2022-10-04-syncthing.md @@ -0,0 +1,179 @@ ++++ +date = 2022-10-04 +title = "Syncthing: A Minimal Self-Hosted Cloud Storage Solution" +description = "" +draft = false ++++ + +# An Overview of Syncthing + +If you\'ve been looking around the self-hosted cloud storage space for a +while, you\'ve undoubtedly run into someone suggesting +[Syncthing](https://syncthing.net) as an option. However, it is an +unusual alternative for those users out there who are used to having a +centralized cloud server that serves as the \"controller\" of the data +and interacts with clients on devices to fetch files. + +This post is a walkthrough of the Syncthing software, how I set up my +personal storage, and some pros and cons of using the software. + +# Installing Syncthing + +To install Syncthing, visit the +[Downloads](https://syncthing.net/downloads/) page or install via your +device\'s package manager. + +## Server & Desktop + +You can install Syncthing on servers and desktops via the Downloads page +linked above or via the command-line. + +For Debian-based distros: + +```sh +sudo apt install syncthing +``` + +For Fedora-based distros: + +```sh +sudo dnf install syncthing +``` + +## Mobile + +Syncthing for Android is available on +[F-Droid](https://f-droid.org/packages/com.nutomic.syncthingandroid/) +and [Google +Play](https://play.google.com/store/apps/details?id=com.nutomic.syncthingandroid). +Syncthing does not have an official iOS client, but there is a +third-party client called [Möbius +Sync](https://apps.apple.com/us/app/m%C3%B6bius-sync/id1539203216). + +# How Does Syncthing Work? + +To start, I wanted to include the main marketing blurb from their +website: + +> Syncthing is a continuous file synchronization program. It +> synchronizes files between two or more computers in real time, safely +> protected from prying eyes. Your data is your data alone, and you +> deserve to choose where it is stored, whether it is shared with some +> third party, and how it\'s transmitted over the internet. + +Let\'s break this apart and add in some other details to help explain +what exactly Syncthing does in order to sync files between devices. + +## Local Syncthing Server(s) + +Syncthing syncs files between multiple devices by creating a local +server on each device. These local servers handle a few different +things, such as watching files and directories for changes, hosting an +administrative GUI website, and authenticating with connected devices. + +You can also start, stop, and restart the Syncthing server via the +command-line or web dashboard. If you\'re running Syncthing on a device +with `systemd`, you can use the following commands: + +```sh +sudo systemctl start syncthing@username.service +sudo systemctl restart syncthing@username.service +sudo systemctl stop syncthing@username.service +``` + +## Syncthing Dashboard + +This biggest part of Syncthing is the admin GUI website that runs on +each device (note that mobile devices will use the Syncthing app rather +than the web GUI). The admin GUI is available through the web browser on +the local device that is running Syncthing - simply go to +`http://localhost:8384` or +`http://127.0.0.1:8384`. This web page is the place where you +will change settings, add/modify synced files, and add/modify connected +devices. + +Here\'s an example web GUI dashboard: + + + +## Remote Devices + +A cloud storage solution wouldn\'t be very useful if you aren\'t able to +share data among various devices. Syncthing does this by sharing Device +IDs to connect servers, and then by manually sharing Folders with +devices that have been connected. + +For instance, if you have a laptop running Syncthing and then install +the Syncthing mobile app on a phone, you could scan the laptop\'s QR +code for Device ID and then accept the authentication on the laptop\'s +dashboard. Next, you can use either device to select a folder for +sharing and dictating which device should send, receive, or both. + +When you connect devices, you can set one device as an \"Introducer,\" +which can add devices from the introducer to the device list, for +mutually shared folders. You can also configure Auto Accept, +compression, rate limits, and more settings per device. + +# My Personal Cloud Storage Set-up + +Personally, I use a model similar to a traditional cloud storage +service. I have a \"centralized\" server running 24/7 that acts as an +Introducer for my Syncthing network. I think of this as my main storage +and all other devices as tertiary client devices. I will likely add +additional servers as backups as time goes on so that I don\'t have to +rely on my laptop or phone as the only backups. + +Currently, I have one desktop and one mobile device connected to the +network, both running intermittently as they are not powered-on 24/7. + +The initial set-up of the software was easy enough, but data transfer +rates were incredibly slow for me due to the Wi-Fi. Instead, I plugged +my laptop into the ethernet network that my server is on and manually +copied my folders over to the server with `scp`. Once +complete, Syncthing validated that all files were there and not missing, +and it did not need to transfer any data through the WAN. + +As slow as the transfer was going, this probably saved me a few days of +waiting for my \~100GB sync. + +# Pros & Cons + +I\'ve put together a short list of pros and cons for Syncthing. I +thought about my experiences with Nextcloud, WebDAV, proprietary +services (Google Drive, iCloud, etc.), and privacy-focused cloud +solutions (pCloud, Tresorit, etc.). + +**Pros:** + +- I\'ve faced no data loss at all through my two-month trial run. +- No third-parties store your data on their servers. +- You have full control over your data and can take your data and + leave at any time. +- It\'s possible to encrypt client-side easily with software like + Cryptomator. +- No proprietary clients or mounted volumes, just plain files and + folders. + +**Cons:** + +- The learning curve is steeper than traditional cloud services and is + focused on a technical audience. +- If a device needs to modify files in a Folder, the devices will need + to sync ALL files from the folder, which may be large. To avoid size + restraints, split large folders into smaller folders for syncing. +- Syncing can be slow due to the clients/servers initially connecting + or re-connecting after sleeping. +- Multiple personal devices are required and require the user to own + or rent them as no third-party servers are involved in the storage + of data. + +Overall, I\'ve had a great experience with Syncthing so far. I\'ve had +no data loss, syncing has been quick and easy when changes are made to +files, device connections are reliable, and I love the freedom of +controlling the clients and servers as I choose. + +Not to mention that I appreciate that I - or someone else - could pull +the Syncthing [source code](https://github.com/syncthing) and continue +development/support if the Syncthing Foundation decides to stop +developing the software or sells the business. diff --git a/content/blog/2022-10-04-syncthing.org b/content/blog/2022-10-04-syncthing.org deleted file mode 100644 index 8c3656a..0000000 --- a/content/blog/2022-10-04-syncthing.org +++ /dev/null @@ -1,169 +0,0 @@ -#+title: Syncthing: A Minimal Self-Hosted Cloud Storage Solution -#+date: 2022-10-04 -#+description: An overview of how you can use Syncthing as a minimal alternative to cloud storage. -#+filetags: :selfhosting: - -* An Overview of Syncthing -If you've been looking around the self-hosted cloud storage space for a -while, you've undoubtedly run into someone suggesting -[[https://syncthing.net][Syncthing]] as an option. However, it is an -unusual alternative for those users out there who are used to having a -centralized cloud server that serves as the "controller" of the data and -interacts with clients on devices to fetch files. - -This post is a walkthrough of the Syncthing software, how I set up my -personal storage, and some pros and cons of using the software. - -* Installing Syncthing -To install Syncthing, visit the -[[https://syncthing.net/downloads/][Downloads]] page or install via your -device's package manager. - -** Server & Desktop -You can install Syncthing on servers and desktops via the Downloads page -linked above or via the command-line. - -For Debian-based distros: - -#+begin_src sh -sudo apt install syncthing -#+end_src - -For Fedora-based distros: - -#+begin_src sh -sudo dnf install syncthing -#+end_src - -** Mobile -Syncthing for Android is available on -[[https://f-droid.org/packages/com.nutomic.syncthingandroid/][F-Droid]] -and -[[https://play.google.com/store/apps/details?id=com.nutomic.syncthingandroid][Google -Play]]. Syncthing does not have an official iOS client, but there is a -third-party client called -[[https://apps.apple.com/us/app/m%C3%B6bius-sync/id1539203216][Möbius -Sync]]. - -* How Does Syncthing Work? -To start, I wanted to include the main marketing blurb from their -website: - -#+begin_quote -Syncthing is a continuous file synchronization program. It synchronizes -files between two or more computers in real time, safely protected from -prying eyes. Your data is your data alone, and you deserve to choose -where it is stored, whether it is shared with some third party, and how -it's transmitted over the internet. -#+end_quote - -Let's break this apart and add in some other details to help explain -what exactly Syncthing does in order to sync files between devices. - -** Local Syncthing Server(s) -Syncthing syncs files between multiple devices by creating a local -server on each device. These local servers handle a few different -things, such as watching files and directories for changes, hosting an -administrative GUI website, and authenticating with connected devices. - -You can also start, stop, and restart the Syncthing server via the -command-line or web dashboard. If you're running Syncthing on a device -with =systemd=, you can use the following commands: - -#+begin_src sh -sudo systemctl start syncthing@username.service -sudo systemctl restart syncthing@username.service -sudo systemctl stop syncthing@username.service -#+end_src - -** Syncthing Dashboard -This biggest part of Syncthing is the admin GUI website that runs on -each device (note that mobile devices will use the Syncthing app rather -than the web GUI). The admin GUI is available through the web browser on -the local device that is running Syncthing - simply go to -=http://localhost:8384= or =http://127.0.0.1:8384=. This web page is the -place where you will change settings, add/modify synced files, and -add/modify connected devices. - -Here's an example web GUI dashboard: - -#+caption: Syncthing Dashboard -[[https://img.cleberg.net/blog/20221020-syncthing/syncthing_gui.png]] - -** Remote Devices -A cloud storage solution wouldn't be very useful if you aren't able to -share data among various devices. Syncthing does this by sharing Device -IDs to connect servers, and then by manually sharing Folders with -devices that have been connected. - -For instance, if you have a laptop running Syncthing and then install -the Syncthing mobile app on a phone, you could scan the laptop's QR code -for Device ID and then accept the authentication on the laptop's -dashboard. Next, you can use either device to select a folder for -sharing and dictating which device should send, receive, or both. - -When you connect devices, you can set one device as an "Introducer," -which can add devices from the introducer to the device list, for -mutually shared folders. You can also configure Auto Accept, -compression, rate limits, and more settings per device. - -* My Personal Cloud Storage Set-up -Personally, I use a model similar to a traditional cloud storage -service. I have a "centralized" server running 24/7 that acts as an -Introducer for my Syncthing network. I think of this as my main storage -and all other devices as tertiary client devices. I will likely add -additional servers as backups as time goes on so that I don't have to -rely on my laptop or phone as the only backups. - -Currently, I have one desktop and one mobile device connected to the -network, both running intermittently as they are not powered-on 24/7. - -The initial set-up of the software was easy enough, but data transfer -rates were incredibly slow for me due to the Wi-Fi. Instead, I plugged -my laptop into the ethernet network that my server is on and manually -copied my folders over to the server with =scp=. Once complete, -Syncthing validated that all files were there and not missing, and it -did not need to transfer any data through the WAN. - -As slow as the transfer was going, this probably saved me a few days of -waiting for my ~100GB sync. - -* Pros & Cons -I've put together a short list of pros and cons for Syncthing. I thought -about my experiences with Nextcloud, WebDAV, proprietary services -(Google Drive, iCloud, etc.), and privacy-focused cloud solutions -(pCloud, Tresorit, etc.). - -*Pros:* - -- I've faced no data loss at all through my two-month trial run. -- No third-parties store your data on their servers. -- You have full control over your data and can take your data and leave - at any time. -- It's possible to encrypt client-side easily with software like - Cryptomator. -- No proprietary clients or mounted volumes, just plain files and - folders. - -*Cons:* - -- The learning curve is steeper than traditional cloud services and is - focused on a technical audience. -- If a device needs to modify files in a Folder, the devices will need - to sync ALL files from the folder, which may be large. To avoid size - restraints, split large folders into smaller folders for syncing. -- Syncing can be slow due to the clients/servers initially connecting or - re-connecting after sleeping. -- Multiple personal devices are required and require the user to own or - rent them as no third-party servers are involved in the storage of - data. - -Overall, I've had a great experience with Syncthing so far. I've had no -data loss, syncing has been quick and easy when changes are made to -files, device connections are reliable, and I love the freedom of -controlling the clients and servers as I choose. - -Not to mention that I appreciate that I - or someone else - could pull -the Syncthing [[https://github.com/syncthing][source code]] and continue -development/support if the Syncthing Foundation decides to stop -developing the software or sells the business. diff --git a/content/blog/2022-10-22-alpine-linux.md b/content/blog/2022-10-22-alpine-linux.md new file mode 100644 index 0000000..2bc43cd --- /dev/null +++ b/content/blog/2022-10-22-alpine-linux.md @@ -0,0 +1,281 @@ ++++ +date = 2022-10-22 +title = "Alpine Linux: My New Server OS" +description = "" +draft = false ++++ + +# Alpine Linux + +[Alpine Linux](https://alpinelinux.org) is a very small distro, built on +musl libc and busybox. It uses ash as the default shell, OpenRC as the +init system, and apk as the package manager. According to their website, +an Alpine container \"requires no more than 8 MB and a minimal +installation to disk requires around 130 MB of storage.\" An actual bare +metal machine is recommended to have 100 MB of RAM and 0-700 MB of +storage space. + +Historically, I\'ve used Ubuntu\'s minimal installation image as my +server OS for the last five years. Ubuntu worked well and helped as my +original server contained an nVidia GPU and no onboard graphics, so +quite a few distros won\'t boot or install without a lot of tinkering. + +Alpine has given me a huge increase in performance across my Docker apps +and Nginx websites. CPU load for the new server I\'m using to test +Alpine hovers around 0-5% on average with an Intel(R) Core(TM) i3-6100 +CPU @ 3.70GHz. + +The only services I haven\'t moved over to Alpine are Plex Media Server +and Syncthing, which may increase CPU load quite a bit depending on how +many streams are running. + +## Installation + +In terms of installation, Alpine has an incredibly useful +[wiki](https://wiki.alpinelinux.org/wiki/Installation) that will guide a +user throughout the installation and post-installation processes, as +well as various other articles and guides. + +To install Alpine, find an appropriate [image to +download](https://alpinelinux.org/downloads/) and flash it to a USB +using software such as Rufus or Etcher. I opted to use the Standard +image for my x86~64~ architecture. + +Once the USB is ready, plug it into the machine and reboot. Note that +you may have to use a key such as `Esc` or `F1-12` +to access the boot menu. The Alpine Linux terminal will load quickly and +for a login. + +To log in to the installation image, use the `root` account; +there is no password. Once logged-in, execute the setup command: + +```sh +setup-alpine +``` + +The setup script will ask a series of questions to configure the system. +Be sure to answer carefully or else you may have to re-configure the +system after boot. + +- Keyboard Layout (Local keyboard language and usage mode, e.g., us + and variant of us-nodeadkeys.) +- Hostname (The name for the computer.) +- Network (For example, automatic IP address discovery with the + \"DHCP\" protocol.) +- DNS Servers (Domain Name Servers to query. For privacy reasons, it + is NOT recommended to route every local request to servers like + Google\'s 8.8.8.8 .) +- Timezone +- Proxy (Proxy server to use for accessing the web. Use \"none\" for + direct connections to the internet.) +- Mirror (From where to download packages. Choose the organization you + trust giving your usage patterns to.) +- SSH (Secure SHell remote access server. \"Openssh\" is part of the + default install image. Use \"none\" to disable remote login, e.g. on + laptops.) +- NTP (Network Time Protocol client used for keeping the system clock + in sync with a time-server. Package \"chrony\" is part of the + default install image.) +- Disk Mode (Select between diskless (disk=\"none\"), \"data\" or + \"sys\", as described above.) + +Once the setup script is finished, be sure to reboot the machine and +remove the USB device. + +```sh +reboot +``` + +## Post-Installation + +There are many things you can do once your Alpine Linux system is up and +running, and it largely depends on what you\'ll use the machine for. +I\'m going to walk through my personal post-installation setup for my +web server. + +1. Upgrade the System + + First, login as `root` in order to update and upgrade the + system: + + ```sh + apk -U upgrade + ``` + +2. Adding a User + + I needed to add a user so that I don\'t need to log in as root. Note + that if you\'re used to using the `sudo` command, you + will now need to use the `doas` command on Alpine Linux. + + ```sh + apk add doas + adduser <username> + adduser <username> wheel + ``` + + You can now log out and log back in using the newly-created user: + + ```sh + exit + ``` + +3. Enable Community Packages + + In order to install more common packages that aren\'t found in the + `main` repository, you will need to enable the + `community` repository: + + ```sh + doas nano /etc/apk/repositories + ``` + + Uncomment the community line for whichever version of Alpine you\'re + running: + + ```sh + /media/usb/apks + http://dl-cdn.alpinelinux.org/alpine/v3.16/main + http://dl-cdn.alpinelinux.org/alpine/v3.16/community + #http://dl-cdn.alpinelinux.org/alpine/edge/main + #http://dl-cdn.alpinelinux.org/alpine/edge/community + #http://dl-cdn.alpinelinux.org/alpine/edge/testing + ``` + +4. Install Required Packages + + Now that the community packages are available, you can install any + packages you need. In my case, I installed the web server packages I + need for my services: + + ```sh + doas apk add nano nginx docker docker-compose ufw + ``` + +5. SSH + + If you didn\'t install OpenSSH as part of the installation, you can + do so now: + + ```sh + doas apk add openssh + ``` + + Next, either create a new key or copy your SSH key to the server + from your current machines: + + ```sh + # Create a new key + ssh-keygen + ``` + + If you need to copy an existing SSH key from a current machine: + + ```sh + # Copy key from existing machines + ssh-copy-id <username>@<ip_address> + ``` + +6. Firewall + + Lastly, I installed `ufw` above as my firewall. To set + up, default to deny incoming and allow outgoing connections. Then + selectively allow other ports or apps as needed. + + ```sh + doas ufw default deny incoming + doas ufw default allow outgoing + doas ufw allow SSH + doas ufw allow "WWW Full" + doas ufw allow 9418 # Git server port + ``` + +7. Change Hostname + + If you don\'t like the hostname set during installation, you just + need to edit two files. First, edit the simple hostname file: + + ```sh + doas nano /etc/hostname + ``` + + ```sh + <hostname> + ``` + + Next, edit the `hosts` file: + + ```sh + doas nano /etc/hosts + ``` + + ```sh + 127.0.0.1 <hostname>.local <hostname> localhost.local localhost + ::1 <hostname> <hostname>.local + ``` + +# Nginx Web Server + +To set up my web server, I simply created the `www` user and +created the necessary files. + +```sh +doas adduser -D -g 'www' www +mkdir /www +doas mkdir /www +doas chown -R www:www /var/lib/nginx/ +doas chown -R www:www /www +``` + +If you\'re running a simple webroot, you can alter the main +`nginx.conf` file. Otherwise, you can drop configuration +files in the following directory. You don\'t need to enable or symlink +the configuration file like you do in other systems. + +```sh +doas nano /etc/nginx/http.d/example_website.conf +``` + +Once the configuration is set and pointed at the `/www` +directory to serve files, enable the Nginx service: + +```sh +# Note that 'default' must be included or Nginx will not start on boot +doas rc-update add nginx default +``` + +# Docker Containers + +Docker works exactly the same as other systems. Either execute a +`docker run` command or create a +`docker-compose.yml` file and do +`docker-compose up -d`. + +# Git Server + +I went in-depth on how to self-host a git server in another post: +[Self-Hosting a Personal Git Server](../git-server/). + +However, there are a few differences with Alpine. First note that in +order to change the `git` user\'s shell, you must do a few +things a little different: + +```sh +doas apk add libuser +doas touch /etc/login.defs +doas mkdir /etc/default +doas touch /etc/default/useradd +doas lchsh git +``` + +# Thoughts on Alpine + +So far, I love Alpine Linux. I have no complaints about anything at this +point, but I\'m not completely finished with the migration yet. Once +I\'m able to upgrade my hardware to a rack-mounted server, I will +migrate Plex and Syncthing over to Alpine as well - possibly putting +Plex into a container or VM. + +The performance is stellar, the `apk` package manager is +seamless, and system administration tasks are effortless. My only regret +is that I didn\'t install Alpine sooner. diff --git a/content/blog/2022-10-22-alpine-linux.org b/content/blog/2022-10-22-alpine-linux.org deleted file mode 100644 index 8d4a14b..0000000 --- a/content/blog/2022-10-22-alpine-linux.org +++ /dev/null @@ -1,269 +0,0 @@ -#+title: Alpine Linux: My New Server OS -#+date: 2022-10-22 -#+description: A retrospective on installing and configuring Alpine Linux as my new server operating system. -#+filetags: :linux: - -* Alpine Linux -[[https://alpinelinux.org][Alpine Linux]] is a very small distro, built -on musl libc and busybox. It uses ash as the default shell, OpenRC as -the init system, and apk as the package manager. According to their -website, an Alpine container "requires no more than 8 MB and a minimal -installation to disk requires around 130 MB of storage." An actual bare -metal machine is recommended to have 100 MB of RAM and 0-700 MB of -storage space. - -Historically, I've used Ubuntu's minimal installation image as my server -OS for the last five years. Ubuntu worked well and helped as my original -server contained an nVidia GPU and no onboard graphics, so quite a few -distros won't boot or install without a lot of tinkering. - -Alpine has given me a huge increase in performance across my Docker apps -and Nginx websites. CPU load for the new server I'm using to test Alpine -hovers around 0-5% on average with an Intel(R) Core(TM) i3-6100 CPU @ -3.70GHz. - -The only services I haven't moved over to Alpine are Plex Media Server -and Syncthing, which may increase CPU load quite a bit depending on how -many streams are running. - -** Installation -In terms of installation, Alpine has an incredibly useful -[[https://wiki.alpinelinux.org/wiki/Installation][wiki]] that will guide -a user throughout the installation and post-installation processes, as -well as various other articles and guides. - -To install Alpine, find an appropriate -[[https://alpinelinux.org/downloads/][image to download]] and flash it -to a USB using software such as Rufus or Etcher. I opted to use the -Standard image for my x86_{64} architecture. - -Once the USB is ready, plug it into the machine and reboot. Note that -you may have to use a key such as =Esc= or =F1-12= to access the boot -menu. The Alpine Linux terminal will load quickly and for a login. - -To log in to the installation image, use the =root= account; there is no -password. Once logged-in, execute the setup command: - -#+begin_src sh -setup-alpine -#+end_src - -The setup script will ask a series of questions to configure the system. -Be sure to answer carefully or else you may have to re-configure the -system after boot. - -- Keyboard Layout (Local keyboard language and usage mode, e.g., us and - variant of us-nodeadkeys.) -- Hostname (The name for the computer.) -- Network (For example, automatic IP address discovery with the "DHCP" - protocol.) -- DNS Servers (Domain Name Servers to query. For privacy reasons, it is - NOT recommended to route every local request to servers like Google's - 8.8.8.8 .) -- Timezone -- Proxy (Proxy server to use for accessing the web. Use "none" for - direct connections to the internet.) -- Mirror (From where to download packages. Choose the organization you - trust giving your usage patterns to.) -- SSH (Secure SHell remote access server. "Openssh" is part of the - default install image. Use "none" to disable remote login, e.g. on - laptops.) -- NTP (Network Time Protocol client used for keeping the system clock in - sync with a time-server. Package "chrony" is part of the default - install image.) -- Disk Mode (Select between diskless (disk="none"), "data" or "sys", as - described above.) - -Once the setup script is finished, be sure to reboot the machine and -remove the USB device. - -#+begin_src sh -reboot -#+end_src - -** Post-Installation -There are many things you can do once your Alpine Linux system is up and -running, and it largely depends on what you'll use the machine for. I'm -going to walk through my personal post-installation setup for my web -server. - -1. Upgrade the System - - First, login as =root= in order to update and upgrade the system: - - #+begin_src sh - apk -U upgrade - #+end_src - -2. Adding a User - - I needed to add a user so that I don't need to log in as root. Note - that if you're used to using the =sudo= command, you will now need to - use the =doas= command on Alpine Linux. - - #+begin_src sh - apk add doas - adduser <username> - adduser <username> wheel - #+end_src - - You can now log out and log back in using the newly-created user: - - #+begin_src sh - exit - #+end_src - -3. Enable Community Packages - - In order to install more common packages that aren't found in the - =main= repository, you will need to enable the =community= - repository: - - #+begin_src sh - doas nano /etc/apk/repositories - #+end_src - - Uncomment the community line for whichever version of Alpine you're - running: - - #+begin_src sh - /media/usb/apks - http://dl-cdn.alpinelinux.org/alpine/v3.16/main - http://dl-cdn.alpinelinux.org/alpine/v3.16/community - #http://dl-cdn.alpinelinux.org/alpine/edge/main - #http://dl-cdn.alpinelinux.org/alpine/edge/community - #http://dl-cdn.alpinelinux.org/alpine/edge/testing - #+end_src - -4. Install Required Packages - - Now that the community packages are available, you can install any - packages you need. In my case, I installed the web server packages I - need for my services: - - #+begin_src sh - doas apk add nano nginx docker docker-compose ufw - #+end_src - -5. SSH - - If you didn't install OpenSSH as part of the installation, you can do - so now: - - #+begin_src sh - doas apk add openssh - #+end_src - - Next, either create a new key or copy your SSH key to the server from - your current machines: - - #+begin_src sh - # Create a new key - ssh-keygen - #+end_src - - If you need to copy an existing SSH key from a current machine: - - #+begin_src sh - # Copy key from existing machines - ssh-copy-id <username>@<ip_address> - #+end_src - -6. Firewall - - Lastly, I installed =ufw= above as my firewall. To set up, default to - deny incoming and allow outgoing connections. Then selectively allow - other ports or apps as needed. - - #+begin_src sh - doas ufw default deny incoming - doas ufw default allow outgoing - doas ufw allow SSH - doas ufw allow "WWW Full" - doas ufw allow 9418 # Git server port - #+end_src - -7. Change Hostname - - If you don't like the hostname set during installation, you just need - to edit two files. First, edit the simple hostname file: - - #+begin_src sh - doas nano /etc/hostname - #+end_src - - #+begin_src sh - <hostname> - #+end_src - - Next, edit the =hosts= file: - - #+begin_src sh - doas nano /etc/hosts - #+end_src - - #+begin_src sh - 127.0.0.1 <hostname>.local <hostname> localhost.local localhost - ::1 <hostname> <hostname>.local - #+end_src - -* Nginx Web Server -To set up my web server, I simply created the =www= user and created the -necessary files. - -#+begin_src sh -doas adduser -D -g 'www' www -mkdir /www -doas mkdir /www -doas chown -R www:www /var/lib/nginx/ -doas chown -R www:www /www -#+end_src - -If you're running a simple webroot, you can alter the main =nginx.conf= -file. Otherwise, you can drop configuration files in the following -directory. You don't need to enable or symlink the configuration file -like you do in other systems. - -#+begin_src sh -doas nano /etc/nginx/http.d/example_website.conf -#+end_src - -Once the configuration is set and pointed at the =/www= directory to -serve files, enable the Nginx service: - -#+begin_src sh -# Note that 'default' must be included or Nginx will not start on boot -doas rc-update add nginx default -#+end_src - -* Docker Containers -Docker works exactly the same as other systems. Either execute a -=docker run= command or create a =docker-compose.yml= file and do -=docker-compose up -d=. - -* Git Server -I went in-depth on how to self-host a git server in another post: -[[../git-server/][Self-Hosting a Personal Git Server]]. - -However, there are a few differences with Alpine. First note that in -order to change the =git= user's shell, you must do a few things a -little different: - -#+begin_src sh -doas apk add libuser -doas touch /etc/login.defs -doas mkdir /etc/default -doas touch /etc/default/useradd -doas lchsh git -#+end_src - -* Thoughts on Alpine -So far, I love Alpine Linux. I have no complaints about anything at this -point, but I'm not completely finished with the migration yet. Once I'm -able to upgrade my hardware to a rack-mounted server, I will migrate -Plex and Syncthing over to Alpine as well - possibly putting Plex into a -container or VM. - -The performance is stellar, the =apk= package manager is seamless, and -system administration tasks are effortless. My only regret is that I -didn't install Alpine sooner. diff --git a/content/blog/2022-10-30-linux-display-manager.md b/content/blog/2022-10-30-linux-display-manager.md new file mode 100644 index 0000000..6b017ca --- /dev/null +++ b/content/blog/2022-10-30-linux-display-manager.md @@ -0,0 +1,82 @@ ++++ +date = 2022-10-30 +title = "How to Disable or Change the Display Manager on Void Linux" +description = "" +draft = false ++++ + +# Display Manager Services + +In order to change the [display +manager](https://en.wikipedia.org/wiki/Display_manager) on Void Linux - +or any other Linux distro - you need to identify the currently enabled +display manager. + +## Disabling the Current Display Manager + +Void Linux only has one ISO available for download with a pre-built +display manager at the time of this post: the XFCE ISO. If you\'ve +installed this version, the pre-assigned display manager is +`lxdm`. If you installed another display manager, replace +`lxdm` in the following command with the display manager you +have installed. + +To disable `lxdm`, simply remove the service symlink: + +```sh +sudo rm /var/service/lxdm +``` + +## Enabling a New Display Manager + +If you want to enable a new display manager, you can do so after +`lxdm` is disabled. Make sure to replace +`<new_display_manager>` with your new DM, such as +`gdm`, `xdm`, etc. + +```sh +sudo ln -s /etc/sv/<new_display_manager> /var/service +``` + +# Set Up `.xinitrc` + +Depending on your setup, you may need to create a few X files, such as +`~/.xinitrc`. For my personal set-up, I created this file to +launch the i3wm as my desktop. + +```sh +nano ~/.xinitrc +``` + +```sh +#!/bin/sh + +exec i3 +``` + +If you run a desktop other than i3, simply replace `i3` with +the shell command that launches that desktop. + +# Set Up Your Shell Profile + +Finally, in order to automatically launch an X session upon login, you +will need to edit the `.bash_profile` (bash) or +`.zprofile` (zsh) files for your shell: + +```sh +nano ~/.zprofile +``` + +Add the following snippet to the end of the shell profile file. This +will execute the `startx` command upon login. + +```sh +if [ -z "${DISPLAY}" ] && [ "${XDG_VTNR}" -eq 1 ]; then + exec startx +fi +``` + +Alternatively, you can ignore this step and simply choose to manually +execute `startx` upon login. This can be useful if you have +issues with your desktop or like to manually launch different desktops +by choice. diff --git a/content/blog/2022-10-30-linux-display-manager.org b/content/blog/2022-10-30-linux-display-manager.org deleted file mode 100644 index 3d8d6d7..0000000 --- a/content/blog/2022-10-30-linux-display-manager.org +++ /dev/null @@ -1,72 +0,0 @@ -#+title: How to Disable or Change the Display Manager on Void Linux -#+date: 2022-10-30 -#+description: Learn how to remove or modify the display manager on Void Linux. -#+filetags: :linux: - -* Display Manager Services -In order to change the -[[https://en.wikipedia.org/wiki/Display_manager][display manager]] on -Void Linux - or any other Linux distro - you need to identify the -currently enabled display manager. - -** Disabling the Current Display Manager -Void Linux only has one ISO available for download with a pre-built -display manager at the time of this post: the XFCE ISO. If you've -installed this version, the pre-assigned display manager is =lxdm=. If -you installed another display manager, replace =lxdm= in the following -command with the display manager you have installed. - -To disable =lxdm=, simply remove the service symlink: - -#+begin_src sh -sudo rm /var/service/lxdm -#+end_src - -** Enabling a New Display Manager -If you want to enable a new display manager, you can do so after =lxdm= -is disabled. Make sure to replace =<new_display_manager>= with your new -DM, such as =gdm=, =xdm=, etc. - -#+begin_src sh -sudo ln -s /etc/sv/<new_display_manager> /var/service -#+end_src - -* Set Up =.xinitrc= -Depending on your setup, you may need to create a few X files, such as -=~/.xinitrc=. For my personal set-up, I created this file to launch the -i3wm as my desktop. - -#+begin_src sh -nano ~/.xinitrc -#+end_src - -#+begin_src sh -#!/bin/sh - -exec i3 -#+end_src - -If you run a desktop other than i3, simply replace =i3= with the shell -command that launches that desktop. - -* Set Up Your Shell Profile -Finally, in order to automatically launch an X session upon login, you -will need to edit the =.bash_profile= (bash) or =.zprofile= (zsh) files -for your shell: - -#+begin_src sh -nano ~/.zprofile -#+end_src - -Add the following snippet to the end of the shell profile file. This -will execute the =startx= command upon login. - -#+begin_src sh -if [ -z "${DISPLAY}" ] && [ "${XDG_VTNR}" -eq 1 ]; then - exec startx -fi -#+end_src - -Alternatively, you can ignore this step and simply choose to manually -execute =startx= upon login. This can be useful if you have issues with -your desktop or like to manually launch different desktops by choice. diff --git a/content/blog/2022-11-07-self-hosting-matrix.org b/content/blog/2022-11-07-self-hosting-matrix.md index c812c60..2d13602 100644 --- a/content/blog/2022-11-07-self-hosting-matrix.org +++ b/content/blog/2022-11-07-self-hosting-matrix.md @@ -1,98 +1,107 @@ -#+title: Self-Hosting Matrix Synapse on Alpine Linux -#+date: 2022-11-07 -#+description: A guide to self-hosting the Matrix Synapse application on your own server. -#+filetags: :selfhosting: ++++ +date = 2022-11-07 +title = "Self-Hosting Matrix Synapse on Alpine Linux" +description = "" +draft = false ++++ -* Synpase -If you're reading this, you likely know that -[[https://github.com/matrix-org/synapse/][Synapse]] is a popular -[[https://matrix.org/][Matrix]] home server software that allows users -to run their own Matrix home server. +# Synpase + +If you\'re reading this, you likely know that +[Synapse](https://github.com/matrix-org/synapse/) is a popular +[Matrix](https://matrix.org/) home server software that allows users to +run their own Matrix home server. This post is a short guide describing how I was able to get Synapse working in a minimally-usable state on Alpine Linux. -* Installation Process -** Dependencies +# Installation Process + +## Dependencies + First, since there is no Alpine-specific package for Synapse, we need to ensure that Alpine has the required dependencies for the Python-based installation method. -#+begin_src sh +```sh doas apk -U update doas apk add python3 py3-virtualenv -#+end_src +``` Next, we need to set up a Python virtual environment for Synapse: -#+begin_src sh +```sh mkdir -p ~/synapse && cd ~/synapse virtualenv -p python3 ~/synapse/env source ~/synapse/env/bin/activate pip install --upgrade pip pip install --upgrade setuptools pip install matrix-synapse -#+end_src +``` + +## Running Synapse -** Running Synapse Once installed, running Synapse is easy. Simply execute the following -command, replacing =example.com= with the domain name that will be used -with this home server. This will generate the configuration files needed -to run the server. +command, replacing `example.com` with the domain name that +will be used with this home server. This will generate the configuration +files needed to run the server. -#+begin_src sh +```sh python -m synapse.app.homeserver \ --server-name example.com \ --config-path homeserver.yaml \ --generate-config \ --report-stats=no -#+end_src +``` Once the configuration is generated, we can start up the Synapse server: -#+begin_src sh +```sh synctl start -#+end_src +``` -** Configuring Synapse -To make any change to Synapse, we need to edit the =YAML= configuration -file: +## Configuring Synapse -#+begin_src sh +To make any change to Synapse, we need to edit the `YAML` +configuration file: + +```sh nano ~/synapse/homeserver.yaml -#+end_src +``` -For now, we just need to ensure the =server_name= is accurate. However, -there are a lot of other configuration options found in the -[[https://matrix-org.github.io/synapse/develop/usage/configuration/config_documentation.html][Configuring -Synapse]] documentation that can be enabled/disabled at any point. +For now, we just need to ensure the `server_name` is +accurate. However, there are a lot of other configuration options found +in the [Configuring +Synapse](https://matrix-org.github.io/synapse/develop/usage/configuration/config_documentation.html) +documentation that can be enabled/disabled at any point. -#+begin_src yaml +``` yaml server_name: "example.com" -#+end_src +``` Make sure to restart Synapse when you make changes to the configuration: -#+begin_src sh +```sh synctl restart -#+end_src +``` + +## Nginx Reverse-Proxy -** Nginx Reverse-Proxy To ensure that Synapse is reachable from the public, we need to connect our domain to the Synapse server. In my case, I use a Nginx reverse-proxy for this purpose. To use Nginx, we need to create a reverse-proxy configuration file: -#+begin_src sh +```sh doas nano /etc/nginx/http.d/example.com.conf -#+end_src +``` -If you already have TLS certificates for this domain (=example.com=), -you can simply use the SSL configuration and point toward your TLS -certificates. +If you already have TLS certificates for this domain +(`example.com`), you can simply use the SSL configuration and +point toward your TLS certificates. -#+begin_src conf +``` conf server { listen 443 ssl http2; listen [::]:443 ssl http2; @@ -131,15 +140,15 @@ server { listen 80; return 404; } -#+end_src +``` If you need to generate TLS certificates (I recommend -[[https://certbot.eff.org/][Certbot]]), you'll need a more minimal Nginx +[Certbot](https://certbot.eff.org/)), you\'ll need a more minimal Nginx conf file before you can use the TLS-enabled example above. Instead, use this configuration file during the Certbot certificate generation process: -#+begin_src conf +``` conf server { server_name example.com; location / { @@ -147,60 +156,65 @@ server { } listen 80; } -#+end_src +``` -Once you're done editing the Nginx conf file, restart Nginx: +Once you\'re done editing the Nginx conf file, restart Nginx: -#+begin_src sh +```sh doas rc-service nginx restart -#+end_src +``` -If you still need to generate TLS certificates, run =certbot= now and -obtain the certificates. Certbot will ask if you want to use a webroot -or spin up a temporary web server. I *highly** recommend using the -temporary web server due to the many issues with using a webroot. +If you still need to generate TLS certificates, run `certbot` +now and obtain the certificates. Certbot will ask if you want to use a +webroot or spin up a temporary web server. I **highly\*** recommend +using the temporary web server due to the many issues with using a +webroot. You will need to stop Nginx in order to user the temporary web server option with Certbot: -#+begin_src sh +```sh # Stop Nginx so certbot can spin up a temp webserver for cert generation doas rc-service nginx stop doas certbot certonly -v doas rc-service nginx start -#+end_src +``` -** Open Firewall & Router Ports -If you use a firewall on the server, open the =8448= port for discovery -and federation, as well as the normal web server ports if you're using a -reverse proxy. If you want additional services, such as voice calls, you -will need to read the Synapse documentation to see which ports need to -be opened for those features. +## Open Firewall & Router Ports -Here's an example of the Universal Firewall (UFW) software: +If you use a firewall on the server, open the `8448` port for +discovery and federation, as well as the normal web server ports if +you\'re using a reverse proxy. If you want additional services, such as +voice calls, you will need to read the Synapse documentation to see +which ports need to be opened for those features. -#+begin_src sh +Here\'s an example of the Universal Firewall (UFW) software: + +```sh # Matrix port doas ufw allow 8448 # Standard web server ports doas ufw allow "Nginx Full" -#+end_src +``` + +Remember to forward any Synapse ports, such as `8448`, +`80`, and `443`, in your Router from the internet +to your server\'s IP address. -Remember to forward any Synapse ports, such as =8448=, =80=, and =443=, -in your Router from the internet to your server's IP address. +## Adding Matrix Users -** Adding Matrix Users -Finally, if you didn't enable public registration in the -=homeserver.yaml= file, you can manually create users via the +Finally, if you didn\'t enable public registration in the +`homeserver.yaml` file, you can manually create users via the command-line: -#+begin_src sh +```sh cd ~/synapse register_new_matrix_user -c homeserver.yaml -#+end_src +``` Remember that the format for federated Matrix usernames is -=@username:example.com= when logging in to client applications. +`@username:example.com` when logging in to client +applications. Once Synapse is running, and you have a username, you are ready to log in to a Matrix client and start sending messages, joining rooms, and diff --git a/content/blog/2022-11-11-nginx-tmp-errors.md b/content/blog/2022-11-11-nginx-tmp-errors.md new file mode 100644 index 0000000..989869b --- /dev/null +++ b/content/blog/2022-11-11-nginx-tmp-errors.md @@ -0,0 +1,80 @@ ++++ +date = 2022-11-11 +title = "Fixing Permission Errors in /var/lib/nginx" +description = "" +draft = false ++++ + +*This is a brief post so that I personally remember the solution as it +has occurred multiple times for me.* + +# The Problem + +After migrating to a new server OS, I started receiving quite a few +permission errors like the one below. These popped up for various +different websites I\'m serving via Nginx on this server, but did not +prevent the website from loading. + +I found the errors in the standard log file: + +```sh +cat /var/log/nginx/error.log +``` + +```sh +2022/11/11 11:30:34 [crit] 8970#8970: *10 open() "/var/lib/nginx/tmp/proxy/3/00/0000000003" failed (13: Permission denied) while reading upstream, client: 169.150.203.10, server: cyberchef.example.com, request: "GET /assets/main.css HTTP/2.0", upstream: "http://127.0.0.1:8111/assets/main.css", host: "cyberchef.example.com", referrer: "https://cyberchef.example.com/" +``` + +You can see that the error is `13: Permission denied` and it +occurs in the `/var/lib/nginx/tmp/` directory. In my case, I +had thousands of errors where Nginx was denied permission to read/write +files in this directory. + +So how do I fix it? + +# The Solution + +In order to resolve the issue, I had to ensure the +`/var/lib/nginx` directory is owned by Nginx. Mine was owned +by the `www` user and Nginx was not able to read or write +files within that directory. This prevented Nginx from caching temporary +files. + +```sh +# Alpine Linux +doas chown -R nginx:nginx /var/lib/nginx + +# Other Distros +sudo chown -R nginx:nginx /var/lib/nginx +``` + +You *may* also be able to change the `proxy_temp_path` in +your Nginx config, but I did not try this. Here\'s a suggestion I found +online that may work if the above solution does not: + +```sh +nano /etc/nginx/http.d/example.com.conf +``` + +``` conf +server { + ... + + # Set the proxy_temp_path to your preference, make sure it's owned by the + # `nginx` user + proxy_temp_path /tmp; + + ... +} +``` + +Finally, restart Nginx and your server should be able to cache temporary +files again. + +```sh +# Alpine Linux (OpenRC) +doas rc-service nginx restart + +# Other Distros (systemd) +sudo systemctl restart nginx +``` diff --git a/content/blog/2022-11-11-nginx-tmp-errors.org b/content/blog/2022-11-11-nginx-tmp-errors.org deleted file mode 100644 index 092b146..0000000 --- a/content/blog/2022-11-11-nginx-tmp-errors.org +++ /dev/null @@ -1,75 +0,0 @@ -#+title: Fixing Permission Errors in /var/lib/nginx -#+date: 2022-11-11 -#+description: Learn how to fix permission errors related to the Nginx temporary file storage. -#+filetags: :nginx: - -/This is a brief post so that I personally remember the solution as it -has occurred multiple times for me./ - -* The Problem -After migrating to a new server OS, I started receiving quite a few -permission errors like the one below. These popped up for various -different websites I'm serving via Nginx on this server, but did not -prevent the website from loading. - -I found the errors in the standard log file: - -#+begin_src sh -cat /var/log/nginx/error.log -#+end_src - -#+begin_src sh -2022/11/11 11:30:34 [crit] 8970#8970: *10 open() "/var/lib/nginx/tmp/proxy/3/00/0000000003" failed (13: Permission denied) while reading upstream, client: 169.150.203.10, server: cyberchef.example.com, request: "GET /assets/main.css HTTP/2.0", upstream: "http://127.0.0.1:8111/assets/main.css", host: "cyberchef.example.com", referrer: "https://cyberchef.example.com/" -#+end_src - -You can see that the error is =13: Permission denied= and it occurs in -the =/var/lib/nginx/tmp/= directory. In my case, I had thousands of -errors where Nginx was denied permission to read/write files in this -directory. - -So how do I fix it? - -* The Solution -In order to resolve the issue, I had to ensure the =/var/lib/nginx= -directory is owned by Nginx. Mine was owned by the =www= user and Nginx -was not able to read or write files within that directory. This -prevented Nginx from caching temporary files. - -#+begin_src sh -# Alpine Linux -doas chown -R nginx:nginx /var/lib/nginx - -# Other Distros -sudo chown -R nginx:nginx /var/lib/nginx -#+end_src - -You /may/ also be able to change the =proxy_temp_path= in your Nginx -config, but I did not try this. Here's a suggestion I found online that -may work if the above solution does not: - -#+begin_src sh -nano /etc/nginx/http.d/example.com.conf -#+end_src - -#+begin_src conf -server { - ... - - # Set the proxy_temp_path to your preference, make sure it's owned by the - # `nginx` user - proxy_temp_path /tmp; - - ... -} -#+end_src - -Finally, restart Nginx and your server should be able to cache temporary -files again. - -#+begin_src sh -# Alpine Linux (OpenRC) -doas rc-service nginx restart - -# Other Distros (systemd) -sudo systemctl restart nginx -#+end_src diff --git a/content/blog/2022-11-27-server-build.org b/content/blog/2022-11-27-server-build.md index 0186a15..acf07e8 100644 --- a/content/blog/2022-11-27-server-build.org +++ b/content/blog/2022-11-27-server-build.md @@ -1,9 +1,12 @@ -#+title: Building a Custom Rack-Mounted Server -#+date: 2022-11-27 -#+description: A retrospective on building my own rack-mounted server. -#+filetags: :hardware: ++++ +date = 2022-11-27 +title = "Building a Custom Rack-Mounted Server" +description = "" +draft = false ++++ + +# The Dilemma -* The Dilemma For years, I have been using desktops and a Raspberry Pi as the backbone of my homelab. I have always wanted to move toward a single dedicated server that could handle all of my tasks, but was often put off by the @@ -19,59 +22,62 @@ After returning the R720XD, I decided that I wanted to build my own server with modern, consumer-grade PC components. This time, I am very happy with the results of my server. -* Components -I'll start by listing all the components I used for this server build: - -- *Case*: - [[https://www.rosewill.com/rosewill-rsv-r4100u-black/p/9SIA072GJ92825][Rosewill - RSV-R4100U 4U Server Chassis Rackmount Case]] -- *Motherboard*: [[https://nzxt.com/product/n7-b550][NZXT B550]] -- *CPU*: AMD Ryzen 7 5700G with Radeon Graphics -- *GPU*: N/A - I specifically chose one of the few AMD CPUs that support - onboard graphics. -- *RAM*: 64GB RAM (2x32GB) /Max of 128GB RAM on this motherboard/ -- *Boot Drive*: Western Digital 500GB M.2 NVME SSD -- *HDD Bay*: - - 10TB WD White /(shucked, moved from previous server)/ - - 8TB WD White /(shucked, moved from previous server)/ - - 2 x 8TB WD Red Plus /(Black Friday lined up perfectly with this - build, so I grabbed two of these)/ -- *PSU*: Corsair RM850 PSU -- *Extras*: - - Corsair TM3Q Thermal Paste - - Noctua 120mm fan /(replacement for front case fan)/ - - 2 x Noctua 80mm fans /(replacement for rear case fans)/ - - CableMatters 6Gbps SATA Cables - -* Building the Server +# Components + +I\'ll start by listing all the components I used for this server build: + +- **Case**: [Rosewill RSV-R4100U 4U Server Chassis Rackmount + Case](https://www.rosewill.com/rosewill-rsv-r4100u-black/p/9SIA072GJ92825) +- **Motherboard**: [NZXT B550](https://nzxt.com/product/n7-b550) +- **CPU**: AMD Ryzen 7 5700G with Radeon Graphics +- **GPU**: N/A - I specifically chose one of the few AMD CPUs that + support onboard graphics. +- **RAM**: 64GB RAM (2x32GB) *Max of 128GB RAM on this motherboard* +- **Boot Drive**: Western Digital 500GB M.2 NVME SSD +- **HDD Bay**: + - 10TB WD White *(shucked, moved from previous server)* + - 8TB WD White *(shucked, moved from previous server)* + - 2 x 8TB WD Red Plus *(Black Friday lined up perfectly with this + build, so I grabbed two of these)* +- **PSU**: Corsair RM850 PSU +- **Extras**: + - Corsair TM3Q Thermal Paste + - Noctua 120mm fan *(replacement for front case fan)* + - 2 x Noctua 80mm fans *(replacement for rear case fans)* + - CableMatters 6Gbps SATA Cables + +# Building the Server + This took quite a while for me to build (in my opinion of time), totaling around 3 hours from start to finish. The case has some peculiar construction, so you have to completely remove the ODD & HDD cages to install the motherboard and other components first. -Now, I've never built a computer of any kind before, so I was quite +Now, I\'ve never built a computer of any kind before, so I was quite nervous. Personally, the only challenging part was getting the CPU cooler to screw into the motherboard without sliding the thermal paste -around too much underneath. I'm still not entirely sure if I did a great -job of it, but nothing's broken yet. +around too much underneath. I\'m still not entirely sure if I did a +great job of it, but nothing\'s broken yet. The main components were all fine and simple. However, installing the hard drives is slightly tedious as I need to power off the server and completely unscrew the HDD cage to install or remove any drives. Additionally, the drives are screwed directly into the metal cage with -small screws, which are quite a bit different from the HDD trays I'm +small screws, which are quite a bit different from the HDD trays I\'m used to in other machines. -Seeing that the cases with hot-swap bays were 3-4x the price, I'm okay +Seeing that the cases with hot-swap bays were 3-4x the price, I\'m okay dealing with the tedium of removing the cage to install new drives. -* Software -I'm not going to dive into the software as I have done so in other +# Software + +I\'m not going to dive into the software as I have done so in other recent posts. However, I wanted to note that I am using Alpine Linux on this server and hosting most services inside Docker. No virtual machines (VMs) and very few bare-metal services. -* The Results +# The Results + How did my build turn out? Well, after migrating my other servers and their services over, I found that my server is blazing fast. The heaviest of my applications, Plex, is handled with ease. Even 4k @@ -81,28 +87,29 @@ I am very happy with the results and will likely continue to improve on this server as the years go by rather than buying another used server online. -** Mistakes I Made -This post wouldn't be complete unless I wrote about the mistakes I made -while building. The only real mistake I made beyond a "whoops I dropped -a screw" related to airflow and fan direction. +## Mistakes I Made + +This post wouldn\'t be complete unless I wrote about the mistakes I made +while building. The only real mistake I made beyond a \"whoops I dropped +a screw\" related to airflow and fan direction. While installing the two new hard drives that showed up on 2022-11-30 and getting ready to install the case in my rack, I noticed that the hard drive temperatures were quite high. -I used the =smartctl= command for each of my drives (=/dev/sda= through -=/dev/sdd=): +I used the `smartctl` command for each of my drives +(`/dev/sda` through `/dev/sdd`): -#+begin_src sh +```sh doas smartctl -a /dev/sda | grep Temperature_Celsius -#+end_src +``` -The results were unusual - all four drives were idling at ~44-46 degrees -Celsius. The only drive that was cooler was my 10TB drive, which was at -38 degrees Celsius. I noted that this 10TB drive was also closest to the -case fan. +The results were unusual - all four drives were idling at \~44-46 +degrees Celsius. The only drive that was cooler was my 10TB drive, which +was at 38 degrees Celsius. I noted that this 10TB drive was also closest +to the case fan. -#+begin_src sh +```sh ID# ATTRIBUTE_NAME FLAG VALUE WORST THRESH TYPE UPDATED WHEN_FAILED RAW_VALUE # /dev/sda 194 Temperature_Celsius 0x0002 147 147 000 Old_age Always - 44 (Min/Max 22/46) @@ -112,7 +119,7 @@ ID# ATTRIBUTE_NAME FLAG VALUE WORST THRESH TYPE UPDATED WHEN_ 194 Temperature_Celsius 0x0002 144 144 000 Old_age Always - 45 (Min/Max 19/61) # /dev/sdd 194 Temperature_Celsius 0x0002 171 171 000 Old_age Always - 38 (Min/Max 14/56) -#+end_src +``` After looking to see if I could fit more fans into the case, I noticed that the 120mm fan used for intake from the front of the case was @@ -120,11 +127,11 @@ actually pushing air out of the case by mistake. This fan sits right in front of the hard drive bay. Once I flipped the fan around to act as an intake fan, the temperatures -dropped immediately! They are now idling at ~31-33 degrees Celsius. A +dropped immediately! They are now idling at \~31-33 degrees Celsius. A single fan spinning the wrong way caused my drives to idle 10-15 degrees higher than they should have. -#+begin_src sh +```sh ID# ATTRIBUTE_NAME FLAG VALUE WORST THRESH TYPE UPDATED WHEN_FAILED RAW_VALUE # /dev/sda 194 Temperature_Celsius 0x0002 209 209 000 Old_age Always - 31 (Min/Max 14/56) @@ -134,8 +141,8 @@ ID# ATTRIBUTE_NAME FLAG VALUE WORST THRESH TYPE UPDATED WHEN_ 194 Temperature_Celsius 0x0002 203 203 000 Old_age Always - 32 (Min/Max 21/48) # /dev/sdd 194 Temperature_Celsius 0x0002 196 196 000 Old_age Always - 33 (Min/Max 22/46) -#+end_src +``` -This was a silly error to make, but I'm glad I found it today before I +This was a silly error to make, but I\'m glad I found it today before I screwed the case into the rack and made things a lot more tedious to fix. diff --git a/content/blog/2022-11-29-nginx-referrer-ban-list.md b/content/blog/2022-11-29-nginx-referrer-ban-list.md new file mode 100644 index 0000000..9144870 --- /dev/null +++ b/content/blog/2022-11-29-nginx-referrer-ban-list.md @@ -0,0 +1,134 @@ ++++ +date = 2022-11-29 +title = "Creating a Referrer Ban List in Nginx" +description = "" +draft = false ++++ + +# Creating the Ban List + +In order to ban list referral domains or websites with Nginx, you need +to create a ban list file. The file below will accept regexes for +different domains or websites you wish to block. + +First, create the file in your nginx directory: + +```sh +doas nano /etc/nginx/banlist.conf +``` + +Next, paste the following contents in and fill out the regexes with +whichever domains you\'re blocking. + +``` conf +# /etc/nginx/banlist.conf + +map $http_referer $bad_referer { + hostnames; + + default 0; + + # Put regexes for undesired referrers here + "~news.ycombinator.com" 1; +} +``` + +# Configuring Nginx + +In order for the ban list to work, Nginx needs to know it exists and how +to handle it. For this, edit the `nginx.conf` file. + +```sh +doas nano /etc/nginx/nginx.conf +``` + +Within this file, find the `http` block and add your ban list +file location to the end of the block. + +``` conf +# /etc/nginx/nginx.conf + +http { + ... + + # Include ban list + include /etc/nginx/banlist.conf; +} +``` + +# Enabling the Ban List + +Finally, we need to take action when a bad referral site is found. To do +so, edit the configuration file for your website. For example, I have +all website configuration files in the `http.d` directory. +You may have them in the `sites-available` directory on some +distributions. + +```sh +doas nano /etc/nginx/http.d/example.com.conf +``` + +Within each website\'s configuration file, edit the `server` +blocks that are listening to ports 80 and 443 and create a check for the +`$bad_referrer` variable we created in the ban list file. + +If a matching site is found, you can return any [HTTP Status +Code](https://en.wikipedia.org/wiki/List_of_HTTP_status_codes) you want. +Code 403 (Forbidden) is logical in this case since you are preventing a +client connection due to a banned domain. + +``` conf +server { + ... + + # If a referral site is banned, return an error + if ($bad_referer) { + return 403; + } + + ... +} +``` + +# Restart Nginx + +Lastly, restart Nginx to enable all changes made. + +```sh +doas rc-service nginx restart +``` + +# Testing Results + +In order to test the results, let\'s curl the contents of our site. To +start, I\'ll curl the site normally: + +```sh +curl https://cleberg.net +``` + +The HTML contents of the page come back successfully: + +``` html +<!doctype html>...</html> +``` + +Next, let\'s include a banned referrer: + +```sh +curl --referer https://news.ycombinator.com https://cleberg.net +``` + +This time, I\'m met with a 403 Forbidden response page. That means we +are successful and any clients being referred from a banned domain will +be met with this same response code. + +``` html +<html> +<head><title>403 Forbidden</title></head> +<body> +<center><h1>403 Forbidden</h1></center> +<hr><center>nginx</center> +</body> +</html> +``` diff --git a/content/blog/2022-11-29-nginx-referrer-ban-list.org b/content/blog/2022-11-29-nginx-referrer-ban-list.org deleted file mode 100644 index a80a602..0000000 --- a/content/blog/2022-11-29-nginx-referrer-ban-list.org +++ /dev/null @@ -1,126 +0,0 @@ -#+title: Creating a Referrer Ban List in Nginx -#+date: 2022-11-29 -#+description: Learn how to create a ban list for referring sites in Nginx. -#+filetags: :nginx: - -* Creating the Ban List -In order to ban list referral domains or websites with Nginx, you need -to create a ban list file. The file below will accept regexes for -different domains or websites you wish to block. - -First, create the file in your nginx directory: - -#+begin_src sh -doas nano /etc/nginx/banlist.conf -#+end_src - -Next, paste the following contents in and fill out the regexes with -whichever domains you're blocking. - -#+begin_src conf -# /etc/nginx/banlist.conf - -map $http_referer $bad_referer { - hostnames; - - default 0; - - # Put regexes for undesired referrers here - "~news.ycombinator.com" 1; -} -#+end_src - -* Configuring Nginx -In order for the ban list to work, Nginx needs to know it exists and how -to handle it. For this, edit the =nginx.conf= file. - -#+begin_src sh -doas nano /etc/nginx/nginx.conf -#+end_src - -Within this file, find the =http= block and add your ban list file -location to the end of the block. - -#+begin_src conf -# /etc/nginx/nginx.conf - -http { - ... - - # Include ban list - include /etc/nginx/banlist.conf; -} -#+end_src - -* Enabling the Ban List -Finally, we need to take action when a bad referral site is found. To do -so, edit the configuration file for your website. For example, I have -all website configuration files in the =http.d= directory. You may have -them in the =sites-available= directory on some distributions. - -#+begin_src sh -doas nano /etc/nginx/http.d/example.com.conf -#+end_src - -Within each website's configuration file, edit the =server= blocks that -are listening to ports 80 and 443 and create a check for the -=$bad_referrer= variable we created in the ban list file. - -If a matching site is found, you can return any -[[https://en.wikipedia.org/wiki/List_of_HTTP_status_codes][HTTP Status -Code]] you want. Code 403 (Forbidden) is logical in this case since you -are preventing a client connection due to a banned domain. - -#+begin_src conf -server { - ... - - # If a referral site is banned, return an error - if ($bad_referer) { - return 403; - } - - ... -} -#+end_src - -* Restart Nginx -Lastly, restart Nginx to enable all changes made. - -#+begin_src sh -doas rc-service nginx restart -#+end_src - -* Testing Results -In order to test the results, let's curl the contents of our site. To -start, I'll curl the site normally: - -#+begin_src sh -curl https://cleberg.net -#+end_src - -The HTML contents of the page come back successfully: - -#+begin_src html -<!doctype html>...</html> -#+end_src - -Next, let's include a banned referrer: - -#+begin_src sh -curl --referer https://news.ycombinator.com https://cleberg.net -#+end_src - -This time, I'm met with a 403 Forbidden response page. That means we are -successful and any clients being referred from a banned domain will be -met with this same response code. - -#+begin_src html -<html> -<head><title>403 Forbidden</title></head> -<body> -<center><h1>403 Forbidden</h1></center> -<hr><center>nginx</center> -</body> -</html> -#+end_src diff --git a/content/blog/2022-12-01-nginx-compression.md b/content/blog/2022-12-01-nginx-compression.md new file mode 100644 index 0000000..d027afe --- /dev/null +++ b/content/blog/2022-12-01-nginx-compression.md @@ -0,0 +1,80 @@ ++++ +date = 2022-12-01 +title = "Enable GZIP Compression in Nginx" +description = "" +draft = false ++++ + +# Text Compression + +Text compression allows a web server to serve text-based resources +faster than uncompressed data. This can speed up things like First +Contentful Paint, Tie to Interactive, and Speed Index. + +# Enable Nginx Compression with gzip + +In order to enable text compression on Nginx, we need to enable it +within the configuration file: + +```sh +nano /etc/nginx/nginx.conf +``` + +Within the `http` block, find the section that shows +something like the block below. This is the default gzip configuration I +found in my `nginx.conf` file on Alpine Linux 3.17. Yours may +look slightly different, just make sure that you\'re not creating any +duplicate gzip options. + +``` conf +# Enable gzipping of responses. +#gzip on; + +# Set the Vary HTTP header as defined in the RFC 2616. Default is 'off'. +gzip_vary on; +``` + +Remove the default gzip lines and replace them with the following: + +``` conf +# Enable gzipping of responses. +gzip on; +gzip_vary on; +gzip_min_length 10240; +gzip_proxied expired no-cache no-store private auth; +gzip_types text/plain text/css text/xml text/javascript application/x-javascript application/xml; +gzip_disable "MSIE [1-6]"; +``` + +# Explanations of ngx~httpgzipmodule~ Options + +Each of the lines above enables a different aspect of the gzip response +for Nginx. Here are the full explanations: + +- `gzip` -- Enables or disables gzipping of responses. +- `gzip_vary` -- Enables or disables inserting the \"Vary: + Accept-Encoding\" response header field if the directives gzip, + gzip~static~, or gunzip are active. +- `gzip_min_length` -- Sets the minimum length of a + response that will be gzipped. The length is determined only from + the \"Content-Length\" response header field. +- `gzip_proxied` -- Enables or disables gzipping of + responses for proxied requests depending on the request and + response. The fact that the request is proxied is determined by the + presence of the \"Via\" request header field. +- `gzip_types` -- Enables gzipping of responses for the + specified MIME types in addition to \"text/html\". The special value + "\*" matches any MIME type (0.8.29). Responses with the + \"text/html\" type are always compressed. +- `gzip_disable` -- Disables gzipping of responses for + requests with \"User-Agent\" header fields matching any of the + specified regular expressions. + - The special mask \"msie6\" (0.7.12) corresponds to the regular + expression \"MSIE \[4-6\].\", but works faster. Starting from + version 0.8.11, \"MSIE 6.0; ... SV1\" is excluded from this + mask. + +More information on these directives and their options can be found on +the [Module +ngx~httpgzipmodule~](https://nginx.org/en/docs/http/ngx_http_gzip_module.html) +page in Nginx\'s documentation. diff --git a/content/blog/2022-12-01-nginx-compression.org b/content/blog/2022-12-01-nginx-compression.org deleted file mode 100644 index 73d218b..0000000 --- a/content/blog/2022-12-01-nginx-compression.org +++ /dev/null @@ -1,73 +0,0 @@ -#+title: Enable GZIP Compression in Nginx -#+date: 2022-12-01 -#+description: Learn how to enable compression in Nginx. -#+filetags: :nginx: - -* Text Compression -Text compression allows a web server to serve text-based resources -faster than uncompressed data. This can speed up things like First -Contentful Paint, Tie to Interactive, and Speed Index. - -* Enable Nginx Compression with gzip -In order to enable text compression on Nginx, we need to enable it -within the configuration file: - -#+begin_src sh -nano /etc/nginx/nginx.conf -#+end_src - -Within the =http= block, find the section that shows something like the -block below. This is the default gzip configuration I found in my -=nginx.conf= file on Alpine Linux 3.17. Yours may look slightly -different, just make sure that you're not creating any duplicate gzip -options. - -#+begin_src conf -# Enable gzipping of responses. -#gzip on; - -# Set the Vary HTTP header as defined in the RFC 2616. Default is 'off'. -gzip_vary on; -#+end_src - -Remove the default gzip lines and replace them with the following: - -#+begin_src conf -# Enable gzipping of responses. -gzip on; -gzip_vary on; -gzip_min_length 10240; -gzip_proxied expired no-cache no-store private auth; -gzip_types text/plain text/css text/xml text/javascript application/x-javascript application/xml; -gzip_disable "MSIE [1-6]"; -#+end_src - -* Explanations of ngx_{httpgzipmodule} Options -Each of the lines above enables a different aspect of the gzip response -for Nginx. Here are the full explanations: - -- =gzip= -- Enables or disables gzipping of responses. -- =gzip_vary= -- Enables or disables inserting the "Vary: - Accept-Encoding" response header field if the directives gzip, - gzip_{static}, or gunzip are active. -- =gzip_min_length= -- Sets the minimum length of a response that will - be gzipped. The length is determined only from the "Content-Length" - response header field. -- =gzip_proxied= -- Enables or disables gzipping of responses for - proxied requests depending on the request and response. The fact that - the request is proxied is determined by the presence of the "Via" - request header field. -- =gzip_types= -- Enables gzipping of responses for the specified MIME - types in addition to "text/html". The special value “*” matches any - MIME type (0.8.29). Responses with the "text/html" type are always - compressed. -- =gzip_disable= -- Disables gzipping of responses for requests with - "User-Agent" header fields matching any of the specified regular - expressions. - - The special mask "msie6" (0.7.12) corresponds to the regular - expression "MSIE [4-6].", but works faster. Starting from version - 0.8.11, "MSIE 6.0; ... SV1" is excluded from this mask. - -More information on these directives and their options can be found on -the [[https://nginx.org/en/docs/http/ngx_http_gzip_module.html][Module -ngx_{httpgzipmodule}]] page in Nginx's documentation. diff --git a/content/blog/2022-12-07-nginx-wildcard-redirect.org b/content/blog/2022-12-07-nginx-wildcard-redirect.md index 41e84cb..c2ef747 100644 --- a/content/blog/2022-12-07-nginx-wildcard-redirect.org +++ b/content/blog/2022-12-07-nginx-wildcard-redirect.md @@ -1,9 +1,12 @@ -#+title: Redirect Nginx Subdomains & Trailing Content with Regex -#+date: 2022-12-07 -#+description: A simple Nginx configuration to redirect all subdomains and trailing content. -#+filetags: :nginx: ++++ +date = 2022-12-07 +title = "Redirect Nginx Subdomains and Trailing Content with Regex" +description = "" +draft = false ++++ + +# Problem -* Problem I recently migrated domains and replaced the old webpage with a simple info page with instructions to users on how to edit their bookmarks and URLs to get to the page they were seeking. @@ -11,12 +14,13 @@ URLs to get to the page they were seeking. This was not ideal as it left the work up to the user and may have caused friction for users who accessed my RSS feed. -* Solution +# Solution + Instead, I finally found a solution that allows me to redirect both subdomains AND trailing content. For example, both of these URLs now -redirect properly using the logic I'll explain below: +redirect properly using the logic I\'ll explain below: -#+begin_src txt +``` txt # Example 1 - Simple base domain redirect with trailing content https://domain1.com/blog/alpine-linux/ -> https://domain2.com/blog/alpine-linux/ @@ -24,22 +28,23 @@ https://domain1.com/blog/alpine-linux/ -> https://domain2.com/blog/alpine-linux/ https://libreddit.domain1.com/r/history/comments/7z8cbg/new_discovery_mode_turns_video_game_assassins/ -> https://libreddit.domain2.com/r/history/comments/7z8cbg/new_discovery_mode_turns_video_game_assassins/ -#+end_src +``` Go ahead, try the URLs if you want to test them. -** Nginx Config +## Nginx Config + To make this possible. I needed to configure a proper redirect scheme in my Nginx configuration. -#+begin_src sh +```sh doas nano /etc/nginx/http.d/domain1.conf -#+end_src +``` Within this file, I had one block configured to redirect HTTP requests to HTTPS for the base domain and all subdomains. -#+begin_src conf +``` conf server { listen [::]:80; listen 80; @@ -55,14 +60,14 @@ server { return 404; } -#+end_src +``` -For the base domain, I have another =server= block dedicated to -redirecting all base domain requests. You can see that the =rewrite= -line is instructing Nginx to gather all trailing content and append it -to the new =domain2.com= URL. +For the base domain, I have another `server` block dedicated +to redirecting all base domain requests. You can see that the +`rewrite` line is instructing Nginx to gather all trailing +content and append it to the new `domain2.com` URL. -#+begin_src conf +``` conf server { listen [::]:443 ssl http2; listen 443 ssl http2; @@ -74,21 +79,23 @@ server { ssl_certificate /etc/letsencrypt/live/domain1.com/fullchain.pem; ssl_certificate_key /etc/letsencrypt/live/domain1.com/privkey.pem; } -#+end_src +``` Finally, the tricky part is figuring out how to tell Nginx to redirect while keeping both a subdomain and trailing content intact. I found that -the easiest way to do this is to give it a =server= block of its own. +the easiest way to do this is to give it a `server` block of +its own. -Within this block, we need to do some regex on the =server_name= line -before we can rewrite anything. This creates a variable called -=subdomain=. +Within this block, we need to do some regex on the +`server_name` line before we can rewrite anything. This +creates a variable called `subdomain`. -Once the server gets to the =rewrite= line, it pulls the =subdomain= -variable from above and uses it on the new =domain2.com= domain before -appending the trailing content (=$request_uri=). +Once the server gets to the `rewrite` line, it pulls the +`subdomain` variable from above and uses it on the new +`domain2.com` domain before appending the trailing content +(`$request_uri`). -#+begin_src conf +``` conf server { listen [::]:443 ssl http2; listen 443 ssl http2; @@ -100,17 +107,17 @@ server { ssl_certificate /etc/letsencrypt/live/domain1.com/fullchain.pem; ssl_certificate_key /etc/letsencrypt/live/domain1.com/privkey.pem; } -#+end_src +``` -That's all there is to it. With this, I simply restarted Nginx and +That\'s all there is to it. With this, I simply restarted Nginx and watched the redirections work in-action. -#+begin_src sh +```sh doas rc-service nginx restart -#+end_src +``` Looking back on it, I wish I had done this sooner. Who knows how many people went looking for my sites or bookmarks and gave up when they saw the redirect instructions page. -Oh well, it's done now. Live and learn. +Oh well, it\'s done now. Live and learn. diff --git a/content/blog/2022-12-17-st.md b/content/blog/2022-12-17-st.md new file mode 100644 index 0000000..46f6cec --- /dev/null +++ b/content/blog/2022-12-17-st.md @@ -0,0 +1,95 @@ ++++ +date = 2022-12-17 +title = "Simple Terminal" +description = "" +draft = false ++++ + +# st + +[st](https://st.suckless.org) standards for Simple Terminal, a simple +terminal implementation for X made by the +[suckless](https://suckless.org) team. + +This post walks through the dependencies needed and process to build and +install `st` on Fedora Workstation. + +## Obtain Files + +To start, obtain the source files for `st` via +`git clone`. + +```sh +mkdir ~/suckless && cd ~/suckless +git clone https://git.suckless.org/st && cd st +``` + +## Dependencies + +Once you have the files and are in the `st` directory, ensure +the following packages are installed. + +```sh +sudo dnf update && sudo dnf upgrade +sudo dnf install gcc patch libX11-devel libXft-devel +``` + +## Building + +Before building, ensure that you read the README file. + +```sh +cat README +``` + +Once you\'ve read the instructions, open the `config.mk` file +and ensure it matches your setup. If you\'re not sure, leave the default +options within the file. + +Finally, you can build `st` with the following command. +Ensure you run as root (e.g., `sudo`) or else you may not end +up with a usable application file. + +```sh +sudo make clean install +``` + +## Customization (Patches) + +Note that customizing `st` requires you to modify the source +files or to download one of the [available +patches](https://st.suckless.org/patches/) for suckless.org. + +If you\'ve already installed `st` and want to customize or +install a patch, start by uninstalling the current program. + +```sh +cd ~/suckless/st +sudo make uninstall +``` + +Next, grab the `<path>.diff` file from the page of the patch +you chose. For example, I will be using the +[defaultfontsize](https://st.suckless.org/patches/defaultfontsize/) +patch in the below example. + +```sh +wget https://st.suckless.org/patches/defaultfontsize/st-defaultfontsize-20210225-4ef0cbd.diff +``` + +Once the file is downloaded inside the `st` folder, apply the +patch and re-install the program. You may need to install the +`patch` command if you don\'t have it installed already (you +should have installed it above). + +```sh +patch -i st-defaultfontsize-20210225-4ef0cbd.diff +sudo make clean install +``` + +Once installed, you can use the default font size patch to launch +`st` with any font size you wish: + +```sh +st -z 16 +``` diff --git a/content/blog/2022-12-17-st.org b/content/blog/2022-12-17-st.org deleted file mode 100644 index c3724fb..0000000 --- a/content/blog/2022-12-17-st.org +++ /dev/null @@ -1,87 +0,0 @@ -#+title: Simple Terminal -#+date: 2022-12-17 -#+description: Instructions for building simple terminal on Fedora. -#+filetags: :linux: - -* st -[[https://st.suckless.org][st]] standards for Simple Terminal, a simple -terminal implementation for X made by the -[[https://suckless.org][suckless]] team. - -This post walks through the dependencies needed and process to build and -install =st= on Fedora Workstation. - -** Obtain Files -To start, obtain the source files for =st= via =git clone=. - -#+begin_src sh -mkdir ~/suckless && cd ~/suckless -git clone https://git.suckless.org/st && cd st -#+end_src - -** Dependencies -Once you have the files and are in the =st= directory, ensure the -following packages are installed. - -#+begin_src sh -sudo dnf update && sudo dnf upgrade -sudo dnf install gcc patch libX11-devel libXft-devel -#+end_src - -** Building -Before building, ensure that you read the README file. - -#+begin_src sh -cat README -#+end_src - -Once you've read the instructions, open the =config.mk= file and ensure -it matches your setup. If you're not sure, leave the default options -within the file. - -Finally, you can build =st= with the following command. Ensure you run -as root (e.g., =sudo=) or else you may not end up with a usable -application file. - -#+begin_src sh -sudo make clean install -#+end_src - -** Customization (Patches) -Note that customizing =st= requires you to modify the source files or to -download one of the [[https://st.suckless.org/patches/][available -patches]] for suckless.org. - -If you've already installed =st= and want to customize or install a -patch, start by uninstalling the current program. - -#+begin_src sh -cd ~/suckless/st -sudo make uninstall -#+end_src - -Next, grab the =<path>.diff= file from the page of the patch you chose. -For example, I will be using the -[[https://st.suckless.org/patches/defaultfontsize/][defaultfontsize]] -patch in the below example. - -#+begin_src sh -wget https://st.suckless.org/patches/defaultfontsize/st-defaultfontsize-20210225-4ef0cbd.diff -#+end_src - -Once the file is downloaded inside the =st= folder, apply the patch and -re-install the program. You may need to install the =patch= command if -you don't have it installed already (you should have installed it -above). - -#+begin_src sh -patch -i st-defaultfontsize-20210225-4ef0cbd.diff -sudo make clean install -#+end_src - -Once installed, you can use the default font size patch to launch =st= -with any font size you wish: - -#+begin_src sh -st -z 16 -#+end_src diff --git a/content/blog/2022-12-23-alpine-desktop.org b/content/blog/2022-12-23-alpine-desktop.md index d217d74..52538b5 100644 --- a/content/blog/2022-12-23-alpine-desktop.org +++ b/content/blog/2022-12-23-alpine-desktop.md @@ -1,86 +1,92 @@ -#+title: Alpine Linux as a Desktop OS -#+date: 2022-12-23 -#+description: Learn how to set up Alpine Linux with Sway to use as a desktop operating system. -#+filetags: :linux: -#+slug: alpine-desktop ++++ +date = 2022-12-23 +title = "Alpine Linux as a Desktop OS" +description = "" +draft = false ++++ + + +# Isn\'t Alpine Linux for Servers? -* Isn't Alpine Linux for Servers? This is a question I see a lot when people are presented with an example of Alpine Linux running as a desktop OS. -While Alpine is small, fast, and minimal, that doesn't stop it from +While Alpine is small, fast, and minimal, that doesn\'t stop it from functioning at a productive level for desktop users. This post is documentation of how I installed and modified Alpine Linux to become my daily desktop OS. -* Installation +# Installation + Note that I cover the installation of Alpine Linux in my other post, so -I won't repeat it here: [[../alpine-linux/][Alpine Linux: My New -Server OS]]. +I won\'t repeat it here: [Alpine Linux: My New Server +OS](../alpine-linux/). Basically, get a bootable USB or whatever you prefer with Alpine on it, boot the ISO, and run the setup script. -#+begin_src sh +```sh setup-alpine -#+end_src +``` Once you have gone through all the options and installer finishes without errors, reboot. -#+begin_src sh +```sh reboot -#+end_src +``` + +# Initial Setup -* Initial Setup Once Alpine is installed and the machine has rebooted, login is as root -initially or =su= to root once you log in as your user. From here, you -should start by updating and upgrading the system in case the ISO was -not fully up-to-date. +initially or `su` to root once you log in as your user. From +here, you should start by updating and upgrading the system in case the +ISO was not fully up-to-date. -#+begin_src sh +```sh # Update and upgrade system apk -U update && apk -U upgrade # Add an editor so we can enable the community repository apk add nano -#+end_src +``` -You need to uncomment the =community= repository for your version of -Alpine Linux. +You need to uncomment the `community` repository for your +version of Alpine Linux. -For v3.17, the =repositories= file should look like this: +For v3.17, the `repositories` file should look like this: -#+begin_src sh +```sh nano /etc/apk/repositories -#+end_src +``` -#+begin_src conf +``` conf #/media/sda/apks http://mirrors.gigenet.com/alpinelinux/v3.17/main http://mirrors.gigenet.com/alpinelinux/v3.17/community #http://mirrors.gigenet.com/alpinelinux/edge/main #http://mirrors.gigenet.com/alpinelinux/edge/community #http://mirrors.gigenet.com/alpinelinux/edge/testing -#+end_src +``` -#+begin_src sh +```sh # Add the rest of your packages apk add linux-firmware iwd doas git curl wget # Add yourself to the wheel group so you can use the doas command adduser $USER wheel -#+end_src +``` + +# Window Manager (Desktop) -* Window Manager (Desktop) -The [[https://wiki.alpinelinux.org/wiki/Sway][Sway installation guide]] +The [Sway installation guide](https://wiki.alpinelinux.org/wiki/Sway) has everything you need to get Sway working on Alpine. -However, I'll include a brief list of the commands I ran and their +However, I\'ll include a brief list of the commands I ran and their purpose for posterity here. -#+begin_src sh +```sh # Add eudev and set it up apk add eudev setup-devd udev @@ -117,21 +123,22 @@ apk add \ # Install optional dependencies: swaylock swaylockd \ # lockscreen tool swaybg \ # wallpaper daemon swayidle # idle management (DPMS) daemon -#+end_src +``` Once you have the packages installed and set-up, you need to export the -=XDG_RUNTIME_DIR= upon login. To do this, edit your =.profile= file. +`XDG_RUNTIME_DIR` upon login. To do this, edit your +`.profile` file. -If you use another shell, such as =zsh=, you need to edit that shell's -profile (e.g., =~/.zprofile=)! +If you use another shell, such as `zsh`, you need to edit +that shell\'s profile (e.g., `~/.zprofile`)! -#+begin_src sh +```sh nano ~/.profile -#+end_src +``` Within the file, paste this: -#+begin_src sh +```sh if test -z "${XDG_RUNTIME_DIR}"; then export XDG_RUNTIME_DIR=/tmp/$(id -u)-runtime-dir if ! test -d "${XDG_RUNTIME_DIR}"; then @@ -139,19 +146,20 @@ if test -z "${XDG_RUNTIME_DIR}"; then chmod 0700 "${XDG_RUNTIME_DIR}" fi fi -#+end_src +``` -Once that's complete, you can launch Sway manually. +Once that\'s complete, you can launch Sway manually. -#+begin_src sh +```sh dbus-run-session -- sway -#+end_src +``` + +## Personal Touches -** Personal Touches I also added the following packages, per my personal preferences and situation. -#+begin_src sh +```sh doas apk add brightnessctl \ # Brightness controller zsh \ # Shell firefox \ # Browser @@ -161,89 +169,93 @@ doas apk add brightnessctl \ # Brightness controller neomutt \ # CLI email client thunderbird \ # GUI email client gnupg # GPG key manager -#+end_src +``` From here, I use my Syncthing storage to pull all the configuration -files I stored from prior desktops, such as -[[https://git.sr.ht/~cmc/dotfiles][my dotfiles]]. +files I stored from prior desktops, such as [my +dotfiles](https://git.sr.ht/~cmc/dotfiles). + +# Resolving Issues -* Resolving Issues -** WiFi Issues -I initially tried to set up my Wi-Fi the standard way with =iwd=, but it -didn't work. +## WiFi Issues -Here is what I initially tried (I did all of this as =root=): +I initially tried to set up my Wi-Fi the standard way with +`iwd`, but it didn\'t work. -#+begin_src sh +Here is what I initially tried (I did all of this as `root`): + +```sh apk add iwd rc-service iwd start iwctl station wlan0 connect <SSID> # This will prompt for the password rc-update add iwd boot && rc-update add dbus boot -#+end_src +``` Then, I added the Wi-Fi entry to the bottom of the networking interface file: -#+begin_src sh +```sh nano /etc/network/interfaces -#+end_src +``` -#+begin_src conf +``` conf auto wlan0 iface wlan0 inet dhcp -#+end_src +``` Finally, restart the networking service: -#+begin_src sh +```sh rc-service networking restart -#+end_src +``` My Wi-Fi interface would receive an IP address from the router, but it could not ping anything in the network. To solve the Wi-Fi issues, I -originally upgraded to Alpine's =edge= repositories, which was -unnecessary. +originally upgraded to Alpine\'s `edge` repositories, which +was unnecessary. -Really, the solution was to enable the =NameResolvingService=resolvconf= -in =/etc/iwd/main.conf=. +Really, the solution was to enable the +`NameResolvingService=resolvconf` in +`/etc/iwd/main.conf`. -#+begin_src sh +```sh doas nano /etc/iwd/main.conf -#+end_src +``` -#+begin_src conf +``` conf [Network] NameResolvingService=resolvconf -#+end_src +``` Once I finished this process, my Wi-Fi is working flawlessly. -** Sound Issues +## Sound Issues + Same as with the Wi-Fi, I had no sound and could not control the mute/unmute or volume buttons on my laptop. To resolve this, I installed -[[https://wiki.alpinelinux.org/wiki/PipeWire][pipewire]]. +[pipewire](https://wiki.alpinelinux.org/wiki/PipeWire). -#+begin_src sh +```sh # Add your user to the following groups addgroup $USER audio addgroup $USER video # Install pipewire and other useful packages apk add pipewire wireplumber pipewire-pulse pipewire-jack pipewire-alsa -#+end_src +``` -Finally, I needed to add =/usr/libexec/pipewire-launcher= to my -=.config/sway/config= file so that Pipewire would run every time I -launched sway. +Finally, I needed to add `/usr/libexec/pipewire-launcher` to +my `.config/sway/config` file so that Pipewire would run +every time I launched sway. -#+begin_src sh +```sh nano ~/.config/sway/config -#+end_src +``` -#+begin_src conf +``` conf # Run pipewire audio server exec /usr/libexec/pipewire-launcher @@ -252,9 +264,9 @@ bindsym XF86AudioRaiseVolume exec --no-startup-id pactl set-sink-volume @DEFAULT bindsym XF86AudioLowerVolume exec --no-startup-id pactl set-sink-volume @DEFAULT_SINK@ -5% bindsym XF86AudioMute exec --no-startup-id pactl set-sink-mute @DEFAULT_SINK@ toggle bindsym XF86AudioMicMute exec --no-startup-id pactl set-source-mute @DEFAULT_SOURCE@ toggle -#+end_src +``` -Note that I do not use bluetooth or screen sharing, so I won't cover +Note that I do not use bluetooth or screen sharing, so I won\'t cover those options in this post. Other than these issues, I have a working Alpine desktop. No other diff --git a/content/blog/2023-01-03-recent-website-changes.org b/content/blog/2023-01-03-recent-website-changes.md index c54f1e3..2334444 100644 --- a/content/blog/2023-01-03-recent-website-changes.org +++ b/content/blog/2023-01-03-recent-website-changes.md @@ -1,36 +1,44 @@ -#+title: Recent Website Changes -#+date: 2023-01-03 -#+description: A retrospective of recent changes to my website. -#+filetags: :dev: ++++ +date = 2023-01-03 +title = "Recent Website Changes" +description = "" +draft = false ++++ + +# The State of This Website -* The State of This Website Over the years, this website has changed URLs, styles, content focus, and much more. However, it seems that I am never done, as I am yet again changing this page to fit my current needs and wants. -While this site was already minimal (~12kb), it contained a lot of +While this site was already minimal (\~12kb), it contained a lot of disorganized content and some poorly chosen color schemes. The recent updates attempt to fix these items while focusing on what I truly care about here: the content within each page. -* Recent Changes -I've made quite a few changes to the style of this website today, both +# Recent Changes + +I\'ve made quite a few changes to the style of this website today, both in the CSS and in the HTML. -Here are some of the key takeaways from today's changes: +Here are some of the key takeaways from today\'s changes: + +1. Reduce the width of the website from `60em` to + `40em`. +2. Remove breadcrumb navigation and replaced with a simple \"Return + Home\" link when visiting anything other than the homepage. +3. Remove syntax highlighting from code blocks. CSS now loads from a + single file. +4. Move blog posts on the homepage to the top, pushing tertiary content + down. +5. Update font-family from `monospace` to + `sans-serif` for readability. + +# Future Focus -1. Reduce the width of the website from =60em= to =40em=. -2. Remove breadcrumb navigation and replaced with a simple "Return Home" - link when visiting anything other than the homepage. -3. Remove syntax highlighting from code blocks. CSS now loads from a - single file. -4. Move blog posts on the homepage to the top, pushing tertiary content - down. -5. Update font-family from =monospace= to =sans-serif= for readability. +## Accessibility -* Future Focus -** Accessibility My main focus amidst all the changes this past year was accessibility. I tried to improve the accessibility of all pages on this site as well as I know how. For example, I added aria labels to identify different @@ -39,7 +47,8 @@ navigation menus in November. I want to continue this in 2023 and learn more about the accessibility features I can utilize to help those who may need them. -** Content First +## Content First + Beyond accessibility, I am making a concerted effort to bring the content of this site to the forefront and push the tertiary information (e.g., About Me, Services, etc.) down below the content. @@ -48,27 +57,30 @@ Further, I want to review and edit previous blog posts for grammar, accuracy, dead links, and more. Where necessary, I may even add a blurb at the top of old posts that are no longer accurate or helpful. -** Style +## Style + As always, I will be searching for ways to reduce distractions and bring a minimalistic approach to this site. While there are certainly more -drastic measures I could take, such as making this a -[[https://shinobi.bt.ht][Shinobi Website]] or a [[https://nocss.club][No -CSS Website]], I prefer to keep some modern features here. +drastic measures I could take, such as making this a [Shinobi +Website](https://shinobi.bt.ht) or a [No CSS +Website](https://nocss.club), I prefer to keep some modern features +here. Two ideas have been floating around in my head, but I am not sure how I feel about these approaches yet: -1. Going all-in with Emacs org-mode and creating a script to - auto-publish all my blog posts from org-mode to plain HTML files and - then letting my CSS style it after the fact. -2. Focus on publishing for Gemini or Gopher and then utilize a - conversion program to translate the pages to HTML. +1. Going all-in with Emacs org-mode and creating a script to + auto-publish all my blog posts from org-mode to plain HTML files and + then letting my CSS style it after the fact. +2. Focus on publishing for Gemini or Gopher and then utilize a + conversion program to translate the pages to HTML. + +# Looking Back -* Looking Back As I sit here and finalize the changes, as well as this post, I am happy -with the current state of this website. It's certainly a long way from -my first attempts (parallax background images, anyone?) and it's good to -see the progress. +with the current state of this website. It\'s certainly a long way from +my first attempts (parallax background images, anyone?) and it\'s good +to see the progress. I can only hope and work hard to ensure that I make more meaningful progress by this time next year. diff --git a/content/blog/2023-01-05-mass-unlike-tumblr-posts.org b/content/blog/2023-01-05-mass-unlike-tumblr-posts.md index 8e7574c..c86102c 100644 --- a/content/blog/2023-01-05-mass-unlike-tumblr-posts.org +++ b/content/blog/2023-01-05-mass-unlike-tumblr-posts.md @@ -1,15 +1,19 @@ -#+title: How to Easily Mass Unlike Tumblr Posts with Javascript -#+date: 2023-01-05 -#+description: Learn how to unlike Tumblr posts en masse in the browser. -#+filetags: :dev: ++++ +date = 2023-01-05 +title = " How to Easily Mass Unlike Tumblr Posts with Javascript" +description = "" +draft = false ++++ + +# The Dilemma -* The Dilemma The dilemma I had was pretty simple: I wanted to unlike all the posts I have liked on Tumblr so that I could follow a new focus on blogs and start fresh. Otherwise, Tumblr will keep recommending content based on your previous likes. -* The Solution +# The Solution + I searched the web for a while and noted that most solutions referenced Tumblr setting and dashboard pages that no longer exist. Additionally, I did not want to install a third party extension to do this, as some @@ -19,12 +23,13 @@ Luckily, I used Javascript for a while a few years ago and figured it would be easy enough to script a solution, as long as Tumblr had a system for the unlike buttons. -** Identifying Unlike Buttons -Tumblr's unlike buttons are structured as you can see in the following -code block. All unlike buttons have an =aria-label= with a value of -=Unlike=. +## Identifying Unlike Buttons + +Tumblr\'s unlike buttons are structured as you can see in the following +code block. All unlike buttons have an `aria-label` with a +value of `Unlike`. -#+begin_src html +``` html <button class="TRX6J" aria-label="Unlike"> <span class="EvhBA B1Z5w ztpfZ" tabindex="-1"> <svg xmlns="http://www.w3.org/2000/svg" height="21" width="23" @@ -33,53 +38,56 @@ code block. All unlike buttons have an =aria-label= with a value of </svg> </span> </button> -#+end_src +``` -** Running a Script to Unlike All Likes -To run this script, you will need to load the -[[https://www.tumblr.com/likes][Likes | Tumblr]] page while logged in to -your account. +## Running a Script to Unlike All Likes + +To run this script, you will need to load the [Likes \| +Tumblr](https://www.tumblr.com/likes) page while logged in to your +account. Further, be sure to scroll down to the bottom and force Tumblr to load more posts so that this script unlikes more posts at a time. Once you are logged in and the page is loaded, open the Developer Tools -and be sure you're on the "Console" tab. It should look something like -this (this is in Firefox, Chromium should be similar): +and be sure you\'re on the \"Console\" tab. It should look something +like this (this is in Firefox, Chromium should be similar): -#+caption: Firefox Dev !Tools -[[https:///img.cleberg.net/blog/20230105-mass-unlike-tumblr-posts/dev_console.png]] + All you need to do is paste the following snippet into the dev console. -This code will collect all unlike buttons (=elements=) and then click -each button to unlike it. +This code will collect all unlike buttons (`elements`) and +then click each button to unlike it. -Optionally, you can comment-out the line =elements[i].click();= and -uncomment the =console.log()= lines to simply print out information -without performing any actions. This can be useful to debug issues or -confirm that the code below isn't doing anything you don't want it to. +Optionally, you can comment-out the line +`elements[i].click();` and uncomment the +`console.log()` lines to simply print out information without +performing any actions. This can be useful to debug issues or confirm +that the code below isn\'t doing anything you don\'t want it to. -#+begin_src javascript +``` javascript const elements = document.querySelectorAll('[aria-label="Unlike"]'); // console.log(elements); // 👉 [button] - + for (let i=0; i < elements.length; i++) { // console.log(elements[i]); elements[i].click(); } -#+end_src +``` + +# Results -* Results -The results were quick for my situation, as it unliked ~200 posts within -2-3 seconds. I am not sure how this will perform on larger sets of likes -(or if Tumblr has a limit to unliking posts). +The results were quick for my situation, as it unliked \~200 posts +within 2-3 seconds. I am not sure how this will perform on larger sets +of likes (or if Tumblr has a limit to unliking posts). You can see the below screenshot showing that I pasted the snippet into the console, pressed Enter, and then the posts are automatically unliked. -#+caption: Script !Results -[[https:///img.cleberg.net/blog/20230105-mass-unlike-tumblr-posts/script_results.png]] + Thinking about this further, I would bet that this would be fairly simple to package into a browser add-on so that users could install the diff --git a/content/blog/2023-01-08-fedora-login-manager.org b/content/blog/2023-01-08-fedora-login-manager.md index 861a174..2f1fdfa 100644 --- a/content/blog/2023-01-08-fedora-login-manager.org +++ b/content/blog/2023-01-08-fedora-login-manager.md @@ -1,10 +1,13 @@ -#+title: How to Remove the Login Manager from Fedora i3 -#+date: 2023-01-08 -#+description: Learn how to completely remove the login manager from Fedora i3. -#+filetags: :linux: ++++ +date = 2023-01-08 +title = "How to Remove the Login Manager from Fedora i3" +description = "" +draft = false ++++ -* Fedora i3's Login Manager -Since I use the i3 spin of Fedora Workstation, I don't like to have a +# Fedora i3\'s Login Manager + +Since I use the i3 spin of Fedora Workstation, I don\'t like to have a login manager installed by default. As of the current version of Fedora i3, the default login manager is LightDM. @@ -12,29 +15,31 @@ If this is no longer the case, you can search for currently-installed packages with the following command and see if you can identify a different login manager. -#+begin_src sh +```sh sudo dnf list installed -#+end_src +``` + +# Removing the Login Manager -* Removing the Login Manager In order to remove the login manager, simply uninstall the package. -#+begin_src sh +```sh sudo dnf remove lightdm -#+end_src +``` + +# Launching i3 Manually -* Launching i3 Manually In order to launch i3 manually, you need to set up your X session -properly. To start, create or edit the =~/.xinitrc= file to include the -following at the bottom. +properly. To start, create or edit the `~/.xinitrc` file to +include the following at the bottom. -#+begin_src config +``` config exec i3 -#+end_src +``` Now, whenever you log in to the TTY, you can launch your desktop with the following command. -#+begin_src sh +```sh startx -#+end_src +``` diff --git a/content/blog/2023-01-21-flatpak-symlinks.md b/content/blog/2023-01-21-flatpak-symlinks.md new file mode 100644 index 0000000..a69b53b --- /dev/null +++ b/content/blog/2023-01-21-flatpak-symlinks.md @@ -0,0 +1,51 @@ ++++ +date = 2023-01-21 +title = "Running Flatpak Apps with Symlinks" +description = "" +draft = false ++++ + +# Running Flatpak Apps Should Be Faster + +If you\'re like me and use Flatpak for those pesky apps that cannot run +on your system for one reason or another, you likely get annoyed with +opening a terminal and manually running the Flatpak app with the lengthy +`flatpak run ...` command. + +In the past, I manually created aliases in my `.zshrc` file +for certain apps. For example, an alias would look like the example +below. + +This would allow me to run the command fast within the terminal, but it +wouldn\'t allow me to run it in an application launcher. + +```sh +# ~/.zshrc +alias librewolf = "flatpak run io.gitlab.librewolf-community" +``` + +However, I now use a much faster and better method that integrates with +the tiling WMs I use and their application launchers - +`dmenu` and `bemenu`. + +# Creating Symlinks for Flatpak Apps + +Let\'s use the example of Librewolf below. I can install the application +like so: + +```sh +flatpak install flathub io.gitlab.librewolf-community +``` + +Once installed, I can create a symlink to link the flatpak app to my new +symlink in a location commonly included in your PATH. In this case, I +chose `/usr/bin`. You may need to choose a different location +if `/usr/bin` isn\'t in your PATH. + +```sh +ln -s /var/lib/flatpak/exports/bin/io.gitlab.librewolf-community /usr/bin/librewolf +``` + +Once complete, you should be able to launch the app using the command +name you chose above in the symlink (`librewolf`) from a +terminal or from your application launcher! diff --git a/content/blog/2023-01-21-flatpak-symlinks.org b/content/blog/2023-01-21-flatpak-symlinks.org deleted file mode 100644 index d535f31..0000000 --- a/content/blog/2023-01-21-flatpak-symlinks.org +++ /dev/null @@ -1,46 +0,0 @@ -#+title: Running Flatpak Apps with Symlinks -#+date: 2023-01-21 -#+description: Learn how to run Flatpak apps through menu launchers with symlinks. -#+filetags: :linux: - -* Running Flatpak Apps Should Be Faster -If you're like me and use Flatpak for those pesky apps that cannot run -on your system for one reason or another, you likely get annoyed with -opening a terminal and manually running the Flatpak app with the lengthy -=flatpak run ...= command. - -In the past, I manually created aliases in my =.zshrc= file for certain -apps. For example, an alias would look like the example below. - -This would allow me to run the command fast within the terminal, but it -wouldn't allow me to run it in an application launcher. - -#+begin_src sh -# ~/.zshrc -alias librewolf = "flatpak run io.gitlab.librewolf-community" -#+end_src - -However, I now use a much faster and better method that integrates with -the tiling WMs I use and their application launchers - =dmenu= and -=bemenu=. - -* Creating Symlinks for Flatpak Apps -Let's use the example of Librewolf below. I can install the application -like so: - -#+begin_src sh -flatpak install flathub io.gitlab.librewolf-community -#+end_src - -Once installed, I can create a symlink to link the flatpak app to my new -symlink in a location commonly included in your PATH. In this case, I -chose =/usr/bin=. You may need to choose a different location if -=/usr/bin= isn't in your PATH. - -#+begin_src sh -ln -s /var/lib/flatpak/exports/bin/io.gitlab.librewolf-community /usr/bin/librewolf -#+end_src - -Once complete, you should be able to launch the app using the command -name you chose above in the symlink (=librewolf=) from a terminal or -from your application launcher! diff --git a/content/blog/2023-01-23-random-wireguard.md b/content/blog/2023-01-23-random-wireguard.md new file mode 100644 index 0000000..6100ea3 --- /dev/null +++ b/content/blog/2023-01-23-random-wireguard.md @@ -0,0 +1,117 @@ ++++ +date = 2023-01-23 +title = "Connecting to a Random Mullvad Wireguard Host on Boot" +description = "" +draft = false ++++ + +# Mullvad Wireguard + +If you\'re using an OS that does not support one of Mullvad\'s apps, +you\'re likely using the Wireguard configuration files instead. + +If not, the first step is to visit Mullvad\'s [Wireguard configuration +files](https://mullvad.net/en/account/#/wireguard-config) page and +download a ZIP of the configuration files you want to use. + +Personally, I downloaded all configuration files across the world and +chose my connections using the script below. + +Once the files are downloaded, unzip them and move them to your +preferred location: + +```sh +cd Downloads +unzip mullvad_wireguard_linux_all_all.zip +mkdir ~/mullvad && mv ~/Downloads/*.conf ~/mullvad/ +``` + +### Creating a Script to Connect to a Random Host + +Once you have a folder of Wireguard configuration files from Mullvad, +you can create a script to randomly connect to any one of the locations. + +Start by creating a shell script - mine is called `vpn.sh`. + +```sh +nano ~/vpn.sh +``` + +Within this script, you can paste the following info. Note that I +specify `us-*` in my script, which means that it will only +consider US-based VPN locations. You can alter this or simply change it +`*` to consider all locations. + +```sh +#!/bin/sh + +ls /home/$USER/mullvad/us-** |sort -R |tail -n 1 |while read file; do + # Replace `doas` with `sudo` if your machine uses `sudo`, + # or remove `doas` if users don't need to su to run wg-quick + doas wg-quick up $file; + printf "\nCreated Mullvad wireguard connection with file: $file"; + printf "\n\nPrinting new IP info:\n" + curl https://am.i.mullvad.net/connected +done +``` + +Once you\'ve modified the script to your liking, add executable +permissions and run the script: + +```sh +chmod +x ~/vpn.sh +~/vpn.sh +``` + +The output should look like the following: + +``` txt +doas (user@host) password: + +# ... The script will process all of the iptables and wg commands here + +Created Mullvad wireguard connection with file: /home/user/mullvad/us-nyc-wg-210.conf + +Printing new IP info: +You are connected to Mullvad (server country-city-wg-num). Your IP address is 12.345.678.99 +``` + +That\'s all there is to it. You can see your new location and IP via the +`printf` and `curl` commands included in the +script. + +You can also go to the [Connection Check \| +Mullvad](https://mullvad.net/en/check/) page to see if you are fully +connected to Mullvad and if any leaks exist. + + + +# Disconnecting from the Wireguard Connection + +If you forget which connection you\'re using, you can execute the +following command to see where Wireguard is currently connected: + +```sh +wg show +``` + +This command will show you the Wireguard interfaces and should output a +connection like so: `interface: us-lax-wg-104`. + +Once you have this, just disconnect using that files\' full path: + +```sh +wg-quick down /home/user/mullvad/us-lax-wg-104.conf +``` + +I have a TODO item on figuring out how to easily export an environment +variable that contains the configuration file\'s full name, so that I +can just execute the following: + +```sh +# Ideal situation if I can export the $file variable to the environment +wg-quick down $file +``` + +If you have an idea on how to do this, email me! diff --git a/content/blog/2023-01-23-random-wireguard.org b/content/blog/2023-01-23-random-wireguard.org deleted file mode 100644 index 162ffc4..0000000 --- a/content/blog/2023-01-23-random-wireguard.org +++ /dev/null @@ -1,112 +0,0 @@ -#+title: Connecting to a Random Mullvad Wireguard Host on Boot -#+date: 2023-01-23 -#+description: Learn how to connect to a random Mullvad Wireguard host on boot. -#+filetags: :linux: - -* Mullvad Wireguard -If you're using an OS that does not support one of Mullvad's apps, -you're likely using the Wireguard configuration files instead. - -If not, the first step is to visit Mullvad's -[[https://mullvad.net/en/account/#/wireguard-config][Wireguard -configuration files]] page and download a ZIP of the configuration files -you want to use. - -Personally, I downloaded all configuration files across the world and -chose my connections using the script below. - -Once the files are downloaded, unzip them and move them to your -preferred location: - -#+begin_src sh -cd Downloads -unzip mullvad_wireguard_linux_all_all.zip -mkdir ~/mullvad && mv ~/Downloads/*.conf ~/mullvad/ -#+end_src - -*** Creating a Script to Connect to a Random Host -Once you have a folder of Wireguard configuration files from Mullvad, -you can create a script to randomly connect to any one of the locations. - -Start by creating a shell script - mine is called =vpn.sh=. - -#+begin_src sh -nano ~/vpn.sh -#+end_src - -Within this script, you can paste the following info. Note that I -specify =us-*= in my script, which means that it will only consider -US-based VPN locations. You can alter this or simply change it =*= to -consider all locations. - -#+begin_src sh -#!/bin/sh - -ls /home/$USER/mullvad/us-** |sort -R |tail -n 1 |while read file; do - # Replace `doas` with `sudo` if your machine uses `sudo`, - # or remove `doas` if users don't need to su to run wg-quick - doas wg-quick up $file; - printf "\nCreated Mullvad wireguard connection with file: $file"; - printf "\n\nPrinting new IP info:\n" - curl https://am.i.mullvad.net/connected -done -#+end_src - -Once you've modified the script to your liking, add executable -permissions and run the script: - -#+begin_src sh -chmod +x ~/vpn.sh -~/vpn.sh -#+end_src - -The output should look like the following: - -#+begin_src txt -doas (user@host) password: - -# ... The script will process all of the iptables and wg commands here - -Created Mullvad wireguard connection with file: /home/user/mullvad/us-nyc-wg-210.conf - -Printing new IP info: -You are connected to Mullvad (server country-city-wg-num). Your IP address is 12.345.678.99 -#+end_src - -That's all there is to it. You can see your new location and IP via the -=printf= and =curl= commands included in the script. - -You can also go to the [[https://mullvad.net/en/check/][Connection Check -| Mullvad]] page to see if you are fully connected to Mullvad and if any -leaks exist. - -#+caption: Mullvad Connection Check -[[https://img.cleberg.net/blog/20230123-random-mullvad-wireguard/mullvad_check.png]] - -* Disconnecting from the Wireguard Connection -If you forget which connection you're using, you can execute the -following command to see where Wireguard is currently connected: - -#+begin_src sh -wg show -#+end_src - -This command will show you the Wireguard interfaces and should output a -connection like so: =interface: us-lax-wg-104=. - -Once you have this, just disconnect using that files' full path: - -#+begin_src sh -wg-quick down /home/user/mullvad/us-lax-wg-104.conf -#+end_src - -I have a TODO item on figuring out how to easily export an environment -variable that contains the configuration file's full name, so that I can -just execute the following: - -#+begin_src sh -# Ideal situation if I can export the $file variable to the environment -wg-quick down $file -#+end_src - -If you have an idea on how to do this, email me! diff --git a/content/blog/2023-01-28-self-hosting-wger.md b/content/blog/2023-01-28-self-hosting-wger.md new file mode 100644 index 0000000..9fddc17 --- /dev/null +++ b/content/blog/2023-01-28-self-hosting-wger.md @@ -0,0 +1,154 @@ ++++ +date = 2023-01-28 +title = "Self-Hosting Wger Workout Manager" +description = "" +draft = false ++++ + +# Wger: The Self-Hosted Workout Manager + +[Wger Workout Manager](https://wger.de) is a fitness tracking tool for +those who enjoy self-hosting their data. You can also register an +account on their main website if you\'d prefer to try without +self-hosting. + +## Features + +I didn\'t see a full listing of features anywhere, so I compiled this +list of my own after installing wger: + +1. Dashboard + + - Dashboard view of Workout Schedule, Nutrition Plan, Weight + Graph, & last 5 Weight Logs + +2. Training + + - Workout Log + - Workout Schedule + - Calendar (shows weight logs and Bad/Neutral/Good days) + - Gallery (shows images you upload) + - Workout templates + - Public templates + - Exercises + +3. Nutrition + + - Nutrition plans + - BMI calculator + - Daily calories calculator + - Ingredient overview + +4. Body Weight + + - Weight overview + +## Documentation + +In order to self-host wger, I opted to use the Docker version of the +application. You can read the README within the +[wger-project/docker](https://github.com/wger-project/docker) project on +GitHub for information and installation instructions. + +## Installation + +To start the installation, I created a folder for wger and started +creating the three necessary files: + +```sh +mkdir ~/wger && mkdir ~/wger/config +touch ~/wger/docker-compose.yml && \ +touch ~/wger/config/prod.env && \ +touch ~/wger/config/nginx.conf +``` + +Once you have the folders and files created, you will need to copy the +contents of the `docker-compose.yml`, `prod.env`, +and `nginx.conf` from the GitHub link above. + +A few notes to explain the changes I made to the default files: + +- I updated the `ALLOW_REGISTRAION` variable in + `prod.env` to `False` after I created an + account via my LAN connection, **before\*** I connected this app to + a publicly-available domain. +- I uncommented and updated `CSRF_TRUSTED_ORIGINS` to be + equal to the public version of this app: + `https://wger.example.com`. +- I updated the port within `docker-compose.yml`, within + the `nginx` block. The port I updated this to will be + reflected in my nginx configuration file on the server (NOT the wger + nginx.conf file). + +## Deploy + +Once all files are created and modified to your needs, simply start the +container. + +```sh +docker-compose up -d +``` + +You can now visit the website on your LAN by going to +`localhost:YOUR_PORT` or by the server\'s IP, if you\'re not +on the same machine that is running the container. + +If you wish to connect this app to a public domain name, you\'ll need to +point an `A` DNS record from the domain to your server\'s +public IP. You\'ll then need to create a configuration file for +whichever web server or reverse proxy you\'re using. + +Wger\'s README suggests the following reverse proxy configuration for +Nginx: + +``` conf +upstream wger { + # This port should match the port in the `nginx` block of docker-compose.yml + # If the container is running on this same machine, replace this with + # server 127.0.0.1:8080 + server 123.456.789.0:8080; +} + +server { + listen 80; + listen [::]:443 ssl; + listen 443 ssl; + + location / { + proxy_pass http://wger; + proxy_set_header Host $http_host; + proxy_set_header X-Real-IP $remote_addr; + proxy_set_header X-Forwarded-For $proxy_add_x_forwarded_for; + proxy_set_header X-Forwarded-Proto $scheme; + proxy_redirect off; + } + + server_name my.domain.example.com; + + ssl_certificate /path/to/https/certificate.crt; + ssl_certificate_key /path/to/https/certificate.key; +} +``` + +# Thoughts on Wger + +I\'m still playing around with the app itself, but it seems to be a +solid all-around workout manager, weight log, and food log. + +I like that the weight log graph is fluid and updates quickly. You can +also import or export data in CSV format if you\'d like to move your +data elsewhere. + +The workout manager is slightly odd, as it requires you to enter sets +and reps for each exercise when you enter it into the plan. Then, when +you add a log entry for performing a workout, you then add what you +actually performed, in terms of reps and weight. + +I haven\'t tried the food log yet and I likely will not, at least for a +while. I have no need for a food log or calorie tracker at the moment. + +## Screenshot Example + +You can see an example of a dashboard with placeholder data here: + + diff --git a/content/blog/2023-01-28-self-hosting-wger.org b/content/blog/2023-01-28-self-hosting-wger.org deleted file mode 100644 index 10825b8..0000000 --- a/content/blog/2023-01-28-self-hosting-wger.org +++ /dev/null @@ -1,143 +0,0 @@ -#+title: Self-Hosting Wger Workout Manager -#+date: 2023-01-28 -#+description: A guide to self-hosting the Wger application on your own server. -#+filetags: :selfhosting: - -* Wger: The Self-Hosted Workout Manager -[[https://wger.de][Wger Workout Manager]] is a fitness tracking tool for -those who enjoy self-hosting their data. You can also register an -account on their main website if you'd prefer to try without -self-hosting. - -** Features -I didn't see a full listing of features anywhere, so I compiled this -list of my own after installing wger: - -1. Dashboard - - - Dashboard view of Workout Schedule, Nutrition Plan, Weight Graph, & - last 5 Weight Logs - -2. Training - - - Workout Log - - Workout Schedule - - Calendar (shows weight logs and Bad/Neutral/Good days) - - Gallery (shows images you upload) - - Workout templates - - Public templates - - Exercises - -3. Nutrition - - - Nutrition plans - - BMI calculator - - Daily calories calculator - - Ingredient overview - -4. Body Weight - - - Weight overview - -** Documentation -In order to self-host wger, I opted to use the Docker version of the -application. You can read the README within the -[[https://github.com/wger-project/docker][wger-project/docker]] project -on GitHub for information and installation instructions. - -** Installation -To start the installation, I created a folder for wger and started -creating the three necessary files: - -#+begin_src sh -mkdir ~/wger && mkdir ~/wger/config -touch ~/wger/docker-compose.yml && \ -touch ~/wger/config/prod.env && \ -touch ~/wger/config/nginx.conf -#+end_src - -Once you have the folders and files created, you will need to copy the -contents of the =docker-compose.yml=, =prod.env=, and =nginx.conf= from -the GitHub link above. - -A few notes to explain the changes I made to the default files: - -- I updated the =ALLOW_REGISTRAION= variable in =prod.env= to =False= - after I created an account via my LAN connection, *before** I connected - this app to a publicly-available domain. -- I uncommented and updated =CSRF_TRUSTED_ORIGINS= to be equal to the - public version of this app: =https://wger.example.com=. -- I updated the port within =docker-compose.yml=, within the =nginx= - block. The port I updated this to will be reflected in my nginx - configuration file on the server (NOT the wger nginx.conf file). - -** Deploy -Once all files are created and modified to your needs, simply start the -container. - -#+begin_src sh -docker-compose up -d -#+end_src - -You can now visit the website on your LAN by going to -=localhost:YOUR_PORT= or by the server's IP, if you're not on the same -machine that is running the container. - -If you wish to connect this app to a public domain name, you'll need to -point an =A= DNS record from the domain to your server's public IP. -You'll then need to create a configuration file for whichever web server -or reverse proxy you're using. - -Wger's README suggests the following reverse proxy configuration for -Nginx: - -#+begin_src conf -upstream wger { - # This port should match the port in the `nginx` block of docker-compose.yml - # If the container is running on this same machine, replace this with - # server 127.0.0.1:8080 - server 123.456.789.0:8080; -} - -server { - listen 80; - listen [::]:443 ssl; - listen 443 ssl; - - location / { - proxy_pass http://wger; - proxy_set_header Host $http_host; - proxy_set_header X-Real-IP $remote_addr; - proxy_set_header X-Forwarded-For $proxy_add_x_forwarded_for; - proxy_set_header X-Forwarded-Proto $scheme; - proxy_redirect off; - } - - server_name my.domain.example.com; - - ssl_certificate /path/to/https/certificate.crt; - ssl_certificate_key /path/to/https/certificate.key; -} -#+end_src - -* Thoughts on Wger -I'm still playing around with the app itself, but it seems to be a solid -all-around workout manager, weight log, and food log. - -I like that the weight log graph is fluid and updates quickly. You can -also import or export data in CSV format if you'd like to move your data -elsewhere. - -The workout manager is slightly odd, as it requires you to enter sets -and reps for each exercise when you enter it into the plan. Then, when -you add a log entry for performing a workout, you then add what you -actually performed, in terms of reps and weight. - -I haven't tried the food log yet and I likely will not, at least for a -while. I have no need for a food log or calorie tracker at the moment. - -** Screenshot Example -You can see an example of a dashboard with placeholder data here: - -#+caption: wger dashboard -[[https://img.cleberg.net/blog/20230128-wger/wger.png]] diff --git a/content/blog/2023-02-02-exploring-hare.md b/content/blog/2023-02-02-exploring-hare.md new file mode 100644 index 0000000..15c448c --- /dev/null +++ b/content/blog/2023-02-02-exploring-hare.md @@ -0,0 +1,172 @@ ++++ +date = 2023-02-02 +title = "Exploring the Hare Programming Language" +description = "" +draft = false ++++ + +# A Quick Note + +By no means am I a professional developer, so this post will be rather +short. I won\'t be going into depth on the specification or anything +that technical. + +Instead, I will simply be talking about how I (a relatively basic +hobbyist programmer) have been playing with Hare and what intrigues me +about the language. + +# Hare + +The [Hare](https://harelang.org) programming language is a +straightforward language that should look familiar if you\'ve ever +programmed with C, Rust, or other languages that aim to build software +at the system-level. + +The Hare homepage states the following: + +> Hare is a systems programming language designed to be simple, stable, +> and robust. Hare uses a static type system, manual memory management, +> and minimal runtime. It is well-suited to writing operating systems, +> system tools, compilers, networking software, and other low-level, +> high performance tasks. + +I have found this all to be true while playing with it for the first +time today. In the next few sections, I\'m going to walk through my +installation and first program. + +## Installation + +I\'m currently running Alpine Linux on my Thinkpad, so the installation +was quite easy as there is a package for Hare in the `apk` +repositories. + +```sh +doas apk add hare hare-doc +``` + +However, I was able to install Hare from scratch on Fedora Linux a short +while ago, which was also very easy to do. If you need further +instructions and Hare doesn\'t have a package on your system, take a +look at the [Hare Installation](https://harelang.org/installation/) +page. + +## Creating a Test Project + +In order to play with the language, I created +[hare-test](https://git.sr.ht/~cmc/hare-projects) and will be putting +any of my Hare-related adventures in here. + +> **Update:\*** I also created a simple Hare program for creating a file +> from user input: +> [files.ha](https://git.sr.ht/~cmc/hare-projects/tree/main/item/files/files.ha) + +Luckily, Hare doesn\'t require any complex set-up tools or build +environment. Once you have Hare installed, you simply need to create a +file ending with `.ha` and you can run a Hare program. + +I created a file called `rgb.ha` in order to test out the +random number generation and passing parameters between functions. + +```sh +nano rgb.ha +``` + +Within this file, I was able to easily import a few of the [standard +library modules](https://harelang.org/tutorials/stdlib/): +`fmt`, `math::random`, and `datetime`. + +With these modules, I created two functions: + +1. `main`: This function calls the `generate_rgb` + function and then prints out the returned values. +2. `generate_rgb`: This function uses the current Unix epoch + time to generate a pseudo-random value and uses this value to create + three more random values between 0 and 255. These three numbers + represent a color in RGB format. + +> **Note**: Some syntax coloring may look odd, as Zola currently +> doesn\'t have a syntax highlighting theme for Hare. Instead, I\'m +> using the C theme, which may not be exactly accurate when coloring the +> code below. + +```c +use datetime; +use fmt; +use math::random; + +export fn main() void = { + const rgb = generate_rgb(); + fmt::printfln("RGB: ({}, {}, {})", rgb[0], rgb[1], rgb[2])!; +}; + +fn generate_rgb() []u64 = { + // Use the current Unix epoch time as the seed value + let datetime = datetime::epochunix(&datetime::now()); + + // Generate initial pseudo-random value + // You must cast the datetime from int to u64 + let x = random::init(datetime: u64); + + // Generate RGB values between (0, 255) using pseudo-random init value + let r = random::u64n(&x, 255); + let g = random::u64n(&x, 255); + let b = random::u64n(&x, 255); + + // Structure data as array and return + let rgb_array: [3]u64 = [r, g, b]; + return rgb_array; +}; +``` + +## Running a Program + +Once you have a Hare file written and ready to run, you simply need to +run it: + +```sh +hare run file.ha +``` + +You can also compile the program into an executable: + +```sh +hare build -o example file.ha +./example +``` + +## Initial Thoughts + +1. Documentation Improvements Would Help + + While I was able to piece everything together eventually, the + biggest downfall right now in Hare\'s documentation. For such a new + project, the documentation is in a great spot. However, bare + specifications don\'t help as much as a brief examples section + would. + + For example, it took me a while to figure out what the + `u64n` function was looking for. I could tell that it + took two parameters and the second was my max value (255), but + couldn\'t figure out what the first value should be. Eventually, I + inspected the `random.ha` file in the [Hare source + code](https://git.sr.ht/~sircmpwn/hare/tree/master/item/math/random/random.ha) + and found the test suite that helped me discover that it needed an + `init()` value in the form of `&var`. + +2. More Basic Modules + + This is another point that comes from Hare being new and awaiting + more contributions, but there are some basic functions that I would + personally enjoy seeing in Hare, such as one to convert decimal + (base 10) values to hexadecimal (base 16). + + If I\'m feeling comfortable with my math, I may work on the list of + functions I want and see if any can make it into the Hare source + code. + +3. Overall Thoughts + + Overall, I actually really enjoy Hare. It\'s not as tedious to get a + project up and running as Rust, but it\'s also simpler and more + user-friendly than learning C. I am going to continue playing with + it and see if I can make anything of particular value. diff --git a/content/blog/2023-02-02-exploring-hare.org b/content/blog/2023-02-02-exploring-hare.org deleted file mode 100644 index 749e46f..0000000 --- a/content/blog/2023-02-02-exploring-hare.org +++ /dev/null @@ -1,169 +0,0 @@ -#+title: Exploring the Hare Programming Language -#+date: 2023-02-02 -#+description: A retrospective on my first time using the Hare Programming Language. -#+filetags: :dev: - -* A Quick Note -By no means am I a professional developer, so this post will be rather -short. I won't be going into depth on the specification or anything that -technical. - -Instead, I will simply be talking about how I (a relatively basic -hobbyist programmer) have been playing with Hare and what intrigues me -about the language. - -* Hare -The [[https://harelang.org][Hare]] programming language is a -straightforward language that should look familiar if you've ever -programmed with C, Rust, or other languages that aim to build software -at the system-level. - -The Hare homepage states the following: - -#+begin_quote -Hare is a systems programming language designed to be simple, stable, -and robust. Hare uses a static type system, manual memory management, -and minimal runtime. It is well-suited to writing operating systems, -system tools, compilers, networking software, and other low-level, high -performance tasks. - -#+end_quote - -I have found this all to be true while playing with it for the first -time today. In the next few sections, I'm going to walk through my -installation and first program. - -** Installation -I'm currently running Alpine Linux on my Thinkpad, so the installation -was quite easy as there is a package for Hare in the =apk= repositories. - -#+begin_src sh -doas apk add hare hare-doc -#+end_src - -However, I was able to install Hare from scratch on Fedora Linux a short -while ago, which was also very easy to do. If you need further -instructions and Hare doesn't have a package on your system, take a look -at the [[https://harelang.org/installation/][Hare Installation]] page. - -** Creating a Test Project -In order to play with the language, I created -[[https://git.sr.ht/~cmc/hare-projects][hare-test]] and will be putting -any of my Hare-related adventures in here. - -#+begin_quote -*Update:** I also created a simple Hare program for creating a file from -user input: -[[https://git.sr.ht/~cmc/hare-projects/tree/main/item/files/files.ha][files.ha]] - -#+end_quote - -Luckily, Hare doesn't require any complex set-up tools or build -environment. Once you have Hare installed, you simply need to create a -file ending with =.ha= and you can run a Hare program. - -I created a file called =rgb.ha= in order to test out the random number -generation and passing parameters between functions. - -#+begin_src sh -nano rgb.ha -#+end_src - -Within this file, I was able to easily import a few of the -[[https://harelang.org/tutorials/stdlib/][standard library modules]]: -=fmt=, =math::random=, and =datetime=. - -With these modules, I created two functions: - -1. =main=: This function calls the =generate_rgb= function and then - prints out the returned values. -2. =generate_rgb=: This function uses the current Unix epoch time to - generate a pseudo-random value and uses this value to create three - more random values between 0 and 255. These three numbers represent a - color in RGB format. - -#+begin_quote -*Note*: Some syntax coloring may look odd, as Zola currently doesn't -have a syntax highlighting theme for Hare. Instead, I'm using the C -theme, which may not be exactly accurate when coloring the code below. - -#+end_quote - -#+begin_src C -use datetime; -use fmt; -use math::random; - -export fn main() void = { - const rgb = generate_rgb(); - fmt::printfln("RGB: ({}, {}, {})", rgb[0], rgb[1], rgb[2])!; -}; - -fn generate_rgb() []u64 = { - // Use the current Unix epoch time as the seed value - let datetime = datetime::epochunix(&datetime::now()); - - // Generate initial pseudo-random value - // You must cast the datetime from int to u64 - let x = random::init(datetime: u64); - - // Generate RGB values between (0, 255) using pseudo-random init value - let r = random::u64n(&x, 255); - let g = random::u64n(&x, 255); - let b = random::u64n(&x, 255); - - // Structure data as array and return - let rgb_array: [3]u64 = [r, g, b]; - return rgb_array; -}; -#+end_src - -** Running a Program -Once you have a Hare file written and ready to run, you simply need to -run it: - -#+begin_src sh -hare run file.ha -#+end_src - -You can also compile the program into an executable: - -#+begin_src sh -hare build -o example file.ha -./example -#+end_src - -** Initial Thoughts -1. Documentation Improvements Would Help - - While I was able to piece everything together eventually, the biggest - downfall right now in Hare's documentation. For such a new project, - the documentation is in a great spot. However, bare specifications - don't help as much as a brief examples section would. - - For example, it took me a while to figure out what the =u64n= - function was looking for. I could tell that it took two parameters - and the second was my max value (255), but couldn't figure out what - the first value should be. Eventually, I inspected the =random.ha= - file in the - [[https://git.sr.ht/~sircmpwn/hare/tree/master/item/math/random/random.ha][Hare - source code]] and found the test suite that helped me discover that - it needed an =init()= value in the form of =&var=. - -2. More Basic Modules - - This is another point that comes from Hare being new and awaiting - more contributions, but there are some basic functions that I would - personally enjoy seeing in Hare, such as one to convert decimal - (base 10) values to hexadecimal (base 16). - - If I'm feeling comfortable with my math, I may work on the list of - functions I want and see if any can make it into the Hare source - code. - -3. Overall Thoughts - - Overall, I actually really enjoy Hare. It's not as tedious to get a - project up and running as Rust, but it's also simpler and more - user-friendly than learning C. I am going to continue playing with it - and see if I can make anything of particular value. diff --git a/content/blog/2023-05-22-burnout.org b/content/blog/2023-05-22-burnout.md index 75757ea..ad97cf6 100644 --- a/content/blog/2023-05-22-burnout.org +++ b/content/blog/2023-05-22-burnout.md @@ -1,17 +1,20 @@ -#+title: RE: Burnout -#+date: 2023-05-22 -#+description: A response to Drew DeVault's burnout post. -#+filetags: :personal: - -* RE: Burnout -I recently read -[[https://drewdevault.com/2023/05/01/2023-05-01-Burnout.html][Drew -DeVault's post on burnout]] around the same time I was pulling out of a -burnout rut myself earlier this month. Finally, seeing the light at the -end of my burnout tunnel made me want to write my first post back on -this topic. - -* Busy Seasons on Busy Seasons ++++ +date = 2023-05-22 +title = "RE: Burnout" +description = "" +draft = false ++++ + +# RE: Burnout {#re-burnout-1} + +I recently read [Drew DeVault\'s post on +burnout](https://drewdevault.com/2023/05/01/2023-05-01-Burnout.html) +around the same time I was pulling out of a burnout rut myself earlier +this month. Finally, seeing the light at the end of my burnout tunnel +made me want to write my first post back on this topic. + +# Busy Seasons on Busy Seasons + My career deals with busy seasons, generally driven by client demand. This last year, I dealt with a harsh busy season from Aug to Oct 2022 to issue a few SOC reports for the period ending 2022-09-30. Immediately @@ -24,18 +27,19 @@ The result? A busy season that has lasted from August 2022 through today. I will likely be rushing throughout the next month or two before I have a brief break and need to focus on the 2023-09-30 SOC reports again. While auditing and consulting always involve a busy season, this -is the first time I've had one last 9+ months without a break. +is the first time I\'ve had one last 9+ months without a break. + +While it\'s been tough, I have a handful of breaks pre-planned +throughout this next cycle and should be able to moderate the level of +commitment required for each client. -While it's been tough, I have a handful of breaks pre-planned throughout -this next cycle and should be able to moderate the level of commitment -required for each client. +# Refocusing -* Refocusing Outside of work, I finally have time to work on hobbies such as this website, programming, athletics, games, etc. -You may have noticed my absence if you're in the same channels, forums, +You may have noticed my absence if you\'re in the same channels, forums, and rooms that I am, but I should finally be active again. -I'm hoping to break an item out of my backlog soon and start working on +I\'m hoping to break an item out of my backlog soon and start working on building a new project or hack around with a stale one. diff --git a/content/blog/2023-06-08-goaccess-geoip.md b/content/blog/2023-06-08-goaccess-geoip.md new file mode 100644 index 0000000..1fc2008 --- /dev/null +++ b/content/blog/2023-06-08-goaccess-geoip.md @@ -0,0 +1,70 @@ ++++ +date = 2023-06-08 +title = "Inspecting Nginx Logs with GoAccess and MaxMind GeoIP Data" +description = "" +draft = false ++++ + +# Overview + +[GoAccess](https://goaccess.io/) is an open source real-time web log +analyzer and interactive viewer that runs in a terminal in \*nix systems +or through your browser. + +# Installation + +To start, you\'ll need to install GoAccess for your OS. Here\'s an +example for Debian-based distros: + +```sh +sudo apt install goaccess +``` + +Next, find any number of the MaxMind GeoIP database files on GitHub or +another file hosting website. We\'re going to use P3TERX\'s version in +this example: + +```sh +wget https://github.com/P3TERX/GeoLite.mmdb/raw/download/GeoLite2-City.mmdb +``` + +Be sure to save this file in an easy to remember location! + +# Usage + +In order to utilize the full capabilities of GoAccess and MMDB, start +with the command template below and customize as necessary. This will +export an HTML view of the GoAccess dashboard, showing all relevant +information related to that site\'s access log. You can also omit the +`-o output.html` parameter if you prefer to view the data +within the CLI instead of creating an HTML file. + +With the addition of the GeoIP Database parameter, section +`16 - Geo Location` will be added with the various countries +that are associated with the collected IP addresses. + +```sh +zcat /var/log/nginx/example.access.log.*.gz | goaccess \ +--geoip-database=/home/user/GeoLite2-City.mmdb \ +--date-format=%d/%b/%Y \ +--time-format=%H:%M:%S \ +--log-format=COMBINED \ +-o output.html \ +/var/log/nginx/example.access.log - +``` + +## Example Output + +See below for an example of the HTML output: + + + +You can also see the GeoIP card created by the integration of the +MaxMind database information. + + + +That\'s all there is to it! Informational data is provided in an +organized fashion with minimal effort. diff --git a/content/blog/2023-06-08-goaccess-geoip.org b/content/blog/2023-06-08-goaccess-geoip.org deleted file mode 100644 index 6136c21..0000000 --- a/content/blog/2023-06-08-goaccess-geoip.org +++ /dev/null @@ -1,64 +0,0 @@ -#+title: Inspecting Nginx Logs with GoAccess and MaxMind GeoIP Data -#+date: 2023-06-08 -#+description: Learn how to use GoAccess and MaxMind to evaluate visitors to your web server. -#+filetags: :sysadmin: - -* Overview -[[https://goaccess.io/][GoAccess]] is an open source real-time web log -analyzer and interactive viewer that runs in a terminal in *nix systems -or through your browser. - -* Installation -To start, you'll need to install GoAccess for your OS. Here's an example -for Debian-based distros: - -#+begin_src sh -sudo apt install goaccess -#+end_src - -Next, find any number of the MaxMind GeoIP database files on GitHub or -another file hosting website. We're going to use P3TERX's version in -this example: - -#+begin_src sh -wget https://github.com/P3TERX/GeoLite.mmdb/raw/download/GeoLite2-City.mmdb -#+end_src - -Be sure to save this file in an easy to remember location! - -* Usage -In order to utilize the full capabilities of GoAccess and MMDB, start -with the command template below and customize as necessary. This will -export an HTML view of the GoAccess dashboard, showing all relevant -information related to that site's access log. You can also omit the -=-o output.html= parameter if you prefer to view the data within the CLI -instead of creating an HTML file. - -With the addition of the GeoIP Database parameter, section -=16 - Geo Location= will be added with the various countries that are -associated with the collected IP addresses. - -#+begin_src sh -zcat /var/log/nginx/example.access.log.*.gz | goaccess \ ---geoip-database=/home/user/GeoLite2-City.mmdb \ ---date-format=%d/%b/%Y \ ---time-format=%H:%M:%S \ ---log-format=COMBINED \ --o output.html \ -/var/log/nginx/example.access.log - -#+end_src - -** Example Output -See below for an example of the HTML output: - -#+caption: GoAccess HTML -[[https://img.cleberg.net/blog/20230608-goaccess/goaccess-dashboard.png]] - -You can also see the GeoIP card created by the integration of the -MaxMind database information. - -#+caption: GoAccess GeoIP -[[https://img.cleberg.net/blog/20230608-goaccess/goaccess-geoip.png]] - -That's all there is to it! Informational data is provided in an -organized fashion with minimal effort. diff --git a/content/blog/2023-06-08-self-hosting-baikal.org b/content/blog/2023-06-08-self-hosting-baikal.md index 1414936..67900cf 100644 --- a/content/blog/2023-06-08-self-hosting-baikal.org +++ b/content/blog/2023-06-08-self-hosting-baikal.md @@ -1,30 +1,35 @@ -#+title: Self-Hosting Baikal Server (CalDAV & CardDAV) -#+date: 2023-06-08 -#+description: A guide to self-hosting the Baikal application on your own server. -#+filetags: :selfhosting: ++++ +date = 2023-06-08 +title = "Self-Hosting Baikal Server (CalDAV & CardDAV)" +description = "" +draft = false ++++ -* What is Baikal? -[[https://sabre.io/baikal/][Baikal]] is a lightweight CalDAV + CardDAV +# What is Baikal? + +[Baikal](https://sabre.io/baikal/) is a lightweight CalDAV + CardDAV server that you can self-host on your own machine. While I have tried (& failed) to get this CalDAV + CardDAV server running before, it was quite easy this time. Not really sure what I did differently this time, but -I'm documenting my process here to ensure I don't forget. +I\'m documenting my process here to ensure I don\'t forget. + +# Installation -* Installation -First, create a folder on your server and open a =docker-compose.yml= -file for editing: +First, create a folder on your server and open a +`docker-compose.yml` file for editing: -#+begin_src sh +```sh mkdir baikal && cd baikal nano docker-compose.yml -#+end_src +``` -Within this file, you'll need to paste the information below. You can -customize the =ports= section to use any port on your server to pass -through to port 80 in the container. You can also edit the =volumes= -section to use docker volumes instead of local folders. +Within this file, you\'ll need to paste the information below. You can +customize the `ports` section to use any port on your server +to pass through to port 80 in the container. You can also edit the +`volumes` section to use docker volumes instead of local +folders. -#+begin_src conf +``` conf version: "2" services: baikal: @@ -35,59 +40,63 @@ services: volumes: - ./config:/var/www/baikal/config - ./data:/var/www/baikal/Specific -#+end_src +``` Once finished with editing, save and close the file. Then, launch the docker container: -#+begin_src sh +```sh sudo docker-compose up -d -#+end_src +``` + +# Intial Setup -* Intial Setup As long as no issues came up when starting the container, you should be -able to visit the server's set-up page at =http://<server_ip>:<port>=. -The application will ask you to create an administrator account and -choose the database type for your storage. Personally, I opted to use -SQLite. +able to visit the server\'s set-up page at +`http://<server_ip>:<port>`. The application will ask you to +create an administrator account and choose the database type for your +storage. Personally, I opted to use SQLite. Make sure the administrator credentials are adequate to protect against common attacks. -* Creating Users -Once you've set up the application, you will be greeted by the Dashboard -page, which will show the version of the app, status of the +# Creating Users + +Once you\'ve set up the application, you will be greeted by the +Dashboard page, which will show the version of the app, status of the admin/CalDAV/CardDAV services, and the number of users, calendars, events, address books, and contacts. -#+caption: Baikal Dashboard -[[https://img.cleberg.net/blog/20230608-baikal/baikal-dashboard.png]] + -To create a new user, navigate to the =Users and resources= page. This -process is as simple as entering a username, password, and email. +To create a new user, navigate to the `Users and resources` +page. This process is as simple as entering a username, password, and +email. Once a user has been created, you can create any number of calendars and address books for user, as well as inspect their information. -* Setting Up a Public URL +# Setting Up a Public URL + Once your application is working locally, you can open access remotely via a URL by using a reverse-proxy like Nginx. As a prerequisite, you must own a domain name and set up DNS records to point a domain name to the server hosting Baikal. -Start by navigating to your web server's configuration directory and +Start by navigating to your web server\'s configuration directory and create a new file for this application. -#+begin_src sh +```sh cd /etc/nginx/sites-available/ nano dav -#+end_src +``` Within this file, paste in the configuration from below and change -=dav.example.com= to match the URL you'll be using. +`dav.example.com` to match the URL you\'ll be using. -#+begin_src conf +``` conf server { if ($host ~ ^[^.]+\.example\.com$) { return 301 https://$host$request_uri; @@ -117,34 +126,35 @@ server { include /etc/letsencrypt/options-ssl-nginx.conf; ssl_dhparam /etc/letsencrypt/ssl-dhparams.pem; } -#+end_src +``` -For Nginx on Ubuntu, you'll need to symlink the configuration file to -the =sites-enabled= directory and then restart Nginx. +For Nginx on Ubuntu, you\'ll need to symlink the configuration file to +the `sites-enabled` directory and then restart Nginx. -#+begin_src sh +```sh sudo ln -s /etc/nginx/sites-available/dav /etc/nginx/sites-enabled/dav sudo systemctl restart nginx.service -#+end_src +``` At this point, the Baikal server should be available over the internet at the URL configured above! -* Configuring Clients +# Configuring Clients + Lastly, configuring clients and applications is essential to making sure the DAV server is being fully utilized. -You can also use the =Users and resources= page to inspect a user's -personal link to their calendars and address books by clicking the info -(i) button. It will show a URI like -=/dav.php/calendars/your-user/default/=. +You can also use the `Users and resources` page to inspect a +user\'s personal link to their calendars and address books by clicking +the info (i) button. It will show a URI like +`/dav.php/calendars/your-user/default/`. However, I found that the following URL works for most applications: -=/dav.php/principals/your-user/=. +`/dav.php/principals/your-user/`. -I used the =principals= URL above for Thunderbird (calendar, tasks, and -contacts), as well as iOS (calendar, tasks, and contacts) and everything -works flawlessly so far. +I used the `principals` URL above for Thunderbird (calendar, +tasks, and contacts), as well as iOS (calendar, tasks, and contacts) and +everything works flawlessly so far. -Syncing is quick between the server and clients, and I haven't seen any +Syncing is quick between the server and clients, and I haven\'t seen any disruptions in the service or data integrity. diff --git a/content/blog/2023-06-18-unifi-ip-blocklist.md b/content/blog/2023-06-18-unifi-ip-blocklist.md new file mode 100644 index 0000000..5ec37d6 --- /dev/null +++ b/content/blog/2023-06-18-unifi-ip-blocklist.md @@ -0,0 +1,88 @@ ++++ +date = 2023-06-18 +title = "Block IP Addresses and Subnets with Unifi Network Firewall" +description = "" +draft = false ++++ + +# Identifying Abusive IPs + +If you\'re like me and use Unifi network equipment at the edge of the +network you manage, you may know that Unifi is only somewhat decent at +identifying and blocking IPs that represent abusive or threat actors. + +While Unifi has a [threat +management](https://help.ui.com/hc/en-us/articles/360006893234-UniFi-Gateway-Threat-Management) +tool inside their Network application, it can be lacking in +functionality and identification. For example, I have my UDM Pro set to +identify and block almost all categories of threats available within the +Unifi settings. However, I regularly identify abusive actors on my web +server via the server logs. + +In addition, I have identified IP addresses and subnets directly within +Unifi\'s logs that the UDM did not block for whatever reason. + +This guide is meant to be another step in the process to manually block +abusive IP addresses or subnets that you have identified but are not +being automatically blocked yet. + +# Create an IP Group Profile + +To start, login to the Unifi machine\'s web GUI and navigate to the +Network app \> Settings \> Profiles. + +Within this page, choose the `IP Groups` tab and click +`Create New`. + +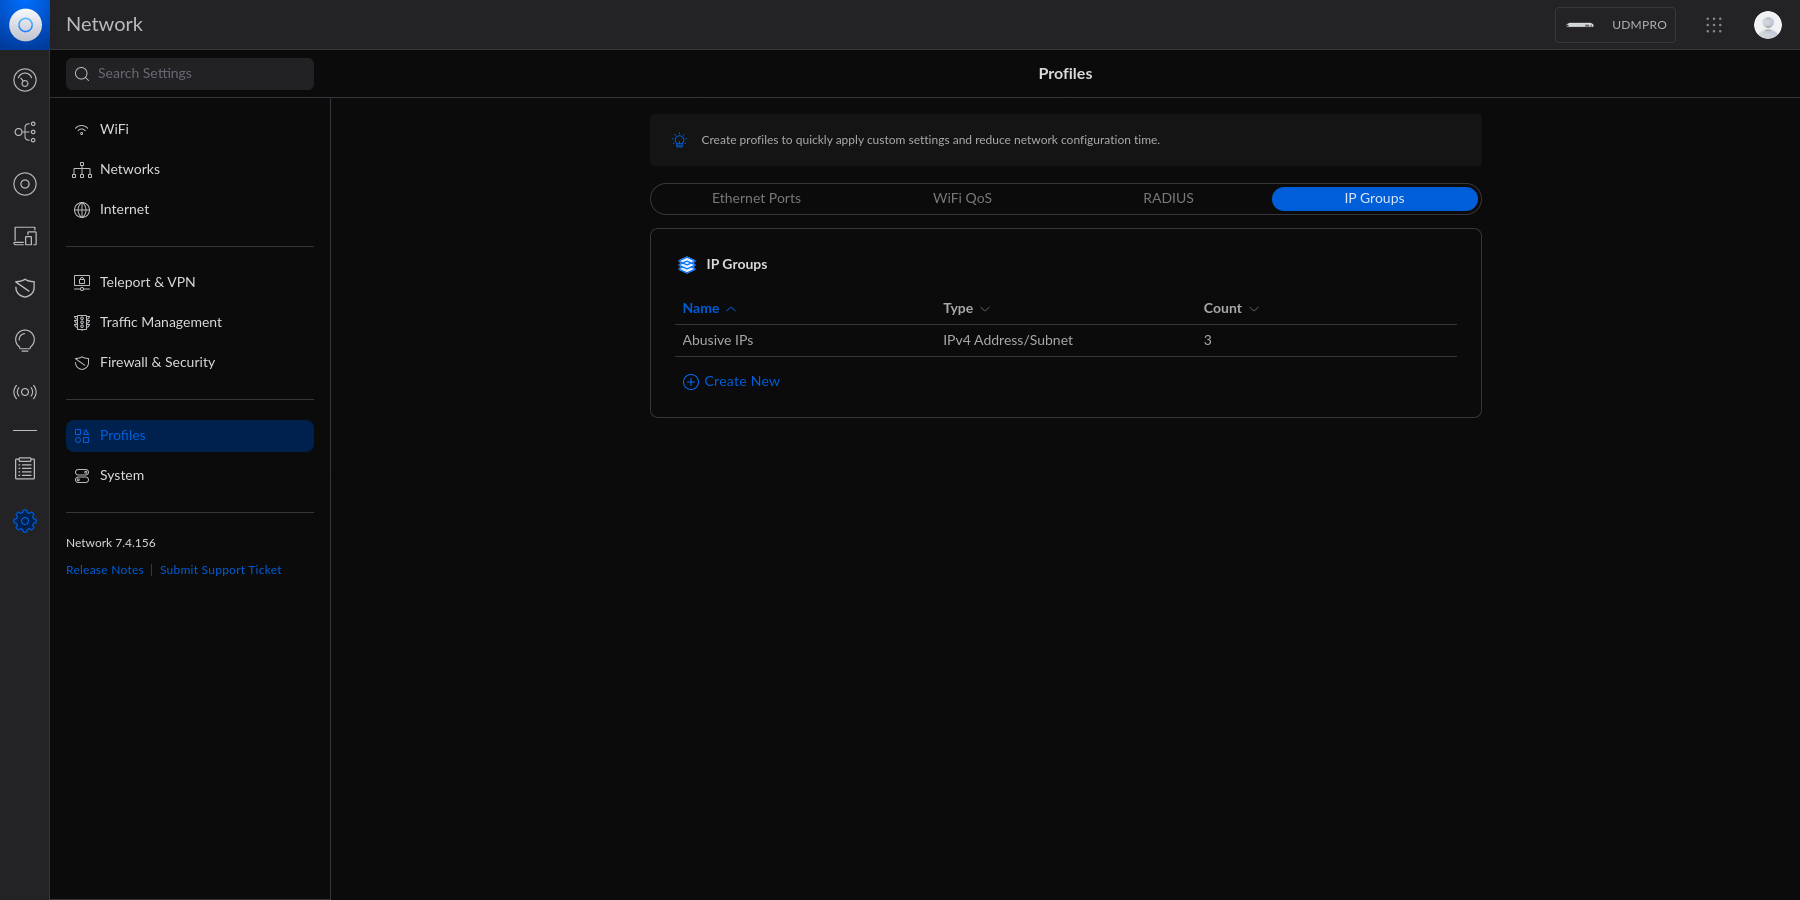 + +Each IP Group profile can be used as one of three options: + +1. Port Group +2. IPv4 Address/Subnet +3. IPv6 Address/Subnet + +In this example, I\'m creating an IPv4 Address/Subnet group and adding a +few different IP addresses and a subnet. Once you\'ve added all IP +addresses and subnets, click the `Apply` button that should +appear at the bottom. + +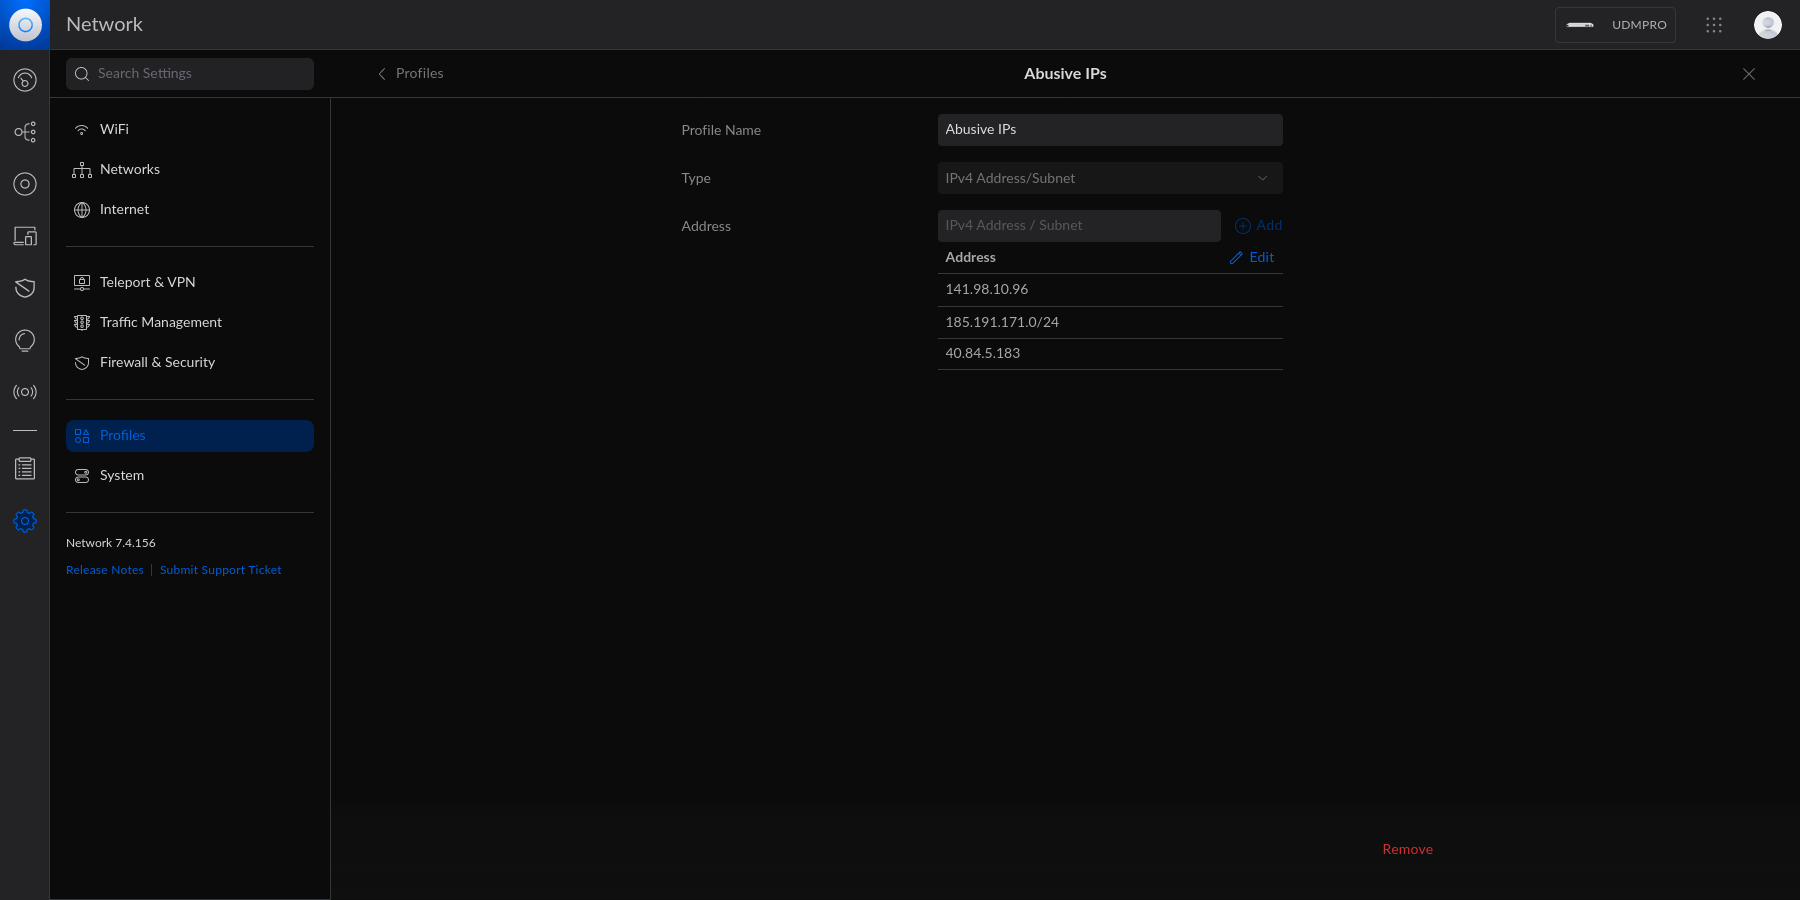 + +At this point, the IPv4 Address/Subnet has been created but not yet +used. + +# Drop IP Group Profile via the Unifi Firewall + +To instruct the Unifi machine to block the profile we just created, we +need to navigate to the Network app \> Settings \> Firewall & Security. + +Within this screen, find the Firewall Rules table and click +`Create Entry`. This entry should contain the following +settings: + +- Type: `Internet In` +- Description: `<Your Custom Rule>` +- Rule Applied: `Before Predefined Rules` +- Action: `Drop` +- Source Type: `Port/IP Group` +- IPv4 Address Group: + `<Name of the Group Profile You Created Above>` + +Customize the remaining configurations to your liking, and then save and +enable the firewall rule. + +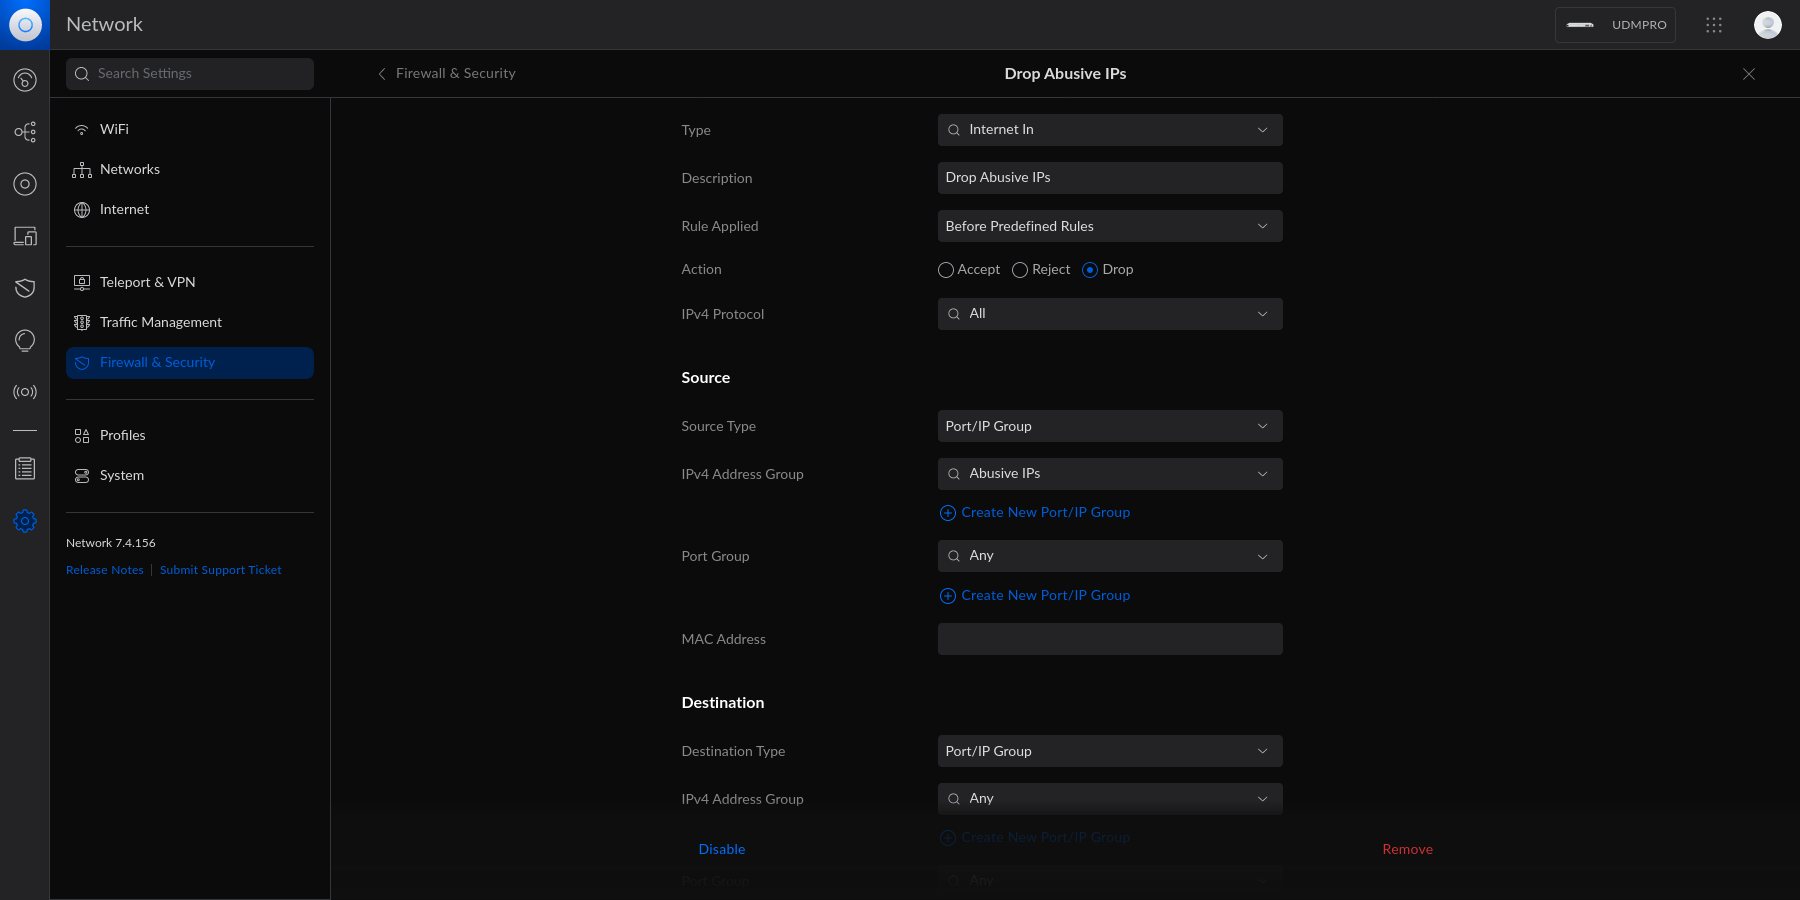 + +Once enabled, the Unifi machine will be able to drop all incoming +connections from the defined IP addresses and subnets within the created +profile. + +> As a personal aside to this topic, I\'m looking for a convenient way +> to update the firewall rules or profiles remotely (within the LAN) +> from the web server to accelerate this process. If you have an idea on +> how to automatically update Unifi IP groups or firewall rules, let me +> know! diff --git a/content/blog/2023-06-18-unifi-ip-blocklist.org b/content/blog/2023-06-18-unifi-ip-blocklist.org deleted file mode 100644 index dbde1b7..0000000 --- a/content/blog/2023-06-18-unifi-ip-blocklist.org +++ /dev/null @@ -1,82 +0,0 @@ -#+title: Block IP Addresses and Subnets with Unifi Network Firewall -#+date: 2023-06-18 -#+description: Learn how to use the Unifi Network Firewall to block IP addresses and subnets. -#+filetags: :network: - -* Identifying Abusive IPs -If you're like me and use Unifi network equipment at the edge of the -network you manage, you may know that Unifi is only somewhat decent at -identifying and blocking IPs that represent abusive or threat actors. - -While Unifi has a -[[https://help.ui.com/hc/en-us/articles/360006893234-UniFi-Gateway-Threat-Management][threat -management]] tool inside their Network application, it can be lacking in -functionality and identification. For example, I have my UDM Pro set to -identify and block almost all categories of threats available within the -Unifi settings. However, I regularly identify abusive actors on my web -server via the server logs. - -In addition, I have identified IP addresses and subnets directly within -Unifi's logs that the UDM did not block for whatever reason. - -This guide is meant to be another step in the process to manually block -abusive IP addresses or subnets that you have identified but are not -being automatically blocked yet. - -* Create an IP Group Profile -To start, login to the Unifi machine's web GUI and navigate to the -Network app > Settings > Profiles. - -Within this page, choose the =IP Groups= tab and click =Create New=. - -#+caption: Network Profiles -[[https://img.cleberg.net/blog/20230618-unifi-ip-blocklist/unifi_profiles.png]] - -Each IP Group profile can be used as one of three options: - -1. Port Group -2. IPv4 Address/Subnet -3. IPv6 Address/Subnet - -In this example, I'm creating an IPv4 Address/Subnet group and adding a -few different IP addresses and a subnet. Once you've added all IP -addresses and subnets, click the =Apply= button that should appear at -the bottom. - -#+caption: Network Profile IPs -[[https://img.cleberg.net/blog/20230618-unifi-ip-blocklist/abusive_ips.png]] - -At this point, the IPv4 Address/Subnet has been created but not yet -used. - -* Drop IP Group Profile via the Unifi Firewall -To instruct the Unifi machine to block the profile we just created, we -need to navigate to the Network app > Settings > Firewall & Security. - -Within this screen, find the Firewall Rules table and click -=Create Entry=. This entry should contain the following settings: - -- Type: =Internet In= -- Description: =<Your Custom Rule>= -- Rule Applied: =Before Predefined Rules= -- Action: =Drop= -- Source Type: =Port/IP Group= -- IPv4 Address Group: =<Name of the Group Profile You Created Above>= - -Customize the remaining configurations to your liking, and then save and -enable the firewall rule. - -#+caption: Firewall Rule -[[https://img.cleberg.net/blog/20230618-unifi-ip-blocklist/firewall_drop_rule.png]] - -Once enabled, the Unifi machine will be able to drop all incoming -connections from the defined IP addresses and subnets within the created -profile. - -#+begin_quote -As a personal aside to this topic, I'm looking for a convenient way to -update the firewall rules or profiles remotely (within the LAN) from the -web server to accelerate this process. If you have an idea on how to -automatically update Unifi IP groups or firewall rules, let me know! - -#+end_quote diff --git a/content/blog/2023-06-20-audit-review-template.md b/content/blog/2023-06-20-audit-review-template.md new file mode 100644 index 0000000..6fc69c8 --- /dev/null +++ b/content/blog/2023-06-20-audit-review-template.md @@ -0,0 +1,81 @@ ++++ +date = 2023-06-20 +title = "Audit Testing Review Template" +description = "" +draft = false ++++ + +# Overview + +This post is a *very* brief overview on the basic process to review +audit test results, focusing on work done as part of a financial +statement audit (FSA) or service organization controls (SOC) report. + +While there are numerous different things to review and look for - all +varying wildly depending on the report, client, and tester - this list +serves as a solid base foundation for a reviewer. + +I have used this throughout my career as a starting point to my reviews, +and it has worked wonders for creating a consistent and objective +template to my reviews. The goal is to keep this base high-level enough +to be used on a wide variety of engagements, while still ensuring that +all key areas are covered. + +# Review Template + +1. [ ] Check all documents for spelling and grammar. +2. [ ] Ensure all acronyms are fully explained upon first use. +3. [ ] For all people referenced, use their full names and job titles + upon first use. +4. [ ] All supporting documents must cross-reference to the lead sheet + and vice-versa. +5. [ ] Verify that the control has been adequately tested: + - [ ] **Test of Design**: Did the tester obtain information + regarding how the control should perform normally and abnormally + (e.g., emergency scenarios)? + - [ ] **Test of Operating Effectiveness**: Did the tester inquire, + observe, inspect, or re-perform sufficient evidence to support + their conclusion over the control? Inquiry alone is not + adequate! +6. [ ] For any information used in the control, whether by the control + operator or by the tester, did the tester appropriately document the + source (system or person), extraction method, parameters, and + completeness and accuracy (C&A)? + - [ ] For any reports, queries, etc. used in the extraction, did + the tester include a copy and notate C&A considerations? +7. [ ] Did the tester document the specific criteria that the control + is being tested against? +8. [ ] Did the tester notate in the supporting documents where each + criterion was satisfied? +9. [ ] If testing specific policies or procedures, are the documents + adequate? + - [ ] e.g., a test to validate that a review of policy XYZ occurs + periodically should also evaluate the sufficiency of the policy + itself, if meant to cover the risk that such a policy does not + exist and is not reviewed. +10. [ ] Does the test cover the appropriate period under review? + - [ ] If the test is meant to cover only a portion of the audit + period, do other controls exist to mitigate the risks that exist + for the remainder of the period? +11. [ ] For any computer-aided audit tools (CAATs) or other automation + techniques used in the test, is the use of such tools explained and + appropriately documented? +12. [ ] If prior-period documentation exists, are there any missing + pieces of evidence that would further enhance the quality of the + test? +13. [ ] Was any information discovered during the walkthrough or inquiry + phase that was not incorporated into the test? +14. [ ] Are there new rules or expectations from your company\'s + internal guidance or your regulatory bodies that would affect the + audit approach for this control? +15. [ ] Was an exception, finding, or deficiency identified as a result + of this test? + - [ ] Was the control deficient in design, operation, or both? + - [ ] What was the root cause of the finding? + - [ ] Does the finding indicate other findings or potential fraud? + - [ ] What\'s the severity and scope of the finding? + - [ ] Do other controls exist as a form of compensation against + the finding\'s severity, and do they mitigate the risk within + the control objective? + - [ ] Does the finding exist at the end of the period, or was it + resolved within the audit period? diff --git a/content/blog/2023-06-20-audit-review-template.org b/content/blog/2023-06-20-audit-review-template.org deleted file mode 100644 index 135a845..0000000 --- a/content/blog/2023-06-20-audit-review-template.org +++ /dev/null @@ -1,76 +0,0 @@ -#+title: Audit Testing Review Template -#+date: 2023-06-20 -#+description: A handy reference template for audit review. -#+filetags: :audit: - -* Overview -This post is a /very/ brief overview on the basic process to review -audit test results, focusing on work done as part of a financial -statement audit (FSA) or service organization controls (SOC) report. - -While there are numerous different things to review and look for - all -varying wildly depending on the report, client, and tester - this list -serves as a solid base foundation for a reviewer. - -I have used this throughout my career as a starting point to my reviews, -and it has worked wonders for creating a consistent and objective -template to my reviews. The goal is to keep this base high-level enough -to be used on a wide variety of engagements, while still ensuring that -all key areas are covered. - -* Review Template -1. [ ] Check all documents for spelling and grammar. -2. [ ] Ensure all acronyms are fully explained upon first use. -3. [ ] For all people referenced, use their full names and job titles - upon first use. -4. [ ] All supporting documents must cross-reference to the lead sheet - and vice-versa. -5. [ ] Verify that the control has been adequately tested: - - [ ] *Test of Design*: Did the tester obtain information regarding - how the control should perform normally and abnormally (e.g., - emergency scenarios)? - - [ ] *Test of Operating Effectiveness*: Did the tester inquire, - observe, inspect, or re-perform sufficient evidence to support - their conclusion over the control? Inquiry alone is not adequate! -6. [ ] For any information used in the control, whether by the control - operator or by the tester, did the tester appropriately document the - source (system or person), extraction method, parameters, and - completeness and accuracy (C&A)? - - [ ] For any reports, queries, etc. used in the extraction, did the - tester include a copy and notate C&A considerations? -7. [ ] Did the tester document the specific criteria that the control is - being tested against? -8. [ ] Did the tester notate in the supporting documents where each - criterion was satisfied? -9. [ ] If testing specific policies or procedures, are the documents - adequate? - - [ ] e.g., a test to validate that a review of policy XYZ occurs - periodically should also evaluate the sufficiency of the policy - itself, if meant to cover the risk that such a policy does not - exist and is not reviewed. -10. [ ] Does the test cover the appropriate period under review? - - [ ] If the test is meant to cover only a portion of the audit - period, do other controls exist to mitigate the risks that exist - for the remainder of the period? -11. [ ] For any computer-aided audit tools (CAATs) or other automation - techniques used in the test, is the use of such tools explained and - appropriately documented? -12. [ ] If prior-period documentation exists, are there any missing - pieces of evidence that would further enhance the quality of the - test? -13. [ ] Was any information discovered during the walkthrough or inquiry - phase that was not incorporated into the test? -14. [ ] Are there new rules or expectations from your company's internal - guidance or your regulatory bodies that would affect the audit - approach for this control? -15. [ ] Was an exception, finding, or deficiency identified as a result - of this test? - - [ ] Was the control deficient in design, operation, or both? - - [ ] What was the root cause of the finding? - - [ ] Does the finding indicate other findings or potential fraud? - - [ ] What's the severity and scope of the finding? - - [ ] Do other controls exist as a form of compensation against the - finding's severity, and do they mitigate the risk within the - control objective? - - [ ] Does the finding exist at the end of the period, or was it - resolved within the audit period? diff --git a/content/blog/2023-06-23-byobu.org b/content/blog/2023-06-23-byobu.md index 902e5f5..991da61 100644 --- a/content/blog/2023-06-23-byobu.org +++ b/content/blog/2023-06-23-byobu.md @@ -1,33 +1,37 @@ -#+title: Byobu -#+date: 2023-06-23 -#+description: Learning about the Byobu application for terminals. -#+filetags: :linux: ++++ +date = 2023-06-23 +title = "Byobu" +description = "" +draft = false ++++ -* Byobu -[[https://www.byobu.org][byobu]] is a command-line tool that allows you -to use numerous screens within a single terminal emulator instance. More -specifically, it's a text based window manager, using either =screen= or -=tmux=. +# Byobu {#byobu-1} + +[byobu](https://www.byobu.org) is a command-line tool that allows you to +use numerous screens within a single terminal emulator instance. More +specifically, it\'s a text based window manager, using either +`screen` or `tmux`. This post is mostly just a self-reference as I explore byobu, so I may come back later and update this post with more content. -** Screenshot +## Screenshot + Take a look below at my current multi-window set-up in byobu while I write this blog post: -#+caption: byobu -[[https://img.cleberg.net/blog/20230623-byobu/byobu.png]] + + +### Keybindings -*** Keybindings You can open the help menu with either of the following commands; they will both open the same manpage: -#+begin_src sh +```sh byobu --help # or man byobu -#+end_src +``` While the manpage contains a ton of information about the functionality of byobu (such as status notifications, sessions, and windows), the @@ -35,7 +39,7 @@ first location to explore should be the keybindings section. The keybindings are configured as follows: -#+begin_src txt +``` txt byobu keybindings can be user defined in /usr/share/byobu/keybindings/ (or within .screenrc if byobu-export was used). The common key bindings are: @@ -63,4 +67,4 @@ Ctrl-a R - Reload profile Ctrl-a ! - Toggle key bindings on and off Ctrl-a k - Kill the current window Ctrl-a ~ - Save the current window's scrollback buffer -#+end_src +``` diff --git a/content/blog/2023-06-23-self-hosting-convos.org b/content/blog/2023-06-23-self-hosting-convos.md index 3ed72d1..d93f2c6 100644 --- a/content/blog/2023-06-23-self-hosting-convos.org +++ b/content/blog/2023-06-23-self-hosting-convos.md @@ -1,39 +1,44 @@ -#+title: Self-Hosting Convos IRC Web Client -#+date: 2023-06-23 -#+description: A guide to self-hosting the Convos application on your own server. -#+filetags: :selfhosting: ++++ +date = 2023-06-23 +title = "Self-Hosting Convos IRC Web Client" +description = "" +draft = false ++++ -* Convos -[[https://convos.chat/][Convos]] is an always-online web client for IRC. +# Convos + +[Convos](https://convos.chat/) is an always-online web client for IRC. It has a few features that made it attractive to me as a self-hosted option: -- Extremely simple Docker Compose installation method. -- Runs in the background and monitors chats even while you're not logged - in. -- Neatly organized sidebar for conversation and client settings. -- Ability to connect to different hosts and create profiles for hosts. -- By default, registration is closed to the public. You can enable - public registration on the Settings page or generate invitation links - on the Users page. -- Customization of the client theme, organization name and URL, admin - email, and video service. - -* Docker Installation -To install Convos, simply create a directory and a =docker-compose.yml= -file: - -#+begin_src sh +- Extremely simple Docker Compose installation method. +- Runs in the background and monitors chats even while you\'re not + logged in. +- Neatly organized sidebar for conversation and client settings. +- Ability to connect to different hosts and create profiles for hosts. +- By default, registration is closed to the public. You can enable + public registration on the Settings page or generate invitation + links on the Users page. +- Customization of the client theme, organization name and URL, admin + email, and video service. + +# Docker Installation + +To install Convos, simply create a directory and a +`docker-compose.yml` file: + +```sh mkdir ~/convos && cd ~/convos nano docker-compose.yml -#+end_src +``` -With the =docker-compose.yml= file open, paste the configuration below -into the file. You can customize the host port to be something unique, -such as =21897:3000=. You can also change the =data= folder to be a -docker volume instead, if you prefer. +With the `docker-compose.yml` file open, paste the +configuration below into the file. You can customize the host port to be +something unique, such as `21897:3000`. You can also change +the `data` folder to be a docker volume instead, if you +prefer. -#+begin_src config +``` config version: '3' services: @@ -46,31 +51,33 @@ services: environment: - CONVOS_REVERSE_PROXY=1 restart: always -#+end_src +``` -Save the =docker-compose.yml= file and bring the container up: +Save the `docker-compose.yml` file and bring the container +up: -#+begin_src sh +```sh sudo docker-compose up -d -#+end_src +``` -At this point, Convos is available at =<server_ip>:3000= but not -available to the public. +At this point, Convos is available at `<server_ip>:3000` but +not available to the public. -* Nginx Reverse Proxy -If you're using Nginx, you can create a configuration file for the +# Nginx Reverse Proxy + +If you\'re using Nginx, you can create a configuration file for the convos application. Start by opening the file: -#+begin_src sh +```sh nano /etc/nginx/sites-available/convos -#+end_src +``` Within the nginx configuration file, paste the following content and be -sure to update =convos.example.com= to match your domain and -=127.0.0.1:3000= to match the port you opened in the -=docker-compose.yml= file. +sure to update `convos.example.com` to match your domain and +`127.0.0.1:3000` to match the port you opened in the +`docker-compose.yml` file. -#+begin_src config +``` config # Host and port where convos is running upstream convos_upstream { server 127.0.0.1:3000; } @@ -108,53 +115,55 @@ server { include /etc/letsencrypt/options-ssl-nginx.conf; ssl_dhparam /etc/letsencrypt/ssl-dhparams.pem; } -#+end_src +``` -Once the file is saved, link it to the =sites-enabled= directory and -restart Nginx. +Once the file is saved, link it to the `sites-enabled` +directory and restart Nginx. -#+begin_src sh +```sh sudo ln -s /etc/nginx/sites-available/convos /etc/nginx/sites-enabled/convos sudo systemctl restart nginx.service -#+end_src +``` + +# Screenshots -* Screenshots See the screenshots below for an example of the Convos homepage and an excerpt of the chat screen. There are numerous themes to choose from; the theme shown in the images below is Dracula. -#+caption: Convos Home -[[https://img.cleberg.net/blog/20230623-convos/convos_home.png]] + + + -#+caption: Convos Chat -[[https://img.cleberg.net/blog/20230623-convos/convos_chat.png]] +# Registering a Nickname -* Registering a Nickname Hop into the server channel so that you can message NickServ. In the case of Convos, the default sever is libera.chat. Simply click the -=libera= conversation at the top of the sidebar to open it. Once the -chat is open, you can claim a nickname by typing: +`libera` conversation at the top of the sidebar to open it. +Once the chat is open, you can claim a nickname by typing: -#+begin_src txt +``` txt /nick <nick> -#+end_src +``` -If the nickname is available, and you'd like to register the nickname to -yourself, you'll need to type another command: +If the nickname is available, and you\'d like to register the nickname +to yourself, you\'ll need to type another command: -#+begin_src txt +``` txt /msg NickServ REGISTER <password> <email> -#+end_src +``` On libera.chat, the server will send a confirmation email with a command that you must message in IRC to verify registration of the nickname: -#+begin_src txt +``` txt /msg NickServ VERIFY REGISTER <nick> <verification_code> -#+end_src +``` Once entered, the server should confirm registration of the nickname to the supplied email with the password specified. diff --git a/content/blog/2023-06-28-backblaze-b2.md b/content/blog/2023-06-28-backblaze-b2.md new file mode 100644 index 0000000..3f2ed48 --- /dev/null +++ b/content/blog/2023-06-28-backblaze-b2.md @@ -0,0 +1,189 @@ ++++ +date = 2023-06-28 +title = "Getting Started with Backblaze B2 Cloud Storage" +description = "" +draft = false ++++ + +# Overview + +Backblaze [B2 Cloud +Storage](https://www.backblaze.com/b2/cloud-storage.html) is an +inexpensive and reliable on-demand cloud storage and backup solution. + +The service starts at \$5/TB/month (\$0.005/GB/month) with a download +rate of \$0.01/GB/month. + +However, there are free tiers: + +- The first 10 GB of storage is free. +- The first 1 GB of data downloaded each day is free. +- Class A transactions are free. +- The first 2500 Class B transactions each day are free. +- The first 2500 Class C transactions each day are free. + +You can see which API calls fall into categories A, B, or C here: +[Pricing Organized by API +Calls](https://www.backblaze.com/b2/b2-transactions-price.html). + +For someone like me, who wants an offsite backup of their server\'s +`/home/` directory and various other server configs that fall +under 10 GB total, Backblaze is a great solution from a financial +perspective. + +# Create An Account + +To start with Backblaze, you\'ll need to [create a free +account](https://www.backblaze.com/b2/sign-up.html) - no payment method +is required to sign up. + +Once you have an account, you can test out the service with their web +GUI, their mobile app, or their CLI tool. I\'m going to use the CLI tool +below to test a file upload and then sync an entire directory to my +Backblaze bucket. + +# Create a Bucket + +Before you can start uploading, you need to create a bucket. If you\'re +familiar with other object storage services, this will feel familiar. If +not, it\'s pretty simple to create one. + +As their webpage says: + +> A bucket is a container that holds files that are uploaded into B2 +> Cloud Storage. The bucket name must be globally unique and must have a +> minimum of 6 characters. A limit of 100 buckets may be created per +> account. An unlimited number of files may be uploaded into a bucket. + +Once you click the `Create a Bucket` button on their webpage +or mobile app, you need to provide the following: + +- Bucket Unique Name +- Files in Bucket are: `Private` or `Public` +- Default Encryption: `Disable` or `Enable` +- Object Lock: `Disable` or `Enable` + +For my bucket, I created a private bucket with encryption enabled and +object lock disabled. + +Once your bucket is created, you can test the upload/download feature on +their web GUI or mobile app! At this point, you have a fully functional +bucket and account. + +# Linux CLI Tool + +## Installation + +To install the `b2` CLI tool, you\'ll need to download it +from the [CLI +Tools](https://www.backblaze.com/docs/cloud-storage-command-line-tools) +page. I recommend copying the URL from the link that says +`Linux` and using wget to download it, as shown below. + +Once downloaded, make the file executable and move it to a location on +your `$PATH`, so that you can execute that command from +anywhere on the machine. + +```sh +wget <b2_cli_url> +chmod +x b2_linux +mv b2_linux /usr/bin/b2 +``` + +## Log In + +The first step after installation is to log in. To do this, execute the +following command and provide your `<applicationKeyId>` and +`<applicationKey>`. + +If you don\'t want to provide these values in the command itself, you +can simply execute the base command and it will request them in an +interactive prompt. + +```sh +# if you want to provide the keys directly: +b2 authorize-account [<applicationKeyId>] [<applicationKey>] + +# or, if you don't want your keys in your shell history: +b2 authorize-account +``` + +## Upload a Test File + +In order to test the functionality of the CLI tool, I\'ll start by +uploading a single test file to the bucket I created above. We can do +this with the `upload_file` function. + +The command is issued as follows: + +```sh +b2 upload_file <bucket_name> <local_file> <remote_file> +``` + +In my situation, I executed the following command with my username. + +```sh +b2 upload_file my_unique_bucket /home/<user>/test.md test.md +``` + +To confirm that the file was uploaded successfully, list the files in +your bucket: + +```sh +b2 ls <bucket_name> +``` + +``` txt +test.md +``` + +## Sync a Directory + +If you have numerous files, you can use the `sync` function +to perform functionality similar to `rsync`, where you can +check what\'s in your bucket and sync anything that is new or modified. + +The command is issued as follows: + +```sh +b2 sync <source file location> <B2 bucket destination> +``` + +In my case, I can sync my user\'s entire home directory to my bucket +without specifying any of the files directly: + +```sh +b2 sync /home/<user>/ "b2://<bucketName>/home/<user>" +``` + +# Caveats + +## Timing of Updates to the Web GUI + +When performing actions over a bucket, there is a slight delay in the +web GUI when inspecting a bucket or its file. Note that simple actions +such as uploading or deleting files may have a delay of a few minutes up +to 24 hours. In my experience (\<10 GB and \~20,000 files), any actions +took only a few minutes to update across clients. + +## Symlinks + +Note that symlinks are resolved by b2, so if you have a link from +`/home/<user>/nas-storage` that symlinks out to a +`/mnt/nas-storage` folder that has 10TB of data, +`b2` will resolve that link and start uploading all 10TB of +data linked within the folder. + +If you\'re not sure if you have any symlinks, a symlink will look like +this (note the `->` symbol): + +```sh +> ls -lha +lrwxrwxrwx 1 root root 20 Jun 28 13:32 nas -> /mnt/nas-storage/ +``` + +You can recursively find symlink in a path with the following command: + +```sh +ls -lR /path/to/search | grep '^l' +``` diff --git a/content/blog/2023-06-28-backblaze-b2.org b/content/blog/2023-06-28-backblaze-b2.org deleted file mode 100644 index d51fd56..0000000 --- a/content/blog/2023-06-28-backblaze-b2.org +++ /dev/null @@ -1,176 +0,0 @@ -#+title: Getting Started with Backblaze B2 Cloud Storage -#+date: 2023-06-28 -#+description: An introduction to the free ttier of Backblaze B2 Cloud Storage. -#+filetags: :sysadmin: - -* Overview -Backblaze [[https://www.backblaze.com/b2/cloud-storage.html][B2 Cloud -Storage]] is an inexpensive and reliable on-demand cloud storage and -backup solution. - -The service starts at $5/TB/month ($0.005/GB/month) with a download rate -of $0.01/GB/month. - -However, there are free tiers: - -- The first 10 GB of storage is free. -- The first 1 GB of data downloaded each day is free. -- Class A transactions are free. -- The first 2500 Class B transactions each day are free. -- The first 2500 Class C transactions each day are free. - -You can see which API calls fall into categories A, B, or C here: -[[https://www.backblaze.com/b2/b2-transactions-price.html][Pricing -Organized by API Calls]]. - -For someone like me, who wants an offsite backup of their server's -=/home/= directory and various other server configs that fall under 10 -GB total, Backblaze is a great solution from a financial perspective. - -* Create An Account -To start with Backblaze, you'll need to -[[https://www.backblaze.com/b2/sign-up.html][create a free account]] - -no payment method is required to sign up. - -Once you have an account, you can test out the service with their web -GUI, their mobile app, or their CLI tool. I'm going to use the CLI tool -below to test a file upload and then sync an entire directory to my -Backblaze bucket. - -* Create a Bucket -Before you can start uploading, you need to create a bucket. If you're -familiar with other object storage services, this will feel familiar. If -not, it's pretty simple to create one. - -As their webpage says: - -#+begin_quote -A bucket is a container that holds files that are uploaded into B2 Cloud -Storage. The bucket name must be globally unique and must have a minimum -of 6 characters. A limit of 100 buckets may be created per account. An -unlimited number of files may be uploaded into a bucket. - -#+end_quote - -Once you click the =Create a Bucket= button on their webpage or mobile -app, you need to provide the following: - -- Bucket Unique Name -- Files in Bucket are: =Private= or =Public= -- Default Encryption: =Disable= or =Enable= -- Object Lock: =Disable= or =Enable= - -For my bucket, I created a private bucket with encryption enabled and -object lock disabled. - -Once your bucket is created, you can test the upload/download feature on -their web GUI or mobile app! At this point, you have a fully functional -bucket and account. - -* Linux CLI Tool -** Installation -To install the =b2= CLI tool, you'll need to download it from the -[[https://www.backblaze.com/docs/cloud-storage-command-line-tools][CLI -Tools]] page. I recommend copying the URL from the link that says -=Linux= and using wget to download it, as shown below. - -Once downloaded, make the file executable and move it to a location on -your =$PATH=, so that you can execute that command from anywhere on the -machine. - -#+begin_src sh -wget <b2_cli_url> -chmod +x b2_linux -mv b2_linux /usr/bin/b2 -#+end_src - -** Log In -The first step after installation is to log in. To do this, execute the -following command and provide your =<applicationKeyId>= and -=<applicationKey>=. - -If you don't want to provide these values in the command itself, you can -simply execute the base command and it will request them in an -interactive prompt. - -#+begin_src sh -# if you want to provide the keys directly: -b2 authorize-account [<applicationKeyId>] [<applicationKey>] - -# or, if you don't want your keys in your shell history: -b2 authorize-account -#+end_src - -** Upload a Test File -In order to test the functionality of the CLI tool, I'll start by -uploading a single test file to the bucket I created above. We can do -this with the =upload_file= function. - -The command is issued as follows: - -#+begin_src sh -b2 upload_file <bucket_name> <local_file> <remote_file> -#+end_src - -In my situation, I executed the following command with my username. - -#+begin_src sh -b2 upload_file my_unique_bucket /home/<user>/test.md test.md -#+end_src - -To confirm that the file was uploaded successfully, list the files in -your bucket: - -#+begin_src sh -b2 ls <bucket_name> -#+end_src - -#+begin_src txt -test.md -#+end_src - -** Sync a Directory -If you have numerous files, you can use the =sync= function to perform -functionality similar to =rsync=, where you can check what's in your -bucket and sync anything that is new or modified. - -The command is issued as follows: - -#+begin_src sh -b2 sync <source file location> <B2 bucket destination> -#+end_src - -In my case, I can sync my user's entire home directory to my bucket -without specifying any of the files directly: - -#+begin_src sh -b2 sync /home/<user>/ "b2://<bucketName>/home/<user>" -#+end_src - -* Caveats -** Timing of Updates to the Web GUI -When performing actions over a bucket, there is a slight delay in the -web GUI when inspecting a bucket or its file. Note that simple actions -such as uploading or deleting files may have a delay of a few minutes up -to 24 hours. In my experience (<10 GB and ~20,000 files), any actions -took only a few minutes to update across clients. - -** Symlinks -Note that symlinks are resolved by b2, so if you have a link from -=/home/<user>/nas-storage= that symlinks out to a =/mnt/nas-storage= -folder that has 10TB of data, =b2= will resolve that link and start -uploading all 10TB of data linked within the folder. - -If you're not sure if you have any symlinks, a symlink will look like -this (note the =->= symbol): - -#+begin_src sh -> ls -lha -lrwxrwxrwx 1 root root 20 Jun 28 13:32 nas -> /mnt/nas-storage/ -#+end_src - -You can recursively find symlink in a path with the following command: - -#+begin_src sh -ls -lR /path/to/search | grep '^l' -#+end_src diff --git a/content/blog/2023-06-30-self-hosting-voyager.org b/content/blog/2023-06-30-self-hosting-voyager.md index 281cb38..66df588 100644 --- a/content/blog/2023-06-30-self-hosting-voyager.org +++ b/content/blog/2023-06-30-self-hosting-voyager.md @@ -1,50 +1,56 @@ -#+title: Self-Hosting Voyager - A Lemmy Web Client -#+date: 2023-06-30 -#+description: A guide to self-hosting the Voyager application on your own server. -#+filetags: :selfhosting: ++++ +date = 2023-06-30 +title = "Self-Hosting Voyager - A Lemmy Web Client" +description = "" +draft = false ++++ -* Installation Guide -[[https://github.com/aeharding/voyager][Voyager]] is a mobile-first -Lemmy web client, based on iOS design standards. It follows very closely -to Apollo's design. +# Installation Guide + +[Voyager](https://github.com/aeharding/voyager) is a mobile-first Lemmy +web client, based on iOS design standards. It follows very closely to +Apollo\'s design. This post is a guide showing how I was able to build and launch my own instance of Voyager via Docker Compose. -** Clone the Repository +## Clone the Repository + Start by cloning the repository and entering it: -#+begin_src sh +```sh git clone https://github.com/aeharding/voyager cd voyager -#+end_src +``` + +## Build the Image -** Build the Image With this repository, you can build the image yourself without any -further configuration. When complete, it'll give you the image ID for +further configuration. When complete, it\'ll give you the image ID for you to run. -#+begin_src sh +```sh sudo docker build . # Successfully built 5f00723cb5be -#+end_src +``` With the image ID above, you can run the container and pass the -requested port =5314= through or use a custom port, if you wish. +requested port `5314` through or use a custom port, if you +wish. -You can also set the =CUSTOM_LEMMY_SERVERS= environment variable if you -want to add to the default suggested login servers. This must be set -with a comma separated list of suggested servers. The first instance in -the list will be the default view for logged-out users. +You can also set the `CUSTOM_LEMMY_SERVERS` environment +variable if you want to add to the default suggested login servers. This +must be set with a comma separated list of suggested servers. The first +instance in the list will be the default view for logged-out users. -I will be using a =docker-compose.yml= file to run this container, -instead of a =docker run= command. +I will be using a `docker-compose.yml` file to run this +container, instead of a `docker run` command. -#+begin_src sh +```sh nano docker-compose.yml -#+end_src +``` -#+begin_src conf +``` conf version: "2" services: voyager: @@ -54,29 +60,30 @@ services: - "<custom_port>:5314" environment: - CUSTOM_LEMMY_SERVERS=lemmy.dbzer0.com,lemmy.world,lemmy.ml,beehaw.org -#+end_src +``` -#+begin_src sh +```sh sudo docker-compose up -d -#+end_src +``` The web app will now be available at the following address: -=<machine_ip>:<custom_port>=. If you are running it on your local -device, try =localhost:<custom_port>=. +`<machine_ip>:<custom_port>`. If you are running it on your +local device, try `localhost:<custom_port>`. + +## Reverse Proxy -** Reverse Proxy -If you want to visit this app via an external URL or domain name, you'll -need to set up a reverse proxy. The example below uses Nginx as a -reverse proxy. +If you want to visit this app via an external URL or domain name, +you\'ll need to set up a reverse proxy. The example below uses Nginx as +a reverse proxy. Simply create the configuration file, paste the contents below, save the file, symlink the file, and restart Nginx. -#+begin_src sh +```sh sudo nano /etc/nginx/sites-available/voyager -#+end_src +``` -#+begin_src conf +``` conf server { if ($host ~ ^[^.]+\.example\.com$) { return 301 https://$host$request_uri; @@ -106,14 +113,15 @@ server { include /etc/letsencrypt/options-ssl-nginx.conf; ssl_dhparam /etc/letsencrypt/ssl-dhparams.pem; } -#+end_src +``` -#+begin_src sh +```sh sudo ln sudo ln -s /etc/nginx/sites-available/voyager /etc/nginx/sites-enabled/voyager sudo systemctl restart nginx.service -#+end_src +``` -The site will now be available at the =server_name= you specified above! +The site will now be available at the `server_name` you +specified above! You can visit my instance at -[[https://voyager.cleberg.net][voyager.cleberg.net]] for an example. +[voyager.cleberg.net](https://voyager.cleberg.net) for an example. diff --git a/content/blog/2023-07-12-wireguard-lan.org b/content/blog/2023-07-12-wireguard-lan.md index 17696de..0c2cebc 100644 --- a/content/blog/2023-07-12-wireguard-lan.org +++ b/content/blog/2023-07-12-wireguard-lan.md @@ -1,28 +1,31 @@ -#+title: Enable LAN Access in Mullvad Wireguard Conf Files -#+date: 2023-07-12 -#+description: Learn how to enable LAN access manually in Mullvad configuration files. -#+filetags: :linux: - -* Download Configuration Files from Mullvad -To begin, you'll need -[[https://mullvad.net/account/wireguard-config][Wireguard configuration -files from Mullvad]]. You can choose any of the options as you download -them. For example, I enabled the kill switch, selected all countries, -and selected a few content filters. ++++ +date = 2023-07-12 +title = "Enable LAN Access in Mullvad Wireguard Configuration Files" +description = "" +draft = false ++++ + +# Download Configuration Files from Mullvad + +To begin, you\'ll need [Wireguard configuration files from +Mullvad](https://mullvad.net/account/wireguard-config). You can choose +any of the options as you download them. For example, I enabled the kill +switch, selected all countries, and selected a few content filters. Once downloaded, unzip the files and move them to the Wireguard folder on your system. -#+begin_src sh +```sh cd ~/Downloads unzip mullvad_wireguard_linux_all_all.zip doas mv *.conf /etc/wireguard/ -#+end_src +``` + +## Configuration File Layout -** Configuration File Layout The default configuration files will look something like this: -#+begin_src conf +``` conf [Interface] # Device: <redacted> PrivateKey = <redacted> @@ -35,46 +38,45 @@ PreDown = iptables -D OUTPUT ! -o %i -m mark ! --mark $(wg show %i fwmark) -m ad PublicKey = <redacted> AllowedIPs = <redacted> Endpoint = <redacted> -#+end_src +``` -#+begin_quote -Note: If you didn't select the kill switch option, you won't see the -=PostUp= and =PreDown= lines. In this case, you'll need to modify the -script below to simply append those lines to the =[Interface]= block. -#+end_quote +> Note: If you didn\'t select the kill switch option, you won\'t see the +> `PostUp` and `PreDown` lines. In this case, +> you\'ll need to modify the script below to simply append those lines +> to the `[Interface]` block. -* Editing the Configuration Files -Once you have the files, you'll need to edit them and replace the -=PostUp= and =PreDown= lines to enable LAN access. +# Editing the Configuration Files -I recommend that you do this process as root, since you'll need to be -able to access files in =/etc/wireguard=, which are generally owned by -root. You can also try using =sudo= or =doas=, but I didn't test that -scenario so you may need to adjust, as necessary. +Once you have the files, you\'ll need to edit them and replace the +`PostUp` and `PreDown` lines to enable LAN access. -#+begin_src sh +I recommend that you do this process as root, since you\'ll need to be +able to access files in `/etc/wireguard`, which are generally +owned by root. You can also try using `sudo` or +`doas`, but I didn\'t test that scenario so you may need to +adjust, as necessary. + +```sh su -#+end_src +``` -Create the Python file that we'll be using to update the Wireguard +Create the Python file that we\'ll be using to update the Wireguard configuration files. -#+begin_src sh +```sh nano replace.py -#+end_src +``` Within the Python file, copy and paste the logic below. This script will open a directory, loop through every configuration file within the -directory, and replace the =PostUp= and =PreDown= lines with the new -LAN-enabled iptables commands. - -#+begin_quote -Note: If your LAN is on a subnet other than =192.168.1.0/24=, you'll -need to update the Python script below appropriately. +directory, and replace the `PostUp` and `PreDown` +lines with the new LAN-enabled iptables commands. -#+end_quote +> Note: If your LAN is on a subnet other than +> `192.168.1.0/24`, you\'ll need to update the Python script +> below appropriately. -#+begin_src python +``` python import os import fileinput @@ -93,25 +95,25 @@ for file in os.listdir(dir): print(line, end="") print("--- done ---") -#+end_src +``` -Once you're done, save and close the file. You can now run the Python +Once you\'re done, save and close the file. You can now run the Python script and watch as each file is updated. -#+begin_src sh +```sh python3 replace.py -#+end_src +``` -To confirm it worked, you can =cat= one of the configuration files to -inspect the new logic and connect to one to test it out. +To confirm it worked, you can `cat` one of the configuration +files to inspect the new logic and connect to one to test it out. -#+begin_src sh +```sh cat /etc/wireguard/us-chi-wg-001.conf -#+end_src +``` The configuration files should now look like this: -#+begin_src conf +``` conf [Interface] # Device: <redacted> PrivateKey = <redacted> @@ -124,20 +126,20 @@ PreDown = iptables -D OUTPUT ! -o %i -m mark ! --mark $(wg show %i fwmark) -m ad PublicKey = <redacted> AllowedIPs = <redacted> Endpoint = <redacted> -#+end_src +``` -If you connect to a Wireguard interface, such as =us-chi-wg-001=, you -can test your SSH functionality and see that it works even while on the -VPN. +If you connect to a Wireguard interface, such as +`us-chi-wg-001`, you can test your SSH functionality and see +that it works even while on the VPN. -#+begin_src sh +```sh wg-quick up us-chi-wg-001 ssh user@lan-host -#+end_src +``` -To confirm your VPN connection, you can curl Mullvad's connection API: +To confirm your VPN connection, you can curl Mullvad\'s connection API: -#+begin_src sh +```sh curl https://am.i.mullvad.net/connected # You are connected to Mullvad (server us-chi-wg-001). Your IP address is <redacted> -#+end_src +``` diff --git a/content/blog/2023-07-19-plex-transcoder-errors.org b/content/blog/2023-07-19-plex-transcoder-errors.md index ae4cf41..5cd57d2 100644 --- a/content/blog/2023-07-19-plex-transcoder-errors.org +++ b/content/blog/2023-07-19-plex-transcoder-errors.md @@ -1,57 +1,64 @@ -#+title: How to Avoid Plex Error: 'Conversion failed. The transcoder failed to start up.' -#+date: 2023-07-19 -#+description: Learn how to avoid Plex conversion errors caused by subtitles. -#+filetags: :sysadmin: ++++ +date = 2023-07-19 +title = "How to Avoid Plex Error: 'Conversion failed. The transcoder failed to start up.'" +description = "" +draft = false ++++ + +# Plex Transcoder Error -* Plex Transcoder Error Occasionally, you may see an error in your Plex client that references a failure with the transcoder conversion process. The specific error wording is: -#+begin_src txt +``` txt Conversion failed. The transcoder failed to start up. -#+end_src +``` + +# Debugging the Cause -* Debugging the Cause -In order to get a better look at what is causing the error, I'm going to -observe the Plex console while the error occurs. To do this, open the -Plex web client, go to =Settings= > =Manage= > =Console=. Now, try to -play the title again and watch to see which errors occur. +In order to get a better look at what is causing the error, I\'m going +to observe the Plex console while the error occurs. To do this, open the +Plex web client, go to `Settings` \> `Manage` \> +`Console`. Now, try to play the title again and watch to see +which errors occur. In my case, you can see the errors below are related to a subtitle file -(=.srt=) causing the transcoder to crash. +(`.srt`) causing the transcoder to crash. -#+begin_src txt +``` txt Jul 19, 2023 16:49:34.945 [140184571120440] Error — Couldn't find the file to stream: /movies/Movie Title (2021)/Movie Title (2021).srt Jul 19, 2023 16:49:34.947 [140184532732728] Error — [Req#7611/Transcode/42935159-67C1-4192-9336-DDC6F7BC9330] Error configuring transcoder: TPU: Failed to download sub-stream to temporary file Jul 19, 2023 16:49:35.225 [140184532732728] Warning — [Req#760d/Transcode] Got a request to stop a transcode session without a valid session GUID. Jul 19, 2023 16:49:45.561 [140184532732728] Info — [Req#7648] AutoUpdate: no updates available Jul 19, 2023 16:51:23.402 [140184510081848] Info — Library section 1 (Movies) will be updated because of a change in "/movies/Movie Title (2021)/Movie Title (2021).srt" -#+end_src +``` + +# Solving the Error -* Solving the Error In my case, I simply removed the subtitle file because it was not critical to keep. You may also avoid this by turning off subtitles if -you don't want to delete the file. +you don\'t want to delete the file. -#+begin_src sh +```sh rm -rf "/movies/Movie Title (2021)/Movie Title (2021).srt" -#+end_src +``` Once the subtitle is removed from the directory or subtitles are turned off, try to play the title again. At this point, it should play without error. If not, reopen or refresh your Plex client and the Plex server: -#+begin_src sh +```sh sudo systemctl restart plexmediaserver.service -#+end_src - -* Related Discussion -Looking at -[[https://forums.plex.tv/t/subtitles-crashing-plex-transcoder-samsung-q80-tv-with-or-without-hardware-transcode/741441/2][a -related Plex forum post]], it seems that =.srt= subtitles are the core -issue here. However, Plex does not seem to have a resolution that fixes -these errors. +``` + +# Related Discussion + +Looking at [a related Plex forum +post](https://forums.plex.tv/t/subtitles-crashing-plex-transcoder-samsung-q80-tv-with-or-without-hardware-transcode/741441/2), +it seems that `.srt` subtitles are the core issue here. +However, Plex does not seem to have a resolution that fixes these +errors. Unfortunately, I would suggest converting subtitle formats, burning the subtitles into the title, or simply removing subtitles when they cause diff --git a/content/blog/2023-08-18-agile-auditing.md b/content/blog/2023-08-18-agile-auditing.md new file mode 100644 index 0000000..de45b8b --- /dev/null +++ b/content/blog/2023-08-18-agile-auditing.md @@ -0,0 +1,159 @@ ++++ +date = 2023-08-18 +title = "Agile Auditing: An Introduction" +description = "" +draft = false ++++ + +# What is Agile Auditing? + +[Agile](https://en.wikipedia.org/wiki/Agile_software_development), the +collaborative philosophy behind many software development methods, has +been picking up steam as a beneficial tool to use in the external and +internal auditing world. + +This blog post will walk through commonly used terms within Agile, +Scrum, and Kanban in order to translate these terms and roles into +audit-specific terms. + +Whether your team is in charge of a financial statement audit, an +attestation (SOC 1, SOC 2, etc.), or a unique internal audit, the terms +used throughout this post should still apply. + +# Agile + +To start, I\'ll take a look at Agile. + +> The Agile methodology is a project management approach that involves +> breaking the project into phases and emphasizes continuous +> collaboration and improvement. Teams follow a cycle of planning, +> executing, and evaluating. + +While this approach may seem familiar to what audit teams have +historically done, an audit team must make distinct changes in their +mentality and how they approach and manage a project. + +## Agile Values + +The Agile Manifesto, written in 2001 at a summit in Utah, contain a set +of four main values that comprise the Agile approach: + +1. Individuals and interactions over processes and tools. +2. Working software over comprehensive documentation. +3. Customer collaboration over contract negotiation. +4. Responding to change over following a plan. + +Beyond the four values, [twelve +principles](https://agilemanifesto.org/principles.html) were also +written as part of the summit. + +In order to relate these values to an audit or attestation engagement, +we need to shift the focus from software development to the main goal of +an engagement: completing sufficient audit testing to address to +relevant risks over the processes and controls at hand. + +Audit Examples: + +- Engagement teams must value the team members, client contacts, and + their interactions over the historical processes and tools that have + been used. +- Engagement teams must value a final report that contains sufficient + audit documentation over excessive documentation or scope creep. +- Engagement teams must collaborate with the audit clients as much as + feasible to ensure that both sides are constantly updated with + current knowledge of the engagement\'s status and any potential + findings, rather than waiting for pre-set meetings or the end of the + engagement to communicate. +- Engagement teams must be able to respond to change in an + engagement\'s schedule, scope, or environment to ensure that the + project is completed in a timely manner and that all relevant areas + are tested. + - In terms of an audit department\'s portfolio, they must be able + to respond to changes in their company\'s or client\'s + environment and be able to dynamically change their audit plan + accordingly. + +# Scrum + +The above section discusses the high-level details of the Agile +philosophy and how an audit team can potentially mold that mindset into +the audit world, but how does a team implement these ideas? + +There are many methods that use an Agile mindset, but I prefer +[Scrum](https://en.wikipedia.org/wiki/Scrum_(software_development)). +Scrum is a framework based on Agile that enables a team to work through +a project through a series of roles, ceremonies, artifacts, and values. + +Let\'s dive into each of these individually. + +## Scrum Team + +A scrum project is only as good as the team running the project. +Standard scrum teams are separated into three distinct areas: + +1. **Product Owner (Client Contact)**: The client contact is the audit + equivalent of the product owner in Scrum. They are responsible for + partnering with the engagement or audit team to ensure progress is + being made, priorities are established, and clear guidance is given + when questions or findings arise within each sprint. +2. **Scrum Master (Engagement Lead)**: The engagement or audit team + lead is responsible for coaching the team and the client contact on + the scrum process, tracking team progress against plan, scheduling + necessary resources, and helping remove obstacles. +3. **Scrum Developers (Engagement Members)**: The engagement or audit + team is the set of team members responsible for getting the work + done. These team members will work on each task, report progress, + resolve obstacles, and collaborate with other team members and the + client contact to ensure goals are being met. + +## Scrum Ceremonies + +Scrum ceremonies are events that are performed on a regular basis. + +1. **Sprint Planning**: The team works together to plan the upcoming + sprint goal and which user stories (tasks) will be added to the + sprint to achieve that goal. +2. **Sprint**: The time period, typically at least one week and no more + than one month in length, where the team works on the stories and + anything in the backlog. +3. **Daily Scrum**: A very short meeting held each day, typically 15 + minutes, to quickly emphasize alignment on the sprint goal and plan + the next 24 hours. Each team member may share what they did the day + before, what they\'ll do today, and any obstacles to their work. +4. **Sprint Review**: At the end of each sprint, the team will gather + and discuss the progress, obstacles, and backlog from the previous + sprint. +5. **Sprint Retrospective**: More specific than the sprint review, the + retrospective is meant to discuss what worked and what did not work + during the sprint. This may be processes, tools, people, or even + things related to the Scrum ceremonies. + +One additional ceremony that may be applicable is organizing the +backlog. This is typically the responsibility of the engagement leader +and is meant to prioritize and clarify what needs to be done to complete +items in the backlog. + +## Artifacts + +While artifacts are generally not customizable in the audit world (i.e., +each control test must include some kind of working paper with evidence +supporting the test results), I wanted to include some quick notes on +associating scrum artifact terms with an audit. + +1. **Product Backlog**: This is the overall backlog of unfinished audit + tasks from all prior sprints. +2. **Sprint Backlog**: This is the backlog of unfinished audit tasks + from one individual sprint. +3. **Increment**: This is the output of each sprint - generally this is + best thought of as any documentation prepared during the sprint, + such as risk assessments, control working papers, deficiency + analysis, etc. + +# Kanban + +Last but not least, Kanban is a methodology that relies on boards to +categorize work into distinct, descriptive categories that allow an +agile or scrum team to effectively plan the work of a sprint or project. + +See Atlassian\'s [Kanban](https://www.atlassian.com/agile/kanban) page +for more information. diff --git a/content/blog/2023-08-18-agile-auditing.org b/content/blog/2023-08-18-agile-auditing.org deleted file mode 100644 index 69e5485..0000000 --- a/content/blog/2023-08-18-agile-auditing.org +++ /dev/null @@ -1,137 +0,0 @@ -#+title: Agile Auditing: An Introduction -#+date: <2023-08-18> -#+description: A quick introduction to using the Agile methodology in an audit. -#+filetags: :audit: - -* What is Agile Auditing? -[[https://en.wikipedia.org/wiki/Agile_software_development][Agile]], the collaborative philosophy behind many software development methods, -has been picking up steam as a beneficial tool to use in the external and -internal auditing world. - -This blog post will walk through commonly used terms within Agile, Scrum, and -Kanban in order to translate these terms and roles into audit-specific terms. - -Whether your team is in charge of a financial statement audit, an attestation -(SOC 1, SOC 2, etc.), or a unique internal audit, the terms used throughout this -post should still apply. - -* Agile -To start, I'll take a look at Agile. - -#+begin_quote -The Agile methodology is a project management approach that involves breaking -the project into phases and emphasizes continuous collaboration and improvement. -Teams follow a cycle of planning, executing, and evaluating. -#+end_quote - -While this approach may seem familiar to what audit teams have historically -done, an audit team must make distinct changes in their mentality and how they -approach and manage a project. - -** Agile Values -The Agile Manifesto, written in 2001 at a summit in Utah, contain a set of four -main values that comprise the Agile approach: - -1. Individuals and interactions over processes and tools. -2. Working software over comprehensive documentation. -3. Customer collaboration over contract negotiation. -4. Responding to change over following a plan. - -Beyond the four values, [[https://agilemanifesto.org/principles.html][twelve principles]] were also written as part of the -summit. - -In order to relate these values to an audit or attestation engagement, we need -to shift the focus from software development to the main goal of an engagement: -completing sufficient audit testing to address to relevant risks over the -processes and controls at hand. - -Audit Examples: - -- Engagement teams must value the team members, client contacts, and their - interactions over the historical processes and tools that have been used. -- Engagement teams must value a final report that contains sufficient audit - documentation over excessive documentation or scope creep. -- Engagement teams must collaborate with the audit clients as much as feasible - to ensure that both sides are constantly updated with current knowledge of the - engagement's status and any potential findings, rather than waiting for - pre-set meetings or the end of the engagement to communicate. -- Engagement teams must be able to respond to change in an engagement's - schedule, scope, or environment to ensure that the project is completed in a - timely manner and that all relevant areas are tested. - - In terms of an audit department's portfolio, they must be able to respond to - changes in their company's or client's environment and be able to - dynamically change their audit plan accordingly. - -* Scrum -The above section discusses the high-level details of the Agile philosophy and -how an audit team can potentially mold that mindset into the audit world, but -how does a team implement these ideas? - -There are many methods that use an Agile mindset, but I prefer [[https://en.wikipedia.org/wiki/Scrum_(software_development)][Scrum]]. Scrum is a -framework based on Agile that enables a team to work through a project through a -series of roles, ceremonies, artifacts, and values. - -Let's dive into each of these individually. - -** Scrum Team -A scrum project is only as good as the team running the project. Standard scrum -teams are separated into three distinct areas: - -1. *Product Owner (Client Contact)*: The client contact is the audit equivalent - of the product owner in Scrum. They are responsible for partnering with the - engagement or audit team to ensure progress is being made, priorities are - established, and clear guidance is given when questions or findings arise - within each sprint. -2. *Scrum Master (Engagement Lead)*: The engagement or audit team lead is - responsible for coaching the team and the client contact on the scrum - process, tracking team progress against plan, scheduling necessary resources, - and helping remove obstacles. -3. *Scrum Developers (Engagement Members)*: The engagement or audit team is the - set of team members responsible for getting the work done. These team members - will work on each task, report progress, resolve obstacles, and collaborate - with other team members and the client contact to ensure goals are being met. - -** Scrum Ceremonies -Scrum ceremonies are events that are performed on a regular basis. - -1. *Sprint Planning*: The team works together to plan the upcoming sprint goal - and which user stories (tasks) will be added to the sprint to achieve that - goal. -2. *Sprint*: The time period, typically at least one week and no more than one - month in length, where the team works on the stories and anything in the - backlog. -3. *Daily Scrum*: A very short meeting held each day, typically 15 minutes, to - quickly emphasize alignment on the sprint goal and plan the next 24 hours. - Each team member may share what they did the day before, what they'll do - today, and any obstacles to their work. -4. *Sprint Review*: At the end of each sprint, the team will gather and discuss - the progress, obstacles, and backlog from the previous sprint. -5. *Sprint Retrospective*: More specific than the sprint review, the - retrospective is meant to discuss what worked and what did not work during - the sprint. This may be processes, tools, people, or even things related to - the Scrum ceremonies. - -One additional ceremony that may be applicable is organizing the backlog. This -is typically the responsibility of the engagement leader and is meant to -prioritize and clarify what needs to be done to complete items in the backlog. - -** Artifacts -While artifacts are generally not customizable in the audit world (i.e., each -control test must include some kind of working paper with evidence supporting -the test results), I wanted to include some quick notes on associating scrum -artifact terms with an audit. - -1. *Product Backlog*: This is the overall backlog of unfinished audit tasks from - all prior sprints. -2. *Sprint Backlog*: This is the backlog of unfinished audit tasks from one - individual sprint. -3. *Increment*: This is the output of each sprint - generally this is best - thought of as any documentation prepared during the sprint, such as risk - assessments, control working papers, deficiency analysis, etc. - -* Kanban -Last but not least, Kanban is a methodology that relies on boards to categorize -work into distinct, descriptive categories that allow an agile or scrum team to -effectively plan the work of a sprint or project. - -See Atlassian's [[https://www.atlassian.com/agile/kanban][Kanban]] page for more information. diff --git a/content/blog/2023-09-15-self-hosting-gitweb.org b/content/blog/2023-09-15-self-hosting-gitweb.md index fb40743..5dca508 100644 --- a/content/blog/2023-09-15-self-hosting-gitweb.org +++ b/content/blog/2023-09-15-self-hosting-gitweb.md @@ -1,12 +1,16 @@ -#+title: Self-Hosting GitWeb via Nginx -#+date: 2023-09-15 -#+description: A guide to self-hosting GitWeb using the Nginx web server. -#+filetags: :selfhosting: ++++ +date = 2023-09-15 +title = "Self-Hosting Gitweb via Nginx" +description = "" +draft = false ++++ -* Overview -[[https://git-scm.com/book/en/v2/Git-on-the-Server-GitWeb][GitWeb]] is a +# Overview + +[GitWeb](https://git-scm.com/book/en/v2/Git-on-the-Server-GitWeb) is a simple web-based visualizer for git repositories. By default, GitWeb -will only run with the =lighttpd= or =webrick= web servers. +will only run with the `lighttpd` or `webrick` web +servers. However, this guide will show you how to keep GitWeb running in the background and display information for all repositories in a chosen @@ -14,24 +18,25 @@ directory. See below for the final result: -#+caption: Gitweb -[[https://img.cleberg.net/blog/20230915-gitweb/gitweb.png]] + + +# Install Dependencies -* Install Dependencies -To start, you'll need install the following packages: +To start, you\'ll need install the following packages: -#+begin_src sh +```sh sudo apt install git gitweb fcgiwrap nginx -#+end_src +``` + +# Configure Nginx -* Configure Nginx Once installed, create an Nginx configuration file. -#+begin_src sh +```sh sudo nano /etc/nginx/sites-available/git.example.com -#+end_src +``` -#+begin_src conf +``` conf server { listen 80; server_name example.com; @@ -50,23 +55,24 @@ server { index index.cgi; } } -#+end_src +``` To make the configuration active, you need to symlink it and then restart Nginx. -#+begin_src sh +```sh sudo ln -s /etc/nginx/sites-available/git.example.com /etc/nginx/sites-enabled/git.example.com sudo systemctl restart nginx.service -#+end_src +``` The GitWeb application should now be available via the URL you set in the Nginx configuration above. -* Customize GitWeb +# Customize GitWeb + If you need to, you can customize many things about Gitweb by editing -the [[https://git-scm.com/docs/gitweb.conf][gitweb.conf]] file. +the [gitweb.conf](https://git-scm.com/docs/gitweb.conf) file. -#+begin_src sh +```sh sudo nano /etc/gitweb.conf -#+end_src +``` diff --git a/content/blog/2023-09-19-audit-sql-scripts.org b/content/blog/2023-09-19-audit-sql-scripts.md index b47771c..b652a21 100644 --- a/content/blog/2023-09-19-audit-sql-scripts.org +++ b/content/blog/2023-09-19-audit-sql-scripts.md @@ -1,21 +1,25 @@ -#+title: Useful SQL Scripts for Auditing Logical Access -#+date: 2023-09-19 -#+description: A reference of SQL scripts for auditing logical access for common databases. -#+filetags: :audit: ++++ +date = 2023-09-19 +title = "Useful SQL Scripts for Auditing Logical Access" +description = "" +draft = false ++++ + +# Overview -* Overview When you have to scope a database into your engagement, you may be curious how to best extract the information from the database. While there are numerous different methods to extract this type of -information, I'm going to show an example of how to gather all users and -privileges from three main database types: Oracle, Microsoft SQL, and -MySQL. +information, I\'m going to show an example of how to gather all users +and privileges from three main database types: Oracle, Microsoft SQL, +and MySQL. + +# Oracle -* Oracle You can use the following SQL script to see all users and their privileges in an Oracle database: -#+begin_src sql +``` sql SELECT grantee AS "User", privilege AS "Privilege" @@ -31,37 +35,40 @@ FROM dba_tab_privs WHERE grantee IN (SELECT DISTINCT grantee FROM dba_tab_privs); -#+end_src +``` -This script queries the =dba_sys_privs= and =dba_tab_privs= views to -retrieve system and table-level privileges respectively. It then -combines the results using =UNION ALL= to show all users and their -associated privileges. Please note that this method does not extract -information from the =dba_role_privs= table - use the method below for +This script queries the `dba_sys_privs` and +`dba_tab_privs` views to retrieve system and table-level +privileges respectively. It then combines the results using +`UNION ALL` to show all users and their associated +privileges. Please note that this method does not extract information +from the `dba_role_privs` table - use the method below for that data. Please note that you might need appropriate privileges (e.g., DBA privileges) to access these views, and you should exercise caution when querying system tables in a production Oracle database. -** Alternative Oracle Query -You can also extract each table's information separately and perform +## Alternative Oracle Query + +You can also extract each table\'s information separately and perform processing outside the database to explore and determine the information necessary for the audit: -#+begin_src sql +``` sql SELECT ** FROM sys.dba_role_privs; SELECT ** FROM sys.dba_sys_privs; SELECT ** FROM sys.dba_tab_privs; SELECT ** FROM sys.dba_users; -#+end_src +``` + +# Microsoft SQL -* Microsoft SQL You can use the following SQL script to see all users and their privileges in a Microsoft SQL Server database -([[https://stackoverflow.com/a/30040784][source]]): +([source](https://stackoverflow.com/a/30040784)): -#+begin_src sql +``` sql /* Security Audit Report 1) List all access provisioned to a sql user or windows user/group directly @@ -92,7 +99,7 @@ ObjectName : Name of the object that the user/role is assigned permissions definitions. ColumnName : Name of the column of the object that the user/role is assigned permissions on. This value is only populated if the object is a table, view or a table value function. -,*/ +*/ --List all access provisioned to a sql user or windows user/group directly SELECT @@ -206,41 +213,45 @@ ORDER BY perm.[permission_name], perm.[state_desc], obj.type_desc--perm.[class_desc] -#+end_src +``` + +# MySQL -* MySQL You can use the following SQL script to see all users and their privileges in a MySQL database: -#+begin_src sh +```sh mysql -u root -p -#+end_src +``` Find all users and hosts with access to the database: -#+begin_src sql +``` sql SELECT ** FROM information_schema.user_privileges; -#+end_src +``` This script retrieves user information and their associated -database-level privileges from the =information_schema.user_privileges= -table in MySQL. It lists various privileges such as SELECT, INSERT, -UPDATE, DELETE, CREATE, and more for each user and database combination. +database-level privileges from the +`information_schema.user_privileges` table in MySQL. It lists +various privileges such as SELECT, INSERT, UPDATE, DELETE, CREATE, and +more for each user and database combination. -Please note that you may need appropriate privileges (e.g., =SELECT= -privileges on =information_schema.user_privileges=) to access this +Please note that you may need appropriate privileges (e.g., +`SELECT` privileges on +`information_schema.user_privileges`) to access this information in a MySQL database. Additionally, some privileges like GRANT OPTION, EXECUTE, EVENT, and TRIGGER may not be relevant for all users and databases. -** Alternative MySQL Query +## Alternative MySQL Query + You can also grab individual sets of data from MySQL if you prefer to join them after extraction. I have marked the queries below with -=SELECT ...= and excluded most =WHERE= clauses for brevity. You should -determine the relevant privileges in-scope and query for those -privileges to reduce the length of time to query. +`SELECT ...` and excluded most `WHERE` clauses for +brevity. You should determine the relevant privileges in-scope and query +for those privileges to reduce the length of time to query. -#+begin_src sql +``` sql -- Global Permissions SELECT ... FROM mysql.user; @@ -259,4 +270,4 @@ WHERE db = @db_name; -- Password Configuration SHOW GLOBAL VARIABLES LIKE 'validate_password%'; SHOW VARIABLES LIKE 'validate_password%'; -#+end_src +``` diff --git a/content/blog/2023-10-04-digital-minimalism.md b/content/blog/2023-10-04-digital-minimalism.md new file mode 100644 index 0000000..7e3a8c9 --- /dev/null +++ b/content/blog/2023-10-04-digital-minimalism.md @@ -0,0 +1,107 @@ ++++ +date = 2023-10-04 +title = "Digital Minimalism" +description = "" +draft = false ++++ + +I\'ve written [a note about minimalism](file:///wiki/#digital-garden) +before, but I wanted to dedicate some time to reflect on digital +minimalism and how I\'ve been able to minimize the impact of digital +devices in my life. + +> These changes crept up on us and happened fast, before we had a chance +> to step back and ask what we really wanted out of the rapid advances +> of the past decade. We added new technologies to the periphery of our +> experience for minor reasons, then woke one morning to discover that +> they had colonized the core of our daily life. We didn\'t, in other +> words, sign up for the digital world in which we\'re currently +> entrenched; we seem to have stumbled backward into it. +> +> *(Digital Minimalism, 2019)* + +# The Principles of Digital Minimalism + +As noted in Cal Newport\'s book, *Digital Minimalism*, there are three +main principles to digital minimalism that I tend to agree with: + +1. Clutter is costly. + - Digital minimalists recognize that cluttering their time and + attention with too many devices, apps, and services creates an + overall negative cost that can swamp the small benefits that + each individual item provides in isolation. +2. Optimization is important. + - Digital minimalists believe that deciding a particular + technology supports something they value is only the first step. + To truly extract its full potential benefit, it\'s necessary to + think carefully about how they\'ll use the technology. +3. Intentionality is satisfying. + - Digital minimalists derive significant satisfaction from their + general commitment to being more intentional about how they + engage with new technologies. This source of satisfaction is + independent of the specific decisions they make and is one of + the biggest reasons that minimalism tends to be immensely + meaningful to its practitioners. + +# Taking Action + +In order to put the logic into practice, I\'ve created a few new habits +and continued performing old habits that are working well: + +## Using Devices With Intention + +- I already rarely use \"social media\", mostly limited to forums such + as Hacker News and Tildes, so I\'ve just tweaked my behavior to stop + looking for content in those places when I\'m bored. +- Use devices with intention. Each time I pick up a digital device, + there should be an intention to use the device to improve my current + situation. No more endless scrolling or searching for something to + interest me. + +## Prevent Distractions + +- Disable (most) notifications on all devices. I spent 15-30 minutes + going through the notifications on my phone, watch, and computer to + ensure that only a select few apps have the ability to interrupt me: + Calendar, Messages, Phone, Reminders, & Signal. +- Disable badges for any apps except the ones mentioned in the bullet + above. +- Set-up focus profiles across devices so that I can enable different + modes, such as Personal when I only want to see notifications from + people I care about or Do Not Disturb, where absolutely nothing can + interrupt me. +- Clean up my home screens. This one was quite easy as I already + maintain a minimalist set-up, but I went extreme by limiting my + phone to just eight apps on the home screen and four in the dock. If + I need another app, I\'ll have to search or use the app library. +- Remove the work profile from my phone. This was a tough decision as + having my work profile on my device definitely makes my life easier + at times, but it also has quite a negative effect when I\'m \"always + online\" and can see the notifications and team activity 24/7. I + believe creating a distinct barrier between my work and personal + devices will be beneficial in the end. + +## Creating Alternative Activities + +This is the most difficult piece, as most of my hobbies and interests +lie in the digital world. However, I\'m making a concerted effort to put +devices down unless necessary and force myself to perform other +activities in the physical world instead. + +I\'ve started with a few basics that are always readily available to me: + +- Do a chore, such as organizing or cleaning. +- Read a book, study a piece of art, etc. +- Exercise or get outdoors. +- Participate in a hobby, such as photography, birding, disc golf, + etc. +- Let yourself be bored and wander into creativity. + +# Making Progress + +I\'ll be taking notes as I continue down this journey and hope to see +positive trends. I\'ve always been a minimalist in the physical world +and it feels refreshing to filter out the clutter that has come to +dominate my digital life over the years. + +I\'m excited to see where this journey leads. diff --git a/content/blog/2023-10-04-digital-minimalism.org b/content/blog/2023-10-04-digital-minimalism.org deleted file mode 100644 index 84894d9..0000000 --- a/content/blog/2023-10-04-digital-minimalism.org +++ /dev/null @@ -1,100 +0,0 @@ -#+title: Digital Minimalism -#+date: 2023-10-04 -#+description: My personal retrospective on digital minimalism. -#+filetags: :personal: - -I've written [[/wiki/#digital-garden][a note about minimalism]] before, -but I wanted to dedicate some time to reflect on digital minimalism and -how I've been able to minimize the impact of digital devices in my life. - -#+begin_quote -These changes crept up on us and happened fast, before we had a chance -to step back and ask what we really wanted out of the rapid advances of -the past decade. We added new technologies to the periphery of our -experience for minor reasons, then woke one morning to discover that -they had colonized the core of our daily life. We didn't, in other -words, sign up for the digital world in which we're currently -entrenched; we seem to have stumbled backward into it. - -/(Digital Minimalism, 2019)/ - -#+end_quote - -* The Principles of Digital Minimalism -As noted in Cal Newport's book, /Digital Minimalism/, there are three -main principles to digital minimalism that I tend to agree with: - -1. Clutter is costly. - - Digital minimalists recognize that cluttering their time and - attention with too many devices, apps, and services creates an - overall negative cost that can swamp the small benefits that each - individual item provides in isolation. -2. Optimization is important. - - Digital minimalists believe that deciding a particular technology - supports something they value is only the first step. To truly - extract its full potential benefit, it's necessary to think - carefully about how they'll use the technology. -3. Intentionality is satisfying. - - Digital minimalists derive significant satisfaction from their - general commitment to being more intentional about how they engage - with new technologies. This source of satisfaction is independent - of the specific decisions they make and is one of the biggest - reasons that minimalism tends to be immensely meaningful to its - practitioners. - -* Taking Action -In order to put the logic into practice, I've created a few new habits -and continued performing old habits that are working well: - -** Using Devices With Intention -- I already rarely use "social media", mostly limited to forums such as - Hacker News and Tildes, so I've just tweaked my behavior to stop - looking for content in those places when I'm bored. -- Use devices with intention. Each time I pick up a digital device, - there should be an intention to use the device to improve my current - situation. No more endless scrolling or searching for something to - interest me. - -** Prevent Distractions -- Disable (most) notifications on all devices. I spent 15-30 minutes - going through the notifications on my phone, watch, and computer to - ensure that only a select few apps have the ability to interrupt me: - Calendar, Messages, Phone, Reminders, & Signal. -- Disable badges for any apps except the ones mentioned in the bullet - above. -- Set-up focus profiles across devices so that I can enable different - modes, such as Personal when I only want to see notifications from - people I care about or Do Not Disturb, where absolutely nothing can - interrupt me. -- Clean up my home screens. This one was quite easy as I already - maintain a minimalist set-up, but I went extreme by limiting my phone - to just eight apps on the home screen and four in the dock. If I need - another app, I'll have to search or use the app library. -- Remove the work profile from my phone. This was a tough decision as - having my work profile on my device definitely makes my life easier at - times, but it also has quite a negative effect when I'm "always - online" and can see the notifications and team activity 24/7. I - believe creating a distinct barrier between my work and personal - devices will be beneficial in the end. - -** Creating Alternative Activities -This is the most difficult piece, as most of my hobbies and interests -lie in the digital world. However, I'm making a concerted effort to put -devices down unless necessary and force myself to perform other -activities in the physical world instead. - -I've started with a few basics that are always readily available to me: - -- Do a chore, such as organizing or cleaning. -- Read a book, study a piece of art, etc. -- Exercise or get outdoors. -- Participate in a hobby, such as photography, birding, disc golf, etc. -- Let yourself be bored and wander into creativity. - -* Making Progress -I'll be taking notes as I continue down this journey and hope to see -positive trends. I've always been a minimalist in the physical world and -it feels refreshing to filter out the clutter that has come to dominate -my digital life over the years. - -I'm excited to see where this journey leads. diff --git a/content/blog/2023-10-11-self-hosting-authelia.org b/content/blog/2023-10-11-self-hosting-authelia.md index 94351f3..34da792 100644 --- a/content/blog/2023-10-11-self-hosting-authelia.org +++ b/content/blog/2023-10-11-self-hosting-authelia.md @@ -1,10 +1,13 @@ -#+title: Self-Hosting Authelia -#+date: 2023-10-11 -#+description: A guide to self-hosting the Authelia application on your own server. -#+filetags: :selfhosting: ++++ +date = 2023-10-11 +title = "Self-Hosting Authelia" +description = "" +draft = false ++++ -* Overview -[[https://www.authelia.com/][Authelia]] is an open-source authentication +# Overview + +[Authelia](https://www.authelia.com/) is an open-source authentication service that allows you to place a portal between end users on the internet and self-hosted services on your server. @@ -13,38 +16,42 @@ authentication for any such user before allowing them to access a specific service on your domain. This guide will walk through a standard installation of Authelia for -=example.com=, using =auth.example.com= as Authelia's authentication -domain and =teddit.example.com= as the website we want to protect behind -the authentication portal. +`example.com`, using `auth.example.com` as +Authelia\'s authentication domain and `teddit.example.com` as +the website we want to protect behind the authentication portal. + +# Prerequisites -* Prerequisites This guide assumes you have the following already set-up: -- A registered domain with DNS pointing to your server. -- A subdomain for Authelia (=auth.example.com=) and a subdomain to - protect via Authelia (=app.example.com=). -- A working Nginx web server. -- Docker and docker-compose installed. +- A registered domain with DNS pointing to your server. +- A subdomain for Authelia (`auth.example.com`) and a + subdomain to protect via Authelia (`app.example.com`). +- A working Nginx web server. +- Docker and docker-compose installed. + +# Installation -* Installation This guide will walk through each installation step one-by-one, starting with the container and finishing by cleaning up external access via an Nginx reverse proxy. -** Docker-Compose +## Docker-Compose + To start, create a directory for Authelia and create a -=docker-compose.yml= file. +`docker-compose.yml` file. -#+begin_src sh +```sh mkdir ~/authelia nano ~/authelia/docker-compose.yml -#+end_src +``` Within this file, paste the following content. If you prefer a different local port, modify the port on the left side of the colon on the -=9091:9091= line. Be sure to modify the =TZ= variable to your timezone. +`9091:9091` line. Be sure to modify the `TZ` +variable to your timezone. -#+begin_src yml +``` yml version: '3.3' services: @@ -57,52 +64,55 @@ services: - 9091:9091 environment: - TZ=America/Chicago -#+end_src +``` Start the container with docker-compose: -#+begin_src sh +```sh sudo docker-compose up -d -#+end_src +``` After the first start, the container will automatically exit and require -you to modify the app's configuration files before continuing. Read on +you to modify the app\'s configuration files before continuing. Read on to learn more. -** Authelia Configuration +## Authelia Configuration + To configure Authelia before we restart the container, we need to open -the =config= directory and modify the files. Start by editing the -=configuration.yml= file, where all of Authelia's settings are stored. +the `config` directory and modify the files. Start by editing +the `configuration.yml` file, where all of Authelia\'s +settings are stored. My personal preference is to copy the original configuration file to a backup file and edit a fresh copy. -#+begin_src sh +```sh sudo cp ~/authelia/config/configuration.yml ~/authelia/config/configuration.yml.bk sudo nano ~/authelia/config/configuration.yml -#+end_src +``` -Within the blank =configuration.yml= file, paste the following -information. You will need to make quite a few updates, so be sure to -read each line carefully and modify as necessary. +Within the blank `configuration.yml` file, paste the +following information. You will need to make quite a few updates, so be +sure to read each line carefully and modify as necessary. The major required changes are: -- Any instances of =example.com= should be replaced by your domain. -- =jwt_secret= - Use the =pwgen 40 1= command to generate a secret for - yourself. -- =access_control= - Set the Authelia domain to bypass here, as well as - any subdomains you want to protect. -- =session= > =secret= - Use the =pwgen 40 1= command to generate a - secret for yourself. -- =regulation= - Set the variables here to restrict login attempts and - bans. -- =storage= > =encryption_key= - Use the =pwgen 40 1= command to - generate a secret for yourself. -- =smtp= - If you have access to an SMTP service, set up the information - here to active outgoing emails. - -#+begin_src yml +- Any instances of `example.com` should be replaced by your + domain. +- `jwt_secret` - Use the `pwgen 40 1` command to + generate a secret for yourself. +- `access_control` - Set the Authelia domain to bypass + here, as well as any subdomains you want to protect. +- `session` \> `secret` - Use the + `pwgen 40 1` command to generate a secret for yourself. +- `regulation` - Set the variables here to restrict login + attempts and bans. +- `storage` \> `encryption_key` - Use the + `pwgen 40 1` command to generate a secret for yourself. +- `smtp` - If you have access to an SMTP service, set up + the information here to active outgoing emails. + +``` yml # yamllint disable rule:comments-indentation --- ############################################################################### @@ -191,25 +201,26 @@ notifier: skip_verify: false minimum_version: TLS1.2 ... -#+end_src +``` + +## Authelia Users -** Authelia Users Next, create the users file for authentication. -#+begin_src sh +```sh sudo nano ~/authelia/config/users_database.yml -#+end_src +``` Within the file, you will need to create an entry for each user that -needs access to Authelia. The =my_username= entry will be the username -used on the login page. +needs access to Authelia. The `my_username` entry will be the +username used on the login page. -To generate the password, go to [[https://argon2.online][Argon2 Hash -Generator]], generate a random salt, and make sure the rest of the -settings match the =authentication_backend= section of -=configuration.yml= file. +To generate the password, go to [Argon2 Hash +Generator](https://argon2.online), generate a random salt, and make sure +the rest of the settings match the `authentication_backend` +section of `configuration.yml` file. -#+begin_src yaml +``` yaml users: my_username: displayname: "My User" @@ -220,30 +231,32 @@ users: groups: - admins - dev -#+end_src +``` Once the app is configured, restart the container from scratch. -#+begin_src sh +```sh cd ~/authelia sudo docker-compose down && sudo docker-compose up -d -#+end_src +``` + +## Nginx: Authelia Domain -** Nginx: Authelia Domain Once the container is running and configured, the final step is to configure external access to the server via Nginx reverse proxy. Start by creating the Authelia domain. -#+begin_src sh +```sh sudo nano /etc/nginx/sites-available/auth -#+end_src +``` Within this file, paste the following information and be sure to update -=example.com= to your domain. Make sure the =$upstream_authelia= -variable matches the location of your Authelia container. +`example.com` to your domain. Make sure the +`$upstream_authelia` variable matches the location of your +Authelia container. -#+begin_src conf +``` conf server { if ($host ~ ^[^.]+\.example\.com$) { return 301 https://$host$request_uri; @@ -295,29 +308,30 @@ server { } } -#+end_src +``` Next, symlink the file and restart Nginx. If there are errors, be sure to resolve those before moving on. -#+begin_src sh +```sh sudo ln -s /etc/nginx/sites-available/auth /etc/nginx/sites-enabled/auth sudo systemctl restart nginx.service -#+end_src +``` + +## Nginx: Protected Domain(s) -** Nginx: Protected Domain(s) Now that Authelia is accessible externally, you need to configure the -domain you intend to protect with Authelia. In this example, I'm -protecting =teddit.example.com=. +domain you intend to protect with Authelia. In this example, I\'m +protecting `teddit.example.com`. Similar to the process above, paste the content and update the relevant variables. -#+begin_src sh +```sh sudo nano /etc/nginx/sites-available/teddit -#+end_src +``` -#+begin_src conf +``` conf server { if ($host ~ ^[^.]+\.example\.com$) { return 301 https://$host$request_uri; @@ -419,25 +433,26 @@ server { proxy_buffers 64 256k; } } -#+end_src +``` Same as before, symlink the file and restart Nginx. -#+begin_src sh +```sh sudo ln -s /etc/nginx/sites-available/teddit /etc/nginx/sites-enabled/teddit sudo systemctl restart nginx.service -#+end_src +``` + +# Results -* Results When visiting the protected domain, you will now be redirected to your authentication domain and presented with the Authelia login portal. -#+caption: Authelia Portal -[[https://img.cleberg.net/blog/20231010-authelia/authelia_portal.png]] + -Once you've successfully authenticated, you can visit your -authentication domain directly and see that you're currently +Once you\'ve successfully authenticated, you can visit your +authentication domain directly and see that you\'re currently authenticated to any domain protected by Authelia. -#+caption: Authelia Success -[[https://img.cleberg.net/blog/20231010-authelia/authelia_success.png]] + diff --git a/content/blog/2023-10-15-alpine-ssh-hardening.org b/content/blog/2023-10-15-alpine-ssh-hardening.md index 4e7fcc5..9fc435a 100644 --- a/content/blog/2023-10-15-alpine-ssh-hardening.org +++ b/content/blog/2023-10-15-alpine-ssh-hardening.md @@ -1,71 +1,75 @@ -#+title: SSH Hardening for Alpine Linux -#+date: 2023-10-15 -#+description: A quick guide to harden SSH configuration on Alpine. -#+filetags: :linux: ++++ +date = 2023-10-15 +title = "SSH Hardening for Alpine Linux" +description = "" +draft = false ++++ + +# Overview -* Overview This guide follows the standard -[[https://www.ssh-audit.com/hardening_guides.html][ssh-audit]] hardening +[ssh-audit](https://www.ssh-audit.com/hardening_guides.html) hardening guide, tweaked for Alpine Linux. -* Hardening Guide -These steps must be performed as root. You can try to use =doas= or -=sudo=, but there may be issues. +# Hardening Guide + +These steps must be performed as root. You can try to use +`doas` or `sudo`, but there may be issues. -1. Re-generate the RSA and ED25519 keys +1. Re-generate the RSA and ED25519 keys -#+begin_src sh +```sh rm /etc/ssh/ssh_host_* ssh-keygen -t rsa -b 4096 -f /etc/ssh/ssh_host_rsa_key -N "" ssh-keygen -t ed25519 -f /etc/ssh/ssh_host_ed25519_key -N "" -#+end_src +``` -2. [@2] Remove small Diffie-Hellman moduli +2. Remove small Diffie-Hellman moduli -#+begin_src sh +```sh awk '$5 >= 3071' /etc/ssh/moduli > /etc/ssh/moduli.safe mv /etc/ssh/moduli.safe /etc/ssh/moduli -#+end_src +``` -3. [@3] Enable the RSA and ED25519 HostKey directives in the - /etc/ssh/sshd_{config} file +3. Enable the RSA and ED25519 HostKey directives in the + /etc/ssh/sshd~config~ file -#+begin_src sh +```sh sed -i 's/^\#HostKey \/etc\/ssh\/ssh_host_\(rsa\|ed25519\)_key$/HostKey \/etc\/ssh\/ssh_host_\1_key/g' /etc/ssh/sshd_config -#+end_src +``` -4. [@4] Restrict supported key exchange, cipher, and MAC algorithms +4. Restrict supported key exchange, cipher, and MAC algorithms -#+begin_src sh +```sh echo -e "\n# Restrict key exchange, cipher, and MAC algorithms, as per sshaudit.com\n# hardening guide.\nKexAlgorithms sntrup761x25519-sha512@openssh.com,curve25519-sha256,curve25519-sha256@libssh.org,diffie-hellman-group16-sha512,diffie-hellman-group18-sha512,diffie-hellman-group-exchange-sha256\nCiphers chacha20-poly1305@openssh.com,aes256-gcm@openssh.com,aes128-gcm@openssh.com,aes256-ctr,aes192-ctr,aes128-ctr\nMACs hmac-sha2-256-etm@openssh.com,hmac-sha2-512-etm@openssh.com,umac-128-etm@openssh.com\nHostKeyAlgorithms ssh-ed25519,ssh-ed25519-cert-v01@openssh.com,sk-ssh-ed25519@openssh.com,sk-ssh-ed25519-cert-v01@openssh.com,rsa-sha2-512,rsa-sha2-512-cert-v01@openssh.com,rsa-sha2-256,rsa-sha2-256-cert-v01@openssh.com" > /etc/ssh/sshd_config.d/ssh-audit_hardening.conf -#+end_src +``` -5. [@5] Include the /etc/ssh/sshd_{config}.d directory +5. Include the /etc/ssh/sshd~config~.d directory -#+begin_src sh +```sh echo -e "Include /etc/ssh/sshd_config.d/*.conf" > /etc/ssh/sshd_config -#+end_src +``` -6. [@6] Restart OpenSSH server +6. Restart OpenSSH server -#+begin_src sh +```sh rc-service sshd restart -#+end_src +``` + +# Testing SSH -* Testing SSH -You can test the results with the =ssh-audit= python script. +You can test the results with the `ssh-audit` python script. -#+begin_src sh +```sh pip3 install ssh-audit ssh-audit localhost -#+end_src +``` If everything succeeded, the results will show as all green. If anything is yellow, orange, or red, you may need to tweak additional settings. -#+begin_src txt -,#+caption: ssh audit -#+end_src +``` txt +#+caption: ssh audit +``` -#+caption: ssh-audit -[[https://img.cleberg.net/blog/20231015-ssh-hardening/ssh-audit.png]] + diff --git a/content/blog/2023-10-17-self-hosting-anonymousoverflow.org b/content/blog/2023-10-17-self-hosting-anonymousoverflow.md index 905939c..66135bc 100644 --- a/content/blog/2023-10-17-self-hosting-anonymousoverflow.org +++ b/content/blog/2023-10-17-self-hosting-anonymousoverflow.md @@ -1,30 +1,36 @@ -#+title: Self-Hosting AnonymousOverflow -#+date: 2023-10-17 -#+description: A guide to self-hosting the AnonymousOverflow application on your own server. -#+filetags: :selfhosting: ++++ +date = 2023-10-17 +title = "Self-Hosting AnonymousOverflow" +description = "" +draft = false ++++ + +# Overview -* Overview I recently launched an instance of AnonymousOverflow at -[[https://ao.cleberg.net][ao.cleberg.net]] and wanted to write a brief +[ao.cleberg.net](https://ao.cleberg.net) and wanted to write a brief post on how easy it is to install with Docker Compose and Nginx. This guide uses Ubuntu server, Docker Compose, and Nginx as a reverse proxy. -* Installation -** Docker Compose +# Installation + +## Docker Compose + To install AnonymousOverflow, start by creating a directory for the -application and create its =docker-compose.yml= file. +application and create its `docker-compose.yml` file. -#+begin_src sh +```sh mkdir ~/anonymousoverflow && cd ~/anonymousoverflow nano docker-compose.yml -#+end_src +``` Within this file, paste the following information. Be sure to change the -=APP_URL=, =JWT_SIGNING_SECRET=, and =ports= to match your needs. +`APP_URL`, `JWT_SIGNING_SECRET`, and +`ports` to match your needs. -#+begin_src yaml +``` yaml version: '3' services: @@ -37,30 +43,32 @@ services: ports: - '9380:8080' restart: 'always' -#+end_src +``` Save and exit the file when complete. You can now launch the container and access it via your local network. -#+begin_src sh +```sh sudo docker-compose up -d -#+end_src +``` + +## Nginx Reverse Proxy -** Nginx Reverse Proxy If you want to access this service outside the local network, I recommend using Nginx as a reverse proxy. -Let's start by creating a configuration file. +Let\'s start by creating a configuration file. -#+begin_src sh +```sh sudo nano /etc/nginx/sites-available/ao -#+end_src +``` Within this file, paste the following content and repace -=ao.example.com= with your URL. You may need to update the SSL -certificate statements if your certificates are in a different location. +`ao.example.com` with your URL. You may need to update the +SSL certificate statements if your certificates are in a different +location. -#+begin_src conf +``` conf server { if ($host ~ ^[^.]+\.cleberg\.net$) { return 301 https://$host$request_uri; @@ -112,16 +120,16 @@ server { proxy_buffers 64 256k; } } -#+end_src +``` Save and exit the file when complete. On Ubuntu, you will need to symlink the configuration file before it will be recognized by Nginx. Once complete, simply restart the web server. -#+begin_src sh +```sh sudo ln -s /etc/nginx/sites-available/ao /etc/nginx/sites-enabled/ao sudo systemctl restart nginx.service -#+end_src +``` -The website will now be available publicly. Visit -[[https://ao.cleberg.net][my instance]] for an example. +The website will now be available publicly. Visit [my +instance](https://ao.cleberg.net) for an example. diff --git a/content/blog/2023-11-08-scli.md b/content/blog/2023-11-08-scli.md new file mode 100644 index 0000000..3b2ce31 --- /dev/null +++ b/content/blog/2023-11-08-scli.md @@ -0,0 +1,158 @@ ++++ +date = 2023-11-08 +title = "Installing scli on Alpine Linux (musl)" +description = "" +draft = false ++++ + +[scli](https://github.com/isamert/scli) is a command-line tool that +allows you to connect to your Signal messenger account. This program +utilizes a two-pane display that shows you chats on the left and the +focused conversation on the right. + +This guide will show you how to install `scli` and its +dependencies on Alpine Linux, which requires some extra work due to +musl. + +If you\'re using a non-musl system, you can likely following the +`scli` README and download the packaged binaries for an +easier installation process. + +# Dependencies + +In order to use `scli`, you need a few dependencies: + +- `openjdk17-jre` - Used as a dependency for the + `signal-cli` tool. Version may vary. +- `signal-cli` - Used as the backbone of the + `scli` tool. +- `findutils` - Replaces the standard Busybox version of + `xargs`. +- `urwid` - A console user interface library for Python. +- `urwid-readline` - For GNU emacs-like keybinds on the + input line. +- `qrencode` - Displays a QR code in the terminal to link + the device using your phone. Not necessary if you\'re only linking + on desktop and can copy/paste the connection URL. + +Let\'s start by installing the packages available via Alpine\'s +repositories. Be sure to install the latest version of +`openjdk`. If you run into Java-related issues, uninstall +`openjdk` and install an older version. + +```sh +doas apk add openjdk17-jre findutils qrencode +``` + +Next, let\'s install `signal-cli`. Be sure to export the +version of `signal-cli` that you want. I use version +`0.12.4` below, but that may be outdated by the time you\'re +reading this. + +```sh +export VERSION="0.12.4" +wget https://github.com/AsamK/signal-cli/releases/download/v"${VERSION}"/signal-cli-"${VERSION}".tar.gz +doas tar xf signal-cli-"${VERSION}".tar.gz -C /opt +doas ln -sf /opt/signal-cli-${VERSION}"/bin/signal/cli /usr/local/bin +``` + +Finally, install the `urwid` packages using the Python +packaging utility. + +```sh +pip3 install urwid urwid-readline +``` + +# Installation + +Now that we have all of the dependencies we need, we can install +`scli`. Start by simply cloning the repository. + +```sh +git clone https://github.com/isamert/scli +``` + +When I cloned this repository on 2023-11-08, I found a bug in the logic +that required a fix. You must edit the `scli` file and +replace the one instance of `RLIMIT_OFILE` with +`RLIMIT_NOFILE`. + +```sh +cd scli +nano scli +``` + +Once complete, you can move this program to anywhere on your +`$PATH`. I chose the following directory. + +```sh +doas mv scli /usr/local/bin/scli +``` + +# Initial Setup + +Now that everything is installed, we can login and configure the client. +Start by generating a connection link. + +```sh +signal-cli link -n "YOUR-DEVICE-NICKNAME" | tee >(xargs -L 1 qrencode -t utf8) +``` + +This will generate a connection link and related QR code for you to use +to link the devices together. Once complete, **wait patiently\*** for +the connection process to finish. + +Once it completes, it will exit and return you to the prompt. From here, +you need to perform an initial `receive` command to start +things off. The `USERNAME` variable should be your phone +number, such as `+15551237890`. + +```sh +signal-cli -u USERNAME receive +``` + +Also be sure to test the daemon to ensure it works properly. If no +errors occur, it\'s working. If you run into errors because you\'re not +running a DBUS session, see my notes below. + +```sh +signal-cli -u USERNAME daemon +``` + +Once the initial reception is complete, you are ready to use +`scli`. + +This process will differ depending on your desktop environment (DE). If +you are running a DE, you likely have a DBUS session running already and +can simply launch the program. + +However, if you\'re like me and running your computer straight on the +TTY without a DE, you\'ll need to start a DBUS session for this program. + +```sh +# If you're not running a DBUS session yet, you need to start one for scli +dbus-run-session -- scli + +# OR - If you're already running a DBUS session, simply run scli +scli +``` + +# Configuration + +Lastly, there are a number of configuration options that you can pass +via the command or in the `~/.config/sclirc` file. See the +Github README for more information on configuration options. + +```sh +nano ~/.config/sclirc +``` + +``` conf +# ~/.config/sclirc + +wrap-at = 80 +enable-notifications = true +``` + +That\'s it! Following this guide, I have a functional `scli` +program that successfully sends messages to my contacts and myself! diff --git a/content/blog/2023-11-08-scli.org b/content/blog/2023-11-08-scli.org deleted file mode 100644 index 8b55ac1..0000000 --- a/content/blog/2023-11-08-scli.org +++ /dev/null @@ -1,145 +0,0 @@ -#+title: Installing scli on Alpine Linux (musl) -#+date: 2023-11-08 -#+description: Learn how to properly configure scli for musl-based systems. -#+filetags: :linux: - -[[https://github.com/isamert/scli][scli]] is a command-line tool that -allows you to connect to your Signal messenger account. This program -utilizes a two-pane display that shows you chats on the left and the -focused conversation on the right. - -This guide will show you how to install =scli= and its dependencies on -Alpine Linux, which requires some extra work due to musl. - -If you're using a non-musl system, you can likely following the =scli= -README and download the packaged binaries for an easier installation -process. - -* Dependencies -In order to use =scli=, you need a few dependencies: - -- =openjdk17-jre= - Used as a dependency for the =signal-cli= tool. - Version may vary. -- =signal-cli= - Used as the backbone of the =scli= tool. -- =findutils= - Replaces the standard Busybox version of =xargs=. -- =urwid= - A console user interface library for Python. -- =urwid-readline= - For GNU emacs-like keybinds on the input line. -- =qrencode= - Displays a QR code in the terminal to link the device - using your phone. Not necessary if you're only linking on desktop and - can copy/paste the connection URL. - -Let's start by installing the packages available via Alpine's -repositories. Be sure to install the latest version of =openjdk=. If you -run into Java-related issues, uninstall =openjdk= and install an older -version. - -#+begin_src sh -doas apk add openjdk17-jre findutils qrencode -#+end_src - -Next, let's install =signal-cli=. Be sure to export the version of -=signal-cli= that you want. I use version =0.12.4= below, but that may -be outdated by the time you're reading this. - -#+begin_src sh -export VERSION="0.12.4" -wget https://github.com/AsamK/signal-cli/releases/download/v"${VERSION}"/signal-cli-"${VERSION}".tar.gz -doas tar xf signal-cli-"${VERSION}".tar.gz -C /opt -doas ln -sf /opt/signal-cli-${VERSION}"/bin/signal/cli /usr/local/bin -#+end_src - -Finally, install the =urwid= packages using the Python packaging -utility. - -#+begin_src sh -pip3 install urwid urwid-readline -#+end_src - -* Installation -Now that we have all of the dependencies we need, we can install =scli=. -Start by simply cloning the repository. - -#+begin_src sh -git clone https://github.com/isamert/scli -#+end_src - -When I cloned this repository on 2023-11-08, I found a bug in the logic -that required a fix. You must edit the =scli= file and replace the one -instance of =RLIMIT_OFILE= with =RLIMIT_NOFILE=. - -#+begin_src sh -cd scli -nano scli -#+end_src - -Once complete, you can move this program to anywhere on your =$PATH=. I -chose the following directory. - -#+begin_src sh -doas mv scli /usr/local/bin/scli -#+end_src - -* Initial Setup -Now that everything is installed, we can login and configure the client. -Start by generating a connection link. - -#+begin_src sh -signal-cli link -n "YOUR-DEVICE-NICKNAME" | tee >(xargs -L 1 qrencode -t utf8) -#+end_src - -This will generate a connection link and related QR code for you to use -to link the devices together. Once complete, *wait patiently** for the -connection process to finish. - -Once it completes, it will exit and return you to the prompt. From here, -you need to perform an initial =receive= command to start things off. -The =USERNAME= variable should be your phone number, such as -=+15551237890=. - -#+begin_src sh -signal-cli -u USERNAME receive -#+end_src - -Also be sure to test the daemon to ensure it works properly. If no -errors occur, it's working. If you run into errors because you're not -running a DBUS session, see my notes below. - -#+begin_src sh -signal-cli -u USERNAME daemon -#+end_src - -Once the initial reception is complete, you are ready to use =scli=. - -This process will differ depending on your desktop environment (DE). If -you are running a DE, you likely have a DBUS session running already and -can simply launch the program. - -However, if you're like me and running your computer straight on the TTY -without a DE, you'll need to start a DBUS session for this program. - -#+begin_src sh -# If you're not running a DBUS session yet, you need to start one for scli -dbus-run-session -- scli - -# OR - If you're already running a DBUS session, simply run scli -scli -#+end_src - -* Configuration -Lastly, there are a number of configuration options that you can pass -via the command or in the =~/.config/sclirc= file. See the Github README -for more information on configuration options. - -#+begin_src sh -nano ~/.config/sclirc -#+end_src - -#+begin_src conf -# ~/.config/sclirc - -wrap-at = 80 -enable-notifications = true -#+end_src - -That's it! Following this guide, I have a functional =scli= program that -successfully sends messages to my contacts and myself! diff --git a/content/blog/2023-12-03-unifi-nextdns.org b/content/blog/2023-12-03-unifi-nextdns.md index 277f8bb..4bbe086 100644 --- a/content/blog/2023-12-03-unifi-nextdns.org +++ b/content/blog/2023-12-03-unifi-nextdns.md @@ -1,94 +1,105 @@ -#+title: How to Install NextDNS on the Unifi Dream Machine -#+date: 2023-12-03 -#+description: A guide to properly install the NextDNS client on the UDM Pro. -#+filetags: :network: ++++ +date = 2023-12-03 +title = "How to Install NextDNS on the Unifi Dream Machine" +description = "" +draft = false ++++ + +# Overview -* Overview I recently installed NextDNS on my Unifi Dream Machine router using the -[[https://github.com/nextdns/nextdns/wiki/UnifiOS][UnifiOS]] wiki page -on NextDNS's GitHub repository. +[UnifiOS](https://github.com/nextdns/nextdns/wiki/UnifiOS) wiki page on +NextDNS\'s GitHub repository. As a result of this, I wanted to write down the process in case the wiki or installer ever gets lost. -* Wiki +# Wiki + The following is copied from the wiki page linked above, with one -difference in the =ssh= command. +difference in the `ssh` command. Install instructions for Unifi Dream Machine (UDM) standard and pro routers. -** Install +## Install + Enable SSH: -- Go to your unifi admin interface and select your device (not the - controller settings, but the Dream Machine settings) -- Click on "Settings" at the bottom of the page -- Go to the "Advanced" section on the left pan -- Enable SSH -- Set a SSH password +- Go to your unifi admin interface and select your device (not the + controller settings, but the Dream Machine settings) +- Click on \"Settings\" at the bottom of the page +- Go to the \"Advanced\" section on the left pan +- Enable SSH +- Set a SSH password -Connect to your router using =ssh root@xxx.xxx.xxx.xxx= with the -password you configured. +Connect to your router using `ssh root@xxx.xxx.xxx.xxx` with +the password you configured. Run the following command and follow the instructions: -#+begin_src sh +```sh sh -c 'sh -c "$(curl -sL https://nextdns.io/install)"' -#+end_src +``` -Note: Queries from the UDM itself won't be routed to NextDNS nor +Note: Queries from the UDM itself won\'t be routed to NextDNS nor encrypted due to current system limitation. All traffic from other devices on then network will. -** Upgrade +## Upgrade + To upgrade to the last version, simply re-run the installer above. If a new version is available, the upgrade action will added to the list of possible actions. -** Uninstall -To uninstall, re-run the installer above and select "Remove" in the +## Uninstall + +To uninstall, re-run the installer above and select \"Remove\" in the menu. -** Troubleshooting +## Troubleshooting + If the installation fail, please the installer in debug mode and contact us at team@nextdns.io with the transcript of the installation: -#+begin_src sh +```sh sh -c 'DEBUG=1 sh -c "$(curl -sL https://nextdns.io/install)"' -#+end_src +``` + +### Content Filtering Conflict -*** Content Filtering Conflict NextDNS CLI and the UDM Content Filtering or the Ad Blocking features are incompatible. If you want to use NextDNS CLI, please make sure they are disabled. -To disable Content Filtering, go to Settings > Network, then for each +To disable Content Filtering, go to Settings \> Network, then for each network, set the Content Filtering feature to None -To disable Ad Blocking, go to Settings > Application Firewall. In the +To disable Ad Blocking, go to Settings \> Application Firewall. In the General tab, uncheck the Ad Blocking checkbox. -*** APT Error +### APT Error + If you get an apt error as follow: -#+begin_src sh +```sh E: Failed to fetch http://security.debian.org/dists/stretch/updates/main/binary-arm64/Packages 404 Not Found [IP: 151.101.70.132 80] -#+end_src +``` You may try to following: -#+begin_src sh +```sh sed -i -e 's/deb.debian.org/archive.debian.org/g' \ -e 's|security.debian.org|archive.debian.org/|g' \ -e '/stretch-updates/d' /etc/apt/sources.list -#+end_src +``` + +## install.sh -** install.sh -Here are the contents of the =install.sh= file used above, as of -2023-12-03: +Here are the contents of the `install.sh` file used above, as +of 2023-12-03: -#+begin_src sh +```sh #!/bin/sh main() { @@ -313,13 +324,13 @@ install_bin() { fi log_debug "Installing $INSTALL_RELEASE binary for $GOOS/$GOARCH to $bin_path" case "$INSTALL_RELEASE" in - ,*/*) + */*) # Snapshot branch=${INSTALL_RELEASE%/*} hash=${INSTALL_RELEASE#*/} url="https://snapshot.nextdns.io/${branch}/nextdns-${hash}_${GOOS}_${GOARCH}.tar.gz" ;; - ,*) + *) url="https://github.com/nextdns/nextdns/releases/download/v${INSTALL_RELEASE}/nextdns_${INSTALL_RELEASE}_${GOOS}_${GOARCH}.tar.gz" ;; esac @@ -621,12 +632,12 @@ install_type() { echo "$FORCE_INSTALL_TYPE"; return 0 fi case "$INSTALL_RELEASE" in - ,*/*) + */*) case $OS in ubios) echo "ubios_snapshot"; return 0 ;; - ,*) + *) # Snapshot mode always use binary install echo "bin"; return 0 ;; @@ -654,7 +665,7 @@ install_type() { . /etc/os-release major=$(echo "$VERSION_ID" | cut -d. -f1) case $major in - ,*[!0-9]*) + *[!0-9]*) if [ "$VERSION_ID" = "19.07.0-rc1" ]; then # No opkg support before 19.07.0-rc2 echo "bin" @@ -663,7 +674,7 @@ install_type() { echo "openwrt" fi ;; - ,*) + *) if [ "$major" -lt 19 ]; then # No opkg support before 19.07.0-rc2 echo "bin" @@ -709,7 +720,7 @@ install_type() { # TODO: pkg for xbps echo "bin" ;; - ,*) + *) log_error "Unsupported installation for $(detect_os)" return 1 ;; @@ -861,7 +872,7 @@ ask_bool() { false) msg="$msg [y|N]: " ;; - ,*) + *) msg="$msg (y/n): " esac while true; do @@ -879,7 +890,7 @@ ask_bool() { echo "false" return 0 ;; - ,*) + *) echo "Invalid input, use yes or no" ;; esac @@ -891,12 +902,12 @@ detect_endiannes() { # Some firmwares do not contain hexdump, for those, try to detect endianness # differently. case $(cat /proc/cpuinfo) in - ,*BCM5300*) + *BCM5300*) # RT-AC66U does not support Merlin version over 380.70 which # lacks hexdump command. echo "le" ;; - ,*) + *) log_error "Cannot determine endianness" return 1 ;; @@ -927,10 +938,10 @@ detect_goarch() { arm) # FreeBSD does not include arm version case "$(sysctl -b hw.model 2>/dev/null)" in - ,*A9*) + *A9*) echo "armv7" ;; - ,*) + *) # Unknown version, fallback to the lowest echo "armv5" ;; @@ -954,7 +965,7 @@ detect_goarch() { # "out of memory allocating heap arena metadata". echo "armv7" ;; - ,*) + *) echo "arm64" ;; esac @@ -966,7 +977,7 @@ detect_goarch() { # TODO: detect hardfloat echo "$(uname -m)$(detect_endiannes)_softfloat" ;; - ,*) + *) log_error "Unsupported GOARCH: $(uname -m)" return 1 ;; @@ -993,7 +1004,7 @@ detect_goos() { OpenBSD) echo "openbsd" ;; - ,*) + *) log_error "Unsupported GOOS: $(uname -s)" return 1 esac @@ -1070,7 +1081,7 @@ detect_os() { OpenBSD) echo "openbsd"; return 0 ;; - ,*) + *) esac log_error "Unsupported OS: $(uname -o) $(grep ID "/etc/os-release" 2>/dev/null | xargs)" return 1 @@ -1089,7 +1100,7 @@ guess_host_type() { darwin|steamos) echo "workstation" ;; - ,*) + *) echo "unsure" ;; esac @@ -1148,7 +1159,7 @@ bin_location() { steamos) echo "$HOME/.local/bin/nextdns" ;; - ,*) + *) log_error "Unknown bin location for $OS" ;; esac @@ -1156,12 +1167,12 @@ bin_location() { is_version_current() { case "$INSTALL_RELEASE" in - ,*/*) + */*) # Snapshot hash=${INSTALL_RELEASE#*/} test "0.0.0-$hash" = "$CURRENT_RELEASE" ;; - ,*) + *) test "$INSTALL_RELEASE" = "$CURRENT_RELEASE" ;; esac @@ -1186,7 +1197,7 @@ get_release() { curl) cmd="curl -A curl -s" ;; wget) cmd="wget -qO- -U curl" ;; openssl) cmd="openssl_get" ;; - ,*) + *) log_error "Cannot retrieve latest version" return ;; @@ -1238,4 +1249,4 @@ openssl_get() { umask 0022 main -#+end_src +``` diff --git a/content/blog/2024-01-08-dont-say-hello.md b/content/blog/2024-01-08-dont-say-hello.md new file mode 100644 index 0000000..f70c4f0 --- /dev/null +++ b/content/blog/2024-01-08-dont-say-hello.md @@ -0,0 +1,29 @@ ++++ +date = 2024-01-08 +title = "Don't Say Hello" +description = "" +draft = false ++++ + +I recently came back from a winter break and have started working +again... only to immediately run into the dilemma of people sending me +cliffhanger messages again. + +# No Hello + +A year or two ago, I discovered [no hello](https://nohello.net/en/) and +have thought about it often since then. I\'ve even sent it to a few +people since then (who wouldn\'t take offense to it). + +I work in a fast-paced environment where efficiency is extremely +valuable. Therefore, I have always held a deep displeasure for +conversations where people start with \"Hello\" and then. + +I searched back through my work messages and found that I received \~50 +messages from \~10 people last year from people that contained \"hi\", +\"hey\", or \"hello\" and did not contain any indication of the purpose +of the conversation. I also noticed that a few of the users were +responsible for the large majority of the cliffhangers. + +There\'s no real point to this post, just a desparate request for people +to please stop doing this. diff --git a/content/blog/2024-01-08-dont-say-hello.org b/content/blog/2024-01-08-dont-say-hello.org deleted file mode 100644 index ef5662c..0000000 --- a/content/blog/2024-01-08-dont-say-hello.org +++ /dev/null @@ -1,26 +0,0 @@ -#+title: Don't Say Hello -#+date: 2024-01-08 -#+description: A short post describing my displeasure with cliffhanger conversations. -#+filetags: :personal: - -I recently came back from a winter break and have started working -again... only to immediately run into the dilemma of people sending me -cliffhanger messages again. - -* No Hello -A year or two ago, I discovered [[https://nohello.net/en/][no hello]] -and have thought about it often since then. I've even sent it to a few -people since then (who wouldn't take offense to it). - -I work in a fast-paced environment where efficiency is extremely -valuable. Therefore, I have always held a deep displeasure for -conversations where people start with "Hello" and then. - -I searched back through my work messages and found that I received ~50 -messages from ~10 people last year from people that contained "hi", -"hey", or "hello" and did not contain any indication of the purpose of -the conversation. I also noticed that a few of the users were -responsible for the large majority of the cliffhangers. - -There's no real point to this post, just a desparate request for people -to please stop doing this. diff --git a/content/blog/2024-01-09-macos-customization.md b/content/blog/2024-01-09-macos-customization.md new file mode 100644 index 0000000..dd4516d --- /dev/null +++ b/content/blog/2024-01-09-macos-customization.md @@ -0,0 +1,181 @@ ++++ +date = 2024-01-09 +title = "Customizing macOS" +description = "" +draft = false ++++ + +I have been using macOS more than Linux lately, so I wrote this post to +describe some simple options to customize macOS beyond the normal +built-in settings menu. + +While not all-encompassing, the options below should be a good start for +anyone looking to dive down the rabbit hole. + +# Basics + +## Package Management + +To install a lot of software on macOS, you will need +[Homebrew](https://brew.sh/). You can use their installation script to +get started. Simply open the `Terminal` application and paste +the following snippet: + +```sh +/bin/bash -c "$(curl -fsSL https://raw.githubusercontent.com/Homebrew/install/HEAD/install.sh)" +``` + +This will allow you to easily install and manage applications and other +software easily through the `brew` command. + +## Terminal + +If you\'re serious about customizing your macOS system, I highly +recommend installing a terminal emulator that you like and if you\'re +not comfortable on the command line yet, start learning. A lot of +customization options require you to edit hidden files, which is easiest +in a terminal. + +There are options like iTerm2, Kitty, Alacritty, Hyper, Warp, or the +built-in Terminal app. + +I use [iTerm2](https://iterm2.com/), which can be installed with +Homebrew: + +```sh +brew install iterm2 +``` + + + +To install color schemes, such as the Dracula scheme shown in the +screenshot above, you visit [iTerm +Themes](https://iterm2colorschemes.com/) and follow their installation +instructions to install any of the themes. + +# Desktop + +## Window Management + +[yabai](https://github.com/koekeishiya/yabai) is a tiling window manager +for macOS. While other window managers exist, I found that most of them +struggled to create logical layouts and to allow me to easily move +windows around the screen. + +Some advanced settings for yabai are only available if partially disable +System Integrity Protection (SIP). However, I chose not to do this and +it hasn\'t affected my basic usage of yabai at all. + +Refer to the [yabai +wiki](https://github.com/koekeishiya/yabai/wiki/Installing-yabai-(latest-release)) +for installation instructions. You will need to ensure that yabai is +allowed to access the accessibility and screen recording APIs. + +You can see a basic three-pane layout atuomatically configured by yabai +for me as I opened the windows below. + + + +## Keyboard Shortcuts + +[skhd](https://github.com/koekeishiya/skhd) is a simple hotkey daemon +that allows you to define hotkeys in a file for usage on your system. + +Installation is simple: + +```sh +brew install koekeishiya/formulae/skhd +skhd --start-service +``` + +After installation, be sure to allow `skhd` access to the +accessibility API in the macOS privacy settings. + +You can configure your hotkeys in the `~/.config/skhd/skhdrc` +file: + +```sh +nano ~/.config/skhd/skhdrc +``` + +For example, I have hotkeys to open my browser and terminal: + +``` conf +# Terminal +cmd - return : /Applications/iTerm.app/Contents/MacOS/iTerm2 + +# Browser +cmd + shift - return : /Applications/LibreWolf.app/Contents/MacOS/librewolf +``` + +## Widgets + +[uebersicht](https://github.com/felixhageloh/uebersicht/) is a handy +desktop-based widget tool with a plethora of community-made widgets +available in the [widgets +gallery](https://tracesof.net/uebersicht-widgets/). You can also write +your own widgets with this tool. + +To install, simply download the latest release from the [uebersicht +website](https://tracesof.net/uebersicht/) and copy it to the +Applications folder. + +See below for an example of the +[Mond](https://tracesof.net/uebersicht-widgets/#Mond) widget in action. + + + +## Status Bar + +[SketchyBar](https://github.com/FelixKratz/SketchyBar) is a customizable +replacement for the macOS status or menu bar. + +You can browse a discussion where various users shared their +[configurations](https://github.com/FelixKratz/SketchyBar/discussions/47?sort=top) +for inspiration or to copy their dotfiles. + +See below for a quick (& slightly broken) copy of +[zer0yu\'s](https://github.com/zer0yu/dotfiles) SketchyBar +configuration. + + + +## Dock + +The easiest way to customize the dock is to install +[uBar](https://ubarapp.com/), which uses a Windows-like menu bar as the +default style. + +However, the built-in macOS dock cannot be disabled and can only be set +to \"always hidden\". This can be annoying as it will pop out any time +your mouse cursor passes closely to the dock edge of the screen. Because +of this, I simply use the built-in dock instead of customizing it with +third-party software. + +Regardless, see below for the default installation style of uBar. + + + +## Application Icons + +You can also customize the icon of any application in macOS, which will +show up in Finder, the Dock, Launchpad, search results, etc. I recommend +using [macOSicons](https://macosicons.com/) to download icons you want, +and then apply them by following this process. + +1. Open the Finder application. +2. Navigate to the `Applications` folder. +3. Right-click an application of your choice, and select + `Get Info`. +4. Drag the image you downloaded on top of the application\'s icon at + the top of information window (you will see a green \"plus\" symbol + when you\'re hovering over it). +5. Release the new icon on top of the old icon and it will update! + +You can see an example of me dragging a new `signal.icns` +file onto my Signal.app information window to update it below: + + diff --git a/content/blog/2024-01-09-macos-customization.org b/content/blog/2024-01-09-macos-customization.org deleted file mode 100644 index 82e2d0a..0000000 --- a/content/blog/2024-01-09-macos-customization.org +++ /dev/null @@ -1,170 +0,0 @@ -#+title: Customizing macOS -#+date: 2024-01-09 -#+description: Learn how to customize macOS beyond the standard, built-in options provided by Apple. -#+filetags: :apple: - -I have been using macOS more than Linux lately, so I wrote this post to -describe some simple options to customize macOS beyond the normal -built-in settings menu. - -While not all-encompassing, the options below should be a good start for -anyone looking to dive down the rabbit hole. - -* Basics -** Package Management -To install a lot of software on macOS, you will need -[[https://brew.sh/][Homebrew]]. You can use their installation script to -get started. Simply open the =Terminal= application and paste the -following snippet: - -#+begin_src sh -/bin/bash -c "$(curl -fsSL https://raw.githubusercontent.com/Homebrew/install/HEAD/install.sh)" -#+end_src - -This will allow you to easily install and manage applications and other -software easily through the =brew= command. - -** Terminal -If you're serious about customizing your macOS system, I highly -recommend installing a terminal emulator that you like and if you're not -comfortable on the command line yet, start learning. A lot of -customization options require you to edit hidden files, which is easiest -in a terminal. - -There are options like iTerm2, Kitty, Alacritty, Hyper, Warp, or the -built-in Terminal app. - -I use [[https://iterm2.com/][iTerm2]], which can be installed with -Homebrew: - -#+begin_src sh -brew install iterm2 -#+end_src - -#+caption: iTerm2 -[[https://img.cleberg.net/blog/20240109-macos-customization/iterm2.png]] - -To install color schemes, such as the Dracula scheme shown in the -screenshot above, you visit [[https://iterm2colorschemes.com/][iTerm -Themes]] and follow their installation instructions to install any of -the themes. - -* Desktop -** Window Management -[[https://github.com/koekeishiya/yabai][yabai]] is a tiling window -manager for macOS. While other window managers exist, I found that most -of them struggled to create logical layouts and to allow me to easily -move windows around the screen. - -Some advanced settings for yabai are only available if partially disable -System Integrity Protection (SIP). However, I chose not to do this and -it hasn't affected my basic usage of yabai at all. - -Refer to the -[[https://github.com/koekeishiya/yabai/wiki/Installing-yabai-(latest-release)][yabai -wiki]] for installation instructions. You will need to ensure that yabai -is allowed to access the accessibility and screen recording APIs. - -You can see a basic three-pane layout atuomatically configured by yabai -for me as I opened the windows below. - -#+caption: yabai window manager -[[https://img.cleberg.net/blog/20240109-macos-customization/yabai.png]] - -** Keyboard Shortcuts -[[https://github.com/koekeishiya/skhd][skhd]] is a simple hotkey daemon -that allows you to define hotkeys in a file for usage on your system. - -Installation is simple: - -#+begin_src sh -brew install koekeishiya/formulae/skhd -skhd --start-service -#+end_src - -After installation, be sure to allow =skhd= access to the accessibility -API in the macOS privacy settings. - -You can configure your hotkeys in the =~/.config/skhd/skhdrc= file: - -#+begin_src sh -nano ~/.config/skhd/skhdrc -#+end_src - -For example, I have hotkeys to open my browser and terminal: - -#+begin_src conf -# Terminal -cmd - return : /Applications/iTerm.app/Contents/MacOS/iTerm2 - -# Browser -cmd + shift - return : /Applications/LibreWolf.app/Contents/MacOS/librewolf -#+end_src - -** Widgets -[[https://github.com/felixhageloh/uebersicht/][uebersicht]] is a handy -desktop-based widget tool with a plethora of community-made widgets -available in the [[https://tracesof.net/uebersicht-widgets/][widgets -gallery]]. You can also write your own widgets with this tool. - -To install, simply download the latest release from the -[[https://tracesof.net/uebersicht/][uebersicht website]] and copy it to -the Applications folder. - -See below for an example of the -[[https://tracesof.net/uebersicht-widgets/#Mond][Mond]] widget in -action. - -#+caption: uebersicht desktop widgets -[[https://img.cleberg.net/blog/20240109-macos-customization/uebersicht.png]] - -** Status Bar -[[https://github.com/FelixKratz/SketchyBar][SketchyBar]] is a -customizable replacement for the macOS status or menu bar. - -You can browse a discussion where various users shared their -[[https://github.com/FelixKratz/SketchyBar/discussions/47?sort=top][configurations]] -for inspiration or to copy their dotfiles. - -See below for a quick (& slightly broken) copy of -[[https://github.com/zer0yu/dotfiles][zer0yu's]] SketchyBar -configuration. - -#+caption: SketchyBar -[[https://img.cleberg.net/blog/20240109-macos-customization/sketchybar.png]] - -** Dock -The easiest way to customize the dock is to install -[[https://ubarapp.com/][uBar]], which uses a Windows-like menu bar as -the default style. - -However, the built-in macOS dock cannot be disabled and can only be set -to "always hidden". This can be annoying as it will pop out any time -your mouse cursor passes closely to the dock edge of the screen. Because -of this, I simply use the built-in dock instead of customizing it with -third-party software. - -Regardless, see below for the default installation style of uBar. - -#+caption: uBar -[[https://img.cleberg.net/blog/20240109-macos-customization/ubar.png]] - -** Application Icons -You can also customize the icon of any application in macOS, which will -show up in Finder, the Dock, Launchpad, search results, etc. I recommend -using [[https://macosicons.com/][macOSicons]] to download icons you -want, and then apply them by following this process. - -1. Open the Finder application. -2. Navigate to the =Applications= folder. -3. Right-click an application of your choice, and select =Get Info=. -4. Drag the image you downloaded on top of the application's icon at the - top of information window (you will see a green "plus" symbol when - you're hovering over it). -5. Release the new icon on top of the old icon and it will update! - -You can see an example of me dragging a new =signal.icns= file onto my -Signal.app information window to update it below: - -#+caption: replace macOS icons -[[https://img.cleberg.net/blog/20240109-macos-customization/replace_icon.png]] diff --git a/content/blog/2024-01-13-local-llm.md b/content/blog/2024-01-13-local-llm.md new file mode 100644 index 0000000..24729a5 --- /dev/null +++ b/content/blog/2024-01-13-local-llm.md @@ -0,0 +1,111 @@ ++++ +date = 2024-01-13 +title = "Running Local LLMs on macOS and iOS" +description = "" +draft = false ++++ + +# Requirements + +I\'ve recently started playing with large language models (LLMs), mostly +in the popular chatbot form, as part of my job and have decided to see +if there\'s a consistent and reliable way to interact with these models +on Apple devices without sacrificing privacy or requiring in-depth +technical setup. + +My requirements for this test: + +- Open source platform +- On-device model files +- Minimal required configuration +- Preferably pre-built, but a simple build process is acceptable + +I tested a handful of apps and have summarized my favorite (so far) for +macOS and iOS below. + +> TL;DR - Here are the two that met my requirements and I have found the +> easiest to install and use so far: + +- macOS: [Ollama](https://ollama.ai/) +- iOS : [LLM Farm](https://llmfarm.site/) + +# macOS + +[Ollama](https://ollama.ai/) is a simple Go application for macOS and +Linux that can run various LLMs locally. + +For macOS, you can download the pplication on the [Ollama download +page](https://ollama.ai/download/mac) and install it by unzipping the +`Ollama.app` file and moving it to the +`Applications` folder. + +If you prefer the command line, you can run these commands after the +download finished: + +```sh +cd ~/Downloads && \ +unzip Ollama-darwin.zip && \ +mv ~/Downloads/Ollama.app /Applications/ +``` + +After running the app, the app will ask you to open a terminal and run +the default `llama2` model, which will open an interactive +chat session in the terminal. You can startfully using the application +at this point. + + + +If you don\'t want to use the default `llama2` model, you can +download and run additional models found on the +[Models](https://ollama.ai/library) page. + +To see the information for the currently-used model, you can run the +`/show info` command in the chat. + + + +## Community Integrations + +I highly recommend browsing the [Community +Integrations](https://github.com/jmorganca/ollama#community-integrations) +section of the project to see how you would prefer to extend Ollama +beyond a simple command-line interface. There are options for APIs, +browser UIs, advanced terminal configurations, and more. + + + +# iOS + +While there are a handful of decent macOS options, it was quite +difficult to find an iOS app that offered an open source platform +without an extensive configuration and building process. I found LLM +Farm to be decent enough in quality to sit at the top of my list - +however, it\'s definitely not user friendly enough for me to consider +using it on a daily basis. + +[LLM Farm](https://llmfarm.site/) is available on TestFlight, so +there\'s no manual build process required. However, you can view the +[LLMFarm repository](https://github.com/guinmoon/LLMFarm) if you wish. + +The caveat is that you will have to manually download the model files +from the links in the +[models.md](https://github.com/guinmoon/LLMFarm/blob/main/models.md) +file to your iPhone to use the app - there\'s currently no option in the +app to reach out and grab the latest version of any supported model. + +Once you have a file downloaded, you simply create a new chat and select +the downloaded model file and ensure the inference matches the +requirement in the `models.md` file. + +See below for a test of the ORCA Mini v3 model: + + Chat List Chat + ------------------------------------------------------------------------- ------------------------------------------------------------------- +   + +[Enchanted](https://github.com/AugustDev/enchanted) is also an iOS for +private AI models, but it requires a public-facing Ollama API, which did +not meet my \"on device requirement.\" Nonetheless, it\'s an interesting +looking app and I will likely set it up to test soon. diff --git a/content/blog/2024-01-13-local-llm.org b/content/blog/2024-01-13-local-llm.org deleted file mode 100644 index ccde66e..0000000 --- a/content/blog/2024-01-13-local-llm.org +++ /dev/null @@ -1,108 +0,0 @@ -#+title: Running Local LLMs on macOS and iOS -#+date: 2024-01-13 -#+description: Finding some useful applications for running local LLMs on macOS and iOS. -#+filetags: :apple: - -* Requirements -I've recently started playing with large language models (LLMs), mostly -in the popular chatbot form, as part of my job and have decided to see -if there's a consistent and reliable way to interact with these models -on Apple devices without sacrificing privacy or requiring in-depth -technical setup. - -My requirements for this test: - -- Open source platform -- On-device model files -- Minimal required configuration -- Preferably pre-built, but a simple build process is acceptable - -I tested a handful of apps and have summarized my favorite (so far) for -macOS and iOS below. - -#+begin_quote -TL;DR - Here are the two that met my requirements and I have found the -easiest to install and use so far: - -#+end_quote - -- macOS: [[https://ollama.ai/][Ollama]] -- iOS : [[https://llmfarm.site/][LLM Farm]] - -* macOS -[[https://ollama.ai/][Ollama]] is a simple Go application for macOS and -Linux that can run various LLMs locally. - -For macOS, you can download the pplication on the -[[https://ollama.ai/download/mac][Ollama download page]] and install it -by unzipping the =Ollama.app= file and moving it to the =Applications= -folder. - -If you prefer the command line, you can run these commands after the -download finished: - -#+begin_src sh -cd ~/Downloads && \ -unzip Ollama-darwin.zip && \ -mv ~/Downloads/Ollama.app /Applications/ -#+end_src - -After running the app, the app will ask you to open a terminal and run -the default =llama2= model, which will open an interactive chat session -in the terminal. You can startfully using the application at this point. - -#+caption: Ollama -[[https://img.cleberg.net/blog/20240113-local-llm/ollama.png]] - -If you don't want to use the default =llama2= model, you can download -and run additional models found on the -[[https://ollama.ai/library][Models]] page. - -To see the information for the currently-used model, you can run the -=/show info= command in the chat. - -#+caption: Model Info -[[https://img.cleberg.net/blog/20240113-local-llm/ollama_info.png]] - -** Community Integrations -I highly recommend browsing the -[[https://github.com/jmorganca/ollama#community-integrations][Community -Integrations]] section of the project to see how you would prefer to -extend Ollama beyond a simple command-line interface. There are options -for APIs, browser UIs, advanced terminal configurations, and more. - -#+caption: Ollama SwiftUI -[[https://img.cleberg.net/blog/20240113-local-llm/ollama-swiftui.png]] - -* iOS -While there are a handful of decent macOS options, it was quite -difficult to find an iOS app that offered an open source platform -without an extensive configuration and building process. I found LLM -Farm to be decent enough in quality to sit at the top of my list - -however, it's definitely not user friendly enough for me to consider -using it on a daily basis. - -[[https://llmfarm.site/][LLM Farm]] is available on TestFlight, so -there's no manual build process required. However, you can view the -[[https://github.com/guinmoon/LLMFarm][LLMFarm repository]] if you wish. - -The caveat is that you will have to manually download the model files -from the links in the -[[https://github.com/guinmoon/LLMFarm/blob/main/models.md][models.md]] -file to your iPhone to use the app - there's currently no option in the -app to reach out and grab the latest version of any supported model. - -Once you have a file downloaded, you simply create a new chat and select -the downloaded model file and ensure the inference matches the -requirement in the =models.md= file. - -See below for a test of the ORCA Mini v3 model: - -| Chat List | Chat | -|------------------------------------------------------------------------+------------------------------------------------------------------| -| [[https://img.cleberg.net/blog/20240113-local-llm/llm_farm_chats.png]] | [[https://img.cleberg.net/blog/20240113-local-llm/llm_farm.png]] | - -[[https://github.com/AugustDev/enchanted][Enchanted]] is also an iOS for -private AI models, but it requires a public-facing Ollama API, which did -not meet my "on device requirement." Nonetheless, it's an interesting -looking app and I will likely set it up to test soon. diff --git a/content/blog/2024-01-26-audit-dashboard.md b/content/blog/2024-01-26-audit-dashboard.md new file mode 100644 index 0000000..5a40f51 --- /dev/null +++ b/content/blog/2024-01-26-audit-dashboard.md @@ -0,0 +1,188 @@ ++++ +date = 2024-01-26 +title = "Building an Audit Status Dashboard" +description = "" +draft = false ++++ + +Alteryx and Power BI are powerful tools that can help turn your +old-school audit trackers into interactive tools that provide useful +insights and potential action plans. + +With these tools, we are going to build the following dashboard: + + + + +# Requirements + +This project assumes the following: + +- You have access to Alteryx Designer and Power BI Desktop. + - If you only have Power BI Desktop, you may need to perform some + analysis in Power BI instead of Alteryx. +- Your data is in a format that can be imported into Alteryx and/or + Power BI. +- You have a basic understanding of data types and visualization. + +# Alteryx: Data Preparation & Analysis + +## Import Data + +With Alteryx, importing data is easy with the use of the +`Input Data` tool. Simply drag this tool onto the canvas from +the `In/Out` tab in the Ribbon to create it as a node. + +You can choose the File Format manually or simply connect to your +file/database and let Alteryx determine the format for you. For this +example, we will be importing an Excel file and changing the +`Start Data Import on Line` variable to `2`. + + + +## Transform Data + +Next, let\'s replace null data and remove whitespace to clean up our +data. We can do this with the `Data Cleansing` tool in the +`Preparation` tab in the Ribbon. + +Ensure that the following options are enabled: + +- Replace Nulls + - Replace with Blanks (String Fields) + - Replace with 0 (Numeric Fields) +- Remove Unwanted Characters + - Leading and Trailing Whitespace + + + +For our next step, we will transform the date fields from strings to +datetime format. Add a `Datetime` tool for each field you +want to transform - in the example below, I am using the tool twice for +the \"Started On\" and \"Submitted On\" fields. + +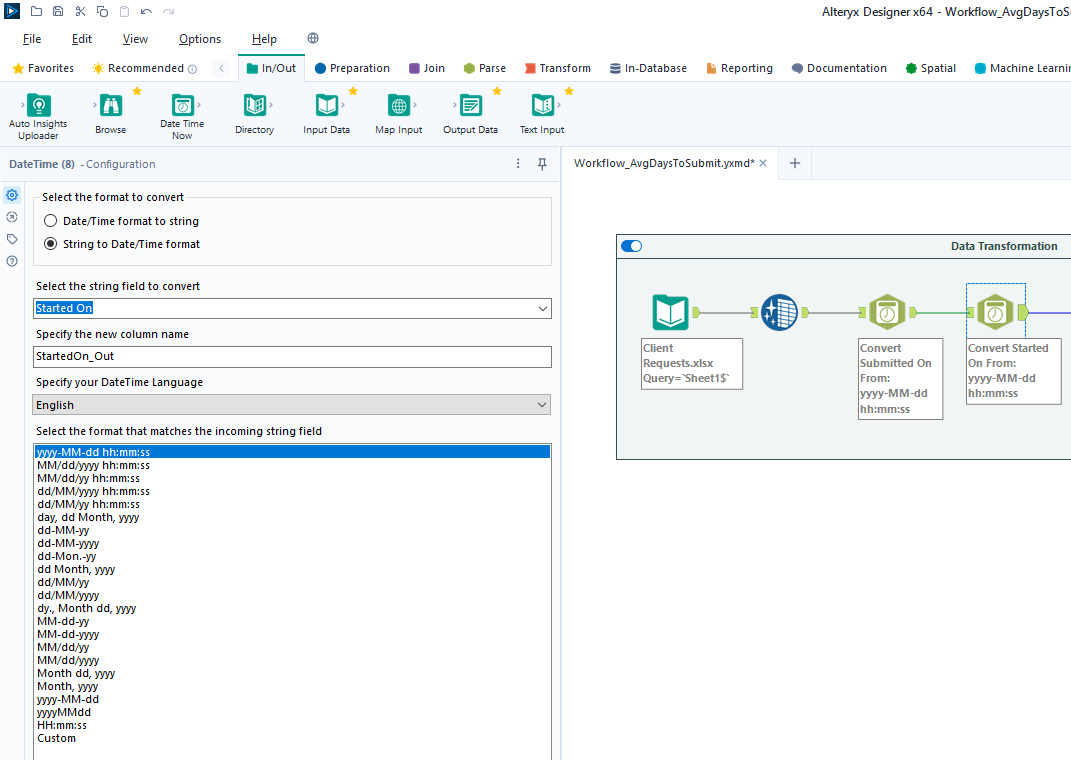 + +Now that the dates are in the correct format, let\'s perform a +calculation based on those fields. Start by adding a `Filter` +tool, naming a new Output Column, and pasting the formula below into it +(the two fields used in this formula must match the output of the +`Datetime` tools above): + +``` txt +DateTimeDiff([SubmittedOn_Out],[StartedOn_Out], "days") +``` + +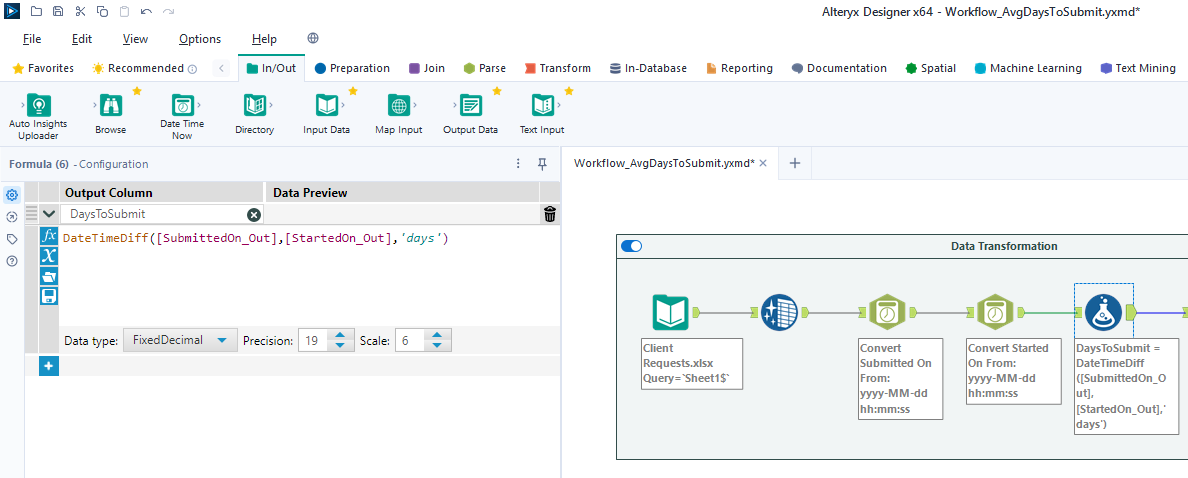 + +## Export Data + +Finalize the process by exporting the transformed data set to a new +file, for use in the following visualization step. + +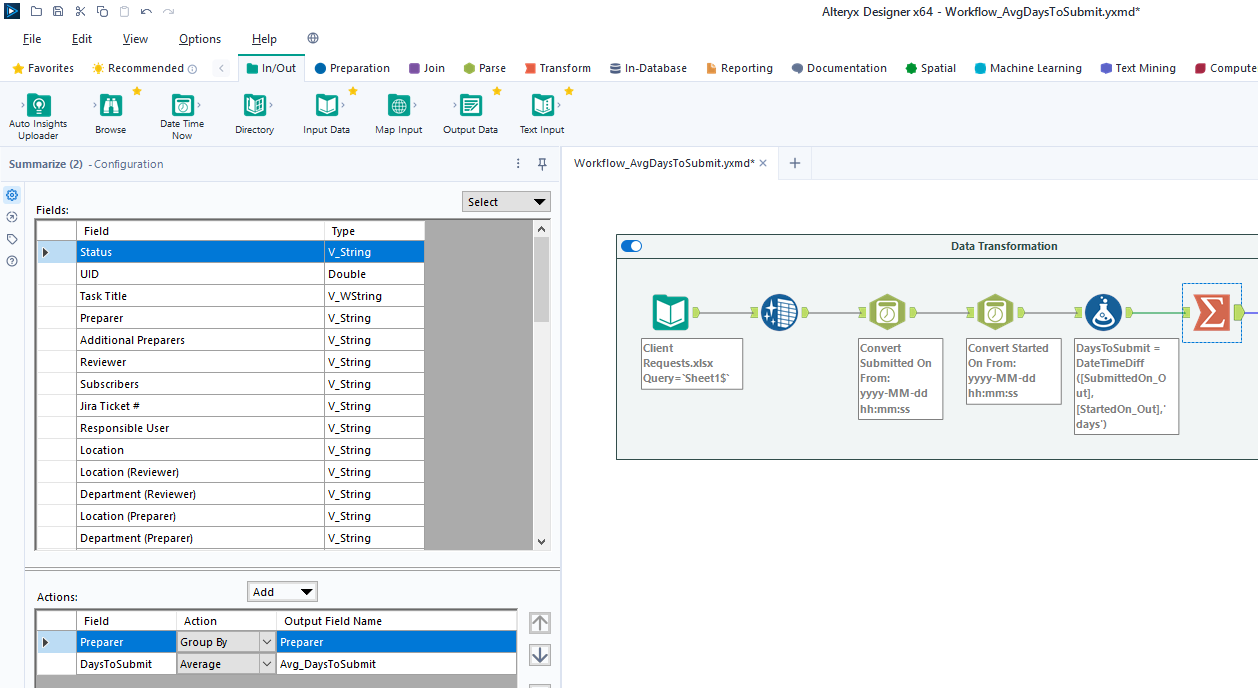 + +# Power BI: Data Visualization + +## Import Data + +To start, open the Power BI Desktop application. Upon first use, Power +BI will ask if you want to open an existing dashboard or import new +data. + +As we are creating our first dashboard, let\'s import our data. In my +example below, I\'m importing data from the \"Tracker\" sheet of the +Excel file I\'m using for this project. + +During this process, I also imported the export from the Alteryx +workflow above. Therefore, we have two different files available for use +in our dashboard. + +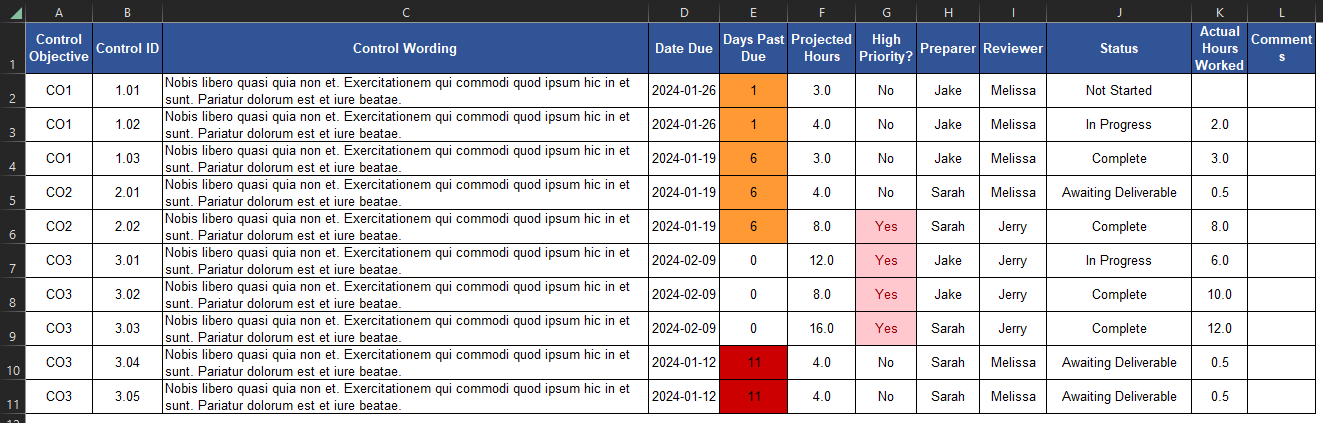 + + + +## Add Visuals + +To create the dashboard below, you will need to follow the list +instructions below and format as needed: + + + + +Instructions to create the visuals above: + +- `Text Box`: Explain the name and purpose of the + dashboard. You can also add images and logos at the top of the + dashboard. +- `Donut Chart`: Overall status of the project. + - `Legend`: Status + - `Values`: Count of Status +- `Stacked Column Chart`: Task count by assignee. + - `X-axis`: Preparer + - `Y-axis`: Count of Control ID + - `Legend`: Status +- `Treemap`: Top N client submitters by average days to + submit. + - `Details`: Preparer + - `Values`: Sum of Avg~DaysToSubmit~ +- `Line Chart`: Projected vs. actual hours over time. +- `Clustered Bar Chart`: Projected vs. actual hours per + person. +- `Slicer & Table` - Upcoming due dates. + - `Slicer`: + - `Values`: Date Due + - `Table`: + - `Columns`: Count of Control ID, Date Due, + Preparer, Status + +## Format the Dashboard + +You can choose a theme in the View tab of the Ribbon. You can even +browse for custom JSON files that define themes, such as ones found +online or custom ones created by your organization. + +For each visual, you can click the `Format` button in the +`Visualizations` side pane and explore the options. You can +custom options such as: + +- Visual + - Legend + - Colors + - Data labels + - Category labels +- General + - Properties + - Title + - Effects + - Header icons + - Tooltips + - Alt text + +You can always look online for inspiration when trying to decide how +best to organize and style your dashboard. + +# Sharing the Results + +Generally, you have a few different options for sharing your dashboards +with others: + +1. Export the dashboard as a PDF in the file menu of Power BI. This + will export all tabs and visuals as they are set when the export + button is pressed. You will lose all interactivity with this option. +2. Send the full Power BI file to those you wish to share the + dashboard. This will retain all settings and interactivity. However, + you will also need to send the source files if they need to refresh + the dashboard and you will need to re-send the files if you make + updates. +3. Store the dashboard in a synced location, such as a shared drive or + Microsoft Teams. Depending on how a user configures their local + Windows paths, the data source paths may not be compatible for all + users with such a setup. diff --git a/content/blog/2024-01-26-audit-dashboard.org b/content/blog/2024-01-26-audit-dashboard.org deleted file mode 100644 index e48c938..0000000 --- a/content/blog/2024-01-26-audit-dashboard.org +++ /dev/null @@ -1,171 +0,0 @@ -#+title: Building an Audit Status Dashboard -#+date: 2024-01-26 -#+description: Learn how to utilize Alteryx Designer and Power BI Desktop to build a simple status tracking dashboard for an audit or other engagement. -#+filetags: :audit: - -Alteryx and Power BI are powerful tools that can help turn your -old-school audit trackers into interactive tools that provide useful -insights and potential action plans. - -With these tools, we are going to build the following dashboard: - -[[https://img.cleberg.net/blog/20240126-audit-dashboard/dashboard_01.png]] -[[https://img.cleberg.net/blog/20240126-audit-dashboard/dashboard_02.png]] - -* Requirements -This project assumes the following: - -- You have access to Alteryx Designer and Power BI Desktop. - - If you only have Power BI Desktop, you may need to perform some - analysis in Power BI instead of Alteryx. -- Your data is in a format that can be imported into Alteryx and/or - Power BI. -- You have a basic understanding of data types and visualization. - -* Alteryx: Data Preparation & Analysis -** Import Data -With Alteryx, importing data is easy with the use of the =Input Data= -tool. Simply drag this tool onto the canvas from the =In/Out= tab in the -Ribbon to create it as a node. - -You can choose the File Format manually or simply connect to your -file/database and let Alteryx determine the format for you. For this -example, we will be importing an Excel file and changing the -=Start Data Import on Line= variable to =2=. - -#+caption: Alteryx Excel Import -[[https://img.cleberg.net/blog/20240126-audit-dashboard/alteryx_import.png]] - -** Transform Data -Next, let's replace null data and remove whitespace to clean up our -data. We can do this with the =Data Cleansing= tool in the =Preparation= -tab in the Ribbon. - -Ensure that the following options are enabled: - -- Replace Nulls - - Replace with Blanks (String Fields) - - Replace with 0 (Numeric Fields) -- Remove Unwanted Characters - - Leading and Trailing Whitespace - -#+caption: Data Cleansing -[[https://img.cleberg.net/blog/20240126-audit-dashboard/alteryx_cleansing.png]] - -For our next step, we will transform the date fields from strings to -datetime format. Add a =Datetime= tool for each field you want to -transform - in the example below, I am using the tool twice for the -"Started On" and "Submitted On" fields. - -#+caption: Data Transformation -[[https://img.cleberg.net/blog/20240126-audit-dashboard/alteryx_transformation.png]] - -Now that the dates are in the correct format, let's perform a -calculation based on those fields. Start by adding a =Filter= tool, -naming a new Output Column, and pasting the formula below into it (the -two fields used in this formula must match the output of the =Datetime= -tools above): - -#+begin_src txt -DateTimeDiff([SubmittedOn_Out],[StartedOn_Out], "days") -#+end_src - -#+caption: Data Analysis -[[https://img.cleberg.net/blog/20240126-audit-dashboard/alteryx_analysis.png]] - -** Export Data -Finalize the process by exporting the transformed data set to a new -file, for use in the following visualization step. - -#+caption: Data Export -[[https://img.cleberg.net/blog/20240126-audit-dashboard/alteryx_export.png]] - -* Power BI: Data Visualization -** Import Data -To start, open the Power BI Desktop application. Upon first use, Power -BI will ask if you want to open an existing dashboard or import new -data. - -As we are creating our first dashboard, let's import our data. In my -example below, I'm importing data from the "Tracker" sheet of the Excel -file I'm using for this project. - -During this process, I also imported the export from the Alteryx -workflow above. Therefore, we have two different files available for use -in our dashboard. - -#+caption: Excel Tracker -[[https://img.cleberg.net/blog/20240126-audit-dashboard/excel_tracker.png]] - -#+caption: Power BI Excel Import -[[https://img.cleberg.net/blog/20240126-audit-dashboard/powerbi_import.png]] - -** Add Visuals -To create the dashboard below, you will need to follow the list -instructions below and format as needed: - -[[https://img.cleberg.net/blog/20240126-audit-dashboard/dashboard_01.png]] -[[https://img.cleberg.net/blog/20240126-audit-dashboard/dashboard_02.png]] - -Instructions to create the visuals above: - -- =Text Box=: Explain the name and purpose of the dashboard. You can - also add images and logos at the top of the dashboard. -- =Donut Chart=: Overall status of the project. - - =Legend=: Status - - =Values=: Count of Status -- =Stacked Column Chart=: Task count by assignee. - - =X-axis=: Preparer - - =Y-axis=: Count of Control ID - - =Legend=: Status -- =Treemap=: Top N client submitters by average days to submit. - - =Details=: Preparer - - =Values=: Sum of Avg_DaysToSubmit -- =Line Chart=: Projected vs. actual hours over time. -- =Clustered Bar Chart=: Projected vs. actual hours per person. -- =Slicer & Table= - Upcoming due dates. - - =Slicer=: - - =Values=: Date Due - - =Table=: - - =Columns=: Count of Control ID, Date Due, Preparer, Status - -** Format the Dashboard -You can choose a theme in the View tab of the Ribbon. You can even -browse for custom JSON files that define themes, such as ones found -online or custom ones created by your organization. - -For each visual, you can click the =Format= button in the -=Visualizations= side pane and explore the options. You can custom -options such as: - -- Visual - - Legend - - Colors - - Data labels - - Category labels -- General - - Properties - - Title - - Effects - - Header icons - - Tooltips - - Alt text - -You can always look online for inspiration when trying to decide how -best to organize and style your dashboard. - -* Sharing the Results -Generally, you have a few different options for sharing your dashboards -with others: - -1. Export the dashboard as a PDF in the file menu of Power BI. This will - export all tabs and visuals as they are set when the export button is - pressed. You will lose all interactivity with this option. -2. Send the full Power BI file to those you wish to share the dashboard. - This will retain all settings and interactivity. However, you will - also need to send the source files if they need to refresh the - dashboard and you will need to re-send the files if you make updates. -3. Store the dashboard in a synced location, such as a shared drive or - Microsoft Teams. Depending on how a user configures their local - Windows paths, the data source paths may not be compatible for all - users with such a setup. diff --git a/content/blog/2024-01-27-tableau-dashboard.md b/content/blog/2024-01-27-tableau-dashboard.md new file mode 100644 index 0000000..4761676 --- /dev/null +++ b/content/blog/2024-01-27-tableau-dashboard.md @@ -0,0 +1,166 @@ ++++ +date = 2024-01-27 +title = "Data Visualization: Mapping Omaha Crime Data with Tableau" +description = "" +draft = false ++++ + +In this project, I am going to show you how to use Tableau Public for +free to create simple dashboards. + +I will be creating simple visuals from an Omaha crime data set and +combining them to create the dashboard below. You can view this +dashboard interactively online here: [Omaha Crime Data (2015 - +2023)](https://public.tableau.com/app/profile/c.c7042/viz/OmahaCrimeData2015-2023/OmahaCrimeData2015-2023#1). + + + +# Gather the Data + +You can download incident data from the Omaha Police Department on their +[Incident Data +Download](https://police.cityofomaha.org/crime-information/incident-data-download) +page. They currently have files for the years 2015 through 2023. + +Each file will be downloaded as a CSV file, approximately 3 MB - 8 MB. + +# Clean and Transform the Data + +I have used Python to combine the files into a single CSV file, as well +as adding a custom `datetime` column. You could do this step +in any software you prefer, but I prefer Python as its free, easy to +use, and has a plethora of support resources online. + +Start by opening a terminal, navigating to your Downloads directory, and +creating a python script. + +```sh +cd ~/Downloads +nano data_processing.py +``` + +Within the Python script, paste the following: + +``` python +# Import modules +import pandas as pd +import glob +import os + +# Import the data +path = r"~/Downloads/*.csv" +files = glob.glob(path) + +list = [] + +for file in files: + df_tmp = pd.read_csv(file) + li.append(df_tmp) + +df = pd.concat(list, axis=0, ignore_index=True) + +# Create a combined datetime column +df["datetime"] = pd.to_datetime( + df["date"] + " " + df["time"], + format="%m/%d/%Y %H:%M:%S" +) +df.head() + +# Export the combined data +df.to_csv(r"~/Downloads/combined_incidents.csv") +``` + +Once pasted, save and close the file. You can execute the file like so: + +```sh +python3 data_processing.py +``` + +After this, you should have a combined data file that contains all +incidents between 2015 and 2023. Mine was approximately 55 MB. + +# Tableau Public + +[Tableau Public](https://public.tableau.com/) is a free-to-use web +application that allows you to create visualizations by uploading data +sources. Note that there\'s no way to keep the data and visualizations +private, so don\'t upload anything private. + +After creating an account, you can click the `Create` \> +`Web Authoring` link to create your first visualization. + + + +## Upload the Data + +Once you\'ve opened your first project, Tableau will ask you to connect +to your data. For this project, click the +`Upload from computer` button and select the CSV file +previously combined in the step above. + + + +Once connected, you can refresh the preview of the data with the +`Refresh Data Source` button in the toolbar. + + + +If you need to edit any of the data types, column names, etc., you can +do so now. Once complete, generate an extract so that you can start +creating visualizations. + +## Create Visualizations + +To start, create a worksheet in the toolbar at the bottom of the screen. + +Within this screen, select a column from the `Data` side bar +on the left and drag it into the `Columns` or +`Rows` area of the canvas. + +See below for the map visualization. You can recreate this by adding the +following fields: + +- `Columns`: Lon +- `Rows`: Lat +- `Marks`: + - Description + - Datetime +- `Filters`: Datetime + + + +You can repeat this process for each visualization you want to create. +Explore your options by dragging data fields to different areas and by +opening the field options to explore what operations can be performed on +different data types (e.g., average, count, etc.). + +## Create Dashboard + +To create a dashboard, click the button on the toolbar at the bottom of +the screen. Within the dashboard, drag each sheet from the left side bar +onto the dashboard canvas. + + + +## Formatting + +You can explore a ton of different formatting options throughout the +worksheets and dashboard. Specifically for maps, you can alter the map +layers, background, and visible features through the `Map` +menu in the top file menu of the editing screen. + +In the finished dashboard below, I opted for a dark mode with a map that +showed county lines and city names. + +There\'s a ton of other options available to be used in a dashboard like +this, but this project shows a quick preview of what you can do in +Tableau Public. + + diff --git a/content/blog/2024-01-27-tableau-dashboard.org b/content/blog/2024-01-27-tableau-dashboard.org deleted file mode 100644 index 2fb9728..0000000 --- a/content/blog/2024-01-27-tableau-dashboard.org +++ /dev/null @@ -1,156 +0,0 @@ -#+title: Data Visualization: Mapping Omaha Crime Data with Tableau -#+date: 2024-01-27 -#+description: Learn how to utilize Tableau Public to build a dashboard to map crimes across Omaha. -#+filetags: :data: - -In this project, I am going to show you how to use Tableau Public for -free to create simple dashboards. - -I will be creating simple visuals from an Omaha crime data set and -combining them to create the dashboard below. You can view this -dashboard interactively online here: -[[https://public.tableau.com/app/profile/c.c7042/viz/OmahaCrimeData2015-2023/OmahaCrimeData2015-2023#1][Omaha -Crime Data (2015 - 2023)]]. - -#+caption: Tableau Dashboard -[[https://img.cleberg.net/blog/20240127-tableau-dashboard/dashboard.png]] - -* Gather the Data -You can download incident data from the Omaha Police Department on their -[[https://police.cityofomaha.org/crime-information/incident-data-download][Incident -Data Download]] page. They currently have files for the years 2015 -through 2023. - -Each file will be downloaded as a CSV file, approximately 3 MB - 8 MB. - -* Clean and Transform the Data -I have used Python to combine the files into a single CSV file, as well -as adding a custom =datetime= column. You could do this step in any -software you prefer, but I prefer Python as its free, easy to use, and -has a plethora of support resources online. - -Start by opening a terminal, navigating to your Downloads directory, and -creating a python script. - -#+begin_src sh -cd ~/Downloads -nano data_processing.py -#+end_src - -Within the Python script, paste the following: - -#+begin_src python -# Import modules -import pandas as pd -import glob -import os - -# Import the data -path = r"~/Downloads/*.csv" -files = glob.glob(path) - -list = [] - -for file in files: - df_tmp = pd.read_csv(file) - li.append(df_tmp) - -df = pd.concat(list, axis=0, ignore_index=True) - -# Create a combined datetime column -df["datetime"] = pd.to_datetime( - df["date"] + " " + df["time"], - format="%m/%d/%Y %H:%M:%S" -) -df.head() - -# Export the combined data -df.to_csv(r"~/Downloads/combined_incidents.csv") -#+end_src - -Once pasted, save and close the file. You can execute the file like so: - -#+begin_src sh -python3 data_processing.py -#+end_src - -After this, you should have a combined data file that contains all -incidents between 2015 and 2023. Mine was approximately 55 MB. - -* Tableau Public -[[https://public.tableau.com/][Tableau Public]] is a free-to-use web -application that allows you to create visualizations by uploading data -sources. Note that there's no way to keep the data and visualizations -private, so don't upload anything private. - -After creating an account, you can click the =Create= > =Web Authoring= -link to create your first visualization. - -#+caption: Create Button -[[https://img.cleberg.net/blog/20240127-tableau-dashboard/create_button.png]] - -** Upload the Data -Once you've opened your first project, Tableau will ask you to connect -to your data. For this project, click the =Upload from computer= button -and select the CSV file previously combined in the step above. - -#+caption: Connect Data -[[https://img.cleberg.net/blog/20240127-tableau-dashboard/connect_data.png]] - -Once connected, you can refresh the preview of the data with the -=Refresh Data Source= button in the toolbar. - -#+caption: Data Preview -[[https://img.cleberg.net/blog/20240127-tableau-dashboard/data_preview.png]] - -If you need to edit any of the data types, column names, etc., you can -do so now. Once complete, generate an extract so that you can start -creating visualizations. - -** Create Visualizations -To start, create a worksheet in the toolbar at the bottom of the screen. - -Within this screen, select a column from the =Data= side bar on the left -and drag it into the =Columns= or =Rows= area of the canvas. - -See below for the map visualization. You can recreate this by adding the -following fields: - -- =Columns=: Lon -- =Rows=: Lat -- =Marks=: - - Description - - Datetime -- =Filters=: Datetime - -#+caption: Worksheet Editing -[[https://img.cleberg.net/blog/20240127-tableau-dashboard/worksheet_edit.png]] - -You can repeat this process for each visualization you want to create. -Explore your options by dragging data fields to different areas and by -opening the field options to explore what operations can be performed on -different data types (e.g., average, count, etc.). - -** Create Dashboard -To create a dashboard, click the button on the toolbar at the bottom of -the screen. Within the dashboard, drag each sheet from the left side bar -onto the dashboard canvas. - -#+caption: Dashboard Editing -[[https://img.cleberg.net/blog/20240127-tableau-dashboard/dashboard_edit.png]] - -** Formatting -You can explore a ton of different formatting options throughout the -worksheets and dashboard. Specifically for maps, you can alter the map -layers, background, and visible features through the =Map= menu in the -top file menu of the editing screen. - -In the finished dashboard below, I opted for a dark mode with a map that -showed county lines and city names. - -There's a ton of other options available to be used in a dashboard like -this, but this project shows a quick preview of what you can do in -Tableau Public. - -#+caption: Tableau Dashboard -[[https://img.cleberg.net/blog/20240127-tableau-dashboard/dashboard.png]] diff --git a/content/blog/2024-02-06-zfs.org b/content/blog/2024-02-06-zfs.md index e1a091d..cda4b73 100644 --- a/content/blog/2024-02-06-zfs.org +++ b/content/blog/2024-02-06-zfs.md @@ -1,7 +1,9 @@ -#+title: How to Create a ZFS Pool on Ubuntu Linux -#+date: 2024-02-06 -#+description: Learn how to create a simple ZFS pool on Ubuntu Linux. -#+filetags: :linux: ++++ +date = 2024-02-06 +title = "How to Create a ZFS Pool on Ubuntu Linux" +description = "" +draft = false ++++ This post details the process I used to create ZFS pools, datasets, and snapshots on Ubuntu Server. @@ -9,59 +11,62 @@ snapshots on Ubuntu Server. I found the following pages very helpful while going through this process: -- [[https://ubuntu.com/tutorials/setup-zfs-storage-pool][Setup a ZFS - storage pool]] -- [[https://wiki.ubuntu.com/Kernel/Reference/ZFS][Kernel/Reference/ZFS]] -- [[https://blog.victormendonca.com/2020/11/03/zfs-for-dummies/][ZFS for - Dummies]] +- [Setup a ZFS storage + pool](https://ubuntu.com/tutorials/setup-zfs-storage-pool) +- [Kernel/Reference/ZFS](https://wiki.ubuntu.com/Kernel/Reference/ZFS) +- [ZFS for + Dummies](https://blog.victormendonca.com/2020/11/03/zfs-for-dummies/) + +# Installation -* Installation To start, I installed the ZFS package with the following command: -#+begin_src sh +```sh sudo apt install zfsutils-linux -#+end_src +``` Once installed, you can check the version to see if it installed correctly. -#+begin_src sh +```sh > zsf --version zfs-2.1.5-1ubuntu6~22.04.2 zfs-kmod-2.1.5-1ubuntu6~22.04.1 -#+end_src +``` + +# ZFS Configuration -* ZFS Configuration Now that ZFS is installed, we can create and configure the pool. You have various options for configuring ZFS pools that all come different pros and cons. I suggest visiting the links at the top of this post or searching online for the best configuration for your use-case. -- Striped VDEVs (Raid0) -- Mirrored VDEVs (Raid1) -- Striped Mirrored VDEVs (Raid10) -- RAIDz (Raid5) -- RAIDz2 (Raidd6) -- RAIDz3 -- Nested RAIDz (Raid50, Raid60) +- Striped VDEVs (Raid0) +- Mirrored VDEVs (Raid1) +- Striped Mirrored VDEVs (Raid10) +- RAIDz (Raid5) +- RAIDz2 (Raidd6) +- RAIDz3 +- Nested RAIDz (Raid50, Raid60) I will be using Raid10 in this guide. However, the majority of the steps are the same regardless of your chosen pool configuration. -** Creating the Pool -To start, let's list the disks available to use. You can use =fdisk= -command to see all available disks. +## Creating the Pool -#+begin_src sh +To start, let\'s list the disks available to use. You can use +`fdisk` command to see all available disks. + +```sh sudo fdisk -l -#+end_src +``` -Or, if you currently have them mounted, you can use the =df= command to -view your disks. +Or, if you currently have them mounted, you can use the `df` +command to view your disks. -#+begin_src sh +```sh > sudo df -h Filesystem Size Used Avail Use% Mounted on @@ -72,35 +77,35 @@ Filesystem Size Used Avail Use% Mounted on /dev/sdd1 9.1T 8.7T 435G 96% /mnt/white-01 /dev/sde1 7.3T 28K 6.9T 1% /mnt/red-03 /dev/sdf1 7.3T 28K 6.9T 1% /mnt/red-04 -#+end_src +``` -If you're going to use mounted disks, make sure to umount them before +If you\'re going to use mounted disks, make sure to umount them before creating the pool. -#+begin_src sh +```sh sudo umount /dev/sda1 sudo umount /dev/sdb1 -#+end_src +``` -Now that I've identified the disks I want to use and have them -unmounted, let's create the pool. For this example, I will call it -=tank=. +Now that I\'ve identified the disks I want to use and have them +unmounted, let\'s create the pool. For this example, I will call it +`tank`. -#+begin_src sh +```sh sudo zpool create -f -m /mnt/pool tank mirror /dev/sda /dev/sdb -#+end_src +``` -See below for the results of the new ZFS pool named =tank=, with a vdev -automatically named =mirror-0=. +See below for the results of the new ZFS pool named `tank`, +with a vdev automatically named `mirror-0`. -#+begin_src sh +```sh > zfs list NAME USED AVAIL REFER MOUNTPOINT tank 396K 7.14T 96K /tank -#+end_src +``` -#+begin_src sh +```sh > zpool status pool: tank @@ -114,35 +119,36 @@ config: sdb ONLINE 0 0 0 errors: No known data errors -#+end_src +``` We can also look at the mounted filesystem to see where the pool is mounted and some quick stats. -#+begin_src sh +```sh > df -h Filesystem Size Used Avail Use% Mounted on ... tank 7.2T 128K 7.2T 1% /tank -#+end_src +``` + +## Expanding the Pool -** Expanding the Pool If you want to expand this pool, you will need to add a new VDEV to the pool. Since I am using 2 disks per VDEV, I will need to add a new 2-disk -VDEV to the existing =tank= pool. +VDEV to the existing `tank` pool. -#+begin_src sh +```sh sudo zpool add tank mirror /dev/sdX /dev/sdY -#+end_src +``` -If you're adding disks of different sizes, you'll need to use the =-f= -flag. Keep in mind that the max size will be limited to the smallest -disk added. +If you\'re adding disks of different sizes, you\'ll need to use the +`-f` flag. Keep in mind that the max size will be limited to +the smallest disk added. -#+begin_src sh +```sh sudo zpool add -f tank mirror /dev/sdX /dev/sdY -#+end_src +``` I added two 8TB hard drives and this process took around 10 seconds to complete. @@ -151,39 +157,42 @@ When viewing the pool again, you can see that the pool has now doubled in size. We have 14.3 TB useable space and the same space used for mirroring. -#+begin_src sh +```sh > zfs list NAME USED AVAIL REFER MOUNTPOINT tank 145G 14.3T 104K /tank tank/cloud 145G 14.3T 145G /tank/cloud tank/media 96K 14.3T 96K /tank/media -#+end_src +``` + +### Converting Disks -*** Converting Disks Some disks, such as NTFS-formatted drives, will need to be partitioned and formatted prior to being added to the pool. Start by identifying the disks you want to format and add to the pool. -#+begin_src sh +```sh sudo fdisk -l | grep /dev -#+end_src +``` -I am going to format my =/dev/sdc= and =/dev/sdd= disks with the =fdisk= -command. +I am going to format my `/dev/sdc` and `/dev/sdd` +disks with the `fdisk` command. -See below for instructions on how to use =fdisk=. Here's what I did to -create basic Linux formatted disks: +See below for instructions on how to use `fdisk`. Here\'s +what I did to create basic Linux formatted disks: -- =g= : Create GPT partition table -- =n= : Create a new partition, hit Enter for all default options -- =t= : Change partition type to =20= for =Linux filesystem= -- =w= : Write the changes to disk and exit +- `g` : Create GPT partition table +- `n` : Create a new partition, hit Enter for all default + options +- `t` : Change partition type to `20` for + `Linux filesystem` +- `w` : Write the changes to disk and exit I repeated this process for both disks. -#+begin_src sh +```sh > sudo fdisk /dev/sdc Welcome to fdisk (util-linux 2.37.2). @@ -229,96 +238,100 @@ Help: G create a new empty SGI (IRIX) partition table o create a new empty DOS partition table s create a new empty Sun partition table -#+end_src +``` Once the drives are formatted, we can add these disks to the pool. -#+begin_src sh +```sh sudo zpool add tank mirror /dev/sdc /dev/sdd -#+end_src +``` When we list the pool again, we can see that our size is now updated to approximately 22TB. This represents my hard drives totalling 45.6TB when -shown with =fdisk -l=, with a Raid10 configuration using 22TB for -mirroring and 22TB of useable space. +shown with `fdisk -l`, with a Raid10 configuration using 22TB +for mirroring and 22TB of useable space. -#+begin_src sh +```sh > zfs list NAME USED AVAIL REFER MOUNTPOINT tank 145G 21.7T 104K /tank tank/cloud 145G 21.7T 145G /tank/cloud tank/media 145GT 21.7T 96K /tank/media -#+end_src +``` + +## Creating Datasets -** Creating Datasets -According to -[[https://docs.oracle.com/cd/E18752_01/html/819-5461/ftyue.html][ZFS -Terminology]], a =dataset= can refer to “clones, file systems, -snapshots, and volumes. +According to [ZFS +Terminology](https://docs.oracle.com/cd/E18752_01/html/819-5461/ftyue.html), +a `dataset` can refer to "clones, file systems, snapshots, +and volumes. -For this guide, I will use the =dataset= term to refer to file systems -created under a pool. +For this guide, I will use the `dataset` term to refer to +file systems created under a pool. -Within my =tank= pool, I am going to create some datasets to help -organize my files. This will give me location to store data rather than -simply dumping everything at the =/tank/= location. +Within my `tank` pool, I am going to create some datasets to +help organize my files. This will give me location to store data rather +than simply dumping everything at the `/tank/` location. -#+begin_src sh +```sh sudo zfs create tank/cloud sudo zfs create tank/media -#+end_src +``` Once created, you can see these datasets in the output of your pool list: -#+begin_src sh +```sh > zfs list NAME USED AVAIL REFER MOUNTPOINT tank 752K 7.14T 104K /tank tank/cloud 96K 7.14T 96K /tank/cloud tank/media 96K 7.14T 96K /tank/media -#+end_src +``` -** Creating Snapshots -Next, let's create our first snapshot. We can do this by calling the -=snapshot= command and give it an output name. I will be throwing the -current date and time into my example. +## Creating Snapshots -#+begin_src sh +Next, let\'s create our first snapshot. We can do this by calling the +`snapshot` command and give it an output name. I will be +throwing the current date and time into my example. + +```sh sudo zfs snapshot tank@$(date '+%Y-%m-%d_%H-%M') -#+end_src +``` We can list the snapshots in our pool with the following command: -#+begin_src sh +```sh > zfs list -t snapshot NAME USED AVAIL REFER MOUNTPOINT tank@2024-02-06_19-41 0B - 104K - -#+end_src +``` + +## Destroy Snapshots -** Destroy Snapshots You can always destroy snapshots that are no longer needed: -#+begin_src sh +```sh sudo zfs destroy tank@2024-02-06_19-41 -#+end_src +``` Once deleted, they will no longer appear in the list: -#+begin_src sh +```sh > zfs list -t snapshot no datasets available -#+end_src - -* My Thoughts on ZFS So Far -- I sacrificed 25TB to be able to mirror my data, but I feel more - comfortable with the potential to save my data by quickly replacing a - disk if I need to. -- The set-up was surprisingly easy and fast. -- Disk I/O is fast as well. I was worried that the data transfer speeds - would be slower due to the RAID configuration. -- Media streaming and transcoding has seen no noticeable drop in - performance. -- My only limitation really is the number of HDD bays in my server HDD - cage. +``` + +# My Thoughts on ZFS So Far + +- I sacrificed 25TB to be able to mirror my data, but I feel more + comfortable with the potential to save my data by quickly replacing + a disk if I need to. +- The set-up was surprisingly easy and fast. +- Disk I/O is fast as well. I was worried that the data transfer + speeds would be slower due to the RAID configuration. +- Media streaming and transcoding has seen no noticeable drop in + performance. +- My only limitation really is the number of HDD bays in my server HDD + cage. diff --git a/content/blog/2024-02-13-ubuntu-emergency-mode.md b/content/blog/2024-02-13-ubuntu-emergency-mode.md new file mode 100644 index 0000000..7482dd1 --- /dev/null +++ b/content/blog/2024-02-13-ubuntu-emergency-mode.md @@ -0,0 +1,75 @@ ++++ +date = 2024-02-13 +title = "Stuck in Ubuntu's Emergency Mode? Try Fixing the Fstab File" +description = "" +draft = false ++++ + +# The Problem + +I recently [migrated my hard drives to a ZFS pool](../zfs/) and found +myself stuck in Ubuntu\'s emergency mode after the first reboot I +performed after creating the ZFS pool. + +My server was stuck in the boot process and showed the following error +on the screen: + +``` txt +You are in emergency mode. +After logging in, type "journalctl -xb" to view system logs, +"systemctl reboot" to reboot, "systemctl default" +or ^D to try again to boot into default mode". +``` + +After rebooting the server and watching the logs scroll on a monitor, I +noticed the root cause was related to a very long search for certain +drives. I kept seeing errors like this: + +``` txt +[ TIME ] Timed out waiting of device dev-disk-by/[disk-uuid] +``` + +I realized that I had not removed the `/etc/fstab` references +that asked Ubuntu to mount two disks on boot, but I had recently changed +those disks to be part of my ZFS pool instead. Therefore, Ubuntu was +trying to identify and mount a disk that was not available. + +Now that we have an idea of the issue, let\'s move to solution. + +# The Solution + +In order to fix the issue, I waited until I was allowed to type the root +user\'s password, and then I executed the following command: + +```sh +nano /etc/fstab +``` + +Within the `fstab` file, I needed to comment/remove the +following lines at the bottom of the file. You can comment-out a line by +prepending a `#` symbol at the beginning of the line. You can +also delete the line entirely. + +``` conf +# What it looked like when running into the issue: +UUID=B64E53824E5339F7 /mnt/white-01 ntfs-3g uid=1000,gid=1000 0 0 +UUID=E69867E59867B32B /mnt/white-02 ntfs-3g uid=1000,gid=1000 0 0 + +# What I changed it to, in order to fix the issue: +# UUID=B64E53824E5339F7 /mnt/white-01 ntfs-3g uid=1000,gid=1000 0 0 +# UUID=E69867E59867B32B /mnt/white-02 ntfs-3g uid=1000,gid=1000 0 0 +``` + +Once removing the lines above from the `/etc/fstab` file, +save and exit the file by hitting the `Ctrl` + `x` +key combo. + +You can now hit `Ctrl` + `D` to continue, or +reboot: + +```sh +systemctl reboot +``` + +Once rebooted, I was able to watch the machine boot properly and launch +to the TTY login screen without errors! diff --git a/content/blog/2024-02-13-ubuntu-emergency-mode.org b/content/blog/2024-02-13-ubuntu-emergency-mode.org deleted file mode 100644 index 9fe7a42..0000000 --- a/content/blog/2024-02-13-ubuntu-emergency-mode.org +++ /dev/null @@ -1,69 +0,0 @@ -#+title: Stuck in Ubuntu's Emergency Mode? Try Fixing the Fstab File -#+date: 2024-02-13 -#+description: Learn how to fix a missing disk issue that can lock you in Ubuntu's emergency mode. -#+filetags: :linux: - -* The Problem -I recently [[../zfs/][migrated my hard drives to a ZFS pool]] and -found myself stuck in Ubuntu's emergency mode after the first reboot I -performed after creating the ZFS pool. - -My server was stuck in the boot process and showed the following error -on the screen: - -#+begin_src txt -You are in emergency mode. -After logging in, type "journalctl -xb" to view system logs, -"systemctl reboot" to reboot, "systemctl default" -or ^D to try again to boot into default mode". -#+end_src - -After rebooting the server and watching the logs scroll on a monitor, I -noticed the root cause was related to a very long search for certain -drives. I kept seeing errors like this: - -#+begin_src txt -[ TIME ] Timed out waiting of device dev-disk-by/[disk-uuid] -#+end_src - -I realized that I had not removed the =/etc/fstab= references that asked -Ubuntu to mount two disks on boot, but I had recently changed those -disks to be part of my ZFS pool instead. Therefore, Ubuntu was trying to -identify and mount a disk that was not available. - -Now that we have an idea of the issue, let's move to solution. - -* The Solution -In order to fix the issue, I waited until I was allowed to type the root -user's password, and then I executed the following command: - -#+begin_src sh -nano /etc/fstab -#+end_src - -Within the =fstab= file, I needed to comment/remove the following lines -at the bottom of the file. You can comment-out a line by prepending a -=#= symbol at the beginning of the line. You can also delete the line -entirely. - -#+begin_src conf -# What it looked like when running into the issue: -UUID=B64E53824E5339F7 /mnt/white-01 ntfs-3g uid=1000,gid=1000 0 0 -UUID=E69867E59867B32B /mnt/white-02 ntfs-3g uid=1000,gid=1000 0 0 - -# What I changed it to, in order to fix the issue: -# UUID=B64E53824E5339F7 /mnt/white-01 ntfs-3g uid=1000,gid=1000 0 0 -# UUID=E69867E59867B32B /mnt/white-02 ntfs-3g uid=1000,gid=1000 0 0 -#+end_src - -Once removing the lines above from the =/etc/fstab= file, save and exit -the file by hitting the =Ctrl= + =x= key combo. - -You can now hit =Ctrl= + =D= to continue, or reboot: - -#+begin_src sh -systemctl reboot -#+end_src - -Once rebooted, I was able to watch the machine boot properly and launch -to the TTY login screen without errors! diff --git a/content/blog/2024-02-21-self-hosting-otter-wiki.org b/content/blog/2024-02-21-self-hosting-otter-wiki.md index c308f12..bfa1e91 100644 --- a/content/blog/2024-02-21-self-hosting-otter-wiki.org +++ b/content/blog/2024-02-21-self-hosting-otter-wiki.md @@ -1,36 +1,41 @@ -#+title: Self-Hosting An Otter Wiki -#+date: <2024-02-21> -#+description: Learn how to easily self-host An Otter Wiki. -#+filetags: :selfhosting: ++++ +date = 2024-02-21 +title = "Self-Hosting an Otter Wiki" +description = "" +draft = false ++++ -* An Otter Wiki -[[https://otterwiki.com/][An Otter Wiki]] is an easy to use wiki -software that takes almost no effort to set up and maintain. +# An Otter Wiki -* Installation -To install An Otter Wiki, I'm going to use Docker Compose to create the +[An Otter Wiki](https://otterwiki.com/) is an easy to use wiki software +that takes almost no effort to set up and maintain. + +# Installation + +To install An Otter Wiki, I\'m going to use Docker Compose to create the container and then use Nginx as a reverse proxy to allow external access via a subdomain I own. -** Docker Compose -Start by creating a directory for the container's files. +## Docker Compose + +Start by creating a directory for the container\'s files. -#+begin_src sh +```sh mkdir ~/otterwiki -#+end_src +``` -Next, create the =docker-compose.yml= file to define the container's -parameters. +Next, create the `docker-compose.yml` file to define the +container\'s parameters. -#+begin_src sh +```sh nano ~/otterwiki/docker-compose.yml -#+end_src +``` -Within the file, paste the following content. You can read the project's -documentation if you want to further override or customize the -container. +Within the file, paste the following content. You can read the +project\'s documentation if you want to further override or customize +the container. -#+begin_src conf +``` conf version: '3' services: otterwiki: @@ -42,32 +47,34 @@ services: - 8337:80 volumes: - ./app-data:/app-data -#+end_src +``` Once the file is saved and closed, you can launch the container. -#+begin_src sh +```sh cd ~/otterwiki sudo docker-compose up -d -#+end_src +``` -The container is now available at =localhost:8337=. Next, we will use -Nginx to serve this app externally. +The container is now available at `localhost:8337`. Next, we +will use Nginx to serve this app externally. -** Nginx -To access the app externally, let's set up a reverse proxy. I'll start +## Nginx + +To access the app externally, let\'s set up a reverse proxy. I\'ll start by creating the Nginx configuration file for my wiki. -#+begin_src sh +```sh sudo nano /etc/nginx/sites-available/wiki -#+end_src +``` Within the file, I have saved the following content. This assumes you already have a TLS/SSL cert to use with this subdomain. If not, simply -remove the =ssl_*= variables, remove the =80= server block, and change -the =443= server block to =80= to serve the app without SSL. +remove the `ssl_*` variables, remove the `80` +server block, and change the `443` server block to +`80` to serve the app without SSL. -#+begin_src conf +``` conf server { if ($host ~ ^[^.]+\.example\.com$) { return 301 https://$host$request_uri; @@ -101,35 +108,36 @@ server { proxy_set_header X-Forwarded-Host $http_host; } } -#+end_src +``` Save and close the configuration file. On Nginx, we need to symlink the file to enable it. -#+begin_src sh +```sh sudo ln -s /etc/nginx/sites-available/wiki /etc/nginx/sites-enabled/wiki -#+end_src +``` Once enabled, restart the Nginx server to start serving the app externally. -#+begin_src sh +```sh sudo systemctl restart nginx.service -#+end_src +``` + +# Screenshots -* Screenshots In the screenshot below, you can see the initial launch screen for An Otter Wiki. Start by creating your admin account and configure the app as necessary. -#+caption: An Otter Wiki - Initial Screen -[[https://img.cleberg.net/blog/20240221-otterwiki/otterwiki.png]] + You can also see the default editing screen for creating and editing -pages. It's as easy as typing Markdown and hitting the save button. +pages. It\'s as easy as typing Markdown and hitting the save button. -#+caption: An Otter Wiki - Editing Screen -[[https://img.cleberg.net/blog/20240221-otterwiki/otterwiki-edit.png]] + Overall, I like An Otter Wiki and will be looking forward to seeing how much use I get out of it going forward. diff --git a/content/blog/2024-03-13-doom-emacs.md b/content/blog/2024-03-13-doom-emacs.md new file mode 100644 index 0000000..2c8ed41 --- /dev/null +++ b/content/blog/2024-03-13-doom-emacs.md @@ -0,0 +1,362 @@ ++++ +date = 2024-03-13 +title = "Doom Emacs & Org-Mode" +description = "" +draft = false ++++ + +## Screenshots + +These screenshots are showing a project opened with projectile, a +treemacs side pane open with the project contents, multiple buffers +tiled next to each other, and the help pane open at the bottomm. + +The themes are `doom-homage-white` and +`doom-homage-black`. + + + + + +## Getting Started + +I have been switching back and forth between +[markdown](https://en.wikipedia.org/wiki/Markdown) and +[org-mode](https://en.wikipedia.org/wiki/Org-mode) recently for my +personal note taking, wiki, and even this blog. As a result, I have been +stumbling further into the world of Emacs and found myself at a point +where I now prefer to do most of my basic editing within Emacs. + +I\'ll leave the markdown vs. org-mode debate for another post, but I +love org-mode\'s extensibility and interactive nature within Emacs, but +it becomes very unwieldy in any other client implementation of +org-mode - especially on iOS. On the flip side, markdown is limited in +functionality and fractured into different standards, but it\'s simple +and popular enough that there are a plethora of great clients to choose +from that will get the job done. + +For now, I want to focus on how I have been using Emacs and some of the +things that would have helped me learn it faster had I known where to +start. + +### Installation + +This post focuses on [Doom +Emacs](https://github.com/doomemacs/doomemacs), which is an Emacs +framework that provides an alternative experience to the vanilla [GNU +Emacs](https://www.gnu.org/software/emacs/). + +The [Getting Start +Guide](https://github.com/doomemacs/doomemacs/blob/master/docs/getting_started.org) +has an extremely detailed walkthrough of installation for all systems, +so please refer to that guide for up-to-date instructions. + +I chose to install on macOS, using the Homebrew option with the +`railwaycat/emacsmacport` version of Emacs. + +Once the program is installed, you can run the program by typing +`emacs` in a terminal. If you installed a version of Emacs +that supports both a GUI and TUI, you will have to run +`emacs -nw` to get the TUI instead of the default GUI. + +### Configuration + +Once installed, you can configure Doom by editing the files within the +`~/.doom.d/` directory. This directory holds four files: + +1. `config.el` - Personal configuration file +2. `custom.el` - Custom set variables +3. `init.el` - Doom modules and load order, must run + `doom sync` after modifying +4. `packages.el` - Declare packages to install in this file, + then run `doom sync` to install + +I only needed a few customizations for my configuration, so I\'ll list +them below. + +```lisp +;; ~/.doom.d/config.el +(setq doom-theme 'doom-homage-black) +(setq display-line-numbers-type t) +(setq org-directory "~/Documents/Notes/") + +;; lengthy org-publish directives at the bottom of the file +``` + +```lisp +;; ~/.doom.d/init.el +(doom! :input + :completion + company ; the ultimate code completion backend + vertico ; the search engine of the future + + :ui + doom ; what makes DOOM look the way it does + doom-dashboard ; a nifty splash screen for Emacs + (emoji +unicode) ; 🙂 + hl-todo ; highlight TODO/FIXME/NOTE/DEPRECATED/HACK/REVIEW + minimap ; show a map of the code on the side + modeline ; snazzy, Atom-inspired modeline, plus API + ophints ; highlight the region an operation acts on + (popup +defaults) ; tame sudden yet inevitable temporary windows + tabs ; a tab bar for Emacs + treemacs ; a project drawer, like neotree but cooler + (vc-gutter +pretty) ; vcs diff in the fringe + vi-tilde-fringe ; fringe tildes to mark beyond EOB + workspaces ; tab emulation, persistence & separate workspaces + + :editor + (evil +everywhere); come to the dark side, we have cookies + file-templates ; auto-snippets for empty files + fold ; (nigh) universal code folding + snippets ; my elves. They type so I don't have to + + :emacs + dired ; making dired pretty [functional] + electric ; smarter, keyword-based electric-indent + undo ; persistent, smarter undo for your inevitable mistakes + vc ; version-control and Emacs, sitting in a tree + + :term + term ; basic terminal emulator for Emacs + + :checkers + syntax ; tasing you for every semicolon you forget + + :tools + (eval +overlay) ; run code, run (also, repls) + lookup ; navigate your code and its documentation + magit ; a git porcelain for Emacs + + :os + (:if (featurep :system 'macos) macos) ; improve compatibility with macOS + + :lang + common-lisp ; if you've seen one lisp, you've seen them all + emacs-lisp ; drown in parentheses + markdown ; writing docs for people to ignore + org ; organize your plain life in plain text + python ; beautiful is better than ugly + sh ; she sells {ba,z,fi}sh shells on the C xor + + :app + irc ; how neckbeards socialize + (rss +org) ; emacs as an RSS reader + + (default +bindings +smartparens)) +``` + +If you\'re editing these files within Doom directly, remember to run +`SPC h r r` to reload the configuration. Also remember to run +`doom sync` for any changes to the `init.el` or +`packages.el` files. + +## Basic Functionality + +I kept a cheat sheet note open at first with all of the basic functions +typed out, copied as I went through the tutorial. After a little while, +I no longer needed it. I highly recommend writing down the most +applicable shortcuts for your preferred functionality and refer back to +it until you\'ve memorized it. + +Memorizing the shortcuts will differ based on the type of Emacs +framework being used. Personally, migrating from vanilla Emacs to Doom +Emacs simplified everything by a large factor and instantly enabled me +to start working on my projects, eliminating most of the hurdles I was +running into. The vanilla emacs hotkeys became obnoxious and I actually +stopped using Emacs entirely for about a month before trying Doom. + +For me, the first logical step is to interact with the local filesystem. +To do this, I needed to know how to open directories, open files, save +files, discard changes, close files, and switch between open files. Here +are some example shortcuts I\'ve written down in order to accomplish +file-based actions. + + Doom Hotkey Emacs Hotkey Description + ---------------------------- --------------------------- ---------------------------------------- + `SPC :` `C-x` Run functions + `SPC f f` `C-x f` Open file in buffer + `SPC f d` `C-x d` Open directory with `dired` + `i` `C-x C-q` Edit current buffer (insert mode) + `q` `C-x C-q` Quit out of insert mode + `SPC f s` `C-x s` Save current buffer + `SPC b k` `C-x k` Kill current buffer + `SPC w h/j/k/l` `C-x o`\[^1^\] Move left/down/up/right to next buffer + +\[^1^\] Doom\'s evil-window functionality is a bit different from GNU +Emacs, but you can always switch to the \"other\" buffer with +`C-x o` or `C-x b` to get a list of buffers to +select. + +In general, when in Doom, you can press `SPC` and wait a +second for the help pane to appear with all available hotkey options. +For example, you can press `SPC`, wait for the help pane, and +then select a key such as `g` to enter the git help pane and +explore further command options. + +## Editing + +Next in my process is to dive into editing for any languages I\'m +currently using. In this post, I will just cover Markdown and Org-Mode +but I have also been slowly adoping some Python and general web dev +tools as well. + +### Markdown + + + +Markdown is fairly simple as the syntax is limited, so just make sure +the `~/.doom.d/init.el` includes the `markdown` +declaration in the `:lang` section. + +This package includes the following hotkey menus. The insert and toggle +menu expands further, allowing you to insert various markdown elements +and toggle things like link hiding. + + Doom Hotkey Function + ----------------------------------------- -------------------------- + `SPC m '` markdown-edit-code-block + `SPC m e` markdown-export + `SPC m i` +insert + `SPC m o` markdown-open + `SPC m p` markdown-preview + `SPC m t` +toggle + `SPC : markdown-table-align` markdown-table-align + +### Org-Mode + + + +Similar to the markdown section above, ensure that the +`~/.doom.d/init.el` includes the `org` declaration +in the `:lang` section. + +There are a few hot keys, but a quick search with `SPC : org` +shows that there are 865 possible org-related functions you can run. I +won\'t possibly be able to list them all, so I will simply cover a few +of the basic commands I use myself. + + Doom Hotkey Function + --------------------------- --------------------------------------- + `SPC m t` org-todo + `SPC n t` org-todo-list + `SPC o A` org-agenda + `SPC X` org-capture + `SPC m p p` org-priority + `SPC m d s` org-schedule + `TAB` org-cycle + `SHIFT TAB` Collapse/open all headings in buffer + `M-q` Format/wrap current section + `M-Left/Right` Demote/promote current heading + `M-Down/Up` Shift current heading section down/up + +1. Org-Publish + + Org includes a [publishing management + system](https://orgmode.org/manual/Publishing.html) by default that + allows you to export org files to Org, iCalendar, HTML, LaTex, + Markdown, ODT, and Plain Text. Most of these can be exported into + another buffer and opened, or simply to an external file. + + While inside an org file, simply run `SPC m e` or + `M-x org-export-dispatch` to open the export menu. This + menu will show all options and ask you to select an option. If you + want to export to HTML, simply press `h` and then + `H` (As HTML buffer), `h` (As HTML file), or + `o` (As HTML file and open). + +2. Projects + + Some publishing options are easier with a defined project in Emacs. + To create a project within Emacs, I use two methods: + + 1. Add the project via the projectile command `SPC p a`. + Does not always work for me. + 2. Add an empty `.projectile` file in the project root. + + Once a project has been created, you can create custom publishing + actions within your `~/.doom.d/config.el` file. For + example, here\'s a test project I created to try and convert this + blog to org-mode recently. + + ```lisp + ;; org-publish + (require 'ox-publish) + + (defun my/org-sitemap-date-entry-format (entry style project) "Format ENTRY in + org-publish PROJECT Sitemap format ENTRY ENTRY STYLE format that includes + date." (let ((filename (org-publish-find-title entry project))) (if (= (length + filename) 0) (format "*%s*" entry) (format "{{{timestamp(%s)}}} + [[file:%s][%s]]" (format-time-string "%Y-%m-%d" (org-publish-find-date entry + project)) entry filename)))) + + (setq org-export-global-macros '(("timestamp" . "@@html:<time datetime='[$1]' + class='timestamp'>[$1]</time>@@"))) + + (setq org-publish-project-alist + `(("blog" + :base-directory "~/Source/cleberg.net/" + :base-extension "org" + :recursive t + :publishing-directory "~/Source/cleberg.net/public/" + :publishing-function org-html-publish-to-html + ;; HTML5 + :html-doctype "html5" + :html-html5-fancy t + ;; Disable some Org's HTML defaults + :html-head-include-scripts nil + :html-head-include-default-style nil + :section-numbers nil + :with-title nil + ;; Sitemap + :auto-sitemap t + :sitemap-title: "Sitemap" + :sitemap-sort-files anti-chronologically + ; :sitemap-function my/org-sitemap-date-entry-format + ;; Customize HTML output + :html-divs ((preamble "header" "preamble") + (content "main" "content") + (postamble "footer" "postamble")) + :html-head "<meta name='theme-color' content='#111' media='(prefers-color-scheme: dark)'> + <meta name='theme-color' content='#fff' media='(prefers-color-scheme: light)'> + <link rel='stylesheet' href='/syntax-theme-dark.css' media='(prefers-color-scheme: dark)'> + <link rel='stylesheet' href='/syntax-theme-light.css' media='(prefers-color-scheme: light)'> + <link rel='stylesheet' href='/styles.css' type='text/css'>" + :html-preamble "<nav class='site-nav' aria-label='site-nav' role='navigation'> + <ul> + <li><a href='/'>Home</a></li> + <li><a href='/blog/'>Blog</a></li> + <li><a href='/services/'>Services</a></li> + <li><a href='/wiki/'>Wiki</a></li> + </ul></nav> + <h1>%t</h1> + <time datetime='%d'>%d</time>" + :html-postamble " + <p>Last build: %T</p> + <p>Created with %c</p>" + ) + + ("static" + :base-directory "~/Source/cleberg.net/static/" + :base-extension "css\\|txt\\|jpg\\|gif\\|png" + :recursive t + :publishing-directory "~/Source/cleberg.net/public/" + :publishing-function org-publish-attachment) + + ("cleberg.net" :components ("blog" "static")))) + ``` + +## General Thoughts + +I have enjoyed Doom Emacs (far more than GNU Emacs) and will likely +continue to use it as my main editor for the time being. Org-Mode is +certainly the largest factor here, as I far prefer it over Markdown due +to its inherent features and detailed markup options. However, working +with org-mode on iOS has been a pain and I will have to see if there\'s +an easier way to resolve those issues or if going back to separate +Markdown, Reminders, and Calendar apps is easier to work with than an +all-in-one org solution. diff --git a/content/blog/2024-03-13-doom-emacs.org b/content/blog/2024-03-13-doom-emacs.org deleted file mode 100644 index 321286c..0000000 --- a/content/blog/2024-03-13-doom-emacs.org +++ /dev/null @@ -1,354 +0,0 @@ -#+title: Doom Emacs & Org-Mode -#+date: <2024-03-14 Thu 16:19:23> -#+description: A quick look at my setup with Doom Emacs and the Org-Mode syntax. - -** Screenshots - -These screenshots are showing a project opened with projectile, a -treemacs side pane open with the project contents, multiple buffers -tiled next to each other, and the help pane open at the bottomm. - -The themes are =doom-homage-white= and =doom-homage-black=. - -#+caption: Doom Emacs Light Mode -[[https://img.cleberg.net/blog/20240314-doom-emacs/light.png]] - -#+caption: Doom Emacs Dark Mode -[[https://img.cleberg.net/blog/20240314-doom-emacs/dark.png]] - -** Getting Started - -I have been switching back and forth between -[[https://en.wikipedia.org/wiki/Markdown][markdown]] and -[[https://en.wikipedia.org/wiki/Org-mode][org-mode]] recently for my -personal note taking, wiki, and even this blog. As a result, I have been -stumbling further into the world of Emacs and found myself at a point -where I now prefer to do most of my basic editing within Emacs. - -I'll leave the markdown vs. org-mode debate for another post, but I love -org-mode's extensibility and interactive nature within Emacs, but it -becomes very unwieldy in any other client implementation of org-mode - -especially on iOS. On the flip side, markdown is limited in -functionality and fractured into different standards, but it's simple -and popular enough that there are a plethora of great clients to choose -from that will get the job done. - -For now, I want to focus on how I have been using Emacs and some of the -things that would have helped me learn it faster had I known where to -start. - -*** Installation - -This post focuses on [[https://github.com/doomemacs/doomemacs][Doom -Emacs]], which is an Emacs framework that provides an alternative -experience to the vanilla [[https://www.gnu.org/software/emacs/][GNU -Emacs]]. - -The -[[https://github.com/doomemacs/doomemacs/blob/master/docs/getting_started.org][Getting -Start Guide]] has an extremely detailed walkthrough of installation for -all systems, so please refer to that guide for up-to-date instructions. - -I chose to install on macOS, using the Homebrew option with the -=railwaycat/emacsmacport= version of Emacs. - -Once the program is installed, you can run the program by typing =emacs= -in a terminal. If you installed a version of Emacs that supports both a -GUI and TUI, you will have to run =emacs -nw= to get the TUI instead of -the default GUI. - -*** Configuration - -Once installed, you can configure Doom by editing the files within the -=~/.doom.d/= directory. This directory holds four files: - -1. =config.el= - Personal configuration file -2. =custom.el= - Custom set variables -3. =init.el= - Doom modules and load order, must run =doom sync= after - modifying -4. =packages.el= - Declare packages to install in this file, then run - =doom sync= to install - -I only needed a few customizations for my configuration, so I'll list -them below. - -#+begin_src lisp -;; ~/.doom.d/config.el -(setq doom-theme 'doom-homage-black) -(setq display-line-numbers-type t) -(setq org-directory "~/Documents/Notes/") - -;; lengthy org-publish directives at the bottom of the file -#+end_src - -#+begin_src lisp -;; ~/.doom.d/init.el -(doom! :input - :completion - company ; the ultimate code completion backend - vertico ; the search engine of the future - - :ui - doom ; what makes DOOM look the way it does - doom-dashboard ; a nifty splash screen for Emacs - (emoji +unicode) ; 🙂 - hl-todo ; highlight TODO/FIXME/NOTE/DEPRECATED/HACK/REVIEW - minimap ; show a map of the code on the side - modeline ; snazzy, Atom-inspired modeline, plus API - ophints ; highlight the region an operation acts on - (popup +defaults) ; tame sudden yet inevitable temporary windows - tabs ; a tab bar for Emacs - treemacs ; a project drawer, like neotree but cooler - (vc-gutter +pretty) ; vcs diff in the fringe - vi-tilde-fringe ; fringe tildes to mark beyond EOB - workspaces ; tab emulation, persistence & separate workspaces - - :editor - (evil +everywhere); come to the dark side, we have cookies - file-templates ; auto-snippets for empty files - fold ; (nigh) universal code folding - snippets ; my elves. They type so I don't have to - - :emacs - dired ; making dired pretty [functional] - electric ; smarter, keyword-based electric-indent - undo ; persistent, smarter undo for your inevitable mistakes - vc ; version-control and Emacs, sitting in a tree - - :term - term ; basic terminal emulator for Emacs - - :checkers - syntax ; tasing you for every semicolon you forget - - :tools - (eval +overlay) ; run code, run (also, repls) - lookup ; navigate your code and its documentation - magit ; a git porcelain for Emacs - - :os - (:if (featurep :system 'macos) macos) ; improve compatibility with macOS - - :lang - common-lisp ; if you've seen one lisp, you've seen them all - emacs-lisp ; drown in parentheses - markdown ; writing docs for people to ignore - org ; organize your plain life in plain text - python ; beautiful is better than ugly - sh ; she sells {ba,z,fi}sh shells on the C xor - - :app - irc ; how neckbeards socialize - (rss +org) ; emacs as an RSS reader - - (default +bindings +smartparens)) -#+end_src - -If you're editing these files within Doom directly, remember to run -=SPC h r r= to reload the configuration. Also remember to run -=doom sync= for any changes to the =init.el= or =packages.el= files. - -** Basic Functionality - -I kept a cheat sheet note open at first with all of the basic functions -typed out, copied as I went through the tutorial. After a little while, -I no longer needed it. I highly recommend writing down the most -applicable shortcuts for your preferred functionality and refer back to -it until you've memorized it. - -Memorizing the shortcuts will differ based on the type of Emacs -framework being used. Personally, migrating from vanilla Emacs to Doom -Emacs simplified everything by a large factor and instantly enabled me -to start working on my projects, eliminating most of the hurdles I was -running into. The vanilla emacs hotkeys became obnoxious and I actually -stopped using Emacs entirely for about a month before trying Doom. - -For me, the first logical step is to interact with the local filesystem. -To do this, I needed to know how to open directories, open files, save -files, discard changes, close files, and switch between open files. Here -are some example shortcuts I've written down in order to accomplish -file-based actions. - -| Doom Hotkey | Emacs Hotkey | Description | -|-----------------+--------------+----------------------------------------| -| =SPC := | =C-x= | Run functions | -| =SPC f f= | =C-x f= | Open file in buffer | -| =SPC f d= | =C-x d= | Open directory with =dired= | -| =i= | =C-x C-q= | Edit current buffer (insert mode) | -| =q= | =C-x C-q= | Quit out of insert mode | -| =SPC f s= | =C-x s= | Save current buffer | -| =SPC b k= | =C-x k= | Kill current buffer | -| =SPC w h/j/k/l= | =C-x o=[^1] | Move left/down/up/right to next buffer | - -[^1] Doom's evil-window functionality is a bit different from GNU Emacs, -but you can always switch to the "other" buffer with =C-x o= or =C-x b= -to get a list of buffers to select. - -In general, when in Doom, you can press =SPC= and wait a second for the -help pane to appear with all available hotkey options. For example, you -can press =SPC=, wait for the help pane, and then select a key such as -=g= to enter the git help pane and explore further command options. - -** Editing - -Next in my process is to dive into editing for any languages I'm -currently using. In this post, I will just cover Markdown and Org-Mode -but I have also been slowly adoping some Python and general web dev -tools as well. - -*** Markdown - -#+caption: Markdown Preview -[[https://img.cleberg.net/blog/20240314-doom-emacs/markdown.png]] - -Markdown is fairly simple as the syntax is limited, so just make sure -the =~/.doom.d/init.el= includes the =markdown= declaration in the -=:lang= section. - -This package includes the following hotkey menus. The insert and toggle -menu expands further, allowing you to insert various markdown elements -and toggle things like link hiding. - -| Doom Hotkey | Function | -|------------------------------+--------------------------| -| =SPC m '= | markdown-edit-code-block | -| =SPC m e= | markdown-export | -| =SPC m i= | +insert | -| =SPC m o= | markdown-open | -| =SPC m p= | markdown-preview | -| =SPC m t= | +toggle | -| =SPC : markdown-table-align= | markdown-table-align | - -*** Org-Mode - -#+caption: Org-Mode Preview -[[https://img.cleberg.net/blog/20240314-doom-emacs/org.png]] - -Similar to the markdown section above, ensure that the -=~/.doom.d/init.el= includes the =org= declaration in the =:lang= -section. - -There are a few hot keys, but a quick search with =SPC : org= shows that -there are 865 possible org-related functions you can run. I won't -possibly be able to list them all, so I will simply cover a few of the -basic commands I use myself. - -| Doom Hotkey | Function | -|----------------+---------------------------------------| -| =SPC m t= | org-todo | -| =SPC n t= | org-todo-list | -| =SPC o A= | org-agenda | -| =SPC X= | org-capture | -| =SPC m p p= | org-priority | -| =SPC m d s= | org-schedule | -| =TAB= | org-cycle | -| =SHIFT TAB= | Collapse/open all headings in buffer | -| =M-q= | Format/wrap current section | -| =M-Left/Right= | Demote/promote current heading | -| =M-Down/Up= | Shift current heading section down/up | - -**** Org-Publish - -Org includes a [[https://orgmode.org/manual/Publishing.html][publishing -management system]] by default that allows you to export org files to -Org, iCalendar, HTML, LaTex, Markdown, ODT, and Plain Text. Most of -these can be exported into another buffer and opened, or simply to an -external file. - -While inside an org file, simply run =SPC m e= or -=M-x org-export-dispatch= to open the export menu. This menu will show -all options and ask you to select an option. If you want to export to -HTML, simply press =h= and then =H= (As HTML buffer), =h= (As HTML -file), or =o= (As HTML file and open). - -**** Projects - -Some publishing options are easier with a defined project in Emacs. To -create a project within Emacs, I use two methods: - -1. Add the project via the projectile command =SPC p a=. Does not always - work for me. -2. Add an empty =.projectile= file in the project root. - -Once a project has been created, you can create custom publishing -actions within your =~/.doom.d/config.el= file. For example, here's a -test project I created to try and convert this blog to org-mode -recently. - -#+begin_src lisp -;; org-publish -(require 'ox-publish) - -(defun my/org-sitemap-date-entry-format (entry style project) "Format ENTRY in - org-publish PROJECT Sitemap format ENTRY ENTRY STYLE format that includes - date." (let ((filename (org-publish-find-title entry project))) (if (= (length - filename) 0) (format "*%s*" entry) (format "{{{timestamp(%s)}}} - [[file:%s][%s]]" (format-time-string "%Y-%m-%d" (org-publish-find-date entry - project)) entry filename)))) - -(setq org-export-global-macros '(("timestamp" . "@@html:<time datetime='[$1]' - class='timestamp'>[$1]</time>@@"))) - -(setq org-publish-project-alist - `(("blog" - :base-directory "~/Source/cleberg.net/" - :base-extension "org" - :recursive t - :publishing-directory "~/Source/cleberg.net/public/" - :publishing-function org-html-publish-to-html - ;; HTML5 - :html-doctype "html5" - :html-html5-fancy t - ;; Disable some Org's HTML defaults - :html-head-include-scripts nil - :html-head-include-default-style nil - :section-numbers nil - :with-title nil - ;; Sitemap - :auto-sitemap t - :sitemap-title: "Sitemap" - :sitemap-sort-files anti-chronologically - ; :sitemap-function my/org-sitemap-date-entry-format - ;; Customize HTML output - :html-divs ((preamble "header" "preamble") - (content "main" "content") - (postamble "footer" "postamble")) - :html-head "<meta name='theme-color' content='#111' media='(prefers-color-scheme: dark)'> - <meta name='theme-color' content='#fff' media='(prefers-color-scheme: light)'> - <link rel='stylesheet' href='/syntax-theme-dark.css' media='(prefers-color-scheme: dark)'> - <link rel='stylesheet' href='/syntax-theme-light.css' media='(prefers-color-scheme: light)'> - <link rel='stylesheet' href='/styles.css' type='text/css'>" - :html-preamble "<nav class='site-nav' aria-label='site-nav' role='navigation'> - <ul> - <li><a href='/'>Home</a></li> - <li><a href='/blog/'>Blog</a></li> - <li><a href='/services/'>Services</a></li> - <li><a href='/wiki/'>Wiki</a></li> - </ul></nav> - <h1>%t</h1> - <time datetime='%d'>%d</time>" - :html-postamble " - <p>Last build: %T</p> - <p>Created with %c</p>" - ) - - ("static" - :base-directory "~/Source/cleberg.net/static/" - :base-extension "css\\|txt\\|jpg\\|gif\\|png" - :recursive t - :publishing-directory "~/Source/cleberg.net/public/" - :publishing-function org-publish-attachment) - - ("cleberg.net" :components ("blog" "static")))) -#+end_src - -** General Thoughts - -I have enjoyed Doom Emacs (far more than GNU Emacs) and will likely -continue to use it as my main editor for the time being. Org-Mode is -certainly the largest factor here, as I far prefer it over Markdown due -to its inherent features and detailed markup options. However, working -with org-mode on iOS has been a pain and I will have to see if there's -an easier way to resolve those issues or if going back to separate -Markdown, Reminders, and Calendar apps is easier to work with than an -all-in-one org solution. diff --git a/content/blog/2024-03-15-self-hosting-ddns-updater.org b/content/blog/2024-03-15-self-hosting-ddns-updater.md index 0e70c58..c81af56 100644 --- a/content/blog/2024-03-15-self-hosting-ddns-updater.org +++ b/content/blog/2024-03-15-self-hosting-ddns-updater.md @@ -1,77 +1,83 @@ -#+title: Self-Hosting DDNS Updater -#+date: <2024-03-15 Fri 14:49:59> -#+description: A guide to self-hosting the DDNS Updater container. ++++ +date = 2024-03-15 +title = "Self-Hosting DDNS Updater" +description = "" +draft = false ++++ -#+caption: DDNS Updater Web View -[[https://img.cleberg.net/blog/20240315-ddns-updater/ddns.png]] + -[[https://github.com/qdm12/ddns-updater][DDNS Updater]] is a program to +[DDNS Updater](https://github.com/qdm12/ddns-updater) is a program to keep DNS A and/or AAAA records updated for multiple DNS providers. -If you've read any of my other posts, you'll notice that I have been +If you\'ve read any of my other posts, you\'ll notice that I have been searching for and using a few different DDNS updating solutions for -years. You'll also notice that I love any projects that offer a Docker +years. You\'ll also notice that I love any projects that offer a Docker Compose solution. Luckily, DDNS Upater fits both of these preferences. -** Installation +## Installation -To get started, always make sure to review the project's -[[https://github.com/qdm12/ddns-updater/blob/master/README.md][README]]. -I'll be documenting my steps below, but they may have changed by the +To get started, always make sure to review the project\'s +[README](https://github.com/qdm12/ddns-updater/blob/master/README.md). +I\'ll be documenting my steps below, but they may have changed by the time you read this. The first step is to set up the directories and files required for the project. -#+begin_src sh +```sh mkdir ~/ddns-updater mkdir ~/ddns-updater/data touch ~/ddns-updater/data/config.json -#+end_src +``` -*** Configuration +### Configuration -The main configuration you need to update is the =data/config.json= -file. There is a large list of supported providers in the README, but -I'm going to use Cloudflare in this example. +The main configuration you need to update is the +`data/config.json` file. There is a large list of supported +providers in the README, but I\'m going to use Cloudflare in this +example. -#+begin_src sh +```sh nano ~/ddns-updater/data/config.json -#+end_src +``` -When setting up the configuration for Cloudflare, you'll need the +When setting up the configuration for Cloudflare, you\'ll need the following: -- Required Parameters - - ="zone_identifier"= is the Zone ID of your site from the domain - overview page - - ="host"= is your host and can be ="@"=, a subdomain or the wildcard - ="*"=. See - [[https://github.com/qdm12/ddns-updater/issues/243#issuecomment-928313949][this - issue comment for context]]. - - ="ttl"= integer value for record TTL in seconds (specify 1 for - automatic) - - One of the following - ([[https://developers.cloudflare.com/fundamentals/api/get-started/][how - to find API keys]]): - - Email ="email"= and Global API Key ="key"= - - User service key ="user_service_key"= - - API Token ="token"=, configured with DNS edit permissions for your - DNS name's zone -- Optional Parameters - - ="proxied"= can be set to =true= to use the proxy services of - Cloudflare - - ="ip_version"= can be =ipv4= (A records), or =ipv6= (AAAA records) - or =ipv4 or ipv6= (update one of the two, depending on the public - ip found). It defaults to =ipv4 or ipv6=. - - ="ipv6_suffix"= is the IPv6 interface identifier suffix to use. It - can be for example =0:0:0:0:72ad:8fbb:a54e:bedd/64=. If left empty, - it defaults to no suffix and the raw public IPv6 address obtained is - used in the record updating. - -#+begin_src conf +- Required Parameters + - `"zone_identifier"` is the Zone ID of your site from + the domain overview page + - `"host"` is your host and can be `"@"`, a + subdomain or the wildcard `"*"`. See [this issue + comment for + context](https://github.com/qdm12/ddns-updater/issues/243#issuecomment-928313949). + - `"ttl"` integer value for record TTL in seconds + (specify 1 for automatic) + - One of the following ([how to find API + keys](https://developers.cloudflare.com/fundamentals/api/get-started/)): + - Email `"email"` and Global API Key + `"key"` + - User service key `"user_service_key"` + - API Token `"token"`, configured with DNS edit + permissions for your DNS name\'s zone +- Optional Parameters + - `"proxied"` can be set to `true` to use + the proxy services of Cloudflare + - `"ip_version"` can be `ipv4` (A records), + or `ipv6` (AAAA records) or + `ipv4 or ipv6` (update one of the two, depending on + the public ip found). It defaults to `ipv4 or ipv6`. + - `"ipv6_suffix"` is the IPv6 interface identifier + suffix to use. It can be for example + `0:0:0:0:72ad:8fbb:a54e:bedd/64`. If left empty, it + defaults to no suffix and the raw public IPv6 address obtained + is used in the record updating. + +``` conf { "settings": [ { @@ -87,12 +93,12 @@ following: } ] } -#+end_src +``` Once you have configured the provider of your choice, correct the file and directory permissions and ownership. -#+begin_src sh +```sh cd ~/ddns_updater # Owned by user ID of Docker container (1000) chown -R 1000 data @@ -100,18 +106,18 @@ chown -R 1000 data chmod 700 data # read access only chmod 400 data/config.json -#+end_src +``` -*** Docker Compose +### Docker Compose -After creating the project structure, let's create the -=docker-compose.yml= file. +After creating the project structure, let\'s create the +`docker-compose.yml` file. -#+begin_src sh +```sh nano ~/ddns_-pdater/docker-compose.yml -#+end_src +``` -#+begin_src config +``` config version: "3.7" services: ddns-updater: @@ -147,20 +153,20 @@ services: - LOG_CALLER=hidden - SHOUTRRR_ADDRESSES= restart: always -#+end_src +``` -After configuring your preferences in the =docker-compose.yml=, launch -the container. +After configuring your preferences in the +`docker-compose.yml`, launch the container. -#+begin_src sh +```sh cd ~/ddns-updater sudo docker-compose up -d -#+end_src +``` -If you've launched this on your local machine, you can launch -=localhost:8097= in your browser to see the results. +If you\'ve launched this on your local machine, you can launch +`localhost:8097` in your browser to see the results. -*** Nginx Reverse Proxy +### Nginx Reverse Proxy If you launched this service on a server, other machine, or just want to access it remotely via a domain name, you can use Nginx as a reverse @@ -168,13 +174,13 @@ proxy to expose the service publicly. Start by creating the Nginx configuration file. -#+begin_src sh +```sh sudo nano /etc/nginx/sites-available/ddns -#+end_src +``` -Here's a basic example that should work properly. +Here\'s a basic example that should work properly. -#+begin_src conf +``` conf server { # If using 443, remember to include your ssl_certificate # and ssl_certificate_key @@ -190,12 +196,12 @@ server { # see the full example below if necessary } } -#+end_src +``` -Here's a full example that uses my Authelia authentication service to +Here\'s a full example that uses my Authelia authentication service to require authentication before someone can access the web page. -#+begin_src conf +``` conf server { if ($host ~ ^[^.]+\.example\.com$) { return 301 https://$host$request_uri; @@ -302,13 +308,14 @@ server { # real_ip_recursive on; } } -#+end_src +``` When complete, simply link the file and restart the web server. -#+begin_src sh +```sh sudo ln -s /etc/nginx/sites-available/ddns /etc/nginx/sites-enabled/ddns sudo systemctl restart nginx.service -#+end_src +``` -Your ddns-updater service will now be available via =ddns.example.com=! +Your ddns-updater service will now be available via +`ddns.example.com`! diff --git a/content/blog/2024-03-29-org-blog.org b/content/blog/2024-03-29-org-blog.md index 57b024f..93bbdaf 100644 --- a/content/blog/2024-03-29-org-blog.org +++ b/content/blog/2024-03-29-org-blog.md @@ -1,75 +1,87 @@ -#+title: Blogging in Org-Mode -#+date: <2024-03-29 Fri 09:00:00> -#+description: A guide to blogging with org-mode, no third-party tools required. -#+filetags: :dev: -#+slug: org-blog - -First and foremost, apologies to those who subscribe via RSS as I know that my -feed duplicated itself when I moved this blog over to org-mode last night. - -This post focuses specifically on the configuration and tools I use to blog from -Emacs with Org-Mode and does not focus on Emacs or Org-Mode themselves. Refer to -the post I wrote about [[/blog/doom-emacs-org-mode.html][Doom Emacs & Org-Mode]] for more information about my base -Emacs configuration. - -* Weblorg - -The first step in blogging with Org-Mode is to choose a method to convert the -source files to HTML and publish them. The Worg site maintains a nice list of -[[https://orgmode.org/worg/org-blog-wiki.html][Blogs and Wikis with Org]], but the tools are inevitably different and -opinionated, so you'll need to find what works for you. - -I tried using Jekyll, Hugo, ox-hugo, Nikola, Blorg, org-static-blog, and the -native org-publish functions before finally settling on Weblorg. For one reason -or another, the other solutions were a drastic step down from my previous -workflow that used [[https://www.getzola.org/][Zola]] with Markdown content. - -[[https://github.com/emacs-love/weblorg][Weblorg]] is a static site generator for [[https://orgmode.org/][org-mode]], built for use within [[https://www.gnu.org/software/emacs/][Emacs]]. -Since it's written in Emacs Lisp, there's no need to install other languages or -frameworks to get started. More than that, you can write in any editor you -please and simply invoke the Emacs build process with the =--script= parameter -instead of requiring you to blog inside Emacs. - -** Installation - -The [[https://emacs.love/weblorg/doc/index.html][Getting Started]] page details broad installation requirements. I am using -Doom Emacs on macOS, which requires you to add the package to the -=~/.doom.d/packages.el= file and configure the =publish.el= file slightly -differently. - -To start, add the =htmlize= and =weblorg= packages to Doom, sync the changes, -and reload. - -#+begin_src sh ++++ +date = 2024-03-29 +title = "Blogging in Org-Mode" +description = "" +draft = false ++++ + +First and foremost, apologies to those who subscribe via RSS as I know +that my feed duplicated itself when I moved this blog over to org-mode +last night. + +This post focuses specifically on the configuration and tools I use to +blog from Emacs with Org-Mode and does not focus on Emacs or Org-Mode +themselves. Refer to the post I wrote about [Doom Emacs & +Org-Mode](file:///blog/doom-emacs-org-mode.html) for more information +about my base Emacs configuration. + +# Weblorg + +The first step in blogging with Org-Mode is to choose a method to +convert the source files to HTML and publish them. The Worg site +maintains a nice list of [Blogs and Wikis with +Org](https://orgmode.org/worg/org-blog-wiki.html), but the tools are +inevitably different and opinionated, so you\'ll need to find what works +for you. + +I tried using Jekyll, Hugo, ox-hugo, Nikola, Blorg, org-static-blog, and +the native org-publish functions before finally settling on Weblorg. For +one reason or another, the other solutions were a drastic step down from +my previous workflow that used [Zola](https://www.getzola.org/) with +Markdown content. + +[Weblorg](https://github.com/emacs-love/weblorg) is a static site +generator for [org-mode](https://orgmode.org/), built for use within +[Emacs](https://www.gnu.org/software/emacs/). Since it\'s written in +Emacs Lisp, there\'s no need to install other languages or frameworks to +get started. More than that, you can write in any editor you please and +simply invoke the Emacs build process with the `--script` +parameter instead of requiring you to blog inside Emacs. + +## Installation + +The [Getting Started](https://emacs.love/weblorg/doc/index.html) page +details broad installation requirements. I am using Doom Emacs on macOS, +which requires you to add the package to the +`~/.doom.d/packages.el` file and configure the +`publish.el` file slightly differently. + +To start, add the `htmlize` and `weblorg` packages +to Doom, sync the changes, and reload. + +```sh nano ~/.doom.d/packages.el -#+end_src +``` -#+begin_src lisp +```lisp (package! htmlize) (package! weblorg) -#+end_src +``` -#+begin_src sh +```sh doom sync -#+end_src +``` -Either re-open Emacs or hit =SPC h r r= to reload the changes. +Either re-open Emacs or hit `SPC h r r` to reload the +changes. -** Configuration +## Configuration -Now that I've installed weblorg, I need to configure the project. I'll start by -navigating to my site's source code and creating a =publish.el= file. +Now that I\'ve installed weblorg, I need to configure the project. I\'ll +start by navigating to my site\'s source code and creating a +`publish.el` file. -#+begin_src sh +```sh cd ~/Source/cleberg.net && nano publish.el -#+end_src +``` -Since I'm using Doom, Emacs will not automatically load the packages I need -later in the build process. To compensate, my =publish.el= file needs to -explicitly tell Emacs where Doom stores the =htmlize=, =weblorg=, and -=templatel= packages. +Since I\'m using Doom, Emacs will not automatically load the packages I +need later in the build process. To compensate, my +`publish.el` file needs to explicitly tell Emacs where Doom +stores the `htmlize`, `weblorg`, and +`templatel` packages. -#+begin_src lisp +```lisp ;; explicity load packages since I'm using Doom Emacs (add-to-list 'load-path "~/.emacs.d/.local/straight/repos/emacs-htmlize") (add-to-list 'load-path "~/.emacs.d/.local/straight/repos/weblorg") @@ -170,19 +182,21 @@ explicitly tell Emacs where Doom stores the =htmlize=, =weblorg=, and ;; fire the engine and export all the files declared in the routes above (weblorg-export) -#+end_src +``` -* Project +# Project -** Structure +## Structure The project structure for weblorg is highly customizable and the main -restriction is that the =publish.el= file must point to the correct paths. +restriction is that the `publish.el` file must point to the +correct paths. -For my blog, I prefer to keep the blog content out of the top-level directory. -This results in the following structure (shortened for brevity): +For my blog, I prefer to keep the blog content out of the top-level +directory. This results in the following structure (shortened for +brevity): -#+begin_src txt +``` txt .build/ content/ blog/ @@ -206,54 +220,58 @@ theme/ wiki.html build.sh publish.el -#+end_src +``` -This is simply my preferred structure and you can alter it to fit your needs. -The key here really is that you can customize at will, as long as the -=publish.el= file matches. +This is simply my preferred structure and you can alter it to fit your +needs. The key here really is that you can customize at will, as long as +the `publish.el` file matches. -** Build & Deploy +## Build & Deploy -Once you're content with the status of the project, you're ready to build and -deploy the blog. +Once you\'re content with the status of the project, you\'re ready to +build and deploy the blog. -My process utilizes a =build.sh= script that combines the steps I take every -time. +My process utilizes a `build.sh` script that combines the +steps I take every time. -#+begin_src sh +```sh touch build.sh && chmod +x build.sh && nano build.sh -#+end_src +``` Within this script, I do the following: -1. Remove any files within the =.build= directory that I use to store published - files. -2. Set the environment variable to =prod= to ensure the =base_url= matches my - configuration in =publish.el=. -3. Build the site with Emacs & =publish.el=. -4. Use =scp= to copy files to my site's public directory on my server. +1. Remove any files within the `.build` directory that I use + to store published files. +2. Set the environment variable to `prod` to ensure the + `base_url` matches my configuration in + `publish.el`. +3. Build the site with Emacs & `publish.el`. +4. Use `scp` to copy files to my site\'s public directory on + my server. -#+begin_src sh +```sh rm -rf .build/* && \ ENV=prod emacs --script publish.el && \ scp -r .build/* ubuntu:/var/www/cleberg.net/ -#+end_src +``` -*** Time to Build +### Time to Build My only current complaints are: -1. Errors messages are not helpful. It takes work to determine what the error is - and where it's coming from. I generally have to sit and watch the build - process to see the file that weblorg pubslishes right before the error - occurred. -2. The build process re-builds every single file on each run, which takes a long - time for a blog of my size. See below for the last time I measured. +1. Errors messages are not helpful. It takes work to determine what the + error is and where it\'s coming from. I generally have to sit and + watch the build process to see the file that weblorg pubslishes + right before the error occurred. +2. The build process re-builds every single file on each run, which + takes a long time for a blog of my size. See below for the last time + I measured. -#+begin_src sh +```sh > time ./build.sh ./build.sh 35.46s user 0.59s system 85% cpu 41.965 total -#+end_src +``` -Overall, I have thoroughly enjoyed using weblog and will continue to use it going forward until I find something better. +Overall, I have thoroughly enjoyed using weblog and will continue to use +it going forward until I find something better. diff --git a/content/blog/2024-04-06-convert-onenote-to-markdown.md b/content/blog/2024-04-06-convert-onenote-to-markdown.md new file mode 100644 index 0000000..682969a --- /dev/null +++ b/content/blog/2024-04-06-convert-onenote-to-markdown.md @@ -0,0 +1,115 @@ ++++ +date = 2024-04-06 +title = "Convert OneNote to Markdown or Org-Mode" +description = "" +draft = false ++++ + +If you\'re looking to convert your OneNote content to another format, +such as Markdown or Org-Mode, you\'re in luck. I use a solution that +doesn\'t require other programs, such as Evernote or Notion. Personally, +I used this solution on a managed corporate laptop that doesn\'t allow +installation of other programs like these. + +This solution uses OneNote and Pandoc on Windows 10. + +# Export OneNote Content to Word + +To start, export any pages or tabs from OneNote to the Word format +(`.docx`): + +1. Open OneNote desktop. +2. Select `File` and then `Export`. +3. Select the scope of content to export, such as `Tab` or + `Page`. +4. Name and save the file in an easy to remember location. I recommend + your Downloads or Desktop folder. + +See below for a visual walkthrough of the export process. + + + + + + + +# Download Pandoc + +Start by downloading Pandoc from their [GitHub +releases](https://github.com/jgm/pandoc/releases) page. I cannot install +`.msi` files on my corporate laptop, so I downloaded the +`pandoc-3.1.12.3-windows-x86_64.zip` file, which contains a +simple `.exe` file that you do not need to install - you will +simply run it from the command line below. + +Once downloaded, unzip the archive and move the `pandoc.exe` +file to the same folder where your Word documents were saved above. If +you prefer, you can move this file to an easier location, such as +`C:\Users\youruser\Downloads`. + +# Convert Word to Markdown + +In this example, I will be converting the Word documents to Markdown, +but Pandoc supports [a ton of different formats for +conversion](https://github.com/jgm/pandoc?tab=readme-ov-file#the-universal-markup-converter). +Choose the format you prefer and then modify the following commands as +needed. + +To perform the conversion, open the Command Prompt. If you can\'t find +it, open the start menu and search for it. + +Within the command prompt, navigate to the directory where you stored +the `pandoc.exe` file and the Word documents. + +```ps1 +cd "C:\Users\yourusername\Downloads" +``` + +You can verify that you\'re in the correct directory with the +`dir` command. + +```ps1 +dir +``` + +Once you have verified that you have the command prompt open in the +correct directory with the `pandoc.exe` and the Word +documents, you can run the following loop to convert all Word documents +to Markdown. + +```ps1 +for %f in (*.docx) do (pandoc.exe --extract-media=. --wrap=preserve "%f" -o "%f.md") +``` + +This loop will perform the following actions: + +1. Find all documents matching the pattern `*.docx`, which + means all Word documents ending with that file extension. +2. Iterate through all files found in step 1. +3. For each file, perform the pandoc command. +4. Within the pandoc command, `--extract-media` saves all + media found in the files to the current folder, with pandoc + automatically creating a `media` subfolder to hold all + images. +5. Within the pandoc command, `--wrap=preserve` will attempt + to prseerve the wrapping from the source document. +6. Within the pandoc command, the final step is to specify the output + path with `-o`. This option adds the `.md` + file extension to recognize the output files as Markdown files. + + + +If you want to export to another format, simply specify the +`-f=`/`--from=` and `-t=`/`--to=` options. + +For example, you can convert the Word document to org-mode. You can also +convert to one format and subsequently convert to other formats as +needed. + +```ps1 +pandoc.exe -f docx -t org file.docx +``` diff --git a/content/blog/2024-04-06-convert-onenote-to-markdown.org b/content/blog/2024-04-06-convert-onenote-to-markdown.org deleted file mode 100644 index 44c75d7..0000000 --- a/content/blog/2024-04-06-convert-onenote-to-markdown.org +++ /dev/null @@ -1,102 +0,0 @@ -#+title: Convert OneNote to Markdown (or Org-Mode) -#+date: <2024-04-06 Sat 10:00:00> -#+description: Learn how to convert OneNote pages or tabs to another format, such as Markdown or Org-Mode. -#+filetags: :dev: -#+slug: convert-onenote-to-markdown - -If you're looking to convert your OneNote content to another format, such as -Markdown or Org-Mode, you're in luck. I use a solution that doesn't require -other programs, such as Evernote or Notion. Personally, I used this solution on -a managed corporate laptop that doesn't allow installation of other programs -like these. - -This solution uses OneNote and Pandoc on Windows 10. - -* Export OneNote Content to Word - -To start, export any pages or tabs from OneNote to the Word format (=.docx=): - -1. Open OneNote desktop. -2. Select =File= and then =Export=. -3. Select the scope of content to export, such as =Tab= or =Page=. -4. Name and save the file in an easy to remember location. I recommend your - Downloads or Desktop folder. - -See below for a visual walkthrough of the export process. - -#+caption: OneNote Notebook -[[https://img.cleberg.net/blog/20240406-convert-onenote-to-markdown/onenote.png]] - -#+caption: OneNote Section Export Options -[[https://img.cleberg.net/blog/20240406-convert-onenote-to-markdown/export.png]] - -#+caption: Exported Word Document -[[https://img.cleberg.net/blog/20240406-convert-onenote-to-markdown/word.png]] - -* Download Pandoc - -Start by downloading Pandoc from their [[https://github.com/jgm/pandoc/releases][GitHub releases]] page. I cannot install -=.msi= files on my corporate laptop, so I downloaded the -=pandoc-3.1.12.3-windows-x86_64.zip= file, which contains a simple =.exe= file -that you do not need to install - you will simply run it from the command line -below. - -Once downloaded, unzip the archive and move the =pandoc.exe= file to the same -folder where your Word documents were saved above. If you prefer, you can move -this file to an easier location, such as =C:\Users\youruser\Downloads=. - -* Convert Word to Markdown - -In this example, I will be converting the Word documents to Markdown, but Pandoc -supports [[https://github.com/jgm/pandoc?tab=readme-ov-file#the-universal-markup-converter][a ton of different formats for conversion]]. Choose the format you prefer -and then modify the following commands as needed. - -To perform the conversion, open the Command Prompt. If you can't find it, open -the start menu and search for it. - -Within the command prompt, navigate to the directory where you stored the -=pandoc.exe= file and the Word documents. - -#+begin_src cli -cd "C:\Users\yourusername\Downloads" -#+end_src - -You can verify that you're in the correct directory with the =dir= command. - -#+begin_src cli -dir -#+end_src - -Once you have verified that you have the command prompt open in the correct -directory with the =pandoc.exe= and the Word documents, you can run the -following loop to convert all Word documents to Markdown. - -#+begin_src cli -for %f in (*.docx) do (pandoc.exe --extract-media=. --wrap=preserve "%f" -o "%f.md") -#+end_src - -This loop will perform the following actions: - -1. Find all documents matching the pattern =*.docx=, which means all Word - documents ending with that file extension. -2. Iterate through all files found in step 1. -3. For each file, perform the pandoc command. -4. Within the pandoc command, =--extract-media= saves all media found in the - files to the current folder, with pandoc automatically creating a =media= - subfolder to hold all images. -5. Within the pandoc command, =--wrap=preserve= will attempt to prseerve the - wrapping from the source document. -6. Within the pandoc command, the final step is to specify the output path with - =-o=. This option adds the =.md= file extension to recognize the output files - as Markdown files. - -#+caption: Pandoc Conversion -[[https://img.cleberg.net/blog/20240406-convert-onenote-to-markdown/command.png]] - -If you want to export to another format, simply specify the =-f=/=--from= and =-t=/=--to= options. - -For example, you can convert the Word document to org-mode. You can also convert to one format and subsequently convert to other formats as needed. - -#+begin_src cli -pandoc.exe -f docx -t org file.docx -#+end_src diff --git a/content/blog/2024-04-08-docker-local-web-server.md b/content/blog/2024-04-08-docker-local-web-server.md new file mode 100644 index 0000000..e8925c7 --- /dev/null +++ b/content/blog/2024-04-08-docker-local-web-server.md @@ -0,0 +1,149 @@ ++++ +date = 2024-04-08 +title = "Using Docker Desktop to Create a Development Web Server" +description = "" +draft = false ++++ + +When developing websites locally, I often use a simple Python web server +to observe the changes. + +```sh +python3 -m http.server +``` + +However, this approach has its limitations. For example, this approach +does not enable logging or access controls. You also need to customize +`SimpleHTTPServer` if you have advanced needs from your web +server. + +So, I went to find an alternative that is almost as easy and far more +extensible and found Docker Desktop to be a suitable replacement. + +# Docker Desktop + +## Installation + +[Docker Desktop](https://www.docker.com/products/docker-desktop/) is a +desktop GUI for the phenomenal Docker container software. This allows +you to manage containers, images, volumes, environments, and extensions +via an easy-to-use GUI. + +To install, open the link above and click the `Download` +button for your platform. I\'m going through this process on an M2 +Macbook, so I downloaded the Mac - Apple Chip version. + +Open the installer and follow the installation process until the +application finishes the installation process. + + + +## Creating an Nginx Container + +I prefer to use the command line to create containers, so the following +commands will be input via the terminal. + +The following command will create a container, using the +`nginx` image: + +1. `-d`: Run this container as a daemon (detach) +2. `-p`: Allocate a port in the format + `<external>:<internal>` +3. `-i`: Keep STDIN open even if not attached +4. `-t`: Allocate a pseudo-TTY +5. `-p`: Allocate a port in the format + `<external>:<internal>` +6. `--rm`: Remove the container once it\'s done running + +```sh +docker run -it --rm -d -p 8000:80 --name web nginx +``` + +You can navigate to <http://localhost:8000> to see the resulting page. + + + +## Customizing the Nginx Container + +Now that I have a container running the Nginx web server, I need to link +some volumes so that I can modify the site configuration and provide the +web files to serve. + +Let\'s start with the new command, which adds two volumes: + +1. `<your_content>:/usr/share/nginx/html`: This is the + directory where you will provide the web pages for the server to + serve. +2. `<your_config>:/etc/nginx/conf.d/default.conf`: This is + the Nginx configuration file for your site. + +To see the updates, you can delete the previous container in the GUI or +run `docker stop web` to stop the container. Once stopped, +you can run the new `docker run` command below. + +```sh +docker run -it -d -p 8000:80 --name web -v ~/Source/cleberg.net/.build:/usr/share/nginx/html -v ~/Source/cleberg.net/nginx-config.conf:/etc/nginx/conf.d/default.conf nginx +``` + +Here\'s an example of my development configuration file. + +``` conf +# nginx-config.conf +server { + server_name cleberg.net www.cleberg.net; + + root /usr/share/nginx/html; + index index.html; + autoindex on; + + access_log /var/log/nginx/cleberg.net.access.log; + error_log /var/log/nginx/cleberg.net.error.log; + + location / { + try_files $uri $uri/ =404; + } + + listen [::]:80; + listen 80; +} +``` + + + +# Customizing Deployment Actions + +I am currently blogging with [weblorg](https://emacs.love/weblorg/), +which uses a custom `publish.el` file to build the static +site. Within this file, I have configured my deployment process to check +for the `ENV` variable in thesh and if it\'s set to +`prod`, the script will set the base URLs to +`https://cleberg.net`. If not, it sets the base URLs to +`localhost:8000` (which matches the port used in the +container above). + +Therefore, I have modified my `build.sh` script to build with +`localhost` URLs if `ENV` is not set to +`prod`. It also prevents the build process from sending the +built files to the production web server. + +```sh +#!/bin/bash + +if [ "$ENV" == "prod" ]; then + echo "Environment = Production" && \ + rm -rf .build/* && \ + emacs --script publish.el && \ + scp -r .build/* ubuntu:/var/www/cleberg.net/ +else + echo "Environment = Development" && \ + rm -rf .build/* && \ + emacs --script publish.el +fi +``` + +You can modify the container in numerous ways and this approach allows +you to create complex scenarios for your web development purposes. I +highly recommend switching over to a container-based approach for +simple, local web development. diff --git a/content/blog/2024-04-08-docker-local-web-server.org b/content/blog/2024-04-08-docker-local-web-server.org deleted file mode 100644 index 82ce02a..0000000 --- a/content/blog/2024-04-08-docker-local-web-server.org +++ /dev/null @@ -1,137 +0,0 @@ -#+title: Using Docker Desktop to Create a Development Web Server -#+date: <2024-04-08 Mon 10:05:45> -#+description: Learn how to launch local web servers with Docker Desktop. -#+filetags: dev, nginx -#+slug: docker-local-web-server - -When developing websites locally, I often use a simple Python web server to -observe the changes. - -#+begin_src shell -python3 -m http.server -#+end_src - -However, this approach has its limitations. For example, this approach does not -enable logging or access controls. You also need to customize =SimpleHTTPServer= -if you have advanced needs from your web server. - -So, I went to find an alternative that is almost as easy and far more extensible -and found Docker Desktop to be a suitable replacement. - -* Docker Desktop - -** Installation - -[[https://www.docker.com/products/docker-desktop/][Docker Desktop]] is a desktop GUI for the phenomenal Docker container software. -This allows you to manage containers, images, volumes, environments, and -extensions via an easy-to-use GUI. - -To install, open the link above and click the =Download= button for your -platform. I'm going through this process on an M2 Macbook, so I downloaded the -Mac - Apple Chip version. - -Open the installer and follow the installation process until the application -finishes the installation process. - -#+caption: Docker Desktop on macOS -[[https://img.cleberg.net/blog/20240408-docker-local-web-server/docker-desktop.png]] - -** Creating an Nginx Container - -I prefer to use the command line to create containers, so the following commands -will be input via the terminal. - -The following command will create a container, using the =nginx= image: - -1. =-d=: Run this container as a daemon (detach) -2. =-p=: Allocate a port in the format =<external>:<internal>= -3. =-i=: Keep STDIN open even if not attached -4. =-t=: Allocate a pseudo-TTY -5. =-p=: Allocate a port in the format =<external>:<internal>= -6. =--rm=: Remove the container once it's done running - -#+begin_src shell -docker run -it --rm -d -p 8000:80 --name web nginx -#+end_src - -You can navigate to [[http://localhost:8000]] to see the resulting page. - -#+caption: Default Nginx Container -[[https://img.cleberg.net/blog/20240408-docker-local-web-server/default-container.png]] - -** Customizing the Nginx Container - -Now that I have a container running the Nginx web server, I need to link some -volumes so that I can modify the site configuration and provide the web files to -serve. - -Let's start with the new command, which adds two volumes: - -1. =<your_content>:/usr/share/nginx/html=: This is the directory where you will - provide the web pages for the server to serve. -2. =<your_config>:/etc/nginx/conf.d/default.conf=: This is the Nginx - configuration file for your site. - -To see the updates, you can delete the previous container in the GUI or run -=docker stop web= to stop the container. Once stopped, you can run the new -=docker run= command below. - -#+begin_src shell -docker run -it -d -p 8000:80 --name web -v ~/Source/cleberg.net/.build:/usr/share/nginx/html -v ~/Source/cleberg.net/nginx-config.conf:/etc/nginx/conf.d/default.conf nginx -#+end_src - -Here's an example of my development configuration file. - -#+begin_src conf -# nginx-config.conf -server { - server_name cleberg.net www.cleberg.net; - - root /usr/share/nginx/html; - index index.html; - autoindex on; - - access_log /var/log/nginx/cleberg.net.access.log; - error_log /var/log/nginx/cleberg.net.error.log; - - location / { - try_files $uri $uri/ =404; - } - - listen [::]:80; - listen 80; -} -#+end_src - -[[https://img.cleberg.net/blog/20240408-docker-local-web-server/custom-container.png]] - -* Customizing Deployment Actions - -I am currently blogging with [[https://emacs.love/weblorg/][weblorg]], which uses a custom =publish.el= file to -build the static site. Within this file, I have configured my deployment process -to check for the =ENV= variable in the shell and if it's set to =prod=, the -script will set the base URLs to =https://cleberg.net=. If not, it sets the base -URLs to =localhost:8000= (which matches the port used in the container above). - -Therefore, I have modified my =build.sh= script to build with =localhost= URLs -if =ENV= is not set to =prod=. It also prevents the build process from sending -the built files to the production web server. - -#+begin_src shell -#!/bin/bash - -if [ "$ENV" == "prod" ]; then - echo "Environment = Production" && \ - rm -rf .build/* && \ - emacs --script publish.el && \ - scp -r .build/* ubuntu:/var/www/cleberg.net/ -else - echo "Environment = Development" && \ - rm -rf .build/* && \ - emacs --script publish.el -fi -#+end_src - -You can modify the container in numerous ways and this approach allows you to -create complex scenarios for your web development purposes. I highly recommend -switching over to a container-based approach for simple, local web development. diff --git a/content/blog/2024-04-18-mu4e.org b/content/blog/2024-04-18-mu4e.md index c305c71..4c01731 100644 --- a/content/blog/2024-04-18-mu4e.org +++ b/content/blog/2024-04-18-mu4e.md @@ -1,77 +1,86 @@ -#+title: Email in Doom Emacs with Mu4e on macOS -#+date: <2024-04-18 Thu 10:49:00> -#+description: A short tutorial on configuring the Mu4e email client for Doom Emacs. -#+filetags: emacs, org-mode, productivity -#+slug: mu4e - -This post was heavily inspired by [[https://macowners.club/posts/email-emacs-mu4e-macos/][Email setup in Emacs with Mu4e on macOS]], but -with my own tweaks for a single-account configuration and some Doom-specific ++++ +date = 2024-04-18 +title = "Email in Doom Emacs with Mu4e on macOS" +description = "" +draft = false ++++ + +This post was heavily inspired by [Email setup in Emacs with Mu4e on +macOS](https://macowners.club/posts/email-emacs-mu4e-macos/), but with +my own tweaks for a single-account configuration and some Doom-specific configurations. -* Overview +# Overview -[[https://github.com/emacsmirror/mu4e][Mu4e]] is an Emacs-based email client based on [[https://www.djcbsoftware.nl/code/mu/][mu]], an indexer that stores email in -the Maildir format. +[Mu4e](https://github.com/emacsmirror/mu4e) is an Emacs-based email +client based on [mu](https://www.djcbsoftware.nl/code/mu/), an indexer +that stores email in the Maildir format. -This blog post covers the installation of Mu4e in Doom Emacs on macOS. This -guide should be very similar to GNU Emacs and Linux-based systems, with a few -tweaks required in the various configuration files. +This blog post covers the installation of Mu4e in Doom Emacs on macOS. +This guide should be very similar to GNU Emacs and Linux-based systems, +with a few tweaks required in the various configuration files. + +# Installation + +## Prerequisites + +### Create the Folder Structure -* Installation -** Prerequisites -*** Create the Folder Structure Start by creating the base folder structure: -#+begin_src sh +```sh mkdir ~/.maildir mkdir ~/.maildir/example # use whatever name you want to call your email account mkdir ~/.maildir/certificates # used to store system root certificates -#+end_src +``` -*** Store Email Account Passwords in macOS Keychain -Next, I will be using the macOS Keychain to store my email account passwords -using the command below. +### Store Email Account Passwords in macOS Keychain -#+begin_src sh +Next, I will be using the macOS Keychain to store my email account +passwords using the command below. + +```sh security add-generic-password -s mu4e-example -a you@example.com -w -#+end_src +``` This will prompt you to input your password twice to confirm. Keep the -=mu4e-example= name in mind, as you will need to reference it later in the IMAP -and SMTP configuration files. +`mu4e-example` name in mind, as you will need to reference it +later in the IMAP and SMTP configuration files. -*** Store Root Certificates +### Store Root Certificates -In order to use IMAP and SMTP, we need to provide certificates to the local -services. We will use the macOS defaults for this. +In order to use IMAP and SMTP, we need to provide certificates to the +local services. We will use the macOS defaults for this. -1. Open =Keychain Access.app=. -2. Select =System Roots= in the sidebar. -3. Select all items with =CMD + a=. -4. Export selected items with =SHIFT + CMD + a= to the file - =~/.maildir/certificates/root-certificates.pem=. +1. Open `Keychain Access.app`. +2. Select `System Roots` in the sidebar. +3. Select all items with `CMD + a`. +4. Export selected items with `SHIFT + CMD + a` to the file + `~/.maildir/certificates/root-certificates.pem`. -*** Install Dependencies +### Install Dependencies -Install =mbsync= (via =isync=) to fetch emails via IMAP, =mu= to index emails, -and =msmtp= to send emails via SMTP. +Install `mbsync` (via `isync`) to fetch emails via +IMAP, `mu` to index emails, and `msmtp` to send +emails via SMTP. -#+begin_src sh +```sh brew install mu isync msmtp -#+end_src +``` -** Installing Mu4e +## Installing Mu4e Within Doom Emacs, we can install Mu4e by enabling the package. -#+begin_src sh +```sh nano ~/.doom.d/init.el -#+end_src +``` -In this file, uncomment the =mu4e= line within the =:email= section. You can -also enable the =+org= and =+gmail= options if you prefer. +In this file, uncomment the `mu4e` line within the +`:email` section. You can also enable the `+org` +and `+gmail` options if you prefer. -#+begin_src elisp +```lisp (doom! :input ... :email @@ -79,32 +88,35 @@ also enable the =+org= and =+gmail= options if you prefer. ;;(mu4e +org +gmail) ... (default +bindings +smartparens)) -#+end_src +``` + +# Configuration -* Configuration -As an overall suggestion, I create the following configuration files in the -=~/.maildir= directory and using symlinks to their proper locations so that I -can backup and restore these files easily. +As an overall suggestion, I create the following configuration files in +the `~/.maildir` directory and using symlinks to their proper +locations so that I can backup and restore these files easily. -#+begin_src sh +```sh touch ~/.maildir/.mbsyncrc && \ touch ~/.maildir/.msmtprc && \ ln -s /Users/username/.maildir/.mbsyncrc /Users/username/.mbsyncrc && \ ln -s /Users/username/.maildir/.msmtprc /Users/username/.msmtprc -#+end_src +``` + +You can also create these files in your home directory and skip the +symlinking process above. -You can also create these files in your home directory and skip the symlinking -process above. +## IMAP -** IMAP -Next, let's configure =mbsync= in the file created above. Paste the following -information and customize it to match your mail provider's information. +Next, let\'s configure `mbsync` in the file created above. +Paste the following information and customize it to match your mail +provider\'s information. -#+begin_src sh +```sh nano ~/.maildir/.mbsyncrc -#+end_src +``` -#+begin_src conf +``` conf IMAPAccount example Host imap.example.com User dummy@example.com @@ -130,44 +142,52 @@ Create Near Sync All Expunge Both SyncState * -#+end_src +``` -** SMTP -Next, let's configured =msmtprc= in the file created above. Paste the following -information and customize it to match your mail provider's information. +## SMTP -#+begin_src sh +Next, let\'s configured `msmtprc` in the file created above. +Paste the following information and customize it to match your mail +provider\'s information. + +```sh nano ~/.maildir/.msmtprc -#+end_src +``` -,#+begin_src conf +```conf +# Set default values for all the accounts. defaults logfile ~/.maildir/msmtp.log tls_trust_file ~/.maildir/certificates/root-certificates.pem -account example +# ====================================================================== + +account startmail auth on -host smtp.example.com +host smtp.startmail.com port 465 protocol smtp -from you@example.com -user you@example.com -passwordeval security find-generic-password -s mu4e-example -a you@example.com -w +from hello@cleberg.net +user hello@cleberg.net +passwordeval security find-generic-password -s startmail -a hello@cleberg.net -w tls on tls_starttls off -account default : example -#+end_src +# ====================================================================== + +account default : startmail +``` -** Doom Emacs -Finally, we need to configure Doom Emacs to use the proper packages and set some -variables and functions. +## Doom Emacs -#+begin_src sh +Finally, we need to configure Doom Emacs to use the proper packages and +set some variables and functions. + +```sh nano ~/.doom.d/config.el -#+end_src +``` -#+begin_src elisp +```lisp ;; load packages and programs (use-package mu4e :load-path "/Users/username/.emacs.d/modules/email/mu4e/") @@ -251,50 +271,53 @@ nano ~/.doom.d/config.el ;; mu4e address completion (add-hook 'mu4e-compose-mode-hook 'company-mode) -#+end_src +``` Be sure to sync Doom to update the current configurations. -#+begin_src sh +```sh doom sync -#+end_src +``` + +If you have Doom open, execute `SPC h r r` to reload the new +configurations. -If you have Doom open, execute =SPC h r r= to reload the new configurations. +# Initial Sync -* Initial Sync -Once you have configured all of the relevant files, you can perform an initial -sync. Note that you can perform syncing within Mu4e itself afer this. +Once you have configured all of the relevant files, you can perform an +initial sync. Note that you can perform syncing within Mu4e itself afer +this. -#+begin_src sh +```sh mbsync -aV -#+end_src +``` Once you sync the data, you can index the emails. -#+begin_src sh +```sh mu init -m ~/.maildir --my-address you@example.com && \ mu index -#+end_src +``` The emails will now to be ready to use! -* Screenshots +# Screenshots -You can now launch Doom and open Mu4e with =SPC o m=. You can also explore the -Mu4e options with =SPC : mu4e=. +You can now launch Doom and open Mu4e with `SPC o m`. You can +also explore the Mu4e options with `SPC : mu4e`. -The home page shows various options and metdata about the account you've opened. +The home page shows various options and metdata about the account +you\'ve opened. -#+caption: Mu4e Home Page -[[https://img.cleberg.net/blog/20240418-mu4e/mu4e.png]] + -When composing an email, you can see the metadata fields at the top and compose -the message below the indicator line. +When composing an email, you can see the metadata fields at the top and +compose the message below the indicator line. -#+caption: Composition Screen -[[https://img.cleberg.net/blog/20240418-mu4e/draft.png]] + -When in a folder, you can view emails in a pane and perform actions as needed. +When in a folder, you can view emails in a pane and perform actions as +needed. -#+caption: Inbox -[[https://img.cleberg.net/blog/20240418-mu4e/inbox.png]] + diff --git a/content/blog/_index.md b/content/blog/_index.md new file mode 100644 index 0000000..892c334 --- /dev/null +++ b/content/blog/_index.md @@ -0,0 +1,5 @@ ++++ +title = "Blog" +sort_by = "date" +template = "blog.html" ++++
\ No newline at end of file diff --git a/content/index.org b/content/index.org deleted file mode 100644 index d94d79b..0000000 --- a/content/index.org +++ /dev/null @@ -1,2 +0,0 @@ -#+title: cleberg.net -#+description: Just a blip of ones and zeroes. diff --git a/content/salary.md b/content/salary.md new file mode 100644 index 0000000..9619eb3 --- /dev/null +++ b/content/salary.md @@ -0,0 +1,35 @@ ++++ +title = "Salary" +draft = false ++++ + +# Salary Transparency + +The data below details the base salary information for each job I've held. This information is posted publicly to ensure others in my position have a solid reference point when determining if their current or proposed salary is appropriate. + +While sites like Glassdoor are locking salary data behind a paywall, LinkedIn is discontinuing LinkedIn Salary, and helpful websites like Big 4 Transparency are extremely rare, I wanted to provide my personal data publicly and freely to those who need it. + +I have seen what can happen when great employees don't know the market values for their skills and I happily help those in my teams, so I'm happy to extend this information to the online community. + +As a final note, there are numerous reasons that people in the same role are paid differently (expertise, years of experience, certifications, education, etc.) and that the data in this table should only be used as a single point of reference, not the whole story. + +# Salary Data + +Note: When in a role that gives periodic raises, I will create a new record with the new base salary in the table below. See the KPMG records for an example of a raise while in the same role. + +| Title | Company | Location | Start | End | Salary | +|------------------------------------------------|------------------------|----------------|---------|---------|----------| +| Senior Associate, Technology Assurance - Audit | KPMG | Omaha, NE | 2023-10 | Current | $116,700 | +| Senior Associate, Technology Assurance - Audit | KPMG | Omaha, NE | 2022-06 | 2023-10 | $110,000 | +| Senior Technology Risk Consultant | Ernst & Young | Des Moines, IA | 2021-09 | 2022-06 | $89,500 | +| Senior IT Auditor | Ameritas | Lincoln, NE | 2021-05 | 2021-09 | $72,000 | +| IT Auditor | Ameritas | Lincoln, NE | 2020-04 | 2021-05 | $65,000 | +| IS Auditor II | Nelnet | Lincoln, NE | 2019-12 | 2020-04 | $58,000 | +| IS Auditor I | Nelnet | Lincoln, NE | 2019-06 | 2019-12 | $20/hour | +| Internal Audit Intern | Ameritas | Lincoln, NE | 2018-02 | 2019-06 | $16/hour | +| Teaching Assistant | University of Nebraska | Lincoln, NE | 2017-08 | 2018-05 | $7/hour | +| Community Management Intern | Walgreens | Lincoln, NE | 2017-06 | 2018-02 | $14/hour | + +This page was inspired by [Xe](https://xeiaso.net/salary-transparency/), and I'm quoting the following wording from them as I want to reiterate this piece: + +> Please consider publishing your salary data like this as well. By open, voluntary transparency we can help to end stigmas around discussing pay and help ensure that the next generations of people in tech are treated fairly. Stigmas thrive in darkness but die in the light of day. You can help end the stigma by playing your cards out in the open like this. diff --git a/content/salary/index.org b/content/salary/index.org deleted file mode 100644 index 206a52d..0000000 --- a/content/salary/index.org +++ /dev/null @@ -1,54 +0,0 @@ -#+title: Salary -#+description: A historical log of my jobs and salaries. -#+slug: index - -* Salary Transparency - -The data below details the base salary information for each job I've held. This -information is posted publicly to ensure others in my position have a solid -reference point when determining if their current or proposed salary is -appropriate. - -While sites like Glassdoor are locking salary data behind a paywall, LinkedIn is -discontinuing LinkedIn Salary, and helpful websites like Big 4 Transparency are -extremely rare, I wanted to provide my personal data publicly and freely to -those who need it. - -I have seen what can happen when great employees don't know the market values -for their skills and I happily help those in my teams, so I'm happy to extend -this information to the online community. - -As a final note, there are numerous reasons that people in the same role are -paid differently (expertise, years of experience, certifications, education, -etc.) and that the data in this table should only be used as a single point of -reference, not the whole story. - -* Salary Data - -Note: When in a role that gives periodic raises, I will create a new record with -the new base salary in the table below. See the KPMG records for an example of a -raise while in the same role. - -| Title | Company | Location | Start | End | Salary | -|------------------------------------------------+------------------------+----------------+---------+---------+----------| -| Senior Associate, Technology Assurance - Audit | KPMG | Omaha, NE | 2023-10 | Current | $116,700 | -| Senior Associate, Technology Assurance - Audit | KPMG | Omaha, NE | 2022-06 | 2023-10 | $110,000 | -| Senior Technology Risk Consultant | Ernst & Young | Des Moines, IA | 2021-09 | 2022-06 | $89,500 | -| Senior IT Auditor | Ameritas | Lincoln, NE | 2021-05 | 2021-09 | $72,000 | -| IT Auditor | Ameritas | Lincoln, NE | 2020-04 | 2021-05 | $65,000 | -| IS Auditor II | Nelnet | Lincoln, NE | 2019-12 | 2020-04 | $58,000 | -| IS Auditor I | Nelnet | Lincoln, NE | 2019-06 | 2019-12 | $20/hour | -| Internal Audit Intern | Ameritas | Lincoln, NE | 2018-02 | 2019-06 | $16/hour | -| Teaching Assistant | University of Nebraska | Lincoln, NE | 2017-08 | 2018-05 | $7/hour | -| Community Management Intern | Walgreens | Lincoln, NE | 2017-06 | 2018-02 | $14/hour | - -This page was inspired by [[https://xeiaso.net/salary-transparency/][Xe]], and I'm quoting the following wording from them as -I want to reiterate this piece: - -#+begin_quote -Please consider publishing your salary data like this as well. By open, -voluntary transparency we can help to end stigmas around discussing pay and help -ensure that the next generations of people in tech are treated fairly. Stigmas -thrive in darkness but die in the light of day. You can help end the stigma by -playing your cards out in the open like this. -#+end_quote diff --git a/content/services.md b/content/services.md new file mode 100644 index 0000000..61e2d96 --- /dev/null +++ b/content/services.md @@ -0,0 +1,17 @@ ++++ +title = "Services" +draft = false ++++ + +- [AnonymousOverflow](https://ao.cleberg.net/) - A StackOverflow proxy +- [CyberChef](https://cyberchef.cleberg.net/) - The Cyber Swiss Army Knife +- [FileArchive](https://files.cleberg.net/) - An interesting file archive +- [FlashPaper](https://paste.cleberg.net/) - One-time encrypted password/secret sharing +- [GotHub](https://gh.cleberg.net/) - An alternative front-end for GitHub +- [ifconfig.php](https://ip.cleberg.net/) - A \"whatsmyip\" tool +- [Invidious](https://invidious.cleberg.net/) - A YouTube proxy +- [Office](https://office.cleberg.net/) - The world\'s smallest office suite +- [Org-Live](https://org.cleberg.net/) - A basic org-mode editor for the web I built +- [SearXNG](https://search.cleberg.net/) - A privacy-respecting, open metasearch engine + +See the [git log](https://git.cleberg.net/?p=cleberg.net.git;a=history;f=content/services/index.org;h=b9ecca2567a02711a33bb633d45f790610ed9214;hb=HEAD) if you want to see changes that have been made. diff --git a/content/services/index.org b/content/services/index.org deleted file mode 100644 index 8f81758..0000000 --- a/content/services/index.org +++ /dev/null @@ -1,16 +0,0 @@ -#+title: Services -#+description: Publicly-available services hosted on cleberg.net. -#+slug: index - -- [[https://ao.cleberg.net/][AnonymousOverflow]] - A StackOverflow proxy -- [[https://cyberchef.cleberg.net/][CyberChef]] - The Cyber Swiss Army Knife -- [[https://files.cleberg.net/][FileArchive]] - An interesting file archive -- [[https://paste.cleberg.net/][FlashPaper]] - One-time encrypted password/secret sharing -- [[https://gh.cleberg.net/][GotHub]] - An alternative front-end for GitHub -- [[https://ip.cleberg.net/][ifconfig.php]] - A "whatsmyip" tool -- [[https://invidious.cleberg.net/][Invidious]] - A YouTube proxy -- [[https://office.cleberg.net/][Office]] - The world's smallest office suite -- [[https://org.cleberg.net/][Org-Live]] - A basic org-mode editor for the web I built -- [[https://search.cleberg.net/][SearXNG]] - A privacy-respecting, open metasearch engine - -See the [[https://git.cleberg.net/?p=cleberg.net.git;a=history;f=content/services/index.org;h=b9ecca2567a02711a33bb633d45f790610ed9214;hb=HEAD][git log]] if you want to see changes that have been made. diff --git a/content/wiki/_index.md b/content/wiki/_index.md new file mode 100644 index 0000000..dc75e88 --- /dev/null +++ b/content/wiki/_index.md @@ -0,0 +1,5 @@ ++++ +title = "Wiki" +sort_by = "title" +template = "wiki.html" ++++
\ No newline at end of file diff --git a/content/wiki/ai.md b/content/wiki/ai.md new file mode 100644 index 0000000..f4da263 --- /dev/null +++ b/content/wiki/ai.md @@ -0,0 +1,5 @@ ++++ +title = "AI" +updated = 2024-03-07 +draft = true ++++
\ No newline at end of file diff --git a/content/wiki/ai.org b/content/wiki/ai.org deleted file mode 100644 index ae9d3a4..0000000 --- a/content/wiki/ai.org +++ /dev/null @@ -1,3 +0,0 @@ -#+title: AI -#+date: <2024-04-01 Mon 08:00:00> -#+draft: t diff --git a/content/wiki/audit.md b/content/wiki/audit.md new file mode 100644 index 0000000..08fe3ec --- /dev/null +++ b/content/wiki/audit.md @@ -0,0 +1,5 @@ ++++ +title = "Audit" +updated = 2024-03-07 +draft = true ++++
\ No newline at end of file diff --git a/content/wiki/audit.org b/content/wiki/audit.org deleted file mode 100644 index 3487777..0000000 --- a/content/wiki/audit.org +++ /dev/null @@ -1,3 +0,0 @@ -#+title: Audit -#+date: <2024-04-01 Mon 08:00:00> -#+draft: t diff --git a/content/wiki/automation.md b/content/wiki/automation.md new file mode 100644 index 0000000..e4cb8d9 --- /dev/null +++ b/content/wiki/automation.md @@ -0,0 +1,5 @@ ++++ +title = "Automation" +updated = 2024-03-07 +draft = true ++++
\ No newline at end of file diff --git a/content/wiki/automation.org b/content/wiki/automation.org deleted file mode 100644 index 1377cc0..0000000 --- a/content/wiki/automation.org +++ /dev/null @@ -1,3 +0,0 @@ -#+title: Automation -#+date: <2024-04-01 Mon 08:00:00> -#+draft: t diff --git a/content/wiki/blogroll.md b/content/wiki/blogroll.md new file mode 100644 index 0000000..de4dd94 --- /dev/null +++ b/content/wiki/blogroll.md @@ -0,0 +1,35 @@ ++++ +title = "Blogroll" +updated = 2024-04-12 +draft = false ++++ + +## Aggregators + + - [1MB Club](https://1mb.club/) + - [250KB Club](https://250kb.club/) + - [512KB Club](https://512kb.club/) + - [Darktheme Club](https://darktheme.club/) + - [No CSS Club](https://nocss.club/) + - [No-JS Club](https://no-js.club/) + - [Ye Olde Blogroll](https://blogroll.org/) + +## Plain Text + +A list of various plaintext websites and lists. + + - [A List Of Text-Only & Minimalist News Sites](https://greycoder.com/a-list-of-text-only-new-sites/) + - [Harvard Law Review](https://harvardlawreview.org/) + - [Hyperlinked Text](https://sjmulder.nl/en/textonly.html) + - [Plain-text web design](https://medium.com/@letsworkshop/plain-text-web-design-a78ccaf9dbc0) + - [Plaintext World](https://plaintextworld.com/) + - [Words](https://justinjackson.ca/words.html) + +## Webrings + +Instead of listing my personal favorites, I\'m just going to drop a link to [brisay's webring list](https://brisray.com/web/webring-list.htm), which contains 237 webrings for a total of 7078 websites, as of 2024-03-15. + +## Everything Else + + - [Dead Simple Sites](https://deadsimplesites.com/) + - [Planet Emacslife](https://planet.emacslife.com/) diff --git a/content/wiki/blogroll.org b/content/wiki/blogroll.org deleted file mode 100644 index df96259..0000000 --- a/content/wiki/blogroll.org +++ /dev/null @@ -1,34 +0,0 @@ -#+title: Blogroll -#+date: <2024-04-12 Fri 22:43:30> - -* Aggregators - -- [[https://1mb.club/][1MB Club]] -- [[https://250kb.club/][250KB Club]] -- [[https://512kb.club/][512KB Club]] -- [[https://darktheme.club/][Darktheme Club]] -- [[https://nocss.club/][No CSS Club]] -- [[https://no-js.club/][No-JS Club]] -- [[https://blogroll.org/][Ye Olde Blogroll]] - -* Plain Text - -A list of various plaintext websites and lists. - -- [[https://greycoder.com/a-list-of-text-only-new-sites/][A List Of Text-Only & Minimalist News Sites]] -- [[https://harvardlawreview.org/][Harvard Law Review]] -- [[https://sjmulder.nl/en/textonly.html][Hyperlinked Text]] -- [[https://medium.com/@letsworkshop/plain-text-web-design-a78ccaf9dbc0][Plain-text web design]] -- [[https://plaintextworld.com/][Plaintext World]] -- [[https://justinjackson.ca/words.html][Words]] - -* Webrings - -Instead of listing my personal favorites, I'm just going to drop a link to -[[https://brisray.com/web/webring-list.htm][brisay's webring list]], which contains 237 webrings for a total of 7078 websites, -as of 2024-03-15. - -* Everything Else - -- [[https://deadsimplesites.com/][Dead Simple Sites]] -- [[https://planet.emacslife.com/][Planet Emacslife]] diff --git a/content/wiki/cli.md b/content/wiki/cli.md new file mode 100644 index 0000000..cf9e2ff --- /dev/null +++ b/content/wiki/cli.md @@ -0,0 +1,5 @@ ++++ +title = "CLI" +updated = 2024-03-07 +draft = true ++++
\ No newline at end of file diff --git a/content/wiki/cli.org b/content/wiki/cli.org deleted file mode 100644 index ea25537..0000000 --- a/content/wiki/cli.org +++ /dev/null @@ -1,3 +0,0 @@ -#+title: CLI -#+date: <2024-04-01 Mon 08:00:00> -#+draft: t diff --git a/content/wiki/data.md b/content/wiki/data.md new file mode 100644 index 0000000..120c22f --- /dev/null +++ b/content/wiki/data.md @@ -0,0 +1,5 @@ ++++ +title = "Data" +updated = 2024-03-07 +draft = true ++++
\ No newline at end of file diff --git a/content/wiki/data.org b/content/wiki/data.org deleted file mode 100644 index a25d7db..0000000 --- a/content/wiki/data.org +++ /dev/null @@ -1,3 +0,0 @@ -#+title: Data -#+date: <2024-04-01 Mon 08:00:00> -#+draft: t diff --git a/content/wiki/editors.md b/content/wiki/editors.md new file mode 100644 index 0000000..adb0939 --- /dev/null +++ b/content/wiki/editors.md @@ -0,0 +1,5 @@ ++++ +title = "Editors" +updated = 2024-03-07 +draft = true ++++
\ No newline at end of file diff --git a/content/wiki/editors.org b/content/wiki/editors.org deleted file mode 100644 index ca51910..0000000 --- a/content/wiki/editors.org +++ /dev/null @@ -1,3 +0,0 @@ -#+title: Editors -#+date: <2024-04-01 Mon 08:00:00> -#+draft: t diff --git a/content/wiki/foss.md b/content/wiki/foss.md new file mode 100644 index 0000000..00415b7 --- /dev/null +++ b/content/wiki/foss.md @@ -0,0 +1,5 @@ ++++ +title = "FOSS" +updated = 2024-03-07 +draft = true ++++
\ No newline at end of file diff --git a/content/wiki/foss.org b/content/wiki/foss.org deleted file mode 100644 index 294e93c..0000000 --- a/content/wiki/foss.org +++ /dev/null @@ -1,3 +0,0 @@ -#+title: FOSS -#+date: <2024-04-01 Mon 08:00:00> -#+draft: t diff --git a/content/wiki/git.md b/content/wiki/git.md new file mode 100644 index 0000000..3cb86eb --- /dev/null +++ b/content/wiki/git.md @@ -0,0 +1,5 @@ ++++ +title = "Git" +updated = 2024-03-07 +draft = true ++++
\ No newline at end of file diff --git a/content/wiki/git.org b/content/wiki/git.org deleted file mode 100644 index d6b682b..0000000 --- a/content/wiki/git.org +++ /dev/null @@ -1,3 +0,0 @@ -#+title: Git -#+date: <2024-04-01 Mon 08:00:00> -#+draft: t diff --git a/content/wiki/hardware.md b/content/wiki/hardware.md new file mode 100644 index 0000000..8620342 --- /dev/null +++ b/content/wiki/hardware.md @@ -0,0 +1,95 @@ ++++ +title = "Hardware" +updated = 2024-03-16 +draft = false ++++ + +## Desktop + +### macOS + +Probably should have added more RAM but Macbooks are stupid expensive. + +| Category | Details | +|----------|-------------------------------------------------------| +| Model | [Macbook Pro 16"](https://www.apple.com/macbook-pro/) | +| CPU | Apple M2 Pro | +| RAM | 16GB | +| Storage | 512GB SSD | + +### Linux + +A beauty. + +| Category | Details | +|----------|--------------------------------------------------------------------------------------------------------------------------------------------------------| +| Model | [Lenovo ThinkPad E15 Gen 4, model 21ED0048US](https://www.lenovo.com/us/en/p/laptops/thinkpad/thinkpade/thinkpad--e15-gen-4-(15-inch-amd)/len101t0023) | +| CPU | AMD Ryzen 5 5625U with Radeon Graphics | +| RAM | 16 GB | +| Storage | 256 GB SSD | + +## Mobile + +Previously used a Pixel 6 & Pixel 7 with GrapheneOS. + +| Category | Details | +|----------|-----------------------------------------------------------| +| Model | [iPhone 15 Pro Max](https://www.apple.com/iphone-15-pro/) | +| CPU | A17 Pro | +| RAM | 8GB | +| Storage | 256GB | + +## Homelab + +I run a small homelab with a mix of consumer (compute/storage) and +enterprise (network) hardware. I try to keep the lab energy efficient +and quiet as my top priorities. + +### IoT + +A collection of mainly smart lights, sensors, and smart appliances. My first preference is to disable all networking for new smart devices or simply not connect internet in the first place (e.g. I never enable internet on my smart TVs). If the smart device requires LAN access, I will connect the device to my guest-restricted IoT network. As a last resort, I will set-up the internet but monitor the DNS lookups via NextDNS and forcibly block any domains I do not want the device to be using. If the device is egregious or shady, I\'ll just sell it and either replace it or live without it. + +- Other Appliances (washer, dryer, humidifier, fans, etc.) + - [Roomba i7+](https://about.irobot.com/sitecore/content/north-america/irobot-us/home/roomba/i7-series) + - [Philips Hue A19 Bulbs](https://www.philips-hue.com/en-us/p/hue-white-and-color-ambiance-a19---e26-smart-bulb---60-w--3-pack-/046677562786) x 15 + - [Philips Hue Play Light Bars](https://www.philips-hue.com/en-us/p/hue-bundle-play-blk-ext/33001) + - [Philips Hue Smart Bridge](https://www.philips-hue.com/en-us/p/hue-bridge/046677458478) + play light bars and a ton of bulbs + - [UP Chime](https://store.ui.com/us/en/collections/unifi-camera-security-special-chime) + - [UP-Sense](https://store.ui.com/us/en/collections/unifi-camera-security-special-sensor) x 2 + - [USP-Plug](https://store.ui.com/us/en/products/unifi-smart-power) + - [UVC G4 Instant](https://store.ui.com/us/en/collections/unifi-camera-security-compact-wifi-connected) x 3 + - [UVC G4 Doorbell Pro](https://store.ui.com/us/en/collections/unifi-camera-security-special-wifi-doorbell) + +### Network + +A rack-mounted Dream Machine Pro, connected downstream to an access point, mesh extender, and a couple ethernet switches. + + - [UDM-Pro](https://store.ui.com/us/en/collections/unifi-dream-machine/products/udm-pro) + - [USW-24-PoE](https://store.ui.com/us/en/collections/unifi-switching-standard-power-over-ethernet/products/usw-24-poe) + - [USW-Lite-8-PoE](https://store.ui.com/us/en/collections/unifi-switching-utility-poe/products/usw-lite-8-poe) + - [U6-Pro](https://store.ui.com/us/en/collections/unifi-wifi-flagship-high-capacity/products/u6-pro) + - [U6-Extender](https://store.ui.com/us/en/collections/unifi-wifi-inwall-outlet-mesh) + - [USW 24-Port Patch Panel](https://store.ui.com/us/en/collections/unifi-accessory-tech-installations-rackmount/products/uacc-rack-panel-patch-blank-24) + +### Servers + +1. Rack-Mount Server + + I wasn't happy with using low-powered PCs as servers and I knew I did not want the ear-shattering enterprise rack-mounted servers, so I built my own. + + | Category | Details | + |--------------------|----------------------------------------| + | Case | Rosewill RSV-R4100U 4U | + | Motherboard | NZXT B550 | + | CPU | AMD Ryzen 7 5700G with Radeon Graphics | + | RAM | 64GB RAM (2x32GB) | + | Storage (On-board) | Western Digital 500GB M.2 NVME SSD | + | Storage (HDD Bay) | 48TB HDD | + | PSU | Corsair RM850 PSU | + +2. Other + + These ran as my main servers before I built the rack-mounted server above. I have shut these down indefinitely for now as I have no use for them. + + - Dell OptiPlex + - Raspberry Pi 4 diff --git a/content/wiki/hardware.org b/content/wiki/hardware.org deleted file mode 100644 index 9fa7f4f..0000000 --- a/content/wiki/hardware.org +++ /dev/null @@ -1,114 +0,0 @@ -#+title: Hardware -#+date: <2024-03-16 Sat 15:42:58> - -** Desktop - -*** macOS - -Probably should have added more RAM but Macbooks are stupid expensive. - -| Category | Details | -|----------+---------------------------------------------------------| -| Model | [[https://www.apple.com/macbook-pro/][Macbook Pro 16”]] | -| CPU | Apple M2 Pro | -| RAM | 16GB | -| Storage | 512GB SSD | - -*** Linux - -A beauty. - -| Category | Details | -|----------+----------------------------------------------------------------------------------------------------------------------------------------------------------| -| Model | [[https://www.lenovo.com/us/en/p/laptops/thinkpad/thinkpade/thinkpad--e15-gen-4-(15-inch-amd)/len101t0023][Lenovo ThinkPad E15 Gen 4, model 21ED0048US]] | -| CPU | AMD Ryzen 5 5625U with Radeon Graphics | -| RAM | 16 GB | -| Storage | 256 GB SSD | - -** Mobile - -Previously used a Pixel 6 & Pixel 7 with GrapheneOS. - -| Category | Details | -|----------+-------------------------------------------------------------| -| Model | [[https://www.apple.com/iphone-15-pro/][iPhone 15 Pro Max]] | -| CPU | A17 Pro | -| RAM | 8GB | -| Storage | 256GB | - -** Homelab - -I run a small homelab with a mix of consumer (compute/storage) and -enterprise (network) hardware. I try to keep the lab energy efficient -and quiet as my top priorities. - -*** IoT - -A collection of mainly smart lights, sensors, and smart appliances. My -first preference is to disable all networking for new smart devices or -simply not connect internet in the first place (e.g. I never enable -internet on my smart TVs). If the smart device requires LAN access, I -will connect the device to my guest-restricted IoT network. As a last -resort, I will set-up the internet but monitor the DNS lookups via -NextDNS and forcibly block any domains I do not want the device to be -using. If the device is egregious or shady, I'll just sell it and either -replace it or live without it. - -- Other Appliances (washer, dryer, humidifier, fans, etc.) -- [[https://about.irobot.com/sitecore/content/north-america/irobot-us/home/roomba/i7-series][Roomba - i7+]] -- [[https://www.philips-hue.com/en-us/p/hue-white-and-color-ambiance-a19---e26-smart-bulb---60-w--3-pack-/046677562786][Philips - Hue A19 Bulbs]] x 15 -- [[https://www.philips-hue.com/en-us/p/hue-bundle-play-blk-ext/33001][Philips - Hue Play Light Bars]] -- [[https://www.philips-hue.com/en-us/p/hue-bridge/046677458478][Philips - Hue Smart Bridge]] + play light bars and a ton of bulbs -- [[https://store.ui.com/us/en/collections/unifi-camera-security-special-chime][UP - Chime]] -- [[https://store.ui.com/us/en/collections/unifi-camera-security-special-sensor][UP-Sense]] - x 2 -- [[https://store.ui.com/us/en/products/unifi-smart-power][USP-Plug]] -- [[https://store.ui.com/us/en/collections/unifi-camera-security-compact-wifi-connected][UVC - G4 Instant]] x 3 -- [[https://store.ui.com/us/en/collections/unifi-camera-security-special-wifi-doorbell][UVC - G4 Doorbell Pro]] - -*** Network - -A rack-mounted Dream Machine Pro, connected downstream to an access -point, mesh extender, and a couple ethernet switches. - -- [[https://store.ui.com/us/en/collections/unifi-dream-machine/products/udm-pro][UDM-Pro]] -- [[https://store.ui.com/us/en/collections/unifi-switching-standard-power-over-ethernet/products/usw-24-poe][USW-24-PoE]] -- [[https://store.ui.com/us/en/collections/unifi-switching-utility-poe/products/usw-lite-8-poe][USW-Lite-8-PoE]] -- [[https://store.ui.com/us/en/collections/unifi-wifi-flagship-high-capacity/products/u6-pro][U6-Pro]] -- [[https://store.ui.com/us/en/collections/unifi-wifi-inwall-outlet-mesh][U6-Extender]] -- [[https://store.ui.com/us/en/collections/unifi-accessory-tech-installations-rackmount/products/uacc-rack-panel-patch-blank-24][USW - 24-Port Patch Panel]] - -*** Servers - -**** Rack-Mount Server - -I wasn't happy with using low-powered PCs as servers and I knew I did -not want the ear-shattering enterprise rack-mounted servers, so I built -my own. - -| Category | Details | -|--------------------+----------------------------------------| -| Case | Rosewill RSV-R4100U 4U | -| Motherboard | NZXT B550 | -| CPU | AMD Ryzen 7 5700G with Radeon Graphics | -| RAM | 64GB RAM (2x32GB) | -| Storage (On-board) | Western Digital 500GB M.2 NVME SSD | -| Storage (HDD Bay) | 48TB HDD | -| PSU | Corsair RM850 PSU | - -**** Other - -These ran as my main servers before I built the rack-mounted server -above. I have shut these down indefinitely for now as I have no use for -them. - -- Dell OptiPlex -- Raspberry Pi 4 diff --git a/content/wiki/ios.md b/content/wiki/ios.md new file mode 100644 index 0000000..61ae622 --- /dev/null +++ b/content/wiki/ios.md @@ -0,0 +1,151 @@ ++++ +title = "iOS" +updated = 2024-03-13 +draft = false ++++ + +Related: + +- [Hardware](/wiki/hardware.html) + +My primary mobile OS. Currently running iOS 17. This wiki page contains most of the apps I have used at one point or another across my different iPhones. + +(`*`) = My favorites + +## Configuration + +### Display + +- Light Mode + - 10:00 to 16:00 +- Dark Mode + - 16:00 to 10:00 + +### Focus Modes + +- Personal Focus + - 06:00 to 21:00 + - Allow Notifications From: + - Alarms + - Calendar + - Contacts (1 person) + - Messages + - Phone + - Reminders + - Signal + - UniFi Protect +- Sleep Focus + - 21:00 to 06:00 + - Allow Notifications From: + - Alarms + - Contacts (1 person) + - Reminders + - Signal + +### Privacy & Security + +I generally follow the [principle of least privilege](https://en.wikipedia.org/wiki/Principle_of_least_privilege) by only permitting the bare minimum privileges and revoking as soon as they are no longer required. + +Here's the baseline I start with: + +- Disable: + - Analytics & Improvements + - Apple Advertising + - Apple ID \> Sign-In & Security \> Two-Factor Authentication + - Location Services \> System Services \> Product Improvement + - Tracking \> Allow Apps to Request to Track + - Safari \> Advanced \> Privacy Preserving Ad Measurement +- Enable: + - Apple ID \> iCloud \> Advanced Data Protection + - Apple ID \> Personal Information \> Communication Preferences + - App Privacy Report + - Location Services only for Camera, Find My, UDisc, & WiFiman + (`While Using`) + - Safari \> Prevent Cross-Site Tracking + - Safari \> Hide IP Address + - Safari \> Advanced \> Advanced Tracking and Fingerprinting + Protection + +## Native Apps + +### Business + +- [Element](https://apps.apple.com/us/app/element-messenger/id1083446067) - A cross-platform messenger, based on Matrix +- [LinkedIn](https://apps.apple.com/us/app/linkedin-network-job-finder/id288429040) - One of the only social media apps I use + +### Developer Tools + +- [Harbour](https://testflight.apple.com/join/F2vK7xo4) - Easily manage your Portainer service +- [iSH](https://apps.apple.com/us/app/ish-shell/id1436902243) - A local shell with SSH functionality + +### Entertainment + +- [Plex](https://apps.apple.com/us/app/plex-watch-live-tv-and-movies/id383457673) - A client for the Plex Media Server +- [Steam](https://apps.apple.com/us/app/steam-mobile/id495369748) - The top gaming marketplace for computers + +### Lifestyle + +- [Home](https://apps.apple.com/us/app/home/id1110145103) (`*`) - Apple homekit powered smart home manager +- [Hue](https://apps.apple.com/us/app/philips-hue/id1055281310) - Philips Hue smart home manager +- [iRobot](https://apps.apple.com/us/app/irobot-home/id1012014442) - Manage iRobot Roomba devices +- [UniFi Protect](https://apps.apple.com/us/app/unifi-protect/id1392492235) - View and manage most UniFi Protect cameras and settings + +### Music + +- [Apple Music](https://apps.apple.com/us/app/apple-music/id1108187390) (`*`) - Apple\'s native music streaming app +- [Plexamp](https://apps.apple.com/us/app/plexamp/id1500797510) (`*`) - Top-notch music app for your Plex Media Server, with a neural network that provides excellent radio/shuffle suggestions + +### News + +- [NetNewsWire](https://apps.apple.com/us/app/netnewswire-rss-reader/id1480640210) - A free and open source RSS reader for Mac, iPhone, and iPad + +### Photo & Video + +- [Aislingeach](https://testflight.apple.com/join/Q6WyyEpS) - A quick way to generate and rate images from the Stable Horde +- [Unsplash](https://apps.apple.com/us/app/unsplash/id1290631746) - Premium images, mostly free + +### Productivity + +- [beorg](https://apps.apple.com/us/app/beorg-to-do-list-agenda/id1238649962) - An org-mode editor, outline, and scheduler with paid extensions +- [Bitwarden](https://apps.apple.com/us/app/bitwarden-password-manager/id1137397744) (`*`) - An open source password manager +- [Cryptomator](https://apps.apple.com/us/app/cryptomator/id1560822163) - A cross-platform encryption program +- [Obsidian](https://apps.apple.com/us/app/obsidian-connected-notes/id1557175442) (`*`) - A nice Markdown-based editor based on a \"vault\" structure. Offers a paid sync solution and community extensions +- [Strongbox](https://apps.apple.com/us/app/strongbox-password-manager/id897283731) - Keepass password manager for iOS & macOS +- [UniFi Network](https://apps.apple.com/us/app/unifi/id1057750338) - View and manage most UniFi Network settings + +### Safari Extensions + +- [AdGuard](https://apps.apple.com/us/app/adguard-adblock-privacy/id1047223162) - + Ad blocker +- [Dark Reader](https://apps.apple.com/us/app/dark-reader-for-safari/id1438243180) - Dark mode for all the sites +- [PiPifier](https://apps.apple.com/us/app/pipifier/id1234771095) - Force videos to support PiP +- [Privacy Redirect](https://apps.apple.com/us/app/privacy-redirect/id1578144015) - Redirect select websites to others, usually to privacy-focused alternatives + +### Social Networking + +- [MultiTab T](https://apps.apple.com/us/app/multitab-for-tumblr/id1071533778) (`*`) - A gallery-based Tumblr client with some unique features, such as tab history and sync +- [Signal](https://apps.apple.com/us/app/signal-private-messenger/id874139669) (`*`) - A simple, powerful, and secure messenger +- [Three Cheers](https://testflight.apple.com/join/mpVk1qIy) - A client for Tildes.net with a design focus that matches the intent of Tildes +- [Voyager](https://apps.apple.com/us/app/voyager-for-lemmy/id6451429762) - A Lemmy client + +### Sports + +- [Apple Sports](https://apps.apple.com/us/app/apple-sports/id6446788829) - Apple\'s new sports app - lacks notifications and live events +- [UDisc](https://apps.apple.com/us/app/udisc-disc-golf/id1072228953) - Disc golf course maps, score cards, and more + +### Utilities + +- [Backblaze](https://apps.apple.com/us/app/backblaze/id628638330) - Quickly view and manage Backblaze b2 cloud storage +- [Mullvad VPN](https://apps.apple.com/us/app/mullvad-vpn/id1488466513) (`*`) - A private VPN service +- [OTP Auth](https://apps.apple.com/us/app/otp-auth/id659877384) (`*`) - A minimalistic OTP app with support for biometrics, custom icons, import/export, and iCloud sync +- [Plex Dash](https://apps.apple.com/us/app/plex-dash/id1500797677) - Stats about your Plex Media Server +- [Safari](https://apps.apple.com/us/app/safari/id1146562112) - iOS default browser +- [Unifi WiFiman](https://apps.apple.com/us/app/ubiquiti-wifiman/id1385561119) - Create visual layouts of WiFi strength and save heat maps to your phone + +## Web Apps & Shortcuts + +- [Brutalist Report](https://brutalist.report/) - Minimal news aggregator +- [_Cyber.Report](https://cyber.report/) - Cybersecurity news aggregator +- [Hacker News](https://news.ycombinator.com/) - Mostly technical news +- [NextDNS](https://nextdns.io/) - NextDNS statistics dashboard +- [Readspike](https://readspike.com/) - Minimal news aggregator diff --git a/content/wiki/ios.org b/content/wiki/ios.org deleted file mode 100644 index f28f20e..0000000 --- a/content/wiki/ios.org +++ /dev/null @@ -1,156 +0,0 @@ -#+title: iOS -#+date: <2024-03-13 Wed 08:00:00> - -Related: - -- [[/wiki/hardware.html][Hardware]] - -My primary mobile OS. Currently running iOS 17. This wiki page contains most of -the apps I have used at one point or another across my different iPhones. - -(=*=) = My favorites - -** Configuration - -*** Display - -- Light Mode - - 10:00 to 16:00 -- Dark Mode - - 16:00 to 10:00 - -*** Focus Modes - -- Personal Focus - - 06:00 to 21:00 - - Allow Notifications From: - - Alarms - - Calendar - - Contacts (1 person) - - Messages - - Phone - - Reminders - - Signal - - UniFi Protect -- Sleep Focus - - 21:00 to 06:00 - - Allow Notifications From: - - Alarms - - Contacts (1 person) - - Reminders - - Signal - -*** Privacy & Security - -I generally follow the [[https://en.wikipedia.org/wiki/Principle_of_least_privilege][principle of least privilege]] by only permitting the bare -minimum privileges and revoking as soon as they are no longer required. - -Here's the baseline I start with: - -- Disable: - - Analytics & Improvements - - Apple Advertising - - Apple ID > Sign-In & Security > Two-Factor Authentication - - Location Services > System Services > Product Improvement - - Tracking > Allow Apps to Request to Track - - Safari > Advanced > Privacy Preserving Ad Measurement -- Enable: - - Apple ID > iCloud > Advanced Data Protection - - Apple ID > Personal Information > Communication Preferences - - App Privacy Report - - Location Services only for Camera, Find My, UDisc, & WiFiman - (=While Using=) - - Safari > Prevent Cross-Site Tracking - - Safari > Hide IP Address - - Safari > Advanced > Advanced Tracking and Fingerprinting Protection - -** Native Apps - -*** Business - -- [[https://apps.apple.com/us/app/element-messenger/id1083446067][Element]] - A cross-platform messenger, based on Matrix -- [[https://apps.apple.com/us/app/linkedin-network-job-finder/id288429040][LinkedIn]] - One of the only social media apps I use - - -*** Developer Tools - -- [[https://testflight.apple.com/join/F2vK7xo4][Harbour]] - Easily manage your Portainer service -- [[https://apps.apple.com/us/app/ish-shell/id1436902243][iSH]] - A local shell with SSH functionality - -*** Entertainment - -- [[https://apps.apple.com/us/app/plex-watch-live-tv-and-movies/id383457673][Plex]] - A client for the Plex Media Server -- [[https://apps.apple.com/us/app/steam-mobile/id495369748][Steam]] - The top gaming marketplace for computers - -*** Lifestyle - -- [[https://apps.apple.com/us/app/home/id1110145103][Home]] (=*=) - Apple homekit powered smart home manager -- [[https://apps.apple.com/us/app/philips-hue/id1055281310][Hue]] - Philips Hue smart home manager -- [[https://apps.apple.com/us/app/irobot-home/id1012014442][iRobot]] - Manage iRobot Roomba devices -- [[https://apps.apple.com/us/app/unifi-protect/id1392492235][UniFi Protect]] - View and manage most UniFi Protect cameras and settings - -*** Music - -- [[https://apps.apple.com/us/app/apple-music/id1108187390][Apple Music]] (=*=) - Apple's native music streaming app -- [[https://apps.apple.com/us/app/plexamp/id1500797510][Plexamp]] (=*=) - Top-notch music app for your Plex Media Server, with a neural - network that provides excellent radio/shuffle suggestions - -*** News - -- [[https://apps.apple.com/us/app/netnewswire-rss-reader/id1480640210][NetNewsWire]] - A free and open source RSS reader for Mac, iPhone, and iPad - -*** Photo & Video - -- [[https://testflight.apple.com/join/Q6WyyEpS][Aislingeach]] - A quick way to generate and rate images from the Stable Horde -- [[https://apps.apple.com/us/app/unsplash/id1290631746][Unsplash]] - Premium images, mostly free - -*** Productivity - -- [[https://apps.apple.com/us/app/beorg-to-do-list-agenda/id1238649962][beorg]] (=*=) - An org-mode editor, outline, and scheduler with paid extensions -- [[https://apps.apple.com/us/app/bitwarden-password-manager/id1137397744][Bitwarden]] (=*=) - An open source password manager -- [[https://apps.apple.com/us/app/cryptomator/id1560822163][Cryptomator]] - A cross-platform encryption program -- [[https://apps.apple.com/us/app/obsidian-connected-notes/id1557175442][Obsidian]] - A nice Markdown-based editor based on a "vault" structure. - Offers a paid sync solution and community extensions -- [[https://apps.apple.com/us/app/strongbox-password-manager/id897283731][Strongbox]] - Keepass password manager for iOS & macOS -- [[https://apps.apple.com/us/app/unifi/id1057750338][UniFi Network]] - View and manage most UniFi Network settings - -*** Safari Extensions - -- [[https://apps.apple.com/us/app/adguard-adblock-privacy/id1047223162][AdGuard]] - Ad blocker -- [[https://apps.apple.com/us/app/dark-reader-for-safari/id1438243180][Dark Reader]] - Dark mode for all the sites -- [[https://apps.apple.com/us/app/pipifier/id1234771095][PiPifier]] - Force videos to support PiP -- [[https://apps.apple.com/us/app/privacy-redirect/id1578144015][Privacy Redirect]] - Redirect select websites to others, usually to - privacy-focused alternatives - -*** Social Networking - -- [[https://apps.apple.com/us/app/multitab-for-tumblr/id1071533778][MultiTab T]] (=*=) - A gallery-based Tumblr client with some unique features, - such as tab history and sync -- [[https://apps.apple.com/us/app/signal-private-messenger/id874139669][Signal]] (=*=) - A simple, powerful, and secure messenger -- [[https://testflight.apple.com/join/mpVk1qIy][Three Cheers]] - A client for Tildes.net with a design focus that matches the - intent of Tildes -- [[https://apps.apple.com/us/app/voyager-for-lemmy/id6451429762][Voyager]] - A Lemmy client - -*** Sports - -- [[https://apps.apple.com/us/app/apple-sports/id6446788829][Apple Sports]] - Apple's new sports app - lacks notifications and live events -- [[https://apps.apple.com/us/app/udisc-disc-golf/id1072228953][UDisc]] - Disc golf course maps, score cards, and more - -*** Utilities - -- [[https://apps.apple.com/us/app/backblaze/id628638330][Backblaze]] - Quickly view and manage Backblaze b2 cloud storage -- [[https://apps.apple.com/us/app/mullvad-vpn/id1488466513][Mullvad VPN]] (=*=) - A private VPN service -- [[https://apps.apple.com/us/app/otp-auth/id659877384][OTP Auth]] (=*=) - A minimalistic OTP app with support for biometrics, custom - icons, import/export, and iCloud sync -- [[https://apps.apple.com/us/app/plex-dash/id1500797677][Plex Dash]] - Stats about your Plex Media Server -- [[https://apps.apple.com/us/app/safari/id1146562112][Safari]] - iOS default browser -- [[https://apps.apple.com/us/app/ubiquiti-wifiman/id1385561119][Unifi WiFiman]] - Create visual layouts of WiFi strength and save heat maps to - your phone - -** Web Apps & Shortcuts - -- [[https://brutalist.report/][Brutalist Report]] - Minimal news aggregator -- [[https://cyber.report/][_Cyber.Report]] - Cybersecurity news aggregator -- [[https://news.ycombinator.com/][Hacker News]] - Mostly technical news -- [[https://nextdns.io/][NextDNS]] - NextDNS statistics dashboard -- [[https://readspike.com/][Readspike]] - Minimal news aggregator diff --git a/content/wiki/linux.org b/content/wiki/linux.md index fe70bcf..a4787ca 100644 --- a/content/wiki/linux.org +++ b/content/wiki/linux.md @@ -1,21 +1,19 @@ -#+title: Linux -#+date: <2024-04-01 Mon 08:00:00> -#+draft: t ++++ +title = "Linux" +updated = 2024-03-07 +draft = true ++++ Related: -- [[/wiki/hardware.html][Hardware]] +- [Hardware](/wiki/hardware/) + +## Alpine Linux -** Alpine Linux -:PROPERTIES: -:CUSTOM_ID: alpine-linux -:END: My secondary laptop OS. -** Ubuntu Server -:PROPERTIES: -:CUSTOM_ID: ubuntu-server -:END: +## Ubuntu Server + My primary server OS. - Applications diff --git a/content/wiki/macos.md b/content/wiki/macos.md new file mode 100644 index 0000000..6a13d3d --- /dev/null +++ b/content/wiki/macos.md @@ -0,0 +1,148 @@ ++++ +title = "macOS" +updated = 2024-04-10 +draft = false ++++ + +Related: + +- [Hardware](/wiki/hardware/) + +My primary OS. Currently running macOS Sonoma 14. This wiki page contains most of the apps I have used at one point or another across my different Macbooks. + +(`*`) = My favorites + +## Configuration + +### Disable System Services + +- [Disabling and Enabling System Integrity + Protection](https://developer.apple.com/documentation/security/disabling_and_enabling_system_integrity_protection) +- Disable Gatekeeper: `sudo spctl --master-disable` + +### Dotfiles + +These are probably out of date, but they give a general idea of how I configure my machine. + +```conf +# ~/.zshrc +export PATH="/opt/homebrew/bin:$PATH" +export PATH="$HOME/.emacs.d/bin:$PATH" +export EDITOR="/opt/homebrew/bin/emacs -nw" +ZSH_THEME="bureau" +plugins=(git zsh-autosuggestions) +source $ZSH/oh-my-zsh.sh +``` + +```conf +# ~/.zprofile +eval "$(/opt/homebrew/bin/brew shellenv)" +``` + +```conf +# ~/.config/skhd/skhdrc +cmd - return : /Applications/iTerm.app/Contents/MacOS/iTerm2 +cmd + shift - return : /Applications/LibreWolf.app/Contents/MacOS/librewolf +``` + +```conf +# ~/.config/yabai/yabairc +yabai -m config \ + mouse_follows_focus off \ + focus_follows_mouse off \ + window_origin_display default \ + window_placement second_child \ + window_zoom_persist on \ + window_shadow on \ + window_animation_duration 0.0 \ + window_animation_frame_rate 120 \ + window_opacity_duration 0.0 \ + active_window_opacity 1.0 \ + normal_window_opacity 0.90 \ + window_opacity off \ + insert_feedback_color 0xffd75f5f \ + split_ratio 0.50 \ + split_type auto \ + auto_balance off \ + top_padding 15 \ + bottom_padding 15 \ + left_padding 15 \ + right_padding 15 \ + window_gap 10 \ + layout bsp \ + mouse_modifier fn \ + mouse_action1 move \ + mouse_action2 resize \ + mouse_drop_action swap +echo "yabai configuration loaded.." +``` + +## Software + +### Browsers + +- [Librewolf](https://librewolf.net/) (`*`) - Custom version of Firefox, focused on privacy and security + - [Bitwarden](https://bitwarden.com/) - An open source password manager + - [Dark Reader](https://darkreader.org/) - Dark mode for all the websites + - [Libredirect](https://libredirect.github.io/) - Automatic web redirections + - [Strongbox](https://strongboxsafe.com/) - Keepass password manager for iOS & macOS + - [uBlock Origin](https://ublockorigin.com/) - Free, open-source ad content blocker +- [Ungoogled Chromium](https://github.com/ungoogled-software/ungoogled-chromium) - Google Chromium, sans integration with Google +- [eww](https://www.gnu.org/software/emacs/manual/html_mono/eww.html) - Emacs Web Wowser, for TUI browsing + +### Communications + +- [Element](https://element.io/) (`*`) - Matrix\'s default GUI client +- [gomuks](https://github.com/tulir/gomuks) - A terminal based Matrix client +- [Thunderbird](https://www.thunderbird.net/) (`*`) - An open source email client by Mozilla +- [Signal](https://signal.org/) (`*`) - A simple, powerful, and secure messenger + +### Development + +- [Docker Desktop](https://www.docker.com/products/docker-desktop/) - Docker containers for your desktop + - [open-webui](https://github.com/open-webui/open-webui) - User-friendly WebUI for LLMs +- [iTerm2](https://iterm2.com/) (`*`) - The best terminal for macOS, hands down +- [Podman Desktop](https://podman-desktop.io/) (`*`) - Open source tool for containers and Kubernetes +- [Xcode](https://developer.apple.com/xcode/) - Apple\'s IDE +- [zsh](https://en.wikipedia.org/wiki/Z_shell) (`*`) - My shell preference due to its plugin and theme community + - [zsh-autosuggestions](https://github.com/zsh-users/zsh-autosuggestions) - Fish-like autosuggestions for zsh + - [zsh-syntax-highlighting](https://github.com/zsh-users/zsh-syntax-highlighting) - Fish shell like syntax highlighting for Zsh + +### Editors + +- [Doom Emacs](https://github.com/doomemacs/doomemacs) (`*`) - An Emacs framework, great for working in org-mode +- [Obsidian](https://obsidian.md/) - A nice Markdown-based editor based on a "vault" structure. Offers a paid sync solution and community extensions +- [Standard Notes](https://standardnotes.com/) - A simple text editor focused on privacy and security. Offers a paid sync solution and community extensions +- [VSCodium](https://vscodium.com/) - VS Code without proprietary blobs + +### Media + +- [Luminar](https://skylum.com/luminar) - Luminar offers top-notch photo editing features +- [Minecraft](https://www.minecraft.net/) - Block mining simulator +- [NetNewsWire](https://netnewswire.com/) - A free and open source RSS reader for Mac, iPhone, and iPad +- [Plex](https://www.plex.tv/) (`*`) - Desktop client for the Plex Media Server +- [Steam](https://store.steampowered.com/) - The top gaming marketplace for computers +- [Transmission](https://transmissionbt.com/) (`*`) - A Fast, Easy and Free Bittorrent Client +- [VLC](https://www.videolan.org/vlc/) - A free and open source cross-platform multimedia player + +### Package Management + +- [Homebrew](https://brew.sh/) (`*`) - The Missing Package Manager for macOS (or Linux) +- [MacPorts](https://www.macports.org/) - A system to compile, install, and manage open source software + +### Utilities + +- [Bartender 5](https://www.macbartender.com/Bartender5/) (`*`) - Easy control and customization over the native macOS menu bar +- [BetterDisplay](https://betterdisplay.pro/) - Allows you to tweak a ton of features of built-in and external screens, such as scaling, configuration overrides, and color/brightness upscaling +- [Bitwarden](https://bitwarden.com/) - An open source password manager +- [Ollama](https://ollama.com/) - Run Llama 2, Code Llama, and other models locally on your machine + - [Ollama Swift](https://github.com/kghandour/Ollama-SwiftUI) - User Interface made for Ollama.ai using Swift +- [LittleSnitch](https://obdev.at/products/littlesnitch/index.html) - Shows all network connections on your Macbook, including system and privileged services +- [MicroSnitch](https://obdev.at/products/microsnitch/index.html) - Camera & microphone monitoring and alterting service +- [Mullvad](https://mullvad.net/) (`*`) - A private VPN service +- [skhd](https://github.com/koekeishiya/skhd) (`*`) - Simple hotkey daemon for macOS +- [Strongbox](https://strongboxsafe.com/) - Keepass password manager for iOS & macOS +- [Syncthing](https://syncthing.net/) (`*`) - Continuous file synchronization +- [TinkerTool](https://www.bresink.com/osx/TinkerTool.html) - Unlock hidden configuration options for macOS +- [yabai](https://github.com/koekeishiya/yabai) (`*`) - Automatic window tiling +- [yt-dlp](https://github.com/yt-dlp/yt-dlp) - A youtube-dl fork with additional features and fixes diff --git a/content/wiki/macos.org b/content/wiki/macos.org deleted file mode 100644 index 0517c9b..0000000 --- a/content/wiki/macos.org +++ /dev/null @@ -1,152 +0,0 @@ -#+title: macOS -#+date: <2024-04-10 Wed 08:36:50> - -Related: - -- [[/wiki/hardware.html][Hardware]] - -My primary OS. Currently running macOS Sonoma 14. This wiki page contains most -of the apps I have used at one point or another across my different Macbooks. - -(=*=) = My favorites - -** Configuration - -*** Disable System Services - -- [[https://developer.apple.com/documentation/security/disabling_and_enabling_system_integrity_protection][Disabling and Enabling System Integrity Protection]] -- Disable Gatekeeper: =sudo spctl --master-disable= - -*** Dotfiles - -These are probably out of date, but they give a general idea of how I configure -my machine. - -#+begin_src config -# ~/.zshrc -export PATH="/opt/homebrew/bin:$PATH" -export PATH="$HOME/.emacs.d/bin:$PATH" -export EDITOR="/opt/homebrew/bin/emacs -nw" -ZSH_THEME="bureau" -plugins=(git zsh-autosuggestions) -source $ZSH/oh-my-zsh.sh -#+end_src - -#+begin_src config -# ~/.zprofile -eval "$(/opt/homebrew/bin/brew shellenv)" -#+end_src - -#+begin_src config -# ~/.config/skhd/skhdrc -cmd - return : /Applications/iTerm.app/Contents/MacOS/iTerm2 -cmd + shift - return : /Applications/LibreWolf.app/Contents/MacOS/librewolf -#+end_src - -#+begin_src config -# ~/.config/yabai/yabairc -yabai -m config \ - mouse_follows_focus off \ - focus_follows_mouse off \ - window_origin_display default \ - window_placement second_child \ - window_zoom_persist on \ - window_shadow on \ - window_animation_duration 0.0 \ - window_animation_frame_rate 120 \ - window_opacity_duration 0.0 \ - active_window_opacity 1.0 \ - normal_window_opacity 0.90 \ - window_opacity off \ - insert_feedback_color 0xffd75f5f \ - split_ratio 0.50 \ - split_type auto \ - auto_balance off \ - top_padding 15 \ - bottom_padding 15 \ - left_padding 15 \ - right_padding 15 \ - window_gap 10 \ - layout bsp \ - mouse_modifier fn \ - mouse_action1 move \ - mouse_action2 resize \ - mouse_drop_action swap -echo "yabai configuration loaded.." -#+end_src - -** Software - -*** Browsers - -- [[https://librewolf.net/][Librewolf]] (=*=) - Custom version of Firefox, focused on privacy and security - - [[https://bitwarden.com/][Bitwarden]] - An open source password manager - - [[https://darkreader.org/][Dark Reader]] - Dark mode for all the websites - - [[https://libredirect.github.io/][Libredirect]] - Automatic web redirections - - [[https://strongboxsafe.com/][Strongbox]] - Keepass password manager for iOS & macOS - - [[https://ublockorigin.com/][uBlock Origin]] - Free, open-source ad content blocker -- [[https://github.com/ungoogled-software/ungoogled-chromium][Ungoogled Chromium]] - Google Chromium, sans integration with Google -- [[https://www.gnu.org/software/emacs/manual/html_mono/eww.html][eww]] - Emacs Web Wowser, for TUI browsing - -*** Communications - -- [[https://element.io/][Element]] (=*=) - Matrix's default GUI client -- [[https://github.com/tulir/gomuks][gomuks]] - A terminal based Matrix client -- [[https://www.thunderbird.net/][Thunderbird]] (=*=) - An open source email client by Mozilla -- [[https://signal.org/][Signal]] (=*=) - A simple, powerful, and secure messenger - -*** Development - -- [[https://www.docker.com/products/docker-desktop/][Docker Desktop]] - Docker containers for your desktop - - [[https://github.com/open-webui/open-webui][open-webui]] - User-friendly WebUI for LLMs -- [[https://iterm2.com/][iTerm2]] (=*=) - The best terminal for macOS, hands down -- [[https://podman-desktop.io/][Podman Desktop]] (=*=) - Open source tool for containers and Kubernetes -- [[https://developer.apple.com/xcode/][Xcode]] - Apple's IDE -- [[https://en.wikipedia.org/wiki/Z_shell][zsh]] (=*=) - My shell preference due to its plugin and theme community - - [[https://github.com/zsh-users/zsh-autosuggestions][zsh-autosuggestions]] - Fish-like autosuggestions for zsh - - [[https://github.com/zsh-users/zsh-syntax-highlighting][zsh-syntax-highlighting]] - Fish shell like syntax highlighting for Zsh - -*** Editors - -- [[https://github.com/doomemacs/doomemacs][Doom Emacs]] (=*=) - An Emacs framework, great for working in org-mode -- [[https://obsidian.md/][Obsidian]] - A nice Markdown-based editor based on a "vault" structure. - Offers a paid sync solution and community extensions -- [[https://standardnotes.com/][Standard Notes]] - A simple text editor focused on privacy and security. Offers - a paid sync solution and community extensions -- [[https://vscodium.com/][VSCodium]] - VS Code without proprietary blobs - -*** Media - -- [[https://skylum.com/luminar][Luminar]] - Luminar offers top-notch photo editing features -- [[https://www.minecraft.net/][Minecraft]] - Block mining simulator -- [[https://netnewswire.com/][NetNewsWire]] - A free and open source RSS reader for Mac, iPhone, and iPad -- [[https://www.plex.tv/][Plex]] (=*=) - Desktop client for the Plex Media Server -- [[https://store.steampowered.com/][Steam]] - The top gaming marketplace for computers -- [[https://transmissionbt.com/][Transmission]] (=*=) - A Fast, Easy and Free Bittorrent Client -- [[https://www.videolan.org/vlc/][VLC]] - A free and open source cross-platform multimedia player - -** Package Management - -- [[https://brew.sh/][Homebrew]] (=*=) - The Missing Package Manager for macOS (or Linux) -- [[https://www.macports.org/][MacPorts]] - A system to compile, install, and manage open source software - -*** Utilities - -- [[https://www.macbartender.com/Bartender5/][Bartender 5]] (=*=) - Easy control and customization over the native macOS menu - bar -- [[https://betterdisplay.pro/][BetterDisplay]] - Allows you to tweak a ton of features of built-in and external - screens, such as scaling, configuration overrides, and color/brightness - upscaling -- [[https://bitwarden.com/][Bitwarden]] - An open source password manager -- [[https://ollama.com/][Ollama]] - Run Llama 2, Code Llama, and other models locally on your machine - - [[https://github.com/kghandour/Ollama-SwiftUI][Ollama Swift]] - User Interface made for Ollama.ai using Swift -- [[https://obdev.at/products/littlesnitch/index.html][LittleSnitch]] - Shows all network connections on your Macbook, including system - and privileged services -- [[https://obdev.at/products/microsnitch/index.html][MicroSnitch]] - Camera & microphone monitoring and alterting service -- [[https://mullvad.net/][Mullvad]] (=*=) - A private VPN service -- [[https://github.com/koekeishiya/skhd][skhd]] (=*=) - Simple hotkey daemon for macOS -- [[https://strongboxsafe.com/][Strongbox]] - Keepass password manager for iOS & macOS -- [[https://syncthing.net/][Syncthing]] (=*=) - Continuous file synchronization -- [[https://www.bresink.com/osx/TinkerTool.html][TinkerTool]] - Unlock hidden configuration options for macOS -- [[https://github.com/koekeishiya/yabai][yabai]] (=*=) - Automatic window tiling -- [[https://github.com/yt-dlp/yt-dlp][yt-dlp]] - A youtube-dl fork with additional features and fixes diff --git a/content/wiki/management.md b/content/wiki/management.md new file mode 100644 index 0000000..4bb3d58 --- /dev/null +++ b/content/wiki/management.md @@ -0,0 +1,11 @@ ++++ +title = "Management" +updated = 2024-03-07 +draft = true ++++ + +## Time Management + +## People Management + +## Project Management diff --git a/content/wiki/management.org b/content/wiki/management.org deleted file mode 100644 index 8f09d31..0000000 --- a/content/wiki/management.org +++ /dev/null @@ -1,16 +0,0 @@ -#+title: Management -#+date: <2024-04-01 Mon 08:00:00> -#+draft: t - -** Time Management -:PROPERTIES: -:CUSTOM_ID: time-management -:END: -** People Management -:PROPERTIES: -:CUSTOM_ID: people-management -:END: -** Project Management -:PROPERTIES: -:CUSTOM_ID: project-management -:END: diff --git a/content/wiki/minimalism.md b/content/wiki/minimalism.md new file mode 100644 index 0000000..b4e8d6b --- /dev/null +++ b/content/wiki/minimalism.md @@ -0,0 +1,5 @@ ++++ +title = "Minimalism" +updated = 2024-03-07 +draft = true ++++
\ No newline at end of file diff --git a/content/wiki/minimalism.org b/content/wiki/minimalism.org deleted file mode 100644 index f253ec2..0000000 --- a/content/wiki/minimalism.org +++ /dev/null @@ -1,3 +0,0 @@ -#+title: Minimalism -#+date: <2024-04-01 Mon 08:00:00> -#+draft: t diff --git a/content/wiki/networking.md b/content/wiki/networking.md new file mode 100644 index 0000000..09631cb --- /dev/null +++ b/content/wiki/networking.md @@ -0,0 +1,27 @@ ++++ +title = "Networking" +updated = 2024-03-07 +draft = true ++++ + +## Bluetooth + +## DNS + +## Gemini + +## Gopher + +## HTTP + +## IoT + +## Nginx + +## SSH + +## SSL + +## VPN + +## Wi-Fi diff --git a/content/wiki/networking.org b/content/wiki/networking.org deleted file mode 100644 index bebc61f..0000000 --- a/content/wiki/networking.org +++ /dev/null @@ -1,48 +0,0 @@ -#+title: Networking -#+date: <2024-04-01 Mon 08:00:00> -#+draft: t - -** Bluetooth -:PROPERTIES: -:CUSTOM_ID: bluetooth -:END: -** DNS -:PROPERTIES: -:CUSTOM_ID: dns -:END: -** Gemini -:PROPERTIES: -:CUSTOM_ID: gemini -:END: -** Gopher -:PROPERTIES: -:CUSTOM_ID: gopher -:END: -** HTTP -:PROPERTIES: -:CUSTOM_ID: http -:END: -** IoT -:PROPERTIES: -:CUSTOM_ID: iot -:END: -** Nginx -:PROPERTIES: -:CUSTOM_ID: nginx -:END: -** SSH -:PROPERTIES: -:CUSTOM_ID: ssh -:END: -** SSL -:PROPERTIES: -:CUSTOM_ID: ssl -:END: -** VPN -:PROPERTIES: -:CUSTOM_ID: vpn -:END: -** Wi-Fi -:PROPERTIES: -:CUSTOM_ID: wi-fi -:END: diff --git a/content/wiki/plaintext.md b/content/wiki/plaintext.md new file mode 100644 index 0000000..670b642 --- /dev/null +++ b/content/wiki/plaintext.md @@ -0,0 +1,11 @@ ++++ +title = "Plaintext" +updated = 2024-03-07 +draft = true ++++ + +## Markdown + +## Org-Mode + +## AsciiDoc diff --git a/content/wiki/plaintext.org b/content/wiki/plaintext.org deleted file mode 100644 index 05431c4..0000000 --- a/content/wiki/plaintext.org +++ /dev/null @@ -1,16 +0,0 @@ -#+title: Plaintext -#+date: <2024-04-01 Mon 08:00:00> -#+draft: t - -** Markdown -:PROPERTIES: -:CUSTOM_ID: markdown -:END: -** Org-Mode -:PROPERTIES: -:CUSTOM_ID: org-mode -:END: -** AsciiDoc -:PROPERTIES: -:CUSTOM_ID: asciidoc -:END: diff --git a/content/wiki/privacy.md b/content/wiki/privacy.md new file mode 100644 index 0000000..6969c4b --- /dev/null +++ b/content/wiki/privacy.md @@ -0,0 +1,5 @@ ++++ +title = "Privacy" +updated = 2024-03-07 +draft = true ++++
\ No newline at end of file diff --git a/content/wiki/privacy.org b/content/wiki/privacy.org deleted file mode 100644 index 094ebc8..0000000 --- a/content/wiki/privacy.org +++ /dev/null @@ -1,3 +0,0 @@ -#+title: Privacy -#+date: <2024-04-01 Mon 08:00:00> -#+draft: t diff --git a/content/wiki/python.md b/content/wiki/python.md new file mode 100644 index 0000000..3244c24 --- /dev/null +++ b/content/wiki/python.md @@ -0,0 +1,5 @@ ++++ +title = "Python" +updated = 2024-03-07 +draft = true ++++
\ No newline at end of file diff --git a/content/wiki/python.org b/content/wiki/python.org deleted file mode 100644 index 33166ba..0000000 --- a/content/wiki/python.org +++ /dev/null @@ -1,3 +0,0 @@ -#+title: Python -#+date: <2024-04-01 Mon 08:00:00> -#+draft: t diff --git a/content/wiki/security.md b/content/wiki/security.md new file mode 100644 index 0000000..cb5dc8d --- /dev/null +++ b/content/wiki/security.md @@ -0,0 +1,5 @@ ++++ +title = "Security" +updated = 2024-03-07 +draft = true ++++
\ No newline at end of file diff --git a/content/wiki/security.org b/content/wiki/security.org deleted file mode 100644 index f483b35..0000000 --- a/content/wiki/security.org +++ /dev/null @@ -1,3 +0,0 @@ -#+title: Security -#+date: <2024-04-01 Mon 08:00:00> -#+draft: t diff --git a/content/wiki/selfhosted.md b/content/wiki/selfhosted.md new file mode 100644 index 0000000..acc884c --- /dev/null +++ b/content/wiki/selfhosted.md @@ -0,0 +1,5 @@ ++++ +title = "Self-Hosted" +updated = 2024-03-07 +draft = true ++++
\ No newline at end of file diff --git a/content/wiki/selfhosted.org b/content/wiki/selfhosted.org deleted file mode 100644 index 6e415ba..0000000 --- a/content/wiki/selfhosted.org +++ /dev/null @@ -1,3 +0,0 @@ -#+title: Self-Hosting -#+date: <2024-04-01 Mon 08:00:00> -#+draft: t diff --git a/content/wiki/windows.md b/content/wiki/windows.md new file mode 100644 index 0000000..1c71c90 --- /dev/null +++ b/content/wiki/windows.md @@ -0,0 +1,18 @@ ++++ +title = "Windows" +updated = 2024-03-07 +draft = true ++++ + +## Windows (Work) + +I am required to use a Windows 10 laptop for work, but I have some +limited customization options. + +- Alteryx +- Notepad++ +- Obsidian +- Power BI +- Task Scheduler + - Auto Dark Mode + - Auto Light Mode diff --git a/content/wiki/windows.org b/content/wiki/windows.org deleted file mode 100644 index 9464e7e..0000000 --- a/content/wiki/windows.org +++ /dev/null @@ -1,18 +0,0 @@ -#+title: Windows -#+date: <2024-04-01 Mon 08:00:00> -#+draft: t - -** Windows (Work) -:PROPERTIES: -:CUSTOM_ID: windows-work -:END: -I am required to use a Windows 10 laptop for work, but I have some -limited customization options. - -- Alteryx -- Notepad++ -- Obsidian -- Power BI -- Task Scheduler - - Auto Dark Mode - - Auto Light Mode diff --git a/nginx-dev.conf b/nginx-dev.conf deleted file mode 100755 index ed94af7..0000000 --- a/nginx-dev.conf +++ /dev/null @@ -1,17 +0,0 @@ -server { - server_name cleberg.net www.cleberg.net; - - root /usr/share/nginx/html; - index index.html; - autoindex on; - - access_log /var/log/nginx/cleberg.net.access.log; - error_log /var/log/nginx/cleberg.net.error.log; - - location / { - try_files $uri $uri/ =404; - } - - listen [::]:80; - listen 80; -} diff --git a/publish.el b/publish.el deleted file mode 100644 index aa3b74a..0000000 --- a/publish.el +++ /dev/null @@ -1,98 +0,0 @@ -;; explicity load packages since I'm using Doom Emacs -(add-to-list 'load-path "~/.emacs.d/.local/straight/repos/emacs-htmlize") -(add-to-list 'load-path "~/.emacs.d/.local/straight/repos/weblorg") -(add-to-list 'load-path "~/.emacs.d/.local/straight/repos/templatel") -(require 'htmlize) -(require 'weblorg) - -;; defaults to http://localhost:8000 -;; ENV=prod emacs --script publish.el -(if (string= (getenv "ENV") "prod") - (setq weblorg-default-url "https://cleberg.net")) - -(weblorg-site - :theme nil - :template-vars '(("site_name" . "cleberg.net") - ("site_owner" . "Christian Cleberg <hello@cleberg.net>") - ("site_description" . "Just a blip of ones and zeroes."))) - -;; route for rendering the index page of the website -(weblorg-route - :name "index" - :input-pattern "content/index.org" - :template "index.html" - :output ".build/index.html" - :url "/") - -;; route for rendering each post -(weblorg-route - :name "blog" - :input-pattern "content/blog/*.org" - :template "post.html" - :output ".build/blog/{{ slug }}.html" - :url "/blog/{{ slug }}.html") - -;; route for rendering the index page of the blog -(weblorg-route - :name "blog-index" - :input-pattern "content/blog/*.org" - :input-aggregate #'weblorg-input-aggregate-all-desc - :template "blog.html" - :output ".build/blog/index.html" - :url "/blog/") - -;; route for rendering each wiki post -(weblorg-route - :name "wiki" - :input-pattern "content/wiki/*.org" - :template "post.html" - :output ".build/wiki/{{ slug }}.html" - :url "/wiki/{{ slug }}.html") - -;; route for rendering the index page of the wiki -(weblorg-route - :name "wiki-index" - :input-pattern "content/wiki/*.org" - :input-aggregate #'weblorg-input-aggregate-all - :template "wiki.html" - :output ".build/wiki/index.html" - :url "/wiki/") - -;; route for rendering each page -(weblorg-route - :name "pages" - :input-pattern "content/*.org" - :template "page.html" - :output ".build/{{ slug }}.html" - :url "/{{ slug }}.html") - -(weblorg-route - :name "salary" - :input-pattern "content/salary/*.org" - :template "page.html" - :output ".build/salary/{{ slug }}.html" - :url "/salary/{{ slug }}.html") - -(weblorg-route - :name "services" - :input-pattern "content/services/*.org" - :template "page.html" - :output ".build/services/{{ slug }}.html" - :url "/services/{{ slug }}.html") - -;; RSS Feed -(weblorg-route - :name "rss" - :input-pattern "content/blog/*.org" - :input-aggregate #'weblorg-input-aggregate-all-desc - :template "feed.xml" - :output ".build/feed.xml" - :url "/feed.xml") - -;; route for static assets that also copies files to .build directory -(weblorg-copy-static - :output ".build/{{ file }}" - :url "/{{ file }}") - -;; fire the engine and export all the files declared in the routes above -(weblorg-export) diff --git a/theme/static/.well-known/security.txt b/static/.well-known/security.txt index 65d5ae7..65d5ae7 100644 --- a/theme/static/.well-known/security.txt +++ b/static/.well-known/security.txt diff --git a/theme/static/gpg.txt b/static/gpg.txt index 93b642d..93b642d 100644 --- a/theme/static/gpg.txt +++ b/static/gpg.txt diff --git a/theme/static/robots.txt b/static/robots.txt index a252a5f..a252a5f 100644 --- a/theme/static/robots.txt +++ b/static/robots.txt diff --git a/static/styles.css b/static/styles.css new file mode 100644 index 0000000..232a935 --- /dev/null +++ b/static/styles.css @@ -0,0 +1,562 @@ +/*! normalize.css v8.0.1 | MIT License | github.com/necolas/normalize.css */ + +/* Document + ========================================================================== */ + +/** + * 1. Correct the line height in all browsers. + * 2. Prevent adjustments of font size after orientation changes in iOS. + */ + +html { + line-height: 1.15; /* 1 */ + -webkit-text-size-adjust: 100%; /* 2 */ +} + +/* Sections + ========================================================================== */ + +/** + * Remove the margin in all browsers. + */ + +body { + margin: 0; +} + +/** + * Render the `main` element consistently in IE. + */ + +main { + display: block; +} + +/** + * Correct the font size and margin on `h1` elements within `section` and + * `article` contexts in Chrome, Firefox, and Safari. + */ + +h1 { + font-size: 2em; + margin: 0.67em 0; +} + +/* Grouping content + ========================================================================== */ + +/** + * 1. Add the correct box sizing in Firefox. + * 2. Show the overflow in Edge and IE. + */ + +hr { + box-sizing: content-box; /* 1 */ + height: 0; /* 1 */ + overflow: visible; /* 2 */ +} + +/** + * 1. Correct the inheritance and scaling of font size in all browsers. + * 2. Correct the odd `em` font sizing in all browsers. + */ + +pre { + font-family: monospace, monospace; /* 1 */ + font-size: 1em; /* 2 */ +} + +/* Text-level semantics + ========================================================================== */ + +/** + * Remove the gray background on active links in IE 10. + */ + +a { + background-color: transparent; +} + +/** + * 1. Remove the bottom border in Chrome 57- + * 2. Add the correct text decoration in Chrome, Edge, IE, Opera, and Safari. + */ + +abbr[title] { + border-bottom: none; /* 1 */ + text-decoration: underline; /* 2 */ + text-decoration: underline dotted; /* 2 */ +} + +/** + * Add the correct font weight in Chrome, Edge, and Safari. + */ + +b, +strong { + font-weight: bolder; +} + +/** + * 1. Correct the inheritance and scaling of font size in all browsers. + * 2. Correct the odd `em` font sizing in all browsers. + */ + +code, +kbd, +samp { + font-family: monospace, monospace; /* 1 */ + font-size: 1em; /* 2 */ +} + +/** + * Add the correct font size in all browsers. + */ + +small { + font-size: 80%; +} + +/** + * Prevent `sub` and `sup` elements from affecting the line height in + * all browsers. + */ + +sub, +sup { + font-size: 75%; + line-height: 0; + position: relative; + vertical-align: baseline; +} + +sub { + bottom: -0.25em; +} + +sup { + top: -0.5em; +} + +/* Embedded content + ========================================================================== */ + +/** + * Remove the border on images inside links in IE 10. + */ + +img { + border-style: none; +} + +/* Forms + ========================================================================== */ + +/** + * 1. Change the font styles in all browsers. + * 2. Remove the margin in Firefox and Safari. + */ + +button, +input, +optgroup, +select, +textarea { + font-family: inherit; /* 1 */ + font-size: 100%; /* 1 */ + line-height: 1.15; /* 1 */ + margin: 0; /* 2 */ +} + +/** + * Show the overflow in IE. + * 1. Show the overflow in Edge. + */ + +button, +input { + /* 1 */ + overflow: visible; +} + +/** + * Remove the inheritance of text transform in Edge, Firefox, and IE. + * 1. Remove the inheritance of text transform in Firefox. + */ + +button, +select { + /* 1 */ + text-transform: none; +} + +/** + * Correct the inability to style clickable types in iOS and Safari. + */ + +button, +[type="button"], +[type="reset"], +[type="submit"] { + -webkit-appearance: button; +} + +/** + * Remove the inner border and padding in Firefox. + */ + +button::-moz-focus-inner, +[type="button"]::-moz-focus-inner, +[type="reset"]::-moz-focus-inner, +[type="submit"]::-moz-focus-inner { + border-style: none; + padding: 0; +} + +/** + * Restore the focus styles unset by the previous rule. + */ + +button:-moz-focusring, +[type="button"]:-moz-focusring, +[type="reset"]:-moz-focusring, +[type="submit"]:-moz-focusring { + outline: 1px dotted ButtonText; +} + +/** + * Correct the padding in Firefox. + */ + +fieldset { + padding: 0.35em 0.75em 0.625em; +} + +/** + * 1. Correct the text wrapping in Edge and IE. + * 2. Correct the color inheritance from `fieldset` elements in IE. + * 3. Remove the padding so developers are not caught out when they zero out + * `fieldset` elements in all browsers. + */ + +legend { + box-sizing: border-box; /* 1 */ + color: inherit; /* 2 */ + display: table; /* 1 */ + max-width: 100%; /* 1 */ + padding: 0; /* 3 */ + white-space: normal; /* 1 */ +} + +/** + * Add the correct vertical alignment in Chrome, Firefox, and Opera. + */ + +progress { + vertical-align: baseline; +} + +/** + * Remove the default vertical scrollbar in IE 10+. + */ + +textarea { + overflow: auto; +} + +/** + * 1. Add the correct box sizing in IE 10. + * 2. Remove the padding in IE 10. + */ + +[type="checkbox"], +[type="radio"] { + box-sizing: border-box; /* 1 */ + padding: 0; /* 2 */ +} + +/** + * Correct the cursor style of increment and decrement buttons in Chrome. + */ + +[type="number"]::-webkit-inner-spin-button, +[type="number"]::-webkit-outer-spin-button { + height: auto; +} + +/** + * 1. Correct the odd appearance in Chrome and Safari. + * 2. Correct the outline style in Safari. + */ + +[type="search"] { + -webkit-appearance: textfield; /* 1 */ + outline-offset: -2px; /* 2 */ +} + +/** + * Remove the inner padding in Chrome and Safari on macOS. + */ + +[type="search"]::-webkit-search-decoration { + -webkit-appearance: none; +} + +/** + * 1. Correct the inability to style clickable types in iOS and Safari. + * 2. Change font properties to `inherit` in Safari. + */ + +::-webkit-file-upload-button { + -webkit-appearance: button; /* 1 */ + font: inherit; /* 2 */ +} + +/* Interactive + ========================================================================== */ + +/* + * Add the correct display in Edge, IE 10+, and Firefox. + */ + +details { + display: block; +} + +/* + * Add the correct display in all browsers. + */ + +summary { + display: list-item; +} + +/* Misc + ========================================================================== */ + +/** + * Add the correct display in IE 10+. + */ + +template { + display: none; +} + +/** + * Add the correct display in IE 10. + */ + +[hidden] { + display: none; +} + +/* CUSTOM CSS */ +:root { + --bg: #fff; + --bg-bright: #eee; + --fg: #111; + --link: #00f; + --code: #f00; + --border: #ccc; +} + +@media (prefers-reduced-motion: no-preference) { + :root { + scroll-behavior: smooth; + } +} + +body { + background-color: var(--bg); + color: var(--fg); + font-family: Menlo, Consolas, Monaco, Liberation Mono, Lucida Console, + monospace; + font-size: 0.9rem; + line-height: 1.5; + max-width: 50em; + margin: 0 auto; + padding: 0 1rem; +} + +.site-nav, +footer { + border-color: var(--fg); +} + +footer { + border-top: 1px dotted; + padding-top: 1rem; + margin: 1rem 0; +} + +footer p { + margin: 0; +} + +.site-nav { + border-bottom: 1px dotted; +} + +.site-nav ul { + list-style-type: none; + display: flex; + align-items: center; + padding: 0; +} + +.site-nav ul li { + margin-right: 0.5rem; +} + +h1, +h2, +h3, +h4 { + color: var(--fg); +} + +a, +a:visited { + color: var(--link); + text-decoration: none; +} + +a:hover { + text-decoration: underline; +} + +img { + width: 100%; +} + +table { + border-collapse: collapse; + color: var(--fg); + border-color: var(--bg-bright); + font-family: Menlo, Consolas, Monaco, Liberation Mono, Lucida Console, + monospace; + font-size: 0.9rem; +} + +thead, +th, +tr, +td { + border: 1px solid var(--border); + padding: 0.25rem; +} + +pre > code, +time, +code { + font-family: Menlo, Consolas, Monaco, Liberation Mono, Lucida Console, + monospace; + font-size: inherit; +} + +pre { + background-color: var(--bg-bright) !important; + margin: 0.5rem 0; + padding: 0.5rem; + overflow-x: auto; +} + +:not(pre) > code { + color: var(--code); + font-family: inherit; +} + +aside { + background-color: var(--bg-bright); + padding: 1rem; +} + +blockquote { + background-color: var(--bg-bright); + border-left: 5px solid var(--link); + margin: 1rem 0; + padding: 0.5rem 1rem; +} + +blockquote p { + margin: 0; +} + +.post, +.wiki-post { + display: flex; +} + +.post time { + flex-shrink: 0; + margin-right: 0.5rem; +} + +.wiki-post { + justify-content: space-between; +} + +.wiki-post:first-of-type { + border-bottom: 1px dotted var(--fg); + margin-bottom: 1rem; +} + +.wiki-post p { + margin: 0; +} + +.post-metadata { + border: 1px dotted var(--fg); + border-top: none; + padding: 1rem; +} + +.post-metadata h1 { + margin: 0; +} + +.post-metadata p { + margin: 0; +} + +details { + margin-top: 1rem; +} + +summary { + font-weight: bold; +} + +.footnote-definition { + display: flex; + justify-content: flex-start; + align-items: top; + margin: 1rem 0; +} + +.footnote-definition sup { + font-size: inherit; + top: 0; + line-height: inherit; + padding-right: 0.5rem; +} + +.footnote-definition sup::after { + content: "."; +} + +.footnote-definition p { + display: inline-block; + margin: 0; +} + +@media (prefers-color-scheme: dark) { + :root { + --bg: #141617; + --bg-bright: #191c1d; + --fg: #b2aea9; + --link: #ff79c6; + --code: #ffb454; + --border: #333; + } +} diff --git a/static/styles.min.css b/static/styles.min.css new file mode 100644 index 0000000..f42cf24 --- /dev/null +++ b/static/styles.min.css @@ -0,0 +1 @@ +/*!normalize.css v8.0.1 | MIT License | github.com/necolas/normalize.css*/html{line-height:1.15;-webkit-text-size-adjust:100%}body{margin:0}main{display:block}h1{font-size:2em;margin:.67em 0}hr{box-sizing:content-box;height:0;overflow:visible}pre{font-family:monospace,monospace;font-size:1em}a{background-color:initial}abbr[title]{border-bottom:none;text-decoration:underline;text-decoration:underline dotted}b,strong{font-weight:bolder}code,kbd,samp{font-family:monospace,monospace;font-size:1em}small{font-size:80%}sub,sup{font-size:75%;line-height:0;position:relative;vertical-align:baseline}sub{bottom:-.25em}sup{top:-.5em}img{border-style:none}button,input,optgroup,select,textarea{font-family:inherit;font-size:100%;line-height:1.15;margin:0}button,input{overflow:visible}button,select{text-transform:none}button,[type=button],[type=reset],[type=submit]{-webkit-appearance:button}button::-moz-focus-inner,[type=button]::-moz-focus-inner,[type=reset]::-moz-focus-inner,[type=submit]::-moz-focus-inner{border-style:none;padding:0}button:-moz-focusring,[type=button]:-moz-focusring,[type=reset]:-moz-focusring,[type=submit]:-moz-focusring{outline:1px dotted ButtonText}fieldset{padding:.35em .75em .625em}legend{box-sizing:border-box;color:inherit;display:table;max-width:100%;padding:0;white-space:normal}progress{vertical-align:baseline}textarea{overflow:auto}[type=checkbox],[type=radio]{box-sizing:border-box;padding:0}[type=number]::-webkit-inner-spin-button,[type=number]::-webkit-outer-spin-button{height:auto}[type=search]{-webkit-appearance:textfield;outline-offset:-2px}[type=search]::-webkit-search-decoration{-webkit-appearance:none}::-webkit-file-upload-button{-webkit-appearance:button;font:inherit}details{display:block}summary{display:list-item}template{display:none}[hidden]{display:none}:root{--bg:#fff;--bg-bright:#eee;--fg:#111;--link:#00f;--code:#f00;--border:#ccc}@media(prefers-reduced-motion:no-preference){:root{scroll-behavior:smooth}}body{background-color:var(--bg);color:var(--fg);font-family:Menlo,Consolas,Monaco,Liberation Mono,Lucida Console,monospace;font-size:.9rem;line-height:1.5;max-width:50em;margin:0 auto;padding:0 1rem}.site-nav,footer{border-color:var(--fg)}footer{border-top:1px dotted;padding-top:1rem;margin:1rem 0}footer p{margin:0}.site-nav{border-bottom:1px dotted}.site-nav ul{list-style-type:none;display:flex;align-items:center;padding:0}.site-nav ul li{margin-right:.5rem}h1,h2,h3,h4{color:var(--fg)}a,a:visited{color:var(--link);text-decoration:none}a:hover{text-decoration:underline}img{width:100%}table{border-collapse:collapse;color:var(--fg);border-color:var(--bg-bright);font-family:Menlo,Consolas,Monaco,Liberation Mono,Lucida Console,monospace;font-size:.9rem}thead,th,tr,td{border:1px solid var(--border);padding:.25rem}pre>code,time,code{font-family:Menlo,Consolas,Monaco,Liberation Mono,Lucida Console,monospace;font-size:inherit}pre{background-color:var(--bg-bright)!important;margin:.5rem 0;padding:.5rem;overflow-x:auto}:not(pre)>code{color:var(--code);font-family:inherit}aside{background-color:var(--bg-bright);padding:1rem}blockquote{background-color:var(--bg-bright);border-left:5px solid var(--link);margin:1rem 0;padding:.5rem 1rem}blockquote p{margin:0}.post,.wiki-post{display:flex}.post time{flex-shrink:0;margin-right:.5rem}.wiki-post{justify-content:space-between}.wiki-post:first-of-type{border-bottom:1px dotted var(--fg);margin-bottom:1rem}.wiki-post p{margin:0}.post-metadata{border:1px dotted var(--fg);border-top:none;padding:1rem}.post-metadata h1{margin:0}.post-metadata p{margin:0}details{margin-top:1rem}summary{font-weight:700}.footnote-definition{display:flex;justify-content:flex-start;align-items:top;margin:1rem 0}.footnote-definition sup{font-size:inherit;top:0;line-height:inherit;padding-right:.5rem}.footnote-definition sup::after{content:"."}.footnote-definition p{display:inline-block;margin:0}@media(prefers-color-scheme:dark){:root{--bg:#141617;--bg-bright:#191c1d;--fg:#b2aea9;--link:#ff79c6;--code:#ffb454;--border:#333}}
\ No newline at end of file diff --git a/static/syntax-theme-dark.css b/static/syntax-theme-dark.css new file mode 100644 index 0000000..75cf13b --- /dev/null +++ b/static/syntax-theme-dark.css @@ -0,0 +1,280 @@ +/* + * theme "ayu" generated by syntect + */ + +.z-code { + color: #bfbab0; + background-color: #0f1419; +} + +.z-comment, .z-punctuation.z-definition.z-comment { + color: #5c6773; +font-style: italic; +} +.z-variable { + color: #bfbab0; +} +.z-string, .z-constant.z-other.z-symbol { + color: #c2d94c; +} +.z-constant.z-numeric { + color: #f29718; +} +.z-string.z-regexp, .z-constant.z-character.z-escape { + color: #95e6cb; +} +.z-constant.z-language { + color: #f29718; +} +.z-constant.z-character, .z-constant.z-other { + color: #f29718; +} +.z-variable.z-member { + color: #ec5f67; +} +.z-keyword, .z-keyword.z-operator.z-word { + color: #ff7733; +} +.z-keyword.z-operator { + color: #f29668; +} +.z-punctuation.z-separator, .z-punctuation.z-terminator { + color: #bfbab0; +} +.z-punctuation.z-section { + color: #bfbab0; +} +.z-punctuation.z-accessor { + color: #f29668; +} +.z-punctuation.z-definition.z-annotation { + color: #bfbab0; +} +.z-variable.z-other.z-dollar.z-only.z-js, .z-variable.z-other.z-object.z-dollar.z-only.z-js, .z-variable.z-type.z-dollar.z-only.z-js, .z-support.z-class.z-dollar.z-only.z-js { + color: #e6b673; +} +.z-storage { + color: #ff7733; +} +.z-storage.z-type { + color: #ff7733; +} +.z-entity.z-name.z-function { + color: #ffb454; +} +.z-entity.z-name, .z-entity.z-name.z-tag, .z-entity.z-name.z-label) { + color: #59c2ff; +} +.z-entity.z-other.z-inherited-class { + color: #59c2ff; +text-decoration: underline; +} +.z-variable.z-parameter { + color: #f29718; +} +.z-variable.z-language { + color: #39bae6; +font-style: italic; +} +.z-entity.z-name.z-tag, .z-meta.z-tag.z-sgml { + color: #39bae6; +} +.z-punctuation.z-definition.z-tag.z-end, .z-punctuation.z-definition.z-tag.z-begin, .z-punctuation.z-definition.z-tag { + color: #39bae6; +} +.z-entity.z-other.z-attribute-name { + color: #ffb454; +} +.z-variable.z-function, .z-variable.z-annotation { + color: #ffb454; +} +.z-support.z-function, .z-support.z-macro { + color: #f07178; +} +.z-support.z-constant { + color: #f29668; +font-style: italic; +} +.z-support.z-type, .z-support.z-class { + color: #39bae6; +font-style: italic; +} +.z-invalid { + color: #ff3333; +} +.z-invalid.z-deprecated { + color: #ffffff; + background-color: #ff7733; +} +.z-meta.z-diff, .z-meta.z-diff.z-header { + color: #c594c5; +} +.z-source.z-ruby .z-variable.z-other.z-readwrite { + color: #ffb454; +} +.z-source.z-css .z-entity.z-name.z-tag, .z-source.z-sass .z-entity.z-name.z-tag, .z-source.z-scss .z-entity.z-name.z-tag, .z-source.z-less .z-entity.z-name.z-tag, .z-source.z-stylus .z-entity.z-name.z-tag { + color: #59c2ff; +} +.z-source.z-css .z-support.z-type, .z-source.z-sass .z-support.z-type, .z-source.z-scss .z-support.z-type, .z-source.z-less .z-support.z-type, .z-source.z-stylus .z-support.z-type { + color: #5c6773; +} +.z-support.z-type.z-property-name { + color: #39bae6; +} +.z-constant.z-numeric.z-line-number.z-find-in-files { + color: #5c6773; +} +.z-constant.z-numeric.z-line-number.z-match { + color: #ff7733; +} +.z-entity.z-name.z-filename.z-find-in-files { + color: #c2d94c; +} +.z-message.z-error { + color: #ff3333; +} +.z-source.z-json .z-meta .z-meta .z-meta .z-meta .z-meta .z-meta .z-meta .z-meta .z-meta .z-meta .z-meta .z-meta .z-meta .z-meta .z-meta .z-meta.z-structure.z-dictionary.z-json .z-string.z-quoted.z-double.z-json, .z-source.z-json .z-meta .z-meta .z-meta .z-meta .z-meta .z-meta .z-meta .z-meta .z-meta .z-meta .z-meta .z-meta .z-meta .z-meta .z-meta .z-meta.z-structure.z-dictionary.z-json .z-punctuation.z-definition.z-string { + color: #39bae6; +} +.z-source.z-json .z-meta .z-meta .z-meta .z-meta .z-meta .z-meta .z-meta .z-meta .z-meta .z-meta .z-meta .z-meta .z-meta .z-meta.z-structure.z-dictionary.z-json .z-string.z-quoted.z-double.z-json, .z-source.z-json .z-meta .z-meta .z-meta .z-meta .z-meta .z-meta .z-meta .z-meta .z-meta .z-meta .z-meta .z-meta .z-meta .z-meta.z-structure.z-dictionary.z-json .z-punctuation.z-definition.z-string { + color: #39bae6; +} +.z-source.z-json .z-meta .z-meta .z-meta .z-meta .z-meta .z-meta .z-meta .z-meta .z-meta .z-meta .z-meta .z-meta.z-structure.z-dictionary.z-json .z-string.z-quoted.z-double.z-json, .z-source.z-json .z-meta .z-meta .z-meta .z-meta .z-meta .z-meta .z-meta .z-meta .z-meta .z-meta .z-meta .z-meta.z-structure.z-dictionary.z-json .z-punctuation.z-definition.z-string { + color: #39bae6; +} +.z-source.z-json .z-meta .z-meta .z-meta .z-meta .z-meta .z-meta .z-meta .z-meta .z-meta .z-meta.z-structure.z-dictionary.z-json .z-string.z-quoted.z-double.z-json, .z-source.z-json .z-meta .z-meta .z-meta .z-meta .z-meta .z-meta .z-meta .z-meta .z-meta .z-meta.z-structure.z-dictionary.z-json .z-punctuation.z-definition.z-string { + color: #39bae6; +} +.z-source.z-json .z-meta .z-meta .z-meta .z-meta .z-meta .z-meta .z-meta .z-meta.z-structure.z-dictionary.z-json .z-string.z-quoted.z-double.z-json, .z-source.z-json .z-meta .z-meta .z-meta .z-meta .z-meta .z-meta .z-meta .z-meta.z-structure.z-dictionary.z-json .z-punctuation.z-definition.z-string { + color: #39bae6; +} +.z-source.z-json .z-meta .z-meta .z-meta .z-meta .z-meta .z-meta.z-structure.z-dictionary.z-json .z-string.z-quoted.z-double.z-json, .z-source.z-json .z-meta .z-meta .z-meta .z-meta .z-meta .z-meta.z-structure.z-dictionary.z-json .z-punctuation.z-definition.z-string { + color: #39bae6; +} +.z-source.z-json .z-meta .z-meta .z-meta .z-meta.z-structure.z-dictionary.z-json .z-string.z-quoted.z-double.z-json, .z-source.z-json .z-meta .z-meta .z-meta .z-meta.z-structure.z-dictionary.z-json .z-punctuation.z-definition.z-string { + color: #39bae6; +} +.z-source.z-json .z-meta .z-meta.z-structure.z-dictionary.z-json .z-string.z-quoted.z-double.z-json, .z-source.z-json .z-meta .z-meta.z-structure.z-dictionary.z-json .z-punctuation.z-definition.z-string { + color: #39bae6; +} +.z-source.z-json .z-meta.z-structure.z-dictionary.z-json .z-string.z-quoted.z-double.z-json, .z-source.z-json .z-meta.z-structure.z-dictionary.z-json .z-punctuation.z-definition.z-string { + color: #39bae6; +} +.z-markup.z-heading { + color: #ff7733; +font-weight: bold; +} +.z-string.z-other.z-link, .z-markup.z-underline.z-link { + color: #95e6cb; +text-decoration: underline; +font-style: italic; +} +.z-punctuation.z-definition.z-image { + color: #ffb454; +} +.z-markup.z-italic { + color: #f07178; +font-style: italic; +} +.z-markup.z-bold { + color: #f07178; +font-weight: bold; +} +.z-markup.z-italic .z-markup.z-bold, .z-markup.z-bold .z-markup.z-italic { +font-weight: bold; +font-style: italic; +} +.z-markup.z-raw { + background-color: #bfbab0; +} +.z-markup.z-raw.z-inline { + background-color: #bfbab0; +} +.z-meta.z-separator { + color: #5c6773; + background-color: #bfbab0; +font-weight: bold; +} +.z-markup.z-quote { + color: #f29718; +font-style: italic; +} +.z-markup.z-list.z-numbered.z-bullet, .z-markup.z-list .z-punctuation.z-definition.z-list_item { + color: #95e6cb; +} +.z-markup.z-inserted { + color: #c2d94c; +} +.z-markup.z-changed { + color: #39bae6; +} +.z-markup.z-deleted { + color: #f07178; +} +.z-markup.z-strike { + color: #e6b673; +} +.z-markup.z-table { + color: #39bae6; + background-color: #bfbab0; +} +.z-text.z-html.z-markdown .z-markup.z-raw.z-inline { + color: #f29668; +} +.z-text.z-html.z-markdown .z-meta.z-dummy.z-line-break { + color: #5c6773; +} +.z-markup.z-raw.z-block.z-fenced.z-markdown { + color: #bfbab0; + background-color: #bfbab0; +} +.z-punctuation.z-definition.z-fenced.z-markdown, .z-variable.z-language.z-fenced.z-markdown { + color: #5c6773; + background-color: #bfbab0; +} +.z-variable.z-language.z-fenced.z-markdown { + color: #5c6773; +} +.z-markup.z-inserted.z-git_gutter { + color: #c2d94c; +} +.z-markup.z-changed.z-git_gutter { + color: #39bae6; +} +.z-markup.z-deleted.z-git_gutter { + color: #ff3333; +} +.z-markup.z-ignored.z-git_gutter { + color: #20272c; +} +.z-markup.z-untracked.z-git_gutter { + color: #20272c; +} +.z-gutter_color { + color: #ffffff; +} +.z-acejump.z-label.z-blue { + color: #ffffff; + background-color: #39bae6; +} +.z-acejump.z-label.z-green { + color: #ffffff; + background-color: #c2d94c; +} +.z-acejump.z-label.z-orange { + color: #ffffff; + background-color: #ff7733; +} +.z-acejump.z-label.z-purple { + color: #ffffff; + background-color: #f07178; +} +.z-sublimelinter.z-mark.z-warning { + color: #39bae6; +} +.z-sublimelinter.z-gutter-mark { + color: #ffffff; +} +.z-sublimelinter.z-mark.z-error { + color: #ff3333; +} diff --git a/static/syntax-theme-light.css b/static/syntax-theme-light.css new file mode 100644 index 0000000..f7dfcb3 --- /dev/null +++ b/static/syntax-theme-light.css @@ -0,0 +1,407 @@ +/* + * theme "GitHub" generated by syntect + */ + +.z-code { + color: #323232; + background-color: #ffffff; +} + +.z-comment { + color: #969896; +font-style: italic; +} +.z-string { + color: #183691; +} +.z-regexp-operator { + color: #a71d5d; +} +.z-string.z-regexp.z-characterclass .z-punctuation.z-definition.z-string.z-begin, .z-string.z-regexp.z-characterclass .z-punctuation.z-definition.z-string.z-end { + color: #a71d5d; +} +.z-constant.z-numeric { + color: #0086b3; +} +.z-constant.z-language { + color: #0086b3; +} +.z-constant.z-character, .z-constant.z-other, .z-variable.z-other.z-constant { + color: #0086b3; +} +.z-variable { + color: #323232; +} +.z-keyword { + color: #a71d5d; +font-weight: bold; +} +.z-bitwise-operator { + color: #a71d5d; +font-weight: bold; +} +.z-storage { + color: #a71d5d; +font-weight: bold; +} +.z-storage.z-type { + color: #a71d5d; +font-weight: bold; +} +.z-entity.z-name.z-class { + color: #0086b3; +} +.z-entity.z-other.z-inherited-class { + color: #0086b3; +} +.z-entity.z-name.z-function { + color: #795da3; +font-weight: bold; +} +.z-variable.z-parameter { + color: #323232; +} +.z-entity.z-name.z-tag { + color: #63a35c; +} +.z-entity.z-other.z-attribute-name { + color: #795da3; +} +.z-support.z-function { + color: #62a35c; +} +.z-support.z-constant { + color: #0086b3; +} +.z-support.z-type, .z-support.z-class { + color: #0086b3; +} +.z-support.z-other.z-variable { + color: #323232; +} +.z-invalid, .z-invalid.z-illegal, .z-invalid.z-deprecated { + color: #b52a1d; + background-color: #f5f5f5; +font-weight: bold; +} +.z-entity.z-name.z-filename.z-find-in-files { + color: #323232; +font-weight: bold; +} +.z-constant.z-numeric.z-line-number.z-find-in-files, .z-constant.z-numeric.z-line-number.z-match.z-find-in-files { + color: #b3b3b3; +} +.z-meta.z-diff.z-header { + color: #969896; + background-color: #ffffff; +font-style: italic; +} +.z-meta.z-diff.z-header .z-punctuation.z-definition.z-from-file.z-diff { + color: #bd2c00; + background-color: #ffecec; +font-weight: bold; +font-style: italic; +} +.z-meta.z-diff.z-header .z-punctuation.z-definition.z-to-file.z-diff { + color: #55a532; + background-color: #eaffea; +font-weight: bold; +font-style: italic; +} +.z-meta.z-diff.z-range { + color: #969896; +font-weight: bold; +font-style: italic; +} +.z-markup.z-deleted { + background-color: #ffecec; +} +.z-markup.z-deleted .z-punctuation.z-definition.z-inserted { + color: #bd2c00; +font-weight: bold; +} +.z-markup.z-inserted { + background-color: #eaffea; +} +.z-markup.z-inserted .z-punctuation.z-definition.z-inserted { + color: #55a532; +font-weight: bold; +} +.z-markup.z-deleted.z-git_gutter { + color: #bd2c00; +} +.z-markup.z-inserted.z-git_gutter { + color: #55a532; +} +.z-markup.z-changed.z-git_gutter { + color: #0086b3; +} +.z-markup.z-ignored.z-git_gutter { + color: #b3b3b3; +} +.z-markup.z-untracked.z-git_gutter { + color: #b3b3b3; +} +.z-source.z-css .z-punctuation.z-definition.z-entity { + color: #323232; +} +.z-source.z-css .z-entity.z-other.z-attribute-name.z-pseudo-class, .z-source.z-css .z-entity.z-other.z-attribute-name.z-pseudo-element { + color: #a71d5d; +} +.z-source.z-css .z-meta.z-value, .z-source.z-css .z-support.z-constant, .z-source.z-css .z-support.z-function { + color: #323232; +} +.z-source.z-css .z-constant.z-other.z-color { + color: #ed6a43; +} +.z-source.z-scss .z-punctuation.z-definition.z-entity { + color: #323232; +} +.z-source.z-scss .z-entity.z-other.z-attribute-name.z-pseudo-class, .z-source.z-scss .z-entity.z-other.z-attribute-name.z-pseudo-element { + color: #a71d5d; +} +.z-source.z-scss .z-support.z-constant.z-property-value, .z-source.z-scss .z-support.z-function { + color: #323232; +} +.z-source.z-scss .z-variable { + color: #a71d5d; +} +.z-variable.z-language.z-this.z-js { + color: #ed6a43; +} +.z-source.z-js .z-entity.z-name.z-function { + color: #323232; +} +.z-source.z-js .z-meta.z-function .z-entity.z-name.z-function, .z-source.z-js .z-entity.z-name.z-function .z-meta.z-function { + color: #795da3; +font-weight: bold; +} +.z-entity.z-name.z-type.z-new.z-js { + color: #795da3; +} +.z-variable.z-language.z-prototype.z-js { + color: #0086b3; +} +.z-source.z-js .z-support.z-function { + color: #0086b3; +} +.z-support.z-type.z-object.z-console.z-js { + color: #795da3; +} +.z-meta .z-meta .z-meta .z-meta .z-meta .z-meta .z-meta .z-meta .z-meta .z-meta .z-meta .z-meta .z-meta .z-meta .z-meta .z-meta .z-meta .z-meta .z-meta .z-meta .z-meta.z-structure.z-dictionary.z-json .z-string.z-quoted.z-double.z-json { + color: #183691; +font-weight: bold; +} +.z-meta .z-meta .z-meta .z-meta .z-meta .z-meta .z-meta .z-meta .z-meta .z-meta .z-meta .z-meta .z-meta .z-meta .z-meta .z-meta .z-meta .z-meta .z-meta .z-meta .z-meta.z-structure.z-dictionary.z-json .z-meta.z-structure.z-dictionary.z-value.z-json .z-string.z-quoted.z-double.z-json { + color: #323232; +} +.z-meta .z-meta .z-meta .z-meta .z-meta .z-meta .z-meta .z-meta .z-meta .z-meta .z-meta .z-meta .z-meta .z-meta .z-meta .z-meta .z-meta .z-meta .z-meta .z-meta.z-structure.z-dictionary.z-json .z-string.z-quoted.z-double.z-json { + color: #183691; +font-weight: bold; +} +.z-meta .z-meta .z-meta .z-meta .z-meta .z-meta .z-meta .z-meta .z-meta .z-meta .z-meta .z-meta .z-meta .z-meta .z-meta .z-meta .z-meta .z-meta .z-meta .z-meta.z-structure.z-dictionary.z-json .z-meta.z-structure.z-dictionary.z-value.z-json .z-string.z-quoted.z-double.z-json { + color: #323232; +} +.z-meta .z-meta .z-meta .z-meta .z-meta .z-meta .z-meta .z-meta .z-meta .z-meta .z-meta .z-meta .z-meta .z-meta .z-meta .z-meta .z-meta .z-meta .z-meta.z-structure.z-dictionary.z-json .z-string.z-quoted.z-double.z-json { + color: #183691; +font-weight: bold; +} +.z-meta .z-meta .z-meta .z-meta .z-meta .z-meta .z-meta .z-meta .z-meta .z-meta .z-meta .z-meta .z-meta .z-meta .z-meta .z-meta .z-meta .z-meta .z-meta.z-structure.z-dictionary.z-json .z-meta.z-structure.z-dictionary.z-value.z-json .z-string.z-quoted.z-double.z-json { + color: #323232; +} +.z-meta .z-meta .z-meta .z-meta .z-meta .z-meta .z-meta .z-meta .z-meta .z-meta .z-meta .z-meta .z-meta .z-meta .z-meta .z-meta .z-meta .z-meta.z-structure.z-dictionary.z-json .z-string.z-quoted.z-double.z-json { + color: #183691; +font-weight: bold; +} +.z-meta .z-meta .z-meta .z-meta .z-meta .z-meta .z-meta .z-meta .z-meta .z-meta .z-meta .z-meta .z-meta .z-meta .z-meta .z-meta .z-meta .z-meta.z-structure.z-dictionary.z-json .z-meta.z-structure.z-dictionary.z-value.z-json .z-string.z-quoted.z-double.z-json { + color: #323232; +} +.z-meta .z-meta .z-meta .z-meta .z-meta .z-meta .z-meta .z-meta .z-meta .z-meta .z-meta .z-meta .z-meta .z-meta .z-meta .z-meta .z-meta.z-structure.z-dictionary.z-json .z-string.z-quoted.z-double.z-json { + color: #183691; +font-weight: bold; +} +.z-meta .z-meta .z-meta .z-meta .z-meta .z-meta .z-meta .z-meta .z-meta .z-meta .z-meta .z-meta .z-meta .z-meta .z-meta .z-meta .z-meta.z-structure.z-dictionary.z-json .z-meta.z-structure.z-dictionary.z-value.z-json .z-string.z-quoted.z-double.z-json { + color: #323232; +} +.z-meta .z-meta .z-meta .z-meta .z-meta .z-meta .z-meta .z-meta .z-meta .z-meta .z-meta .z-meta .z-meta .z-meta .z-meta .z-meta.z-structure.z-dictionary.z-json .z-string.z-quoted.z-double.z-json { + color: #183691; +font-weight: bold; +} +.z-meta .z-meta .z-meta .z-meta .z-meta .z-meta .z-meta .z-meta .z-meta .z-meta .z-meta .z-meta .z-meta .z-meta .z-meta .z-meta.z-structure.z-dictionary.z-json .z-meta.z-structure.z-dictionary.z-value.z-json .z-string.z-quoted.z-double.z-json { + color: #323232; +} +.z-meta .z-meta .z-meta .z-meta .z-meta .z-meta .z-meta .z-meta .z-meta .z-meta .z-meta .z-meta .z-meta .z-meta .z-meta.z-structure.z-dictionary.z-json .z-string.z-quoted.z-double.z-json { + color: #183691; +font-weight: bold; +} +.z-meta .z-meta .z-meta .z-meta .z-meta .z-meta .z-meta .z-meta .z-meta .z-meta .z-meta .z-meta .z-meta .z-meta .z-meta.z-structure.z-dictionary.z-json .z-meta.z-structure.z-dictionary.z-value.z-json .z-string.z-quoted.z-double.z-json { + color: #323232; +} +.z-meta .z-meta .z-meta .z-meta .z-meta .z-meta .z-meta .z-meta .z-meta .z-meta .z-meta .z-meta .z-meta .z-meta.z-structure.z-dictionary.z-json .z-string.z-quoted.z-double.z-json { + color: #183691; +font-weight: bold; +} +.z-meta .z-meta .z-meta .z-meta .z-meta .z-meta .z-meta .z-meta .z-meta .z-meta .z-meta .z-meta .z-meta .z-meta.z-structure.z-dictionary.z-json .z-meta.z-structure.z-dictionary.z-value.z-json .z-string.z-quoted.z-double.z-json { + color: #323232; +} +.z-meta .z-meta .z-meta .z-meta .z-meta .z-meta .z-meta .z-meta .z-meta .z-meta .z-meta .z-meta .z-meta.z-structure.z-dictionary.z-json .z-string.z-quoted.z-double.z-json { + color: #183691; +font-weight: bold; +} +.z-meta .z-meta .z-meta .z-meta .z-meta .z-meta .z-meta .z-meta .z-meta .z-meta .z-meta .z-meta .z-meta.z-structure.z-dictionary.z-json .z-meta.z-structure.z-dictionary.z-value.z-json .z-string.z-quoted.z-double.z-json { + color: #323232; +} +.z-meta .z-meta .z-meta .z-meta .z-meta .z-meta .z-meta .z-meta .z-meta .z-meta .z-meta .z-meta.z-structure.z-dictionary.z-json .z-string.z-quoted.z-double.z-json { + color: #183691; +font-weight: bold; +} +.z-meta .z-meta .z-meta .z-meta .z-meta .z-meta .z-meta .z-meta .z-meta .z-meta .z-meta .z-meta.z-structure.z-dictionary.z-json .z-meta.z-structure.z-dictionary.z-value.z-json .z-string.z-quoted.z-double.z-json { + color: #323232; +} +.z-meta .z-meta .z-meta .z-meta .z-meta .z-meta .z-meta .z-meta .z-meta .z-meta .z-meta.z-structure.z-dictionary.z-json .z-string.z-quoted.z-double.z-json { + color: #183691; +font-weight: bold; +} +.z-meta .z-meta .z-meta .z-meta .z-meta .z-meta .z-meta .z-meta .z-meta .z-meta .z-meta.z-structure.z-dictionary.z-json .z-meta.z-structure.z-dictionary.z-value.z-json .z-string.z-quoted.z-double.z-json { + color: #323232; +} +.z-meta .z-meta .z-meta .z-meta .z-meta .z-meta .z-meta .z-meta .z-meta .z-meta.z-structure.z-dictionary.z-json .z-string.z-quoted.z-double.z-json { + color: #183691; +font-weight: bold; +} +.z-meta .z-meta .z-meta .z-meta .z-meta .z-meta .z-meta .z-meta .z-meta .z-meta.z-structure.z-dictionary.z-json .z-meta.z-structure.z-dictionary.z-value.z-json .z-string.z-quoted.z-double.z-json { + color: #323232; +} +.z-meta .z-meta .z-meta .z-meta .z-meta .z-meta .z-meta .z-meta .z-meta.z-structure.z-dictionary.z-json .z-string.z-quoted.z-double.z-json { + color: #183691; +font-weight: bold; +} +.z-meta .z-meta .z-meta .z-meta .z-meta .z-meta .z-meta .z-meta .z-meta.z-structure.z-dictionary.z-json .z-meta.z-structure.z-dictionary.z-value.z-json .z-string.z-quoted.z-double.z-json { + color: #323232; +} +.z-meta .z-meta .z-meta .z-meta .z-meta .z-meta .z-meta .z-meta.z-structure.z-dictionary.z-json .z-string.z-quoted.z-double.z-json { + color: #183691; +font-weight: bold; +} +.z-meta .z-meta .z-meta .z-meta .z-meta .z-meta .z-meta .z-meta.z-structure.z-dictionary.z-json .z-meta.z-structure.z-dictionary.z-value.z-json .z-string.z-quoted.z-double.z-json { + color: #323232; +} +.z-meta .z-meta .z-meta .z-meta .z-meta .z-meta .z-meta.z-structure.z-dictionary.z-json .z-string.z-quoted.z-double.z-json { + color: #183691; +font-weight: bold; +} +.z-meta .z-meta .z-meta .z-meta .z-meta .z-meta .z-meta.z-structure.z-dictionary.z-json .z-meta.z-structure.z-dictionary.z-value.z-json .z-string.z-quoted.z-double.z-json { + color: #323232; +} +.z-meta .z-meta .z-meta .z-meta .z-meta .z-meta.z-structure.z-dictionary.z-json .z-string.z-quoted.z-double.z-json { + color: #183691; +font-weight: bold; +} +.z-meta .z-meta .z-meta .z-meta .z-meta .z-meta.z-structure.z-dictionary.z-json .z-meta.z-structure.z-dictionary.z-value.z-json .z-string.z-quoted.z-double.z-json { + color: #323232; +} +.z-meta .z-meta .z-meta .z-meta .z-meta.z-structure.z-dictionary.z-json .z-string.z-quoted.z-double.z-json { + color: #183691; +font-weight: bold; +} +.z-meta .z-meta .z-meta .z-meta .z-meta.z-structure.z-dictionary.z-json .z-meta.z-structure.z-dictionary.z-value.z-json .z-string.z-quoted.z-double.z-json { + color: #323232; +} +.z-meta .z-meta .z-meta .z-meta.z-structure.z-dictionary.z-json .z-string.z-quoted.z-double.z-json { + color: #183691; +font-weight: bold; +} +.z-meta .z-meta .z-meta .z-meta.z-structure.z-dictionary.z-json .z-meta.z-structure.z-dictionary.z-value.z-json .z-string.z-quoted.z-double.z-json { + color: #323232; +} +.z-meta .z-meta .z-meta.z-structure.z-dictionary.z-json .z-string.z-quoted.z-double.z-json { + color: #183691; +font-weight: bold; +} +.z-meta .z-meta .z-meta.z-structure.z-dictionary.z-json .z-meta.z-structure.z-dictionary.z-value.z-json .z-string.z-quoted.z-double.z-json { + color: #323232; +} +.z-meta .z-meta.z-structure.z-dictionary.z-json .z-string.z-quoted.z-double.z-json { + color: #183691; +font-weight: bold; +} +.z-meta .z-meta.z-structure.z-dictionary.z-json .z-meta.z-structure.z-dictionary.z-value.z-json .z-string.z-quoted.z-double.z-json { + color: #323232; +} +.z-meta.z-structure.z-dictionary.z-json .z-string.z-quoted.z-double.z-json { + color: #183691; +font-weight: bold; +} +.z-meta.z-structure.z-dictionary.z-json .z-meta.z-structure.z-dictionary.z-value.z-json .z-string.z-quoted.z-double.z-json { + color: #323232; +} +.z-source.z-python .z-keyword { +font-weight: bold; +} +.z-source.z-python .z-storage { +font-weight: bold; +} +.z-source.z-python .z-storage.z-type { +font-weight: bold; +} +.z-source.z-python .z-entity.z-name.z-function { + color: #323232; +font-weight: bold; +} +.z-source.z-php .z-entity.z-name.z-type.z-class { + color: #323232; +font-weight: bold; +} +.z-variable.z-language.z-ruby { + color: #ed6a43; +} +.z-entity.z-name.z-type.z-module.z-ruby { + color: #795da3; +font-weight: bold; +} +.z-entity.z-name.z-type.z-class.z-ruby { + color: #795da3; +font-weight: bold; +} +.z-entity.z-other.z-inherited-class.z-ruby { + color: #795da3; +font-weight: bold; +} +.z-punctuation.z-definition.z-heading.z-markdown, .z-punctuation.z-definition.z-italic.z-markdown, .z-punctuation.z-definition.z-bold.z-markdown, .z-punctuation.z-definition.z-string.z-begin.z-markdown, .z-punctuation.z-definition.z-string.z-end.z-markdown, .z-punctuation.z-definition.z-metadata.z-markdown, .z-punctuation.z-definition.z-link.z-markdown, .z-punctuation.z-definition.z-blockquote.z-markdown, .z-punctuation.z-definition.z-raw.z-markdown { + color: #a71d5d; +} +.z-text.z-html.z-markdown .z-meta.z-separator { + color: #b3b3b3; +} +.z-text.z-html.z-markdown .z-markup.z-heading { +font-weight: bold; +} +.z-text.z-html.z-markdown .z-markup.z-raw.z-block { + color: #323232; +} +.z-text.z-html.z-markdown .z-markup.z-raw.z-inline { + color: #323232; +} +.z-text.z-html.z-markdown .z-meta.z-link, .z-text.z-html.z-markdown .z-meta.z-image { + color: #4183c4; +} +.z-text.z-html.z-markdown .z-markup.z-underline.z-link, .z-text.z-html.z-markdown .z-constant.z-other.z-reference { +font-style: italic; +} +.z-text.z-html.z-markdown .z-markup.z-list { + color: #ed6a43; +} +.z-text.z-html.z-markdown .z-markup.z-bold { +font-weight: bold; +} +.z-text.z-html.z-markdown .z-markup.z-italic { +font-style: italic; +} +.z-text.z-html.z-markdown .z-markup.z-bold .z-markup.z-italic { +font-weight: bold; +font-style: italic; +} +.z-text.z-html.z-markdown .z-markup.z-italic .z-markup.z-bold { +font-weight: bold; +font-style: italic; +} diff --git a/templates/base.html b/templates/base.html new file mode 100644 index 0000000..e867cb9 --- /dev/null +++ b/templates/base.html @@ -0,0 +1,48 @@ +<!doctype html> +<html lang="en"> +<head> + {% block title %} + <title>cleberg.net</title> + {% endblock %} + <meta name="viewport" content="width=device-width, initial-scale=1.0"> + <meta name="theme-color" content="#111" media="(prefers-color-scheme: dark)"> + <meta name="theme-color" content="#fff" media="(prefers-color-scheme: light)"> + {% if page %} + {% if page.description %} + <meta name="description" content="{{ page.description }}"> + {% elif config.description %} + <meta name="description" content="{{ config.description }}"> + {% endif %} + {% elif config.description %} + <meta name="description" content="{{ config.description }}" /> + {% endif %} + + {% block rss %} + <link rel="alternate" type="application/atom+xml" title="RSS" href="{{ get_url(path="atom.xml", trailing_slash=false) }}"> + {% endblock %} + + {% block css %} + <link rel="stylesheet" href="/styles.min.css"> + {% endblock css %} + + {% block extra_head %}{% endblock extra_head %} +</head> +<body> + <nav class="site-nav" aria-label="site-nav" role="navigation"> + <ul> + <li><a href="/">Home</a></li> + <li><a href="/blog/">Blog</a></li> + <li><a href="/services/">Services</a></li> + <li><a href="/wiki/">Wiki</a></li> + </ul> + </nav> + + <main>{% block content %}{% endblock content %}</main> + + <footer> + <p>Last build: {{ now() | date(format="%Y-%m-%d %H:%M:%S") }}</p> + <p><a href="https://git.cleberg.net/?p=cleberg.net.git;a=summary" target="_blank" rel="noopener">Source Code</a></p> + <p><a href="/atom.xml">Atom RSS Feed</a></p> + </footer> +</body> +</html> diff --git a/templates/blog.html b/templates/blog.html new file mode 100644 index 0000000..184587b --- /dev/null +++ b/templates/blog.html @@ -0,0 +1,18 @@ +{% extends "base.html" %} + +{% block content %} +<h1>{{ section.title }}</h1> +<p>Use <code>Ctrl + F</code> to search blog post titles for keywords.</p> +<p>You can also add the <a href="/atom.xml">Atom RSS Feed</a> to your feed reader.</p> +{% set post_date = "1970-01-01" | date(format="%Y") %} +{% for page in section.pages %} + {% if post_date != page.date | date(format="%Y") %} + {% set_global post_date = page.date | date(format="%Y") %} + <h2>{{ post_date }}</h2> + {% endif %} + <div class="post"> + <time datetime="{{ page.date | date(format='%Y-%m-%d %H:%M:%S') }}">{{ page.date | date(format='%Y-%m-%d') }}</time> + <a href="/blog/{{ page.slug }}/">{{ page.title }}</a> + </div> +{% endfor %} +{% endblock content %} diff --git a/templates/index.html b/templates/index.html new file mode 100644 index 0000000..5f14396 --- /dev/null +++ b/templates/index.html @@ -0,0 +1,42 @@ +{% extends "base.html" %} + +{% block content %} +<section> + <h1>cleberg.net</h1> + <pre>pub rsa4096 2022-11-16 [SC] + <a href="/gpg.txt">3917 973F B159 BBB8 6194 5385 6945 1A51 7AC0 CB37</a> +uid [ultimate] Christian Cleberg <hello@cleberg.net></pre> +</section> +<section> + <h2>Recent Blog Posts</h2> + {% set section = get_section(path="blog/_index.md") %} + {% set i = 0 %} + {% for page in section.pages %} + {% if i < 3%} + {% set_global i = i + 1%} + <div class="post"> + <time datetime="{{ page.date | date(format='%Y-%m-%d %H:%M:%S') }}">{{ page.date | date(format='%Y-%m-%d') }}</time> + <a href="/blog/{{ page.slug }}/">{{ page.title }}</a> + </div> + {% endif %} + {% endfor %} + <br> + <a href="/blog/">All Posts →</a> +</section> +<section> + <h2>Everything Else</h2> + <ul> + <li><a href="/salary/">Salary</a></li> + <li><a href="/services/">Services</a></li> + <li><a href="/wiki/">Wiki</a></li> + </ul> +</section> +<section> + <h2>Contact</h2> + <ul> + <li>hello [at] cleberg.net (<a href="/gpg.txt">GPG</a>)</li> + <li><a href="https://matrix.to/#/@cyborg:matrix.tchncs.de" target="_blank" rel="noopener">@cyborg:@matrix.tchncs.de</a></li> + <li><a href="https://git.cleberg.net/" target="_blank" rel="noopener">Git</a></li> + </ul> +</section> +{% endblock content %} diff --git a/templates/page.html b/templates/page.html new file mode 100644 index 0000000..b858d1a --- /dev/null +++ b/templates/page.html @@ -0,0 +1,51 @@ +{% extends "base.html" %} + +{% block title %} +<title>{{ page.title }} | cleberg.net</title> +{% endblock %} + +{% block css %} +<link rel="stylesheet" href="/syntax-theme-dark.css" media="(prefers-color-scheme: dark)"> +<link rel="stylesheet" href="/syntax-theme-light.css" media="(prefers-color-scheme: light)"> +<link rel="stylesheet" href="/styles.css"> +{% endblock css %} + +{% block content %} +<section class="post-metadata"> + <h1>{{ page.title }}</h1> + {% if page.date %} + <p><time datetime="{{ page.date | date(format='%Y-%m-%d %H:%M:%S') }}">{{ page.date }}</time></p> + {% endif %} + {% if page.updated %} + <p>Last Updated: <time datetime="{{ page.updated | date(format='%Y-%m-%d %H:%M:%S') }}">{{ page.updated }}</time></p> + {% endif %} + <p>{{ page.word_count }} words; {{ page.reading_time }} minute(s)</p> +{% if page.toc %} + <details open> + <summary>Table of Contents</summary> + <nav class="page-nav" aria-label="page-nav" role="navigation"> + <ul> + {% for h1 in page.toc %} + <li> + <a href="{{ h1.permalink | safe }}">{{ h1.title }}</a> + {% if h1.children %} + <ul> + {% for h2 in h1.children %} + <li> + <a href="{{ h2.permalink | safe }}">{{ h2.title }}</a> + </li> + {% endfor %} + </ul> + {% endif %} + </li> + {% endfor %} + </ul> + </nav> + </details> +{% endif %} +</section> + +<article role="article"> +{{ page.content | safe }} +</article> +{% endblock content %} diff --git a/templates/wiki.html b/templates/wiki.html new file mode 100644 index 0000000..a61d197 --- /dev/null +++ b/templates/wiki.html @@ -0,0 +1,16 @@ +{% extends "base.html" %} + +{% block content %} +<h1>{{ section.title }}</h1> +<p>Use <code>Ctrl + F</code> to search wiki pages for keywords.</p> +<div class="wiki-post"> + <p>Wiki Page</p> + <p>Last Updated</p> +</div> +{% for page in section.pages %} + <div class="wiki-post"> + <p><a href="/wiki/{{ page.slug }}/">{{ page.title }}</a></p> + <time datetime="{{ page.updated | date(format='%Y-%m-%d %H:%M:%S') }}">{{ page.updated | date(format='%Y-%m-%d')}}</p> + </div> +{% endfor %} +{% endblock content %} diff --git a/theme/static/styles.css b/theme/static/styles.css deleted file mode 100644 index 0d574da..0000000 --- a/theme/static/styles.css +++ /dev/null @@ -1,39 +0,0 @@ -body { - font-family: - Menlo, - Consolas, - Monaco, - Liberation Mono, - Lucida Console, - monospace; - font-size: 0.9rem; - margin: 0 auto; - max-width: 50em; - padding: 1rem; -} - -img { - height: auto; - max-width: 100%; - width: 100%; -} - -pre { - border: 1px solid #000; - overflow: scroll; - padding: 0.5rem; -} - -:not(pre) code { - color: #f00; -} - -nav ul { - padding: 0; -} - -nav li { - display: inline; - list-style: none; - padding-right: 0.25rem; -} diff --git a/theme/static/styles.min.css b/theme/static/styles.min.css deleted file mode 100644 index bfcf00d..0000000 --- a/theme/static/styles.min.css +++ /dev/null @@ -1 +0,0 @@ -body{font-family:Menlo,Consolas,Monaco,Liberation Mono,Lucida Console,monospace;font-size:.9rem;margin:0 auto;max-width:50em;padding:1rem}img{height:auto;max-width:100%;width:100%}pre{border:1px solid #000;overflow:scroll;padding:.5rem}:not(pre) code{color:red}nav ul{padding:0}nav li{display:inline;list-style:none;padding-right:.25rem}
\ No newline at end of file diff --git a/theme/templates/base.html b/theme/templates/base.html deleted file mode 100644 index 33197c2..0000000 --- a/theme/templates/base.html +++ /dev/null @@ -1,22 +0,0 @@ - -<!doctype html> -<html lang="en-us"> -<head> - {% block head %} - <meta charset="utf-8"> - <title> - {% block subtitle %}{% endblock %} - {% block title %}{{ site_name | default("weblorg website") }}{% endblock %} - </title> - <meta name="viewport" content="width=device-width, initial-scale=1"> - {% if site_owner is defined %}<meta name="author" content="{{ site_owner }}" >{% endif %} - {% if site_description is defined %}<meta name="description" content="{{ site_description }}" >{% endif %} - {% if site_keywords is defined %}<meta name="keywords" content="{{ site_keywords }}" >{% endif %} - <link rel="stylesheet" href="{{ url_for("static", file="styles.min.css") }}" type="text/css"> - {% block meta %}{% endblock %} - {% endblock %} -</head> -<body> - <main>{% block main %}{% endblock %}</main> -</body> -</html> diff --git a/theme/templates/blog.html b/theme/templates/blog.html deleted file mode 100644 index 110043f..0000000 --- a/theme/templates/blog.html +++ /dev/null @@ -1,15 +0,0 @@ -{% extends "base.html" %} - -{% block subtitle %}Blog | {% endblock %} -{% block main %} -<p><a href="/">← home</a></p> -<h1>Blog</h1> -<p>Use <code>Ctrl + F</code> to search blog post titles for keywords.</p> -<p>You can also add the <a href="/feed.xml">RSS Feed</a> to your feed reader.</p> -{% for post in posts %} -<div class="post"> - <time datetime='{{ post.date | strftime("%Y-%m-%d") }}'>{{ post.date|strftime("%Y-%m-%d") }}</time> - <a href='{{ url_for("blog", slug=post.slug) }}'>{{ post.title }}</a> -</div> -{% endfor %} -{% endblock %} diff --git a/theme/templates/feed.xml b/theme/templates/feed.xml deleted file mode 100644 index d3f25db..0000000 --- a/theme/templates/feed.xml +++ /dev/null @@ -1,37 +0,0 @@ -<?xml version="1.0" encoding="UTF-8" ?> -<rss version="2.0" - xmlns:content="http://purl.org/rss/1.0/modules/content/" - xmlns:wfw="http://wellformedweb.org/CommentAPI/" - xmlns:dc="http://purl.org/dc/elements/1.1/" - xmlns:atom="http://www.w3.org/2005/Atom" - xmlns:sy="http://purl.org/rss/1.0/modules/syndication/" - xmlns:slash="http://purl.org/rss/1.0/modules/slash/" - xmlns:georss="http://www.georss.org/georss" - xmlns:geo="http://www.w3.org/2003/01/geo/wgs84_pos#" - xmlns:media="http://search.yahoo.com/mrss/"> - <channel> - <title>{{ site_name | default("Simple Blog") }}</title> - <atom:link - href="{{ url_for("rss") }}" - rel="self" type="application/rss+xml" /> - <link>{{ url_for("index") }}</link> - <description><![CDATA[]]></description> - <language>en</language> - <pubDate>{{ posts | first | getattr("date") | strftime("%a, %d %b %Y %H:%M:%S %z") }}</pubDate> - <lastBuildDate>{{ now() | strftime("%a, %d %b %Y %H:%M:%S %z") }}</lastBuildDate> - <generator>{{ meta.generator }}</generator> - <webMaster>{{ site_owner | default("hello@cleberg.net") }}</webMaster> - - {% for post in posts %} - <item> - <title>{{ post.title }}</title> - <link>{{ url_for("blog", slug=post.slug) }}</link> - <author>{{ post.author|default("hello@cleberg.net") }}</author> - <guid isPermaLink="false">{{ url_for("blog", slug=post.slug) }}</guid> - <pubDate>{{ post.date|strftime("%a, %d %b %Y %H:%M:%S %z") }}</pubDate> - <description><![CDATA[{{ post.html|safe }}]]></description> - </item> - {% endfor %} - - </channel> -</rss> diff --git a/theme/templates/index.html b/theme/templates/index.html deleted file mode 100644 index ad96a5d..0000000 --- a/theme/templates/index.html +++ /dev/null @@ -1,55 +0,0 @@ -{% extends "base.html" %} {% block main %} -<section> - <h1>cleberg.net</h1> - <pre>pub rsa4096 2022-11-16 [SC] - <a href="/gpg.txt">3917 973F B159 BBB8 6194 5385 6945 1A51 7AC0 CB37</a> -uid [ultimate] Christian Cleberg <hello@cleberg.net></pre> -</section> -<section> - <table> - <thead> - <tr> - <th>link</th> - <th>desc</th> - </tr> - </thead> - <tbody> - <tr> - <td><a href="/blog/">blog</a></td> - <td>my personal blog</td> - </tr> - <tr> - <td><a href="https://git.cleberg.net">git</a></td> - <td>personal git hosting</td> - </tr> - <tr> - <td><a href="https://matrix.to/#/@cyborg:matrix.tchncs.de">matrix</a></td> - <td>encrypted chat</td> - </tr> - <tr> - <td><a href="/feed.xml">rss</a></td> - <td>feed for my personal blog</td> - </tr> - <tr> - <td><a href="/salary/">salary</a></td> - <td>my salary log</td> - </tr> - <tr> - <td><a href="/services/">services</a></td> - <td>my public services</td> - </tr> - <tr> - <td><a href="/wiki/">wiki</a></td> - <td>my personal wiki</td> - </tr> - </tbody> - </table> -</section> -<footer> - <p> - Last Build: <<time datetime='{{ now() | strftime("%Y-%m-%d %H:%M:%S") }}' - >{{ now() | strftime("%Y-%m-%d %a %H:%M:%S") }}</time - >> - </p> -</footer> -{% endblock %} diff --git a/theme/templates/page.html b/theme/templates/page.html deleted file mode 100644 index 2e6dada..0000000 --- a/theme/templates/page.html +++ /dev/null @@ -1,12 +0,0 @@ -{% extends "base.html" %} - -{% block subtitle %} - {{ post.title }} | -{% endblock %} -{% block main %} -<p><a href="/">← home</a></p> -<article role="article"> - <h1>{{ post.title }}</h1> - <section>{{ post.html | safe }}</section> -</article> -{% endblock %} diff --git a/theme/templates/post.html b/theme/templates/post.html deleted file mode 100644 index 0a154f9..0000000 --- a/theme/templates/post.html +++ /dev/null @@ -1,22 +0,0 @@ -{% extends "base.html" %} {% block subtitle %} {{ post.title }} | {% endblock %} -{% block meta %} -<meta property="og:title" content="{{ post.title }}" /> -<meta property="og:url" content="{{ post.url }}" /> -{% if post.description is defined %} -<meta property="og:description" content="{{ post.description }}" /> -{% elif project_description is defined %} -<meta property="og:description" content="{{ project_description }}" /> -{% endif %} {% endblock %} {% block main %} -<p><a href="/">← home</a></p> -<article role="article"> - <section class="post-metadata"> - <h1 class="post__title">{{ post.title }}</h1> - {% if post.date is defined %} - <time datetime='{{ post.date|strftime("%Y-%m-%d") }}' - ><{{ post.date|strftime("%Y-%m-%d %a %H:%M:%S") }}></time - > - {% endif %} - </section> - <section>{{ post.html | safe }}</section> -</article> -{% endblock %} diff --git a/theme/templates/wiki.html b/theme/templates/wiki.html deleted file mode 100644 index 3860350..0000000 --- a/theme/templates/wiki.html +++ /dev/null @@ -1,14 +0,0 @@ -{% extends "base.html" %} - -{% block subtitle %}Wiki | {% endblock %} -{% block main %} -<p><a href="/">← home</a></p> -<h1>Wiki</h1> -<p>Use <code>Ctrl + F</code> to search wiki pages for keywords.</p> -{% for post in posts %} - <div class="post"> - <time datetime='{{ post.date | strftime("%Y-%m-%d") }}'>{{ post.date|strftime("%Y-%m-%d") }}</time> - <a href='{{ url_for("wiki", slug=post.slug) }}'>{{ post.title }}</a> - </div> -{% endfor %} -{% endblock %} |